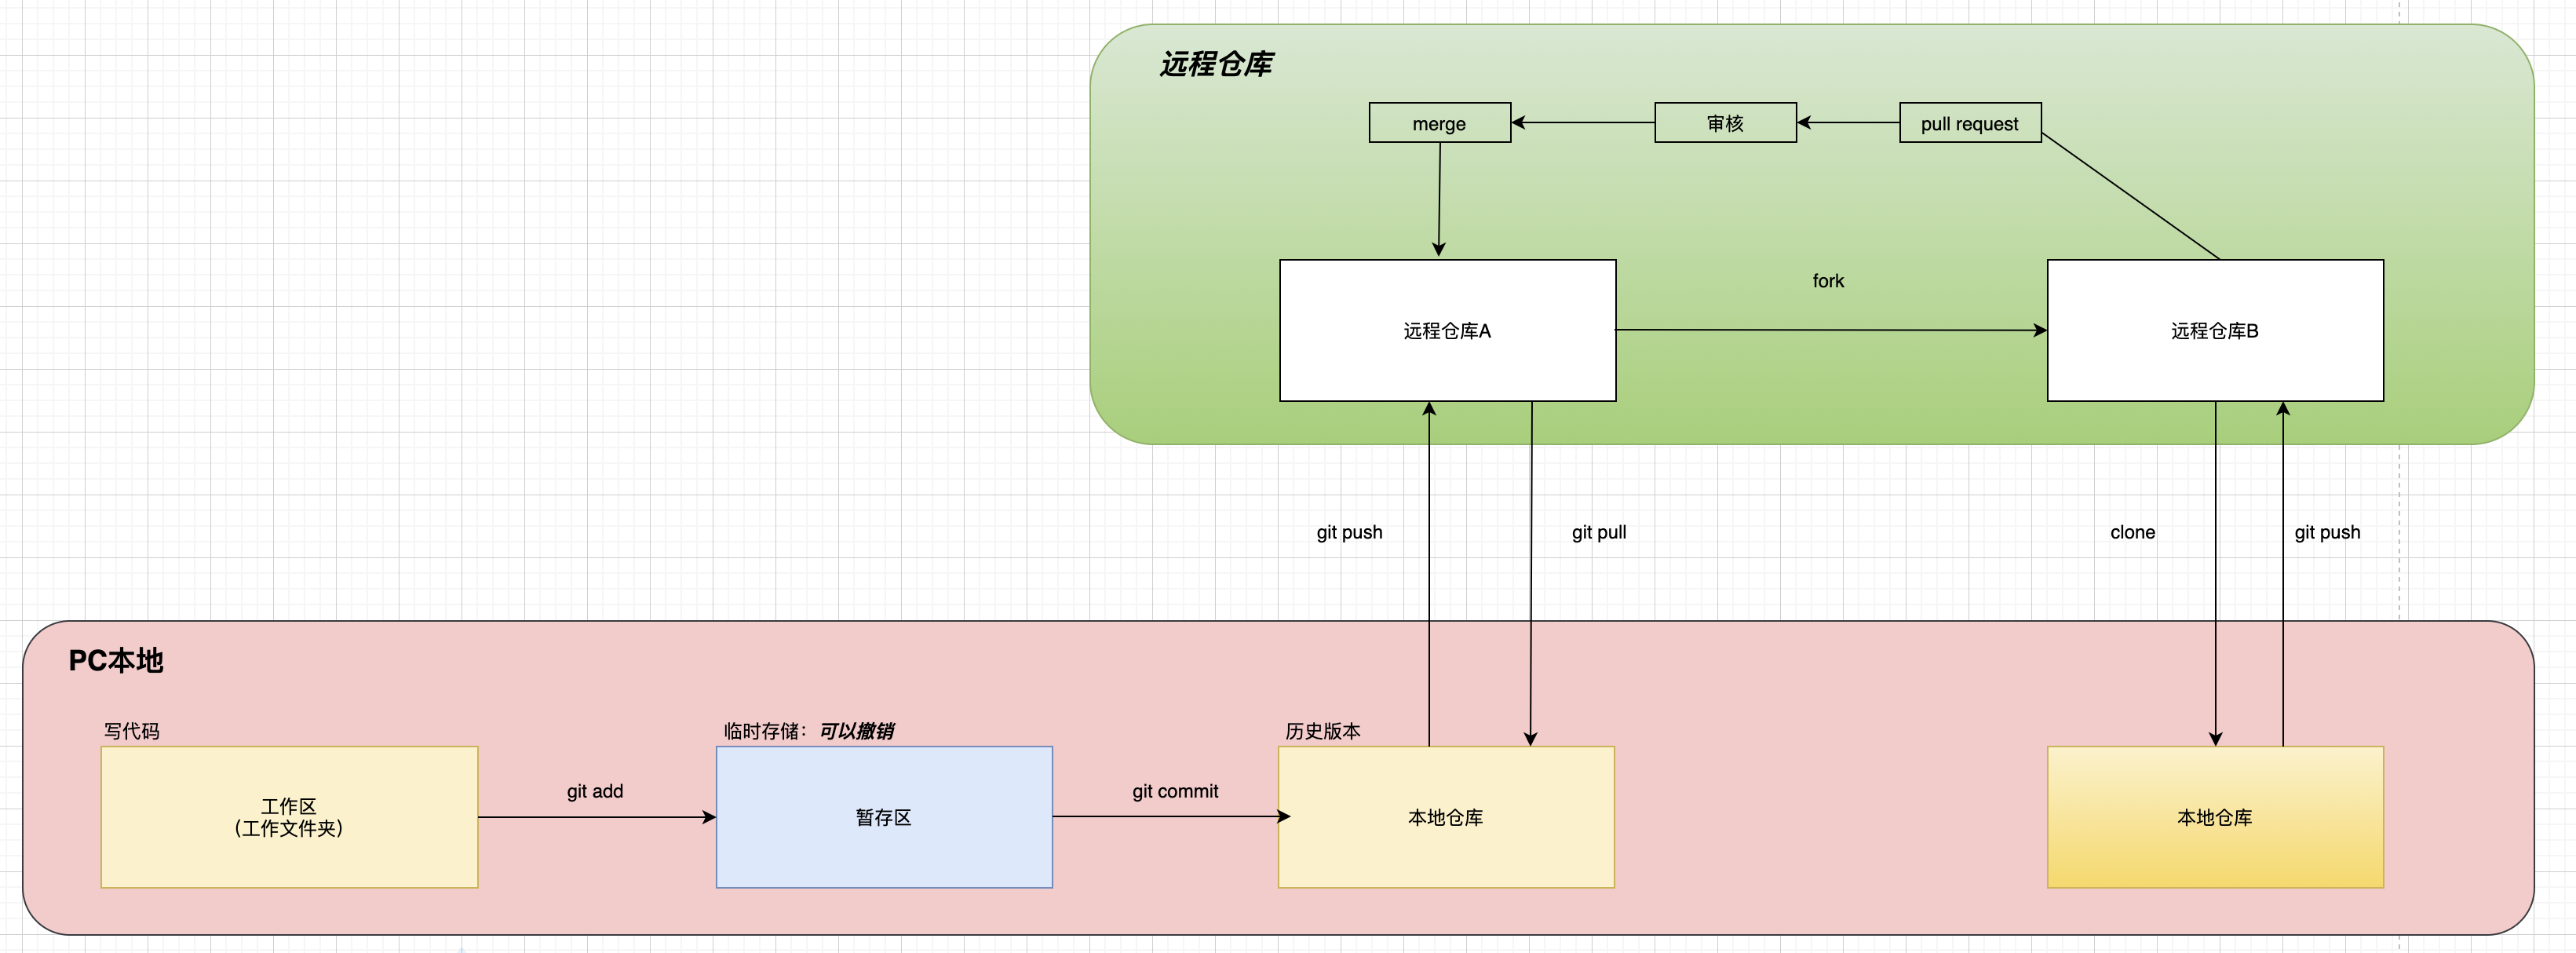
git命令操作
git工作流程
本地庫操作
初始化本地倉庫
- 初始化命令
git init
$ work % cd workspace
$ workspace % mkdir WebService //建立資料夾
$ workspace % git init //初始化
Initialized empty Git repository in /Users/jack/work/workspace/.git/
$ workspace %
- 初始化後的效果
會在初始化後的目錄中生成一個.git隱藏資料夾
$ workspace % cd .git
$ .git % ls
HEAD		branches	config		description	hooks		info		objects		refs
$ .git % ls -l
total 24
-rw-r--r--   1 jack  staff   23 Sep 25 22:16 HEAD
drwxr-xr-x   2 jack  staff   64 Sep 25 22:16 branches
-rw-r--r--   1 jack  staff  137 Sep 25 22:16 config
-rw-r--r--   1 jack  staff   73 Sep 25 22:16 description
drwxr-xr-x  13 jack  staff  416 Sep 25 22:16 hooks
drwxr-xr-x   3 jack  staff   96 Sep 25 22:16 info
drwxr-xr-x   4 jack  staff  128 Sep 25 22:16 objects
drwxr-xr-x   4 jack  staff  128 Sep 25 22:16 refs
$ .git %
注意:.git目錄中的檔案不要刪除也不要修改,否則git不能正常工作。
設定簽名
- 形式
使用者名稱:XXX
Email地址:XXX@gmail.com - 作用
只是為了區分成員身份,不會給郵件地址傳送郵件。而且郵件地址可以是不存在地址。 - 注意
這裡的簽名和遠端倉庫的郵件地址密碼沒有任何關係 - 命令
1.專案級別/倉庫級別
僅在當前本地倉庫有效
git config user.name 使用者名稱
git config user.email 郵箱地址
2.系統使用者級別$ WebService % git config user.name njzy $ WebService % git config user.email njzy@2020.com $ WebService %
登入當前系統的使用者範圍
git config --global user.name 使用者名稱
git config --global user.email 郵箱地址$ WebService % git config --global user.name njzy_global $ WebService % git config --global user.email njzy_global@2020.com $ WebService % - 簽名儲存位置
1.專案級別
當前專案下的.git資料夾下的config檔案中。
檢視命令:cat .git/config
2.系統使用者級別$ WebService % cat .git/config //檢視當前專案的簽名資訊 [core] repositoryformatversion = 0 filemode = true bare = false logallrefupdates = true ignorecase = true precomposeunicode = true [user] name = njzy //被設定的專案使用者名稱 email = njzy@2020.com //被設定的專案郵件地址 $ WebService %
當前使用者資料夾下的.gitconfig檔案中。
檢視命令:cat .gitconfig$ ~ % cd ~ //切換到當前使用者根目錄 $ ~ % pwd //檢視當前位置 /Users/jack $ ~ % cat .gitconfig //檢視全域性簽名資訊 [user] name = njzy_global //被設定的全域性使用者名稱 email = njzy_global@2020.com //被設定的全域性郵件地址 $ ~ % - 專案級別和系統使用者級別的簽名的優先(就近原則)
1.> 兩個都設定情況下
專案級別優先於系統使用者級別
2.> 只設定系統使用者級別簽名
以系統使用者級簽名別為準
3.> 只設定專案級別
以專案級別為準
4.> 兩個都沒有設定的話不允許。
檢視git狀態
- 作用
確認git的暫存區,本地倉庫的情況。 - 命令
git status
新增操作
- 目的
把內容從工作區新增到暫存區,也叫追蹤。 - 命令
1.新增單個檔案
git add 檔名
2.新增多個檔案
1.> git add 檔名1 檔名2 檔名3 ....
2.> git add -A
3.> git add .
詳細參考git幫助文件usage: git add [<options>] [--] <pathspec>... -n, --dry-run dry run -v, --verbose be verbose -i, --interactive interactive picking -p, --patch select hunks interactively -e, --edit edit current diff and apply -f, --force allow adding otherwise ignored files -u, --update update tracked files //更新追蹤的檔案 --renormalize renormalize EOL of tracked files (implies -u) -N, --intent-to-add record only the fact that the path will be added later -A, --all add changes from all tracked and untracked files //新增所有被追蹤檔案的更新,和沒有被追蹤的檔案 --ignore-removal ignore paths removed in the working tree (same as --no-all) //忽略工作區被刪除的檔案 --refresh don't add, only refresh the index --ignore-errors just skip files which cannot be added because of errors //忽略由於檔案的錯誤不能被追蹤 --ignore-missing check if - even missing - files are ignored in dry run --chmod (+|-)x override the executable bit of the listed files - 使用例
為了清除git各個階段的狀態,在進行新增操作之前先檢視一下git的狀態。
(下面例子是從工作區檔案的建立到追加暫存區的過程)
1.檢視工作區被初始化後的狀態
2.建立檔案testGIt.txt檔案$ WebService % git status On branch master No commits yet //本地倉庫沒有可提交的東西 nothing to commit (create/copy files and use "git add" to track) //暫存區沒有可以提交的東西 $ WebService %
3.檢視檔案建立完後git狀態$ WebService % vim testGit.txt $ WebService % cat testGit.txt //檢視檔案內容 hello ! this is my first git test file ! $ WebService %
4.將檔案新增到暫存區並檢視狀態$ WebService % git status On branch master No commits yet //本地倉庫沒有樂意提交的東西。 Untracked files: //沒有追加跟蹤的檔案 (use "git add <file>..." to include in what will be committed) //使用git add <file> 命令可以追加檔案到暫存區 testGit.txt //剛才新建立的檔案,此時檔名字型為紅色 nothing added to commit but untracked files present (use "git add" to track) //使用git add命令 $ WebService %$ WebService % git add testGit.txt $ WebService % git status On branch master No commits yet Changes to be committed: (use "git rm --cached <file>..." to unstage) //已經把檔案放到暫存區,如果想清除暫存區,可以使用git rm --cached 檔名來擦除暫存區 testGit.txt new file: testGit.txt //此時檔案為綠色 $ WebService %
提交操作
- 目的
將檔案從暫存區提交到本地倉庫 - 命令
1.提交單個檔案
git commit -m "提交時註釋資訊" 檔名
2.提交複數個檔案
git comit -a -m "提交時註釋資訊"
更多詳細可以參考git幫助文件usage: git commit [<options>] [--] <pathspec>... -q, --quiet suppress summary after successful commit -v, --verbose show diff in commit message template Commit message options -F, --file <file> read message from file --author <author> override author for commit --date <date> override date for commit -m, --message <message> commit message -c, --reedit-message <commit> reuse and edit message from specified commit -C, --reuse-message <commit> reuse message from specified commit --fixup <commit> use autosquash formatted message to fixup specified commit --squash <commit> use autosquash formatted message to squash specified commit --reset-author the commit is authored by me now (used with -C/-c/--amend) -s, --signoff add Signed-off-by: -t, --template <file> use specified template file -e, --edit force edit of commit --cleanup <mode> how to strip spaces and #comments from message --status include status in commit message template -S, --gpg-sign[=<key-id>] GPG sign commit Commit contents options -a, --all commit all changed files -i, --include add specified files to index for commit --interactive interactively add files -p, --patch interactively add changes -o, --only commit only specified files -n, --no-verify bypass pre-commit and commit-msg hooks --dry-run show what would be committed --short show status concisely --branch show branch information --ahead-behind compute full ahead/behind values --porcelain machine-readable output --long show status in long format (default) -z, --null terminate entries with NUL --amend amend previous commit --no-post-rewrite bypass post-rewrite hook -u, --untracked-files[=<mode>] show untracked files, optional modes: all, normal, no. (Default: all) - 使用例
提交檔案到本地倉庫並檢視git狀態$ WebService % git commit -m "first commit:new file testGit.txt" testGit.txt [master (root-commit) c970a17] first commit:new file testGit.txt //first commit:new file testGit.txt 是提交時候的註釋資訊 1 file changed, 2 insertions(+) //改變了一個檔案,追加了兩行資訊。 create mode 100644 testGit.txt $ WebService % git status On branch master nothing to commit, working tree clean //暫存區沒有可以提交的東西 $ WebService %
擦除暫存區操作
- 目的
擦除暫存區的內容 - 命令
git rm --cached 檔名$ WebService % git rm --cached testGit.txt rm 'testGit.txt' $ WebService % git status On branch master No commits yet Untracked files: (use "git add <file>..." to include in what will be committed) testGit.txt //沒有被追蹤的檔案 nothing added to commit but untracked files present (use "git add" to track) $ WebService %
檢視歷史版本資訊
- 目的
檢視提交版本的歷史資訊 - 命令
1.git log
顯示完整資訊,包含提交的版本號,提交使用者,提交日期,提交註釋等資訊。
2.git log --pretty=oneline
只包含提交後的完整版本號和提交時的註釋資訊
3.git log --oneline
包含提交後的簡略版本號和提交時的註釋資訊 - 注意
只能檢視已經被提交(commit)的檔案的歷史資訊。 - 使用例1
$ WebService % git log //第二次被提交的資訊 commit 148942fd3c0ff3e01e09bf98d883f97a3b0a9c86 (HEAD -> master) //提交版本的hash值 Author: njzy <njzy@2020.com> //提交使用者資訊 Date: Sat Sep 26 15:53:52 2020 +0900 //提交日期 this is my second commit, modify testGit.txt //提交時註釋 //第一次被提交的資訊 commit c970a176de13abc4d436e4a08df329046ef193e7 Author: njzy <njzy@2020.com> Date: Sat Sep 26 12:30:20 2020 +0900 first commit:new file testGit.txt $ WebService % - 使用例2
$ WebService % git log --pretty=oneline 148942fd3c0ff3e01e09bf98d883f97a3b0a9c86 (HEAD -> master) this is my second commit, modify testGit.txt c970a176de13abc4d436e4a08df329046ef193e7 first commit:new file testGit.txt $ WebService % - 使用例3
$ WebService % git log --oneline

148942f (HEAD -> master) this is my second commit, modify testGit.txt
c970a17 first commit:new file testGit.txt
$ WebService %
歷史版本的前進或者回退
檢視帶head資訊的日誌
- 目的
檢視帶有指標和hash地址的日誌資訊,方便進行版本的前進或者後退。 - 命令
git reflog - 使用例
$ WebService % git reflog
148942f (HEAD -> master) HEAD@{0}: commit: this is my second commit, modify testGit.txt
//148942f:簡短的hash地址
//HEAD@{0}:指標0的位置
c970a17 HEAD@{1}: commit (initial): first commit:new file testGit.txt
//HEAD@{1} 指標1的位置
$ WebService %
版本的前進或者和回退
基於hash地址的版本指定【推薦】
- 目的
對版本進行前進操作或者回退操作 - 命令
git reset --hard 指定版本的hash地址 - 使用例
從第五個版本跳轉到第三個版本$ WebService % git reflog //首先檢視各種版本資訊 d3c9608 (HEAD -> master) HEAD@{0}: commit: this is my fifth updata,updata testGit.txt 364024e HEAD@{1}: commit: this is my fourth commit,updata testGit.txt 9dba7c5 HEAD@{2}: commit: this is my third commit,updata testGit.txt 148942f HEAD@{3}: commit: this is my second commit, modify testGit.txt c970a17 HEAD@{4}: commit (initial): first commit:new file testGit.txt $ WebService % cat testGit.txt //檢視當前版本的檔案內容 hello ! this is my first git test file ! this is added this is my third updata! this is my four updata! this is my fifth updata! $ WebService % git reset --hard 9dba7c5 //然後根據檢視的版本地址資訊,指定到要恢復到的版本。 HEAD is now at 9dba7c5 this is my third commit,updata testGit.txt $ WebService % cat testGit.txt //然後檢視回退後的當前版本檔案內容 hello ! this is my first git test file ! this is added this is my third updata! $ WebService % git reflog //然後我們再來看一下log資訊 9dba7c5 (HEAD -> master) HEAD@{0}: reset: moving to 9dba7c5 d3c9608 HEAD@{1}: commit: this is my fifth updata,updata testGit.txt 364024e HEAD@{2}: commit: this is my fourth commit,updata testGit.txt 9dba7c5 (HEAD -> master) HEAD@{3}: commit: this is my third commit,updata testGit.txt 148942f HEAD@{4}: commit: this is my second commit, modify testGit.txt c970a17 HEAD@{5}: commit (initial): first commit:new file testGit.txt $ WebService %
使用^符號(只能進行版本的後退不能前進)
- 目的
進行版本的回退 - 命令
git reset --hard HEAD^
(注意:一個^代表倒退一個版本) - 使用例
從第四個版本倒退到一個版本到第三個版本
倒退兩個版本$ WebService % git reset --hard HEAD^ HEAD is now at 9dba7c5 this is my third commit,updata testGit.txt $ WebService % cat testGit.txt hello ! this is my first git test file ! this is added this is my third updata! $ WebService %$ WebService % git reset --hard HEAD^^ HEAD is now at c970a17 first commit:new file testGit.txt $ WebService % cat testGit.txt hello ! this is my first git test file ! $ WebService %
使用~符號
- 目的
退回指定版本
(只能倒退,但是可以指定指定退幾步) - 命令
git reset --hard HEAD~要退的步數 - 使用例
從當前版本第五版後退兩步到第三個版本$ WebService % git reset --hard HEAD~2 HEAD is now at 9dba7c5 this is my third commit,updata testGit.txt $ WebService % cat testGit.txt hello ! this is my first git test file ! this is added this is my third updata! $ WebService %
reset三個引數的對比
--soft引數
- 示意圖
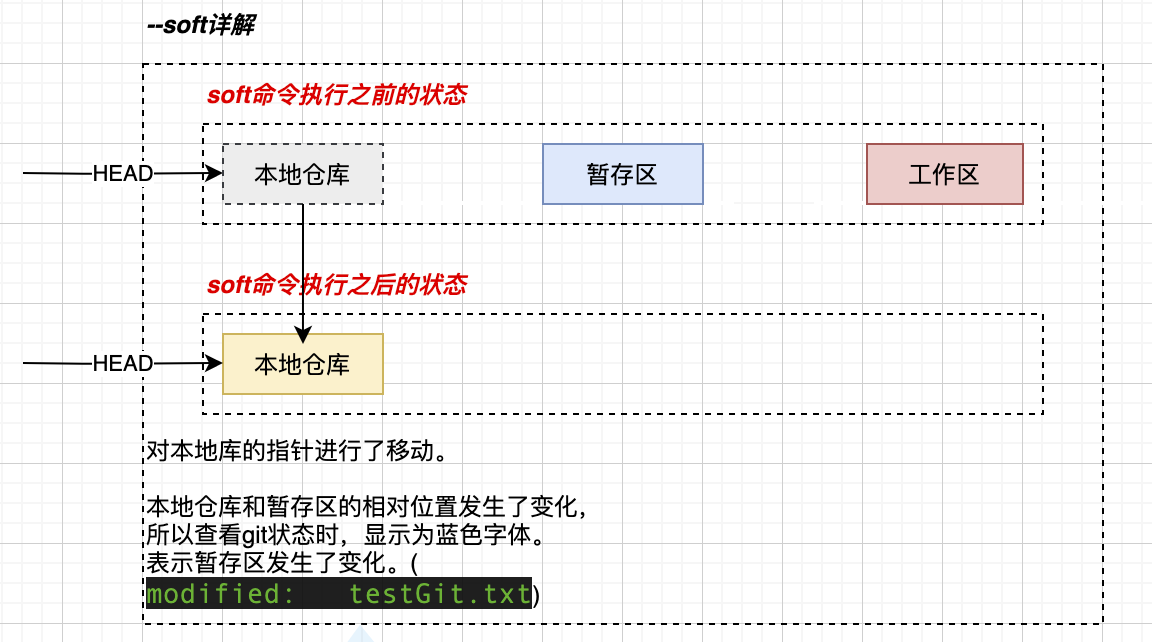
- 說明
僅在本地倉庫移動HEAD指標 - 命令
git reset -soft 指定版本號 - 使用例
$ WebService % cat testGit.txt //退回版本之前檢視檔案內容
hello !
this is my first git test file !

this is added

this is my third updata!

$ WebService % git reset --soft 148942f
//退回版本操作
$ WebService % cat testGit.txt //退回版本資訊後檢視檔案內容
hello !
this is my first git test file !

this is added

this is my third updata!

$ WebService % git status //檢視狀態
On branch master
Changes to be committed:
  (use "git restore --staged <file>..." to unstage)
	modified:   testGit.txt //檢視完後顯示為綠色字型,表示被更改了。為哈如此呢?
	//是由於原來本地倉庫,暫存區,工作區的指標是相同的。而經過soft操作後,本地倉庫的指標發生變化,導致暫存區的指標相對的產生了變化。所以顯示是發生了變化。

$ WebService %
--mixd引數
- 示意圖
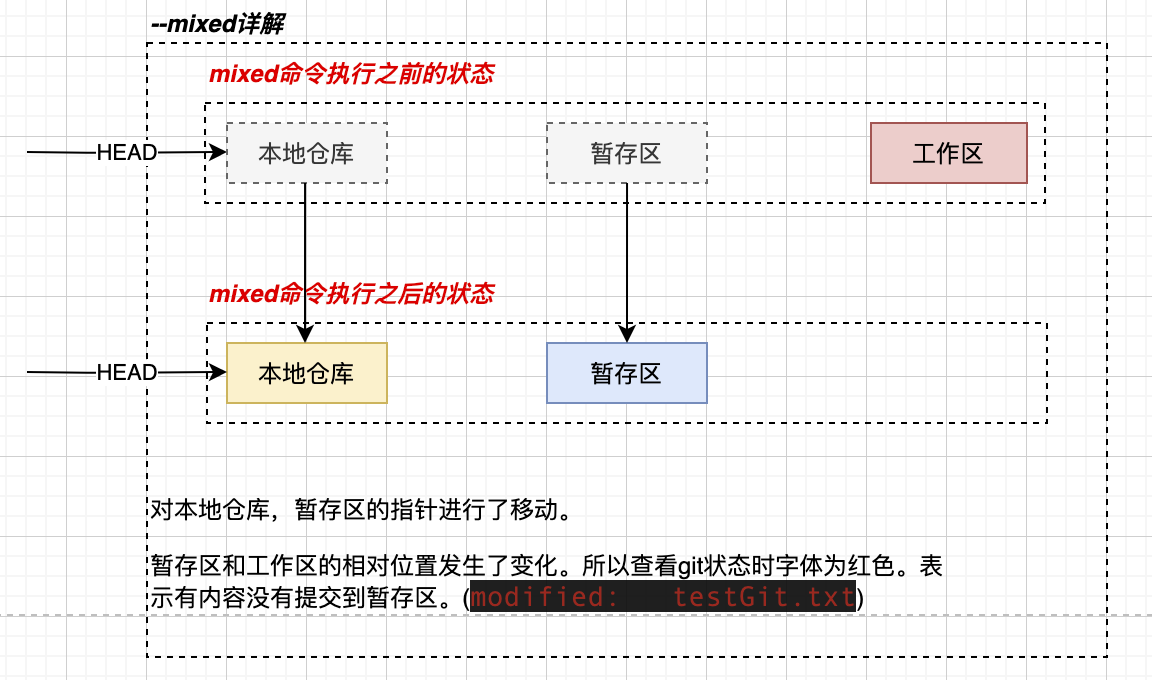
- 說明
在本地倉庫移動HEAD指標,重置暫存區。 - 命令
git reset --mixed 指定版本號 - 使用例
$ WebService % cat testGit.txt //跳轉到其他版本之前檔案內容
hello !
this is my first git test file !

this is added

this is my third updata!

$ WebService % git reset --mixed d3c9608
//指定到指定版本
Unstaged changes after reset:
M	testGit.txt
$ WebService % git reflog
//指定版本後的日誌
d3c9608 (HEAD -> master) HEAD@{0}: reset: moving to d3c9608
148942f HEAD@{1}: reset: moving to 148942f
9dba7c5 HEAD@{2}: reset: moving to HEAD~2
d3c9608 (HEAD -> master) HEAD@{3}: reset: moving to d3c9608
c970a17 HEAD@{4}: reset: moving to HEAD^^
9dba7c5 HEAD@{5}: reset: moving to HEAD^
364024e HEAD@{6}: reset: moving to 364024e
9dba7c5 HEAD@{7}: reset: moving to 9dba7c5
d3c9608 (HEAD -> master) HEAD@{8}: commit: this is my fifth updata,updata testGit.txt
364024e HEAD@{9}: commit: this is my fourth commit,updata testGit.txt
9dba7c5 HEAD@{10}: commit: this is my third commit,updata testGit.txt
148942f HEAD@{11}: commit: this is my second commit, modify testGit.txt
c970a17 HEAD@{12}: commit (initial): first commit:new file testGit.txt
$ WebService % cat testGit.txt  //檢視切換版本後的檔案內容
hello !
this is my first git test file !

this is added

this is my third updata!

$ WebService % git status
On branch master
Changes not staged for commit:
  (use "git add <file>..." to update what will be committed)
  (use "git restore <file>..." to discard changes in working directory)
	modified:   testGit.txt //此時檔名是紅色

no changes added to commit (use "git add" and/or "git commit -a")
$ WebService %
--hard引數
- 示意圖
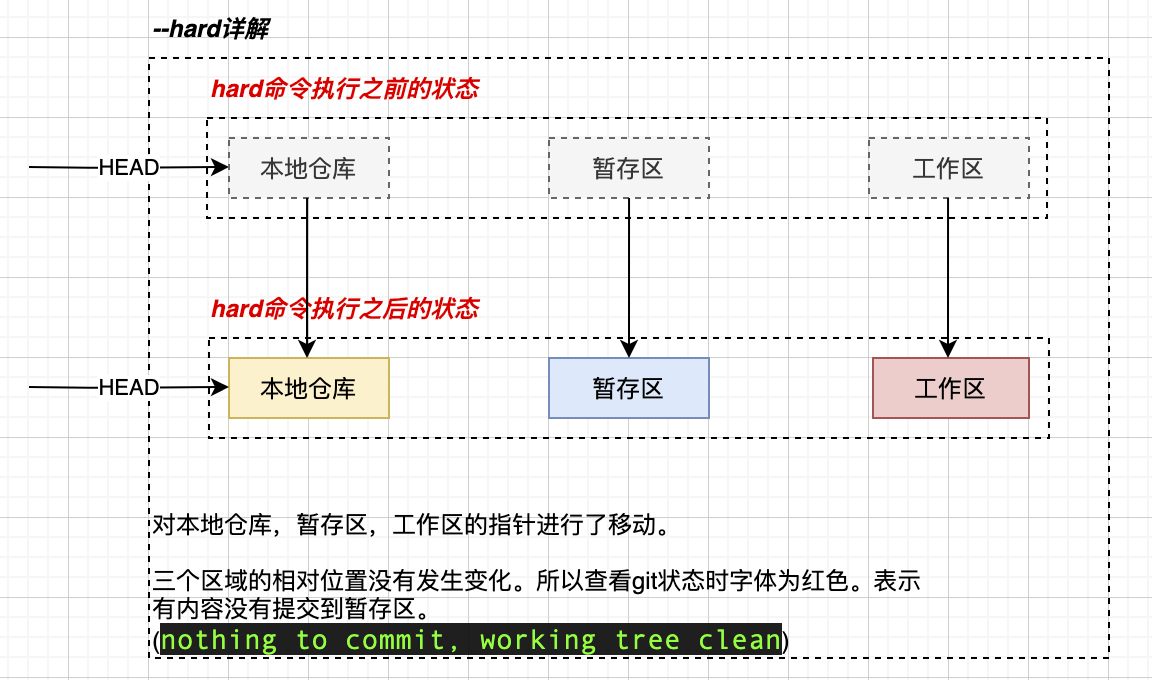
- 說明
在本地倉庫移動HEAD指標
重置暫存區
重置工作區 - 命令
git reset --hard 指定版本 - 使用例
參照上面各種版本前進或者後退的例子。
刪除檔案並找回
- 示意圖
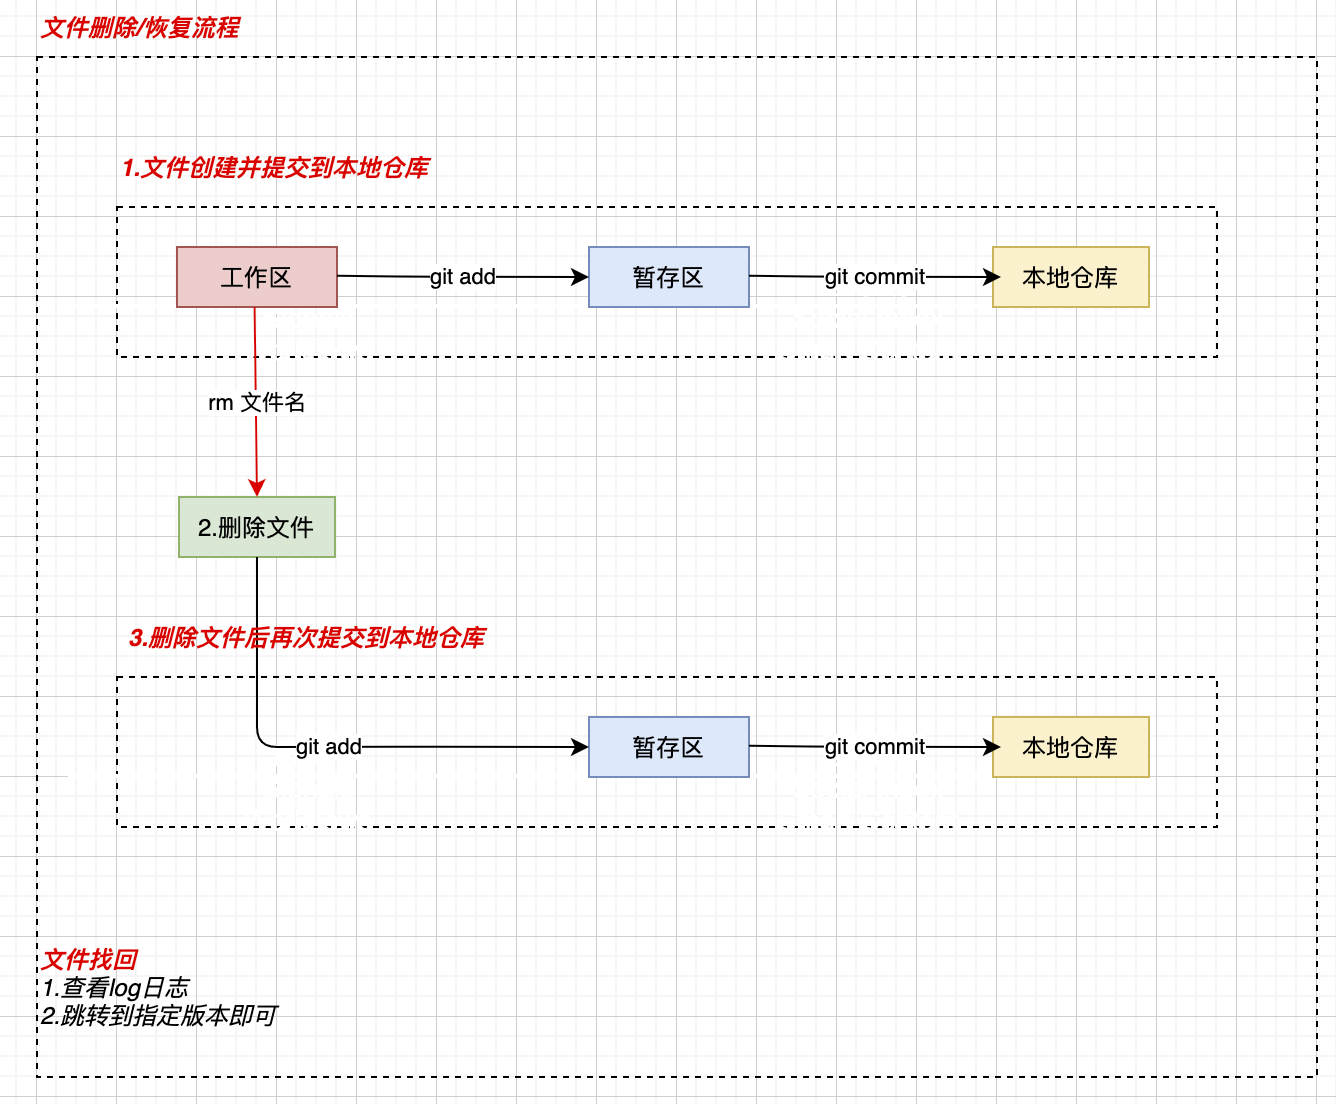
- 前提
提交到本地庫後刪除才能找回 - 刪除
物理刪除即可 - 找回版本
通過跳轉到指定版本命令即可找回刪除的內容。 - 使用例
新建檔案->追加到暫存區->提交到本地倉庫->刪除檔案->新增到暫存區->提交到本地倉庫$ WebService % vim test2.txt //1.建立一個新的測試檔案 $ WebService % git add test2.txt //2.新增到暫存區 $ WebService % git commit -m "add new test2.txt" test2.txt //3.提交到本地倉庫 [master 8a4e57d] add new test2.txt 1 file changed, 3 insertions(+) create mode 100644 test2.txt $ WebService % ls -l //檢視當前資料夾檔案 total 16 -rw-r--r-- 1 jack staff 27 Sep 27 07:11 test2.txt -rw-r--r-- 1 jack staff 134 Sep 26 22:33 testGit.txt $ WebService % git status //檢視git狀態 On branch master nothing to commit, working tree clean $ WebService % $ WebService % $ WebService % $ WebService % rm test2.txt //4.本地物理刪除檔案 $ WebService % ls -l //5.刪除後確認 total 8 -rw-r--r-- 1 jack staff 134 Sep 26 22:33 testGit.txt $ WebService % git status //6.檢視刪除後 On branch master Changes not staged for commit: (use "git add/rm <file>..." to update what will be committed) (use "git restore <file>..." to discard changes in working directory) deleted: test2.txt //紅色字型,表示這個操作沒有被新增到暫存區 no changes added to commit (use "git add" and/or "git commit -a") $ WebService % git add test2.txt //7.將刪除後的狀態新增到暫存區 $ WebService % git status //檢視新增後的git狀態 On branch master Changes to be committed: (use "git restore --staged <file>..." to unstage) deleted: test2.txt //文字為綠色,表示暫存區已被更新。 $ WebService % git commit -m "delete file test2.txt" test2.txt //8.把暫存區內容提交到本地倉庫 [master f8373c4] delete file test2.txt 1 file changed, 3 deletions(-) delete mode 100644 test2.txt $ WebService % git status //檢視git狀態 On branch master nothing to commit, working tree clean $ WebService % ls testGit.txt $ WebService % git reflog //9.檢視日誌資訊 f8373c4 (HEAD -> master) HEAD@{0}: commit: delete file test2.txt //10/1檔案被刪除的歷史記錄 8a4e57d HEAD@{1}: commit: add new test2.txt d3c9608 HEAD@{2}: reset: moving to d3c9608 d3c9608 HEAD@{3}: reset: moving to d3c9608 148942f HEAD@{4}: reset: moving to 148942f 9dba7c5 HEAD@{5}: reset: moving to HEAD~2 d3c9608 HEAD@{6}: reset: moving to d3c9608 c970a17 HEAD@{7}: reset: moving to HEAD^^ 9dba7c5 HEAD@{8}: reset: moving to HEAD^ 364024e HEAD@{9}: reset: moving to 364024e 9dba7c5 HEAD@{10}: reset: moving to 9dba7c5 d3c9608 HEAD@{11}: commit: this is my fifth updata,updata testGit.txt 364024e HEAD@{12}: commit: this is my fourth commit,updata testGit.txt 9dba7c5 HEAD@{13}: commit: this is my third commit,updata testGit.txt 148942f HEAD@{14}: commit: this is my second commit, modify testGit.txt c970a17 HEAD@{15}: commit (initial): first commit:new file testGit.txt $ WebService % git reset --hard 8a4e57d //2.恢復到刪除之前的版本 HEAD is now at 8a4e57d add new test2.txt $ WebService % ls -l//3.檢視本地檔案是否恢復? total 16 -rw-r--r-- 1 jack staff 27 Sep 27 07:25 test2.txt//檔案又被恢復回來了 -rw-r--r-- 1 jack staff 134 Sep 26 22:33 testGit.txt $ WebService %
恢復暫存區的檔案
- 說明
使暫存區檔案恢復 - 命令
git reset --hard HEAD
通過上面重新整理讓三個區保持一致即可 - 條件
要恢復的檔案提交到了本地庫
版本比較
比較工作區和暫存區
- 命令
git diff 檔名 - 使用例
比較修改後的test2.txt的工作區和暫存區
工作區,暫存區,本地倉庫test2.txt內容一致
修改後的工作區test2.txtaaaaaaaa bbbbbbbb cccccccc
比較後結果aaaaaaaa bbbbbbbb cccccccc@@@@@@
提交到暫存區後再比較$ WebService % git diff test2.txt diff --git a/test2.txt b/test2.txt index 092b923..0c08686 100644 --- a/test2.txt +++ b/test2.txt @@ -1,3 +1,3 @@ aaaaaaaa bbbbbbbb -cccccccc //-代表刪除 +cccccccc@@@@@@ //+代表追加。git是以行尾單位來管理版本的,所以cccccccc表示為刪除,cccccccc@@@@@@表示為追加。 $ WebService %$ WebService % git add test2.txt $ WebService % git diff test2.txt $ WebService %
工作區和本地倉庫版本比較
- 命令
git diff 指定版本 [檔名] - 指定版本
HEAD:當前本地倉庫的版本
HEAD^:本地倉庫的上一個版本
HEAD^^:本地倉庫的上兩個版本
HEAD~n:本地倉庫的上n個版本
版本號的hash值 - 注意
檔名不寫的話是所有當前資料夾的所有檔案 - 使用例
工作區和本地倉庫的當前版本比較
和本地倉庫的上一個版本進行比較$ WebService % git reset --hard HEAD //先把三個區同步一下,恢復到同一狀態 HEAD is now at 8a4e57d add new test2.txt $ WebService % git status On branch master nothing to commit, working tree clean $ WebService % cat test2.txt aaaaaaaa bbbbbbbb cccccccc $ WebService % vim test2.txt //對工作區修改 $ WebService % git diff HEAD test2.txt//修改後進行比較 diff --git a/test2.txt b/test2.txt index 092b923..0c08686 100644 --- a/test2.txt +++ b/test2.txt @@ -1,3 +1,3 @@ aaaaaaaa bbbbbbbb -cccccccc +cccccccc@@@@@@ $ WebService %$ WebService % git diff HEAD^ test2.txt diff --git a/test2.txt b/test2.txt new file mode 100644 index 0000000..0c08686 --- /dev/null +++ b/test2.txt @@ -0,0 +1,3 @@ +aaaaaaaa +bbbbbbbb +cccccccc@@@@@@ $ WebService %
分支
分支概述
在版本控制過程中,使用多條線同時推進多個任務。
分支好處
- 同時推進多個功能開發,提高生產效率。
- 各個分支在開發過程中,如有某個分支失敗,不會對其他分支有影響。失敗的分支可以重新獲取mastaer分支,進行再次開發。
建立分支
- 命令
git branch 分支名 - 使用例
$ WebService % git branch hot_fix
檢視分支
- 命令
git branch -v - 使用例
$ WebService % git branch -v
hot_fix 8a4e57d add new test2.txt
* master  8a4e57d add new test2.txt
//*所在的位值就是我們現在所以在的分支
$ WebService %
切換分支
- 說明
把分支從當前分支切換到其他分支 - 命令
git checkout 分支名 - 使用例
$ WebService % git checkout hot_fix
Switched to branch 'hot_fix'
$ WebService % git branch -v
* hot_fix 8a4e57d add new test2.txt //現在已經切換到hot_fix分支
master  8a4e57d add new test2.txt
$ WebService %
合併分支
- 說明
把指定分支的內容合併到當前分支 - 命令
git merge 要合併內容的分支名$ WebService % git branch -v //檢視當前分支 * hot_fix a360edf hox_fix one add master 8a4e57d add new test2.txt $ WebService % git checkout master //切換到內容要合併到的分支 Switched to branch 'master' $ WebService % git branch -v //再次確認切換後的分支 hot_fix a360edf hox_fix one add * master 8a4e57d add new test2.txt $ WebService % git merge hot_fix //進行分支合併 Updating 8a4e57d..a360edf Fast-forward test2.txt | 2 +- 1 file changed, 1 insertion(+), 1 deletion(-) $ WebService % cat test2.txt//檢視合併後的內容 aaaaaaaa bbbbbbbb cccccccc edit by hox_fix//次內容是hot_fix分支內容,證明已經合併成功。 $ WebService % git branch -v hot_fix a360edf hox_fix one add //當兩個分支內容一樣的時候,此時兩個分支的hash值是一樣的。 * master a360edf hox_fix one add //當兩個分支內容一樣的時候,此時兩個分支的hash值是一樣的。 $ WebService %
解決合併衝突
- 說明
當要合併兩個分支的時候,兩個分支修改內容不一樣,導致不能自動進行合併操作,所以需要手動進行合併操作。 - 解決思路
1.刪除衝突檔案內容的特殊符號
2.修改衝突內容
3.修改後的檔案新增到暫存區。(git add 檔名)
4.從暫存區提交到本地倉庫。
(命令:git commit -m "註釋") 注:這裡的commit命令不能帶檔名稱引數。
上面執行完merge命令後,test2.txt檔案的內容,$ WebService % vim test2.txt //修改mster分支的test2檔案 $ WebService % git add test2.txt //把修改後的檔案新增到暫存區 $ WebService % git commit test2.txt //把暫存區檔案提交到本地倉庫 [master 4a902f1] updata master 1 file changed, 1 insertion(+) $ WebService % git branch -v //檢視當前分支 hot_fix a360edf hox_fix one add * master 4a902f1 updata master $ WebService % $ WebService % git checkout hot_fix //切換到hot_fix分支 Switched to branch 'hot_fix' $ WebService % git branch -v //檢視分支 * hot_fix a360edf hox_fix one add master 4a902f1 updata master $ WebService % vim test2.txt //編輯test2.txt $ WebService % git add test2.txt //修改後的檔案新增到暫存區 $ WebService % git commit -m "updata hox_fix" test2.txt //提交檔案到本地倉庫 [hot_fix ee3ae4c] updata hox_fix 1 file changed, 1 insertion(+) $ WebService % $ WebService % git merge master //合併分支 Auto-merging test2.txt CONFLICT (content): Merge conflict in test2.txt Automatic merge failed; fix conflicts and then commit the result. //自動合併分支失敗,接下來需要手動修改檔案後在進行提交來解決衝突 $ WebService % ls -l total 16 -rw-r--r-- 1 jack staff 126 Sep 27 11:02 test2.txt -rw-r--r-- 1 jack staff 134 Sep 26 22:33 testGit.txt $ WebService % vim test2.txt //開啟檔案進行手動合併檔案內容 $ WebService % git status //檢視git狀態 On branch hot_fix //在hot_fix分支上 You have unmerged paths.//沒有合併的路徑 (fix conflicts and run "git commit") //修理衝突並執行 (use "git merge --abort" to abort the merge) //終止合併 Unmerged paths: (use "git add <file>..." to mark resolution) //使用git add <file> 命令去標記為解決 both modified: test2.txt no changes added to commit (use "git add" and/or "git commit -a") $ WebService % git add test2.txt //解決衝突後的檔案新增到暫存區 $ WebService % git status On branch hot_fix All conflicts fixed but you are still merging.//所有的衝突已經解決了,但是你仍然處於“合併中”狀態。 (use "git commit" to conclude merge) //使用git commit 命令去變換”合併中“的狀態 Changes to be committed: modified: test2.txt $ WebService % git commit -m "resolve conflict" test2.txt fatal: cannot do a partial commit during a merge. //注意:在這中特殊場合下的commit不能再後面使用檔名 $ WebService % git commit -m "resolve conflict" //去掉檔名再次執行提交。 [hot_fix 0d62477] resolve conflict //衝突解決了。 $ WebService % git status //檢視git狀態 On branch hot_fix nothing to commit, working tree clean $ WebService % vim test2.txt //確認合併後的內容 $ WebService %
上面修改後的檔案內容aaaaaaaa bbbbbbbb cccccccc edit by hox_fix <<<<<<< HEAD //指標版本內容 eeeeeeee add by hox_fix ======= dddddddd add by master >>>>>>> master //master版本內容aaaaaaaa bbbbbbbb cccccccc edit by hox_fix dddddddd add by master eeeeeeee add by hox_fix
遠端庫操作
註冊賬戶
- 註冊github賬戶
- 註冊碼雲賬戶
- 兩個賬戶任意一個即可
建立專案倉庫
- 建立新倉庫
(在這裡不做敘述)
遠端倉庫別名設定
- 說明
起別名的目的為了在推送到遠端倉庫的時候比較簡單,不至於敲很長的地址。 - 命令
git remote add 別名 遠端倉庫地址.git - 使用例
$ WebService % git remote add origin https://github.com/jack2019/WebService.git
$ WebService %
檢視遠端倉庫別名資訊
- 說明
在設定遠端倉庫別名後,檢視設定是否成功。 - 命令
git remote -v - 使用例
$ WebService % git remote -v
    origin	https://github.com/jack2019/WebService.git (fetch)
    origin	https://github.com/jack2019/WebService.git (push)
$ WebService %
推送到遠端倉庫
- 說明
把本地倉庫的內容上傳到遠端倉庫 - 命令
git push 遠端庫別名 分支名 - 使用例
$ WebService % git push origin hot_fix
Enumerating objects: 30, done.
Counting objects: 100% (30/30), done.
Delta compression using up to 16 threads
Compressing objects: 100% (22/22), done.
Writing objects: 100% (30/30), 2.52 KiB | 1.26 MiB/s, done.
Total 30 (delta 4), reused 0 (delta 0)
remote: Resolving deltas: 100% (4/4), done.
remote:
remote: Create a pull request for 'hot_fix' on GitHub by visiting:
remote:      https://github.com/jack2019/WebService/pull/new/hot_fix
remote:
To https://github.com/jack2019/WebService.git
 * [new branch]      hot_fix -> hot_fix
$ WebService %
推送發生失敗
- 當推送到遠端倉庫時莫名發生失敗,此時可以進行強行推送
- 命令
git push 遠端倉庫名稱.git 分支名 -f - 使用例
$ WebService % git push origin master //首次推送
To https://github.com/jack2019/WebService.git
 ! [rejected]        master -> master (fetch first)
error: failed to push some refs to 'https://github.com/jack2019/WebService.git' //推送失敗
hint: Updates were rejected because the remote contains work that you do
hint: not have locally. This is usually caused by another repository pushing
hint: to the same ref. You may want to first integrate the remote changes
hint: (e.g., 'git pull ...') before pushing again.
hint: See the 'Note about fast-forwards' in 'git push --help' for details.
$ WebService % git push origin master -f //進行強行推送
Total 0 (delta 0), reused 0 (delta 0)
To https://github.com/jack2019/WebService.git
 + 6cfbddc...4a902f1 master -> master (forced update) //強行推送成功,可以去github倉庫檢視是否已經有上傳的內容。
$ WebService %
遠端倉庫克隆
- 說明
當我們想從github或者碼雲下載他人的專案進行學習閱讀的時候,我們可以使用克隆命令。 - 命令
git clone 遠端倉庫地址 - 注意
克隆操作在完成下載檔案到本地的同時還完成了兩件事情。分別是初始化遠端倉庫別名,初始話本地倉庫(也就是git init命令執行過程。) - 使用例
➜  IdeaProjects git clone https://github.com/jack2019/gitLearnning.git //克隆遠端倉庫庫
Cloning into 'gitLearnning'...
remote: Enumerating objects: 52, done.
remote: Counting objects: 100% (52/52), done.
remote: Compressing objects: 100% (34/34), done.
remote: Total 52 (delta 10), reused 51 (delta 10), pack-reused 0
Unpacking objects: 100% (52/52), done. //克隆成功
➜  IdeaProjects cd gitLearnning //進入下載的資料夾
➜  gitLearnning git:(master) ls -al //檢視下載的檔案
total 16
drwxr-xr-x   5 jack  staff  160 Oct  6 21:34 .
drwxr-xr-x@ 21 jack  staff  672 Oct  6 21:34 ..
drwxr-xr-x  13 jack  staff  416 Oct  6 21:34 .git
-rw-r--r--   1 jack  staff  219 Oct  6 21:34 test2.txt
-rw-r--r--   1 jack  staff  134 Oct  6 21:34 testGit.txt
➜  gitLearnning git:(master) git status //檢視git狀態
On branch master
Your branch is up to date with 'origin/master'. //被下載到了origin/master下

nothing to commit, working tree clean
➜  gitLearnning git:(master)
從遠端庫拉取最新的內容
fetch操作
- 說明
遠端庫的內容被更新後,我們想取得最新的到本地,這時候就用到了fetch命令。如果我們還想和本地的版本進行合併。我們還需要使用merge命令進行合併。 - 命令
git fetch 遠端倉庫別名 分支名 - 使用例
  $ git fetch origin master //抓取內容
  remote: Enumerating objects: 5, done.
  remote: Counting objects: 100% (5/5), done.
  remote: Compressing objects: 100% (2/2), done.
  remote: Total 3 (delta 1), reused 3 (delta 1), pack-reused 0
  Unpacking objects: 100% (3/3), done.
  From https://github.com/jack2019/WebService
   * branch            master     -> FETCH_HEAD
     f1a3142..da6a4ee  master     -> origin/master

  Window-PC MINGW64 /e/workspace/web/webservice (master)
  $ ls -l
  total 2
  -rw-r--r-- 1 laofan 197121 100 九月 28 21:30 test2.txt
  -rw-r--r-- 1 laofan 197121 144 九月 28 21:30 testGit.txt

  Window-PC MINGW64 /e/workspace/web/webservice (master)
  $ cat test2.txt
  aaaaaaaa
  bbbbbbbb
  cccccccc edit by hox_fix
  dddddddd add by master

  mmmmmmm push after updata!

  Window-PC MINGW64 /e/workspace/web/webservice (master)
  $ git checkout origin/master //fetch下來的內容放在origin/master下,切換分支到origin、master下。
  Note: checking out 'origin/master'.

  You are in 'detached HEAD' state. You can look around, make experimental
  changes and commit them, and you can discard any commits you make in this
  state without impacting any branches by performing another checkout.

  If you want to create a new branch to retain commits you create, you may
  do so (now or later) by using -b with the checkout command again. Example:

    git checkout -b <new-branch-name>

  HEAD is now at da6a4ee... mac commit ,window fetch

  Window-PC MINGW64 /e/workspace/web/webservice ((da6a4ee...))
  $ git branch -v //檢視當前分支
  * (HEAD detached at origin/master) da6a4ee mac commit ,window fetch
    master f1a3142 [behind 1] push after updata test2.txt //當前所處的分支是origin/master下

  Window-PC MINGW64 /e/workspace/web/webservice ((da6a4ee...))
  $ cat test2.txt //檢視當前分支下的檔案內容
  aaaaaaaa
  bbbbbbbb
  cccccccc edit by hox_fix
  dddddddd add by master

  mmmmmmm push after updata
  nnnnnnn macbook add! //當前分支新追加的內容

  Window-PC MINGW64 /e/workspace/web/webservice ((da6a4ee...))
  $ git checkout master  //切換分支到master
  Previous HEAD position was da6a4ee... mac commit ,window fetch
  Switched to branch 'master'
  Your branch is behind 'origin/master' by 1 commit, and can be fast-forwarded.
    (use "git pull" to update your local branch)

  Window-PC MINGW64 /e/workspace/web/webservice (master)
  $ git branch -v //檢視當前分支
  * master f1a3142 [behind 1] push after updata test2.txt

  Window-PC MINGW64 /e/workspace/web/webservice (master)
  $ cat test2.txt //檢視當前分支內容
  aaaaaaaa
  bbbbbbbb
  cccccccc edit by hox_fix
  dddddddd add by master

  mmmmmmm push after updata!

  Window-PC MINGW64 /e/workspace/web/webservice (master)
  $ git merge origin/master  //把origin/master分支內容合併到master
  Updating f1a3142..da6a4ee
  Fast-forward
   test2.txt | 3 ++-
   1 file changed, 2 insertions(+), 1 deletion(-)

  Window-PC MINGW64 /e/workspace/web/webservice (master)
  $ cat test2.txt //檢視合併後的master分支檔案內容
  aaaaaaaa
  bbbbbbbb
  cccccccc edit by hox_fix
  dddddddd add by master

  mmmmmmm push after updata
  nnnnnnn macbook add! //origin/master追加的內容

  Window-PC MINGW64 /e/workspace/web/webservice (master)
pull操作
- 說明
pull操作等價於fetch操作 + merge操作 - 命令
git pull 遠端倉庫別名 分支名 - 使用例
$ git pull origin master
remote: Enumerating objects: 5, done.
remote: Counting objects: 100% (5/5), done.
remote: Compressing objects: 100% (2/2), done.
remote: Total 3 (delta 1), reused 3 (delta 1), pack-reused 0
Unpacking objects: 100% (3/3), done.
From https://github.com/jack2019/WebService
 * branch            master     -> FETCH_HEAD
   da6a4ee..494ed55  master     -> origin/master
Updating da6a4ee..494ed55
Fast-forward
 test2.txt | 1 +
 1 file changed, 1 insertion(+)

Window-PC MINGW64 /e/workspace/web/webservice (master)
$ cat test2.txt
aaaaaaaa
bbbbbbbb
cccccccc edit by hox_fix
dddddddd add by master

mmmmmmm push after updata
nnnnnnn macbook add!
jjjjjjj macbook add2!

Window-PC MINGW64 /e/workspace/web/webservice (master)
$
協同開發衝突的解決
- 說明
如果不基於遠端庫最新版本進行修改的話則不能推送,必須先拉取最新的遠端庫。拉取後發生衝突,則按照“分支衝突解決”的操作即可。 - 例子
mac端更新後提交github
window端不拉取最新的github直接更新進行提交github。此時需要先拉取最新的遠端庫進行,並進行遠端庫和本地庫的合併。
跨團隊協作
- 說明
當需要團隊外部的人員進行程式碼的變更時,由於團隊外的人沒有push的許可權,所以需要團隊外人員對專案進行fork操作。 - 正常流程
1.github使用者1fork使用者2的專案
(fork之後,在遠端庫自動建立一個同樣的專案)
2.clone到本地
3.本地修改內容
4.提交到暫存區,本地庫
5.push到github使用者1
6.向使用者2申請提交請求
pull requests
new pull request
7.使用者2進行pull requestes的處理,並進行merge操作。
git知識補充
- Q:當不小心對整個系統的資料夾進行git inint操作後該如何取消?
A:通過命令rm -rf .git對git檔案進行刪除操作就即可。 - Q:如何檢視幫助文件?
A:通過命令git help 要檢視的命令 進行檢視即可。