0.學習目標
- 瞭解SpringBoot的作用
- 掌握java配置的方式
- 瞭解SpringBoot自動配置原理
- 掌握SpringBoot的基本使用
- 瞭解Thymeleaf的基本使用
1. 瞭解SpringBoot
在這一部分,我們主要了解以下3個問題:
- 什麼是SpringBoot
- 為什麼要學習SpringBoot
- SpringBoot的特點
1.1.什麼是SpringBoot
SpringBoot是Spring專案中的一個子工程,與我們所熟知的Spring-framework 同屬於spring的產品:
我們可以看到下面的一段介紹:
Spring Boot makes it easy to create stand-alone, production-grade Spring based Applications that you can "just run".
We take an opinionated view of the Spring platform and third-party libraries so you can get started with minimum fuss. Most Spring Boot applications need very little Spring configuration.
翻譯一下:
Spring Boot你只需要“run”就可以非常輕易的構建獨立的、生產級別的spring應用。
我們為spring平臺和第三方依賴庫提供了一種固定化的使用方式,使你能非常輕鬆的開始開發你的應用程式。大部分Spring Boot應用只需要很少的配置。
其實人們把Spring Boot稱為搭建程式的腳手架。其最主要作用就是幫我們快速的構建龐大的spring專案,並且儘可能的減少一切xml配置,做到開箱即用,迅速上手,讓我們關注於業務而非配置。
我們可以使用SpringBoot建立java應用,並使用java –jar 啟動它,就能得到一個生產級別的web工程。
1.2.為什麼要學習SpringBoot
java一直被人詬病的一點就是臃腫、麻煩。當我們還在辛苦的搭建專案時,可能Python程式設計師已經把功能寫好了,究其原因主要是兩點:
-
複雜的配置
專案各種配置其實是開發時的損耗, 因為在思考 Spring 特性配置和解決業務問題之間需要進行思維切換,所以寫配置擠佔了寫應用程式邏輯的時間。
-
混亂的依賴管理
專案的依賴管理也是件吃力不討好的事情。決定專案裡要用哪些庫就已經夠讓人頭痛的了,你還要知道這些庫的哪個版本和其他庫不會有衝突,這也是件棘手的問題。並且,依賴管理也是一種損耗,新增依賴不是寫應用程式程式碼。一旦選錯了依賴的版本,隨之而來的不相容問題毫無疑問會是生產力殺手。
而SpringBoot讓這一切成為過去!
1.3.SpringBoot的特點
Spring Boot 主要特徵是:
- 建立獨立的spring應用程式
- 直接內嵌tomcat、jetty和undertow(不需要打包成war包部署)
- 提供了固定化的“starter”配置,以簡化構建配置
- 儘可能的自動配置spring和第三方庫
- 提供產品級的功能,如:安全指標、執行狀況監測和外部化配置等
- 絕對不會生成程式碼,並且不需要XML配置
總之,Spring Boot為所有 Spring 的開發者提供一個開箱即用的、非常快速的、廣泛接受的入門體驗
更多細節,大家可以到官網檢視。
2.快速入門
接下來,我們就來利用SpringBoot搭建一個web工程,體會一下SpringBoot的魅力所在!
環境要求:

2.1.建立工程
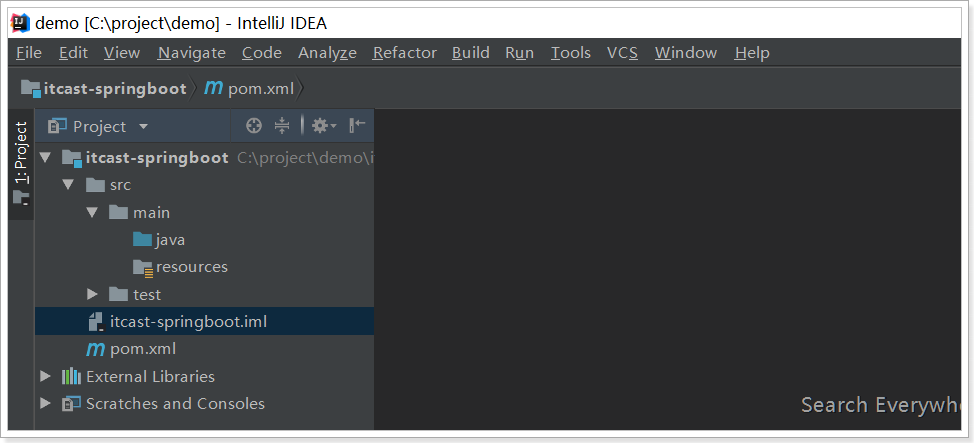
我們先新建一個空的demo工程,建立moduel並填寫座標資訊。
建立完成後的目錄結構:
2.2.引入依賴
看到這裡很多同學會有疑惑,前面說傳統開發的問題之一就是依賴管理混亂,怎麼這裡我們還需要管理依賴呢?難道SpringBoot不幫我們管理嗎?
彆著急,現在我們的專案與SpringBoot還沒有什麼關聯。SpringBoot提供了一個名為spring-boot-starter-parent的工程,裡面已經對各種常用依賴(並非全部)的版本進行了管理,我們的專案需要以這個專案為父工程,這樣我們就不用操心依賴的版本問題了,需要什麼依賴,直接引入座標即可!
<?xml version="1.0" encoding="UTF-8"?>
<project xmlns="http://maven.apache.org/POM/4.0.0"
         xmlns:xsi="http://www.w3.org/2001/XMLSchema-instance"
         xsi:schemaLocation="http://maven.apache.org/POM/4.0.0 http://maven.apache.org/xsd/maven-4.0.0.xsd">
    <modelVersion>4.0.0</modelVersion>

    <groupId>cn.itcast.springboot</groupId>
    <artifactId>itcast-springboot</artifactId>
    <version>1.0-SNAPSHOT</version>

    <!-- 所有的springboot的工程都以spring父工程為父工程 -->
    <parent>
        <groupId>org.springframework.boot</groupId>
        <artifactId>spring-boot-starter-parent</artifactId>
        <version>2.0.6.RELEASE</version>
    </parent>

    <dependencies>
        <dependency>
            <groupId>org.springframework.boot</groupId>
            <artifactId>spring-boot-starter-web</artifactId>
        </dependency>
    </dependencies>
</project>
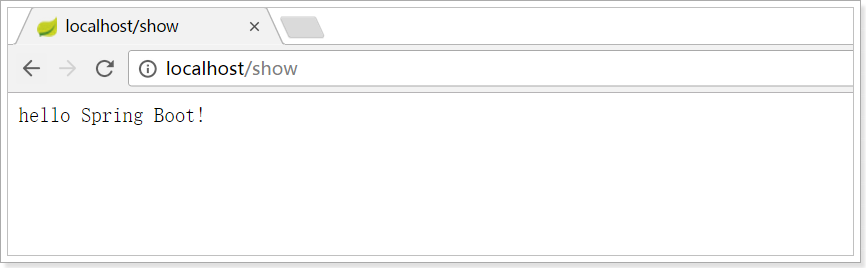
2.3.編寫HelloController
程式碼:
@RestController
@EnableAutoConfiguration
public class HelloController {

    @GetMapping("show")
    public String test(){
        return "hello Spring Boot!";
    }

    public static void main(String[] args) {
        SpringApplication.run(HelloController.class, args);
    }
}
2.4.啟動測試

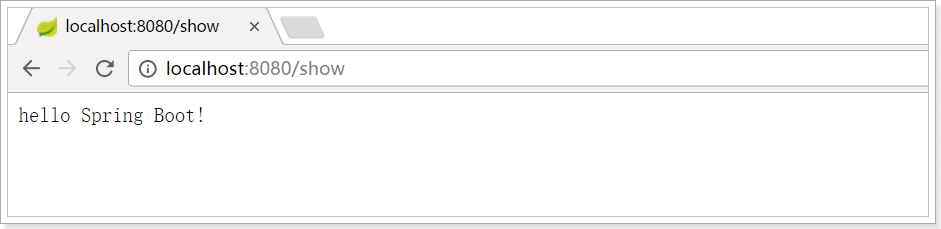
bingo!訪問成功!
2.5.詳解
入門工程中:pom.xml裡引入了啟動器的概念以@EnableAutoConfiguration註解。
2.5.1.啟動器
為了讓SpringBoot幫我們完成各種自動配置,我們必須引入SpringBoot提供的自動配置依賴,我們稱為啟動器。spring-boot-starter-parent工程將依賴關係宣告為一個或者多個啟動器,我們可以根據專案需求引入相應的啟動器,因為我們是web專案,這裡我們引入web啟動器:
<dependencies>
    <dependency>
        <groupId>org.springframework.boot</groupId>
        <artifactId>spring-boot-starter-web</artifactId>
    </dependency>
</dependencies>
需要注意的是,我們並沒有在這裡指定版本資訊。因為SpringBoot的父工程已經對版本進行了管理了。
這個時候,我們會發現專案中多出了大量的依賴:
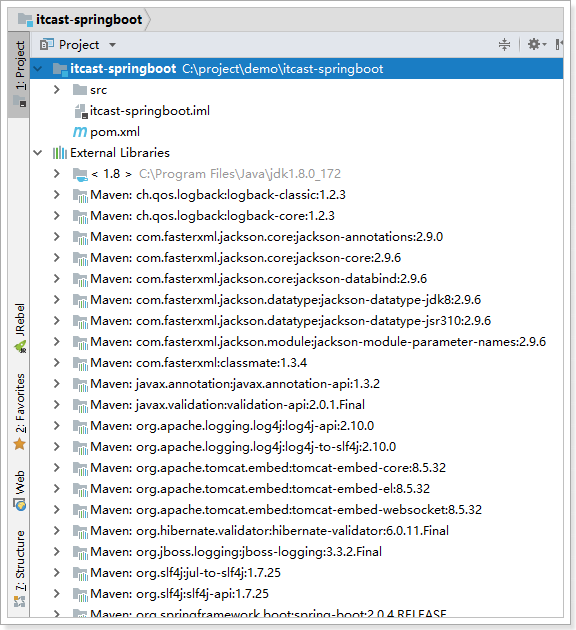
這些都是SpringBoot根據spring-boot-starter-web這個依賴自動引入的,而且所有的版本都已經管理好,不會出現衝突。
2.5.2.@EnableAutoConfiguration
關於這個註解,官網上有一段說明:
Enable auto-configuration of the Spring Application Context, attempting to guess and configure beans that you are likely to need. Auto-configuration classes are usually applied based on your classpath and what beans you have defined.
簡單翻譯以下:
開啟spring應用程式的自動配置,SpringBoot基於你所新增的依賴和你自己定義的bean,試圖去猜測並配置你想要的配置。比如我們引入了
spring-boot-starter-web,而這個啟動器中幫我們新增了tomcat、SpringMVC的依賴。此時自動配置就知道你是要開發一個web應用,所以就幫你完成了web及SpringMVC的預設配置了!
總結,SpringBoot內部對大量的第三方庫或Spring內部庫進行了預設配置,這些配置是否生效,取決於我們是否引入了對應庫所需的依賴,如果有那麼預設配置就會生效。
所以,我們使用SpringBoot構建一個專案,只需要引入所需依賴,配置就可以交給SpringBoot處理了。
2.6.優化入門程式
現在工程中只有一個Controller,可以這麼玩;那麼如果有多個Controller,怎麼辦呢?
新增Hello2Controller
程式碼:
@RestController
public class Hello2Controller {

    @GetMapping("show2")
    public String test(){
        return "hello Spring Boot2!";
    }

}
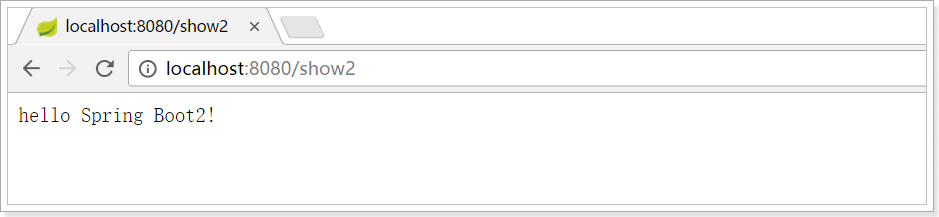
啟動重新啟動,訪問show2測試,失敗:

難道要在每一個Controller中都新增一個main方法和@EnableAutoConfiguration註解,這樣啟動一個springboot程式也太麻煩了。也無法同時啟動多個Controller,因為每個main方法都監聽8080埠。所以,一個springboot程式應該只有一個springboot的main方法。
所以,springboot程式引入了一個全域性的引導類。
2.5.1.新增引導類
通常請求下,我們在一個springboot工程中都會在基包下建立一個引導類,一些springboot的全域性註解(@EnableAutoConfiguration註解)以及springboot程式的入口main方法都放在該類中。
在springboot的程式的基包下(引導類和Controller包在同級目錄下),建立TestApplication.class:
內容如下:
@EnableAutoConfiguration
public class TestApplication {

    public static void main(String[] args) {
        SpringApplication.run(TestApplication.class, args);
    }
}
並修改HelloController,去掉main方法及@EnableAutoConfiguration:
@RestController
public class HelloController {

    @GetMapping("show")
    public String test(){
        return "hello Spring Boot!";
    }
}
啟動引導類,訪問show測試:

發現所有的Controller都不能訪問,為什麼?
回想以前程式,我們在配置檔案中新增了註解掃描,它能掃描指定包下的所有Controller,而現在並沒有。怎麼解決——@ComponentScan註解
2.5.2.@ComponentScan
spring框架除了提供配置方式的註解掃描<context:component-scan />,還提供了註解方式的註解掃描@ComponentScan。
在TestApplication.class中,使用@ComponentScan註解:
@EnableAutoConfiguration
@ComponentScan
public class TestApplication {

    public static void main(String[] args) {
        SpringApplication.run(TestApplication.class, args);
    }

}
重新啟動,訪問show或者show2:

我們跟進該註解的原始碼,並沒有看到什麼特殊的地方。我們檢視註釋:
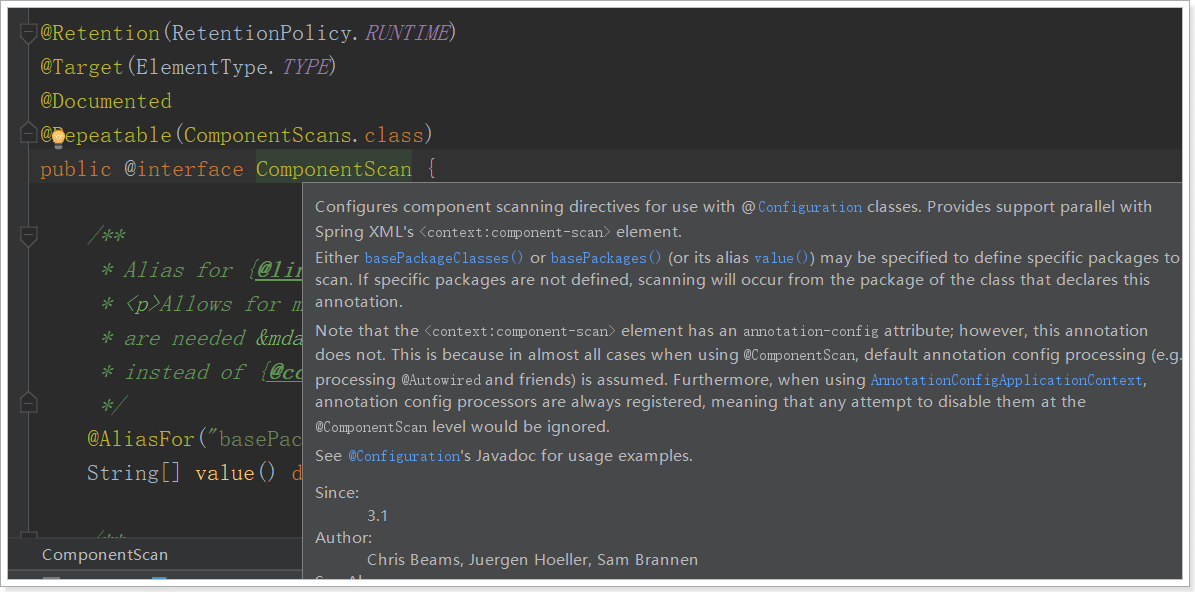
大概的意思:
配置元件掃描的指令。提供了類似與
<context:component-scan>標籤的作用通過basePackageClasses或者basePackages屬性來指定要掃描的包。如果沒有指定這些屬性,那麼將從宣告這個註解的類所在的包開始,掃描包及子包
而我們的@ComponentScan註解宣告的類就是main函式所在的啟動類,因此掃描的包是該類所在包及其子包。一般啟動類會放在一個比較淺的包目錄中。
2.5.3.@SpringBootApplication
我們現在的引導類中使用了@EnableAutoConfiguration和@ComponentScan註解,有點麻煩。springboot提供了一種簡便的玩法:@SpringBootApplication註解
使用@SpringBootApplication改造TestApplication:
@SpringBootApplication
public class TestApplication {

    public static void main(String[] args) {
        SpringApplication.run(TestApplication.class, args);
    }

}
點選進入,檢視原始碼:
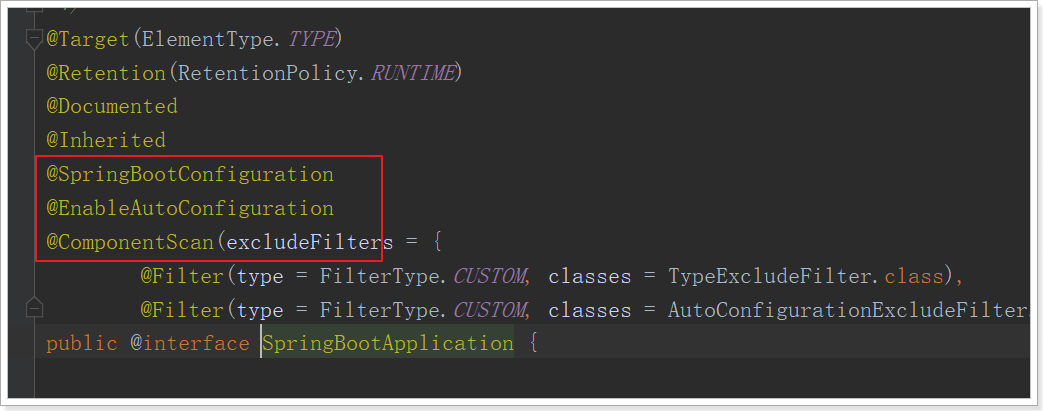
發現@SpringBootApplication其實是一個組合註解,這裡重點的註解有3個:
- @SpringBootConfiguration
- @EnableAutoConfiguration:開啟自動配置
- @ComponentScan:開啟註解掃描
2.5.4.@SpringBootConfiguration
@SpringBootConfiguration註解的原始碼:
我們繼續點選檢視原始碼:

通過這段我們可以看出,在這個註解上面,又有一個@Configuration註解。通過上面的註釋閱讀我們知道:這個註解的作用就是宣告當前類是一個配置類,然後Spring會自動掃描到新增了@Configuration的類,並且讀取其中的配置資訊。而@SpringBootConfiguration是來宣告當前類是SpringBoot應用的配置類,專案中只能有一個。所以一般我們無需自己新增。
3.預設配置原理
springboot的預設配置方式和我們之前玩的配置方式不太一樣,沒有任何的xml。那麼如果自己要新增配置該怎麼辦?比如我們要配置一個資料庫連線池,以前會這麼做:
<!-- 配置連線池 -->
<bean id="dataSource" class="com.alibaba.druid.pool.DruidDataSource"
      init-method="init" destroy-method="close">
    <property name="url" value="${jdbc.url}" />
    <property name="username" value="${jdbc.username}" />
    <property name="password" value="${jdbc.password}" />
</bean>
現在該怎麼做呢?
3.1.回顧歷史
事實上,在Spring3.0開始,Spring官方就已經開始推薦使用java配置來代替傳統的xml配置了,我們不妨來回顧一下Spring的歷史:
-
Spring1.0時代
在此時因為jdk1.5剛剛出來,註解開發並未盛行,因此一切Spring配置都是xml格式,想象一下所有的bean都用xml配置,細思極恐啊,心疼那個時候的程式設計師2秒
-
Spring2.0時代
Spring引入了註解開發,但是因為並不完善,因此並未完全替代xml,此時的程式設計師往往是把xml與註解進行結合,貌似我們之前都是這種方式。
-
Spring3.0及以後
3.0以後Spring的註解已經非常完善了,因此Spring推薦大家使用完全的java配置來代替以前的xml,不過似乎在國內並未推廣盛行。然後當SpringBoot來臨,人們才慢慢認識到java配置的優雅。
有句古話說的好:擁抱變化,擁抱未來。所以我們也應該順應時代潮流,做時尚的弄潮兒,一起來學習下java配置的玩法。
3.2.嘗試java配置
java配置主要靠java類和一些註解來達到和xml配置一樣的效果,比較常用的註解有:
@Configuration:宣告一個類作為配置類,代替xml檔案@Bean:宣告在方法上,將方法的返回值加入Bean容器,代替<bean>標籤@Value:屬性注入@PropertySource:指定外部屬性檔案。
我們接下來用java配置來嘗試實現連線池配置
3.2.1.引入依賴
首先在pom.xml中,引入Druid連線池依賴:
<dependency>
    <groupId>com.github.drtrang</groupId>
    <artifactId>druid-spring-boot2-starter</artifactId>
    <version>1.1.10</version>
</dependency>
3.2.2.新增jdbc.properties
jdbc.driverClassName=com.mysql.jdbc.Driver
jdbc.url=jdbc:mysql://127.0.0.1:3306/leyou
jdbc.username=root
jdbc.password=root
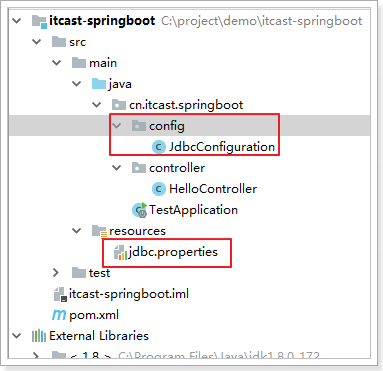
3.2.3.配置資料來源
建立JdbcConfiguration類:
@Configuration
@PropertySource("classpath:jdbc.properties")
public class JdbcConfiguration {

    @Value("${jdbc.url}")
    String url;
    @Value("${jdbc.driverClassName}")
    String driverClassName;
    @Value("${jdbc.username}")
    String username;
    @Value("${jdbc.password}")
    String password;

    @Bean
    public DataSource dataSource() {
        DruidDataSource dataSource = new DruidDataSource();
        dataSource.setUrl(url);
        dataSource.setDriverClassName(driverClassName);
        dataSource.setUsername(username);
        dataSource.setPassword(password);
        return dataSource;
    }
}
解讀:
@Configuration:宣告JdbcConfiguration是一個配置類。@PropertySource:指定屬性檔案的路徑是:classpath:jdbc.properties- 通過
@Value為屬性注入值。 - 通過@Bean將
dataSource()方法宣告為一個註冊Bean的方法,Spring會自動呼叫該方法,將方法的返回值加入Spring容器中。相當於以前的bean標籤
然後就可以在任意位置通過@Autowired注入DataSource了!
3.2.4.測試
我們在HelloController中測試:
@RestController
public class HelloController {

    @Autowired
    private DataSource dataSource;

    @GetMapping("show")
    public String test(){
        return "hello Spring Boot!";
    }

}
在test方法中打一個斷點,然後Debug執行並檢視:
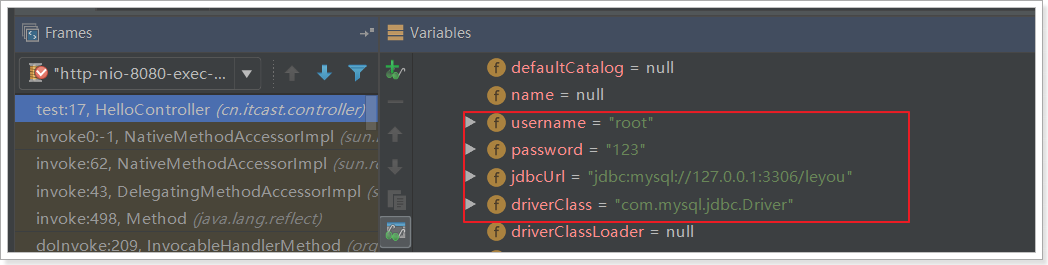
屬性注入成功了!
3.3.SpringBoot的屬性注入
在上面的案例中,我們實驗了java配置方式。不過屬性注入使用的是@Value註解。這種方式雖然可行,但是不夠強大,因為它只能注入基本型別值。
在SpringBoot中,提供了一種新的屬性注入方式,支援各種java基本資料型別及複雜型別的注入。
1)新建JdbcProperties,用來進行屬性注入:
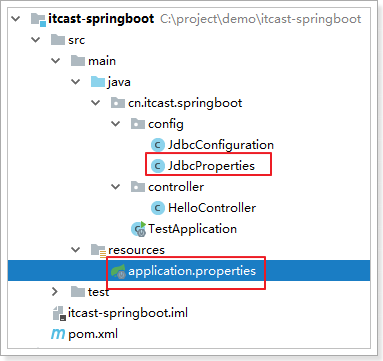
程式碼:
@ConfigurationProperties(prefix = "jdbc")
public class JdbcProperties {
    private String url;
    private String driverClassName;
    private String username;
    private String password;
    // ... 略
    // getters 和 setters
}
-
在類上通過@ConfigurationProperties註解宣告當前類為屬性讀取類
-
prefix="jdbc"讀取屬性檔案中,字首為jdbc的值。 -
在類上定義各個屬性,名稱必須與屬性檔案中
jdbc.後面部分一致,並且必須具有getter和setter方法 -
需要注意的是,這裡我們並沒有指定屬性檔案的地址,SpringBoot預設會讀取檔名為application.properties的資原始檔,所以我們把jdbc.properties名稱改為application.properties
2)在JdbcConfiguration中使用這個屬性:
-
通過
@EnableConfigurationProperties(JdbcProperties.class)來宣告要使用JdbcProperties這個類的物件 -
然後你可以通過以下方式在JdbcConfiguration類中注入JdbcProperties:
- @Autowired注入
@Configuration @EnableConfigurationProperties(JdbcProperties.class) public class JdbcConfiguration { @Autowired private JdbcProperties jdbcProperties; @Bean public DataSource dataSource() { DruidDataSource dataSource = new DruidDataSource(); dataSource.setUrl(jdbcProperties.getUrl()); dataSource.setDriverClassName(jdbcProperties.getDriverClassName()); dataSource.setUsername(jdbcProperties.getUsername()); dataSource.setPassword(jdbcProperties.getPassword()); return dataSource; } }- 建構函式注入
@Configuration @EnableConfigurationProperties(JdbcProperties.class) public class JdbcConfiguration { private JdbcProperties jdbcProperties; public JdbcConfiguration(JdbcProperties jdbcProperties){ this.jdbcProperties = jdbcProperties; } @Bean public DataSource dataSource() { // 略 } }- @Bean方法的引數注入
@Configuration
@EnableConfigurationProperties(JdbcProperties.class)
public class JdbcConfiguration {

    @Bean
    public DataSource dataSource(JdbcProperties jdbcProperties) {
        // ...
    }
}
本例中,我們採用第三種方式。
3)測試結果:
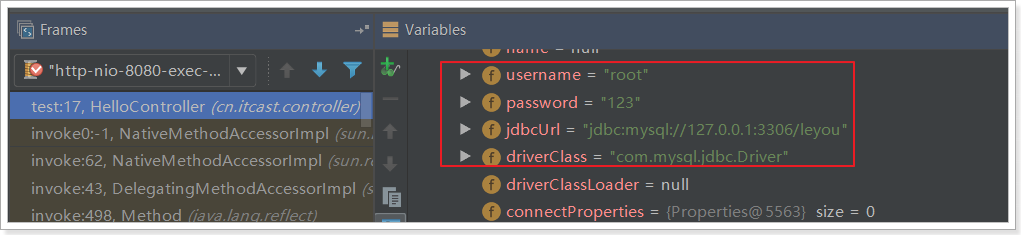
大家會覺得這種方式似乎更麻煩了,事實上這種方式有更強大的功能,也是SpringBoot推薦的注入方式。兩者對比關係:
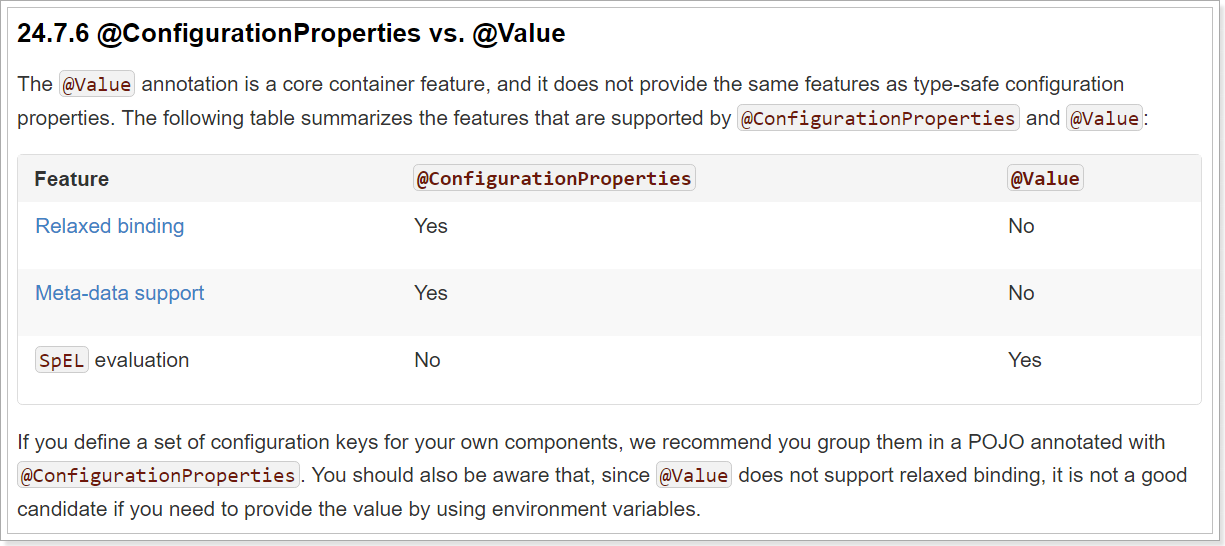
優勢:
-
Relaxed binding:鬆散繫結
- 不嚴格要求屬性檔案中的屬性名與成員變數名一致。支援駝峰,中劃線,下劃線等等轉換,甚至支援物件引導。比如:user.friend.name:代表的是user物件中的friend屬性中的name屬性,顯然friend也是物件。@value註解就難以完成這樣的注入方式。
- meta-data support:後設資料支援,幫助IDE生成屬性提示(寫開源框架會用到)。
3.4.更優雅的注入
事實上,如果一段屬性只有一個Bean需要使用,我們無需將其注入到一個類(JdbcProperties)中。而是直接在需要的地方宣告即可:
@Configuration
public class JdbcConfiguration {

    @Bean
    // 宣告要注入的屬性字首,SpringBoot會自動把相關屬性通過set方法注入到DataSource中
    @ConfigurationProperties(prefix = "jdbc")
    public DataSource dataSource() {
        DruidDataSource dataSource = new DruidDataSource();
        return dataSource;
    }
}
我們直接把@ConfigurationProperties(prefix = "jdbc")宣告在需要使用的@Bean的方法上,然後SpringBoot就會自動呼叫這個Bean(此處是DataSource)的set方法,然後完成注入。使用的前提是:該類必須有對應屬性的set方法!
我們將jdbc的url改成:/heima,再次測試:

3.5.SpringBoot中的預設配置
通過剛才的學習,我們知道@EnableAutoConfiguration會開啟SpringBoot的自動配置,並且根據你引入的依賴來生效對應的預設配置。那麼問題來了:
- 這些預設配置是怎麼配置的,在哪裡配置的呢?
- 為何依賴引入就會觸發配置呢?
- 這些預設配置的屬性來自哪裡呢?
其實在我們的專案中,已經引入了一個依賴:spring-boot-autoconfigure,其中定義了大量自動配置類:
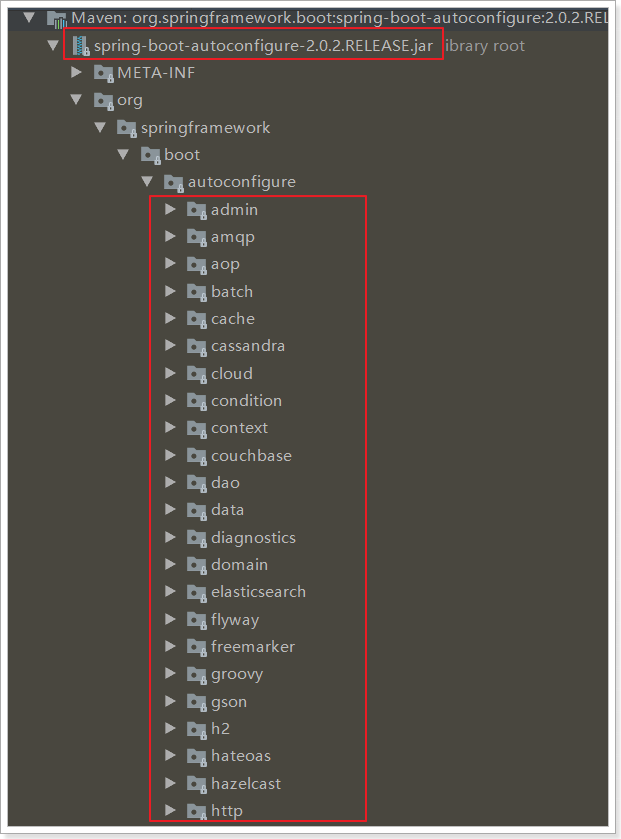
還有:
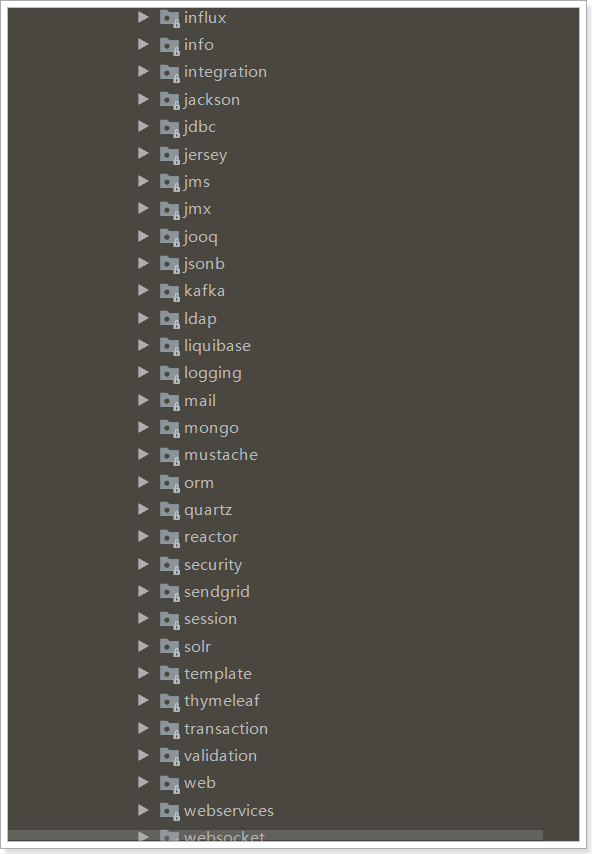
非常多,幾乎涵蓋了現在主流的開源框架,例如:
- redis
- jms
- amqp
- jdbc
- jackson
- mongodb
- jpa
- solr
- elasticsearch
... 等等
我們來看一個我們熟悉的,例如SpringMVC,檢視mvc 的自動配置類:
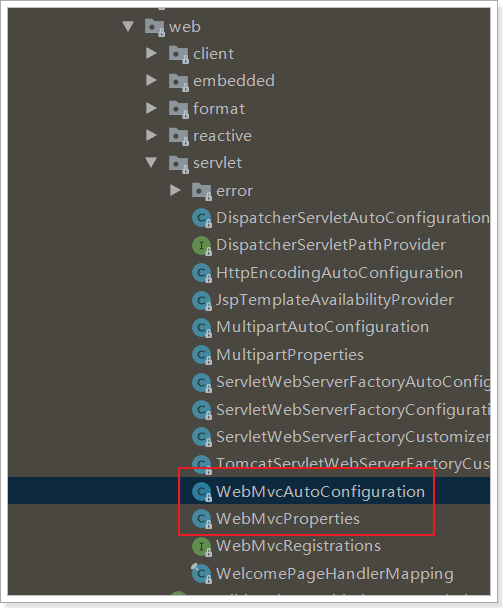
開啟WebMvcAutoConfiguration:
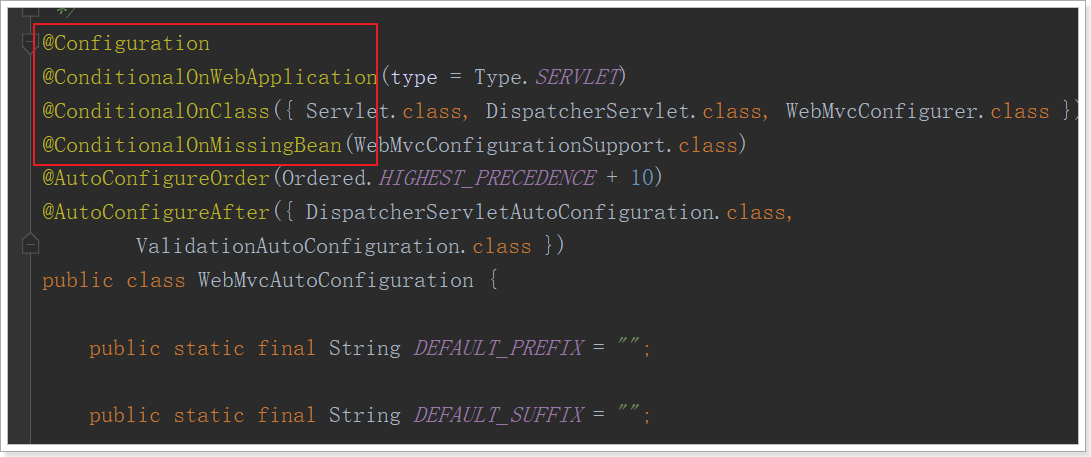
我們看到這個類上的4個註解:
-
@Configuration:宣告這個類是一個配置類 -
@ConditionalOnWebApplication(type = Type.SERVLET)ConditionalOn,翻譯就是在某個條件下,此處就是滿足專案的類是是Type.SERVLET型別,也就是一個普通web工程,顯然我們就是
-
@ConditionalOnClass({ Servlet.class, DispatcherServlet.class, WebMvcConfigurer.class })這裡的條件是OnClass,也就是滿足以下類存在:Servlet、DispatcherServlet、WebMvcConfigurer,其中Servlet只要引入了tomcat依賴自然會有,後兩個需要引入SpringMVC才會有。這裡就是判斷你是否引入了相關依賴,引入依賴後該條件成立,當前類的配置才會生效!
-
@ConditionalOnMissingBean(WebMvcConfigurationSupport.class)這個條件與上面不同,OnMissingBean,是說環境中沒有指定的Bean這個才生效。其實這就是自定義配置的入口,也就是說,如果我們自己配置了一個WebMVCConfigurationSupport的類,那麼這個預設配置就會失效!
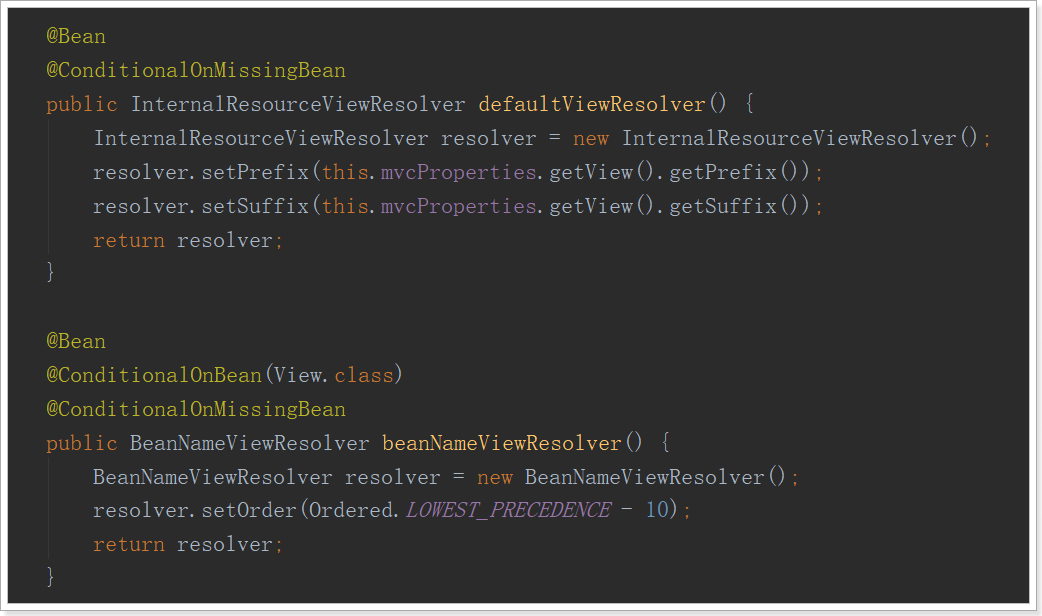
接著,我們檢視該類中定義了什麼:
檢視解析器:
處理器介面卡(HandlerAdapter):

還有很多,這裡就不一一截圖了。
另外,這些預設配置的屬性來自哪裡呢?
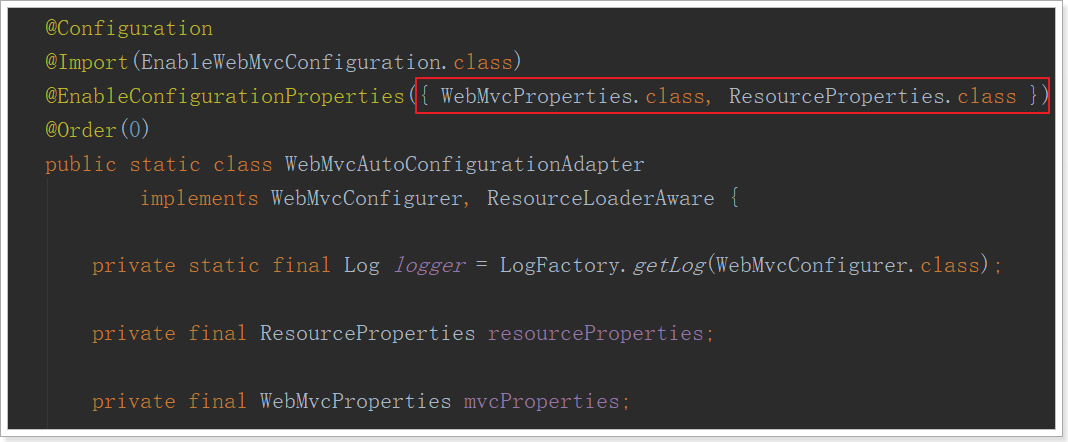
我們看到,這裡通過@EnableAutoConfiguration註解引入了兩個屬性:WebMvcProperties和ResourceProperties。
我們檢視這兩個屬性類:
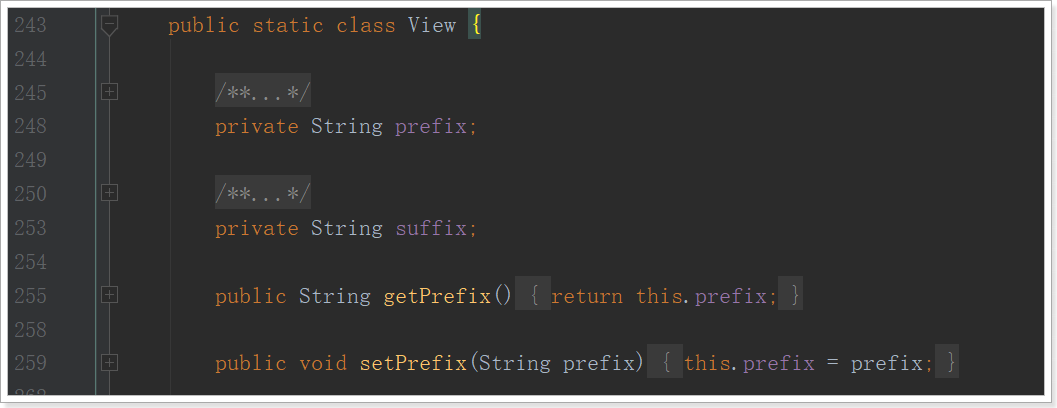
找到了內部資源檢視解析器的prefix和suffix屬性。
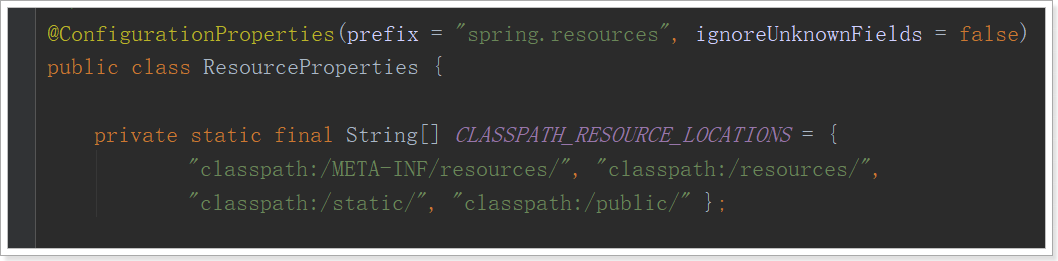
ResourceProperties中主要定義了靜態資源(.js,.html,.css等)的路徑:
如果我們要覆蓋這些預設屬性,只需要在application.properties中定義與其字首prefix和欄位名一致的屬性即可。
3.6.總結
SpringBoot為我們提供了預設配置,而預設配置生效的條件一般有兩個:
- 你引入了相關依賴
- 你自己沒有配置
1)啟動器
之所以,我們如果不想配置,只需要引入依賴即可,而依賴版本我們也不用操心,因為只要引入了SpringBoot提供的stater(啟動器),就會自動管理依賴及版本了。
因此,玩SpringBoot的第一件事情,就是找啟動器,SpringBoot提供了大量的預設啟動器,參考SpringBoot啟動器
2)全域性配置
另外,SpringBoot的預設配置,都會讀取預設屬性,而這些屬性可以通過自定義application.properties檔案來進行覆蓋。這樣雖然使用的還是預設配置,但是配置中的值改成了我們自定義的。
因此,玩SpringBoot的第二件事情,就是通過application.properties來覆蓋預設屬性值,形成自定義配置。我們需要知道SpringBoot的預設屬性key,非常多,參考SpringBoot全域性屬性
4.SpringBoot實戰
接下來,我們來看看如何用SpringBoot來玩轉以前的SSM,我們使用資料庫tb_user和實體類User

4.1.建立工程
4.2.編寫基本程式碼
pom.xml:
<?xml version="1.0" encoding="UTF-8"?>
<project xmlns="http://maven.apache.org/POM/4.0.0"
         xmlns:xsi="http://www.w3.org/2001/XMLSchema-instance"
         xsi:schemaLocation="http://maven.apache.org/POM/4.0.0 http://maven.apache.org/xsd/maven-4.0.0.xsd">

    <modelVersion>4.0.0</modelVersion>

    <groupId>cn.itcast.user</groupId>
    <artifactId>itcast-user</artifactId>
    <version>1.0-SNAPSHOT</version>

    <parent>
        <groupId>org.springframework.boot</groupId>
        <artifactId>spring-boot-starter-parent</artifactId>
        <version>2.0.6.RELEASE</version>
    </parent>

    <dependencies>
        <dependency>
            <groupId>org.springframework.boot</groupId>
            <artifactId>spring-boot-starter-web</artifactId>
        </dependency>
    </dependencies>

</project>
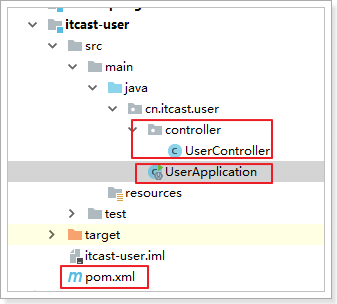
參照上邊的專案,編寫引導類:
@SpringBootApplication
public class UserApplication {

    public static void main(String[] args) {
        SpringApplication.run(UserApplication.class);
    }
}
編寫UserController:
@RestController
@RequestMapping("user")
public class UserController {

    @GetMapping("hello")
    public String test(){
        return "hello ssm";
    }
}
4.3.整合SpringMVC
雖然預設配置已經可以使用SpringMVC了,不過我們有時候需要進行自定義配置。
4.3.1.修改埠
新增全域性配置檔案:application.properties
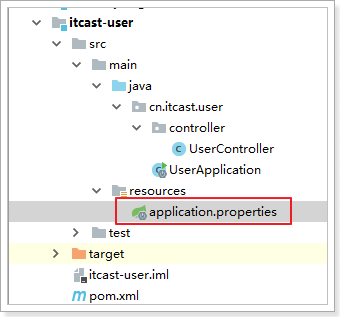
埠通過以下方式配置

# 對映埠
server.port=80
重啟服務後測試:

4.3.2.訪問靜態資源
現在,我們的專案是一個jar工程,那麼就沒有webapp,我們的靜態資源該放哪裡呢?
回顧我們上面看的原始碼,有一個叫做ResourceProperties的類,裡面就定義了靜態資源的預設查詢路徑:

預設的靜態資源路徑為:
- classpath:/META-INF/resources/
- classpath:/resources/
- classpath:/static/
- classpath:/public/
只要靜態資源放在這些目錄中任何一個,SpringMVC都會幫我們處理。
我們習慣會把靜態資源放在classpath:/static/目錄下。我們建立目錄,並且新增一些靜態資源:

重啟專案後測試:

4.3.3.新增攔截器
攔截器也是我們經常需要使用的,在SpringBoot中該如何配置呢?
攔截器不是一個普通屬性,而是一個類,所以就要用到java配置方式了。在SpringBoot官方文件中有這麼一段說明:
If you want to keep Spring Boot MVC features and you want to add additional MVC configuration (interceptors, formatters, view controllers, and other features), you can add your own
@Configurationclass of typeWebMvcConfigurerbut without@EnableWebMvc. If you wish to provide custom instances ofRequestMappingHandlerMapping,RequestMappingHandlerAdapter, orExceptionHandlerExceptionResolver, you can declare aWebMvcRegistrationsAdapterinstance to provide such components.If you want to take complete control of Spring MVC, you can add your own
@Configurationannotated with@EnableWebMvc.
翻譯:
如果你想要保持Spring Boot 的一些預設MVC特徵,同時又想自定義一些MVC配置(包括:攔截器,格式化器, 檢視控制器、訊息轉換器 等等),你應該讓一個類實現
WebMvcConfigurer,並且新增@Configuration註解,但是千萬不要加@EnableWebMvc註解。如果你想要自定義HandlerMapping、HandlerAdapter、ExceptionResolver等元件,你可以建立一個WebMvcRegistrationsAdapter例項 來提供以上元件。如果你想要完全自定義SpringMVC,不保留SpringBoot提供的一切特徵,你可以自己定義類並且新增
@Configuration註解和@EnableWebMvc註解
總結:通過實現WebMvcConfigurer並新增@Configuration註解來實現自定義部分SpringMvc配置。
實現如下:
首先我們定義一個攔截器:
@Component
public class MyInterceptor implements HandlerInterceptor {
    @Override
    public boolean preHandle(HttpServletRequest request, HttpServletResponse response, Object handler) throws Exception {
        System.out.println("preHandle method is running!");
        return true;
    }

    @Override
    public void postHandle(HttpServletRequest request, HttpServletResponse response, Object handler, ModelAndView modelAndView) throws Exception {
        System.out.println("postHandle method is running!");
    }

    @Override
    public void afterCompletion(HttpServletRequest request, HttpServletResponse response, Object handler, Exception ex) throws Exception {
        System.out.println("afterCompletion method is running!");
    }
}
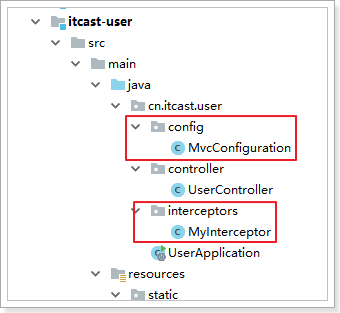
然後定義配置類,註冊攔截器:
@Configuration
public class MvcConfiguration implements WebMvcConfigurer {

    @Autowired
    private HandlerInterceptor myInterceptor;

    /**
     * 重寫介面中的addInterceptors方法,新增自定義攔截器
     * @param registry
     */
    @Override
    public void addInterceptors(InterceptorRegistry registry) {
        registry.addInterceptor(myInterceptor).addPathPatterns("/**");
    }
}
接下來執行並檢視日誌:
preHandle method is running!
postHandle method is running!
afterCompletion method is running!
你會發現日誌中只有這些列印資訊,springMVC的日誌資訊都沒有,因為springMVC記錄的log級別是debug,springboot預設是顯示info以上,我們需要進行配置。
SpringBoot通過logging.level.*=debug來配置日誌級別,*填寫包名
# 設定org.springframework包的日誌級別為debug
logging.level.org.springframework=debug
再次執行檢視:

4.4.整合連線池
jdbc連線池是spring配置中的重要一環,在SpringBoot中該如何處理呢?
答案是不需要處理,我們只要找到SpringBoot提供的啟動器即可:

在pom.xml中引入jdbc的啟動器:
<!--jdbc的啟動器,預設使用HikariCP連線池-->
<dependency>
    <groupId>org.springframework.boot</groupId>
    <artifactId>spring-boot-starter-jdbc</artifactId>
</dependency>
<!--不要忘記資料庫驅動,因為springboot不知道我們使用的什麼資料庫,這裡選擇mysql-->
<dependency>
    <groupId>mysql</groupId>
    <artifactId>mysql-connector-java</artifactId>
</dependency>
SpringBoot已經自動幫我們引入了一個連線池:

HikariCP應該是目前速度最快的連線池了,我們看看它與c3p0的對比:
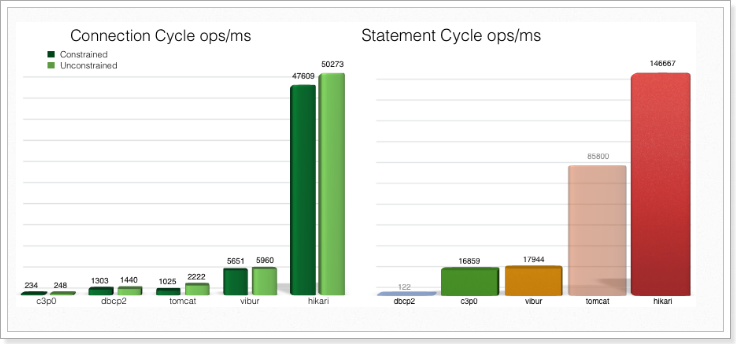
因此,我們只需要指定連線池引數即可:
# 連線四大引數
spring.datasource.url=jdbc:mysql://localhost:3306/heima
spring.datasource.username=root
spring.datasource.password=root
# 可省略,SpringBoot自動推斷
spring.datasource.driverClassName=com.mysql.jdbc.Driver

spring.datasource.hikari.idle-timeout=60000
spring.datasource.hikari.maximum-pool-size=30
spring.datasource.hikari.minimum-idle=10
當然,如果你更喜歡Druid連線池,也可以使用Druid官方提供的啟動器:
<!-- Druid連線池 -->
<dependency>
    <groupId>com.alibaba</groupId>
    <artifactId>druid-spring-boot-starter</artifactId>
    <version>1.1.6</version>
</dependency>
而連線資訊的配置與上面是類似的,只不過在連線池特有屬性上,方式略有不同:
#初始化連線數
spring.datasource.druid.initial-size=1
#最小空閒連線
spring.datasource.druid.min-idle=1
#最大活動連線
spring.datasource.druid.max-active=20
#獲取連線時測試是否可用
spring.datasource.druid.test-on-borrow=true
#監控頁面啟動
spring.datasource.druid.stat-view-servlet.allow=true
4.5.整合mybatis
4.5.1.mybatis
SpringBoot官方並沒有提供Mybatis的啟動器,不過Mybatis官方自己實現了:
<!--mybatis -->
<dependency>
    <groupId>org.mybatis.spring.boot</groupId>
    <artifactId>mybatis-spring-boot-starter</artifactId>
    <version>1.3.2</version>
</dependency>
配置,基本沒有需要配置的:
# mybatis 別名掃描
mybatis.type-aliases-package=cn.itcast.pojo
# mapper.xml檔案位置,如果沒有對映檔案,請註釋掉
mybatis.mapper-locations=classpath:mappers/*.xml
需要注意,這裡沒有配置mapper介面掃描包,因此我們需要給每一個Mapper介面新增@Mapper註解,才能被識別。
@Mapper
public interface UserMapper {
}
user物件:
@Table(name = "tb_user")
public class User {
    @Id
    @GeneratedValue(strategy = GenerationType.IDENTITY)
    private Long id;

    private String userName;

    private String password;

    private String name;

    private Integer age;

    private Integer sex;

    private Date birthday;

    private Date created;

    private Date updated;

    //getter and setter 省略...
}
接下來,就去整合通用mapper。
4.5.2.通用mapper
通用Mapper的作者也為自己的外掛編寫了啟動器,我們直接引入即可:
<!-- 通用mapper -->
<dependency>
    <groupId>tk.mybatis</groupId>
    <artifactId>mapper-spring-boot-starter</artifactId>
    <version>2.0.2</version>
</dependency>
不需要做任何配置就可以使用了。
@Mapper
public interface UserMapper extends tk.mybatis.mapper.common.Mapper<User>{
}
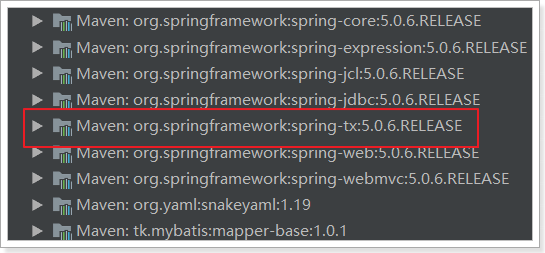
4.6.整合事務
其實,我們引入jdbc或者web的啟動器,就已經引入事務相關的依賴及預設配置了
至於事務,SpringBoot中通過註解來控制。就是我們熟知的@Transactional
@Service
public class UserService {

    @Autowired
    private UserMapper userMapper;

    public User queryById(Long id){
        return this.userMapper.selectByPrimaryKey(id);
    }

    @Transactional
    public void deleteById(Long id){
        this.userMapper.deleteByPrimaryKey(id);
    }
}
4.7.啟動測試
在UserController中新增測試方法,內容:
@RestController
@RequestMapping("user")
public class UserController {

    @Autowired
    private UserService userService;

    @GetMapping("{id}")
    public User queryUserById(@PathVariable("id")Long id){
        return this.userService.queryById(id);
    }

    @GetMapping("hello")
    public String test(){
        return "hello ssm";
    }
}
我們啟動專案,檢視:
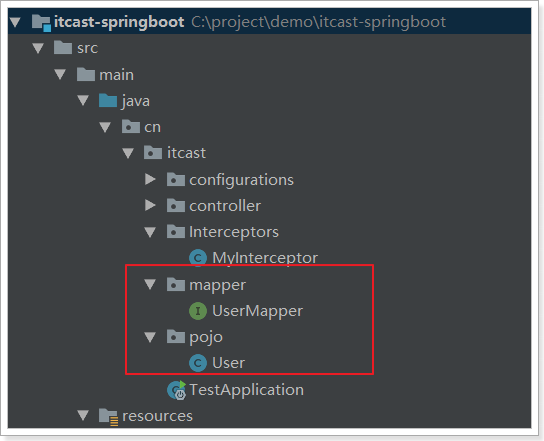
4.8.完整專案結構

完整的pom.xml:
<?xml version="1.0" encoding="UTF-8"?>
<project xmlns="http://maven.apache.org/POM/4.0.0"
         xmlns:xsi="http://www.w3.org/2001/XMLSchema-instance"
         xsi:schemaLocation="http://maven.apache.org/POM/4.0.0 http://maven.apache.org/xsd/maven-4.0.0.xsd">

    <modelVersion>4.0.0</modelVersion>

    <groupId>cn.itcast.user</groupId>
    <artifactId>itcast-user</artifactId>
    <version>1.0-SNAPSHOT</version>

    <parent>
        <groupId>org.springframework.boot</groupId>
        <artifactId>spring-boot-starter-parent</artifactId>
        <version>2.0.6.RELEASE</version>
    </parent>

    <dependencies>
        <dependency>
            <groupId>org.springframework.boot</groupId>
            <artifactId>spring-boot-starter-web</artifactId>
        </dependency>
        <!--jdbc的啟動器,預設使用HikariCP連線池-->
        <dependency>
            <groupId>org.springframework.boot</groupId>
            <artifactId>spring-boot-starter-jdbc</artifactId>
        </dependency>
        <!--不要忘記資料庫驅動,因為springboot不知道我們使用的什麼資料庫,這裡選擇mysql-->
        <dependency>
            <groupId>mysql</groupId>
            <artifactId>mysql-connector-java</artifactId>
        </dependency>

        <!--mybatis -->
        <dependency>
            <groupId>org.mybatis.spring.boot</groupId>
            <artifactId>mybatis-spring-boot-starter</artifactId>
            <version>1.3.2</version>
        </dependency>

        <!-- 通用mapper -->
        <dependency>
            <groupId>tk.mybatis</groupId>
            <artifactId>mapper-spring-boot-starter</artifactId>
            <version>2.0.2</version>
        </dependency>
    </dependencies>

</project>
完整的application.properties:
server.port=80

logging.level.org.springframework=debug

spring.datasource.url=jdbc:mysql://localhost:3306/heima
spring.datasource.username=root
spring.datasource.password=root

# mybatis 別名掃描
mybatis.type-aliases-package=cn.itcast.pojo
# mapper.xml檔案位置,如果沒有對映檔案,請註釋掉
# mybatis.mapper-locations=classpath:mappers/*.xml
5.Thymeleaf快速入門
SpringBoot並不推薦使用jsp,但是支援一些模板引擎技術:
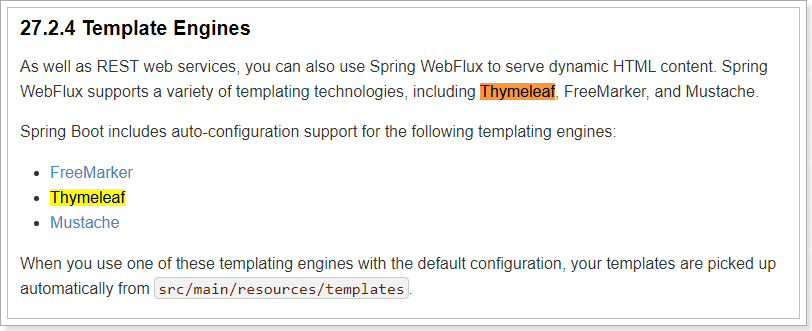
以前大家用的比較多的是Freemarker,但是我們今天的主角是Thymeleaf!
5.1.為什麼是Thymeleaf?
簡單說, Thymeleaf 是一個跟 Velocity、FreeMarker 類似的模板引擎,它可以完全替代 JSP 。相較於其他的模板引擎,它有如下四個極吸引人的特點:
- 動靜結合:Thymeleaf 在有網路和無網路的環境下皆可執行,即它可以讓美工在瀏覽器檢視頁面的靜態效果,也可以讓程式設計師在伺服器檢視帶資料的動態頁面效果。這是由於它支援 html 原型,然後在 html 標籤裡增加額外的屬性來達到模板+資料的展示方式。瀏覽器解釋 html 時會忽略未定義的標籤屬性,所以 thymeleaf 的模板可以靜態地執行;當有資料返回到頁面時,Thymeleaf 標籤會動態地替換掉靜態內容,使頁面動態顯示。
- 開箱即用:它提供標準和spring標準兩種方言,可以直接套用模板實現JSTL、 OGNL表示式效果,避免每天套模板、改jstl、改標籤的困擾。同時開發人員也可以擴充套件和建立自定義的方言。
- 多方言支援:Thymeleaf 提供spring標準方言和一個與 SpringMVC 完美整合的可選模組,可以快速的實現表單繫結、屬性編輯器、國際化等功能。
- 與SpringBoot完美整合,SpringBoot提供了Thymeleaf的預設配置,並且為Thymeleaf設定了檢視解析器,我們可以像以前操作jsp一樣來操作Thymeleaf。程式碼幾乎沒有任何區別,就是在模板語法上有區別。
接下來,我們就通過入門案例來體會Thymeleaf的魅力:
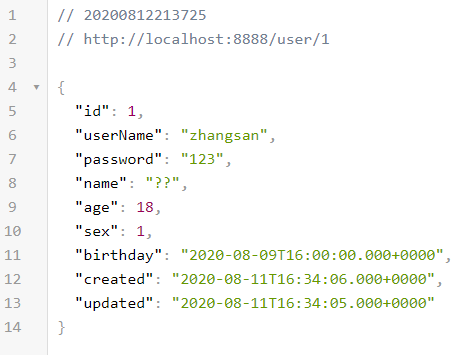
5.2.提供資料
編寫一個controller方法,返回一些使用者資料,放入模型中,將來在頁面渲染
@GetMapping("/all")
public String all(ModelMap model) {
    // 查詢使用者
    List<User> users = this.userService.queryAll();
    // 放入模型
    model.addAttribute("users", users);
    // 返回模板名稱(就是classpath:/templates/目錄下的html檔名)
    return "users";
}
5.3.引入啟動器
直接引入啟動器:
<dependency>
    <groupId>org.springframework.boot</groupId>
    <artifactId>spring-boot-starter-thymeleaf</artifactId>
</dependency>
SpringBoot會自動為Thymeleaf註冊一個檢視解析器:

與解析JSP的InternalViewResolver類似,Thymeleaf也會根據字首和字尾來確定模板檔案的位置:

- 預設字首:
classpath:/templates/ - 預設字尾:
.html
所以如果我們返回檢視:users,會指向到 classpath:/templates/users.html
一般我們無需進行修改,預設即可。
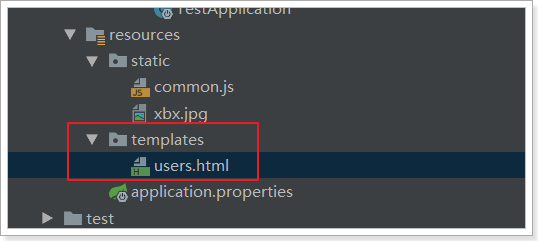
5.4.靜態頁面
根據上面的文件介紹,模板預設放在classpath下的templates資料夾,我們新建一個html檔案放入其中:
編寫html模板,渲染模型中的資料:
注意,把html 的名稱空間,改成:xmlns:th="http://www.thymeleaf.org" 會有語法提示
<!DOCTYPE html>
<html xmlns:th="http://www.thymeleaf.org">
<head>
    <meta charset="UTF-8">
    <title>首頁</title>
    <style type="text/css">
        table {border-collapse: collapse; font-size: 14px; width: 80%; margin: auto}
        table, th, td {border: 1px solid darkslategray;padding: 10px}
    </style>
</head>
<body>
<div style="text-align: center">
    <span style="color: darkslategray; font-size: 30px">歡迎光臨!</span>
    <hr/>
    <table class="list">
        <tr>
            <th>id</th>
            <th>姓名</th>
            <th>使用者名稱</th>
            <th>年齡</th>
            <th>性別</th>
            <th>生日</th>
        </tr>
        <tr th:each="user : ${users}">
            <td th:text="${user.id}">1</td>
            <td th:text="${user.name}">張三</td>
            <td th:text="${user.userName}">zhangsan</td>
            <td th:text="${user.age}">20</td>
            <td th:text="${user.sex}">男</td>
            <td th:text="${user.birthday}">1980-02-30</td>
        </tr>
    </table>
</div>
</body>
</html>
我們看到這裡使用了以下語法:
${}:這個類似與el表示式,但其實是ognl的語法,比el表示式更加強大th-指令:th-是利用了Html5中的自定義屬性來實現的。如果不支援H5,可以用data-th-來代替th:each:類似於c:foreach遍歷集合,但是語法更加簡潔th:text:宣告標籤中的文字- 例如
<td th-text='${user.id}'>1</td>,如果user.id有值,會覆蓋預設的1 - 如果沒有值,則會顯示td中預設的1。這正是thymeleaf能夠動靜結合的原因,模板解析失敗不影響頁面的顯示效果,因為會顯示預設值!
- 例如
5.5.測試
接下來,我們開啟頁面測試一下:

5.6.模板快取
Thymeleaf會在第一次對模板解析之後進行快取,極大的提高了併發處理能力。但是這給我們開發帶來了不便,修改頁面後並不會立刻看到效果,我們開發階段可以關掉快取使用:
# 開發階段關閉thymeleaf的模板快取
spring.thymeleaf.cache=false
注意:
在Idea中,我們需要在修改頁面後按快捷鍵:`Ctrl + Shift + F9` 對專案進行rebuild才可以。

eclipse中沒有測試過。
我們可以修改頁面,測試一下。