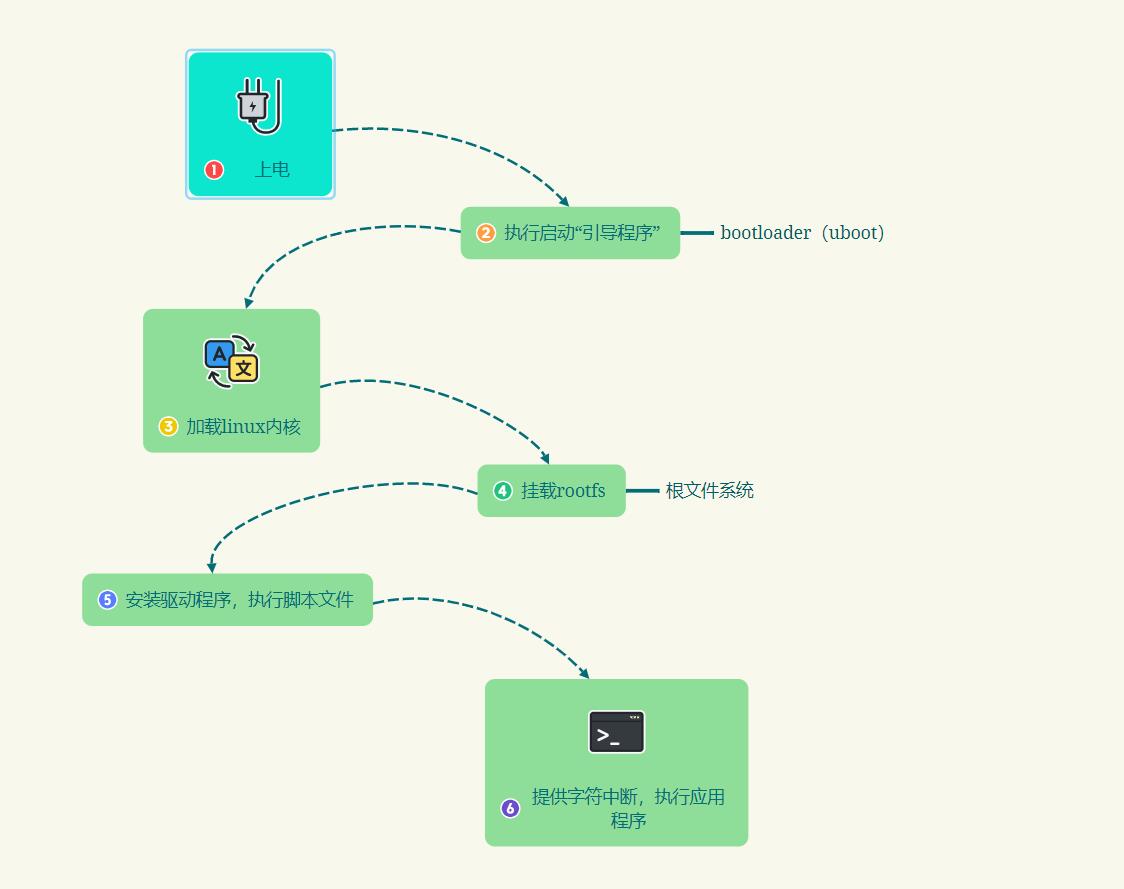
linux系統啟動過程

myownstars發表於2013-01-30

Linux啟動過程,大致可分為3

1步載入BIOS並讀取MBR以引導啟動kernel;第2步執行init啟動各項服務,包括/etc/rc.d/rc.sysinit以及/etc/modprobe.conf等;第3步執行/bin/login等候使用者登入


載入kernel

1載入BIOS硬體資訊

2讀取第一個啟動裝置的MBR的引導載入程式(lilo/grub/spfdisk)

3載入kernel並解壓縮,嘗試驅動所有硬體裝置

主機啟動後第一個讀取的地方就是BIOS,其記錄了各種硬體資訊,系統根據這些資訊進行加電自檢,成功後開始讀取MBR;

MBR包含引導載入程式以便將OS kernel讀入記憶體,對於linux常見的有lilogrub,而kernel位於/boot目錄,

$ strings /boot/vmlinuz-2.6.9-67.EL | head -5

Direct booting from floppy is no longer supported.

Please use a boot loader program instead.

Remove disk and press any key to reboot . . .

.HdrS

ZZuD


執行init

4執行init程式,並由init執行/etc/rc.d/rc.sysinit

5啟動外掛模組/etc/modprobe.conf

6執行各個批處理檔案

7執行/etc/rc.d/rc.local


載入完kernel後,第一個執行的程式為/sbin/init(pid1),而其需要讀取/etc/inittab獲取具體配置資訊

$ ps aux | head -10

USER       PID %CPU %MEM   VSZ  RSS TTY      STAT START   TIME COMMAND

root         1  0.0  0.0  4756  516 ?        S     2012   0:19 init [3]        

root         2  0.0  0.0     0    0 ?        S     2012   0:22 [migration/0]

root         3  0.0  0.0     0    0 ?        SN    2012   0:00 [ksoftirqd/0]

root         4  0.0  0.0     0    0 ?        S     2012   0:18 [migration/1]

root         5  0.0  0.0     0    0 ?        SN    2012   0:00 [ksoftirqd/1]

root         6  0.0  0.0     0    0 ?        S     2012   0:18 [migration/2]

root         7  0.0  0.0     0    0 ?        SN    2012   0:00 [ksoftirqd/2]

root         8  0.0  0.0     0    0 ?        S     2012   0:15 [migration/3]

root         9  0.0  0.0     0    0 ?        SN    2012   0:00 [ksoftirqd/3]

首先獲取預設執行等級,然後執行sysinit初始化各種配置,接著依次啟動系統服務和使用者自定義服務,最後開啟終端等待使用者登入

$ more /etc/inittab

id:3:initdefault:      

# System initialization.

si::sysinit:/etc/rc.d/rc.sysinit

sysinit做的工作比較多,按照順序主要如下:

獲取網路環境和主機型別,讀取/etc/sysconfig/network

載入/proc以及USB裝置/sys

檢測介面裝置和PnP,根據kernel啟動時檢測的結果(/proc/sys/kernel/modprobe)進行IDE/SCSI/網路等裝置的檢測;

載入自定義模組,/etc/sysconfig/modules/*.modules;

載入kernel相關設定,/etc/sysctl.conf

設定系統時間clock;

設定RAID/LVM

呼叫fsck檢測磁碟檔案系統;

以可讀取模式過載系統磁碟;

清除啟動時產生的臨時檔案;

將相關啟動資訊寫入/var/log/dmesg


執行完sysinit後接下來要啟動各項系統服務,根據如下配置,決定了/etc/rc.d/rcN.d包含程式的執行等級,而這些程式全是指向/etc/rc.d/init.d的軟連結

$ more /etc/inittab

l0:0:wait:/etc/rc.d/rc 0

l1:1:wait:/etc/rc.d/rc 1

l2:2:wait:/etc/rc.d/rc 2

l3:3:wait:/etc/rc.d/rc 3

l4:4:wait:/etc/rc.d/rc 4

l5:5:wait:/etc/rc.d/rc 5

l6:6:wait:/etc/rc.d/rc 6


接下來啟動使用者自定義服務/etc/rc.d/rc.local,也就是說如果使用者想新增隨OS自動啟動的服務,需要配置該檔案

$ more /etc/rc.d/rc.local

#!/bin/sh

#

# This script. will be executed *after* all the other init scripts.

# You can put your own initialization stuff in here if you don't

# want to do the full Sys V style. init stuff.


touch /var/lock/subsys/local


啟動終端


8 執行/bin/login,等待使用者登入

9 登入後以shell控制主機


接下來啟動終端或X-window介面等待使用者登入

$ more /etc/inittab

# Run gettys in standard runlevels

1:2345:respawn:/sbin/mingetty tty1

2:2345:respawn:/sbin/mingetty tty2

3:2345:respawn:/sbin/mingetty tty3

4:2345:respawn:/sbin/mingetty tty4

5:2345:respawn:/sbin/mingetty tty5

6:2345:respawn:/sbin/mingetty tty6


# Run xdm in runlevel 5

x:5:respawn:/etc/X11/prefdm -nodaemon


注:/etc/inittab中的wait表示需執行完該命令才能進行下一步,而respawn表示關閉後會自動重其;


/etc/init.d/sysinit總共約1000行,透過sh -x除錯

首先讀取network資訊,然後載入/proc/sys

    18  if [ -f /etc/sysconfig/network ]; then

    19      . /etc/sysconfig/network

20  fi

    26  mount -n -t proc /proc /proc

    27  [ -d /proc/bus/usb ] && mount -n -t usbfs /proc/bus/usb /proc/bus/usb

    28  mount -n -t sysfs /sys /sys >/dev/null 2>&1

然後設定字型/clock/lang,以下是sh –x除錯輸出結果

Setting default font (latarcyrheb-sun16): /etc/rc.d/rc.sysinit: line 91: /dev/tty1: Permission denied

[FAILED]


                Welcome to Red Hat Enterprise Linux AS

                Press 'I' to enter interactive startup.

Sorry, only the superuser can change the Hardware Clock.

Setting clock  (localtime): Wed Jan 30 14:06:42 CST 2013 [  OK  ]

klogctl: Operation not permitted

接下來執行

  169  [ -x /sbin/start_udev ] && /sbin/start_udev

對應除錯資訊

Starting udev:  rm: cannot remove `/dev//.udev.tdb': Permission denied

ln: cannot remove `/dev//fd': Permission denied

ln: cannot remove `/dev//stdin': Permission denied

ln: cannot remove `/dev//stdout': Permission denied

ln: cannot remove `/dev//stderr': Permission denied

ln: cannot remove `/dev//core': Permission denied

MAKEDEV: error making /dev/tty1: Permission denied

接下來配置硬體及kernel引數

Initializing hardware...  storage network audio done[  OK  ]

然後是檔案系統完整性檢驗

[FAILED]

Your system appears to have shut down uncleanly

Press Y within 1 seconds to force file system integrity check...

Checking root filesystem

fsck.ext3: You must have r/w access to the filesystem or be root

過載root檔案系統

   481  # Remount the root filesystem read-write.

   482  update_boot_stage RCmountfs

載入多路徑

   496  if [ -c /dev/mapper/control ]; then

   497      if [ -f /etc/multipath.conf -a -x /sbin/multipath.static ]; then

   498          modprobe dm-multipath >/dev/null 2>&1

   499          /sbin/multipath.static -v 0

初始化隨機數生成器

   770  # Initialize pseudo-random number generator

   771  if [ -f "/var/lib/random-seed" ]; then

   772          cat /var/lib/random-seed > /dev/urandom

   773  else

   774          touch /var/lib/random-seed

   775  fi

   776  chmod 600 /var/lib/random-seed

   777  dd if=/dev/urandom f=/var/lib/random-seed count=1 bs=512 2>/dev/null

最後刪除臨時檔案並寫入/var/log/dmesg


來自 “ ITPUB部落格 ” ,連結:http://blog.itpub.net/15480802/viewspace-753566/,如需轉載,請註明出處,否則將追究法律責任。

相關文章