mybatis入門教程
簡介
MyBatis 是支援定製化 SQL、儲存過程以及高階對映的優秀的持久層框架。MyBatis 避免了幾乎所有的 JDBC 程式碼和手動設定引數以及獲取結果集。MyBatis 可以對配置和原生Map使用簡單的 XML 或註解,將介面和 Java 的 POJOs(Plain Old Java Objects,普通的 Java物件)對映成資料庫中的記錄。[1]
本文將演示Mybatis的基本用法,通過XML或介面類對資料庫的增刪改查。
建立Mybatis專案
1、使用Idea建立一個maven專案,依賴包內容如下
    <dependencies>
        <dependency>
            <groupId>mysql</groupId>
            <artifactId>mysql-connector-java</artifactId>
            <version>5.1.38</version>
        </dependency>
        <dependency>
            <groupId>org.mybatis</groupId>
            <artifactId>mybatis</artifactId>
            <version>3.4.4</version>
        </dependency>
    </dependencies>
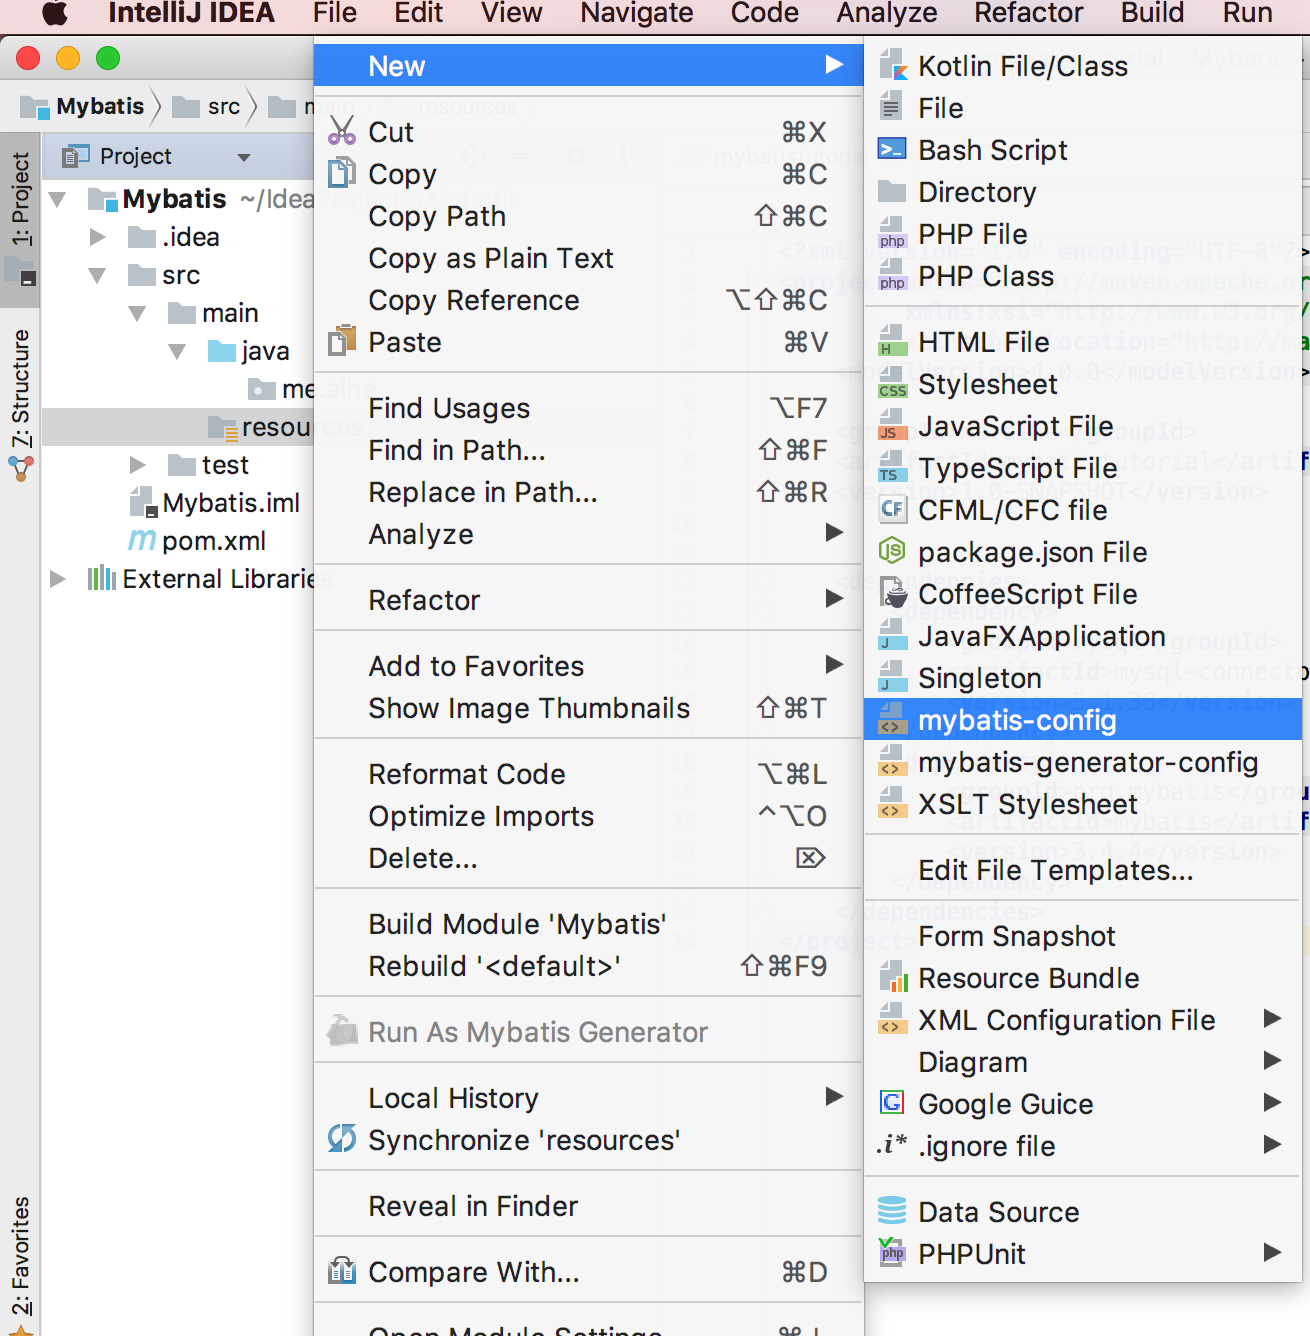
2、建立Mybatis配置檔案
使用Idea整合開發環境,可以下載Mybatis plugin,然後可更好的使用mybatis。關於mybatis的破解過程,參考附錄的mybatis plugin 破解
專案檔案內容
1、在resource目錄下增加mybatis-config.xml檔案,內容如下
<?xml version="1.0" encoding="UTF-8"?>
<!DOCTYPE configuration
        PUBLIC "-//mybatis.org//DTD Config 3.0//EN"
        "http://mybatis.org/dtd/mybatis-3-config.dtd">
<configuration>

    <properties>
        <property name="jdbc.driver" value="com.mysql.jdbc.Driver" />
        <property name="jdbc.user" value="aihe" />
        <property name="jdbc.pass" value="123456" />
        <property name="jdbc.url" value="jdbc:mysql://localhost:3306/test" />
    </properties>

    <settings>
        <!-- Globally enables or disables any caches configured in any mapper under this configuration -->
        <setting name="cacheEnabled" value="true"/>
        <!-- Sets the number of seconds the driver will wait for a response from the database -->
        <setting name="defaultStatementTimeout" value="3000"/>
        <!-- Enables automatic mapping from classic database column names A_COLUMN to camel case classic Java property names aColumn -->
        <setting name="mapUnderscoreToCamelCase" value="true"/>
        <!-- Allows JDBC support for generated keys. A compatible driver is required.
        This setting forces generated keys to be used if set to true,
         as some drivers deny compatibility but still work -->
        <setting name="useGeneratedKeys" value="true"/>
    </settings>

    <!--便於後面解析物件-->
    <typeAliases>
        <package name="me.aihe" />
    </typeAliases>
    <!-- Continue going here -->
    <environments default="dev">
        <environment id="dev">
            <transactionManager type="JDBC"></transactionManager>
            <dataSource type="POOLED">
                <property name="driver" value="${jdbc.driver}" />
                <property name="url" value="${jdbc.url}" />
                <property name="username" value="${jdbc.user}" />
                <property name="password" value="${jdbc.pass}" />
            </dataSource>
        </environment>
    </environments>

    <mappers>
        <mapper resource="BlogMapper.xml" />
    </mappers>

</configuration>
2、在resource目錄下增加BlogMapper.xml檔案,內容如下
<?xml version="1.0" encoding="UTF-8" ?>
<!DOCTYPE mapper
        PUBLIC "-//mybatis.org//DTD Mapper 3.0//EN"
        "http://mybatis.org/dtd/mybatis-3-mapper.dtd">

<mapper namespace="me.aihe.dao.BlogMapper">

    <select id="selectBlog" resultType="me.aihe.Blog">
        select * from Blog where id = #{id}
    </select>

    <insert id="insertBlog" parameterType="Blog">
        insert into Blog (id,title) values (#{id},#{title})
    </insert>

    <update id="updateBlog" parameterType="Blog">
        UPDATE Blog SET title=#{title} WHERE id=#{id}
    </update>

    <delete id="deleteBlog" parameterType="integer">
        DELETE FROM BLOG WHERE id=#{id}
    </delete>

</mapper>
3、新建Blog物件
package me.aihe;

public class Blog {
    int id;
    String title;

    public int getId() {
        return id;
    }

    public void setId(int id) {
        this.id = id;
    }

    public String getTitle() {
        return title;
    }

    public void setTitle(String title) {
        this.title = title;
    }

    @Override
    public String toString() {
        return "Blog{" +
                "id=" + id +
                ", title=`" + title + ``` +
                `}`;
    }
}
4、新建主檔案,Tutorial.java,並進行測試。
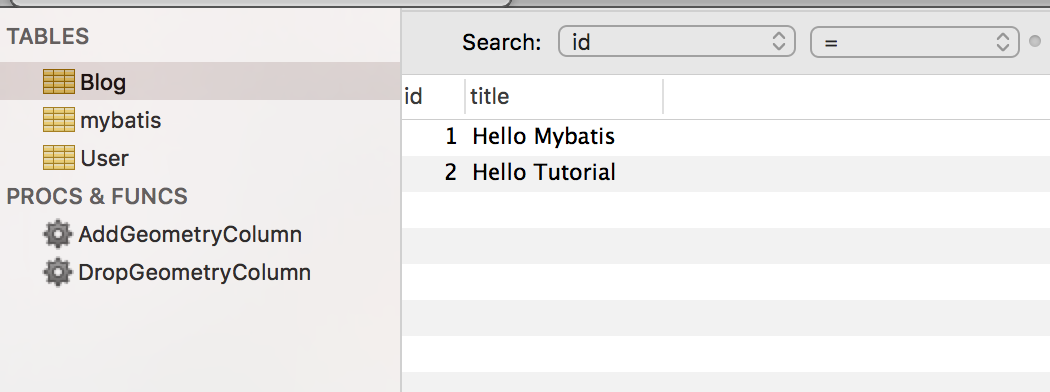
當前我們的資料表內容如下
5、Tutorial.java檔案內容如下
package me.aihe;

import org.apache.ibatis.io.Resources;
import org.apache.ibatis.session.SqlSession;
import org.apache.ibatis.session.SqlSessionFactory;
import org.apache.ibatis.session.SqlSessionFactoryBuilder;

import java.io.IOException;
import java.io.InputStream;
import java.util.Random;

public class Tutorial {
    public static void main(String[] args) {
        SqlSession sqlSession = null;
        try {
            InputStream inputStream = Resources.getResourceAsStream("mybatis-config.xml");
            SqlSessionFactory sqlSessionFactory = new SqlSessionFactoryBuilder().build(inputStream);

            // 查詢資料庫內容
            sqlSession = sqlSessionFactory.openSession();
            Blog blog = sqlSession.selectOne("me.aihe.dao.BlogMapper.selectBlog",1);
            System.out.println(blog);

            // 插入資料庫內容
            Blog b = new Blog();
            b.setTitle("Insert Value" + new Random().nextInt(1000));
            int row = sqlSession.insert("me.aihe.dao.BlogMapper.insertBlog",b);
            System.out.println(row);
            sqlSession.commit();

            // 更新資料庫內容
            b.setId(2);
            row = sqlSession.update("me.aihe.dao.BlogMapper.updateBlog",b);
            System.out.println(row);
            sqlSession.commit();


            //刪除資料庫內容
            row = sqlSession.delete("me.aihe.dao.BlogMapper.deleteBlog",1);
            System.out.println(row);
            sqlSession.commit();

        } catch (IOException e) {
            e.printStackTrace();
        }finally {
            if (sqlSession != null) {
                sqlSession.close();
            }
        }
    }

}
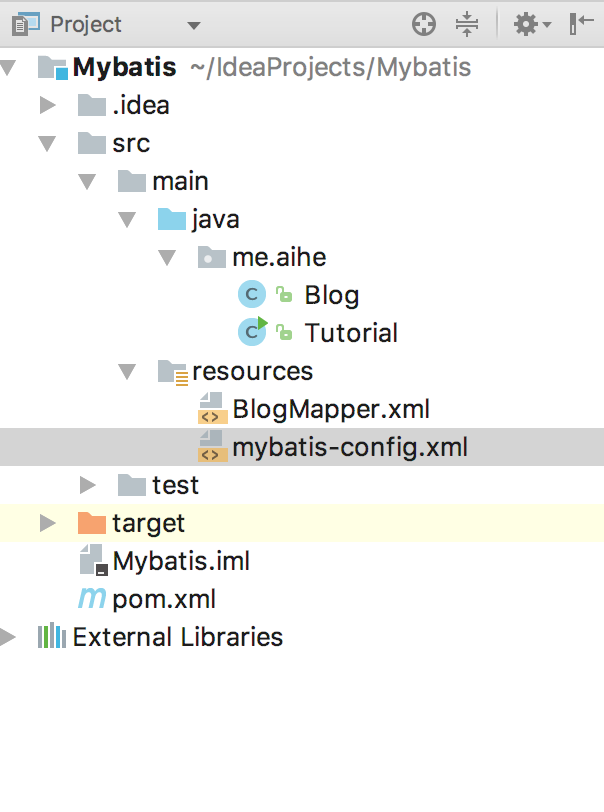
最終的專案結構如下
6、執行結果
Blog{id=1, title=`Hello Mybatis`}
1
1
1
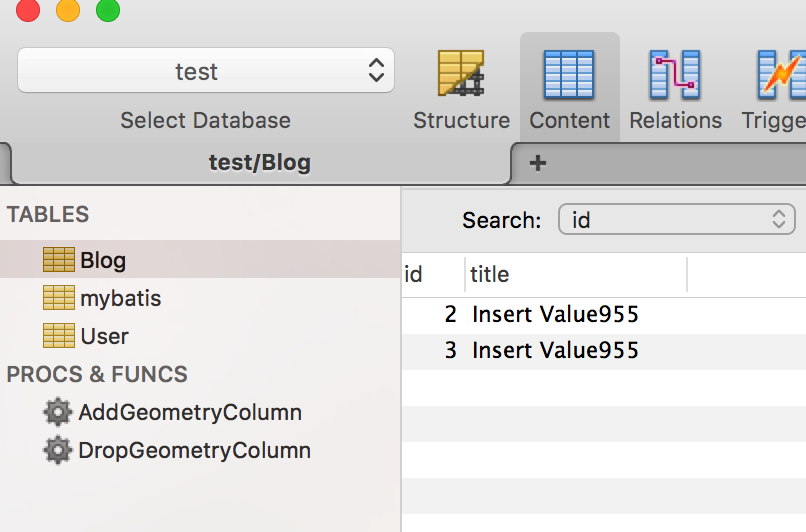
檢視當前資料表的內容,可見查詢了id為1的資料,插入了一條心的資料,更新了id為2 的資料,刪除了id為1的資料。
總結
這篇文章主要簡單的演示了通過xml配置Mybatis,對資料庫的增刪改查。使用介面註解的方式類似,可自行查閱。關於更多高階用法,請聽下回分解。
可擴充部分
- 介面註解增刪改查
- Mybatis配置屬性詳細介紹
- 更好的組織專案結構
錯誤彙總
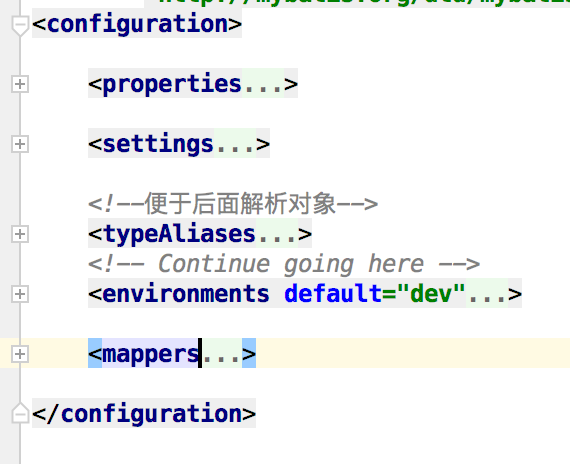
1、mybatis-config.xml屬性順序錯誤
Exception in thread "main" org.apache.ibatis.exceptions.PersistenceException:
### Error building SqlSession.
### Cause: org.apache.ibatis.builder.BuilderException: Error creating document instance.  Cause: org.xml.sax.SAXParseException; lineNumber: 50; columnNumber: 17; 元素型別為 "configuration" 的內容必須匹配 "(properties?,settings?,typeAliases?,typeHandlers?,objectFactory?,objectWrapperFactory?,reflectorFactory?,plugins?,environments?,databaseIdProvider?,mappers?)"
解決方案:mybatis-config.xml檔案按照(properties?,settings?,typeAliases?,typeHandlers?,objectFactory?,objectWrapperFactory?,reflectorFactory?,plugins?,environments?,databaseIdProvider?,mappers?)進行順序排列。
2、不能找到某個類檔案
Exception in thread "main" org.apache.ibatis.exceptions.PersistenceException:
### Error building SqlSession.
### The error may exist in BlogMapper.xml
### Cause: org.apache.ibatis.builder.BuilderException: Error parsing SQL Mapper Configuration. Cause: org.apache.ibatis.builder.BuilderException: Error parsing Mapper XML. Cause: org.apache.ibatis.builder.BuilderException: Error resolving class. Cause: org.apache.ibatis.type.TypeException: Could not resolve type alias `Blog`.  Cause: java.lang.ClassNotFoundException: Cannot find class: Blog
解決方案:兩者選其一即可
1、在Mapper檔案的resultType中返回為全路徑

2、新增TypeAlias

附錄
相關文章
- SpringBoot+MySQL+MyBatis的入門教程Spring BootMySqlMyBatis
- 【Mybatis】Mybatis快速入門MyBatis
- MyBatis從入門到精通(一):MyBatis入門MyBatis
- MyBatis 入門MyBatis
- Mybatis入門MyBatis
- MyBatis系列(一):MyBatis入門MyBatis
- MyBatis(二)MyBatis入門程式(MyBatis demo)MyBatis
- MyBatis(一) 入門MyBatis
- mybatis快速入門MyBatis
- mybatis入門程式MyBatis
- Java Mybatis 框架入門教程JavaMyBatis框架
- Mybatis 入門介紹MyBatis
- Mybatis極速入門MyBatis
- mybatis入門學習MyBatis
- MyBatis--快速入門MyBatis
- Mybatis入門及第一個Mybatis程式MyBatis
- MyBatis入門——瞭解配置MyBatis
- 30分鐘入門MyBatisMyBatis
- Mybatis框架 入門學習MyBatis框架
- MyBatis研習錄(01)——MyBatis概述與入門MyBatis
- Android入門教程 | RecyclerView使用入門AndroidView
- MyBatis 框架之快速入門程式MyBatis框架
- Mybatis-Plus入門實踐MyBatis
- Java持久層框架Mybatis入門Java框架MyBatis
- MyBatis-Plus筆記(入門)MyBatis筆記
- 深入淺出Mybatis原始碼系列(一)---Mybatis入門MyBatis原始碼
- AudioKit 入門教程
- awk 入門教程
- Maven入門教程Maven
- Aseprite入門教程
- Electron入門教程
- HBase入門教程
- RabbitMQ入門教程MQ
- CMake入門教程
- SnapKit入門教程APK
- Linux入門教程Linux
- Springboot入門教程Spring Boot
- Vuex入門教程Vue
- Webpack 入門教程Web