只能顯示一段文字的 ListView 實在是太單調了,我們現在就來對 ListView 的介面進行 定製,讓它可以顯示更加豐富的內容。
首先需要準備好一組圖片,分別對應上面提供的每一種水果,待會我們要讓這些水果名 稱的旁邊都有一個圖樣。
接著定義一個實體類,作為 ListView 介面卡的適配型別。新建類 Fruit,程式碼如下所示:
public class Fruit { private String name; private int imageId;
public Fruit(String name, int imageId) {
this.name = name;
this.imageId = imageId;
}
public String getName() {
return name;
}
public int getImageId() {
return imageId;
}
}
Fruit 類中只有兩個欄位,name 表示水果的名字,imageId 表示水果對應圖片的資源 id。 然 後 需 要 為 ListView 的 子 項 指 定一 個 我 們 自 定 義 的 布 局, 在 layout 目 錄 下 新 建
fruit_item.xml,程式碼如下所示:
<LinearLayout xmlns:android="http://schemas.android.com/apk/res/android" android:layout_width="match_parent" android:layout_height="match_parent" >
<ImageView android:id="@+id/fruit_image" android:layout_width="wrap_content" android:layout_height="wrap_content" />
<TextView android:id="@+id/fruit_name" android:layout_width="wrap_content" android:layout_height="wrap_content" android:layout_gravity="center" android:layout_marginLeft="10dip" />
</LinearLayout>
在這個佈局中,我們定義了一個 ImageView 用於顯示水果的圖片,又定義了一個
TextView 用於顯示水果的名稱。
接下來需要建立一個自定義的介面卡,這個介面卡繼承自 ArrayAdapter,並將泛型指定 為 Fruit 類。新建類 FruitAdapter,程式碼如下所示:
public class FruitAdapter extends ArrayAdapter<Fruit> {
private int resourceId;
public FruitAdapter(Context context, int textViewResourceId, List<Fruit> objects) {
super(context, textViewResourceId, objects);
resourceId = textViewResourceId;
}
@Override
public View getView(int position, View convertView, ViewGroup parent) { Fruit fruit = getItem(position); // 獲取當前項的Fruit例項
View view = LayoutInflater.from(getContext()).inflate(resourceId, null); ImageView fruitImage = (ImageView) view.findViewById(R.id.fruit_image); TextView fruitName = (TextView) view.findViewById(R.id.fruit_name); fruitImage.setImageResource(fruit.getImageId()); fruitName.setText(fruit.getName());
return view;
}
}
FruitAdapter 重寫了父類的一組建構函式,用於將上下文、ListView 子項佈局的 id 和數 據都傳遞進來。另外又重寫了 getView()方法,這個方法在每個子項被滾動到螢幕內的時候 會被呼叫。在 getView 方法中,首先通過 getItem()方法得到當前項的 Fruit 例項,然後使用 LayoutInflater 來為這個子項載入我們傳入的佈局,接著呼叫 View 的 findViewById()方法分別 獲取到 ImageView 和 TextView 的例項,並分別呼叫它們的 setImageResource()和 setText()方 法來設定顯示的圖片和文字,最後將佈局返回,這樣我們自定義的介面卡就完成了。
下面修改 MainActivity 中的程式碼,如下所示:
public class MainActivity extends Activity {
private List<Fruit> fruitList = new ArrayList<Fruit>();
@Override
protected void onCreate(Bundle savedInstanceState) { super.onCreate(savedInstanceState); setContentView(R.layout.activity_main);
initFruits(); // 初始化水果資料
FruitAdapter adapter = new FruitAdapter(MainActivity.this, R.layout.fruit_item, fruitList);
ListView listView = (ListView) findViewById(R.id.list_view);
listView.setAdapter(adapter);
}
private void initFruits() {
Fruit apple = new Fruit("Apple", R.drawable.apple_pic);
fruitList.add(apple);
Fruit banana = new Fruit("Banana", R.drawable.banana_pic);
fruitList.add(banana);
Fruit orange = new Fruit("Orange", R.drawable.orange_pic);
fruitList.add(orange);
Fruit watermelon = new Fruit("Watermelon", R.drawable.watermelon_pic);
fruitList.add(watermelon);
Fruit pear = new Fruit("Pear", R.drawable.pear_pic);
fruitList.add(pear);
Fruit grape = new Fruit("Grape", R.drawable.grape_pic);
fruitList.add(grape);
Fruit pineapple = new Fruit("Pineapple", R.drawable.pineapple_pic);
fruitList.add(pineapple);
Fruit strawberry = new Fruit("Strawberry", R.drawable.strawberry_pic);
fruitList.add(strawberry);
Fruit cherry = new Fruit("Cherry", R.drawable.cherry_pic);
fruitList.add(cherry);
Fruit mango = new Fruit("Mango", R.drawable.mango_pic);
fruitList.add(mango);
}
}
可以看到,這裡新增了一個 initFruits()方法,用於初始化所有的水果資料。在 Fruit 類的 建構函式中將水果的名字和對應的圖片 id 傳入,然後把建立好的物件新增到水果列表中。 接著我們在 onCreate()方法中建立了 FruitAdapter 物件,並將 FruitAdapter 作為介面卡傳遞給 了 ListView。這樣定製 ListView 介面的任務就完成了。
現在重新執行程式,效果如圖 3.30 所示。
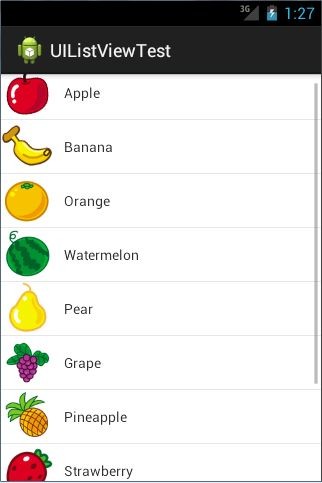
圖 3.30