我們制 作的 message_left.9.png 可以作為收到訊息的背景圖,那麼毫無疑問你還需要再製作一張 message_right.9.png 作為發出訊息的背景圖。
圖片都提供好了之後就可以開始編碼了,首先還是編寫主介面,修改 activity_main.xml
中的程式碼,如下所示:
<LinearLayout xmlns:android="http://schemas.android.com/apk/res/android"
    xmlns:android1="http://schemas.android.com/apk/res/android"
    android:layout_width="match_parent"
    android:layout_height="match_parent"
    android:background="#d8e0e8"
    android:orientation="vertical" >

    <ListView
        android1:id="@+id/msg_list_view"
        android1:layout_width="match_parent"
        android1:layout_height="0dp"
        android:layout_weight="1"
        android:divider="#0000"
        >
    </ListView>

    <LinearLayout
        android1:layout_width="match_parent"
        android:layout_height="wrap_content" >

        <EditText
android:id="@+id/input_text"
android:layout_width="0dp"
android:layout_height="wrap_content"
android:layout_weight="1"
android:hint="Type somthing here"
android:maxLines="2" />

        <Button
android:id="@+id/send"
android:layout_width="wrap_content"
android:layout_height="wrap_content"
android:text="Send" />

    </LinearLayout>

</LinearLayout>
這裡在主介面中放置了一個 ListView 用於顯示聊天的訊息內容,又放置了一個 EditText 用於輸入訊息,還放置了一個 Button 用於傳送訊息。ListView 中用到了一個 android:divider 屬性,它可以指定 ListView 分隔線的顏色,這裡#0000 表示將分隔線設為透明色。其他用到 的所有屬性都是我們之前學過的,相信你理解起來應該不費力。
然後我們來定義訊息的實體類,新建 Msg,程式碼如下所示:
package com.example.uibestpractice;


//defined message class
public class Msg {

    //message content
    private String content;
    //message type
    private int type;

    //defined message type value
    public static final int TYPE_RECEIVE = 0;
    public static final int TYPE_SEND = 1;


    //defined constructor
    public Msg(String content , int type){

        this.content = content;
        this.type = type;

    }


    //function use to getcontent
    public String getContent(){

        return content;

    }

    //function use to gettype
    public int getType(){

        return type;
    }


}
Msg 類中只有兩個欄位,content 表示訊息的內容,type 表示訊息的型別。其中訊息型別 有兩個值可選,TYPE_RECEIVED 表示這是一條收到的訊息,TYPE_SENT 表示這是一條發 出的訊息。
接著來編寫 ListView 子項的佈局,新建 msg_item.xml,程式碼如下所示:
<?xml version="1.0" encoding="utf-8"?>
<LinearLayout xmlns:android="http://schemas.android.com/apk/res/android"
    android:layout_width="match_parent"
    android:layout_height="match_parent"
    android:orientation="vertical"
    android:padding="10dp" >

    <LinearLayout
        android:id="@+id/left_layout"
        android:layout_width="wrap_content"
        android:layout_height="wrap_content"
        android:layout_gravity="left"
        android:background="@drawable/message_left" >

        <TextView
android:id="@+id/left_msg"
android:layout_width="wrap_content"
android:layout_height="wrap_content"
android:layout_gravity="center"
android:layout_margin="10dp"
android:textColor="#fff" />

</LinearLayout>

     <LinearLayout
         android:id="@+id/right_layout"
         android:layout_width="wrap_content"
         android:layout_height="wrap_content"
         android:layout_gravity="right"
         android:background="@drawable/message_right" >

        <TextView
            android:id="@+id/right_msg"
            android:layout_width="wrap_content"
            android:layout_height="wrap_content"
            android:layout_gravity="center"
            android:layout_margin="10dp"
            android:textColor="#fff" />


</LinearLayout>


</LinearLayout>
這裡我們讓收到的訊息居左對齊,發出的訊息居右對齊,並且分別使用 message_left.9.png
和 message_right.9.png 作為背景圖。你可能會有些疑慮,怎麼能讓收到的訊息和發出的訊息 都放在同一個佈局裡呢?不用擔心,還記得我們前面學過的可見屬性嗎,只要稍後在程式碼中 根據訊息的型別來決定隱藏和顯示哪種訊息就可以了。
接下來需要建立 ListView 的介面卡類,讓它繼承自 ArrayAdapter,並將泛型指定為 Msg
類。新建類 MsgAdapter,程式碼如下所示:
package com.example.uibestpractice;

import java.util.List;

import android.content.Context;
import android.view.LayoutInflater;
import android.view.View;
import android.view.ViewGroup;
import android.widget.ArrayAdapter;
import android.widget.LinearLayout;
import android.widget.TextView;

public class MsgAdapter extends ArrayAdapter<Msg> {

    private int resourceId;

    //context,listview sub item layoutid, listview data
    public MsgAdapter(Context context, int textViewResourceId,
            List<Msg> objects) {
        super(context, textViewResourceId, objects);
        // TODO Auto-generated constructor stub

        resourceId = textViewResourceId;

    }


    @Override
    public View getView(int position, View convertView, ViewGroup parent) {
        // TODO Auto-generated method stub
        //return super.getView(position, convertView, parent);

        //get current item Msg
        Msg msg = getItem(position);

        //through LayoutInflater for current sub item  load layout;
        if(convertView == null){

            convertView = LayoutInflater.from(getContext()).inflate(resourceId, parent,false);

        }

        //though viewhoder model to optimization listview

        //get layout object
        LinearLayout leftLinearLayout = ViewHolder.get(convertView, R.id.left_layout);
        LinearLayout rightLinearLayout = ViewHolder.get(convertView, R.id.right_layout);

        //though msg object type set linearlayout is visible
        if(msg.getType() == Msg.TYPE_RECEIVE){

            //this is receive message , show left linearlayout and hide right linearlayout
            leftLinearLayout.setVisibility(View.VISIBLE);
            rightLinearLayout.setVisibility(View.GONE);

            //show receive message content
            TextView leftTextView = ViewHolder.get(convertView, R.id.left_msg);
            leftTextView.setText(msg.getContent());

        }
        else if(msg.getType() == msg.TYPE_SEND){

            //this is send message , show right linearlayout and hide right linearlayout
            leftLinearLayout.setVisibility(View.GONE);
            rightLinearLayout.setVisibility(View.VISIBLE);

            //show receive message content
            TextView rightTextView = ViewHolder.get(convertView, R.id.right_msg);
            rightTextView.setText(msg.getContent());

        }

        return convertView;

    }


}
以上程式碼你應該是非常熟悉了,和我們學習 ListView 那一節的程式碼基本是一樣的,只不 過在 getView()方法中增加了對訊息型別的判斷。如果這條訊息是收到的,則顯示左邊的消 息佈局,如果這條訊息是發出的,則顯示右邊的訊息佈局。
最後修改 MainActivity 中的程式碼,來為 ListView 初始化一些資料,並給傳送按鈕加入事 件響應,程式碼如下所示:
package com.example.uibestpractice;

import java.util.ArrayList;
import java.util.List;

import android.app.Activity;
import android.os.Bundle;
import android.view.View;
import android.view.Window;
import android.widget.Button;
import android.widget.EditText;
import android.widget.ListView;

public class MainActivity extends Activity {


    private List<Msg> msgList = new ArrayList<Msg>();

    private MsgAdapter msgAdapter ;

    //defined message edittext control
    private EditText editText;

    //defined send button control
    private Button sendButton;

    //defined listview control;
    private ListView listView;

    @Override
    protected void onCreate(Bundle savedInstanceState) {
        super.onCreate(savedInstanceState);
        //hide app title
        requestWindowFeature(Window.FEATURE_NO_TITLE);
        setContentView(R.layout.activity_main);

        //init message data
        initMsgs();

        //init MsgAdapter
        msgAdapter = new MsgAdapter(MainActivity.this, R.layout.msg_item, msgList);

        //get layout control
        editText = (EditText)findViewById(R.id.input_text);
        sendButton = (Button)findViewById(R.id.send);
        listView = (ListView)findViewById(R.id.msg_list_view);

        //give listview control set adapter;
        listView.setAdapter(msgAdapter);

        //set sendbutton onclick event
        sendButton.setOnClickListener(new View.OnClickListener() {

            @Override
            public void onClick(View v) {
                // TODO Auto-generated method stub

                //set listview control to show input message content

                String content = editText.getText().toString();

                //if content is not null
                if(content.length() > 0){

                    //init msg object
                    Msg msg = new Msg(content, Msg.TYPE_SEND);

                    //add msg object to msglist data
                    msgList.add(msg);

                    //if new message is send, refresh listview control
                    msgAdapter.notifyDataSetChanged();

                    //position to the listview last line
                    listView.setSelection(msgList.size());

                    //clear input text content
                    editText.setText("");

                }


            }
        });


    }


    //init message data
    private void initMsgs(){

        Msg msg1 = new Msg("Hello guy.", Msg.TYPE_RECEIVE);
        msgList.add(msg1);
        Msg msg2 = new Msg("Hello. Who is that?", Msg.TYPE_SEND);
        msgList.add(msg2);
        Msg msg3 = new Msg("This is Tom. Nice talking to you. ", Msg.TYPE_RECEIVE);
        msgList.add(msg3);

    }

}
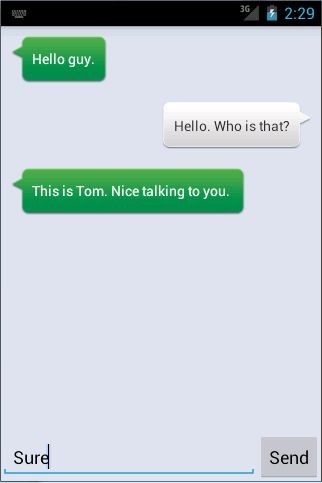
在 initMsgs()方法中我們先初始化了幾條資料用於在 ListView 中顯示。然後在傳送按鈕
的點選事件裡獲取了 EditText 中的內容,如果內容不為空則建立出一個新的 Msg 物件,並把 它新增到 msgList 列表中去。之後又呼叫了介面卡的 notifyDataSetChanged()方法,用於通知 列表的資料發生了變化,這樣新增的一條訊息才能夠在 ListView 中顯示。接著呼叫 ListView 的 setSelection()方法將顯示的資料定位到最後一行,以保證一定可以看得到最後發出的一條 訊息。最後呼叫 EditText 的 setText()方法將輸入的內容清空。
這樣所有的工作就都完成了,終於可以檢驗一下我們的成果了,執行程式之後你將會看 到非常美觀的聊天介面,並且可以輸入和傳送訊息,如圖 3.43 所示。