一段時間不用,很快就忘光了。為方便自己快速回憶,特此記上一筆。
<base-layout>
  <template slot="header">
    <h1>Here might be a page title</h1>
  </template>
</base-layout>上述slot="header"的寫法已被廢棄,改用如下v-slot:header的寫法
<base-layout>
  <template v-slot:header>
    <h1>Here might be a page title</h1>
  </template>
</base-layout>如果覺得這樣寫很麻煩,可以使用如下所示#header的簡寫形式
<base-layout>
  <template #header>
    <h1>Here might be a page title</h1>
  </template>
</base-layout>如果該元件有且只有一個預設插槽,則可以去掉<template>標籤進一步簡寫
<base-layout>
    <h1>Here might be a page title</h1>
</base-layout>
先寫一個帶有作用域插槽的vue元件,取名為 user-list 元件。此元件有3個插槽,一個名叫first,一個名叫last,還有一個是預設插槽default
<template>
    <ul class="list-unstyled">
        <li v-for="user in users">
            <slot :user="user">
                {{user.id}}
            </slot>
            <slot name="first" :first="user">
                {{user.firstName}}
            </slot>
            <slot name="last" :last="user">
                {{user.lastName}}
            </slot>
        </li>
    </ul>
</template>

<script>
    export default {
        props: ['users']
    }
</script>在blade模版中敲入程式碼<user-list :users="{{$users}}"></user-list>,顯示如下資訊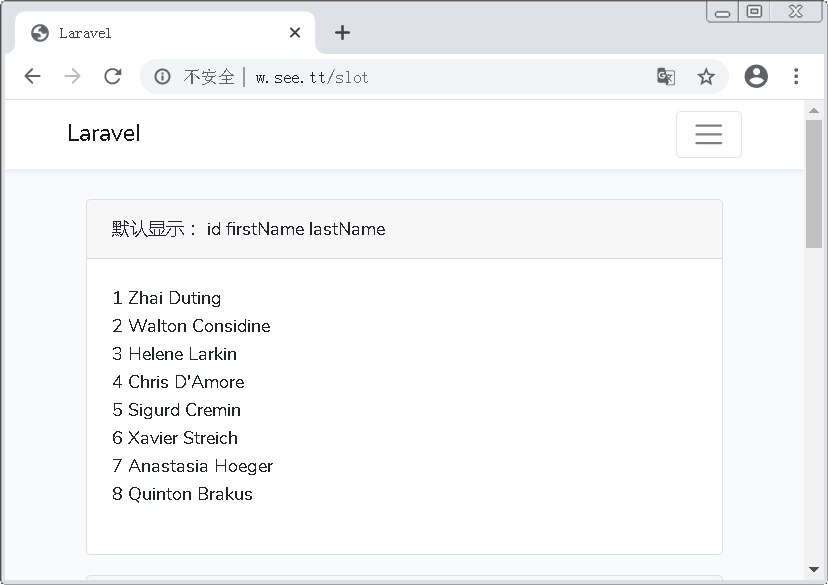
開始玩花樣了,用下面這段程式碼格式化firstName(改成大寫,並放到括號裡面)
    <user-list :users="{{$users}}">
        <template #first="props">
            【@{{props.first.firstName.toUpperCase()}}】
        </template>
</user-list>效果如下圖。這裡分析一下這段程式碼的含義:呼叫者是blade模板,呼叫的是user-list元件,呼叫者呼叫元件後對元件的first插槽做了點手腳,使得元件呈現的效果有所不同(從而達到格式化的目的)。注意這行<template #first="props">,其中#first是不能變的,這是由插槽的名字決定的;引號裡面的props是自由可變的。需要注意的是props.first.firstName.toUpperCase()這句程式碼裡面的first是怎麼來的?這個first是元件定義插槽時決定的。元件定義插槽時有這麼一行<slot name="first" :first="user">,這裡面有個:first,就是由這個帶冒號的屬性決定的。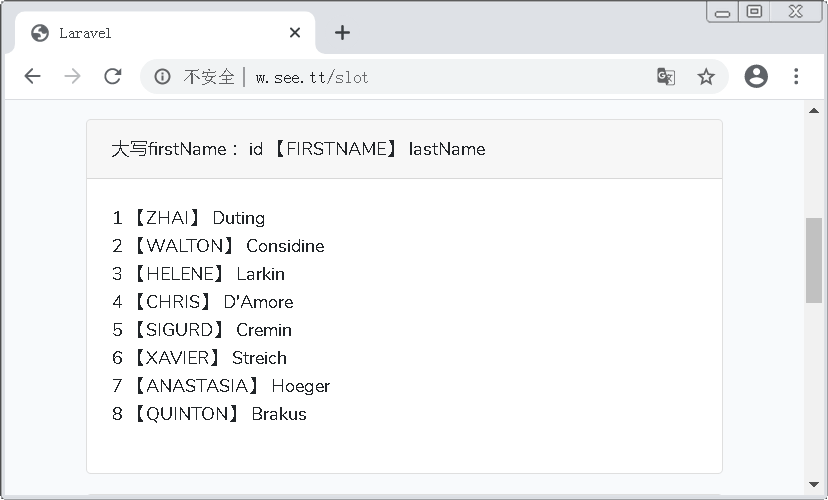
使用物件解構,會讓程式碼簡單一些
    <user-list :users="{{$users}}">
        <template #last="{last}">
            <span class="text-primary"> @{{last.lastName}} </span>
        </template>
</user-list>效果如下圖。這裡面的#last="{last}"就是物件解構,使用的時候就可以直接寫成last.lastName了。這比前例的寫法要緊湊,前例多了一個自由命名的props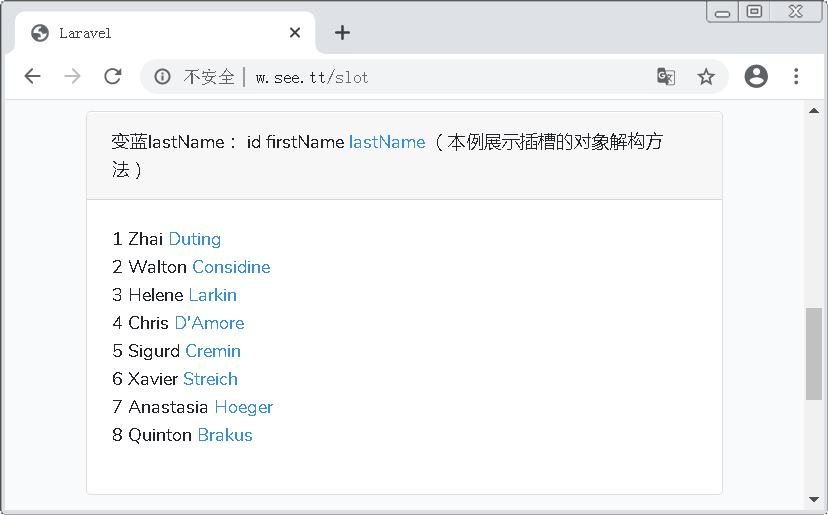
在定義插槽的時候,不同的插槽要取不同的名字,這點毫無疑問。但是不同插槽的屬性名稱是沒必要區分的,屬性名稱完全可以取一模一樣的名字。
具體來說:<slot :user="user">、<slot name="first" :first="user">和<slot name="last" :last="user">,其中default插槽取了一個叫做:user的屬性名稱,first取了一個叫做:first的屬性名,最後一個取了一個:last的屬性名。這種區分完全沒必要。
可以全部寫成一樣的:user,即<slot :user="user">、<slot name="first" :user="user">和<slot name="last" :user="user">
最後一例:預設插槽的物件解構(格式化預設插槽,並清空first插槽及last插槽的預設資料)
    <user-list :users="{{$users}}">
        <template #default="{user}">
            (@{{user.id}}) @{{user.name}}
        </template>
        <template #first><i></i></template>
        <template #last><i></i></template>
    </user-list>
以下為效果圖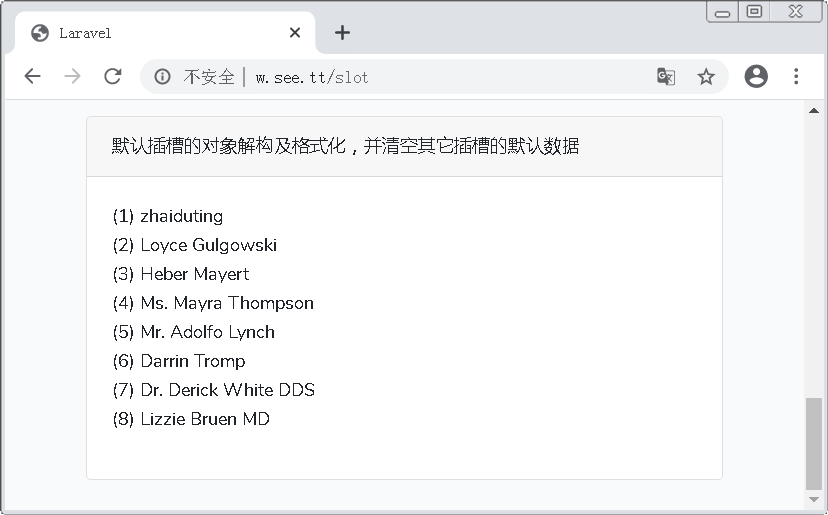
將元件user-list中的的first插槽及last插槽全部刪除,只剩下一個default插槽(獨佔)。對於獨佔式作用域插槽,呼叫的時候可以完全刪除<template>標籤,但是要將#default="{user}"挪到父標籤裡面(程式碼如下,展示效果跟上圖一樣)
    <user-list :users="{{$users}}" #default="{user}">
        (@{{user.id}}) @{{user.name}}
    </user-list>
blade模版對user-list元件說:我給你一批使用者資料,你幫我展現出來。
user-list元件說:好的,我用一個for迴圈依次處理。
blade模版:但是不能完全按你的那一套來,在slot這個地方要改一改。
user-list元件:具體要怎麼改?
blade模版:你把材料拿過來,我演示給你看。
user-list元件:好的,給你 :user(這一步早在插槽定義的時候就準備好了的 <slot :user="user">)。
blade模版接過材料:看好了,我給你寫個模版,你要照著模版弄(所謂 的接過材料,其實就是解構出 user )<template #default="{user}">(@{{user.id}}) @{{user.name}}</template>
user-list元件:好的,沒問題。
通過使用作用域插槽,blade模版達到了效果定製的目的;而user-list元件也通過作用域插槽明白了呼叫者的意圖。
本文程式碼 git@gitee.com:zhaiduting/see.git
1、git clone git@gitee.com:zhaiduting/see.git
2、cd see; composer install; npm i
3、配置 .env
4、php artisan migrate --seed
5、搭建伺服器
6、使用http://x.xx.x/slot檢視效果
7、版本回退,重新編譯後再看效果