Spring的核心是模組是Spring-IOC容器模組、Spring-AOP模組。
IOC容器
IOC容器的實現
容器分為兩大系列,一類是BeanFactory介面,另一類是ApplicationContext。BeanFactory
提供對單個bean的查詢等方法。Beanfacory介面定義了IOC容器的最基本形式。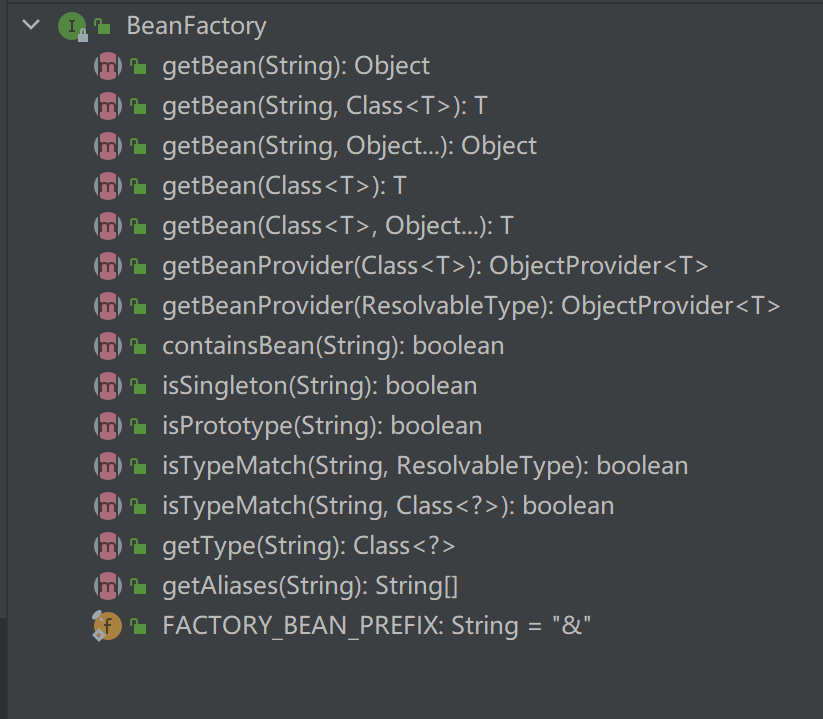
ApplicationContext
ApplicationContext在BeanFacroty的基礎上,新增了其他高階特性。ApplicationContext一方面透過繼承ListableBeanFactory、HierarchicalBeanFactory,來獲取BeanFactory的功能;另一方面,透過繼承EnvironmentCapable、MessageSource、ApplicationEventPublisher、ResourcePatternResolver介面,來新增其他高階特性。public interface ApplicationContext extends
EnvironmentCapable, ListableBeanFactory, HierarchicalBeanFactory,
MessageSource, ApplicationEventPublisher, ResourcePatternResolver {
}
以下介紹ListableBeanFactory、HierarchicalBeanFactory的功能:
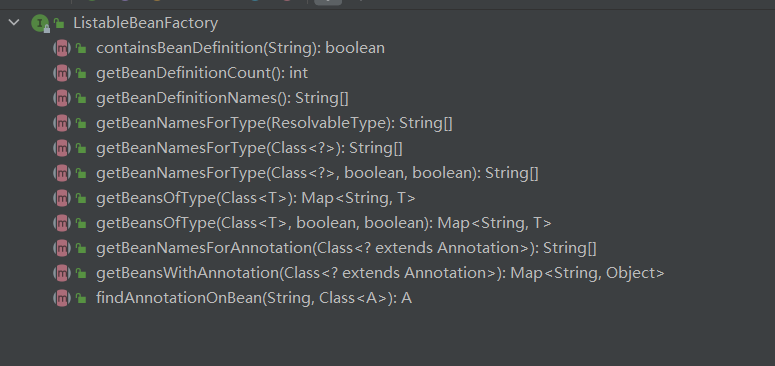
1、ListableBeanFactory:簡單來說,BeanFactory提供的是單個查詢Bean的方法,ListableBeanFactory在此基礎上,新增了批次查詢Bean的方法。
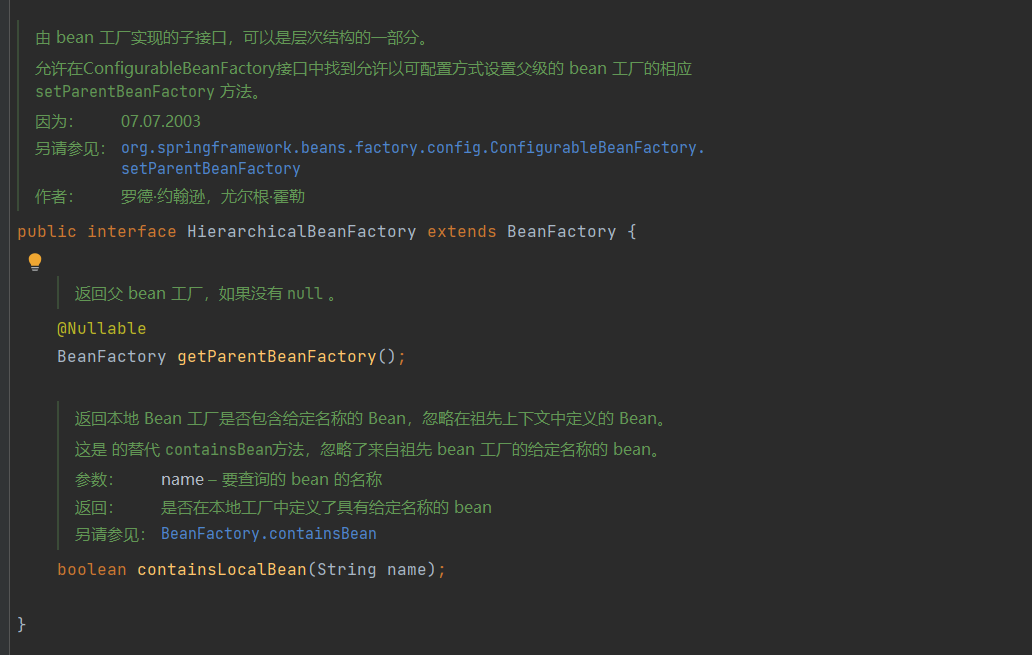
2、HierarchicalBeanFactory:對父類BeanFactory進行一些操作
3、MessageSource:國際化支援
4、ApplicationEventPublisher:事件釋出與監聽
IOC容器的設計
BeanFactory的功能
以XmlBeanFactory來分析,XmlBeanFactory繼承了DefaullistableBeanfactory。在Spring中,實標上是把DefaullistableBeanfactory作為一個預設的功能完整的loc容器來使用的。Xmlbeanfactory在繼承了Defaullistablebeanfactory容器的功能的同時,增加了新的功能,這些功能很容易從xmlbeanfactory的名字上猜到。它是一個與xml相關的BeanFactory,也就是說它是一個可以讀取以xml檔案方式定義的BeanDefinition的loc容器。
package org.springframework.beans.factory.xml;

import org.springframework.beans.BeansException;
import org.springframework.beans.factory.BeanFactory;
import org.springframework.beans.factory.support.DefaultListableBeanFactory;
import org.springframework.core.io.Resource;

@Deprecated
@SuppressWarnings({"serial", "all"})
public class XmlBeanFactory extends DefaultListableBeanFactory {

    private final XmlBeanDefinitionReader reader = new XmlBeanDefinitionReader(this);


    /**
    * Create a new XmlBeanFactory with the given resource,
    * which must be parsable using DOM.
    * @param resource the XML resource to load bean definitions from
    * @throws BeansException in case of loading or parsing errors
    */
    public XmlBeanFactory(Resource resource) throws BeansException {
      this(resource, null);
   }

   /**
    * Create a new XmlBeanFactory with the given input stream,
    * which must be parsable using DOM.
    * @param resource the XML resource to load bean definitions from
    * @param parentBeanFactory parent bean factory
    * @throws BeansException in case of loading or parsing errors
    */
   public XmlBeanFactory(Resource resource, BeanFactory parentBeanFactory) throws BeansException {
      super(parentBeanFactory);
      this.reader.loadBeanDefinitions(resource);
   }

}
public class DefaultListableBeanFactory extends AbstractAutowireCapableBeanFactory
implements ConfigurableListableBeanFactory, BeanDefinitionRegistry, Serializable {


}
AbstractAutowireCapableBeanFactory:提供自動裝配
ConfigurableListableBeanFactory:bean生命週期的配置
DefaultListableBeanFactory:<font style="color:rgb(5, 7, 59);">DefaultListableBeanFactory</font>除了支援按型別和按名稱查詢bean外,還支援bean的註冊、自動裝配、屬性填充、生命週期管理等高階功能。而<font style="color:rgb(5, 7, 59);">ListableBeanFactory</font>主要聚焦於bean的查詢功能。
BeanFactory的設計原理
以XmlBeanfactory為例,如下: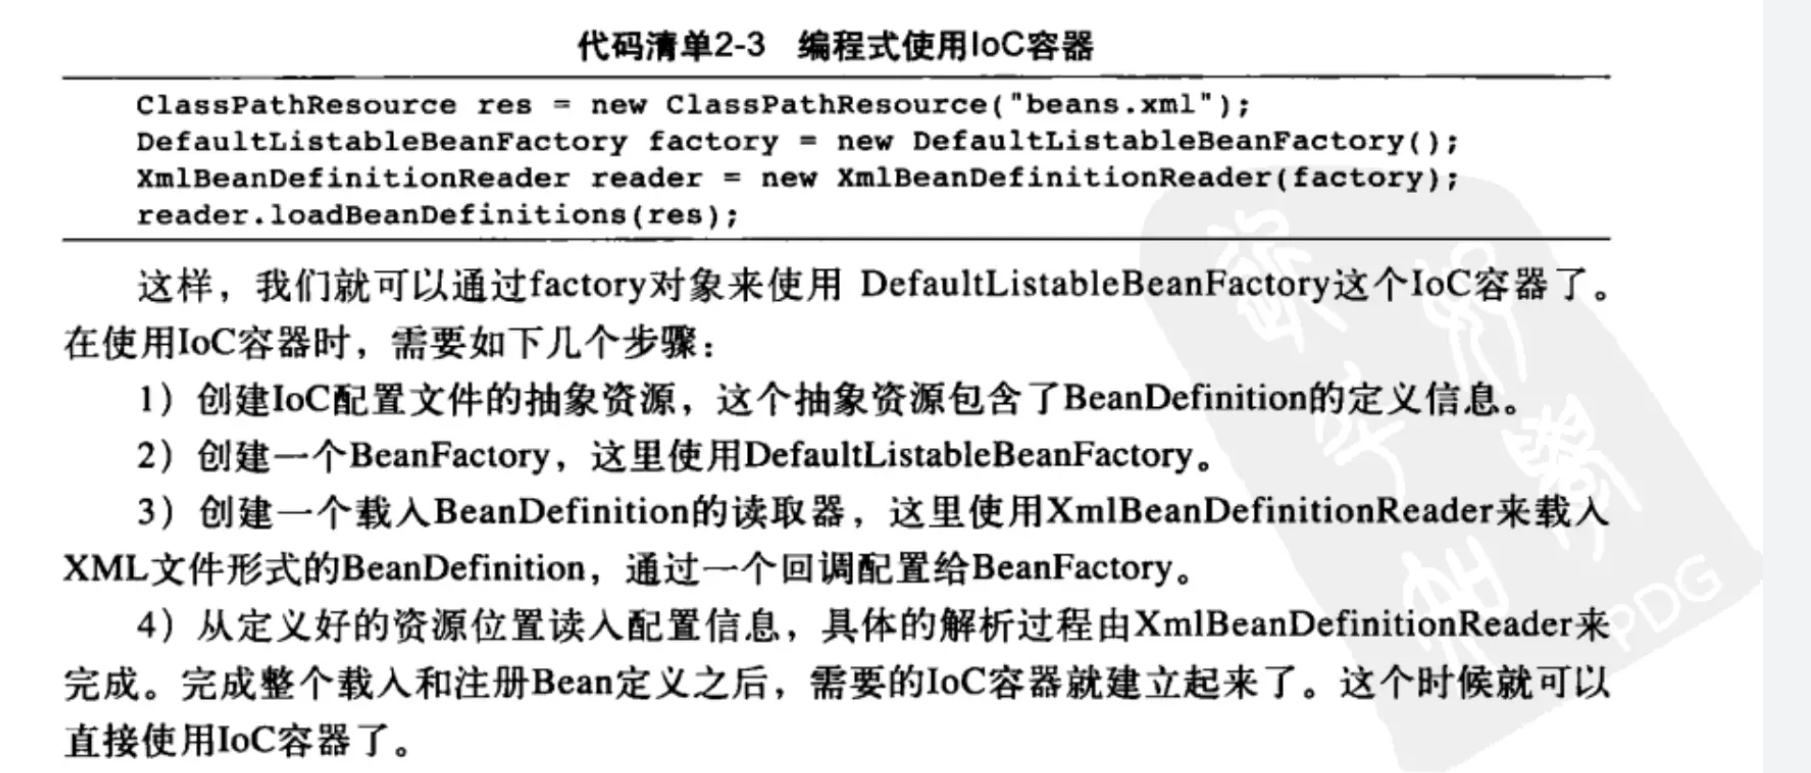
ApplicationContext的功能
```java public interface ApplicationContext extends EnvironmentCapable, ListableBeanFactory, HierarchicalBeanFactory, MessageSource, ApplicationEventPublisher, ResourcePatternResolver {}
+ 支援不同的資訊源:我們看到Applicationcontext擴充套件了Messagesource介面,這些資訊源的擴充套件功能可以支援國際化的實現。
+ 訪問資源:這一特性體現在對ResourceLoader和Resource的支援上,這樣我們可以從不同地方得到bean定義資源。ResourcePatternResolver繼承了ResourceLoader介面
+ 支援應用事件:繼承了介面ApplicationEventPublisher,從而在上下文中引人了事件機制。這些事件和bean的生命週期的結合為bean的管理提供了便利。

ApplicationContext是一種面向框架的使用風格

<h3 id="LN7bI">ApplicationContext的設計原理</h3>
以FileSystemXmlApplicationContext為例,包含兩部分內容,一是refresh()介面來初始化容器,即啟動容器,這是所有ApplicationContext基本通用的部分。二是載入XML形式的bean定義檔案相關的部分。

<h1 id="cKuBA">容器的初始化過程</h1>
容器的初始化步驟分為:BeanDefinition的resource定位、BeanDefinition的載入和解析、BeanDefinition在IOC容器中的註冊;

<h2 id="zVL1U">DefaultListableBeanFactory的容器初始化</h2>
當我們使用DefaultListableBeanFactory作為容器時,啟動容器的過程如下:

```java
public class A {
    // 假設A有一個簡單的方法
    public void doSomething() {
        System.out.println("A is doing something!");
    }
}
public class B {
    private A a;

    // 構造器注入A
    public B(A a) {
        this.a = a;
    }

    // 或者使用setter方法注入A
    // public void setA(A a) {
    //     this.a = a;
    // }

    public void doSomethingWithA() {
        a.doSomething();
        System.out.println("B is doing something with A!");
    }
}
<?xml version="1.0" encoding="UTF-8"?>
<beans xmlns="http://www.springframework.org/schema/beans"
  xmlns:xsi="http://www.w3.org/2001/XMLSchema-instance"
  xsi:schemaLocation="http://www.springframework.org/schema/beans
  http://www.springframework.org/schema/beans/spring-beans.xsd">

  <!-- 定義A的bean -->
  <bean id="aBean" class="cc.com.context.init.A" />

  <!-- 定義B的bean,透過構造器注入A -->
  <bean id="bBean" class="cc.com.context.init.B">
    <constructor-arg ref="aBean" />
  </bean>
</beans>
public class DefaultContextTest {
    public static void main(String[] args) {
        // beanDefinition資源定位
        ClassPathResource classPathResource = new ClassPathResource("beans/beanDefinition.xml");
        // 建立context
        DefaultListableBeanFactory beanFactory = new DefaultListableBeanFactory();
        // 建立Reader: beanDefinition的解析載入、beanDefinition在ioc容器中的註冊
        XmlBeanDefinitionReader beanDefinitionReader = new XmlBeanDefinitionReader(beanFactory);
        beanDefinitionReader.loadBeanDefinitions(classPathResource);

        B b = beanFactory.getBean(B.class);
        b.doSomethingWithA();
    }
}
FileSystemXmlApplicationContext容器初始化
DefaultListableBeanFactory是BeanFactory這個型別的容器,如果將其換位ApplicationContext型別的容器FileSystemXmlApplicationContext,則容器的啟動過程如下(bean定義不變):public class ResourceTest {
public static void main(String[] args) {
String resourcePath = "beans\\beanDefinition.xml";
// 啟動容器
FileSystemXmlApplicationContext context = new FileSystemXmlApplicationContext(resourcePath);
B b = (B) context.getBean("bBean");
b.doSomethingWithA();
context.close();
}
}
與DefaultListableBeanFactory相比較,FileSystemXmlApplicationContext的啟動程式碼中少了beanDefinition資源定位、beanDefinition的解析載入相關程式碼。這部分程式碼在**refresh()**方法中。呼叫過程如下:
public class FileSystemXmlApplicationContext extends AbstractXmlApplicationContext {
    // 類:FileSystemXmlApplicationContext;
    // 初始化容器
    public FileSystemXmlApplicationContext(String configLocation) throws BeansException {
        this(new String[] {configLocation}, true, null);
    }

    public FileSystemXmlApplicationContext(
            String[] configLocations, boolean refresh, @Nullable ApplicationContext parent)
            throws BeansException {

        super(parent);
        setConfigLocations(configLocations);
        if (refresh) {
            // 容器初始化
            refresh();
        }
    }

    @Override
	protected Resource getResourceByPath(String path) {
		if (path.startsWith("/")) {
			path = path.substring(1);
		}
		return new FileSystemResource(path);
	}
}
public abstract class AbstractApplicationContext extends DefaultResourceLoader
implements ConfigurableApplicationContext {
    //方法內部其他程式碼省略
    @Override
	public void refresh() throws BeansException, IllegalStateException {
		synchronized (this.startupShutdownMonitor) {

		ConfigurableListableBeanFactory beanFactory = obtainFreshBeanFactory();
	}


	protected ConfigurableListableBeanFactory obtainFreshBeanFactory() {
		refreshBeanFactory();
		return getBeanFactory();
	}
}
public abstract class AbstractRefreshableApplicationContext extends AbstractApplicationContext {

    @Override
	protected final void refreshBeanFactory() throws BeansException {
		if (hasBeanFactory()) {
			destroyBeans();
			closeBeanFactory();
		}
		try {
			DefaultListableBeanFactory beanFactory = createBeanFactory();
			beanFactory.setSerializationId(getId());
			customizeBeanFactory(beanFactory);
            // 定位beanDefinition資源、載入解析;
			loadBeanDefinitions(beanFactory);
			synchronized (this.beanFactoryMonitor) {
				this.beanFactory = beanFactory;
			}
		}
		catch (IOException ex) {
			throw new ApplicationContextException("I/O error parsing bean definition source for " + getDisplayName(), ex);
		}
	}
}
public abstract class AbstractXmlApplicationContext extends AbstractRefreshableConfigApplicationContext {
    	@Override
	protected void loadBeanDefinitions(DefaultListableBeanFactory beanFactory) throws BeansException, IOException {
		// 建立讀取xml格式的beanDefinition的Reader類
		XmlBeanDefinitionReader beanDefinitionReader = new XmlBeanDefinitionReader(beanFactory);


		beanDefinitionReader.setEnvironment(this.getEnvironment());
		beanDefinitionReader.setResourceLoader(this);
		beanDefinitionReader.setEntityResolver(new ResourceEntityResolver(this));


		initBeanDefinitionReader(beanDefinitionReader);

        // beanDefinition資源的載入解析
		loadBeanDefinitions(beanDefinitionReader);
	}

    protected void loadBeanDefinitions(XmlBeanDefinitionReader reader) throws BeansException, IOException {
        Resource[] configResources = getConfigResources();
        if (configResources != null) {
            reader.loadBeanDefinitions(configResources);
        }
        String[] configLocations = getConfigLocations();
        if (configLocations != null) {
            reader.loadBeanDefinitions(configLocations);
        }
	}
}
Reader的建立,和對beanDefinition資源的讀取過程,全部在refresh()方法中,伴隨者容器的建立,自動執行。
bean例項的建立過程
原始碼分析
當bean設定為懶載入時,在容器初始化之後,beanFactory.getBean()方法被呼叫時,才會開始建立bean示例。當bean設定為懶載入時,在refresh()介面中,就會呼叫beanFactory.getBean()方法,來建立bean示例,這種情況在最後說明。bean例項的建立過程大體分為三步:初始化、依賴注入、示例化。以上一小節的單例bean定義A、B為例,分析bBean的建立過程。具體的建立流程在doGetBean方法中。
doGetBean:318, AbstractBeanFactory (org.springframework.beans.factory.support)
getBean:199, AbstractBeanFactory (org.springframework.beans.factory.support)
getBean:1105, AbstractApplicationContext (org.springframework.context.support)
main:11, ResourceTest (cc.com.context.init)
/**
 * Return an instance, which may be shared or independent, of the specified bean.
 * @param name the name of the bean to retrieve
 * @param requiredType the required type of the bean to retrieve
 * @param args arguments to use when creating a bean instance using explicit arguments
 * (only applied when creating a new instance as opposed to retrieving an existing one)
 * @param typeCheckOnly whether the instance is obtained for a type check,
 * not for actual use
 * @return an instance of the bean
 * @throws BeansException if the bean could not be created
 */
@SuppressWarnings("unchecked")
protected <T> T doGetBean(final String name, @Nullable final Class<T> requiredType,
@Nullable final Object[] args, boolean typeCheckOnly) throws BeansException {

    final String beanName = transformedBeanName(name);
    Object bean;

    // 先嚐試從快取中獲取bean例項,getSingleton的程式碼在下方
    Object sharedInstance = getSingleton(beanName);
    if (sharedInstance != null && args == null) {
        if (logger.isTraceEnabled()) {
            if (isSingletonCurrentlyInCreation(beanName)) {
                logger.trace("Returning eagerly cached instance of singleton bean '" + beanName +
                             "' that is not fully initialized yet - a consequence of a circular reference");
            }
            else {
                logger.trace("Returning cached instance of singleton bean '" + beanName + "'");
            }
        }
        // 獲取bean的代理類
        bean = getObjectForBeanInstance(sharedInstance, name, beanName, null);
    }

    else {
        // Fail if we're already creating this bean instance:
        // We're assumably within a circular reference.
        if (isPrototypeCurrentlyInCreation(beanName)) {
            throw new BeanCurrentlyInCreationException(beanName);
        }

        // Check if bean definition exists in this factory.
        BeanFactory parentBeanFactory = getParentBeanFactory();
        if (parentBeanFactory != null && !containsBeanDefinition(beanName)) {
            // Not found -> check parent.
            String nameToLookup = originalBeanName(name);
            if (parentBeanFactory instanceof AbstractBeanFactory) {
                return ((AbstractBeanFactory) parentBeanFactory).doGetBean(
                    nameToLookup, requiredType, args, typeCheckOnly);
            }
            else if (args != null) {
                // Delegation to parent with explicit args.
                return (T) parentBeanFactory.getBean(nameToLookup, args);
            }
            else if (requiredType != null) {
                // No args -> delegate to standard getBean method.
                return parentBeanFactory.getBean(nameToLookup, requiredType);
            }
            else {
                return (T) parentBeanFactory.getBean(nameToLookup);
            }
        }

        if (!typeCheckOnly) {
            markBeanAsCreated(beanName);
        }

        try {
            final RootBeanDefinition mbd = getMergedLocalBeanDefinition(beanName);
            checkMergedBeanDefinition(mbd, beanName, args);

            // Guarantee initialization of beans that the current bean depends on.
         String[] dependsOn = mbd.getDependsOn();
         if (dependsOn != null) {
            for (String dep : dependsOn) {
               if (isDependent(beanName, dep)) {
                  throw new BeanCreationException(mbd.getResourceDescription(), beanName,
                        "Circular depends-on relationship between '" + beanName + "' and '" + dep + "'");
               }
               registerDependentBean(dep, beanName);
               try {
                  getBean(dep);
               }
               catch (NoSuchBeanDefinitionException ex) {
                  throw new BeanCreationException(mbd.getResourceDescription(), beanName,
                        "'" + beanName + "' depends on missing bean '" + dep + "'", ex);
               }
            }
         }

         // Create bean instance.
         if (mbd.isSingleton()) {
             // 如果從快取中獲取不到bean,則呼叫getSingleton方法,
             // 在入參中傳入一個singltonFactory物件(重寫了getObject方法)
             // 注:singltonFactory是一個獲取單例bean的工廠類
            sharedInstance = getSingleton(beanName, () -> {
               try {
                  return createBean(beanName, mbd, args);
               }
               catch (BeansException ex) {
                  // Explicitly remove instance from singleton cache: It might have been put there
                  // eagerly by the creation process, to allow for circular reference resolution.
                  // Also remove any beans that received a temporary reference to the bean.
                  destroySingleton(beanName);
                  throw ex;
               }
            });
            bean = getObjectForBeanInstance(sharedInstance, name, beanName, mbd);
         }

         else if (mbd.isPrototype()) {
            // It's a prototype -> create a new instance.
            Object prototypeInstance = null;
            try {
               beforePrototypeCreation(beanName);
               prototypeInstance = createBean(beanName, mbd, args);
            }
            finally {
               afterPrototypeCreation(beanName);
            }
            bean = getObjectForBeanInstance(prototypeInstance, name, beanName, mbd);
         }

         else {
            String scopeName = mbd.getScope();
            final Scope scope = this.scopes.get(scopeName);
            if (scope == null) {
               throw new IllegalStateException("No Scope registered for scope name '" + scopeName + "'");
            }
            try {
               Object scopedInstance = scope.get(beanName, () -> {
                  beforePrototypeCreation(beanName);
                  try {
                     return createBean(beanName, mbd, args);
                  }
                  finally {
                     afterPrototypeCreation(beanName);
                  }
               });
               bean = getObjectForBeanInstance(scopedInstance, name, beanName, mbd);
            }
            catch (IllegalStateException ex) {
               throw new BeanCreationException(beanName,
                     "Scope '" + scopeName + "' is not active for the current thread; consider " +
                     "defining a scoped proxy for this bean if you intend to refer to it from a singleton",
                     ex);
            }
         }
      }
      catch (BeansException ex) {
         cleanupAfterBeanCreationFailure(beanName);
         throw ex;
      }
   }

   // Check if required type matches the type of the actual bean instance.
   if (requiredType != null && !requiredType.isInstance(bean)) {
      try {
         T convertedBean = getTypeConverter().convertIfNecessary(bean, requiredType);
         if (convertedBean == null) {
            throw new BeanNotOfRequiredTypeException(name, requiredType, bean.getClass());
         }
         return convertedBean;
      }
      catch (TypeMismatchException ex) {
         if (logger.isTraceEnabled()) {
            logger.trace("Failed to convert bean '" + name + "' to required type '" +
                  ClassUtils.getQualifiedName(requiredType) + "'", ex);
         }
         throw new BeanNotOfRequiredTypeException(name, requiredType, bean.getClass());
      }
   }
   return (T) bean;
}
以下是getSingleton方法的原始碼
@Override
@Nullable
public Object getSingleton(String beanName) {
    return getSingleton(beanName, true);
}

@Nullable
protected Object getSingleton(String beanName, boolean allowEarlyReference) {
    // 如果一級快取中存在,則從一級快取中取
    Object singletonObject = this.singletonObjects.get(beanName);
    if (singletonObject == null && isSingletonCurrentlyInCreation(beanName)) {
        synchronized (this.singletonObjects) {
            // 如果二級快取中存在, 則從二級快取中取
            singletonObject = this.earlySingletonObjects.get(beanName);
            if (singletonObject == null && allowEarlyReference) {
                // 如果一級、二級中均不存在,則從三級快取中取出singletonFactory,來初始化bean
                ObjectFactory<?> singletonFactory = this.singletonFactories.get(beanName);
                if (singletonFactory != null) {
                    // 獲取單例bean,將其放入二級快取,並刪除三級快取的內容
                    singletonObject = singletonFactory.getObject();
                    this.earlySingletonObjects.put(beanName, singletonObject);
                    this.singletonFactories.remove(beanName);
                }
            }
        }
    }
    return singletonObject;
}


public Object getSingleton(String beanName, ObjectFactory<?> singletonFactory) {
    Assert.notNull(beanName, "Bean name must not be null");
    synchronized (this.singletonObjects) {
        // 先從一級快取中取,若取不到,則從singletonFactory方法中取
        Object singletonObject = this.singletonObjects.get(beanName);
        if (singletonObject == null) {
            if (this.singletonsCurrentlyInDestruction) {
                throw new BeanCreationNotAllowedException(beanName,
                        "Singleton bean creation not allowed while singletons of this factory are in destruction " +
                        "(Do not request a bean from a BeanFactory in a destroy method implementation!)");
            }
            if (logger.isDebugEnabled()) {
                logger.debug("Creating shared instance of singleton bean '" + beanName + "'");
            }
            beforeSingletonCreation(beanName);
            boolean newSingleton = false;
            boolean recordSuppressedExceptions = (this.suppressedExceptions == null);
            if (recordSuppressedExceptions) {
                this.suppressedExceptions = new LinkedHashSet<>();
            }
            try {
                // 獲取bean, 其中getObject方法的具體實現就是createBean方法
                singletonObject = singletonFactory.getObject();
                newSingleton = true;
            }
            catch (IllegalStateException ex) {
                // Has the singleton object implicitly appeared in the meantime ->
                // if yes, proceed with it since the exception indicates that state.
                singletonObject = this.singletonObjects.get(beanName);
                if (singletonObject == null) {
                    throw ex;
                }
            }
            catch (BeanCreationException ex) {
                if (recordSuppressedExceptions) {
                    for (Exception suppressedException : this.suppressedExceptions) {
                        ex.addRelatedCause(suppressedException);
                    }
                }
                throw ex;
            }
            finally {
                if (recordSuppressedExceptions) {
                    this.suppressedExceptions = null;
                }
                afterSingletonCreation(beanName);
            }
            // 如果是初次初始化的單例,則放入一級快取,並移除二、三級快取的內容
            if (newSingleton) {
                addSingleton(beanName, singletonObject);
            }
        }
        return singletonObject;
    }
}
以下是createBean方法的原始碼
/**
 * Central method of this class: creates a bean instance,
 * populates the bean instance, applies post-processors, etc.
 * @see #doCreateBean
 */
@Override
protected Object createBean(String beanName, RootBeanDefinition mbd, @Nullable Object[] args)
throws BeanCreationException {

    if (logger.isTraceEnabled()) {
        logger.trace("Creating instance of bean '" + beanName + "'");
    }
    RootBeanDefinition mbdToUse = mbd;

    // Make sure bean class is actually resolved at this point, and
    // clone the bean definition in case of a dynamically resolved Class
    // which cannot be stored in the shared merged bean definition.
    Class<?> resolvedClass = resolveBeanClass(mbd, beanName);
    if (resolvedClass != null && !mbd.hasBeanClass() && mbd.getBeanClassName() != null) {
        mbdToUse = new RootBeanDefinition(mbd);
        mbdToUse.setBeanClass(resolvedClass);
    }

    // Prepare method overrides.
    try {
        mbdToUse.prepareMethodOverrides();
    }
    catch (BeanDefinitionValidationException ex) {
        throw new BeanDefinitionStoreException(mbdToUse.getResourceDescription(),
                                               beanName, "Validation of method overrides failed", ex);
    }

    try {
        // Give BeanPostProcessors a chance to return a proxy instead of the target bean instance.
        Object bean = resolveBeforeInstantiation(beanName, mbdToUse);
        if (bean != null) {
            return bean;
        }
    }
    catch (Throwable ex) {
        throw new BeanCreationException(mbdToUse.getResourceDescription(), beanName,
                                        "BeanPostProcessor before instantiation of bean failed", ex);
    }

    try {
        // 例項化bean的具體建立過程在doCreateBean方法中
        Object beanInstance = doCreateBean(beanName, mbdToUse, args);
        if (logger.isTraceEnabled()) {
            logger.trace("Finished creating instance of bean '" + beanName + "'");
        }
        return beanInstance;
    }
    catch (BeanCreationException | ImplicitlyAppearedSingletonException ex) {
        // A previously detected exception with proper bean creation context already,
        // or illegal singleton state to be communicated up to DefaultSingletonBeanRegistry.
        throw ex;
    }
    catch (Throwable ex) {
        throw new BeanCreationException(
            mbdToUse.getResourceDescription(), beanName, "Unexpected exception during bean creation", ex);
    }
}

/**
 * Actually create the specified bean. Pre-creation processing has already happened
 * at this point, e.g. checking {@code postProcessBeforeInstantiation} callbacks.
 * <p>Differentiates between default bean instantiation, use of a
 * factory method, and autowiring a constructor.
 * @param beanName the name of the bean
 * @param mbd the merged bean definition for the bean
 * @param args explicit arguments to use for constructor or factory method invocation
 * @return a new instance of the bean
 * @throws BeanCreationException if the bean could not be created
 * @see #instantiateBean
 * @see #instantiateUsingFactoryMethod
 * @see #autowireConstructor
 */
protected Object doCreateBean(final String beanName, final RootBeanDefinition mbd, final @Nullable Object[] args)
        throws BeanCreationException {

    // 例項化bean
    BeanWrapper instanceWrapper = null;
    if (mbd.isSingleton()) {
        instanceWrapper = this.factoryBeanInstanceCache.remove(beanName);
    }
    if (instanceWrapper == null) {
        instanceWrapper = createBeanInstance(beanName, mbd, args);
    }
    final Object bean = instanceWrapper.getWrappedInstance();
    Class<?> beanType = instanceWrapper.getWrappedClass();
    if (beanType != NullBean.class) {
        mbd.resolvedTargetType = beanType;
    }

    // Allow post-processors to modify the merged bean definition.
    synchronized (mbd.postProcessingLock) {
        if (!mbd.postProcessed) {
            try {
                applyMergedBeanDefinitionPostProcessors(mbd, beanType, beanName);
            }
            catch (Throwable ex) {
                throw new BeanCreationException(mbd.getResourceDescription(), beanName,
                        "Post-processing of merged bean definition failed", ex);
            }
            mbd.postProcessed = true;
        }
    }

    // Eagerly cache singletons to be able to resolve circular references
    // even when triggered by lifecycle interfaces like BeanFactoryAware.
    boolean earlySingletonExposure = (mbd.isSingleton() && this.allowCircularReferences &&
            isSingletonCurrentlyInCreation(beanName));
    if (earlySingletonExposure) {
        if (logger.isTraceEnabled()) {
            logger.trace("Eagerly caching bean '" + beanName +
                    "' to allow for resolving potential circular references");
        }
        // 將singletonFactory放入三級快取
        addSingletonFactory(beanName, () -> getEarlyBeanReference(beanName, mbd, bean));
    }

    // 將初始化的bean例項化
    Object exposedObject = bean;
    try {
        // 依賴注入
        populateBean(beanName, mbd, instanceWrapper);
        // 初始化
        exposedObject = initializeBean(beanName, exposedObject, mbd);
    }
    catch (Throwable ex) {
        if (ex instanceof BeanCreationException && beanName.equals(((BeanCreationException) ex).getBeanName())) {
            throw (BeanCreationException) ex;
        }
        else {
            throw new BeanCreationException(
                    mbd.getResourceDescription(), beanName, "Initialization of bean failed", ex);
        }
    }

    if (earlySingletonExposure) {
        Object earlySingletonReference = getSingleton(beanName, false);
        if (earlySingletonReference != null) {
            if (exposedObject == bean) {
                exposedObject = earlySingletonReference;
            }
            else if (!this.allowRawInjectionDespiteWrapping && hasDependentBean(beanName)) {
                String[] dependentBeans = getDependentBeans(beanName);
                Set<String> actualDependentBeans = new LinkedHashSet<>(dependentBeans.length);
                for (String dependentBean : dependentBeans) {
                    if (!removeSingletonIfCreatedForTypeCheckOnly(dependentBean)) {
                        actualDependentBeans.add(dependentBean);
                    }
                }
                if (!actualDependentBeans.isEmpty()) {
                    throw new BeanCurrentlyInCreationException(beanName,
                            "Bean with name '" + beanName + "' has been injected into other beans [" +
                            StringUtils.collectionToCommaDelimitedString(actualDependentBeans) +
                            "] in its raw version as part of a circular reference, but has eventually been " +
                            "wrapped. This means that said other beans do not use the final version of the " +
                            "bean. This is often the result of over-eager type matching - consider using " +
                            "'getBeanNamesOfType' with the 'allowEagerInit' flag turned off, for example.");
                }
            }
        }
    }

    // Register bean as disposable.
    try {
        registerDisposableBeanIfNecessary(beanName, bean, mbd);
    }
    catch (BeanDefinitionValidationException ex) {
        throw new BeanCreationException(
                mbd.getResourceDescription(), beanName, "Invalid destruction signature", ex);
    }

    return exposedObject;
}


/**
 * Add the given singleton factory for building the specified singleton
 * if necessary.
 * <p>To be called for eager registration of singletons, e.g. to be able to
 * resolve circular references.
 * @param beanName the name of the bean
 * @param singletonFactory the factory for the singleton object
 */
protected void addSingletonFactory(String beanName, ObjectFactory<?> singletonFactory) {
    Assert.notNull(singletonFactory, "Singleton factory must not be null");
    synchronized (this.singletonObjects) {
        if (!this.singletonObjects.containsKey(beanName)) {
            this.singletonFactories.put(beanName, singletonFactory);
            this.earlySingletonObjects.remove(beanName);
            this.registeredSingletons.add(beanName);
        }
    }
}
下面是依賴注入的方法populateBean()
/**
 * Populate the bean instance in the given BeanWrapper with the property values
 * from the bean definition.
 * @param beanName the name of the bean
 * @param mbd the bean definition for the bean
 * @param bw the BeanWrapper with bean instance
 */
@SuppressWarnings("deprecation")  // for postProcessPropertyValues
protected void populateBean(String beanName, RootBeanDefinition mbd, @Nullable BeanWrapper bw) {
    if (bw == null) {
        if (mbd.hasPropertyValues()) {
            throw new BeanCreationException(
                mbd.getResourceDescription(), beanName, "Cannot apply property values to null instance");
        }
        else {
            // Skip property population phase for null instance.
            return;
        }
    }

    // Give any InstantiationAwareBeanPostProcessors the opportunity to modify the
    // state of the bean before properties are set. This can be used, for example,
    // to support styles of field injection.
    boolean continueWithPropertyPopulation = true;

    if (!mbd.isSynthetic() && hasInstantiationAwareBeanPostProcessors()) {
        for (BeanPostProcessor bp : getBeanPostProcessors()) {
            if (bp instanceof InstantiationAwareBeanPostProcessor) {
                InstantiationAwareBeanPostProcessor ibp = (InstantiationAwareBeanPostProcessor) bp;
                if (!ibp.postProcessAfterInstantiation(bw.getWrappedInstance(), beanName)) {
                    continueWithPropertyPopulation = false;
                    break;
                }
            }
        }
    }

    if (!continueWithPropertyPopulation) {
        return;
    }

    PropertyValues pvs = (mbd.hasPropertyValues() ? mbd.getPropertyValues() : null);
    // 根據名稱或這型別來執行依賴注入
    if (mbd.getResolvedAutowireMode() == AUTOWIRE_BY_NAME || mbd.getResolvedAutowireMode() == AUTOWIRE_BY_TYPE) {
        MutablePropertyValues newPvs = new MutablePropertyValues(pvs);
        // Add property values based on autowire by name if applicable.
        if (mbd.getResolvedAutowireMode() == AUTOWIRE_BY_NAME) {
            autowireByName(beanName, mbd, bw, newPvs);
        }
        // Add property values based on autowire by type if applicable.
        if (mbd.getResolvedAutowireMode() == AUTOWIRE_BY_TYPE) {
            autowireByType(beanName, mbd, bw, newPvs);
        }
        pvs = newPvs;
    }

    boolean hasInstAwareBpps = hasInstantiationAwareBeanPostProcessors();
    boolean needsDepCheck = (mbd.getDependencyCheck() != AbstractBeanDefinition.DEPENDENCY_CHECK_NONE);

    PropertyDescriptor[] filteredPds = null;
    if (hasInstAwareBpps) {
        if (pvs == null) {
            pvs = mbd.getPropertyValues();
        }
        for (BeanPostProcessor bp : getBeanPostProcessors()) {
            if (bp instanceof InstantiationAwareBeanPostProcessor) {
                InstantiationAwareBeanPostProcessor ibp = (InstantiationAwareBeanPostProcessor) bp;
                PropertyValues pvsToUse = ibp.postProcessProperties(pvs, bw.getWrappedInstance(), beanName);
                if (pvsToUse == null) {
                    if (filteredPds == null) {
                        filteredPds = filterPropertyDescriptorsForDependencyCheck(bw, mbd.allowCaching);
               }
               pvsToUse = ibp.postProcessPropertyValues(pvs, filteredPds, bw.getWrappedInstance(), beanName);
               if (pvsToUse == null) {
                  return;
               }
            }
            pvs = pvsToUse;
         }
      }
   }
   if (needsDepCheck) {
      if (filteredPds == null) {
         filteredPds = filterPropertyDescriptorsForDependencyCheck(bw, mbd.allowCaching);
      }
      checkDependencies(beanName, mbd, filteredPds, pvs);
   }

   if (pvs != null) {
      applyPropertyValues(beanName, mbd, bw, pvs);
   }
}


/**
 * Fill in any missing property values with references to
 * other beans in this factory if autowire is set to "byName".
 * @param beanName the name of the bean we're wiring up.
 * Useful for debugging messages; not used functionally.
 * @param mbd bean definition to update through autowiring
 * @param bw the BeanWrapper from which we can obtain information about the bean
 * @param pvs the PropertyValues to register wired objects with
 */
protected void autowireByName(
        String beanName, AbstractBeanDefinition mbd, BeanWrapper bw, MutablePropertyValues pvs) {

    String[] propertyNames = unsatisfiedNonSimpleProperties(mbd, bw);
    for (String propertyName : propertyNames) {
        if (containsBean(propertyName)) {
            // 此處又呼叫getBean(),來獲取依賴的bean
            Object bean = getBean(propertyName);
            pvs.add(propertyName, bean);
            registerDependentBean(propertyName, beanName);
            if (logger.isTraceEnabled()) {
                logger.trace("Added autowiring by name from bean name '" + beanName +
                        "' via property '" + propertyName + "' to bean named '" + propertyName + "'");
            }
        }
        else {
            if (logger.isTraceEnabled()) {
                logger.trace("Not autowiring property '" + propertyName + "' of bean '" + beanName +
                        "' by name: no matching bean found");
            }
        }
    }
}
bean建立流程總結
以下是主要流程(doGetBean、createBean)的虛擬碼public class Test {
public Object getBean(String name) throws BeansException {
doGetBean(引數...);
}
protected <T> T doGetBean(final String name, @Nullable final Class<T> requiredType,
@Nullable final Object[] args, boolean typeCheckOnly) throws BeansException{
bean = getSingleton(beanName, false);
if (bean == null) {
ObjectFactory beanFactory = () -> {
return createBean(beanName, mbd, args);
};
bean = getSingleton(beanName, beanFactory);
}
}
protected Object getSingleton(String beanName, boolean allowEarlyReference) {
if(singletonObjects快取存在bean) return bean;
if(earySingletonObjects快取存在bean) return bean;
if(singletonFactories快取存在singletonFactory != null) {
singletonFactory = singletonFactories.getSingletonFactory;
bean = singletonFactory.getObject(呼叫createBean());
bean快取至earySingletonObjects;
刪除在singletonFactories中的快取;
}
}
public Object getSingleton(String beanName, ObjectFactory<?> singletonFactory) {
if(singletonObjects快取存在bean) {
bean = singletonObjects.getBean(beanName);
} eles {
bean = singletonFactory.getObject(呼叫createBean());
}
if(初次生成的bean) {
bean快取至singletonObjects;
刪除在earySingletonObjects、singletonFactories中的快取;
}
}
protected Object createBean(String beanName, RootBeanDefinition mbd, @Nullable Object[] args)
throws BeanCreationException{
}
protected Object doCreateBean(final String beanName, final RootBeanDefinition mbd, final @Nullable Object[] args)
throws BeanCreationException {
bean = 例項化bean;
將singletonFactory快取至singletonFactories;
依賴注入,呼叫populateBean();
初始化bean;
return bean;
}
protected void populateBean(String beanName, RootBeanDefinition mbd, @Nullable BeanWrapper bw) {
選擇依賴注入的方式;
for() {
被依賴的bean = getBean(beanName);
}
完成依賴注入;
}
- **getBean( ) -> doGetBean( )**
    * 呼叫**getSingleton(beanName)**方法:
        + 先在singletonObjects中查詢bean,若存在,則返回bean;
        + 若上一步取不到bean,在earySingletonObjects中查詢bean,若存在,則返回bean,並將其放入**earySingletonObjects**,並刪除singletonFactories。反之查詢singletonFactories;
        + 若上一步取不到bean,在singletonFactories中查詢bean對應的singletonFactory,若存在,則返回單例bean;
    * 若上一步未查詢到bean,則生成一個singletonFactory(將getObject( )方法重寫為**createBean( )**方法),再呼叫getSingleton(beanName,singletonFactory)方法:
        + 先在singletonObjects中查詢bean,若存在,則返回bean;
        + 若上一步取不到bean,則呼叫singletonFactory的getObject中取(觸發createBean方法);
        + 得到初始化後的bean,將如果bean是首次生成的,則**快取至singletonObjects**,刪除其他快取;


    * **createBean( ) -> doCreateBean( )** **:**
        + 例項化bean
        + 將singletonFactory快取至singletonFactories;
        + 依賴注入populateBean( ):
            - 如果有依賴,則透過條用getBean( )介面來獲取依賴的beanB(這一步將beanB的singletonFactory快取至singletonFactories);
            - 將beanB快取至earlySingletonFactory,刪除singletonFactories中的快取;
            - 注入beanB;
        + 初始化:初始化bean;
        + 返回初始化後的bean;
三級快取
關於我們熟知的三級快取的,以下是bean放入三級快取的時刻: * singletonFactories快取:是在首次建立bean時,將singletonFactory存入singletonFactories,入口在**createBean( ) -> doCreateBean( )**
* earlySingletonObjects快取:是bean被注入其他bean後,將被注入的bean快取至earlySingletonObjects,入口在**populateBean( ) -> getBean( ) -> doGetBean( ) -> getSingleton(beanName)**
* singletonObjects快取:是在bean完成初始化之後,將bean快取至singletonObjects;入口在**getBean( ) -> doGetBean( )**