RedHat 7.2配置LAMP環境下的redius+mysql+openvpn環境
利用openvpn+mysql+freeradius+RadiusPlugin+daloRADIUS搭建可管理的OPENVPN
因每一個人的環境有所不同,安裝這個環境需要你有一定的linux基礎,要不然出現報錯情況你將不能很好的進行排錯。有一些圖是多截的,就是讓大家看到一些安裝過程的相關內容,供參考。在搭本環境過程中會出現各類錯誤,建議大家將整個環境分開多個小環境,在小環境搭成功後先把系統備份一下,至少可以分成:LAMP+freeradius+openvpn等三個部分。本文是在先完成搭建整理出相關資料後,再利用相關資料進行重新搭建環境後完善的總結,雖然是在寫後再搭再完善資料的,但難勉有錯。
一:各元件作用說明:
openvpn 就是openvpn的主軟體
mysql 資料庫,當然也可以用mariadb資料庫
freeradius 用來進行賬戶認證管理,記賬管理
RadiusPlugin 是freeradius與mysql進行連結的元件
daloRADIUS 帶Web程式管理FreeRADIUS服務
二:本例中的各系統版本說明:
作業系統:radhat 7.2 64bit
openvpn版本:openvpn-2.4.4-1.el7.x86_6
mysql版本:利用mysql> select version(); 得到 5.7.20
RadiusPlugin版本:radiusplugin_v2.1a_beta1.tar.gz 就是整個下載的包名
PHP版本: 7.0.26 利用命令 php -v得到
PHP 7.0.26 (cli)(built: Nov 27 2017 11:27:17) ( NTS )
Copyright (c)1997-2017 The PHP Group
Zend Engine v3.0.0,Copyright (c) 1998-2017 Zend Technologies
FreeRadius版本:直接yum -y install freeradiusfreeradius-utils freeradius-mysql安裝
daloRADIUS版本:直接利用命令下載(實際的時候只下載了0.9.9.tar.gz這個包)
wget https://github.com/lirantal/daloradius/archive/master.zip
以及
即為0.9.9的版本,兩個包分別解壓後再合併在一起(其實很多檔案一樣的,還是建議直接用0.9.9的包,master的包不要用了)
防火牆說明:本文利用firewall並不是iptables方式(對於兩者配置上的轉換見下面章節)
三:搞明白認證方式,各檔案間的相互關係:
openvpn可以是利用證照認證、使用者名稱與密碼認證兩種方式,搭建來認證方式的前提是openvpn可以完成利用證照方式認證登入;
而openvpn+mysql中利用pam_mysql方式進行認證與本例中的radius方式認證openvpn是兩回事,所以這裡不用到pam_mysql元件,即根本不會理會pam_mysql這個元件的事;
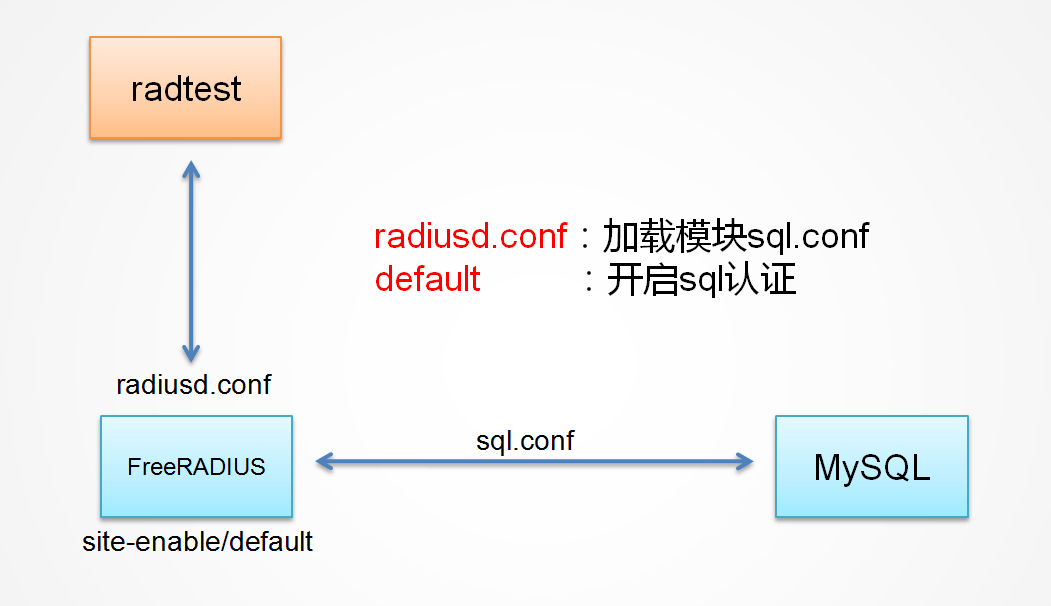
這裡的認證方式是openvpn通過radius方式去認證,而radius則與後臺的mysql資料庫進行通訊認證,其各軟體間的關係如下:
其中:client.conf為linux端的客戶端配置檔案,對應windows端的是client.ovpn
server.conf是openvpn服務端的主要配置檔案
radiusplugin.cnf 與 radiusplugin.so 為openvpn與RadiusPlugin進行連結的配置檔案,radiusplugin.cnf檔案裡有相關配置
radiusplugin.cnf同時也是RadiusPlugin與Freeradius服務端進行通訊的一個配置檔案
/etc/raddb/client.conf是RadiusPlugin與Freeradius服務端進行通訊的一個配置檔案,另一個配置檔案
/etc/raddb/mods-available/sql檔案是mysql與Freeradius進行通訊的配置檔案(下面圖中的sql.conf是錯的,並不是sql.conf而是sql)
這裡可以將整個系統分成三部分:openvpn、mysql(mariadb)、freeradius 然後通過radiusplugin進行相互的連結與通訊。即如果不用radiusplugin進行相互間的連結,那麼openvpn、mysql、freeradius(加daloRADIUS)這三者之前是可以獨立工作的,或者說是openvpn與mysql、freeradius(加daloRADIUS)這兩者間可以獨立工作(這裡就是freeradius與mysql資料結合在一起工作)

修正後的圖:

四:涉及到的防火牆配置及相關
增加udp的1194埠:firewall-cmd --add-port=1194/udp --permanent
重新載入防火牆:firewall-cmd --reload
重啟防火牆systemctl restart firewalld.service
對於將radius的1812以及1813等udp埠進行加入防火牆,讓其可以通過完全可以參考上面描述,這裡預設openvpn用1194埠
為使得連結成功後可以連結別的計算機需要加入路由:
[root@localhost~]# iptables -A INPUT -p udp --dport 1194 -j ACCEPT
[root@localhost~]# iptables -t nat -A POSTROUTING -o tun0 -s 192.168.128.0/24 -j MASQUERADE
[root@localhost~]# iptables -t nat -A POSTROUTING -o eth0 -s 192.168.128.0/24 -j MASQUERADE
注意對應的網口號與IP地址,192.168.128.0為openvpn服務端配置的server欄位值
五:搭建過程中可能遇到的報錯資訊
5.1:mysql安裝過程報mysql.sock錯誤:
ERROR2002 (HY000): Can't connect to local MySQL server through socket'/var/lib/mysql/mysql.sock' (2)
其實是沒有安裝完成,要重新裝一下
裝好後要更新root密碼
updatemysql.user set password=password('123456') where User="root" andHost="localhost";
flushprivileges;
5.2:利用radtest認證返回Access-Reject
[root@localhost mysql]# radtest sense 123456 192.168.1.200 0testing123
SentAccess-Request Id 67 from 0.0.0.0:41089 to 192.168.1.200:1812 length 75
User-Name = "sense"
User-Password = "123456"
NAS-IP-Address = 127.0.0.1
NAS-Port = 0
Message-Authenticator = 0x00
Cleartext-Password = "123456"
ReceivedAccess-Reject Id 67 from 192.168.1.200:1812 to 0.0.0.0:0 length 20
(0)-: Expected Access-Accept got Access-Reject
解決:
#radtest testing password123 127.0.0.1 0 testing123
終於明白為什麼認證不成功了,建使用者的時候要用Cleartext-Password
insertinto radcheck (username,attribute,op,value) values ('test','Cleartext-Password',':=','testpwd');
即在建使用者的時候要選擇Cleartext-Password這種認證方式,否則報錯
5.3:安裝後openvpn不能利用serviceopenvpn start 來啟動
解決:手工輸入openvpn /etc/openvpn/server.conf & 後臺執行
5.4:安裝後vpn不能轉發地址
編輯 /etc/sysctl.conf
將下面欄位值設定為1,即: net.ipv4.ip_forward = 1
然後進行重新整理 [root@localhost ~]# sysctl-p
5.5:幾種認證方式說明
0(or “plain”):不加密,明文儲存。不推薦使用。
1(or “Y”):使用crypt(3)函式,相當於MySQL中的ENCRYPT()函式。
2(or “mysql”):使用MySQL的PASSWORD()函式。PAM可能與MySQL的函式不同,不推薦使用。
3(or “md5″):使用MD5。
4(or “sha1″):使用SHA1。
MD5我試用過有些問題。最後我使用的是1。
5.6:在用make命令編輯radiusplugin時報std::stringgetTime()提示
[root@localhostradiusplugin]# make
OBJ: RadiusClass/RadiusAttribute.o
OBJ: RadiusClass/RadiusPacket.o
OBJ: RadiusClass/RadiusConfig.o
OBJ: RadiusClass/RadiusServer.o
OBJ: RadiusClass/RadiusVendorSpecificAttribute.o
OBJ: AccountingProcess.o
OBJ: Exception.o
OBJ: PluginContext.o
OBJ: UserAuth.o
OBJ: AcctScheduler.o
OBJ: IpcSocket.o
OBJ: radiusplugin.o
radiusplugin.cpp:In function ‘std::stringgetTime()’:
radiusplugin.cpp:1220:15:warning: variable ‘timeinfo’ set but not used [-Wunused-but-set-variable]
struct tm * timeinfo;
^
OBJ: User.o
OBJ: AuthenticationProcess.o
OBJ: main.o
OBJ: UserAcct.o
OBJ: UserPlugin.o
OBJ: Config.o
BIN: radiusplugin.so
解決:在本例中並沒有理會,因為能生成所需要的檔案,最初有懷疑過這裡可能有問題,但後來測試可以正常使用,所以沒有理會這個提示
5.7Unknown column 'acctupdatetime'
報錯:
Thu Mar 1 09:58:48 2018 : ERROR: (7) sql: ERROR: rlm_sql_mysql: ERROR 1054(Unknown column 'acctupdatetime' in 'field list'): 42S22
ThuMar 1 09:58:48 2018 : Info: Need 6 moreconnections to reach 10 spares
ThuMar 1 09:58:48 2018 : Info: rlm_sql(sql): Opening additional connection (13), 1 of 28 pending slots used
ThuMar 1 09:59:07 2018 : Info: Need 5 moreconnections to reach 10 spares
ThuMar 1 09:59:07 2018 : Info: rlm_sql(sql): Opening additional connection (14), 1 of 27 pending slots used
ThuMar 1 09:59:07 2018 : Auth: (8) LoginOK: [1212] (from client all_client port 1 cli 192.168.1.132)
ThuMar 1 09:59:07 2018 : ERROR: (9) sql:ERROR: rlm_sql_mysql: ERROR 1054 (Unknown column 'acctupdatetime' in 'fieldlist'): 42S22
ThuMar 1 09:59:08 2018 : ERROR: (10) sql:ERROR: rlm_sql_mysql: ERROR 1054 (Unknown column 'acctupdatetime' in 'fieldlist'): 42S22
ThuMar 1 09:59:08 2018 : Info: Need 4 moreconnections to reach 10 spares
ThuMar 1 09:59:08 2018 : Info: rlm_sql(sql): Opening additional connection (15), 1 of 26 pending slots used
原因是在radacct表裡沒有對應的acctupdatetime欄位
解決:
修改CREATE TABLE `radacct` 增加一列,不然沒法更新線上使用者狀態
altertable radacct add acctupdatetime datetime NULL default NULL;
注意新增欄位在重新登入資料庫後才能看到
5.8 利用命令啟動openvpn提示無相關路徑
解決:
利用systemctl -f enable openvpn@server
systemctl startopenvpn@server
5.9利用freeradius認證mysql時報Invalid character ' ' in attribute
通過檢視radius日誌,日誌路徑/var/log/radius/radius.log
TueFeb 27 14:08:41 2018 : Info: rlm_sql (sql): Closing connection (4): Hitidle_timeout, was idle for 108 seconds
TueFeb 27 14:08:41 2018 : Info: rlm_sql (sql): Closing connection (0): Hitidle_timeout, was idle for 108 seconds
TueFeb 27 14:08:41 2018 : Info: rlm_sql (sql): Closing connection (5): Hitidle_timeout, was idle for 108 seconds
TueFeb 27 14:08:41 2018 : Info: rlm_sql (sql): Opening additional connection (6),1 of 32 pending slots used
TueFeb 27 14:08:41 2018 : Info: Need 2 more connections to reach min connections(3)
TueFeb 27 14:08:41 2018 : Info: rlm_sql (sql): Opening additional connection (7),1 of 31 pending slots used
TueFeb 27 14:08:41 2018 : Auth: (0) Invalid user (sql: Failed to create the pair:Invalid character ' ' in attribute): [t] (from client localhost port 1812)
TueFeb 27 14:09:26 2018 : Info: Need 1 more connections to reach min connections(3)
TueFeb 27 14:09:26 2018 : Info: rlm_sql (sql): Opening additional connection (8),1 of 30 pending slots used
TueFeb 27 14:09:26 2018 : Auth: (1) Invalid user (sql: Failed to create the pair:Invalid character ' ' in attribute): [t] (from client localhost port 0)
解決:
查明後發現是一但加入“組”就會驗證失敗,將使用者從組裡刪除就可以了
WedFeb 28 10:45:56 2018 : Info: rlm_sql (sql): Opening additional connection (23),1 of 31 pending slots used
WedFeb 28 10:45:56 2018 : Auth: (11) Invalid user (sql: Failed to create the pair:Invalid character ' ' in attribute): [1212] (from client localhost port 1812)
後來重新向表裡增加組資訊就可以了,認證通過了
加使用者:
insertinto radcheck (username,attribute,op,value) values ('1212','Cleartext-Password',':=','0000');
加組:
insertinto radgroupreply (groupname,attribute,op,value) values('groupname','Auth-Type',':=','Local');
將使用者加組:
insertinto usergroup (username,groupname) values ('1212','groupname');
其實可以先加使用者,不加組,也不將使用者加組,測試radtest t 123456 localhost 1812 testing123是不是返回成功。
成功資訊如下:
[root@localhost~]# radtest 1212 0000 localhost0 testing123
SendingAccess-Request of id 128 to 127.0.0.1 port 1812
User-Name = "1212"
User-Password = "1234"
NAS-IP-Address = 255.255.255.255
NAS-Port = 0
Re-sendingAccess-Request of id 128 to 127.0.0.1 port 1812
User-Name = "1212"
User-Password = "1234"
NAS-IP-Address = 255.255.255.255
NAS-Port = 0
rad_recv:Access-Reject packet from host 127.0.0.1:1812, id=128, length=20
5.10連結時報 Noserver certificate verification method has been enabled錯誤
SunFeb 25 21:30:37 2018 TCP/UDP: Closing socket
SunFeb 25 21:30:37 2018 SIGUSR1[soft,connection-reset] received, processrestarting
SunFeb 25 21:30:37 2018 Restart pause, 5 second(s)
SunFeb 25 21:30:42 2018 WARNING: No server certificate verification method hasbeen enabled. See http://openvpn.net/howto.html#mitm for more info.
SunFeb 25 21:30:42 2018 NOTE: OpenVPN 2.1 requires '--script-security 2' or higherto call user-defined scripts or executables
SunFeb 25 21:30:42 2018 Re-using SSL/TLS context
SunFeb 25 21:30:42 2018 LZO compression initialized
SunFeb 25 21:30:42 2018 Control Channel MTU parms [ L:1544 D:168 EF:68 EB:0 ET:0EL:0 ]
SunFeb 25 21:30:42 2018 Socket Buffers: R=[65536->65536] S=[65536->65536]
SunFeb 25 21:30:42 2018 Data Channel MTU parms [ L:1544 D:1450 EF:44 EB:135 ET:0EL:0 AF:3/1 ]
SunFeb 25 21:30:42 2018 Local Options hash (VER=V4): 'ee93268d'
SunFeb 25 21:30:42 2018 Expected Remote Options hash (VER=V4): 'bd577cd1'
SunFeb 25 21:30:42 2018 Attempting to establish TCP connection with192.168.1.200:1194
SunFeb 25 21:30:42 2018 TCP connection established with 192.168.1.200:1194
SunFeb 25 21:30:42 2018 TCPv4_CLIENT link local: [undef]
SunFeb 25 21:30:42 2018 TCPv4_CLIENT link remote: 192.168.1.200:1194
SunFeb 25 21:30:42 2018 Connection reset, restarting [0]
SunFeb 25 21:30:42 2018 TCP/UDP: Closing socket
SunFeb 25 21:30:42 2018 SIGUSR1[soft,connection-reset] received, processrestarting
SunFeb 25 21:30:42 2018 Restart pause, 5 second(s)
解決:
將server,client間的通訊採用udp協議:proto udp
TLSAuth Error: Auth Username/Password verification failed for peer
manopenvpn 看一下幫助就知道了,服務端需要設定
script-security3
否則密碼環境變數無法傳遞過去,不用system都可以讀取了
六:安裝過程中其它可能用到的命令
檢視日誌:/var/log/messages
/var/log/secure
別的日誌檔案作用自己網上搜一下
建字符集中uft8的庫: create database openvpncharset=utf8;
CREATEDATABASE IF NOT EXISTS reaidus DEFAULT CHARSET utf8;
pam_mysql時的testsaslauthd驗證
#驗證本地登入,使用者名稱和密碼是登入Centos使用的使用者名稱和密碼
testsaslauthd-u username -p password -s sshd
#驗證openvpn,使用者名稱密碼是資料庫openvpn.user中的使用者名稱和密碼
testsaslauthd-u username -p password -s openvpn
關閉selinux
臨時:setenforce 0
永久:修改/etc/selinux/config 檔案
將SELINUX=enforcing改為SELINUX=disabled
重啟機器即可
七:在CentOS7,RHEL7安裝FreeRadius+Daloradiusweb管理
這裡並不進行對應的漢化,主要參考文章
http://blog.csdn.net/zy517863543/article/details/78914150
注意:本文所有命令均在root命令下執行,linux下的網路配置這裡不說明了
這個是對應的/etc/sysconfig/network-scripts/ifcfg-enp0s3檔案內容,原來計算機用的是200現在用的是234的IP
TYPE=Ethernet
BOOTPROTO=none
DEFROUTE=yes
IPV4_FAILURE_FATAL=no
IPV6INIT=yes
IPV6_AUTOCONF=yes
IPV6_DEFROUTE=yes
IPV6_FAILURE_FATAL=no
NAME=enp0s3
UUID=XXXXXXXXXXXXXXXXXXXXXXXXX
DEVICE=enp0s3
ONBOOT=yes
IPADDR=192.168.1.234
PREFIX=24
GATEWAY=192.168.1.1
DNS1=XXX.XXX.XXX.XXX
IPV6_PEERDNS=yes
IPV6_PEERROUTES=yes
在開始安裝之前,建議關閉SELinux或將其設定為disabled,最好建議永久關閉SELinux:
# sed -i 's/^SELINUX=.*/SELINUX=disabled/g'/etc/selinux/config
重啟系統:reboot,重啟完成後檢視SELinux
#/usr/sbin/sestatus -v

安裝Apache伺服器
這裡需在配置yum源,這裡不做講述,網上很多,可以是利用163的源也可以利用安裝光碟的源(本例用的是163源)
# yum -y installhttpd httpd-devel
-設定開機啟動和啟動Apache服務
# systemctlenable httpd
# systemctl start httpd

啟動之後瀏覽器中輸入本機ip,可以看到Apache主頁,這裡我設定測試時的IP為192.168.1.200,如果不能訪問,注意把防火牆關了,或是設定相關埠可以訪問
[root@localhostyum.repos.d]# firewall-cmd --add-port=1194/udp --permanent
success
[root@localhostyum.repos.d]# firewall-cmd --add-port=80/tcp --permanent
success
[root@localhostyum.repos.d]# firewall-cmd --add-port=1194/tcp--permanent
success
[root@localhostyum.repos.d]# firewall-cmd --add-port=1812/udp --permanent
success
[root@localhostyum.repos.d]# firewall-cmd --add-port=1813/udp --permanent
success
[root@localhostyum.repos.d]# firewall-cmd --reload
success
[root@localhostyum.repos.d]#
這裡一次性把等下要用到的1812 1813 1194 等埠也加上了,注意tcp還是udp,1194即有tcp又有udp是因為除錯的時候用tcp這樣可以通過客戶端telnet,實際用的時候udp安全,即除錯成功後改成udp。

安裝MariaDB(與下面的安裝mysql選一個就行了)
這裡並沒有安裝這個資料庫,是根據源文複製過來的
為什麼不用Mysql?
答:MariaDB資料庫管理系統是MySQL的一個分支,主要由開源社群在維護,採用GPL授權許可。開發這個分支的原因之一是:甲骨文公司收購了MySQL後,有將MySQL閉源的潛在風險,因此社群採用分支的方式來避開這個風險。
安裝
# yum install -ymariadb-server mariadb
設定MariaDB開機啟動和啟動MariaDB服務
# systemctl startmariadb
# systemctl enable mariadb

檢視MariaDB狀態,running已經執行
# systemctlstatus mariadb

初始設定MariaDB,設定root密碼,出於安全考慮,考慮刪除匿名使用者和禁用遠端根登入,參見下面的示例配置。
#mysql_secure_installation
Set root password?[Y/n] y
New password:
Re-enter new password:
Password updated successfully!
Reloading privilege tables..
... Success!
Remove anonymous users? [Y/n] y
Disallow root login remotely? [Y/n] y
Remove test database and access to it?[Y/n] y
Reload privilege tables now? [Y/n] y
建立Radius資料庫和使用者名稱密碼
# mysql -u root-p
MariaDB[(none)]> CREATEDATABASE radius;
MariaDB[(none)]> GRANT ALL ON radius.* TO radius@localhostIDENTIFIED BY "radius";
MariaDB[(none)]> FLUSHPRIVILEGES;
MariaDB[(none)]> exit
安裝MYSQL,本例為MYSQL(與上面的安裝MariaDB選一個就行了)
首先解除安裝系統自帶mariadb資料庫(預設安裝的可能已裝了mariadb資料庫)
# rpm -qa| grep mariadb
# rpm -e --nodepsmariadb-libs-5.5.44-2.el7.centos.x86_64 (根據上一語句運用結果更改)
本例實際為:
[root@localhost opt]# rpm -qa| grep mariadb
mariadb-libs-5.5.44-2.el7.x86_64
[root@localhost opt]# rpm -e --nodepsmariadb-libs-5.5.44-2.el7.x86_64
[root@localhost opt]#
下載YUM庫,一般可以下載到/opt目錄下
# wget http://dev.MySQL.com/get/mysql57-community-release-el7-7.noarch.rpm |
|
安裝YUM庫
# yum localinstall -y mysql57-community-release-el7-7.noarch.rpm
安裝資料庫(這裡有會一個較長的等待時間,要下載近190MB的東西並安裝,當然看你網速)
# yum install -y mysql-community-server

實在太慢,重啟了一下就快了,安裝成功後的載圖:

啟動MySQL服務 systemctl start mysqld.service |
由於mysql5.7會自動生成密碼,密碼檔案儲存在/var/log/mysqld.log 中搜尋password關鍵字即可找到密碼,登陸mysql
# mysql -uroot -p |
mysql > alter user 'root'@'localhost' identified by '密碼'; |
|
重新以root使用者和剛設定的密碼進行登入即可。並授權使用者root使用密碼從任何主機連線到mysql伺服器
mysql > grant all privileges on *.*to 'root'@'%' identifiedby '密碼' with grant option;
mysql > flush privileges; |
|
或允許使用者root只能從ip為192.168.1.200的主機連線到mysql伺服器
mysql > grant all privileges on *.*to 'root'@'192.168.1.200' identified by '密碼' with grant option;
mysql > flush privileges; |
|
開啟3306埠
# firewall-cmd --add-port=3306/tcp |
|
以上所述是介紹的redhat7.2下使用YUM快速安裝MySQL5.7的方法,實際安裝過程中可能遇到各類問題,自己在網上搜一下解決方案就可以了,比如:不能裝簡單密碼插入資料庫、密碼長度過短或過長等。如果密碼輸入錯誤可以在網上搜相關資料,這裡我參照的是http://blog.csdn.net/mrs_haining/article/details/78953259 注意5.7的版本是authentication_string欄位,而不是password欄位
update user set authentication_string=password("123456") where user="root";

這裡是裝好了mysql但還沒有建立與radius連結的相關庫與使用者名稱
安裝PHP7
安裝
# curl 'https://setup.ius.io/' -o setup-ius.sh
# bash setup-ius.sh
# yum remove php-cli mod_phpphp-common
# yum -y install mod_php70uphp70u-cli php70u-mysqlnd php70u-devel php70u-gd php70u-mcrypt php70u-mbstringphp70u-xml php70u-pear
-檢視php版本
# php -v

測試PHP,Apache網站跟目錄下新建info.php網頁,按Ins輸入內容後按esc,:wq 儲存退出。
# vim /var/www/html/info.php
<?php
phpinfo();
?>
重啟Apache伺服器,開啟info.php網頁,顯示php資訊即正常。
# systemctlrestart httpd.service

部分命令載圖:

驗證php可以順利讀取mysql(mariadb)資料內容
登入資料庫,然後建表與插入資料
createtable table_name (id int not null ,name varchar(20));
insertinto table_name (id,name) values ('123','test');
在對應目錄/var/www/html下新建test.php檔案,內容如下:
<?php
$server_name="localhost:3306";//資料庫伺服器名稱
$username="radius";// 連線資料庫使用者名稱
$password="radius";// 連線資料庫密碼
$mysql_database="radius";// 資料庫的名字
//連線到資料庫
$conn=mysql_connect($server_name,$username, $password);
mysql_query("setnames utf8");
//從表中提取資訊的sql語句
$strsql="select* from table_name";
//執行sql查詢
//mysql_select_db($mysql_database,$conn);
//$result=mysql_query($sql);
$result=mysql_db_query($mysql_database,$strsql, $conn);
//獲取查詢結果
//定位到第一條記錄
mysql_data_seek($result,0);
//迴圈取出記錄
while($row=mysql_fetch_row($result))
{
for($i=0; $i<mysql_num_fields($result); $i++ )
{
echo$row[$i];
}
}
//釋放資源
mysql_free_result($result);
//關閉連線
mysql_close($conn);
?>
安裝FreeRadius
安裝
# yum -y installfreeradius freeradius-utils freeradius-mysql

等待下載完成之後出現:Complete,即完整完成。

啟動radius和設定開機啟動
# systemctl startradiusd.service
# systemctl enable radiusd.service
檢視Radius使用的埠,然後新增Radius服務到防火牆中;
# cat/usr/lib/firewalld/services/radius.xml
檢視防火牆狀態,啟動狀態才能新增規則,centos7中預設防火牆就是firewalld,一般不需要額外設定。
# firewall-cmd--state
新增Radius服務到firewalld中。
# firewall-cmd--add-service=radius --permanent
success
# firewall-cmd --reload
success
# firewall-cmd --list-services
dhcpv6-client radius ssh

這裡沒有別的沒有關係主要是要有radius,其中SSH是我用SecureCRT連結的程式
配置FreeRadius(實際用的是mysql,其實效果是一樣的)
先建立相關的資料庫與使用者名稱,這個步驟資料上沒有(如果是利用MariaDB的可以參照上面的內容,我這裡是另外建的,建成utf8字符集的),所以這裡補上
新建庫
CREATEDATABASE IF NOT EXISTS radius DEFAULT CHARSET utf8;
報錯:ERROR 1820 (HY000): You must SET PASSWORD before executing this statement

解決:
SET PASSWORD = PASSWORD('123456');這句話重新設定一次密碼!

GRANTALL ON radius.* TO radius@'%' IDENTIFIED BY "radius"; # 將使用者授權
FLUSHPRIVILEGES; # 重新整理
mysql-uradius -pradius #利用使用者登入

利用show databases;就可以看到radius使用者所可以操作的庫了

好了,在mysql上建立radius庫完成
匯入Radius資料庫到mysql資料庫中
# mysql -u root-p radius < /etc/raddb/mods-config/sql/main/mysql/schema.sql

為/etc/raddb/mods-enabled建立軟連線
# ln -s/etc/raddb/mods-available/sql /etc/raddb/mods-enabled/
配置SQL模組/ raddb/mods-available/ SQL,並更改資料庫連線引數,以適合您的環境:
# vim/etc/raddb/mods-available/sql
sql {
#The sub-module to use to execute queries. This should match
#the database you're attempting to connect to.
#
# * rlm_sql_mysql
# * rlm_sql_mssql
# * rlm_sql_oracle
# * rlm_sql_postgresql
# * rlm_sql_sqlite
# * rlm_sql_null (log queries to disk)
#
driver = "rlm_sql_mysql"
dialect = "mysql"
#Connection info:
#
server = "localhost"
port = 3306
login = "radius"
password = "radius"
#Database table configuration for everything except Oracle
radius_db = "radius"
......
# Set to 'yes' to read radiusclients from the database ('nas' table)
#Clients will ONLY be read on server startup.
read_clients = yes


其他配置預設無需更改。
然後,將/etc/raddb/mods-enabled/sql所屬組更改為radiusd:
# chgrp -hradiusd /etc/raddb/mods-enabled/sql
新增啟動服務
# systemctl enable radiusd.service
調整FreeRadius與mysql的啟動順序,FreeRadius必須在mysql啟動之後啟動,在[Unit]部分,增加After=mysqld.service,就是編輯
/etc/systemd/system/multi-user.target.wants/radiusd.service
檔案,如下圖所示:
# vim/etc/systemd/system/multi-user.target.wants/radiusd.service
加入:After=mariadb.service

新增客戶端連線設定,新增允許所有使用者接入,如需特定ip訪問,ip可以自由更改。
# vim/etc/raddb/clients.conf
clientall_client {
ipaddr = 0.0.0.0/0
secret = testing123
require_message_authenticator = no
}

測試 radius驗證mysql成功
如果這一步沒成功,則在後面openvpn進行使用者名稱與密碼登入的時候就不能實現,但是你可以正常用網頁訪問利用freeradius操作mysql資料庫
建立組資訊
mysql>insert into radgroupreply (groupname,attribute,op,value) values('user','Auth-Type',':=','Local');
mysql>insert into radgroupreply (groupname,attribute,op,value) values('user','Service-Type',':=','Framed-User');
mysql>insert into radgroupreply (groupname,attribute,op,value) values('user','Framed-IP- Address',':=','255.255.255.255');
mysql>insert into radgroupreply (groupname,attribute,op,value) values('user','Framed-IP- Netmask',':=','255.255.255.0');
建立使用者資訊
mysql>insert into radcheck (username,attribute,op,value) values('test','User-Password',':=','test');
mysql>insert into radcheck (username,attribute,op,value) values('sense','User-Password',':=','123456');
將使用者加入組中:
mysql>insert into radusergroup (username,groupname) values ('test','user');
報錯資訊:

原因是有空格????同時提示是in attribute 這個屬性,欄位
解決辦法:
重新向表裡增加組資訊就可以了,認證通過了
新加使用者:
insertinto radcheck (username,attribute,op,value) values('1212','Cleartext-Password',':=','0000');
新加組名:
insertinto radgroupreply (groupname,attribute,op,value) values('groupname','Auth-Type',':=','Local');
將使用者名稱加組:
insert into usergroup (username,groupname)values ('1212','groupname');
其實這裡是表裡的欄位出現了未各知的空格,表面看不出來的

前面兩個沒有驗證成功是所以組有空格,下面的驗證成功(組資訊是新加的)
radtest使用者名稱 對應密碼 localhost 1812testing123
這個是mysql裡資料庫對應的使用者名稱與密碼,就是在表radcheck裡
而要改的是radusergroup 這張表的相關資訊,就是新增一條正確的


這樣就完成了radius與mysql間的驗證
安裝FreeRADIUS管理介面Daloradius
進入Apache網站根目錄,下載原始檔
# cd/var/www/html/
# wget https://github.com/lirantal/daloradius/archive/master.zip
如出現 -bash: wget: command not found 等就安裝相應軟體,沒出現忽略這步。
# yum -y install wgetunzip zip (部分已安裝的話可以不用執行本命令的)
解壓壓縮包,修改資料夾名稱
# unzipmaster.zip
# mv daloradius-master/ daloradius

下載daloradius-0.9-9.tar.gz,解壓後合併到daloradius資料夾中
下載時的相關命令及結果:
tar-zxvf daloradius-0.9-9.tar.gz
cddaloradius-0.9-9/
cp-r -f daloradius-0.9-9/* daloradius/ (直接覆蓋而不提示,如果還是提示請網上搜一下,比如:cp覆蓋不提示)


進入daloradius目錄,匯入daloradius資料庫
(本例先將路徑轉到了/var/www/html/daloradius/contrib/db)
# cd daloradius
# mysql -u root -p radius < contrib/db/fr2-mysql-daloradius-and-freeradius.sql
# mysql -u root -p radius <contrib/db/mysql-daloradius.sql
設定daloradius目錄使用者組和使用者,設定daloradius.conf.php許可權
# chown -Rapache:apache /var/www/html/daloradius/
# chmod 664/var/www/html/daloradius/library/daloradius.conf.php

設定daloradius資料庫連線資訊,開啟daloradius.conf.php檔案,修改CONFIG_DB_USER,CONFIG_DB_PASS,CONFIG_DB_NAME。
# vim/var/www/html/daloradius/library/daloradius.conf.php

重啟服務
# systemctlrestart radiusd.service
# systemctl restart mysqld.service
# systemctl restart httpd

如果提示:Warning: radiusd.service changed on disk. Run ‘systemctl daemon-reload’ to reloadunits.
沒有上面提示就忽略此步
# systemctldaemon-reload
# systemctl restart radiusd.service

-安裝php-pear
# yum installphp-pear
# pear install DB
登入web介面
預設使用者名稱: administrator
密碼: radius
http://ip-address/daloradius/login.php

登入成功後的介面:

至此FreeRadius+Daloradius+web管理介面已經安裝成功
登入時出現:
Database connection error
Error Message: DB Error: extension not found
報錯資訊

解決方法:
其實這裡是因為沒有正確安裝phh-mysql引起的,但是安裝php-mysql又會提示報錯,所以把mysql先刪除了,yum remove mysql ,然後 yum removephp70u-common-7.0.27-1.ius.el7.x86_64 php70u-mysqlnd-7.0.27-1.ius.el7.x86_64php70u-pdo-7.0.27-1.ius.el7.x86_64 php-mysql-5.4.16-43.el7_4.x86_64 如果安裝php-mysql沒有報錯,這一步不用執行,如果報錯了,看具體資訊,本例是因為裝了這些東西,所以先刪除

八:在redhat7.2下安裝openvpn2.4.4
如何安裝openvpn進行證照認證的文章很多,可以是直接利用yum安裝,也可以利用編輯安裝,這裡只講一下直接利用yum安裝,然後下easy-rsa.zip到指定目錄進行金鑰製作。實際過程中可以根據不同人的情況選擇安裝方式。
1、安裝前的準備工作
請關閉防火牆和selinux,簡單的安裝方法就是使用yum安裝,首先我們應該先安裝epel軟體倉庫。
serviceiptables stop
setenforce0
rpm-ivh http://mirrors.ustc.edu.cn/fedora/epel/6/x86_64/epel-release-6-8.noarch.rpm
2、開啟伺服器端路由轉發功能
sysctl-w net.ipv4.ip_forward=1
3、設定nat轉發
注:保證VPN地址池可路由出外網(在redhat 7.0以上版本建議利用firewall,具體配置見另外章節)
iptables-t nat -A POSTROUTING -s 10.8.0.0/24-o eth0 -j MASQUERADE
注意將10.8.0.0/24 與 eth0改成實際地址,
本例中10.8.0.0/24改為192.168.128.0/24 eth0改為enp0s3 就是ifconfig出來後的網路卡名
4、安裝openvpn,他會自動解決依賴關係
我使用的openvpn版本是2.4.4,建議大家也使用這個版本
yuminstall openvpn -y
如果不能安裝,則重新配置163源然後
yum clean all&& yum makecache && yum install epel-release -y && yumupdate -y
5、安裝好之後我們檢視安裝了哪些檔案
[root@vpn~]# rpm -ql openvpn
/etc/openvpn
/etc/openvpn/client
/etc/openvpn/server
/run/openvpn-client
/run/openvpn-server
/usr/lib/systemd/system/openvpn-client@.service
/usr/lib/systemd/system/openvpn-server@.service
/usr/lib/systemd/system/openvpn@.service
/usr/lib/tmpfiles.d/openvpn.conf
/usr/lib64/openvpn
/usr/lib64/openvpn/plugins
/usr/lib64/openvpn/plugins/openvpn-plugin-auth-pam.so
/usr/lib64/openvpn/plugins/openvpn-plugin-down-root.so
/usr/sbin/openvpn
/usr/share/doc/openvpn-2.4.4
/usr/share/doc/openvpn-2.4.4/AUTHORS
/usr/share/doc/openvpn-2.4.4/COPYING
/usr/share/doc/openvpn-2.4.4/COPYRIGHT.GPL
/usr/share/doc/openvpn-2.4.4/Changes.rst
/usr/share/doc/openvpn-2.4.4/README
/usr/share/doc/openvpn-2.4.4/README.auth-pam
/usr/share/doc/openvpn-2.4.4/README.down-root
/usr/share/doc/openvpn-2.4.4/README.mbedtls
/usr/share/doc/openvpn-2.4.4/README.systemd
/usr/share/doc/openvpn-2.4.4/contrib
/usr/share/doc/openvpn-2.4.4/contrib/OCSP_check
/usr/share/doc/openvpn-2.4.4/contrib/OCSP_check/OCSP_check.sh
/usr/share/doc/openvpn-2.4.4/contrib/README
/usr/share/doc/openvpn-2.4.4/contrib/openvpn-fwmarkroute-1.00
/usr/share/doc/openvpn-2.4.4/contrib/openvpn-fwmarkroute-1.00/README
/usr/share/doc/openvpn-2.4.4/contrib/openvpn-fwmarkroute-1.00/fwmarkroute.down
/usr/share/doc/openvpn-2.4.4/contrib/openvpn-fwmarkroute-1.00/fwmarkroute.up
/usr/share/doc/openvpn-2.4.4/contrib/pull-resolv-conf
/usr/share/doc/openvpn-2.4.4/contrib/pull-resolv-conf/client.down
/usr/share/doc/openvpn-2.4.4/contrib/pull-resolv-conf/client.up
/usr/share/doc/openvpn-2.4.4/management-notes.txt
/usr/share/doc/openvpn-2.4.4/sample
/usr/share/doc/openvpn-2.4.4/sample/sample-config-files
/usr/share/doc/openvpn-2.4.4/sample/sample-config-files/README
/usr/share/doc/openvpn-2.4.4/sample/sample-config-files/client.conf
/usr/share/doc/openvpn-2.4.4/sample/sample-config-files/firewall.sh
/usr/share/doc/openvpn-2.4.4/sample/sample-config-files/home.up
/usr/share/doc/openvpn-2.4.4/sample/sample-config-files/loopback-client
/usr/share/doc/openvpn-2.4.4/sample/sample-config-files/loopback-server
/usr/share/doc/openvpn-2.4.4/sample/sample-config-files/office.up
/usr/share/doc/openvpn-2.4.4/sample/sample-config-files/openvpn-shutdown.sh
/usr/share/doc/openvpn-2.4.4/sample/sample-config-files/openvpn-startup.sh
/usr/share/doc/openvpn-2.4.4/sample/sample-config-files/roadwarrior-client.conf
/usr/share/doc/openvpn-2.4.4/sample/sample-config-files/roadwarrior-server.conf
/usr/share/doc/openvpn-2.4.4/sample/sample-config-files/server.conf
/usr/share/doc/openvpn-2.4.4/sample/sample-config-files/static-home.conf
/usr/share/doc/openvpn-2.4.4/sample/sample-config-files/static-office.conf
/usr/share/doc/openvpn-2.4.4/sample/sample-config-files/tls-home.conf
/usr/share/doc/openvpn-2.4.4/sample/sample-config-files/tls-office.conf
/usr/share/doc/openvpn-2.4.4/sample/sample-config-files/xinetd-client-config
/usr/share/doc/openvpn-2.4.4/sample/sample-config-files/xinetd-server-config
/usr/share/doc/openvpn-2.4.4/sample/sample-scripts
/usr/share/doc/openvpn-2.4.4/sample/sample-scripts/auth-pam.pl
/usr/share/doc/openvpn-2.4.4/sample/sample-scripts/bridge-start
/usr/share/doc/openvpn-2.4.4/sample/sample-scripts/bridge-stop
/usr/share/doc/openvpn-2.4.4/sample/sample-scripts/ucn.pl
/usr/share/doc/openvpn-2.4.4/sample/sample-scripts/verify-cn
/usr/share/doc/openvpn-2.4.4/sample/sample-windows
/usr/share/doc/openvpn-2.4.4/sample/sample-windows/sample.ovpn
/usr/share/man/man8/openvpn.8.gz
/var/lib/openvpn
以下進行OpenVPN的配置
首先把主要配置檔案複製到/etc/openvpn
cp /usr/share/doc/openvpn-2.4.4/sample/sample-config-files/server.conf /etc/openvpn/ |
|
注意:這裡執行openvpn的許可權是root,如果要使用openvpn許可權執行的話,務必修改一些檔案的許可權,比如證照等等。
vim /etc/openvpn/server.conf
port 1194
proto tcp
dev tun
ca /usr/share/doc/openvpn-2.3.7/sample/sample-keys/ca.crt
cert /usr/share/doc/openvpn-2.3.7/sample/sample-keys/server.crt
key /usr/share/doc/openvpn-2.3.7/sample/sample-keys/server.key
dh /usr/share/doc/openvpn-2.3.7/sample/sample-keys/dh2048.pem
server 10.8.0.0 255.255.255.0
ifconfig-pool-persist ipp.txt
push "route 10.0.0.0 255.255.255.0"
push "redirect-gateway def1 bypass-dhcp"
push "dhcp-option DNS 114.114.114.114"
topology subnet
client-to-client
keepalive 10 120
comp-lzo
persist-key
persist-tun
status /var/log/openvpn/openvpn-status.log
log-append /var/log/openvpn/openvpn.log
verb 3
注:可按照預設模板配置,本例為自定義配置檔案,";"還有"#"開頭的是註釋
--------------------------
# 設定監聽IP,預設是監聽所有IP
;local a.b.c.d
# 設定監聽埠,必須要對應的在防火牆裡面開啟
port 1194
# 設定用TCP還是UDP協議?(用UDP會比較快些)
;proto tcp
proto tcp
# 設定建立tun的路由IP通道,還是建立tap的乙太網通道路,由於IP容易控制,所以推薦使用tun;但如果IPX等必須使用第二層才能通過的通訊,則可以用tap方式,tap也就是乙太網橋接
;dev tap
dev tun
# Windows服務端需要給網路卡一個名稱,linux不需要
;dev-node MyTap
# 這裡是重點,必須指定SSL/TLS root certificate (ca),certificate(cert), and private key(key),ca檔案是服務端和客戶端都必須使用的,但不需要ca.key,服務端和客戶端指定各自的.crt和.key,請注意路徑,可以使用以配置檔案開始為根的相對路徑,也可以使用絕對路徑,請小心存放.key金鑰檔案
ca /usr/share/doc/openvpn-2.4.4/sample/sample-keys/ca.crt
cert /usr/share/doc/openvpn-2.4.4/sample/sample-keys/server.crt
key /usr/share/doc/openvpn-2.4.4/sample/sample-keys/server.key
# 指定Diffie hellman parameters.
dh /usr/share/doc/openvpn-2.4.4/sample/sample-keys/dh2048.pem
# 配置伺服器模式和VPN使用的網段,OpenVPN會自動提供基於該網段的DHCP服務,但不能和任何一方的區域網段重複,VPN伺服器將會把10.8.0.1留給自己,其餘的分配給VPN客戶端,每一個客戶端都會從10.8.0.1這個IP到達OpenVpn服務端,如果使用dev tap模式,則需要註釋掉該指令。
server 192.168.1.200 255.255.255.0
# 維持一個客戶端和virtual IP的對應表,以方便客戶端重新連線可以獲得同樣的IP
ifconfig-pool-persist ipp.txt
# 配置為乙太網橋模式(dev tap),但需要使用系統的橋接功能,這裡不需要使用
;server-bridge 10.8.0.4 255.255.255.0 10.8.0.50 10.8.0.100
# 為客戶端建立對應的路由,以另其通達公司網內部伺服器,但記住,公司網內部伺服器也需要有可用路由返回到客戶端,這裡主要填寫openvpn所在區域網的網段,我的openvpn所在的區域網是10.0.0.0,如果你的openvpn所在的區域網是其他的網段,下面請填寫其他網段,可以填寫多個網段。
;push "route 192.168.20.0 255.255.255.0"
push "route 10.0.0.0 255.255.255.0"
# 若客戶端希望所有的流量都通過VPN傳輸,則可以使用該語句,其會自動改變客戶端的閘道器為VPN伺服器,推薦關閉,一旦設定,請小心服務端的DHCP設定問題,如果需要抓取所以連線VPN客戶端的流量資訊,需要開啟,這就是網路上面所說的翻牆。
;push "redirect-gateway def1 bypass-dhcp" 所有資料都通過VPN
# 用OpenVPN的DHCP功能為客戶端提供指定的DNS、WINS等
push "dhcp-option DNS 114.114.114.114"
;push "dhcp-option WINS 10.8.0.1"
# 預設客戶端之間是不能直接通訊的,除非把下面的語句註釋掉
client-to-client
# 如果您希望有相同Common Name的客戶端都可以登陸,也可以註釋下面的語句,推薦每個客戶端都使用不用的Common Name,開啟的話,一個證照可以多個客戶端連線
;duplicate-cn
# 設定服務端檢測的間隔和超時時間
keepalive 10 120
# 使用lzo壓縮的通訊,服務端和客戶端都必須配置
comp-lzo
# 設定最大使用者數
;max-clients 100
# 讓OpenVPN以nobody使用者和組來執行(安全)
;user nobody
;group nobody
#持續選項會盡量避免訪問某些資源的重新啟動可能不可以因為特權的降級。
persist-key
persist-tun
# 輸出短日誌,每分鐘重新整理一次,以顯示當前的客戶端
status /var/log/openvpn/openvpn-status.log
# 預設日誌會記錄在系統日誌中,但也可以導向到其他地方建議除錯的使用先不要設定,除錯完成後再定義,只能使用其中的一個,log會每次啟動前先清楚日誌,log-append會對資料追加
;log /var/log/openvpn/openvpn.log
log-append /var/log/openvpn/openvpn.log
# 設定日誌的級別
verb 3
--------------------------
其中我們只需要修改一下紅色的部分,很多其他不常用的引數並沒有列舉出來,如果需要可以查閱配置檔案
OpenVPN的啟動
啟動:service openvpn start
檢視埠情況:netstat -tlnp
Active Internet connections (only servers)
Proto Recv-Q Send-Q Local Address Foreign Address State PID/Program name
tcp 0 0 0.0.0.0:22 0.0.0.0:* LISTEN 2381/sshd
tcp 0 0 127.0.0.1:25 0.0.0.0:* LISTEN 1425/master
tcp 0 0 0.0.0.0:1194 0.0.0.0:* LISTEN 12947/openvpn
利用easy_rsa製作證照
下載金鑰製作工具easy_rsa2:如果地址失效,請自己網上搜一下
wgethttps://github.com/OpenVPN/easy-rsa/archive/release/2.x.zip
下面後得到檔案:easy-rsa-release-2.x.zip
解壓easy_rsa並拷貝到/etc/openvpn:
unzip 2.x.zip
mveasy-rsa-release-2.x/easy-rsa/ /etc/openvpn/
編輯easy-rsa的vars檔案,設定相關變數資訊,根據實際情況隨便寫:
cd /etc/openvpn//easy-rsa/2.0
vim vars
export KEY_COUNTRY="CN"
export KEY_PROVINCE="Shanghai"
export KEY_CITY="Shanghai"
export KEY_ORG="11111"
export KEY_EMAIL="ADMIN@111111.COM"
export KEY_OU="MyOpenVPN"
編輯完之後,儲存退出。
///////////////這裡介紹以下將用到的各命令作用,介紹開始///////////////
# 初始化環境變數
source vars
# 清除所有與證照相關的檔案
./clean-all
# 生成CA相關檔案
./build-ca
# 生成服務端相關檔案
./build-key-server server
# 生成客戶端相關檔案
./build-key user1
# 生成dh2048.pem檔案
./build-dh
# 生成ta.key檔案(防DDos攻擊)
openvpn --genkey --secret keys/ta.key
///////////////介紹結束///////////////
將剛才編輯的vars檔案,執行如下命令:
source vars
./clean-all
./build-ca
建立伺服器的證照和金鑰:
./build-key-serverServer
[root@cloud 2.0]# ./build-key-server Server
Generating a 2048 bit RSA private key
.................................+++
............+++
writing new private key to 'Server.key'
中間省略了喲
Certificate is to becertified until May 2 07:49:13 2025 GMT (3650 days)
Sign the certificate?[y/n]:y
1 out of 1 certificaterequests certified, commit? [y/n]y
Write out database with1 new entries
Data Base Updated
建立客戶端的證照和金鑰:
./build-keyclient
[root@cloud 2.0]# ./build-key client
Generating a 2048 bit RSA private key
....................+++
...............................................................................+++
writing new private keyto 'client.key'
-----
Certificate is to becertified until May 2 07:53:17 2025 GMT (3650 days)
Sign the certificate?[y/n]:y
中間省略了喲
1 out of 1 certificaterequests certified, commit? [y/n]y
Write out database with1 new entries
Data Base Updated
建立DiffieHellman 引數:
./build-dh
# 生成ta.key檔案(防DDos攻擊,只是搭openvpn非必須,但本例中是必須的,如果不做影響配置)
openvpn --genkey --secretkeys/ta.key
OpenVPN客戶端的安裝
1.下載客戶端,並預設安裝:
這個網上自己搜一下,注意區別是windows的還是linux的
2.將服務端內ca.crt、client.crt、client.key、client.conf、ta.key複製到客戶端C:\Program Files(x86)\OpenVPN\config\XXX下。即對應的安裝目錄,XXX目錄可以自己新建,注意ta.key檔案這裡可以不要,但是在進行radius認證的時候就要用到了。
3.新建檔案client.ovpn內容如下
client
dev tun
proto tcp
remote 211.152.x.x 1194
resolv-retry infinite
nobind
persist-key
persist-tun
ca ca.crt
cert client.crt
key client.key
comp-lzo
verb 3
客戶端各欄位內容介紹:
# 定義是一個客戶端
client
# 定義使用路由IP模式,與服務端一致
;dev tap
dev tun
# 定義Windows下使用的網路卡名稱,linux不需要
;dev-node MyTap
# 定義使用的協議,與服務端一致
;proto tcp
proto tcp
# 指定服務端地址和埠,如果在公網上,那就是公網地址了,可以用多行指定多臺伺服器實現負載均衡高可用(從上往下嘗試)
remote 192.168.1.200 1194
;remote my-server-2 1194
# 若上面配置了多臺伺服器,讓客戶端隨機連線,以便實現負載均衡
;remote-random
# 解析伺服器域名
resolv-retry infinite
# 客戶端不需要繫結埠
nobind
# Try to preserve some state across restarts.
persist-key
persist-tun
# 重點,就是指定ca和客戶端的證照
ca ca.crt
cert client.crt
key client.key
# 使用lzo壓縮,與服務端一致
comp-lzo
# Set log file verbosity.
verb 3
-----------------------
client裡面可以只填寫上面紅色的引數,其他的引數可以全部刪掉。經過以上搭建過程openvpn可以利用證照進行驗證登入,也就是說到這裡的話openvpn與mysql+freeradius+daloRADIUS兩者間可以獨立工作了,接下就是要將這兩者進行整合。
九:安裝RadiusPlugin並配置FreeRADIUS與MySQL的連線
安裝RadiusPlugin
RadiusPlugin外掛的下載地址,如地址失效請另行下載
http://www.nongnu.org/radiusplugin/。
#下載外掛
wget http://www.nongnu.org/radiusplugin/radiusplugin_v2.1a_beta1.tar.gz
#解壓縮
tar xf radiusplugin_v2.1a_beta1.tar.gz
cd radiusplugin_v2.1a_beta1
#解決依賴問題
yum install libgcrypt-devel -y
#安裝非常簡單,直接在目錄下make
make
#把編譯好的模組拷貝到
cp radiusplugin.so /etc/openvpn/
#拷貝相應的配置檔案
cp radiusplugin.cnf /etc/openvpn/
配置FreeRADIUS與MySQL的連線
對於FreeRADIUS伺服器來說,根據需要,要對3個配置檔案進行修改,其中一個是FreeRADIUS伺服器的主配置檔案radiusd.conf,一個是認證配置檔案default,還有一個是與SQL資料庫相關的配置檔案sql.conf(並沒有sql.conf只有sql即在/etc/raddb/mods-available目錄下)。

1、配置資料庫
首先配置一下資料庫,資料庫的sql指令碼是freeradius-mysql軟體包帶的,所以需要安裝它。
mysql> create database radius;
mysql> grant all privileges on radius.* to radius@"localhost" identified by "radpass";
mysql> grant all privileges on radius.* to radius@"127.0.0.1" identified by "radpass";
mysql> use radius;
mysql> source /etc/raddb/sql/mysql/schema.sql
mysql> source /etc/raddb/sql/mysql/nas.sql
mysql> show tables;
+------------------+
| Tables_in_radius |
+------------------+
| nas |
| radacct |
| radcheck |
| radgroupcheck |
| radgroupreply |
| radpostauth |
| radreply |
| radusergroup |
+------------------+
# 插入測試資料,用於後面認證
mysql> insert into radcheck (username,attribute,op,value) values ('test','Cleartext-Password',':=','test');
8 rows in set (0.00 sec)
這裡要注意Cleartext-Password否則在驗證時可能不成功
主資料庫各欄位含義:
radcheck 使用者檢查資訊表
radreply 使用者回覆資訊表
radgroupcheck 使用者組檢查資訊表
radgroupreply 使用者組檢查資訊表
radusergroup 使用者和組關係表
radacct 計費情況表
radpostauth 認證後處理資訊,可以包括認證請求成功和拒絕的記錄。
nas 網路裝置表
擴充套件功能表,可以按需匯入ippool.sql、wimax.sql wimax、cui.sql cui詳細的表定義。
2、配置主配置檔案radiusd.conf
這個配置檔案比較簡單,在module模組裡面把sql.conf和counter.conf前面的註釋去掉即可,用來啟用資料庫連線查詢等功能(如果沒有找到sql.conf就不用理會,版本不一樣):
# As of 2.0.5, most of the module configurations are in a
# sub-directory. Files matching the regex /[a-zA-Z0-9_.]+/
# are loaded. The modules are initialized ONLY if they are
# referenced in a processing section, such as authorize,
# authenticate, accounting, pre/post-proxy, etc.
#
$INCLUDE ${confdir}/modules/
# Extensible Authentication Protocol
#
# For all EAP related authentications.
# Now in another file, because it is very large.
#
$INCLUDE eap.conf
# Include another file that has the SQL-related configuration.
# This is another file only because it tends to be big.
#
$INCLUDE sql.conf #開啟這裡的註釋
#
# This module is an SQL enabled version of the counter module.
#
# Rather than maintaining seperate (GDBM) databases of
# accounting info for each counter, this module uses the data
# stored in the raddacct table by the sql modules. This
# module NEVER does any database INSERTs or UPDATEs. It is
# totally dependent on the SQL module to process Accounting
# packets.
#
$INCLUDE sql/mysql/counter.conf #開啟這裡的註釋
#
|
|
3、配置radius認證檔案
修改/etc/raddb/site_enabled下的defoult檔案,預設是使用的檔案認證,現在取消檔案認證,改為sql認證,差不多還有file的註釋掉,sql的啟用,下面是一個模板。實際過程中注意先備份原檔案,然後利用模板或是根據模板檔案進行對應修改
| [root@iosvpn ~]# grep -Ev "^#|[:spcae:]*#|^$" /etc/raddb/sites-enabled/default authorize { preprocess chap mschap digest suffix eap { ok = return } sql #去掉註釋,開啟sql expiration logintime pap } authenticate { Auth-Type PAP { pap } Auth-Type CHAP { chap } Auth-Type MS-CHAP { mschap } digest unix eap } preacct { preprocess acct_unique suffix # files } accounting { detail unix radutmp sql #去掉註釋 exec attr_filter.accounting_response } session { radutmp sql } post-auth { sql exec Post-Auth-Type REJECT { attr_filter.access_reject } } pre-proxy { } post-proxy { eap } |
|
4、配置與mysql資料庫連線的配置檔案sql.conf(實際上沒有找到只有sql即在/etc/raddb/mods-available目錄下)
其實按照上面的引數設定的話,這個檔案不需要修改的,檔案內容如下:
[root@iosvpn ~]# grep -Ev "^#|[:spcae:]*#|^$" /etc/raddb/sql.conf
sql {
database = "mysql"
driver = "rlm_sql_${database}"
server = "localhost"
login = "radius"
password = "radpass"
radius_db = "radius"
acct_table1 = "radacct"
acct_table2 = "radacct"
postauth_table = "radpostauth"
authcheck_table = "radcheck"
authreply_table = "radreply"
groupcheck_table = "radgroupcheck"
groupreply_table = "radgroupreply"
usergroup_table = "radusergroup"
deletestalesessions = yes
sqltrace = no
sqltracefile = ${logdir}/sqltrace.sql
num_sql_socks = ${thread[pool].max_servers}
connect_failure_retry_delay = 60
lifetime = 0
max_queries = 0
nas_table = "nas"
$INCLUDE sql/${database}/dialup.conf
}
5、測試FreeRADIUS和MySQL的通訊認證
配置到這裡我們簡單測試一下FreeRADIUS的認證是否可以了。需要命令radtest,如果沒有這個命令,我們可以通過安裝軟體包來新增。
yum install freeradius-utils -y # 啟動freeradius,可以使用radiusd -X開啟Debug模式 service radiusd start |
用radtest測試test使用者,密碼是test。
[root@iosvpn ~]# radtest test test localhost 0 testing123
Sending Access-Request of id 239 to 127.0.0.1 port 1812
User-Name = "test"
User-Password = "test"
NAS-IP-Address = 127.0.0.1
NAS-Port = 0
Message-Authenticator = 0x00000000000000000000000000000000
rad_recv: Access-Accept packet from host 127.0.0.1 port 1812, id=239, length=20
伺服器如果返回有“Access-Accept”的字樣,代表認證成功了,如果有“Access-Reject”字樣則認證失敗,這時可以停用radiusd服務,用命令radiusd -X開啟服務從全部的debug資訊中找到問題並解決,如果NAS-IP-Address顯示的不是127.0.0.1那說明你沒有配置主機名解析,請在hosts裡面配置一下。
OpenVPN通過外掛連線FreeRADIUS進行認證

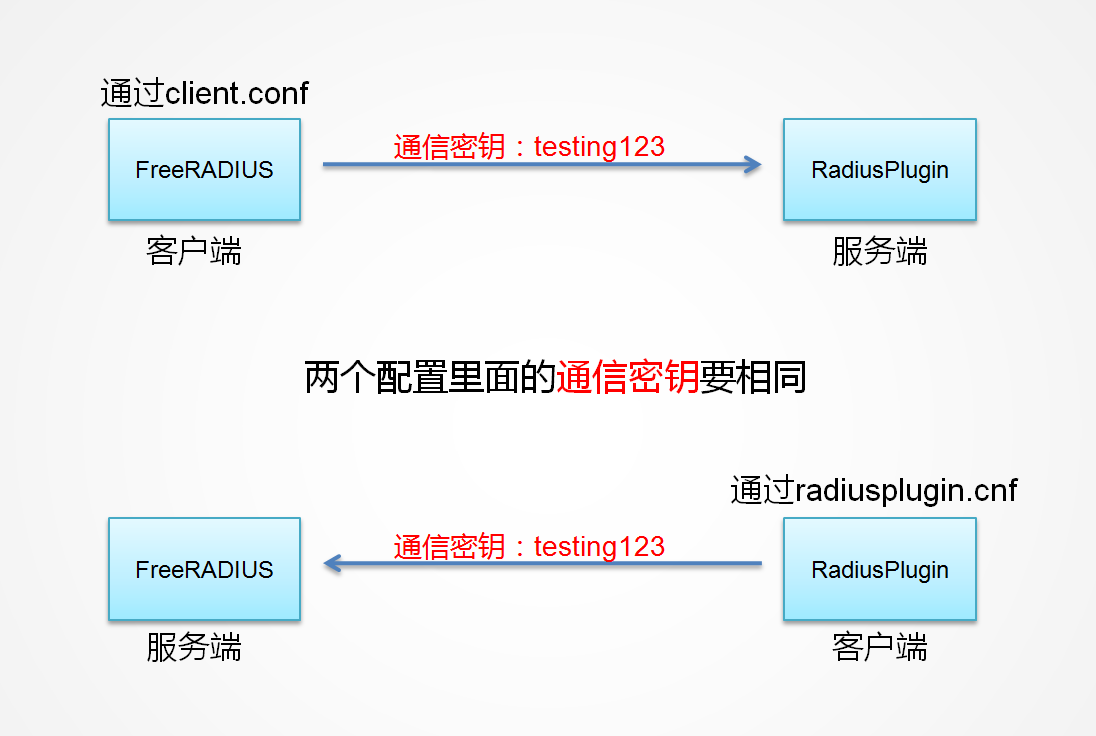
1、配置與客戶端通訊配置檔案clients.conf
這個檔案是FreeRADIUS與客戶端(RadiusPlugin)通訊使用的配置檔案,預設檔案只需新增shorname = localhost項,通訊金鑰可以預設。
| [root@iosvpn ~]# grep -Ev "^#|[:spcae:]*#|^$" /etc/raddb/clients.conf client localhost { ipaddr = 127.0.0.1 secret = testing123 #此引數與後面的radiusplugin.cnf內引數需一致 require_message_authenticator = no shortname = localhost } |
2、配置radiusplugin.cnf
此檔案是用來關聯OpenVPN和FreeRADIUS的,前面FreeRADIUS和MySQL的測試已經成功了,下面配置好此檔案之後就可以測試VPN的認證了,此檔案需要修改的地方不多,我這裡的配置如下:
[root@iosvpn ~]# grep -Ev "^#|^$" /etc/openvpn/radiusplugin.cnf
NAS-Identifier=OpenVpn
Service-Type=5
Framed-Protocol=1
NAS-Port-Type=5
NAS-IP-Address=127.0.0.1
OpenVPNConfig=/etc/openvpn/server.conf
subnet=255.255.255.0
overwriteccfiles=true
nonfatalaccounting=false
server
{
# The UDP port for radius accounting.
acctport=1813
# The UDP port for radius authentication.
authport=1812
# The name or ip address of the radius server.
name=127.0.0.1
# How many times should the plugin send the if there is no response?
retry=1
# How long should the plugin wait for a response?
wait=1
# The shared secret.
sharedsecret=testing123 #和FreeRadius的客戶端配置檔案保持一致
}
3、OpenVPN服務端配置檔案
通過plugin欄位讓OpenVPN呼叫RadiusPlugin外掛。
[root@iosvpn ~]# grep -Ev "^#|^$|^;" /etc/openvpn/server.conf management 127.0.0.1 5800 #開啟管理介面,不需要可以註釋掉 port 1194 proto tcp dev tun ca /etc/openvpn/easy-rsa/2.0/keys/ca.crt cert /etc/openvpn/easy-rsa/2.0/keys/server.crt key /etc/openvpn/easy-rsa/2.0/keys/server.key dh /etc/openvpn/easy-rsa/2.0/keys/dh2048.pem topology subnet #開啟節省IP,具體為什麼檢視我的OpenVPN安裝文件 tls-auth /etc/openvpn/easy-rsa/2.0/keys/ta.key 0 server 192.168.128.0 255.255.255.0 ifconfig-pool-persist ipp.txt push "route 10.0.0.0 255.0.0.0" push "redirect-gateway def1 bypass-dhcp" push "dhcp-option DNS 114.114.114.114" client-to-client duplicate-cn keepalive 10 120 comp-lzo persist-key persist-tun status /var/log/openvpn/openvpn-status.log log-append /var/log/openvpn/openvpn.log verb 3 script-security 3 system plugin /usr/lib64/openvpn/plugin/lib/radiusplugin.so /etc/openvpn/radiusplugin.cnf client-cert-not-required username-as-common-name |
4、OpenVPN客戶端配置檔案
這裡是Windows的客戶端,配置檔案如下:
client
dev tun
proto tcp
remote 192.168.1.200 1194 #OpenVPN伺服器的IP地址
nobind
persist-key
persist-tun
ca ca.crt
tls-authta.key 1
comp-lzo
verb 3
auth-user-pass #客戶端使用賬號密碼登入
reneg-sec 360000
VPN 正常啟動後服務端的網路卡資訊

openvpn與radius啟動後對應的埠資訊

十:VPN連線測試
重啟OpenVPN 服務端後客戶端就可以用“使用者名稱/密碼”的形式登入VPN了,如果要新增新的使用者只需要在radius資料庫的radcheck表插入新的記錄即可,很是方便快捷。
在/var/log/radius和/var/log/openvpn下面有很多日誌是記錄連線狀態的,如果連線有問題可以檢視日誌查詢原因。
服務端status=0接入表示成功了,部分資訊如下:
ThuFeb 22 13:07:58 2018 PLUGIN_CALL: POST/etc/openvpn/radiusplugin.so/PLUGIN_CLIENT_DISCONNECT status=0
ThuFeb 22 13:08:13 2018 Closing TUN/TAP interface
ThuFeb 22 13:08:13 2018 /sbin/ip addr del dev tun0 192.168.128.1/24
下面是客戶端的日誌

到此為止,OpenVPN使用者已經成功通過了FreeRADIUS驗證,而且也成功登入了OpenVPN伺服器,因此通過FreeRADIUS驗證OpenVPN使用者登入OpenVPN伺服器也便全部完成了。
十一:在redhat 7.2下的firewall配置,讓路由通過
在7的版本下沒有iptables只有firewall,兩者具體較大的區別,在openvpn搭建完成後iptables需要加入的語句需對應轉換成firewall裡的語句
iptables -t nat -A POSTROUTING -o enp0s3 -s 192.168.128.0/24 -j MASQUERADE
iptables -t nat -A POSTROUTING -o tun0 -s 192.168.128.0/24 -j MASQUERADE
iptables -t nat -A POSTROUTING -o eth0 -s 192.168.128.0/24 -j MASQUERADE
iptables -t nat -A POSTROUTING -o tun0 -s 192.168.128.0/24 -j MASQUERADE
iptables -A INPUT -p udp --dport 1194 -j ACCEPT
iptables-save
對應firewall為(只寫第一條,後面的自己可以依樣轉換):
firewall-cmd--permanent --direct --add-rule ipv4 filter POSTROUTING 0 -t nat -s192.168.128.0/24 -o enp3s0 -j MASQUERADE -t nat
firewall-cmd--permanent --direct --add-rule ipv4 filter INPUT 0 -i enp3s0 -p dup -j ACCEPT
firewall-cmd--reload
在實際過程中增加的:
firewall-cmd--permanent --direct --passthrough ipv4 -t nat -I POSTROUTING -o tun0 -jMASQUERADE -s 192.168.128.0/24
firewall-cmd--permanent --direct --passthrough ipv4 -t nat -I POSTROUTING -o enp0s3 -jMASQUERADE -s 192.168.122.0/24
下面是後來增加的,除錯連結10.1.90.1 10.23.48.1 (沒成功)
firewall-cmd--permanent --direct --passthrough ipv4 -A FORWARD -i tun0 -s 192.168.128.0/24-o enp0s3 -j ACCEPT
最後是在server.conf里加入 push "route 10.0.0.0 255.0.0.0" 就是加入一個A類地址
相關的參考資料:
http://blog.163.com/qiushuhui1989@126/blog/static/270110892015013113730465/
http://blog.csdn.net/angle_sun/article/details/53144617
http://blog.csdn.net/remote_roamer/article/details/50885171
補充說明:
整個系統分成以下幾個部分,建議大家一部分一部分的來裝,總的來說是這樣的:先搭建LAMP環境,然後搭建Freeradius+daloradius環境,接著利用freeradius環境驗證與mysql的認證(radtest test test localhost 0 testing123),再接著搭建openvpn環境(建議是可以利用證照方式登入成功,不測試其實不影響,只要確認沒有搭錯就行),最後利用RadiusPlugin外掛連結openvpn與freeradius
LAMP環境:可以是mysql也可以民mariadb,在7.0以上版本建議是maraidb,先測試php是不是可以讀取資料庫內容
freeradius環境:這個安裝比較簡的,直接利用命令或是原始碼包就可以
daloradius環境:這個是freeradius的WEB管理端,利用上面的介紹可以順利安裝,但是要注意安裝pear與DB,如果Db沒有安裝會提示500等錯誤,freeradius與daloradius環境安裝可以參考http://blog.csdn.net/zy517863543/article/details/78914150
或http://blog.51cto.com/mcshell/413457,要進行整合就必須通過radtest認證
即 radtest testtest localhost 0 testing123 返回accpet,如果有reject表示出錯,注意為資料庫裡的使用者名稱與密碼,testing123的設定看下面的意思。
OpenVPN環境:利用yum或是原始碼安裝均可以,在整合前最好是可以利用證照認證的方式進行登入
RadiusPlugin外掛:openvpn與freeradius進行連結的外掛,很簡單make後生成檔案複製改一下配置
為安裝順利需提前安裝(要不然會報rlm_sql_mysql.so的一個錯誤,就是在freeradius驗證mysql的時間) yuminstall php-mysql
檢視openvpn日誌 tail -f/etc/openvpn/log/openvpn.log
檢視radius日誌 tail -f var/log/radius/radius.log
檢視系統message日誌 tail -f /var/log/message 注意/var/log資料夾裡的一些日誌檔案
看進行系統整合的時候一個是要看openvpn的日誌,一個是要看radius的日誌,同時要看message日誌
建議提前安裝相關的支援包:
yum-y install php-mysql php-gdphp-imap php-ldap php-odbc php-pear php-xml php-xmlrpc
以及
yum-y installgcc gcc-c++ autoconflibjpeg libjpeg-devel libpng libpng-devel freetype freetype-devel libxml2libxml2-devel zlib zlib-devel glibc glibc-devel glib2 glib2-develbzip2bzip2-devel ncurses ncurses-devel curl curl-devel e2fsprogse2fsprogs-devel krb5 krb5-devel libidn libidn-devel openssl openssl-devel openldapopenldap-devel nss_ldap openldap-clients openldap-servers
redhat7.2選擇安裝介面,如何安裝這裡不詳細說明了
提供安裝過程中用到的各元件(包)、配置檔案的下載連結:
https://download.csdn.net/download/zhuorong_/10362240
相關文章
- LAMP(CentOS 7.2)環境下搭建WordPressLAMPCentOS
- LAMP環境搭配與配置LAMP
- centos 7.2 64位 docker安裝lamp環境CentOSDockerLAMP
- 詳解CentOS5.5 下搭建 PHP 環境(最佳的LAMP環境)CentOSPHPLAMP
- PHP環境LAMP/LNMP安裝與配置筆記PHPLAMPLNMP筆記
- app自動化測試環境配置:adb環境配置、monkey環境配置、appium環境配置大全APP
- 配置開發環境、生成環境、測試環境開發環境
- LAMP架構部署和動態網站環境的配置LAMP架構網站
- Maven環境下MyBatisGenerator 配置MavenMyBatis
- Windows 下 Laravel 環境配置WindowsLaravel
- linux下配置java環境LinuxJava
- CentOS下Ant環境配置CentOS
- Windows環境下的Nginx環境搭建WindowsNginx
- 環境配置
- Webpack下多環境配置的思路Web
- docker下springboot的多環境配置DockerSpring Boot
- Linux 下配置 node + mongodb 環境LinuxMongoDB
- linux環境下ssh 互信配置Linux
- CentOS7.3 編譯搭建 lamp 環境CentOS編譯LAMP
- Windows 環境下 Python 環境安裝WindowsPython
- window環境下testlink環境搭建(xammp)
- ApacheCordovaforios環境配置ApacheiOS
- Linux環境配置Linux
- vue – 環境配置Vue
- JAV A環境配置
- Flutter環境配置Flutter
- 配置python環境Python
- nerfstudio環境配置
- IDEA配置環境Idea
- 一、環境配置
- JAVA環境配置Java
- conda環境配置
- Anaconda環境配置
- php環境配置PHP
- Maven 環境配置Maven
- Java環境下載、配置環境、編寫我的第一個Java程式Java
- Linux下Java環境變數的配置LinuxJava變數
- 在windows下配置Eclipse + go環境WindowsEclipseGo