nGrinder中快速編寫groovy指令碼04-傳送POST請求
POST請求分類:
1、根據是否修改程式碼,分為兩種方式:
一種是在UI介面新增後自動生成指令碼,一種是直接在指令碼中新增
2、根據請求引數的不同,主要可以分為兩種:
param為key value格式
body為json格式
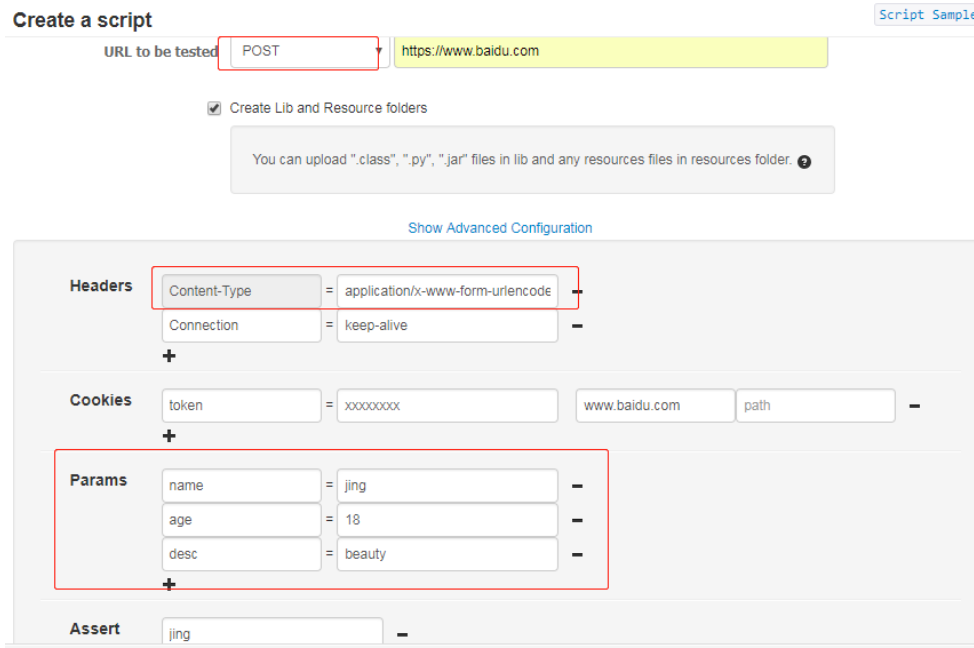
一、透過UI方式傳送POST請求–key/value引數
透過 UI 設定:指令碼 -> 新建指令碼 -> 顯示高階配置
當選擇了請求方法為POST後,在高階配置中預設會在headers中顯示Content-Type為x-www-form-urlencoded,同時,新增key/value格式的params:
生成程式碼如下(由於篇幅限制,去掉import部分):
@RunWith(GrinderRunner)
@FixMethodOrder(MethodSorters.NAME_ASCENDING)
class TestRunner {
public static GTest test
public static HTTPRequest request
public static NVPair[] headers = []
public static NVPair[] params = []
public static Cookie[] cookies = []
@BeforeProcess
public static void beforeProcess() {
HTTPPluginControl.getConnectionDefaults().timeout = 6000
test = new GTest(1, ")
request = new HTTPRequest()
// Set header datas
List<NVPair> headerList = new ArrayList<NVPair>()
headerList.add(new NVPair("Content-Type", "application/x-www-form-urlencoded"))
headerList.add(new NVPair("Connection", "keep-alive"))
headers = headerList.toArray()
// Set param datas
List<NVPair> paramList = new ArrayList<NVPair>()
paramList.add(new NVPair("name", "jing"))
paramList.add(new NVPair("age", "18"))
paramList.add(new NVPair("desc", "beauty"))
params = paramList.toArray()
// Set cookie datas
List<Cookie> cookieList = new ArrayList<Cookie>()
cookieList.add(new Cookie("token", "xxxxxxxx", ", "", new Date(32503647599000L), false))
cookies = cookieList.toArray()
grinder.logger.info("before process.");
}
@BeforeThread
public void beforeThread() {
test.record(this, "test")
grinder.statistics.delayReports=true;
grinder.logger.info("before thread.");
}
@Before
public void before() {
request.setHeaders(headers)
cookies.each { CookieModule.addCookie(it, HTTPPluginControl.getThreadHTTPClientContext()) }
grinder.logger.info("before thread. init headers and cookies");
}
@Test
public void test(){
HTTPResponse result = request.POST("https://, params)
assertThat(result.statusCode, is(200))
assertThat(result.getText(), containsString("jing"))
}
}
從以上程式碼可以看出,這種方式跟之前使用GET方式新增引數的效果一樣,都是把引數新增在@BeforeProcess,不同的只是在@Test中使用的是request.POST方法。
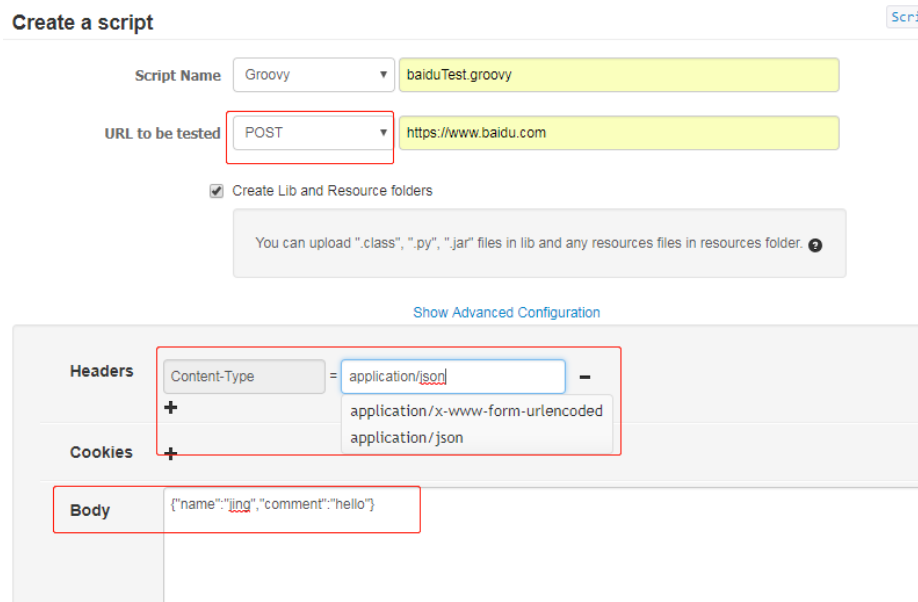
二、透過UI方式傳送POST請求–json
透過 UI 設定:指令碼 -> 新建指令碼 -> 顯示高階配置
當選擇了請求方法為POST後,在高階配置中的headers中選擇Content-Type為application/json,同時,新增json字串:
生成程式碼如下(由於篇幅限制,去掉import部分):
@RunWith(GrinderRunner)
@FixMethodOrder(MethodSorters.NAME_ASCENDING)
class TestRunner {
public static GTest test
public static HTTPRequest request
public static NVPair[] headers = []
public static String body = "{"name":"jing","comment":"hello"}"
public static Cookie[] cookies = []
@BeforeProcess
public static void beforeProcess() {
HTTPPluginControl.getConnectionDefaults().timeout = 6000
test = new GTest(1, ")
request = new HTTPRequest()
// Set header datas
List<NVPair> headerList = new ArrayList<NVPair>()
headerList.add(new NVPair("Content-Type", "application/json"))
headers = headerList.toArray()
grinder.logger.info("before process.");
}
@BeforeThread
public void beforeThread() {
test.record(this, "test")
grinder.statistics.delayReports=true;
grinder.logger.info("before thread.");
}
@Before
public void before() {
request.setHeaders(headers)
cookies.each { CookieModule.addCookie(it, HTTPPluginControl.getThreadHTTPClientContext()) }
grinder.logger.info("before thread. init headers and cookies");
}
@Test
public void test(){
HTTPResponse result = request.POST("https://, body.getBytes())
assertThat(result.statusCode, is(200))
}
}
從以上程式碼可以看出,這種方式是在靜態變數中定義了body的內容,在@BeforeProcess中新增json請求頭,並在@Test中的request.POST方法中加入了body引數。
關鍵程式碼如下:
public static String body = "{"name":"jing","comment":"hello"}"
headerList.add(new NVPair("Content-Type", "application/json"))
HTTPResponse result = request.POST("https://, body.getBytes())
三、直接在指令碼中為POST請求新增json格式的body
使用UI方式新增的json字串預設是在建立靜態變數body的同時新增的;
直接修改指令碼的話,就比較靈活,可以在類的任意位置新增,然後在POST請求中呼叫
(但是要注意變數作用域的問題)
// 定義json字串
String jsonStr = '{"name": "jing"}';
//在@Test的POST方法中使用json字串,同時新增header
request.POST("https://, jsonStr.getBytes(), [
new NVPair("Content-Type", "application/json"
] as NVPair[])
其中,需要注意的是:
POST(java.lang.String uri, byte[] data)
此方法中接收body引數時需要把字串轉成位元組陣列。
來自 “ ITPUB部落格 ” ,連結:http://blog.itpub.net/69942496/viewspace-2655106/,如需轉載,請註明出處,否則將追究法律責任。
相關文章
- nGrinder中快速編寫groovy指令碼03-在GET請求中傳送引數指令碼
- nGrinder中快速編寫groovy指令碼01-指令碼結構指令碼
- Postman傳送Post請求Postman
- Java傳送Post請求Java
- SpringMVC中如何傳送GET請求、POST請求、PUT請求、DELETE請求。SpringMVCdelete
- python傳送HTTP POST請求PythonHTTP
- shell指令碼:批次傳送curl請求指令碼
- java傳送GET和post請求Java
- linux用curl傳送post請求Linux
- httprequest- post- get -傳送請求HTTP
- 使用Postman傳送POST請求的指南Postman
- file_get_contents傳送post請求
- 以Raw的方式傳送POST請求
- scrapy-redis原始碼解讀之傳送POST請求Redis原始碼
- postman(二):使用postman傳送get or post請求Postman
- curl 傳送 POST 請求的四種方式
- 【Postman】6 Postman 傳送post請求-Json格式PostmanJSON
- cURL實現傳送Get和Post請求(PHP)PHP
- jmeter之傳送json資料的post請求JMeterJSON
- Vue中通過Axios向SpringBoot傳送get和post請求VueiOSSpring Boot
- axios傳送post請求,request.getParamter接收不到iOS
- 利用post請求傳送內容進行爬蟲爬蟲
- python+pytest介面自動化傳送post請求Python
- Java用HttpClient3傳送http/https協議get/post請求,傳送map,jsoJavaHTTPclient協議JS
- Golang:使用go-resty/resty傳送http請求get和postGolangRESTHTTP
- 『動善時』JMeter基礎 — 14、使用JMeter傳送Post請求JMeter
- vue-cli3.x中使用axios傳送請求,配合webpack中的devServer編寫本地mock資料介面(get/post/put/delete)VueiOSWebdevServerMockdelete
- Android 傳送HTTP GET POST 請求以及通過 MultipartEntityBuilder 上傳檔案(二)AndroidHTTPUI
- java apache commons HttpClient傳送get和post請求的學習整理JavaApacheHTTPclient
- 『居善地』介面測試 — 5、使用Requests庫傳送POST請求
- Python開發技巧:scrapy-redis爬蟲如何傳送POST請求PythonRedis爬蟲
- java傳送http請求JavaHTTP
- 傳送GET請求 示例
- 請問上傳的檔案如何傳送post
- Python中get、post請求詳解(HTTP請求頭、狀態碼)PythonHTTP
- html頁面中如何傳送ajax請求HTML
- 如何在 Go 中傳送表單請求Go
- 如何傳送請求以及AJAX