swagger
jmeter 生成 jtl 報告一鍵部署到 swagger 平臺
背景:jmeter 生成 api 報告後,為了方便開發人員跟蹤除錯錯誤介面,故搭建 jtl 部署到 swagger 平臺。
作用:開發人員可以根據轉換後的 swagger,一鍵執行錯誤介面,進行重新問題。
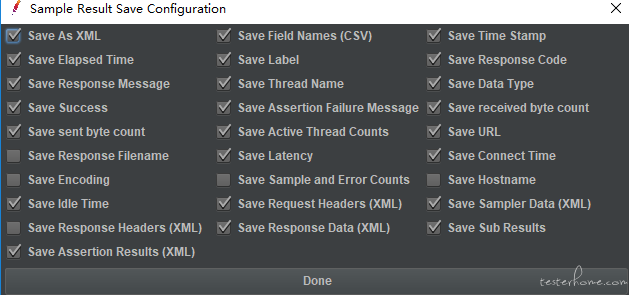
1.在生成 jtl 檔案前,我們需要對 jmeter 系統檔案 user.properties 進行設定。
jmeter.save.saveservice.output_format=xml
jmeter.save.saveservice.response_data=true
jmeter.save.saveservice.samplerData=true
jmeter.save.saveservice.requestHeaders=true
jmeter.save.saveservice.url=true
jmeter.save.saveservice.responseHeaders=true
jmeter.save.saveservice.thread_name=true
jmeter.save.saveservice.response_data.on_error=true
2.jtl 檔案轉換 swagger.json 指令碼
import xml.etree.ElementTree as ET
tree = ET.parse(r'C:\Users\Administrator\Desktop\test.xml')
root = tree.getroot()
data = {}
swagger_json = {}
swagger_json.setdefault("swagger", "2.0")
swagger_json.setdefault("info", {"version": "1.0", "title": "視覺化api服務端測試"})
swagger_json.setdefault("tags", [{"name": "visual-controller-fail", "description": "【Jmeter Test Result】 FAILED"},{"name": "visual-controller-pass", "description": "【Jmeter Test Result】 PASS"}])
swagger_json.setdefault("schemes", ["http"])
paths = {}
definitions = {}
httpSamples = root.findall("httpSample")
for i in range(httpSamples.__len__()):
    httpSample = httpSamples[i]
    hattribute = httpSample.attrib
    summary = hattribute.get("lb")
    status = hattribute.get("s")
    rc = hattribute.get("rc")
    if "JDBC" in summary:
        continue
    print(httpSample.findall("method"))
    method = httpSample.findall("method")[0].text
    rcode = hattribute.get("rc")
    header = httpSample.findall("requestHeader")[0].text
    queryString = httpSample.findall("queryString")[0].text
    headers = {}
    for h in header.split("\n"):
        if h != '':
            headers.setdefault(h.split(": ")[0], h.split(": ")[1])
    url = str(httpSample.findall("java.net.URL")[0].text).split(headers.get("Host"))[1]
    model = url.split("/")[-1]
    definition_name = model[0].upper()+model[1:]
    swagger_json.setdefault("host", headers.get("Host"))
    parameters = []
    token = headers.get("Authorization")
    if queryString is not None:
        try:
            body = json.loads(queryString)
            switch = {
                str:"string",
                int:"integer($int32)",
                float:"double",
                dict:"map",
                list:"list",
                tuple:"array",
                bool:"boolean"
            }


            parameters.append({"in":"header","name":"Authorization","default":token,"required":True,"type":"string"})
            parameters.append({"in":"body","name":model,"description":model,"required":True,"schema":{"$ref":'#/definitions/'+definition_name}})
            properties = {}
            for key, value in body.items():
                try:
                    tp = switch[type(value)]
                except KeyError as e:
                    tp = "object"

                properties.setdefault(key,{"type":tp,"example":value})
            definitions.setdefault(definition_name,{"type": "object", "properties": properties, "title": definition_name})

        except Exception as e:
            res = "{\""+ str(queryString).replace("=","\":\"").replace("&","\",\"")+"\"}"
            body = json.loads(res)
            for key, value in body.items():
                if value != '':
                    parameters.append(
                        {"in": "query", "name": key, "default": value, "required": True, "type": "string"})
                else:
                    parameters.append(
                        {"in": "query", "name": key, "default": value, "required": False, "type": "string"})

    else:
        parameters.append(
            {"in": "header", "name": "Authorization", "default": token, "required": True, "type": "string"})
        body = {}
    if status == "true":
        paths.setdefault(url, {
            str(method).lower(): {"responses": {rc: {"description": "OK"}}, "tags": ["visual-controller-pass"],
                                  "summary": summary, "description": "",
                                  "consumes": ["application/json","application/x-www-form-urlencoded; charset=UTF-8"],
                                  "produces": ["application/json"],
                                  "parameters": parameters}})
    if status == "false":
        response_data = httpSample.findall("responseData")[0].text
        paths.setdefault(url, {
            str(method).lower(): {"responses": {rc: {"description": response_data}}, "tags": ["visual-controller-fail"],
                                  "summary": summary, "description": "",
                                  "consumes": ["application/json",
                                               "application/x-www-form-urlencoded; charset=UTF-8"],
                                  "produces": ["application/json"],
                                  "parameters": parameters}})

swagger_json.setdefault("definitions",definitions)

swagger_json.setdefault("paths",paths)
print(swagger_json)
data = json.dumps(swagger_json)
with open("jmeter.json","w",encoding="utf8") as file:
    file.writelines(data)
3.搭建本地 swagger-ui 環境,新增匯入 json 檔案模組。
3.1.進入官網下載 ui 專案,專案在 github 中的位置:GitHub:Swagger-ui,若 github 也無法訪問詳見最後檔案下載地址。
3.2.下載到本地進行解壓,首先看目錄結構你可能會懵逼,不要緊,主體部分都放入 dist 目錄下,可以進入 dist 目錄開啟 index.html 看下介面,可以發現基本的模式還是有了,只不過是靜態的檔案,接下來進行 nodejs 配置,使其可以進行埠訪問,直接使用 node 命令訪問 index.js 沒有反應,英語稍微好點點的同學可以看下官網的配置步驟,接下來手動配置 ui 環境。
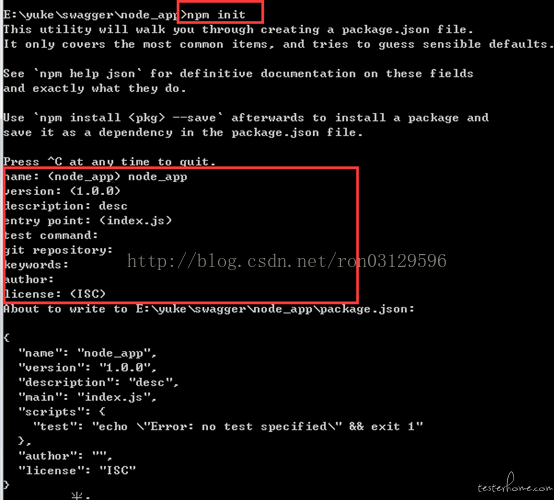
3.3.下面進行專案的配置,新建 node_app 資料夾,初始化 node,輸入好資訊後會自動建立 package.json 檔案,如下圖:

初始化命令 npm init,出現如下資訊,填的地方可以隨便寫,也可以不寫
3.4.將下載的 swagger-ui 中的 dist 資料夾複製到 node_app 下:
3.5.安裝 express,如果出錯可以去 nodejs 安裝目錄進行安裝
>>npm install express
3.6.建立 swagger.js,並將如下程式碼寫入該 js 中
var express = require('express');
var http = require('http');
var app = express();
var fs = require('fs');
var multer = require('multer');
app.set('view engine','ejs');

var createFolder = function(folder){
    try{
        fs.accessSync(folder);
    }catch(e){
        fs.mkdirSync(folder);
    }

};

var uploadFolder = './public/data/';
createFolder(uploadFolder);

var storage = multer.diskStorage({
    destination:function(req,file,cb){
        cb(null,uploadFolder);
    },
    filename:function(req,file,cb){
        cb(null,file.originalname);
    }

});

var upload = multer({storage:storage})

// 介面顯示頁面
app.use('/static', express.static('public'));
app.listen(8005, function () {
  console.log('app listening on port 8005!');
});
//檔案上傳
var filename = '';
app.post('/static/index', upload.single('file'), function(req, res, next){
    filename = req.file.originalname;
    res.render('index',{filename:filename});
});

app.get('/static/form', function(req, res, next){
    var index = fs.readFileSync('./public/form.html', {encoding: 'utf8'});
    res.send(index);
});


app.use('/getResponse', function(req, response){

    var headers = {
      'aa': req.headers.aa,
      'xx':req.headers.xx,
      'content-type': req.headers["content-type"]
    };

    if(req.query){
        path = req.path.replace('/getResponse', '')  + "?" + querystring.stringify(req.query)
    }else{
        path = req.path.replace('/getResponse', '')
    }
    var options = {
        hostname: config_data.host,
        path: path,
        headers: headers,
        method: req.method
    };

    var req = http.request(options, function(res) {
        res.setEncoding('utf8');
        res.on('data', function (chunk) {
            response.send(chunk);
            console.log('返回值: ' + chunk);
        });
    });
    req.on('error', function(e) {
        console.log('problem with request: ' + e.message);
    });

    req.write(querystring.stringify(req.body));
    req.end();
   });

app.listen(3000);
3.7 啟動 swagger-ui
>>node swagger.js

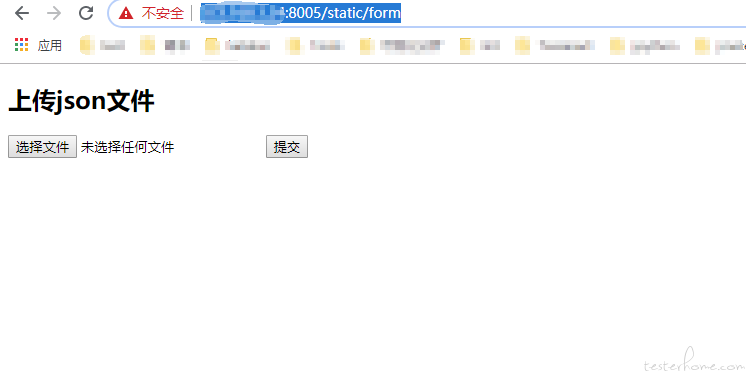
4.我們開啟瀏覽器進行訪問:
http://ip:8005/static/form
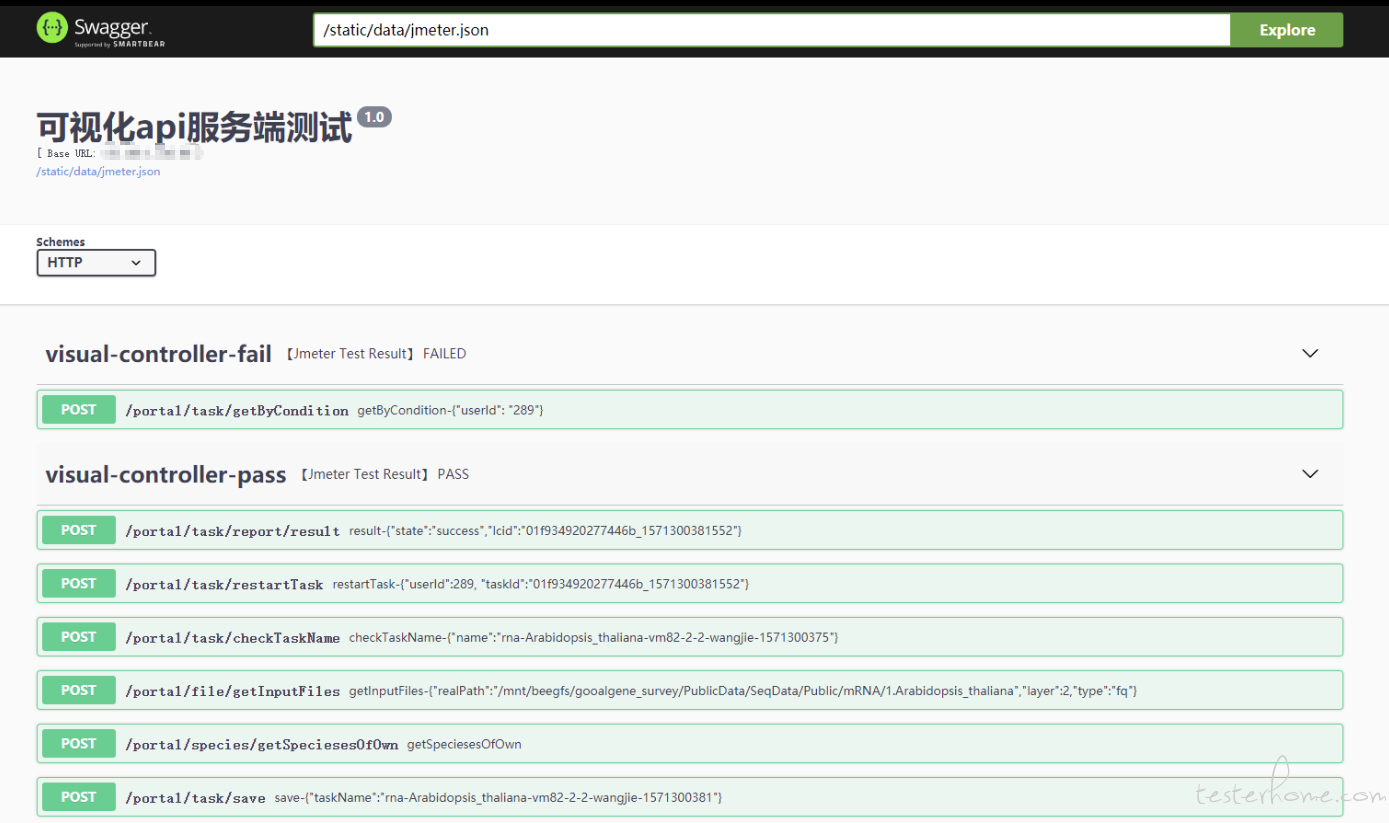
5.生成 swagger.json 後上傳到 swagger 系統,如下圖:
相關文章
- 【swagger】C# 中 swagger 的使用及避坑SwaggerC#
- swagger簡介Swagger
- springboot引入swaggerSpring BootSwagger
- Swagger的使用Swagger
- swagger加密碼Swagger加密密碼
- go swagger 使用GoSwagger
- SpringBoot整合SwaggerSpring BootSwagger
- Swagger API 文件SwaggerAPI
- .NetCore(.NET6)中使用swagger和swagger版本控制NetCoreSwagger
- 使用go-swagger為golang API自動生成swagger文件SwaggerGolangAPI
- SSM+Swagger問題解決 Can‘t read swagger JSON from http://localhost:8080/xxx/swagger/api-docsSSMSwaggerJSONHTTPlocalhostAPI
- spring中配置swaggerSpringSwagger
- Swagger 2.0 整合配置Swagger
- swagger使用總結Swagger
- Node express 整合SwaggerExpressSwagger
- Swagger+SpringBoot整理SwaggerSpring Boot
- Swagger配置與使用Swagger
- Spring Boot整合SwaggerSpring BootSwagger
- Gin 生成 Swagger 文件Swagger
- Swagger簡明教程Swagger
- java Swagger 使用匯總JavaSwagger
- Laravel Swagger 生成 API 文件LaravelSwaggerAPI
- SpringBoot_5_integrate_SwaggerSpring BootSwagger
- Swagger之外的選擇Swagger
- Swagger介紹及使用Swagger
- swagger ui remove springboot pathsSwaggerUIREMSpring Boot
- Spring Boot 快速整合SwaggerSpring BootSwagger
- 【Spring Boot】快速整合SwaggerSpring BootSwagger
- 關於Swagger優化Swagger優化
- 07SpringBoot整合SwaggerSpring BootSwagger
- SpringBoot整合Swagger-UISpring BootSwaggerUI
- springboot整合swagger2Spring BootSwagger
- springboot和swagger2衝突 Swagger-ui/index.html 404 解決Spring BootSwaggerUIIndexHTML
- springboot整合swagger遇到的坑Spring BootSwagger
- 超好用的API工具-SwaggerAPISwagger
- Spring Cloud Gateway 聚合swagger文件SpringCloudGatewaySwagger
- Swagger-UI 本地安裝SwaggerUI
- springboot3.2.3如何整合swaggerSpring BootSwagger