每天看郭神的公眾號文章已經成了我的一個習慣,前段時間看到一篇文章,ActivityThread的main()方法究竟做了什麼工作?main方法程式碼並不長,但行行珠璣。
我也開啟原始碼去看了main方法,之後還滑鼠滑滑滑大致看了ActivityThread,發現了performLaunchActivity方法,這個方法分明就是用來啟動Activity的,那麼這個performLaunchActivity方法在哪裡被呼叫了呢?Activity的啟動過程從哪裡開始?
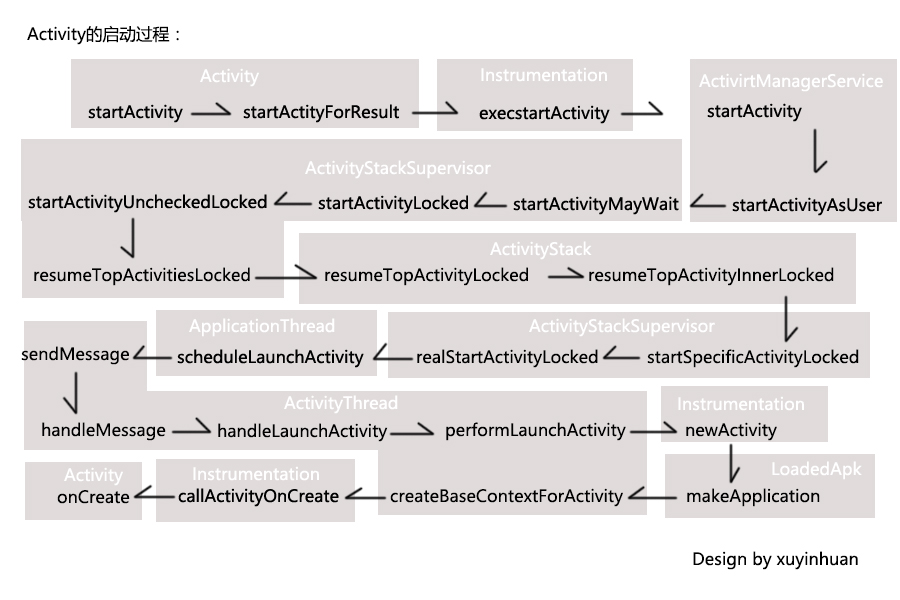
Activity的啟動過程真的很複雜,先看一張圖大概瞭解一下,其中用灰色背景框起來的是在同一個類的方法,如下圖:
那接下來就從原始碼的角度來分析Activity的啟動過程。
當然是從Activity的startActivity方法開始的,
@Override
public void startActivity(Intent intent) {
    this.startActivity(intent, null);
}
使用this關鍵字呼叫 了startActivity方法的兩個引數的過載。如下:
@Override
public void startActivity(Intent intent, @Nullable Bundle options) {
if (options != null) {
startActivityForResult(intent, -1, options);
} else {
startActivityForResult(intent, -1);
}
}
不管怎樣,都會呼叫startActivityForResult方法。並將intent傳進。
public void startActivityForResult(Intent intent, int requestCode) {
    startActivityForResult(intent, requestCode, null);
}
轉到了startActivityForResult三個引數的過載方法,那就跟進瞧瞧,原始碼如下:
public void startActivityForResult(Intent intent, int requestCode, @Nullable Bundle options) {
    if (mParent == null) {
        Instrumentation.ActivityResult ar =
            mInstrumentation.execStartActivity(
                this, mMainThread.getApplicationThread(), mToken, this,
                intent, requestCode, options);
        if (ar != null) {
            mMainThread.sendActivityResult(
                mToken, mEmbeddedID, requestCode, ar.getResultCode(),
                ar.getResultData());
        }
        if (requestCode >= 0) {
            // If this start is requesting a result, we can avoid making
            // the activity visible until the result is received.  Setting
            // this code during onCreate(Bundle savedInstanceState) or onResume() will keep the
            // activity hidden during this time, to avoid flickering.
            // This can only be done when a result is requested because
            // that guarantees we will get information back when the
            // activity is finished, no matter what happens to it.
            mStartedActivity = true;
        }

        cancelInputsAndStartExitTransition(options);
        // TODO Consider clearing/flushing other event sources and events for child windows.
    } else {
        if (options != null) {
            mParent.startActivityFromChild(this, intent, requestCode, options);
        } else {

        //程式碼省略
        }
    }
}
- 1
- 2
- 3
- 4
- 5
- 6
- 7
- 8
- 9
- 10
- 11
- 12
- 13
- 14
- 15
- 16
- 17
- 18
- 19
- 20
- 21
- 22
- 23
- 24
- 25
- 26
- 27
- 28
- 29
- 30
- 31
- 32
- 33
- 34
- 1
- 2
- 3
- 4
- 5
- 6
- 7
- 8
- 9
- 10
- 11
- 12
- 13
- 14
- 15
- 16
- 17
- 18
- 19
- 20
- 21
- 22
- 23
- 24
- 25
- 26
- 27
- 28
- 29
- 30
- 31
- 32
- 33
- 34
先是判斷mParent是否為空。那麼mParent是什麼呢?Activity中有一個isChild方法如下:
/** Is this activity embedded inside of another activity? */
public final boolean isChild() {
    return mParent != null;
}
從註釋中可以知道mParent是一個ActivityGroup來的,可以嵌入子Activity的,這個我沒用過。在我剛學Android的時候Fragment已經很流行了。
那我們回到startActivityForResult方法直接看到mParent == null的情況即可。可以看到內部呼叫了Instrumentation的execStartActivity方法,從字眼上看這個方法就是用來啟動Activity的吧。
這個execStartActivity方法的第二個引數mMainThread.getApplicationThread()。是一個ApplicationThread物件。ApplicationThread繼承自ApplicationThreadNative,而ApplicationThreadNative繼承自Binder並實現了IApplicationThread介面。也就是說ApplicationThread是一個Binder,而且是IApplicationThread的實現類,IApplicationThread介面有很多啟動Activity,Service,註冊廣播等方法,很強大。那麼他的實現類ApplicationThread就具備了這些功能。好,到這裡先。
那現在跟進看看Instrumentation的execStartActivity方法內部實現,
public ActivityResult execStartActivity(
Context who, IBinder contextThread, IBinder token, Activity target,
Intent intent, int requestCode, Bundle options) {
IApplicationThread whoThread = (IApplicationThread) contextThread;
Uri referrer = target != null ? target.onProvideReferrer() : null;
try {
intent.migrateExtraStreamToClipData();
intent.prepareToLeaveProcess();
int result = ActivityManagerNative.getDefault()
.startActivity(whoThread, who.getBasePackageName(), intent,
intent.resolveTypeIfNeeded(who.getContentResolver()),
token, target != null ? target.mEmbeddedID : null,
requestCode, 0, null, options);
checkStartActivityResult(result, intent);
} catch (RemoteException e) {
throw new RuntimeException("Failure from system", e);
}
return null;
}
- 1
- 2
- 3
- 4
- 5
- 6
- 7
- 8
- 9
- 10
- 11
- 12
- 13
- 14
- 15
- 16
- 17
- 18
- 19
- 20
- 21
- 22
- 23
- 1
- 2
- 3
- 4
- 5
- 6
- 7
- 8
- 9
- 10
- 11
- 12
- 13
- 14
- 15
- 16
- 17
- 18
- 19
- 20
- 21
- 22
- 23
看,從execStartActivity方法的引數列表也可以看出,剛才傳進的ApplicationThread是一個Binder。
那麼現在分析下execStartActivity方法的內部實現,找到了startActivity的字眼了,在try/catch程式碼塊,這個從丟擲的異常RemoteException,也可以推斷是一個跨程式操作了。先不管。從try/catch程式碼塊中可以看到ActivityManagerNative.getDefault()呼叫了startActivity的方法去啟動Activity,
返回了一個result結果,之後將result傳進checkStartActivityResult方法,這個方法是用來檢查Activity啟動結果的,如下:
public static void checkStartActivityResult(int res, Object intent) {
if (res >= ActivityManager.START_SUCCESS) {
return;
}
switch (res) {
case ActivityManager.START_INTENT_NOT_RESOLVED:
case ActivityManager.START_CLASS_NOT_FOUND:
if (intent instanceof Intent && ((Intent)intent).getComponent() != null)
throw new ActivityNotFoundException(
"Unable to find explicit activity class "
+ ((Intent)intent).getComponent().toShortString()
+ "; have you declared this activity in your AndroidManifest.xml?");
throw new ActivityNotFoundException(
"No Activity found to handle " + intent);
}
}
- 1
- 2
- 3
- 4
- 5
- 6
- 7
- 8
- 9
- 10
- 11
- 12
- 13
- 14
- 15
- 16
- 17
- 18
- 19
- 20
- 21
- 1
- 2
- 3
- 4
- 5
- 6
- 7
- 8
- 9
- 10
- 11
- 12
- 13
- 14
- 15
- 16
- 17
- 18
- 19
- 20
- 21
Unable to find explicit activity class have you declared this activity in your AndroidManifest.xml? No Activity found to handle,從這些熟悉的異常資訊我們可以知道,當沒有在AndroidManifest註冊Activity,到了checkStartActivityResult方法就會丟擲異常。
好,那現在回到剛才分析的ActivityManagerNative.getDefault()呼叫startActivity方法,現在不知道怎麼跟蹤原始碼了,因為我們不知道ActivityManagerNative.getDefault()是什麼?
ActivityManagerNative是一個抽象類來的,繼承自Binder並實現了IActivityManager介面。而ActivirtManagerService是繼承自ActivityManagerNative這個抽象類的,也就是說ActivirtManagerService是IActivityManager的實現類。
那麼我們先看到ActivityManagerNative的getDefault方法,
/**
 * Retrieve the system's default/global activity manager.
 */
static public IActivityManager getDefault() {
    return gDefault.get();
}
那麼gDefault又是什麼?
private static final Singleton<IActivityManager> gDefault = new Singleton<IActivityManager>() {
    protected IActivityManager create() {
        IBinder b = ServiceManager.getService("activity");
        if (false) {
            Log.v("ActivityManager", "default service binder = " + b);
        }
        IActivityManager am = asInterface(b);
        if (false) {
            Log.v("ActivityManager", "default service = " + am);
        }
        return am;
    }
};
gDefault其實是一個單例類,接收泛型引數。有一個create方法。那麼就看看這個Singleton單例類是什麼樣的。
public abstract class Singleton<T> {
    private T mInstance;

    protected abstract T create();

    public final T get() {
        synchronized (this) {
            if (mInstance == null) {
                mInstance = create();
            }
            return mInstance;
        }
    }
}
如果泛型物件為空,就呼叫create方法建立,不為空則返回,那麼我們現在看到剛才的create方法的實現就好了。
ServiceManager呼叫了getService方法,這是什麼意思呢?這個不深入了,其實ServiceManager.getService(“activity”)返回的就是IActivityManager 的實現類ActivirtManagerService。
而ServiceManager的內部,使用了集合來儲存各種系統服務,而這種用集合儲存服務的方法也是一種單例模式。有興趣的同學可以去探探究竟。
那麼ActivityManagerNative.getDefault()返回的是一個ActivirtManagerService,簡稱AMS。我們現在看到AMS的startActivity方法即可。
@Override
public final int startActivity(IApplicationThread caller, String callingPackage,
        Intent intent, String resolvedType, IBinder resultTo, String resultWho, int requestCode,
        int startFlags, ProfilerInfo profilerInfo, Bundle options) {
    return startActivityAsUser(caller, callingPackage, intent, resolvedType, resultTo,
        resultWho, requestCode, startFlags, profilerInfo, options,
        UserHandle.getCallingUserId());
}
繼續跟進startActivityAsUser方法
@Override
public final int startActivityAsUser(IApplicationThread caller, String callingPackage,
Intent intent, String resolvedType, IBinder resultTo, String resultWho, int requestCode,
int startFlags, ProfilerInfo profilerInfo, Bundle options, int userId) {
enforceNotIsolatedCaller("startActivity");
userId = handleIncomingUser(Binder.getCallingPid(), Binder.getCallingUid(), userId,
false, ALLOW_FULL_ONLY, "startActivity", null);
return mStackSupervisor.startActivityMayWait(caller, -1, callingPackage, intent,
resolvedType, null, null, resultTo, resultWho, requestCode, startFlags,
profilerInfo, null, null, options, false, userId, null, null);
}
同樣是鎖定startActivity字眼,在最後的return語句。可以看到,呼叫了ActivityStackSupervisor的startActivityMayWait方法來啟動Activity,這時已經到了到了ActivityStackSupervisor類了。現在回憶下開篇看的那張描述Activity啟動過程的圖,思路會更清晰。
那繼續跟進。探探ActivityStackSupervisor的startActivityMayWait方法,
final int startActivityMayWait(IApplicationThread caller, int callingUid,
String callingPackage, Intent intent, String resolvedType,
IVoiceInteractionSession voiceSession, IVoiceInteractor voiceInteractor,
IBinder resultTo, String resultWho, int requestCode, int startFlags,
ProfilerInfo profilerInfo, WaitResult outResult, Configuration config,
Bundle options, boolean ignoreTargetSecurity, int userId,
IActivityContainer iContainer, TaskRecord inTask) {
if (intent != null && intent.hasFileDescriptors()) {
throw new IllegalArgumentException("File descriptors passed in Intent");
}
boolean componentSpecified = intent.getComponent() != null;
intent = new Intent(intent);
int res = startActivityLocked(caller, intent, resolvedType, aInfo,
voiceSession, voiceInteractor, resultTo, resultWho,
requestCode, callingPid, callingUid, callingPackage,
realCallingPid, realCallingUid, startFlags, options, ignoreTargetSecurity,
componentSpecified, null, container, inTask);
return res;
}
}
- 1
- 2
- 3
- 4
- 5
- 6
- 7
- 8
- 9
- 10
- 11
- 12
- 13
- 14
- 15
- 16
- 17
- 18
- 19
- 20
- 21
- 22
- 23
- 24
- 25
- 26
- 27
- 28
- 29
- 30
- 1
- 2
- 3
- 4
- 5
- 6
- 7
- 8
- 9
- 10
- 11
- 12
- 13
- 14
- 15
- 16
- 17
- 18
- 19
- 20
- 21
- 22
- 23
- 24
- 25
- 26
- 27
- 28
- 29
- 30
這個方法程式碼其實是很長的啊,總之會轉到startActivityLocked方法。那我們繼續看到startActivityLocked方法,
final int startActivityLocked(IApplicationThread caller,
Intent intent, String resolvedType, ActivityInfo aInfo,
IVoiceInteractionSession voiceSession, IVoiceInteractor voiceInteractor,
IBinder resultTo, String resultWho, int requestCode,
int callingPid, int callingUid, String callingPackage,
int realCallingPid, int realCallingUid, int startFlags, Bundle options,
boolean ignoreTargetSecurity, boolean componentSpecified, ActivityRecord[] outActivity,
ActivityContainer container, TaskRecord inTask) {
int err = ActivityManager.START_SUCCESS;
ActivityRecord r = new ActivityRecord(mService, callerApp, callingUid, callingPackage,
intent, resolvedType, aInfo, mService.mConfiguration, resultRecord, resultWho,
requestCode, componentSpecified, voiceSession != null, this, container, options);
err = startActivityUncheckedLocked(r, sourceRecord, voiceSession, voiceInteractor,
startFlags, true, options, inTask);
if (err < 0) {
notifyActivityDrawnForKeyguard();
}
return err;
}
- 1
- 2
- 3
- 4
- 5
- 6
- 7
- 8
- 9
- 10
- 11
- 12
- 13
- 14
- 15
- 16
- 17
- 18
- 19
- 20
- 21
- 22
- 23
- 24
- 25
- 26
- 27
- 28
- 29
- 30
- 31
- 1
- 2
- 3
- 4
- 5
- 6
- 7
- 8
- 9
- 10
- 11
- 12
- 13
- 14
- 15
- 16
- 17
- 18
- 19
- 20
- 21
- 22
- 23
- 24
- 25
- 26
- 27
- 28
- 29
- 30
- 31
startActivityLocked方法又會呼叫startActivityUncheckedLocked方法。
startActivityUncheckedLocked方法如下:
final int startActivityUncheckedLocked(final ActivityRecord r, ActivityRecord sourceRecord,
IVoiceInteractionSession voiceSession, IVoiceInteractor voiceInteractor, int startFlags,
boolean doResume, Bundle options, TaskRecord inTask) {
final Intent intent = r.intent;
final int callingUid = r.launchedFromUid;
ActivityStack topStack = mFocusedStack;
ActivityRecord top = topStack.topRunningNonDelayedActivityLocked(notTop);
if (top != null && r.resultTo == null) {
if (top.realActivity.equals(r.realActivity) && top.userId == r.userId) {
if (top.app != null && top.app.thread != null) {
if ((launchFlags & Intent.FLAG_ACTIVITY_SINGLE_TOP) != 0
|| launchSingleTop || launchSingleTask) {
ActivityStack.logStartActivity(EventLogTags.AM_NEW_INTENT, top,
top.task);
topStack.mLastPausedActivity = null;
if (doResume) {
resumeTopActivitiesLocked();
}
ActivityOptions.abort(options);
if ((startFlags&ActivityManager.START_FLAG_ONLY_IF_NEEDED) != 0) {
return ActivityManager.START_RETURN_INTENT_TO_CALLER;
}
top.deliverNewIntentLocked(callingUid, r.intent, r.launchedFromPackage);
return ActivityManager.START_DELIVERED_TO_TOP;
}
}
}
}
}
- 1
- 2
- 3
- 4
- 5
- 6
- 7
- 8
- 9
- 10
- 11
- 12
- 13
- 14
- 15
- 16
- 17
- 18
- 19
- 20
- 21
- 22
- 23
- 24
- 25
- 26
- 27
- 28
- 29
- 30
- 31
- 32
- 33
- 34
- 35
- 36
- 37
- 38
- 39
- 40
- 41
- 42
- 43
- 44
- 1
- 2
- 3
- 4
- 5
- 6
- 7
- 8
- 9
- 10
- 11
- 12
- 13
- 14
- 15
- 16
- 17
- 18
- 19
- 20
- 21
- 22
- 23
- 24
- 25
- 26
- 27
- 28
- 29
- 30
- 31
- 32
- 33
- 34
- 35
- 36
- 37
- 38
- 39
- 40
- 41
- 42
- 43
- 44
可以看到startActivityUncheckedLocked方法內部,在if(doResume)的判斷,會呼叫resumeTopActivitiesLocked方法。
那就跟進resumeTopActivitiesLocked方法
boolean resumeTopActivitiesLocked() {
    return resumeTopActivitiesLocked(null, null, null);
}
繼續點進去
boolean resumeTopActivitiesLocked(ActivityStack targetStack, ActivityRecord target,
Bundle targetOptions) {
if (targetStack == null) {
targetStack = mFocusedStack;
}
boolean result = false;
if (isFrontStack(targetStack)) {
result = targetStack.resumeTopActivityLocked(target, targetOptions);
}
for (int displayNdx = mActivityDisplays.size() - 1; displayNdx >= 0; --displayNdx) {
final ArrayList<ActivityStack> stacks = mActivityDisplays.valueAt(displayNdx).mStacks;
for (int stackNdx = stacks.size() - 1; stackNdx >= 0; --stackNdx) {
final ActivityStack stack = stacks.get(stackNdx);
if (stack == targetStack) {
continue;
}
if (isFrontStack(stack)) {
stack.resumeTopActivityLocked(null);
}
}
}
return result;
}
- 1
- 2
- 3
- 4
- 5
- 6
- 7
- 8
- 9
- 10
- 11
- 12
- 13
- 14
- 15
- 16
- 17
- 18
- 19
- 20
- 21
- 22
- 23
- 24
- 25
- 26
- 27
- 1
- 2
- 3
- 4
- 5
- 6
- 7
- 8
- 9
- 10
- 11
- 12
- 13
- 14
- 15
- 16
- 17
- 18
- 19
- 20
- 21
- 22
- 23
- 24
- 25
- 26
- 27
這裡會呼叫ActivityStack的resumeTopActivityLocked方法,此時已經來到了ActivityStack了。
final boolean resumeTopActivityLocked(ActivityRecord prev, Bundle options) {
if (mStackSupervisor.inResumeTopActivity) {
return false;
}
boolean result = false;
try {
mStackSupervisor.inResumeTopActivity = true;
if (mService.mLockScreenShown == ActivityManagerService.LOCK_SCREEN_LEAVING) {
mService.mLockScreenShown = ActivityManagerService.LOCK_SCREEN_HIDDEN;
mService.updateSleepIfNeededLocked();
}
result = resumeTopActivityInnerLocked(prev, options);
} finally {
mStackSupervisor.inResumeTopActivity = false;
}
return result;
}
- 1
- 2
- 3
- 4
- 5
- 6
- 7
- 8
- 9
- 10
- 11
- 12
- 13
- 14
- 15
- 16
- 17
- 18
- 19
- 20
- 21
- 1
- 2
- 3
- 4
- 5
- 6
- 7
- 8
- 9
- 10
- 11
- 12
- 13
- 14
- 15
- 16
- 17
- 18
- 19
- 20
- 21
看到try程式碼塊,呼叫了ActivityStack的resumeTopActivityInnerLocked方法,如下:
private boolean resumeTopActivityInnerLocked(ActivityRecord prev, Bundle options) {
if (DEBUG_STATES) Slog.d(TAG_STATES, "resumeTopActivityLocked: Restarting " + next);
mStackSupervisor.startSpecificActivityLocked(next, true, true);
}
if (DEBUG_STACK) mStackSupervisor.validateTopActivitiesLocked();
return true;
}
resumeTopActivityInnerLocked方法內部又會呼叫ActivityStackSupervisor的startSpecificActivityLocked方法,現在又回到了ActivityStackSupervisor。好神奇兜了一圈又回來了
繼續看到ActivityStackSupervisor的startSpecificActivityLocked方法
void startSpecificActivityLocked(ActivityRecord r,
boolean andResume, boolean checkConfig) {
ProcessRecord app = mService.getProcessRecordLocked(r.processName,
r.info.applicationInfo.uid, true);
r.task.stack.setLaunchTime(r);
if (app != null && app.thread != null) {
try {
if ((r.info.flags&ActivityInfo.FLAG_MULTIPROCESS) == 0
|| !"android".equals(r.info.packageName)) {
app.addPackage(r.info.packageName, r.info.applicationInfo.versionCode,
mService.mProcessStats);
}
realStartActivityLocked(r, app, andResume, checkConfig);
return;
} catch (RemoteException e) {
Slog.w(TAG, "Exception when starting activity "
+ r.intent.getComponent().flattenToShortString(), e);
}
}
mService.startProcessLocked(r.processName, r.info.applicationInfo, true, 0,
"activity", r.intent.getComponent(), false, false, true);
}
- 1
- 2
- 3
- 4
- 5
- 6
- 7
- 8
- 9
- 10
- 11
- 12
- 13
- 14
- 15
- 16
- 17
- 18
- 19
- 20
- 21
- 22
- 23
- 24
- 25
- 26
- 27
- 28
- 29
- 30
- 31
- 32
- 33
- 34
- 1
- 2
- 3
- 4
- 5
- 6
- 7
- 8
- 9
- 10
- 11
- 12
- 13
- 14
- 15
- 16
- 17
- 18
- 19
- 20
- 21
- 22
- 23
- 24
- 25
- 26
- 27
- 28
- 29
- 30
- 31
- 32
- 33
- 34
可以看到呼叫了realStartActivityLocked方法,這個方法已經開始將Activity的啟動過程往AvtivityThread靠近了。那繼續跟進realStartActivityLocked方法。
final boolean realStartActivityLocked(ActivityRecord r,
ProcessRecord app, boolean andResume, boolean checkConfig)
throws RemoteException {
//程式碼省略
app.thread.scheduleLaunchActivity(new Intent(r.intent), r.appToken,
System.identityHashCode(r), r.info, new Configuration(mService.mConfiguration),
new Configuration(stack.mOverrideConfig), r.compat, r.launchedFromPackage,
task.voiceInteractor, app.repProcState, r.icicle, r.persistentState, results,
newIntents, !andResume, mService.isNextTransitionForward(), profilerInfo)
//程式碼省略
return true
}
- 1
- 2
- 3
- 4
- 5
- 6
- 7
- 8
- 9
- 10
- 11
- 12
- 13
- 14
- 15
- 16
- 17
- 1
- 2
- 3
- 4
- 5
- 6
- 7
- 8
- 9
- 10
- 11
- 12
- 13
- 14
- 15
- 16
- 17
app.thread呼叫了scheduleLaunchActivity方法去啟動Activity。而app.thread是什麼呢?
IApplicationThread thread;  // the actual proc...  may be null only if
                            // 'persistent' is true (in which case we
                            // are in the process of launching the app)
是一個IApplicationThread型別的實現類,那麼從開始的分析可以知道就是ApplicationThread。ApplicationThread還是ActivityThread的內部類,我們現在已經回到了主執行緒。
@Override
public final void scheduleLaunchActivity(Intent intent, IBinder token, int ident,
ActivityInfo info, Configuration curConfig, Configuration overrideConfig,
CompatibilityInfo compatInfo, String referrer, IVoiceInteractor voiceInteractor,
int procState, Bundle state, PersistableBundle persistentState,
List<ResultInfo> pendingResults, List<ReferrerIntent> pendingNewIntents,
boolean notResumed, boolean isForward, ProfilerInfo profilerInfo) {
updateProcessState(procState, false)
ActivityClientRecord r = new ActivityClientRecord()
r.token = token
r.ident = ident
r.intent = intent
r.referrer = referrer
r.voiceInteractor = voiceInteractor
r.activityInfo = info
r.compatInfo = compatInfo
r.state = state
r.persistentState = persistentState
r.pendingResults = pendingResults
r.pendingIntents = pendingNewIntents
r.startsNotResumed = notResumed
r.isForward = isForward
r.profilerInfo = profilerInfo
r.overrideConfig = overrideConfig
updatePendingConfiguration(curConfig)
sendMessage(H.LAUNCH_ACTIVITY, r)
}
- 1
- 2
- 3
- 4
- 5
- 6
- 7
- 8
- 9
- 10
- 11
- 12
- 13
- 14
- 15
- 16
- 17
- 18
- 19
- 20
- 21
- 22
- 23
- 24
- 25
- 26
- 27
- 28
- 29
- 30
- 31
- 32
- 33
- 34
- 35
- 36
- 1
- 2
- 3
- 4
- 5
- 6
- 7
- 8
- 9
- 10
- 11
- 12
- 13
- 14
- 15
- 16
- 17
- 18
- 19
- 20
- 21
- 22
- 23
- 24
- 25
- 26
- 27
- 28
- 29
- 30
- 31
- 32
- 33
- 34
- 35
- 36
ScheduleLaunchActivity的邏輯比較簡單,封裝了一些Activity元件信心,然後傳送一個訊息到ActivityThread。那麼我們找到LAUNCH_ACTIVITY這個訊息即可。
public void handleMessage(Message msg) {
if (DEBUG_MESSAGES) Slog.v(TAG, ">>> handling: " + codeToString(msg.what))
switch (msg.what) {
case LAUNCH_ACTIVITY: {
Trace.traceBegin(Trace.TRACE_TAG_ACTIVITY_MANAGER, "activityStart")
final ActivityClientRecord r = (ActivityClientRecord) msg.obj
r.packageInfo = getPackageInfoNoCheck(
r.activityInfo.applicationInfo, r.compatInfo)
handleLaunchActivity(r, null)
Trace.traceEnd(Trace.TRACE_TAG_ACTIVITY_MANAGER)
} break
//程式碼省略
}
- 1
- 2
- 3
- 4
- 5
- 6
- 7
- 8
- 9
- 10
- 11
- 12
- 13
- 14
- 15
- 16
- 17
- 1
- 2
- 3
- 4
- 5
- 6
- 7
- 8
- 9
- 10
- 11
- 12
- 13
- 14
- 15
- 16
- 17
這個LAUNCH_ACTIVITY訊息肯定是用於啟動Activity的,可以看到呼叫了handleLaunchActivity方法,並將封裝了待啟動Activity資訊的ActivityClientRecord型別的引數傳入。
private void handleLaunchActivity(ActivityClientRecord r, Intent customIntent) {
WindowManagerGlobal.initialize();
Activity a = performLaunchActivity(r, customIntent);
if (a != null) {
r.createdConfig = new Configuration(mConfiguration);
Bundle oldState = r.state;
handleResumeActivity(r.token, false, r.isForward,
!r.activity.mFinished && !r.startsNotResumed);
}
}
- 1
- 2
- 3
- 4
- 5
- 6
- 7
- 8
- 9
- 10
- 11
- 12
- 13
- 14
- 15
- 16
- 17
- 18
- 19
- 20
- 1
- 2
- 3
- 4
- 5
- 6
- 7
- 8
- 9
- 10
- 11
- 12
- 13
- 14
- 15
- 16
- 17
- 18
- 19
- 20
這個方法做了一些工作,比如初始化Window,等等。
那麼我們就看到核心的performLaunchActivity方法:
private Activity performLaunchActivity(ActivityClientRecord r, Intent customIntent) {
// System.out.println("##### [" + System.currentTimeMillis() + "] ActivityThread.performLaunchActivity(" + r + ")")
ActivityInfo aInfo = r.activityInfo
if (r.packageInfo == null) {
r.packageInfo = getPackageInfo(aInfo.applicationInfo, r.compatInfo,
Context.CONTEXT_INCLUDE_CODE)
}
ComponentName component = r.intent.getComponent()
if (component == null) {
component = r.intent.resolveActivity(
mInitialApplication.getPackageManager())
r.intent.setComponent(component)
}
if (r.activityInfo.targetActivity != null) {
component = new ComponentName(r.activityInfo.packageName,
r.activityInfo.targetActivity)
}
Activity activity = null
try {
java.lang.ClassLoader cl = r.packageInfo.getClassLoader()
activity = mInstrumentation.newActivity(
cl, component.getClassName(), r.intent)
StrictMode.incrementExpectedActivityCount(activity.getClass())
r.intent.setExtrasClassLoader(cl)
r.intent.prepareToEnterProcess()
if (r.state != null) {
r.state.setClassLoader(cl)
}
} catch (Exception e) {
if (!mInstrumentation.onException(activity, e)) {
throw new RuntimeException(
"Unable to instantiate activity " + component
+ ": " + e.toString(), e)
}
}
try {
Application app = r.packageInfo.makeApplication(false, mInstrumentation)
if (localLOGV) Slog.v(TAG, "Performing launch of " + r)
if (localLOGV) Slog.v(
TAG, r + ": app=" + app
+ ", appName=" + app.getPackageName()
+ ", pkg=" + r.packageInfo.getPackageName()
+ ", comp=" + r.intent.getComponent().toShortString()
+ ", dir=" + r.packageInfo.getAppDir())
if (activity != null) {
Context appContext = createBaseContextForActivity(r, activity)
CharSequence title = r.activityInfo.loadLabel(appContext.getPackageManager())
Configuration config = new Configuration(mCompatConfiguration)
if (DEBUG_CONFIGURATION) Slog.v(TAG, "Launching activity "
+ r.activityInfo.name + " with config " + config)
activity.attach(appContext, this, getInstrumentation(), r.token,
r.ident, app, r.intent, r.activityInfo, title, r.parent,
r.embeddedID, r.lastNonConfigurationInstances, config,
r.referrer, r.voiceInteractor)
if (customIntent != null) {
activity.mIntent = customIntent
}
r.lastNonConfigurationInstances = null
activity.mStartedActivity = false
int theme = r.activityInfo.getThemeResource()
if (theme != 0) {
activity.setTheme(theme)
}
activity.mCalled = false
if (r.isPersistable()) {
mInstrumentation.callActivityOnCreate(activity, r.state, r.persistentState)
} else {
mInstrumentation.callActivityOnCreate(activity, r.state)
}
if (!activity.mCalled) {
throw new SuperNotCalledException(
"Activity " + r.intent.getComponent().toShortString() +
" did not call through to super.onCreate()")
}
r.activity = activity
r.stopped = true
if (!r.activity.mFinished) {
activity.performStart()
r.stopped = false
}
if (!r.activity.mFinished) {
if (r.isPersistable()) {
if (r.state != null || r.persistentState != null) {
mInstrumentation.callActivityOnRestoreInstanceState(activity, r.state,
r.persistentState)
}
} else if (r.state != null) {
mInstrumentation.callActivityOnRestoreInstanceState(activity, r.state)
}
}
if (!r.activity.mFinished) {
activity.mCalled = false
if (r.isPersistable()) {
mInstrumentation.callActivityOnPostCreate(activity, r.state,
r.persistentState)
} else {
mInstrumentation.callActivityOnPostCreate(activity, r.state)
}
if (!activity.mCalled) {
throw new SuperNotCalledException(
"Activity " + r.intent.getComponent().toShortString() +
" did not call through to super.onPostCreate()")
}
}
}
r.paused = true
mActivities.put(r.token, r)
} catch (SuperNotCalledException e) {
throw e
} catch (Exception e) {
if (!mInstrumentation.onException(activity, e)) {
throw new RuntimeException(
"Unable to start activity " + component
+ ": " + e.toString(), e)
}
}
return activity
}
- 1
- 2
- 3
- 4
- 5
- 6
- 7
- 8
- 9
- 10
- 11
- 12
- 13
- 14
- 15
- 16
- 17
- 18
- 19
- 20
- 21
- 22
- 23
- 24
- 25
- 26
- 27
- 28
- 29
- 30
- 31
- 32
- 33
- 34
- 35
- 36
- 37
- 38
- 39
- 40
- 41
- 42
- 43
- 44
- 45
- 46
- 47
- 48
- 49
- 50
- 51
- 52
- 53
- 54
- 55
- 56
- 57
- 58
- 59
- 60
- 61
- 62
- 63
- 64
- 65
- 66
- 67
- 68
- 69
- 70
- 71
- 72
- 73
- 74
- 75
- 76
- 77
- 78
- 79
- 80
- 81
- 82
- 83
- 84
- 85
- 86
- 87
- 88
- 89
- 90
- 91
- 92
- 93
- 94
- 95
- 96
- 97
- 98
- 99
- 100
- 101
- 102
- 103
- 104
- 105
- 106
- 107
- 108
- 109
- 110
- 111
- 112
- 113
- 114
- 115
- 116
- 117
- 118
- 119
- 120
- 121
- 122
- 123
- 124
- 125
- 126
- 127
- 128
- 129
- 130
- 131
- 132
最核心的performLaunchActivity方法,
首先從ActivityClientRecord中獲取待啟動的Activity的元件資訊,ActivityClientRecord裡面是封裝了很多東西的。如果r.packageInfo==null,呼叫getPackageInfo方法獲取到LoadedApk例項並賦值給r.packageInfo
通過LoadedApk獲取到一個類載入器,呼叫Instrumentation的newActivity方法通過這個類載入器建立了一個Activity物件 ,newActivity方法如下:
public Activity newActivity(ClassLoader cl, String className,
        Intent intent)
        throws InstantiationException, IllegalAccessException,
        ClassNotFoundException {
    return (Activity)cl.loadClass(className).newInstance();
}
接著呼叫LoadedApk的makeApplication方法建立Application物件,如下:
public Application makeApplication(boolean forceDefaultAppClass,
Instrumentation instrumentation) {
if (mApplication != null) {
return mApplication;
}
Application app = null;
String appClass = mApplicationInfo.className;
if (forceDefaultAppClass || (appClass == null)) {
appClass = "android.app.Application";
}
try {
java.lang.ClassLoader cl = getClassLoader();
if (!mPackageName.equals("android")) {
initializeJavaContextClassLoader();
}
ContextImpl appContext = ContextImpl.createAppContext(mActivityThread, this);
app = mActivityThread.mInstrumentation.newApplication(
cl, appClass, appContext);
appContext.setOuterContext(app);
} catch (Exception e) {
if (!mActivityThread.mInstrumentation.onException(app, e)) {
throw new RuntimeException(
"Unable to instantiate application " + appClass
+ ": " + e.toString(), e);
}
}
mActivityThread.mAllApplications.add(app);
mApplication = app;
if (instrumentation != null) {
try {
instrumentation.callApplicationOnCreate(app);
} catch (Exception e) {
if (!instrumentation.onException(app, e)) {
throw new RuntimeException(
"Unable to create application " + app.getClass().getName()
+ ": " + e.toString(), e);
}
}
}
return app;
}
- 1
- 2
- 3
- 4
- 5
- 6
- 7
- 8
- 9
- 10
- 11
- 12
- 13
- 14
- 15
- 16
- 17
- 18
- 19
- 20
- 21
- 22
- 23
- 24
- 25
- 26
- 27
- 28
- 29
- 30
- 31
- 32
- 33
- 34
- 35
- 36
- 37
- 38
- 39
- 40
- 41
- 42
- 43
- 44
- 45
- 46
- 47
- 48
- 49
- 1
- 2
- 3
- 4
- 5
- 6
- 7
- 8
- 9
- 10
- 11
- 12
- 13
- 14
- 15
- 16
- 17
- 18
- 19
- 20
- 21
- 22
- 23
- 24
- 25
- 26
- 27
- 28
- 29
- 30
- 31
- 32
- 33
- 34
- 35
- 36
- 37
- 38
- 39
- 40
- 41
- 42
- 43
- 44
- 45
- 46
- 47
- 48
- 49
可以看到Application是唯一的。建立Application後,Instrumentation會呼叫callApplicationOnCreate去回撥Application的onCreate方法。
我們可以推出:當應用啟動,MainActivity的建立比Application早,但是onCreate方法的回撥是Application早
再接著呼叫createBaseContextForActivity方法,建立了一個Context的實現類ContextImpl的物件:
private Context createBaseContextForActivity(ActivityClientRecord r, final Activity activity) {
int displayId = Display.DEFAULT_DISPLAY;
try {
displayId = ActivityManagerNative.getDefault().getActivityDisplayId(r.token);
} catch (RemoteException e) {
}
ContextImpl appContext = ContextImpl.createActivityContext(
this, r.packageInfo, displayId, r.overrideConfig);
appContext.setOuterContext(activity);
Context baseContext = appContext;
return baseContext;
}
- 1
- 2
- 3
- 4
- 5
- 6
- 7
- 8
- 9
- 10
- 11
- 12
- 13
- 14
- 15
- 16
- 17
- 1
- 2
- 3
- 4
- 5
- 6
- 7
- 8
- 9
- 10
- 11
- 12
- 13
- 14
- 15
- 16
- 17
最後Activity呼叫attach與Application,ContextImpl等關聯起來。
也呼叫了Instrumentation的callActivityOnCreate方法去回撥了Activity的onCreate方法,至此,Activity終於誕生了
以上就是Activity的啟動過程,呼!這篇文章好長。如果認真讀了下來,在看回前面的圖。相信你和我都會有收穫。
如果你想知道當應用啟動時,MainActivity的啟動過程的話,可以從ActivityThread的main方法中的這兩行程式碼跟進,
ActivityThread thread = new ActivityThread();
thread.attach(false);
你會發現會到ActivityStackSupervisor的realStartActivityLocked方法,之後就是進入到ApplicationThread了。和以上的分析是一樣的。所以那個MainActivity的建立在Application前的推論是正確的。
轉載請註明出處:http://blog.csdn.net/xyh269