前言
- 本文主要以OS為Mac Apple晶片版本為主進行記錄,其他OS均可在提供的官網連結中找到相應的配置說明;
- 本文暫時記錄了Homebrew、JDK8、Maven3.9.0、MySQL8.0、Redis、Jmeter這些程式的環境配置,其他程式待後續使用時再補充。
Homebrew
官網下載地址:https://brew.sh/index_zh-cn
配置說明
- 下載步驟
- 開啟終端》輸入
/bin/zsh -c "$(curl -fsSL https://gitee.com/cunkai/HomebrewCN/raw/master/Homebrew.sh)" - 選擇映象,如中科院
- 等待下載完成,如果提示需要安裝git,則先安裝git,再執行shell安裝指令碼
- 安裝完成後,“brew -v”檢視版本
- 安裝目錄/opt/homebrew
- 解除安裝
/bin/zsh -c "$(curl -fsSL https://gitee.com/cunkai/HomebrewCN/raw/master/HomebrewUninstall.sh)"
- 開啟終端》輸入
- 使用
# 搜尋包
brew search 包
# 安裝包
brew install 包
# 檢視包資訊
brew info 包
# 解除安裝包
brew uninstall 包
# 顯示已安裝的包
brew list
# 顯示已安裝包的路徑
brew list 包
# 檢視brew的幫助
brew –help
# 更新
brew update
# 檢查過時(是否有新版本),這會列出所有安裝的包裡,哪些可以升級
brew outdated
brew outdated 包
# 升級所有可以升級的軟體們
brew upgrade
brew upgrade 包
# 清理不需要的版本極其安裝包快取
brew cleanup
brew cleanup 包
JDK
官網下載地址:https://www.oracle.com/java/technologies/javase/javase8-archive-downloads.html
配置說明
-
windows:https://www.runoob.com/java/java-environment-setup.html
-
mac
- 官網下載:下載“JDK-8U202-macOSX-X64.dmg”或其他macOS版本,一步步點選即可【X64和Apple晶片均相容】
- 安裝路徑:/Library/Java/JavaVirtualMachines/jdk1.8.0_351.jdk/Contents/Home
- 環境變數配置:/Library/Internet Plug-Ins/JavaAppletPlugin.plugin/Contents/Home/bin/java
- 完全解除安裝:
- 刪除jdk
sudo rm -rf /Library/Java/JavaVirtualMachines/jdk1.8.0_351.jdk - 刪除執行路徑和環境
sudo rm -rf /Library/Internet\ Plug-Ins/JavaAppletPlugin.plugin
sudo rm -rf /Library/PreferencesPanes/JavaControlPanel.prefPane
sudo rm -rf /Library/Application\ Support/Java
- 刪除jdk
-
linux
- 官網下載:下載"jdk-8u202-linux-x64.tar.gz"或者其他linux版本
- 解壓:
tar -zxvf jdk-8u202-linux-x64.tar.gz -C /usr/local - 配置環境變數
# 環境變數配置存放在/etc/profile,改變前先複製一份備用
cp /etc/profile /etc/profile-init
# 開啟編輯檔案
vim /etc/profile
# 在最前面或最後面新增JDK環境變數
export JAVA_HOME=/download/jdk1.8.0_202
export PATH=$JAVA_HOME/bin:$PATH
export CLASSPATH=.:$JAVA_HOME/lib/dt.jar:$JAVA_HOME/lib/tools.jar
Maven
官網下載地址:https://maven.apache.org/download.cgi
配置說明
- 配置參考:https://www.runoob.com/maven/maven-setup.html【菜鳥教程】
- setting.xml檔案配置:https://maven.apache.org/settings.html【官網說明】
- 自用setting.xml
<?xml version="1.0" encoding="UTF-8"?>
<settings xmlns="http://maven.apache.org/SETTINGS/1.2.0"
        xmlns:xsi="http://www.w3.org/2001/XMLSchema-instance"
        xsi:schemaLocation="http://maven.apache.org/SETTINGS/1.2.0 https://maven.apache.org/xsd/settings-1.2.0.xsd">
    <!-- 本地倉庫 -->
    <localRepository>/Users/mybook/DevelopTools/apache-maven-3.9.0/Repository</localRepository>

    <pluginGroups></pluginGroups>

    <proxies></proxies>

    <!--私服使用者配置,沒用私服不需要配置了-->
    <servers></servers>

    <!--映象中央倉庫-->
    <mirrors>
        <mirror>
            <id>alimaven</id>
            <name>aliyun maven</name>
            <url>http://maven.aliyun.com/nexus/content/groups/public/</url>
            <mirrorOf>central</mirrorOf>
        </mirror>
        <mirror>
            <id>central</id>
            <name>Maven Repository Switchboard</name>
            <url>https://repo1.maven.org/maven2/</url>
            <mirrorOf>central</mirrorOf>
        </mirror>
        <mirror>
            <id>jboss-public-repository-group</id>
            <mirrorOf>central</mirrorOf>
            <name>JBoss Public Repository Group</name>
            <url>http://repository.jboss.org/nexus/content/groups/public</url>
        </mirror>
    </mirrors>

    <!--私服使用者配置,沒用私服不需要配置了-->
    <profiles></profiles>
    <activeProfiles></activeProfiles>
</settings>
MySQL
官網下載地址:https://dev.mysql.com/downloads/mysql/
配置說明
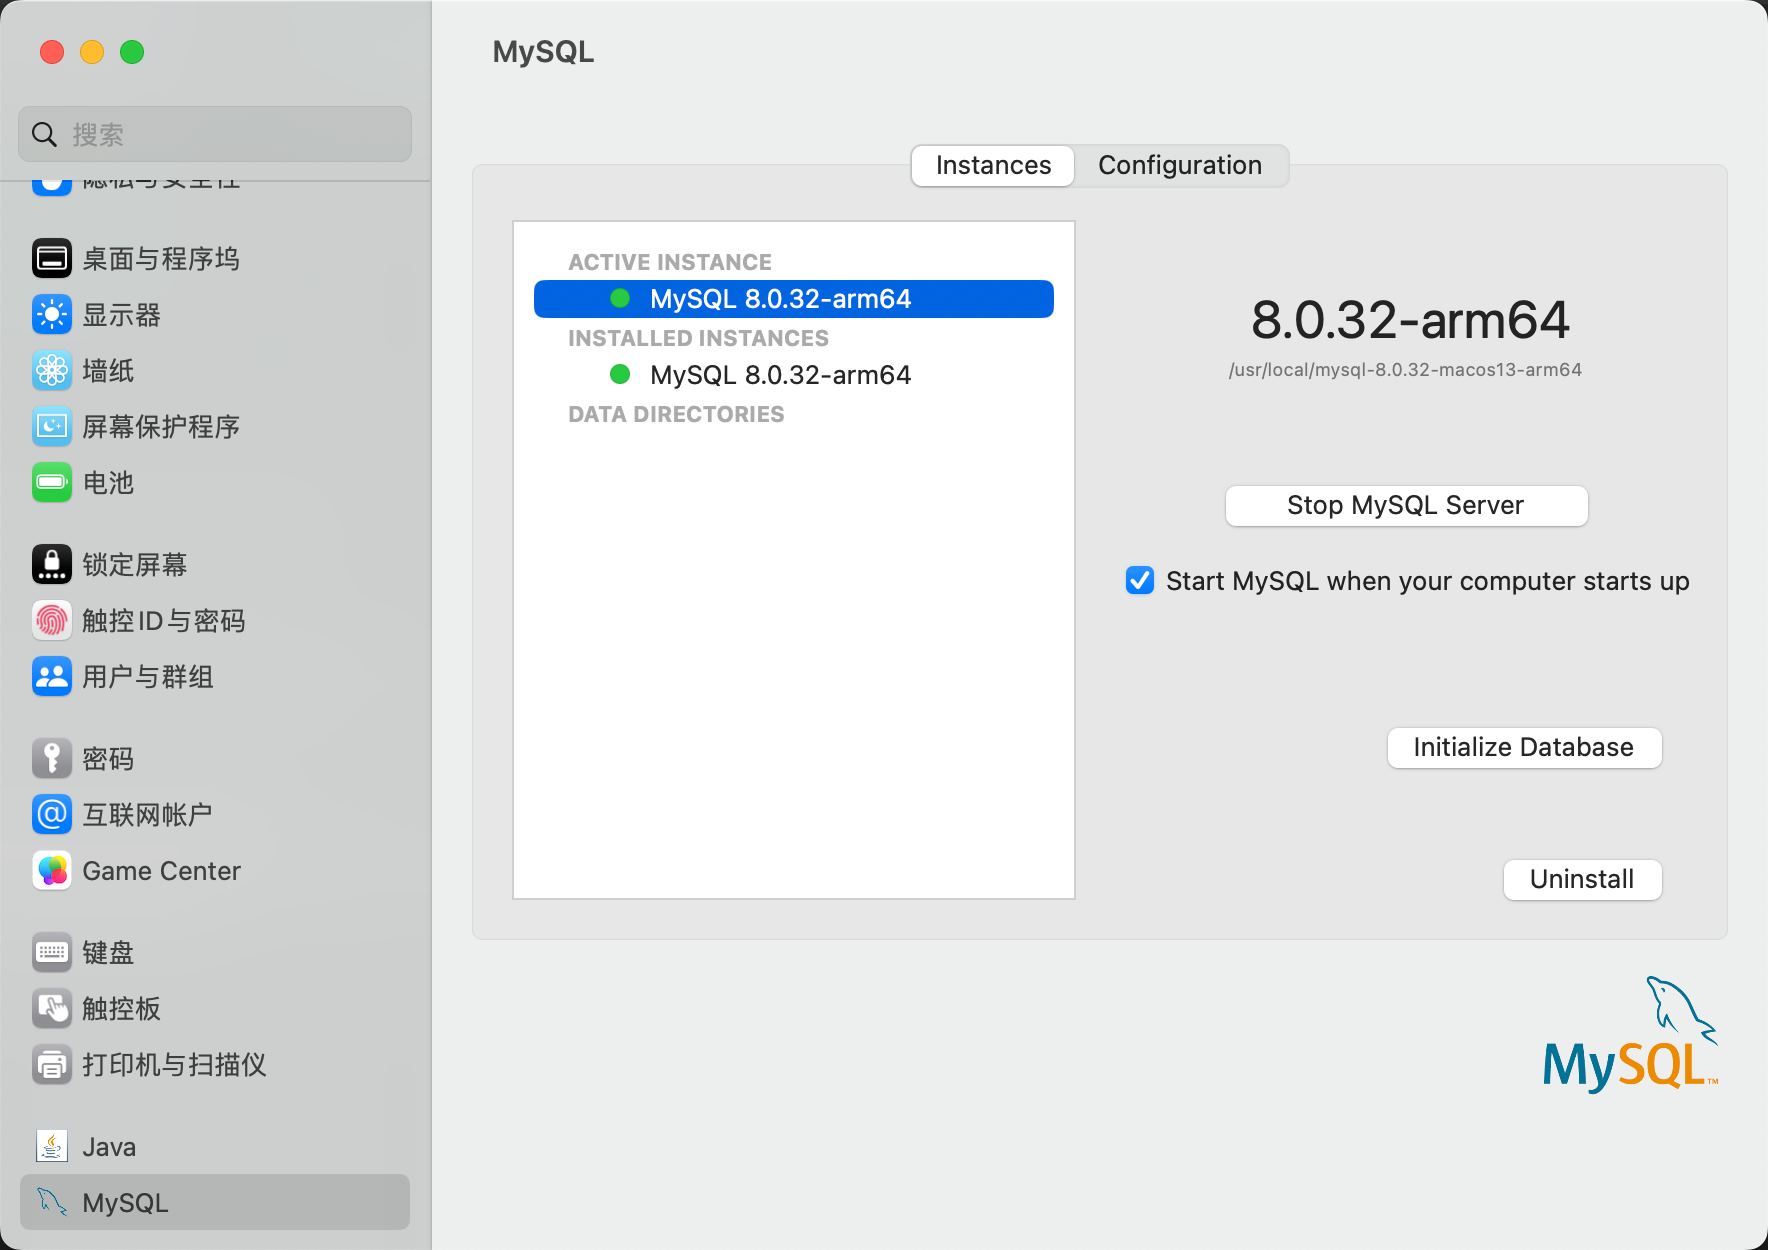
- mac
-
下載:直接下載"macOS 13 (ARM, 64-bit), DMG Archive ",一路點選,密碼選擇"use legacy password encryption",設定root使用者的登入密碼
-
配置環境變數
# 編輯,設定如下內容
sudo vim /etc/profile
# 配置生效
source /etc/profile
# 檢視版本
mysql --version
#mysql export PATH=$PATH:/usr/local/mysql/bin export PATH=$PATH:/usr/local/mysql/support-files -
啟動、安裝/解除安裝、配置
-
- linux
- 下載:https://dev.mysql.com/downloads/mysql/
- 解壓:tar -xvJf mysql-8.0.21-linux-glibc2.12-x86_64.tar.xz
- 重新命名:mv mysql-8.0.21-linux-glibc2.12-x86_64 mysql8.0
- 建立資料儲存目錄:mkdir /../mysql8.0/data
- 建立mysql使用者和使用者組,並設定許可權
# 建立mysql使用者和使用者組 groupadd mysql useradd -g mysql mysql # 給mysql使用者賦予許可權 chown -R mysql.mysql /usr/local/mysql/ - 初始化mysql資訊
cd /usr/local/mysql/bin # 初始化基本資訊 ./mysqld --user=mysql --basedir=/usr/local/mysql --datadir=/usr/local/mysql/data/ --initialize # 獲取臨時密碼:最後一行 root@localhost: lxkqDibw2?Yn - 新增mysql服務到系統
cd /usr/local/mysql/mysql8.0
# 將mysqld服務新增到系統
cp -a ./support-files/mysql.server /etc/init.d/mysql
# 授權以及新增服務
chmod +x /etc/init.d/mysql
chkconfig --add mysql
# 建立my.cnf檔案
sudo vim /etc/my.cnf
# 設定許可權
sudo chmod 664 /etc/my.cnf
# Example MySQL config file for small systems. # # This is for a system with little memory (<= 64M) where MySQL is only used # from time to time and it's important that the mysqld daemon # doesn't use much resources. # # MySQL programs look for option files in a set of # locations which depend on the deployment platform. # You can copy this option file to one of those # locations. For information about these locations, see: # http://dev.mysql.com/doc/mysql/en/option-files.html # # In this file, you can use all long options that a program supports. # If you want to know which options a program supports, run the program # with the "--help" option. # The following options will be passed to all MySQL clients [client] default-character-set=utf8 #password = k0Ui&wV(Z3yt port = 3306 socket = /tmp/mysql.sock # Here follows entries for some specific programs # The MySQL server [mysqld] #配置mysql的資料夾 和 mysql data目錄 basedir=/usr/local/mysql/mysql8.0 datadir=/usr/local/mysql/mysql8.0/data default-storage-engine=INNODB character-set-server=utf8 collation-server=utf8_general_ci port = 3306 socket = /tmp/mysql.sock skip-external-locking key_buffer_size = 16K max_allowed_packet = 1M table_open_cache = 4 sort_buffer_size = 64K read_buffer_size = 256K read_rnd_buffer_size = 256K net_buffer_length = 2K thread_stack = 128K # Don't listen on a TCP/IP port at all. This can be a security enhancement, # if all processes that need to connect to mysqld run on the same host. # All interaction with mysqld must be made via Unix sockets or named pipes. # Note that using this option without enabling named pipes on Windows # (using the "enable-named-pipe" option) will render mysqld useless! # #skip-networking server-id = 1 # Uncomment the following if you want to log updates #log-bin=mysql-bin # binary logging format - mixed recommended #binlog_format=mixed # Causes updates to non-transactional engines using statement format to be # written directly to binary log. Before using this option make sure that # there are no dependencies between transactional and non-transactional # tables such as in the statement INSERT INTO t_myisam SELECT * FROM # t_innodb; otherwise, slaves may diverge from the master. #binlog_direct_non_transactional_updates=TRUE # Uncomment the following if you are using InnoDB tables #innodb_data_home_dir = /usr/local/mysql/data #innodb_data_file_path = ibdata1:10M:autoextend #innodb_log_group_home_dir = /usr/local/mysql/data # You can set .._buffer_pool_size up to 50 - 80 % # of RAM but beware of setting memory usage too high #innodb_buffer_pool_size = 16M #innodb_additional_mem_pool_size = 2M # Set .._log_file_size to 25 % of buffer pool size #innodb_log_file_size = 5M #innodb_log_buffer_size = 8M #innodb_flush_log_at_trx_commit = 1 #innodb_lock_wait_timeout = 50 [mysqldump] quick max_allowed_packet = 16M [mysql] no-auto-rehash # Remove the next comment character if you are not familiar with SQL #safe-updates [myisamchk] key_buffer_size = 8M sort_buffer_size = 8M [mysqlhotcopy] interactive-timeout
服務啟動/關閉/登入/退出
- mysql服務啟動/關閉
# 啟動mysql服務 service mysql start # 檢視mysql執行狀態 service mysql status # 將mysql命令新增到服務 ln -s /usr/local/mysql/mysql8.0/bin/mysql /usr/bin # 關閉mysql服務 service mysql stop - mysql服務登入/退出
# 登入
mysql mysql -uroot -p
# 退出
quit;
# 修改root密碼 mysql>
ALTER USER 'root'@'localhost' IDENTIFIED WITH mysql_native_password BY '123456';
# 重新整理快取
flush privileges;
客戶端
推薦兩款使用下來體驗很不錯的客戶端: Navicat(收費,或找破解版)、DBeaver(開源免費,但下載程式後還需要下載驅動才可使用)
Redis
官網下載:https://redis.io/docs/getting-started/
配置說明
- mac:https://redis.io/docs/getting-started/installation/install-redis-on-mac-os/
- linux:https://redis.io/docs/getting-started/installation/install-redis-on-linux/
- windows:https://redis.io/docs/getting-started/installation/install-redis-on-windows/
Jmeter
官網下載地址:https://jmeter.apache.org/download_jmeter.cgi
配置說明
- 下載:官網下載太慢,選擇阿里雲映象下載,下載地址 https://mirrors.aliyun.com/apache/jmeter/binaries/?spm=a2c6h.25603864.0.0.436f69a5u1Mo7X
- 解壓:
sudo tar -zxvf apache-jmeter-5.5.tgz -C DevelopTools - 啟動配置修改:/bin/jmeter.properties
# 修改語言 language=zh_en改成language=zh_CN # 修改編碼 sampleresult.default.encoding=ISO-8859-1 改為 UTF-8 - 啟動:
sh /bin/jmeter.sh - 使用(參考文章:https://www.jianshu.com/p/20fac18f478f)
-
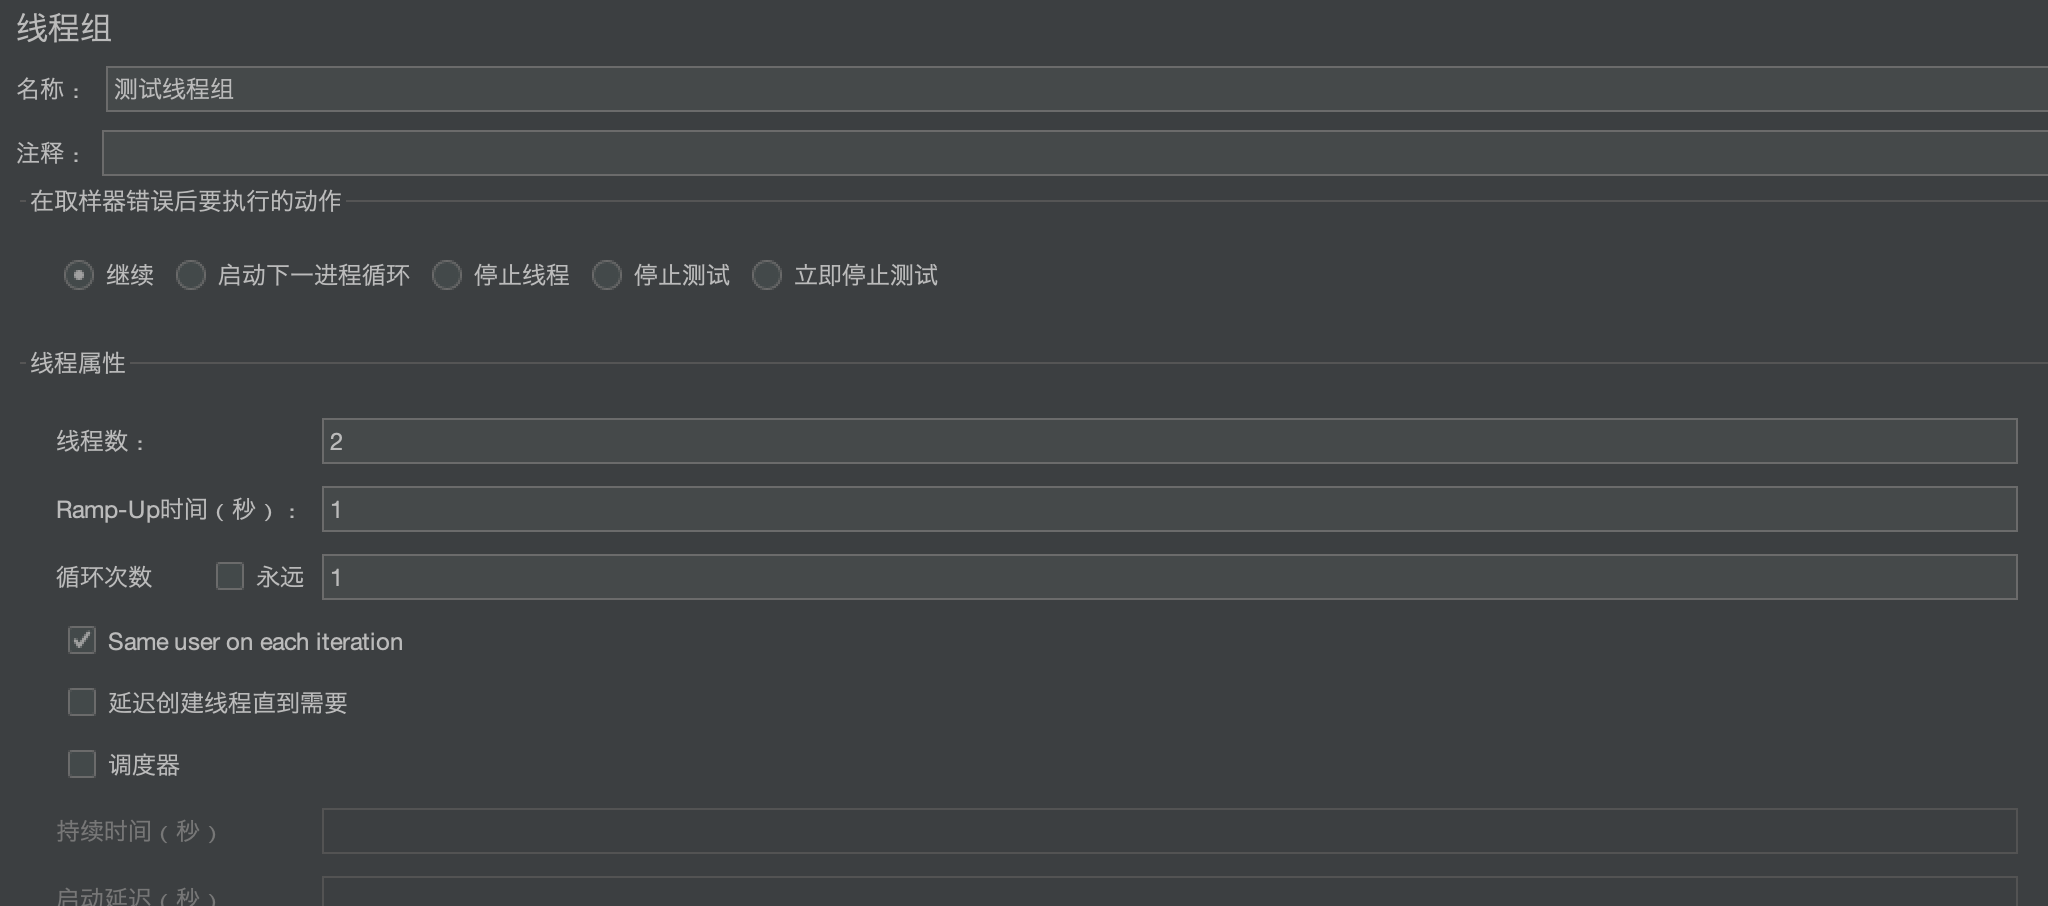
新增執行緒組
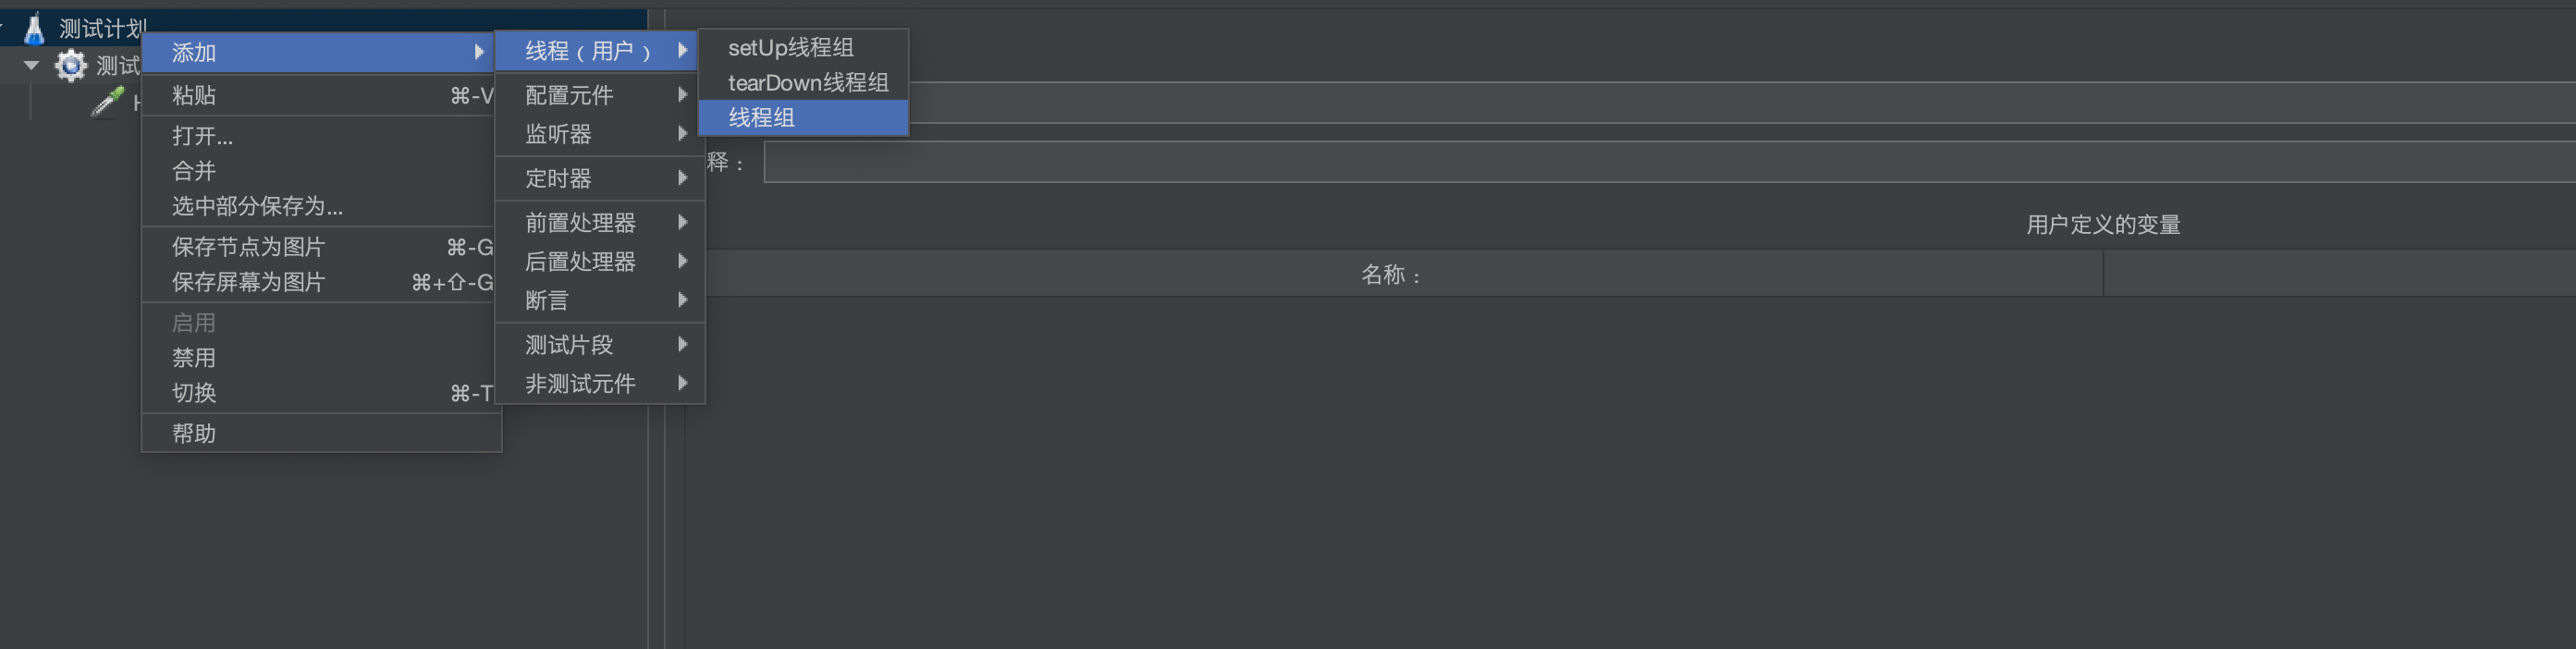
-
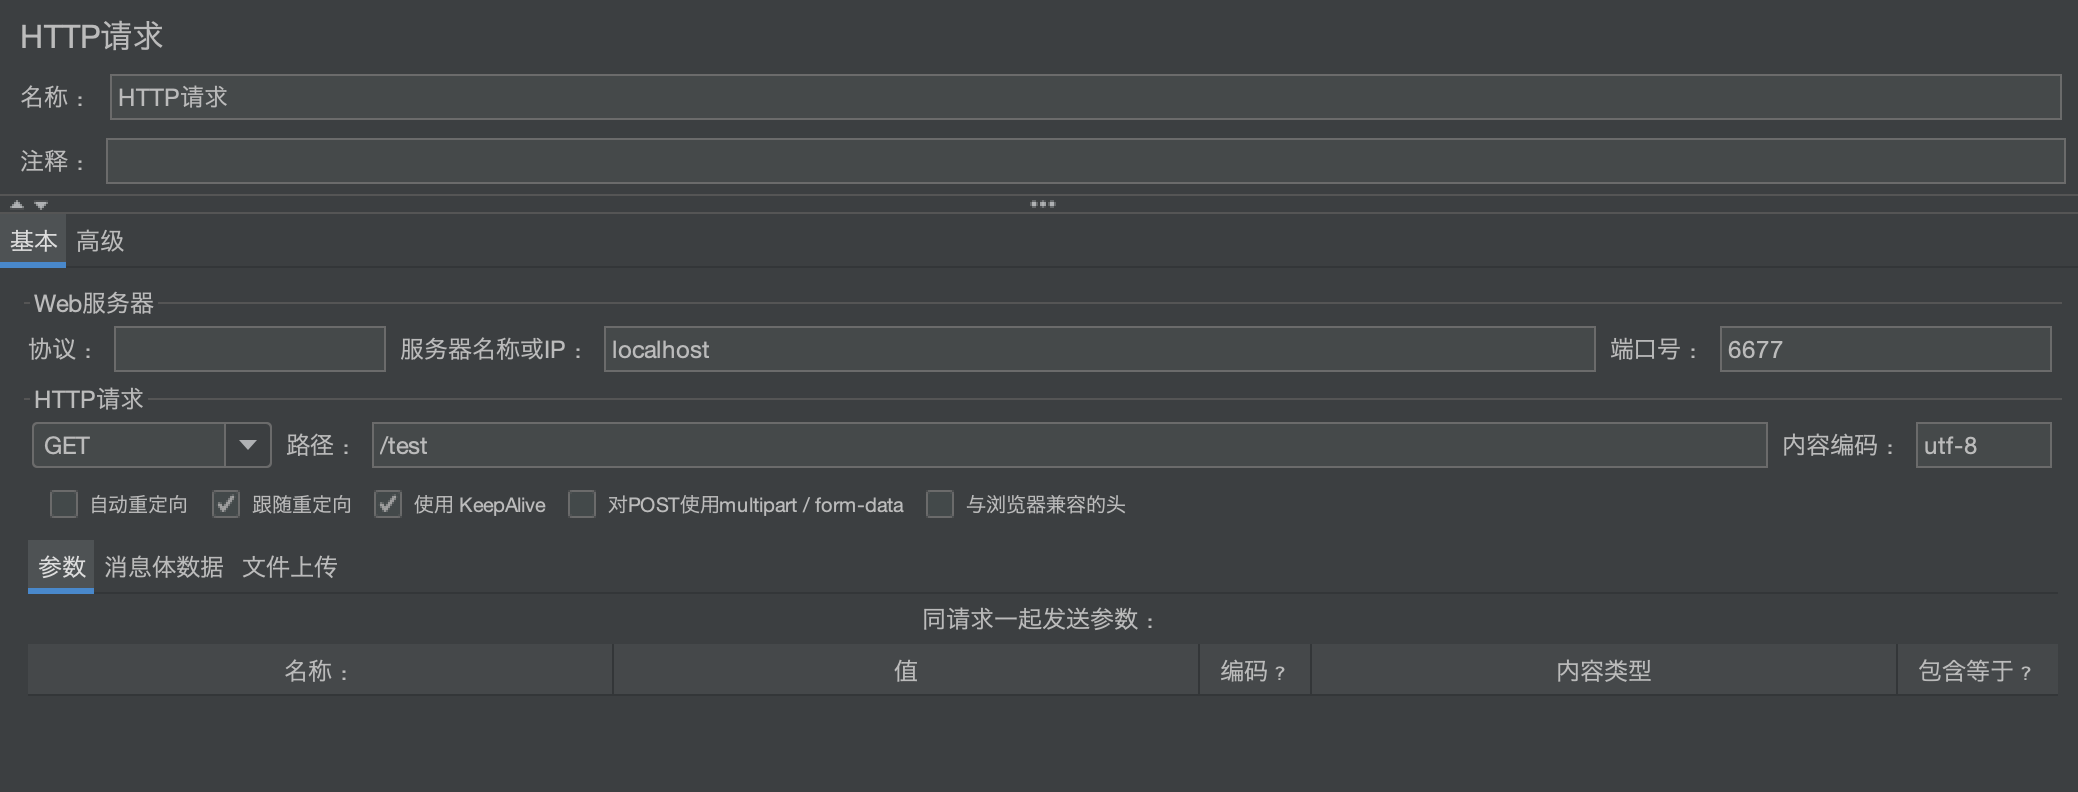
新增Http請求

-
啟動測試即可
-