Spring 學習筆記
好記憶不如爛筆頭, 能記下點什麼, 就記下點什麼, 方便後期的鞏固
Spring介紹
Spring 是一個開源框架,是一個分層的 JavaEE 一站式框架。
所謂一站式框架是指 Spring 有 JavaEE 開發的每一層解決方案。
-
WEB層:SpringMVC
-
Service層:Spring的Bean管理,宣告式事務
-
DAO層:Spring的JDBC模板,ORM模板
優點:
-
IOC:方便解耦合
-
AOP:對程式進行擴充套件
-
輕量級框架
-
方便與其他框架整合
Spring使用
Spring開發包解壓後的目錄介紹:
-
docs: Spring 開發規範和API
-
libs: Spring jar 包和原始碼
-
schema: Spring 配置檔案的約束
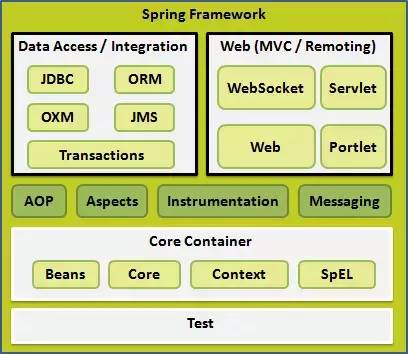
DataAccess 用於資料訪問,WEB 用於頁面顯示,核心容器也就是IOC部分。
控制反轉(IOC)
控制反轉(Inversion of Control)是指將物件的建立權反轉(交給)Spring。
使用IOC就需要匯入IOC相關的包,也就是上圖中核心容器中的幾個包:beans,context,core,expression四個包。
實現原理
傳統方式建立物件:
UserDAO userDAO=new UserDAO();
進一步面向介面程式設計,可以多型:
UserDAO userDAO=new UserDAOImpl();
這種方式的缺點是介面和實現類高耦合,切換底層實現類時,需要修改原始碼。程式設計應該滿足OCP元祖,在儘量不修改程式原始碼的基礎上對程式進行擴充套件。此時,可以使用工廠模式:
class BeanFactory{
public static UserDAO getUserDAO(){
return new UserDAOImpl();
}
}
此種方式雖然在介面和實現類之間沒有耦合,但是介面和工廠之間存在耦合。
使用工廠+反射+配置檔案的方式,實現解耦,這也是 Spring 框架 IOC 的底層實現。
//xml配置檔案
//<bean id="userDAO" class="xxx.UserDAOImpl"></bean>
class BeanFactory{
public static Object getBean(String id){
//解析XML
//反射
Class clazz=Class.forName();
return clazz.newInstance();
}
}
IOC XML 開發
在 docs 檔案中包含了 xsd-configuration.hmtl 檔案。其中定義了 beans schema。
<beans xmlns="http://www.springframework.org/schema/beans"
xmlns:xsi="http://www.w3.org/2001/XMLSchema-instance"
xsi:schemaLocation="
http://www.springframework.org/schema/beans http://www.springframework.org/schema/beans/spring-beans.xsd">
//在此配置bean
<bean id="userService" class="x.y.UserServiceImpl">
</bean>
</beans>
呼叫類:
ApplicationContext applicationContext=new ClassPathXmlApplicationContext("applicationContext.xml");
UserService userService=(UserService)applicationContext.getBean("userService");
userService.save();
IOC 和 DI
DI 指依賴注入,其前提是必須有 IOC 的環境,Spring 管理這個類的時候將類的依賴的屬性注入進來。
例如,在UserServiceImpl.java中:
public class UserServiceImpl implements UserService{
private String name;
public void setName(String name){
this.name=name;
}
public void save(){
System.out.println("save "+name);
}
}
在配置檔案中:
<beans xmlns="http://www.springframework.org/schema/beans"
xmlns:xsi="http://www.w3.org/2001/XMLSchema-instance"
xsi:schemaLocation="
http://www.springframework.org/schema/beans http://www.springframework.org/schema/beans/spring-beans.xsd">
<bean id="userService" class="spring.demo1.UserServiceImpl">
<!--配置依賴的屬性-->
<property name="name" value="tony"/>
</bean>
</beans>
測試程式碼:
@Test
public void demo2(){
//建立Spring工廠
ApplicationContext applicationContext=new ClassPathXmlApplicationContext("applicationContext.xml");
UserService userService=(UserService)applicationContext.getBean("userService");
userService.save();
}
執行結果:
save tony
可以看到,在配置檔案中配置的屬性,在 Spring 管理該類的時候將其依賴的屬性成功進行了設定。如果不使用依賴注入,則無法使用介面,只能使用實現類來進行設定,因為介面中沒有該屬性。
Spring 的工廠類
-
BeanFactory: 老版本的工廠類,在呼叫
getBean()方法時,才會生成類的例項。 -
ApplicationContext: 在載入配置檔案的時候,就會將 Spring 管理的類都例項化。有兩個實現類:
-
ClassPathXmlApplicationContext: 載入類路徑下的配置檔案
-
FileSystemXmlApplicationContext: 載入磁碟下的配置檔案
-
bean標籤配置
-
id: 唯一約束,不能出現特殊字元
-
name: 理論上可以重複,但是開發中最好不要。可以出現特殊字元
生命週期:
-
init-method: bean被初始化的時候執行的方法
-
destroy-method: bean被銷燬的時候執行的方法
作用範圍:
-
scope: bean的作用範圍,有如下幾種,常用的是前兩種
-
singleton: 預設使用單例模式建立
-
prototype: 多例
-
request: 在web專案中,spring 建立類後,將其存入到 request 範圍中
-
session: 在web專案中,spring 建立類後,將其存入到 session 範圍中
-
globalsession: 在web專案中,必須用在 porlet 環境
-
屬性注入設定
-
構造方法方式的屬性注入: Car 類在構造方法中有兩個屬性,分別為 name 和 price。
<bean id="car" class="demo.Car">
<constructor-arg name="name" value="bmw">
<constructor-arg name="price" value="123">
</bean>
-
set 方法屬性注入: Employee 類在有兩個 set 方法,分別設定普通型別的 name 和引用型別的 Car (使用 ref 指向引用型別的 id 或 name)。
<bean id="employee" class="demo.Employee">
<property name="name" value="xiaoming">
<property name="car" ref="car">
</bean>
-
P名稱空間的屬性注入: 首先需要引入p名稱空間:
<beans xmlns="http://www.springframework.org/schema/beans"
//引入p名稱空間
xmlns:p="http://www.springframework.org/schema/p"
xmlns:xsi="http://www.w3.org/2001/XMLSchema-instance"
xsi:schemaLocation="
http://www.springframework.org/schema/beans http://www.springframework.org/schema/beans/spring-beans.xsd">
</beans>
如果是普通屬性:
<bean id="car" class="demo.Car" p:name="bmv" p:price="123">
</bean>
如果是引用型別:
<bean id="employee" class="demo.Employee" p:name="xiaoming" p:car-ref:"car">
</bean>
-
SpEL(Spring Expression Language)屬性注入(Spring 3.x以上版本)
<bean id="car" class="demo.Car">
<property name="name" value="#{'xiaoming'}">
<property name="car" ref="#{car}">
</bean>
-
集合型別屬性注入:
<bean id="car" class="demo.Car">
<property name="namelist">
<list>
<value>qirui</value>
<value>baoma</value>
<value>benchi</value>
</list>
</property>
</bean>
多模組開發配置
-
在載入配置檔案的時候,載入多個配置檔案
-
在一個配置檔案中引入多個配置檔案,通過實現
IOC 註解開發
示例
-
引入jar包: 除了要引入上述的四個包之外,還需要引入aop包。
-
建立 applicationContext.xml ,使用註解開發引入 context 約束(xsd-configuration.html)
<beans xmlns="http://www.springframework.org/schema/beans"
xmlns:xsi="http://www.w3.org/2001/XMLSchema-instance"
xmlns:context="http://www.springframework.org/schema/context" xsi:schemaLocation="
http://www.springframework.org/schema/beans http://www.springframework.org/schema/beans/spring-beans.xsd
http://www.springframework.org/schema/context http://www.springframework.org/schema/context/spring-context.xsd">
<!-- bean definitions here -->
</beans>
-
元件掃描: 使用IOC註解開發,需要配置元件掃描,也就是哪些包下的類使用IOC的註解。
<context:component-scan base-package="demo1">
-
在類上新增註解
-
使用註解設定屬性的值
屬性如果有set方法,將屬性注入的註解新增到set方法
屬性沒有set方法,將註解新增到屬性上。
@Component("UserDao")//相當於配置了一個<bean> 其id為UserDao,對應的類為該類
public class UserDAOImpl implements UserDAO {
@Override
public void save() {
// TODO Auto-generated method stub
System.out.println("save");
}
}
註解詳解
-
@Component
元件註解,用於修飾一個類,將這個類交給 Spring 管理。
有三個衍生的註解,功能類似,也用來修飾類。
-
@Controller:修飾 web 層類
-
@Service:修飾 service 層類
-
@Repository:修飾 dao 層類
2.屬性注入
-
普通屬性使用 @Value 來設定屬性的值
-
物件屬性使用 @Autowired ,這個註解是按照型別來進行屬性注入的。如果希望按照 bean 的名稱或id進行屬性注入,需要用 @Autowired 和 @Qualifier 一起使用
-
實際開發中,使用 @Resource(name=" ") 來進行按照物件的名稱完成屬性注入
3.其他註解
-
@PostConstruct 相當於 init-method,用於初始化函式的註解
-
@PreDestroy 相當於 destroy-method,用於銷燬函式的註解
-
@Scope 作用範圍的註解,常用的是預設單例,還有多例 @Scope("prototype")
IOC 的 XML 和註解開發比較
-
適用場景:XML 適用於任何場景;註解只適合自己寫的類,不是自己提供的類無法新增註解。
-
可以使用 XML 管理 bean,使用註解來進行屬性注入
AOP開發
AOP 是 Aspect Oriented Programming 的縮寫,意為面向切面程式設計,通過預編譯方式和執行期動態代理實現程式功能的統一維護的一種技術,是OOP的延續。
AOP 能夠對程式進行增強,在不修改原始碼的情況下,可以進行許可權校驗,日誌記錄,效能監控,事務控制等。
也就是說功能分為兩大類,一類是核心業務功能,一類是輔助增強功能。兩類功能彼此獨立進行開發。比如登入功能是核心業務功能,日誌功能是輔助增強功能,如果有需要,將日誌和登入編制在一起。輔助功能就稱為切面,這種能選擇性的、低耦合的把切面和核心業務功能結合的程式設計思想稱為切面程式設計。
底層實現
JDK 動態代理只能對實現了介面的類產生代理。Cglib 動態代理可以對沒有實現介面的類產生代理物件,生成的是子類物件。
使用 JDK 動態代理:
public interface UserDao {
public void insert();
public void delete();
public void update();
public void query();
}
實現類:
public class UserDaoImpl implements UserDao { @Override public void insert() { System.out.println("insert"); } @Override public void delete() { System.out.println("delete"); } @Override public void update() { System.out.println("update"); } @Override public void query() { System.out.println("query"); } }
JDK 代理:
public class JDKProxy implements InvocationHandler{
private UserDao userDao;
public JDKProxy(UserDao userDao){
this.userDao=userDao;
}
public UserDao createProxy(){
UserDao userDaoProxy=(UserDao)Proxy.newProxyInstance(userDao.getClass().getClassLoader(),
userDao.getClass().getInterfaces(), this);
return userDaoProxy;
}
@Override
public Object invoke(Object proxy, Method method, Object[] args) throws Throwable {
if("update".equals(method.getName())){
System.out.println("許可權校驗");
return method.invoke(userDao, args);
}
return method.invoke(userDao, args);
}
}
通過動態代理增強了 update 函式。 測試類:
public class Demo1 {
@Test
public void demo1(){
UserDao userDao=new UserDaoImpl();
UserDao proxy=new JDKProxy(userDao).createProxy();
proxy.insert();
proxy.delete();
proxy.update();
proxy.query();
}
}
執行結果為:
insert
delete
許可權校驗
update
query
CglibCglib 是第三方開原始碼生成類庫,可以動態新增類的屬性和方法。
與上邊JDK代理不同,Cglib的使用方式如下:
public class CglibProxy implements MethodInterceptor{
//傳入增強的物件
private UserDao customerDao;
public CglibProxy(UserDao userDao){
this.userDao=userDao;
}
public UserDao createProxy(){
Enhancer enhancer=new Enhancer();
enhancer.setSuperclass(userDao.getClass());
enhancer.setCallback(this);
UserDao proxy=(UserDao)enhancer.create();
return proxy;
}
@Override
public Object intercept(Object proxy, Method method, Object[] args, MethodProxy methodProxy) throws Throwable {
if("save".equals(method.getName())){
System.out.println("enhance function");
return methodProxy.invokeSuper(proxy, args);
}
return methodProxy.invokeSuper(proxy, args);
}
}
如果實現了介面的類,底層採用JDK代理。如果不是實現了介面的類,底層採用 Cglib代理。
IOC與傳統方式的比較
-
獲取物件方式:傳統通過 new 關鍵字主動建立一個物件。IOC 方式中,將物件的生命週期交給 Spring 管理,直接從 Spring 獲取物件。也就是控制反轉————將控制權從自己手中交到了 Spring 手中。
Spring 的 AOP 開發(AspectJ 的 XML 方式)
AspectJ 是一個 AOP 的框架,Spring 引入 AspectJ,基於 AspectJ 進行 AOP 的開發。
相關術語
-
Joinpoint: 連線點,可以被攔截到的點。也就是可以被增強的方法都是連線點。
-
Pointcut: 切入點,真正被攔截到的點,也就是真正被增強的方法
-
Advice: 通知,方法層面的增強。對某個方法進行增強的方法,比如對 save 方法進行許可權校驗,許可權校驗的方法稱為通知。
-
Introduction: 引介,類層面的增強。
-
Target: 目標,被增強的物件(類)。
-
Weaving: 織入,將 advice 應用到 target 的過程。
-
Proxy: 代理物件,被增強的物件。
-
Aspect: 切面,多個通知和多個切入點的組合。
使用方法
-
引入相關包
-
引入配置檔案
<?xml version="1.0" encoding="UTF-8"?>
<beans xmlns="http://www.springframework.org/schema/beans"
xmlns:xsi="http://www.w3.org/2001/XMLSchema-instance"
xmlns:aop="http://www.springframework.org/schema/aop" xsi:schemaLocation="
http://www.springframework.org/schema/beans http://www.springframework.org/schema/beans/spring-beans.xsd
http://www.springframework.org/schema/aop http://www.springframework.org/schema/aop/spring-aop.xsd"> <!-- bean definitions here -->
</beans>
-
編寫目標類並配置:
public class ProductDaoImpl implements ProductDao {
@Override
public void save() {
System.out.println("save");
}
@Override
public void update() {
System.out.println("update");
}
@Override
public void find() {
System.out.println("find");
}
@Override
public void delete() {
System.out.println("delete");
}
}
<bean id="productDao" class="demo1.ProductDaoImpl"></bean>
-
編寫切面類,假設用於許可權驗證並配置
public class MyAspectXML {
public void checkPri(){
System.out.println("check auth");
}
}
<bean id="myAspect" class="demo1.MyAspectXML"></bean>
-
通過AOP配置完成對目標類的增強
<aop:config>
<aop:pointcut expression="execution(* demo1.ProductDaoImpl.save(..))" id="pointcut1"/>
<aop:aspect ref="myAspect">
<aop:before method="chechPri" pointcut-ref="pointcut1"/>
</aop:aspect>
</aop:config>
通知型別
-
前置通知:在目標方法執行前操作,可以獲得切入點資訊
<aop:before method="chechPri" pointcut-ref="pointcut1"/>
public void checkPri(JoinPoint joinPoint){
System.out.println("check auth "+joinPoint);
}
-
後置通知:在目標方法執行後操作,可以獲得方法返回值
<aop:after-returning method="writeLog" pointcut-ref="pointcut2" returning="result"/>
public void writeLog(Object result){
System.out.println("writeLog "+result);
}
-
環繞通知:在目標方法執行前和後操作,可以阻止目標方法執
<aop:around method="around" pointcut-ref="pointcut3"/>
public Object around(ProceedingJoinPoint joinPoint) throws Throwable{
System.out.println("before");
Object result=joinPoint.proceed();
System.out.println("after");
return result;
}
-
異常丟擲通知:程式出現異常時操作
<aop:after-throwing method="afterThrowing" pointcut-ref="pointcut4" throwing="ex"/>
public void afterThrowing(Throwable ex){
System.out.println("exception "+ex.getMessage());
}
-
最終通知:相當於finally塊,無論程式碼是否有異常,都會執行
<aop:after method="finallyFunc" pointcut-ref="pointcut4"/>
public void finallyFunc(){
System.out.println("finally");
}
-
引介通知:不常用
Spring 切入點表示式
基於 execution 函式完成
語法:[訪問修飾符] 方法返回值 包名.類名.方法名(引數)
其中任意欄位可以使用*代替表示任意值
Spring 的 AOP 基於 AspectJ 註解開發
開發步驟
-
引入jar包
-
設定配置檔案:
<?xml version="1.0" encoding="UTF-8"?>
<beans xmlns="http://www.springframework.org/schema/beans"
xmlns:xsi="http://www.w3.org/2001/XMLSchema-instance"
xmlns:context="http://www.springframework.org/schema/context"
xmlns:aop="http://www.springframework.org/schema/aop"
xmlns:tx="http://www.springframework.org/schema/tx"
xsi:schemaLocation="http://www.springframework.org/schema/beans
http://www.springframework.org/schema/beans/spring-beans.xsd
http://www.springframework.org/schema/context
http://www.springframework.org/schema/context/spring-context.xsd
http://www.springframework.org/schema/aop
http://www.springframework.org/schema/aop/spring-aop.xsd
http://www.springframework.org/schema/tx
http://www.springframework.org/schema/tx/spring-tx.xsd">
</beans>
-
編寫配置目標類
<bean id="orderDao" class="demo1.OrderDao"></bean>
public class OrderDao {
public void save(){
System.out.println("save order");
}
public void update(){
System.out.println("update order");
}
public void delete(){
System.out.println("delete order");
}
public void find(){
System.out.println("find order");
}
}
-
開啟aop註解自動代理
<aop:aspectj-autoproxy/>
-
編寫切面類並配置
@Aspect
public class MyAspectAnno {
@Before(value="execution(* demo1.OrderDao.save(..))")
public void before(){
System.out.println("before");
}
}
<bean id="myAspect" class="demo1.MyAspectAnno">
註解通知型別
-
@Before: 前置通知
-
@AfterReturning: 後置通知
@AfterReturning(value="execution(* demo1.OrderDao.save(..))",returning="result")
public void after(Object result){
System.out.println("after "+result);
}
-
@Around:環繞通知
@Around(value="execution(* demo1.OrderDao.save(..))")
public Object around(ProceedingJoinPoint joinPoint) throws Throwable{
System.out.println("before");
Object obj=joinPoint.proceed();
System.out.println("after");
return obj;
}
-
@AfterThrowing: 丟擲異常
@AfterThrowing(value="execution(* demo1.OrderDao.save(..))",throwing="e")
public void afterThrowing(Throwable e){
System.out.println("exception:"+e.getMessage();
}
-
@After: 最終通知
@After(value="execution(* demo1.OrderDao.save(..))")
public void after(){
System.out.println("finally");
}
-
@PointCut:切入點註解
@PointCut(value="execution(* demo1.OrderDao.save(..))")
private void pointcut1(){}
此時,在上述通知的註解中,value可以替換為該函式名,例如:
@After(value="MyAspect.pointcut1()")
public void after(){
System.out.println("finally");
}
這個註解的好處是,只需要維護切入點即可,不用在修改時修改每個註解。
Spring 的 JDBC 模板
Spring 對持久層也提供瞭解決方案,也就是 ORM 模組和 JDBC 的模板。針對 JDBC ,提供了 org.springframework.jdbc.core.JdbcTemplate 作為模板類。
使用 JDBC 模板
-
引入jar包,資料庫驅動,Spring 的 jdbc 相關包。
-
基本使用:
public void demo1(){
//建立連線池
DriverManagerDataSource dataSource=new DriverManagerDataSource();
dataSource.setDriverClassName("com.mysql.jdbc.Driver");
dataSource.setUrl("jdbc:mysql:///spring4");
dataSource.setUsername("root");
dataSource.setPassword("123456");
//建立JDBC模板
JdbcTemplate jdbcTemplate=new JdbcTemplate(dataSource);
jdbcTemplate.update("insert into account values (null,?,?)", "xiaoming",1000d);
}
-
將連線池和模板交給 Spring 管理
-
配置檔案:
<bean id="dataSource" class="org.springframework.jdbc.datasource.DriverManagerDataSource;">
<property name="driverClassName" value="com.mysql.jdbc.Driver"></property>
<property name="url" value="jdbc:mysql:///spring4"></property>
<property name="username" value="root"></property>
<property name="password" value="123456"></property>
</bean>
<bean id="jdbcTemplate" class="org.springframework.jdbc.core.JdbcTemplate;">
<property name="dataSource" ref="dataSource"></property>
</bean>
-
測試檔案:
@RunWith(SpringJUnit4ClassRunner.class)
@ContextConfiguration("classpath:applicationContext.xml")
public class JdbcDemo2 {
@Resource(name="jdbcTemplate")
private JdbcTemplate jdbcTemplate;
@Test
public void demo2(){
jdbcTemplate.update("insert into account values (null,?,?)", "xiaolan",1000d);
}
}
使用開源資料庫連線池
-
使用 DBCP 的配置:
<bean id="dataSource" class="org.apache.commons.dbcp.BasicDataSource">
<property name="driverClassName" value="com.mysql.jdbc.Driver"></property>
<property name="url" value="jdbc:mysql://192.168.66.128/spring4"></property>
<property name="username" value="root"></property>
<property name="password" value="123456"></property>
-
使用 C3P0 的配置:
<bean id="dataSource" class="com.mchange.v2.c3p0.ComboPooledDataSource">
<property name="driverClass" value="com.mysql.jdbc.Driver"></property>
<property name="jdbcUrl" value="jdbc:mysql://192.168.66.128/spring4"></property>
<property name="user" value="root"></property>
<property name="password" value="123456"></property>
</bean>
-
引入外部屬性檔案
首先建立外部屬性檔案:
jdbc.driverClass=com.mysql.jdbc.Driver
jdbc.url=jdbc:mysql://192.168.66.128/spring4
jdbc.username=root
jdbc.password=123456
然後對屬性檔案進行配置:
<context:property-placeholder location="classpath:jdbc.properties"/>
<bean id="dataSource" class="com.mchange.v2.c3p0.ComboPooledDataSource">
<property name="driverClass" value="${jdbc.driverClass}"></property>
<property name="jdbcUrl" value="${jdbc.url}"></property>
<property name="user" value="${jdbc.username}"></property>
<property name="password" value="${jdbc.password}"></property>
</bean>
CRUD操作
insert, update, delete 語句都藉助模板的 update 方法進行操作。
public void demo(){
jdbcTemplate.update("insert into account values (null,?,?)", "xiaoda",1000d);
jdbcTemplate.update("update account set name=?,money=? where id=?", "xiaoda",1000d,2);
jdbcTemplate.update("delete from account where id=?", 6);
}
查詢操作:
public void demo3(){
String name=jdbcTemplate.queryForObject("select name from account where id=?",String.class,5);
long count=jdbcTemplate.queryForObject("select count(*) from account",Long.class);
}
將返回的結果封裝成為類:
public void demo4(){
Account account=jdbcTemplate.queryForObject("select * from account where id=?", new MyRowMapper(),5);
}
其中:
class MyRowMapper implements RowMapper<Account>{
@Override
public Account mapRow(ResultSet rs, int rowNum) throws SQLException {
Account account=new Account();
account.setId(rs.getInt("id"));
account.setName(rs.getString("name"));
account.setMoney(rs.getDouble("money"));
return account;
}
}
Spring的事務管理
事務
事務是指邏輯上的一組操作,組成這組操作的各個單元,要麼全部成功,要麼全部失敗。
具有四個特性:
-
原子性:事務不可分
-
一致性:事務執行前後資料完整性保持一致
-
隔離性:一個事務的執行不應該受到其他事務干擾
-
永續性:一旦事務結束,資料就持久化到資料庫
如果不考慮隔離性會引發安全性問題:
-
讀問題:
-
髒讀:一個事務讀到另一個事務未提交的資料
-
不可重複讀:一個事務讀到另一個事務已經提交的 update 資料,導致一個事務中多次查詢結果不一致
-
幻讀:一個事務讀到另一個事務已經提交的 insert 資料,導致一個事務中多次查詢結果不一致
-
-
寫問題:
-
丟失更新
-
解決讀問題:設定事務隔離級別
-
Read uncommitted: 未提交讀,無法解決任何讀問題
-
Read committed: 已提交讀,解決髒讀問題
-
Repeatable read: 重複讀,解決髒讀和不可重複讀問題
-
Serializable:序列化,解決所有讀問題
事務管理API
-
PlatformTransactionManager: 平臺事務管理器
這是一個介面,擁有多個不同的實現類,如 DataSourceTransactionManager 底層使用了JDBC 管理事務; HibernateTransactionManager 底層使用了 Hibernate 管理事務。
-
TransactionDefinition: 事務定義資訊
用於定義事務的相關資訊,如隔離級別、超時資訊、傳播行為、是否只讀等
-
TransactionStatus: 事務的狀態
用於記錄在事務管理過程中,事務的狀態的物件。
上述API的關係: Spring 在進行事務管理的時候,首先平臺事務管理器根據事務定義資訊進行事務管理,在事務管理過程當中,產生各種此狀態,將這些狀態資訊記錄到事務狀態的物件當中。
事務的傳播行為
事務的傳播行為主要解決業務層(Service)方法相互呼叫的問題,也就是不同的業務中存在不同的事務時,如何操作。
Spring 中提供了7種事務的傳播行為,分為三類:
-
保證多個操作在同一個事務中
-
PROPAGATION_REQUIRED: B方法呼叫A方法,如果A中有事務,使用A中的事務並將B中的操作包含到該事務中;否則新建一個事務,將A和B中的操作包含進來。(預設)
-
PROPAGATION_SUPPORTS:如果A中有事務,使用A的事務;否則不使用事務
-
PROPAGATION_MANDATORY:如果A中有事務,使用A的事務;否則丟擲異常
-
-
保證多個操作不在同一個事務中
-
PROPAGATION_REQUIRES_NEW:如果A中有事務,將其掛起,建立新事務,只包含自身操作。否則,新建一個事務,只包含自身操作。
-
PROPAGATION_NOT_SUPPORTED:如果A中有事務,掛起,不使用事務。
-
PROPAGATION_NEVER:如果A中有事務,丟擲異常,也即不能用事務執行。
-
-
巢狀事務
-
PROPAGATION_NESTED:如果A有事務,按照A的事務執行,執行完成後,設定一個儲存點,然後執行B的操作。如果出現異常,可以回滾到最初狀態或儲存點狀態。
-
例項
以轉賬為例,業務層的DAO層類如下:
public interface AccountDao {
public void outMoney(String from,Double money);
public void inMoney(String to,Double money);
}
public class AccountDaoImpl extends JdbcDaoSupport implements AccountDao{
@Override
public void outMoney(String from, Double money) {
this.getJdbcTemplate().update("update account set money = money - ? where name = ?",money,from);
}
@Override
public void inMoney(String to, Double money) {
this.getJdbcTemplate().update("update account set money = money + ? where name = ?",money,to);
}
}
public interface AccountService {
public void transfer(String from,String to,Double money);
}
public class AccountServiceImpl implements AccountService {
private AccountDao accountDao;
public void setAccountDao(AccountDao accountDao) {
this.accountDao = accountDao;
}
@Override
public void transfer(String from, String to, Double money) {
accountDao.outMoney(from, money);
accountDao.inMoney(to, money);
}
}
在xml中進行類的配置:
<bean id="accountService" class="tx.demo.AccountServiceImpl">
<property name="accountDao" ref="accountDao"/>
</bean>
<bean id="accountDao" class="tx.demo.AccountDaoImpl">
<property name="dataSource" ref="dataSource"/>
</bean>
事務管理1: 程式設計式事務管理
-
配置平臺事務管理器
<bean id="transactionManager" class="org.springframework.jdbc.datasource.DataSourceTransactionManager">
<property name="dataSource" ref="dataSource"></property>
</bean>
-
配置事務管理模板類
<bean id="transactionTemplate" class="org.springframework.transaction.support.TransactionTemplate">
<property name="transactionManager" ref="transactionManager"></property>
</bean>
-
在業務層注入事務管理模板
<bean id="accountService" class="tx.demo1.AccountServiceImpl">
<property name="accountDao" ref="accountDao"/>
<property name="transactionTemplate" ref="transactionTemplate"/>
</bean>
-
編碼實現事務管理
//ServiceImpl類中:
private TransactionTemplate transactionTemplate;
@Override
public void transfer(String from, String to, Double money) {
transactionTemplate.execute(new TransactionCallbackWithoutResult() {
@Override
protected void doInTransactionWithoutResult(TransactionStatus arg0) {
accountDao.outMoney(from, money);
accountDao.inMoney(to, money);
}
});
}
宣告式事務管理(配置實現,基於AOP思想)
-
XML 方式的宣告式事務管理
-
配置事務管理器
<bean id="transactionManager" class="org.springframework.jdbc.datasource.DataSourceTransactionManager">
<property name="dataSource" ref="dataSource"></property>
</bean>
-
配置事務通知
<tx:advice id="txAdvice" transaction-manager="transactionManager">
<tx:attributes>
<tx:method name="transfer" propagation="REQUIRED"/>
</tx:attributes>
</tx:advice>
-
配置aop事務
<aop:config>
<aop:pointcut expression="execution(* tx.demo2.AccountServiceImpl.*(..))" id="pointcut1"/>
<aop:advisor advice-ref="txAdvice" pointcut-ref="pointcut1"/>
</aop:config>
-
註解方式
-
配置事務管理器,和上方一致
-
開啟事務管理的註解:
<tx:annotation-driven transaction-manager="transactionManager"/>
-
在使用事務的類上新增一個註解@Transactional
相關文章
- spring學習筆記Spring筆記
- Spring學習筆記(一)Spring筆記
- spring學習筆記(1)Spring筆記
- Spring 學習筆記(2) Spring BeanSpring筆記Bean
- Spring 學習筆記(3)Spring MVCSpring筆記MVC
- spring-5學習筆記Spring筆記
- Spring MVC學習筆記二SpringMVC筆記
- Spring框架學習筆記(1)Spring框架筆記
- Spring學習筆記目錄Spring筆記
- Spring Security Filter 學習筆記SpringFilter筆記
- 第一個完整的spring查詢功能學習筆記【Spring工程學習筆記(二)】Spring筆記
- Spring Boot學習筆記:Spring Boot核心配置Spring Boot筆記
- Spring Boot 學習筆記(3):MyBatisSpring Boot筆記MyBatis
- Spring Boot 學習筆記(2):JDBCSpring Boot筆記JDBC
- Java Spring Boot 學習筆記(一)JavaSpring Boot筆記
- Spring boot + Zookeeper + Dubbo學習筆記Springboot筆記
- Spring Boot 學習筆記(1):快速上手Spring Boot筆記
- Spring AOP學習筆記01:AOP概述Spring筆記
- spring boot學習簡要筆記1Spring Boot筆記
- 【學習筆記】Spring與Junit的整合筆記Spring
- springcloud學習筆記(一)Spring Cloud EurekaSpringGCCloud筆記
- springcloud學習筆記(二)Spring Cloud FeignSpringGCCloud筆記
- springcloud學習筆記(三)Spring Cloud RibbonSpringGCCloud筆記
- springcloud學習筆記(四)Spring Cloud HystrixSpringGCCloud筆記
- springcloud學習筆記(五)Spring Cloud ActuatorSpringGCCloud筆記
- springcloud學習筆記(六)Spring Cloud ZuulSpringGCCloud筆記Zuul
- spring cloud Alibaba 之 spring boot 基礎學習筆記CloudSpring Boot筆記
- Spring 學習筆記(五)執行時注入Spring筆記
- Spring Boot 學習筆記(5):日誌配置Spring Boot筆記
- Spring Boot 學習筆記(4):配置properties(1)Spring Boot筆記
- Spring Boot 學習筆記(4):配置properties(2)Spring Boot筆記
- Spring MVC學習筆記和SSH的整合SpringMVC筆記
- Java | Spring框架學習筆記--(1)工廠JavaSpring框架筆記
- Java_EE企業級開發學習筆記——spring學習筆記第二章Java筆記Spring
- numpy的學習筆記\pandas學習筆記筆記
- Spring學習筆記2(IOC註解方式&AOP)Spring筆記
- Spring學習筆記3(JDBC模板&事務管理)Spring筆記JDBC
- Spring AOP學習筆記02:如何開啟AOPSpring筆記