Caffe下自己的資料訓練和測試
【原文:http://blog.csdn.net/qqlu_did/article/details/47131549】
在caffe提供的例程當中,例如mnist與cifar10中,資料集的準備均是通過呼叫程式碼自己完成的,而對於ImageNet1000類的資料庫,對於高校實驗室而言,常常面臨電腦記憶體不足的尷尬境地。而對於應用者而言,用適合於自己條件的的資料集在caffe下訓練及測試才是更重要的。所以我們有必要自己做資料庫以及在caffe上訓練及測試。
1,資料準備
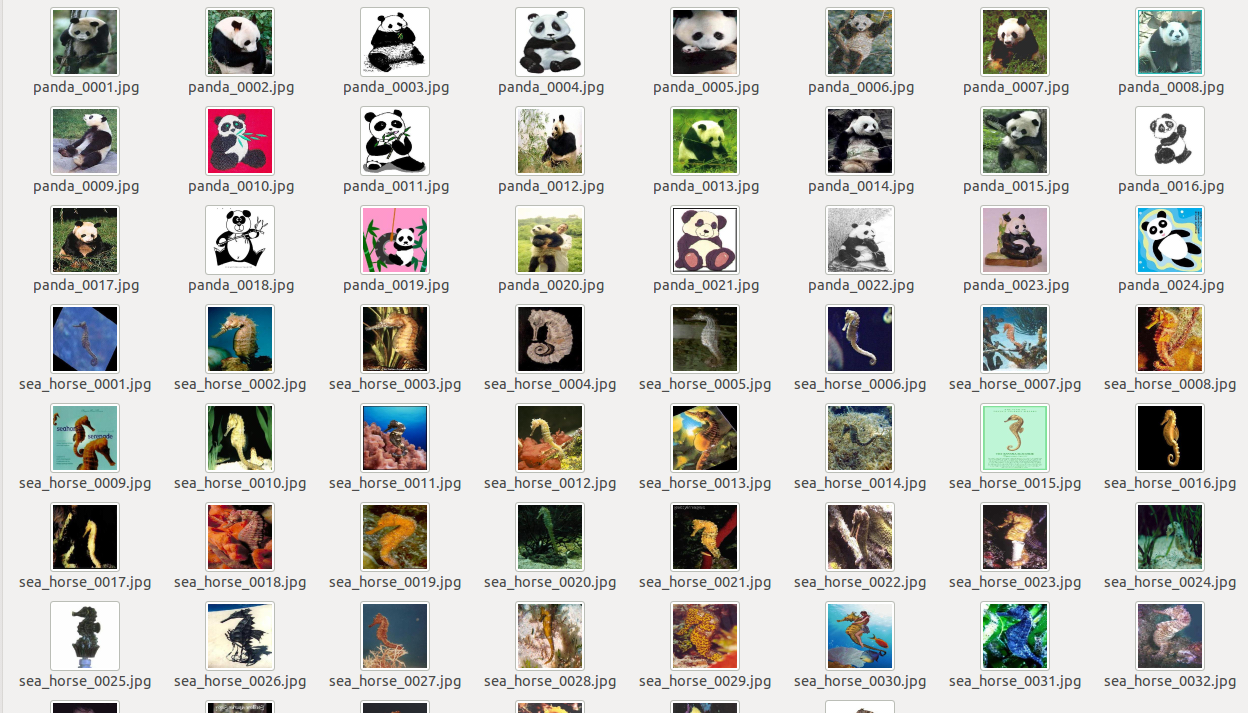
在data中新建資料夾myself,我們擷取了ImageNet1000類中的兩類—panda與sea_horse,訓練panda的圖片24張,測試panda的圖片6張,訓練sea_horse的圖片38張,測試sea_horse的圖片7張。如圖所示:
培訓和測試的輸入是用train.txt和val.txt描述的,這些文件列出所有檔案和他們的標籤。注意,在imagenet1000類中,我們分類的名字是ASCII碼的順序,即0-999,對應的分類名和數字的對映在synset_words.txt(自己寫)中。
執行以下指令:
<code class="hljs lasso has-numbering" style="display: block; padding: 0px; background-color: transparent; color: inherit; box-sizing: border-box; font-family: 'Source Code Pro', monospace;font-size:undefined; white-space: pre; border-top-left-radius: 0px; border-top-right-radius: 0px; border-bottom-right-radius: 0px; border-bottom-left-radius: 0px; word-wrap: normal; background-position: initial initial; background-repeat: initial initial;">find <span class="hljs-attribute" style="box-sizing: border-box;">-name</span> <span class="hljs-subst" style="color: rgb(0, 0, 0); box-sizing: border-box;">*</span><span class="hljs-built_in" style="color: rgb(102, 0, 102); box-sizing: border-box;">.</span>jpeg <span class="hljs-subst" style="color: rgb(0, 0, 0); box-sizing: border-box;">|</span>cut <span class="hljs-attribute" style="box-sizing: border-box;">-d</span> <span class="hljs-string" style="color: rgb(0, 136, 0); box-sizing: border-box;">'/'</span> <span class="hljs-attribute" style="box-sizing: border-box;">-f2</span><span class="hljs-subst" style="color: rgb(0, 0, 0); box-sizing: border-box;">-</span><span class="hljs-number" style="color: rgb(0, 102, 102); box-sizing: border-box;">3</span><span class="hljs-subst" style="color: rgb(0, 0, 0); box-sizing: border-box;">></span> train<span class="hljs-built_in" style="color: rgb(102, 0, 102); box-sizing: border-box;">.</span>txt</code><ul class="pre-numbering" style="box-sizing: border-box; position: absolute; width: 50px; background-color: rgb(238, 238, 238); top: 0px; left: 0px; margin: 0px; padding: 6px 0px 40px; border-right-width: 1px; border-right-style: solid; border-right-color: rgb(221, 221, 221); list-style: none; text-align: right;"><li style="box-sizing: border-box; padding: 0px 5px;">1</li></ul>
注意路徑
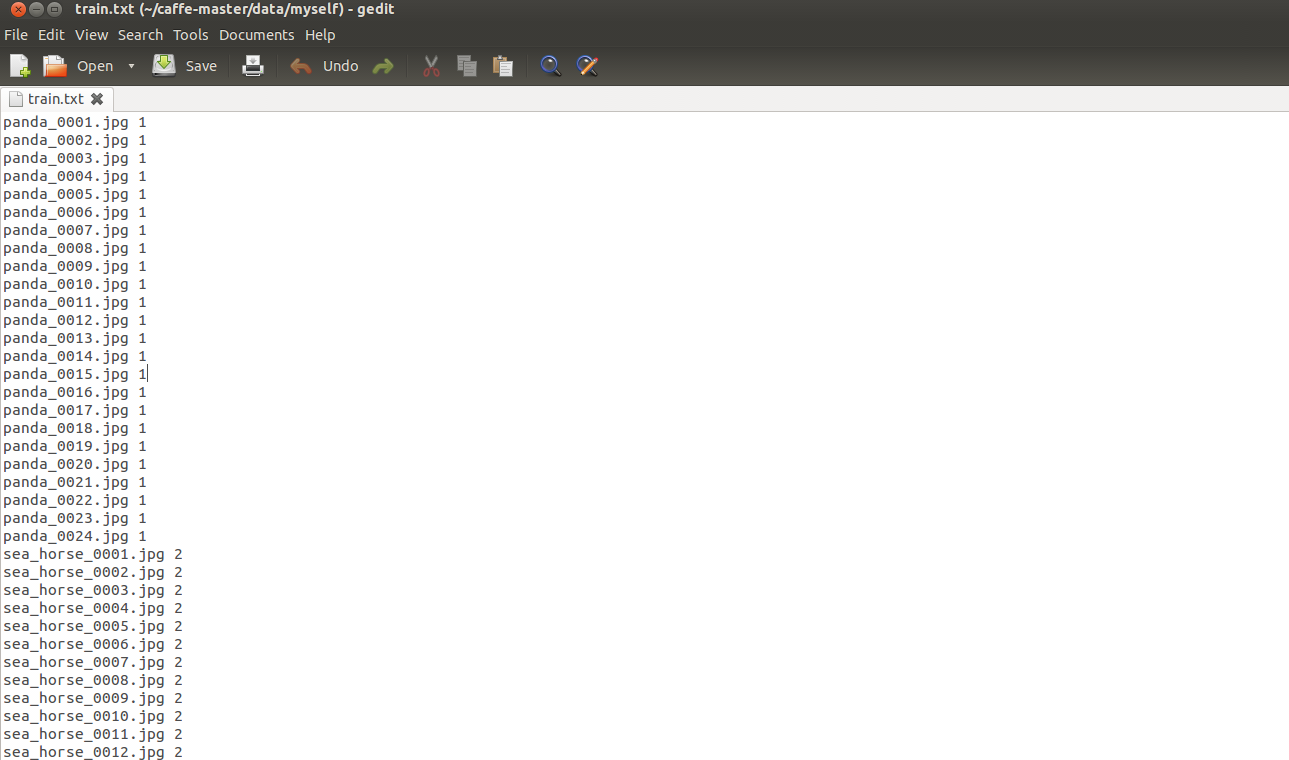
然後,因為自己的資料庫樣本數比較少,可以自行手動做分類標籤。在train.txt的每個照片後用1-2分類。如圖:
當樣本過多,就自己編寫指令批量處理。
同理,獲得val.txt。matlab(windows下)批量處理程式碼如下:
<code class="hljs delphi has-numbering" style="display: block; padding: 0px; background-color: transparent; color: inherit; box-sizing: border-box; font-family: 'Source Code Pro', monospace;font-size:undefined; white-space: pre; border-top-left-radius: 0px; border-top-right-radius: 0px; border-bottom-right-radius: 0px; border-bottom-left-radius: 0px; word-wrap: normal; background-position: initial initial; background-repeat: initial initial;">% batch <span class="hljs-keyword" style="color: rgb(0, 0, 136); box-sizing: border-box;">write</span> <span class="hljs-keyword" style="color: rgb(0, 0, 136); box-sizing: border-box;">in</span> txt
clear all
clc
<span class="hljs-keyword" style="color: rgb(0, 0, 136); box-sizing: border-box;">file</span>=dir(<span class="hljs-string" style="color: rgb(0, 136, 0); box-sizing: border-box;">'F:\animal\sea_horse'</span>);
temp=length(<span class="hljs-keyword" style="color: rgb(0, 0, 136); box-sizing: border-box;">file</span>);
<span class="hljs-keyword" style="color: rgb(0, 0, 136); box-sizing: border-box;">file</span>=<span class="hljs-keyword" style="color: rgb(0, 0, 136); box-sizing: border-box;">file</span>(<span class="hljs-number" style="color: rgb(0, 102, 102); box-sizing: border-box;">3</span>:temp);
fp=fopen(<span class="hljs-string" style="color: rgb(0, 136, 0); box-sizing: border-box;">'F:\animal\animal.txt'</span>,<span class="hljs-string" style="color: rgb(0, 136, 0); box-sizing: border-box;">'at'</span>);
% <span class="hljs-string" style="color: rgb(0, 136, 0); box-sizing: border-box;">'at'</span> open <span class="hljs-keyword" style="color: rgb(0, 0, 136); box-sizing: border-box;">or</span> create <span class="hljs-keyword" style="color: rgb(0, 0, 136); box-sizing: border-box;">file</span> <span class="hljs-keyword" style="color: rgb(0, 0, 136); box-sizing: border-box;">for</span> reading <span class="hljs-keyword" style="color: rgb(0, 0, 136); box-sizing: border-box;">and</span> writing; append data <span class="hljs-keyword" style="color: rgb(0, 0, 136); box-sizing: border-box;">to</span> <span class="hljs-keyword" style="color: rgb(0, 0, 136); box-sizing: border-box;">end</span> <span class="hljs-keyword" style="color: rgb(0, 0, 136); box-sizing: border-box;">of</span> <span class="hljs-keyword" style="color: rgb(0, 0, 136); box-sizing: border-box;">file</span>
% <span class="hljs-string" style="color: rgb(0, 136, 0); box-sizing: border-box;">'wt'</span> discard existing contents
<span class="hljs-keyword" style="color: rgb(0, 0, 136); box-sizing: border-box;">for</span> n=<span class="hljs-number" style="color: rgb(0, 102, 102); box-sizing: border-box;">1</span>:length(<span class="hljs-keyword" style="color: rgb(0, 0, 136); box-sizing: border-box;">file</span>)
    fprintf(<span class="hljs-string" style="color: rgb(0, 136, 0); box-sizing: border-box;">'iter=%d\n'</span>,n)
    txt=[<span class="hljs-keyword" style="color: rgb(0, 0, 136); box-sizing: border-box;">file</span>(n).name <span class="hljs-string" style="color: rgb(0, 136, 0); box-sizing: border-box;">' 2'</span> <span class="hljs-string" style="color: rgb(0, 136, 0); box-sizing: border-box;">'\n'</span>];
    fprintf(fp,txt);
<span class="hljs-keyword" style="color: rgb(0, 0, 136); box-sizing: border-box;">end</span>
fclose(fp);</code><ul class="pre-numbering" style="box-sizing: border-box; position: absolute; width: 50px; background-color: rgb(238, 238, 238); top: 0px; left: 0px; margin: 0px; padding: 6px 0px 40px; border-right-width: 1px; border-right-style: solid; border-right-color: rgb(221, 221, 221); list-style: none; text-align: right;"><li style="box-sizing: border-box; padding: 0px 5px;">1</li><li style="box-sizing: border-box; padding: 0px 5px;">2</li><li style="box-sizing: border-box; padding: 0px 5px;">3</li><li style="box-sizing: border-box; padding: 0px 5px;">4</li><li style="box-sizing: border-box; padding: 0px 5px;">5</li><li style="box-sizing: border-box; padding: 0px 5px;">6</li><li style="box-sizing: border-box; padding: 0px 5px;">7</li><li style="box-sizing: border-box; padding: 0px 5px;">8</li><li style="box-sizing: border-box; padding: 0px 5px;">9</li><li style="box-sizing: border-box; padding: 0px 5px;">10</li><li style="box-sizing: border-box; padding: 0px 5px;">11</li><li style="box-sizing: border-box; padding: 0px 5px;">12</li><li style="box-sizing: border-box; padding: 0px 5px;">13</li><li style="box-sizing: border-box; padding: 0px 5px;">14</li><li style="box-sizing: border-box; padding: 0px 5px;">15</li></ul>
Test.txt不能標籤,全部設定成0。
我們還需要把圖片的大小變成256X256,官網上提供了下面的命令:
<code class="hljs bash has-numbering" style="display: block; padding: 0px; background-color: transparent; color: inherit; box-sizing: border-box; font-family: 'Source Code Pro', monospace;font-size:undefined; white-space: pre; border-top-left-radius: 0px; border-top-right-radius: 0px; border-bottom-right-radius: 0px; border-bottom-left-radius: 0px; word-wrap: normal; background-position: initial initial; background-repeat: initial initial;"><span class="hljs-keyword" style="color: rgb(0, 0, 136); box-sizing: border-box;">for</span> name <span class="hljs-keyword" style="color: rgb(0, 0, 136); box-sizing: border-box;">in</span> /path/to/imagenet/val/*.JPEG; <span class="hljs-keyword" style="color: rgb(0, 0, 136); box-sizing: border-box;">do</span>
convert -resize <span class="hljs-number" style="color: rgb(0, 102, 102); box-sizing: border-box;">256</span>x256\! <span class="hljs-variable" style="color: rgb(102, 0, 102); box-sizing: border-box;">$name</span> <span class="hljs-variable" style="color: rgb(102, 0, 102); box-sizing: border-box;">$name</span>
<span class="hljs-keyword" style="color: rgb(0, 0, 136); box-sizing: border-box;">done</span></code><ul class="pre-numbering" style="box-sizing: border-box; position: absolute; width: 50px; background-color: rgb(238, 238, 238); top: 0px; left: 0px; margin: 0px; padding: 6px 0px 40px; border-right-width: 1px; border-right-style: solid; border-right-color: rgb(221, 221, 221); list-style: none; text-align: right;"><li style="box-sizing: border-box; padding: 0px 5px;">1</li><li style="box-sizing: border-box; padding: 0px 5px;">2</li><li style="box-sizing: border-box; padding: 0px 5px;">3</li></ul>
但是我自己並沒有成功,就只好用matlab(windows下)程式碼處理了一下:
<code class="hljs applescript has-numbering" style="display: block; padding: 0px; background-color: transparent; color: inherit; box-sizing: border-box; font-family: 'Source Code Pro', monospace;font-size:undefined; white-space: pre; border-top-left-radius: 0px; border-top-right-radius: 0px; border-bottom-right-radius: 0px; border-bottom-left-radius: 0px; word-wrap: normal; background-position: initial initial; background-repeat: initial initial;"><span class="hljs-keyword" style="color: rgb(0, 0, 136); box-sizing: border-box;">for</span> n=<span class="hljs-number" style="color: rgb(0, 102, 102); box-sizing: border-box;">1</span>:<span class="hljs-property" style="box-sizing: border-box;">length</span>(<span class="hljs-type" style="box-sizing: border-box;">file</span>)
    temp=imread(['F:\animal\panda\' <span class="hljs-type" style="box-sizing: border-box;">file</span>(n).<span class="hljs-property" style="box-sizing: border-box;">name</span>]);
    temp=imresize(temp,<span class="hljs-number" style="color: rgb(0, 102, 102); box-sizing: border-box;">2</span>);
    temp=imresize(temp,[<span class="hljs-number" style="color: rgb(0, 102, 102); box-sizing: border-box;">256</span> <span class="hljs-number" style="color: rgb(0, 102, 102); box-sizing: border-box;">256</span>]);
    imwrite(temp,['F:\animal\panda\' <span class="hljs-type" style="box-sizing: border-box;">file</span>(n).<span class="hljs-property" style="box-sizing: border-box;">name</span>]);
<span class="hljs-keyword" style="color: rgb(0, 0, 136); box-sizing: border-box;">end</span></code><ul class="pre-numbering" style="box-sizing: border-box; position: absolute; width: 50px; background-color: rgb(238, 238, 238); top: 0px; left: 0px; margin: 0px; padding: 6px 0px 40px; border-right-width: 1px; border-right-style: solid; border-right-color: rgb(221, 221, 221); list-style: none; text-align: right;"><li style="box-sizing: border-box; padding: 0px 5px;">1</li><li style="box-sizing: border-box; padding: 0px 5px;">2</li><li style="box-sizing: border-box; padding: 0px 5px;">3</li><li style="box-sizing: border-box; padding: 0px 5px;">4</li><li style="box-sizing: border-box; padding: 0px 5px;">5</li><li style="box-sizing: border-box; padding: 0px 5px;">6</li></ul>
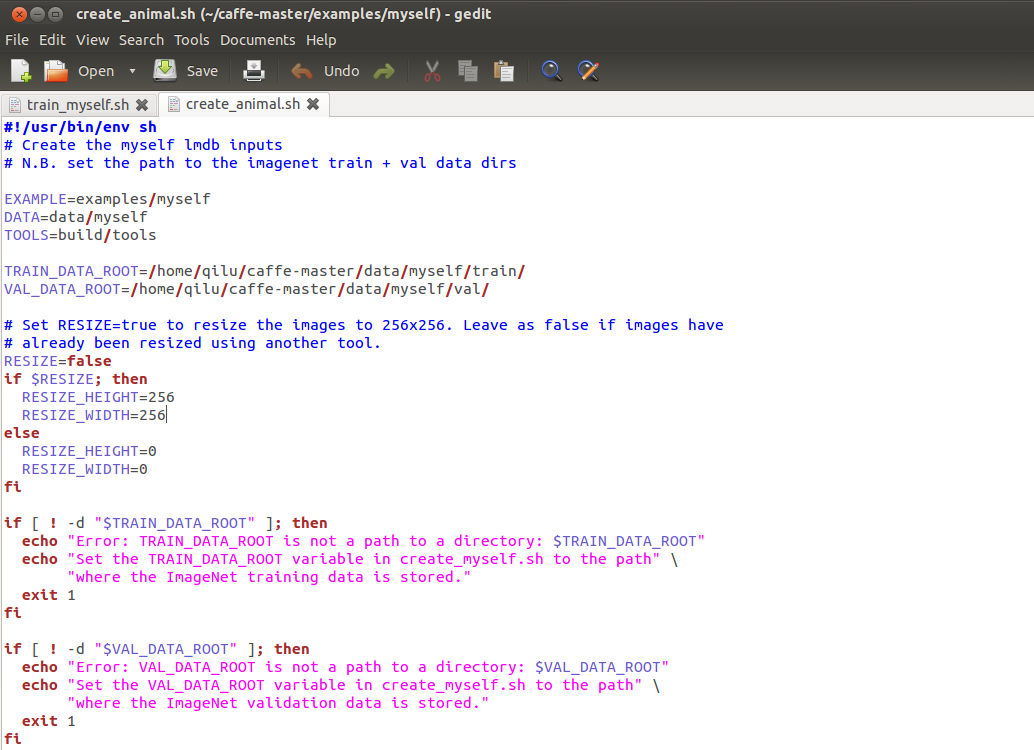
然後在caffe-master/examples中新建myself資料夾,然後將caffe-maester/examples/imagenet的create_imagenet.sh複製到該資料夾下,將其名改為create_animal.sh,修改訓練和測試路徑的設定,執行該sh.如圖: 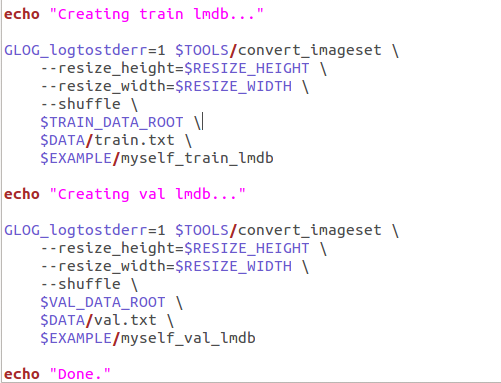
最後得到myself_train_lmdb和myself_val_lmdb:
2 計算影象均值
模型需要我們從每張圖片減去均值,所以我們必須獲得訓練的均值,用
tools/compute_image_mean.cpp實現,這個cpp是一個很好的例子去熟悉如何操作多個組建,例如協議的緩衝區,leveldbs,登入等。我們同樣複製caffe-maester/examples/imagenet的
./make_imagenet_mean到examples/myself中,將其改名為make_animal_mean.sh,加以修改路徑。 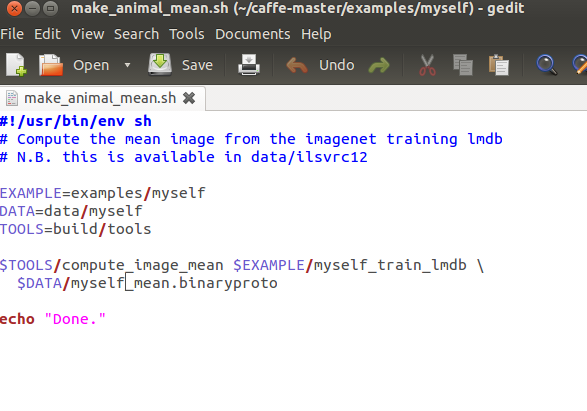
3 網路的定義
把caffe-master/models/bvlc_reference_caffenet中所有檔案複製到caffe-master/examples/myself資料夾中,修改train_val.prototxt,注意修改資料層的路徑。如圖: 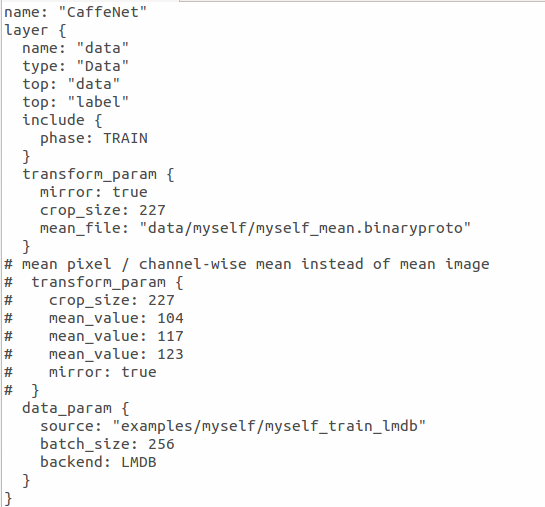
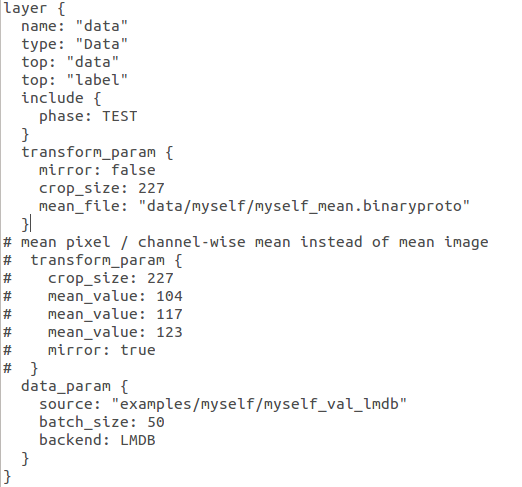
如果你細心觀察train_val.prototext,你會發現他們除了資料來源不同和最後一層不同,其他基本相同。在訓練中,我們用一個softmax——loss層計算損失函式和初始化反向傳播,而在驗證,我們使用精度層檢測我們的精度。
我們還有一個執行的協議solver.prototxt,複製過來,將第一行路徑改為我們的路徑net: “examples/myself/train_val.prototxt”,從裡面可以觀察到,我們將執行256批次,迭代4500000次(90期),每1000次迭代,我們測試學習網路驗證資料,我們設定初始的學習率為0.01,每100000(20期)次迭代減少學習率,顯示一次資訊,訓練的weight_decay為0.0005,每10000次迭代,我們顯示一下當前狀態。
以上是教程的,實際上,以上需要耗費很長時間,因此,我們稍微改一下
test_iter: 1000是指測試的批次,我們就10張照片,設定10就可以了。
test_interval: 1000是指每1000次迭代測試一次,我們改成500次測試一次。
base_lr: 0.01是基礎學習率,因為資料量小,0.01就會下降太快了,因此改成0.001
lr_policy: “step”學習率變化
gamma: 0.1學習率變化的比率
stepsize: 100000每100000次迭代減少學習率
display: 20每20層顯示一次
max_iter: 450000最大迭代次數,
momentum: 0.9學習的引數,不用變
weight_decay: 0.0005學習的引數,不用變
snapshot: 10000每迭代10000次顯示狀態,這裡改為2000次
solver_mode: GPU末尾加一行,代表用GPU進行
4 訓練
把caffe-master/examples/imagenet中的train_caffenet.sh複製過來並修改名為train_myself.sh執行,修改裡面的路徑,如圖: 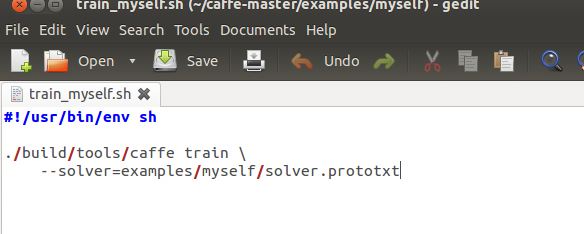
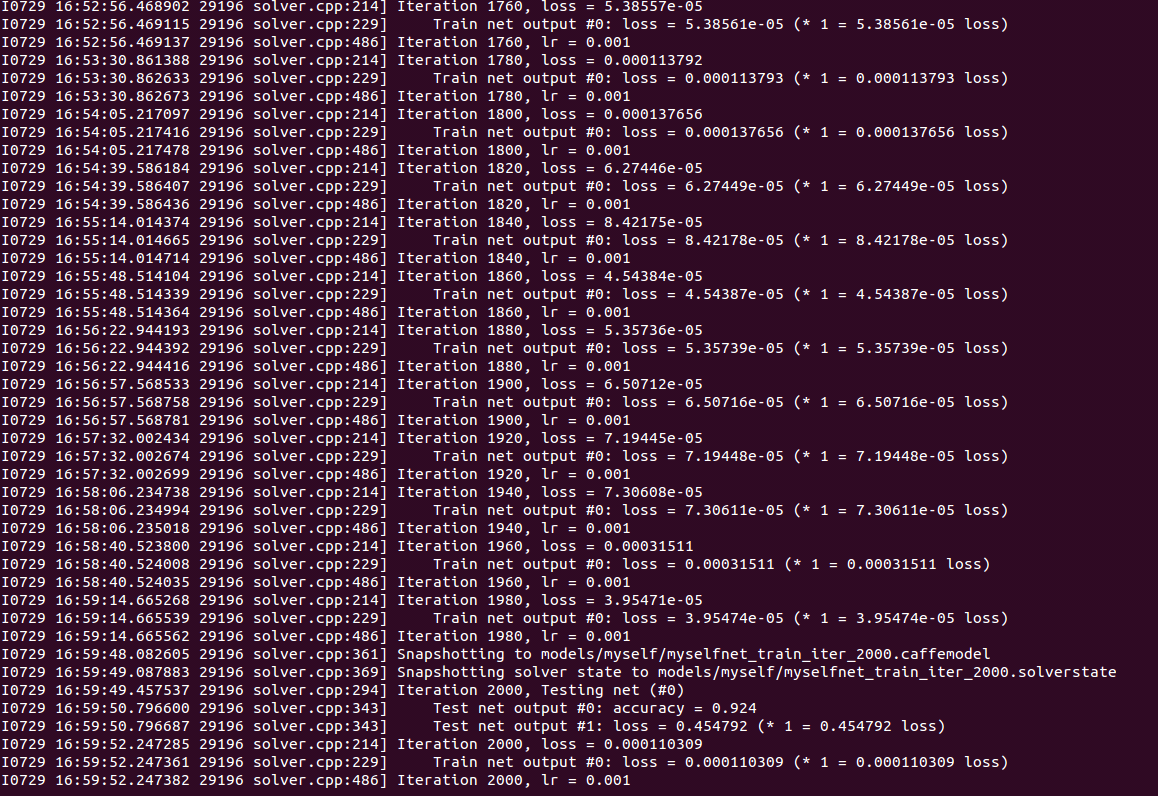
當然,只有兩類,正確率還是相當的高,例如迭代到2000次的時候,正確率是0.924,即13張var樣本只有1張預測錯了。
如圖:
5 恢復資料
把caffe-master/examples/imagenet中的resume_training.sh複製過來並執行。
我們用指令./即可。
參照材料:學習筆記3 用自己的資料訓練和測試“CaffeNet” 2014.7.22 薛開宇
Caffe官網 ImageNet tutorial
相關文章
- (13)caffe總結之訓練和測試自己的圖片
- Caffe 訓練mnist資料
- Caffe-SSD-Ubuntu16-04-訓練自己的資料集Ubuntu
- Caffe SSD Ubuntu16 04 訓練自己的資料集Ubuntu
- YOLOv4 win10 配置 + 訓練自己的資料 + 測試YOLOWin10
- yolov5 自建資料集訓練測試YOLO
- yolov3訓練自己資料教程YOLO
- 在caffe上跑自己的資料
- window7下caffe安裝與mnist資料集測試
- Alink漫談(七) : 如何劃分訓練資料集和測試資料集
- Mxnet R FCN 訓練自己的資料集
- Caffe訓練模型時core dump模型
- caffe for windows 訓練cifar10Windows
- 用SSD-Pytorch訓練自己的資料集PyTorch
- Mxnet-R-FCN-訓練自己的資料集
- OpenCV訓練自己的衣服探測分類器OpenCV
- keras-retinanet 用自己的資料集訓練KerasNaN
- 谷歌colab訓練自己的資料集YOLOv3谷歌YOLO
- 用PyTorch版本R-FCN訓練自己的資料PyTorch
- 全網最細 | 教你如何在 docker 容器下使用 mmdetection 訓練自己的資料集Docker
- Yolov3程式碼分析與訓練自己資料集YOLO
- 保姆級教程:nnUnet在2維影像的訓練和測試
- 資料集訓練
- linux下yolact演算法的實現,測試自己的資料集Linux演算法
- Windows10 使用 Tensorflow Object_detection API 訓練自己的資料WindowsObjectAPI
- 資料集訓練+1
- 自己訓練SVM分類器進行HOG行人檢測HOG
- 資料模型需要多少訓練資料?模型
- 【訓練】sql訓練、建立和管理表、約束、檢視及其他資料庫物件SQL資料庫物件
- 目標檢測---教你利用yolov5訓練自己的目標檢測模型YOLO模型
- fashion資料集訓練
- win10 下的YOLOv3 訓練 wider_face 資料集檢測人臉Win10YOLOIDE
- 模型訓練:資料預處理和預載入模型
- 使用 TensorBoard 視覺化模型、資料和訓練ORB視覺化模型
- 使用自己的資料集訓練MobileNet、ResNet實現影象分類(TensorFlow)
- nnUNet使用指南(一):Ubuntu系統下使用nnUNet對自己的多模態MR資料集訓練Ubuntu
- Yolov5_v6.2訓練資料集進行預測YOLO
- 訓練集(train set),驗證集(validation set)和測試集(test set)AI
