spring心得1--spring入門介紹@bean的載入初講@第一個spring專案helloWord
1.開始spring之旅
Spring是一個開源的控制反轉(Inversion of Control ,IOC)和面向切面(AOP)的容器框架.它的主要目得是簡化企業開發.
幫助文件路徑,在springjar包的存在路徑下:
spring-framework-3.2.2.RELEASE-dist\spring-framework-3.2.2.RELEASE\docs\spring-framework-reference\html 網頁幫助文件
spring-framework-3.2.2.RELEASE-dist\spring-framework-3.2.2.RELEASE\docs\spring-framework-reference\pdf pdf文件
l IOC 控制反轉
public class PersonServiceBean {
private PersonDao personDao = new PersonDaoBean();
public void save(Person person){
personDao.save(person);
}
}
PersonDaoBean 是在應用內部建立及維護的。所謂控制反轉就是應用本身不負責依賴物件的建立及維護,依賴物件的建立及維護是由外部容器負責的。這樣控制權就由應用轉移到了外部容器,控制權的轉移就是所謂反轉。
l 依賴注入(Dependency Injection)
當我們把依賴物件交給外部容器負責建立,那麼PersonServiceBean 類可以改成如下:
public class PersonServiceBean {
private PersonDao personDao ;
//通過構造器引數,讓容器把建立好的依賴物件注入進PersonServiceBean,當然也可以使用setter方法進行注入。
public PersonServiceBean(PersonDao personDao){
this.personDao=personDao;
}
public void save(Person person){
personDao.save(person);
}
}
所謂依賴注入就是指:在執行期,由外部容器動態地將依賴物件注入到元件中。
2.為何要使用Spring
1)降低元件之間的耦合度,實現軟體各層之間的解耦。
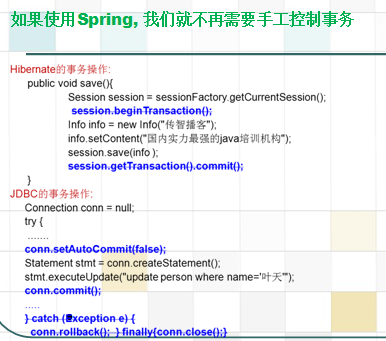
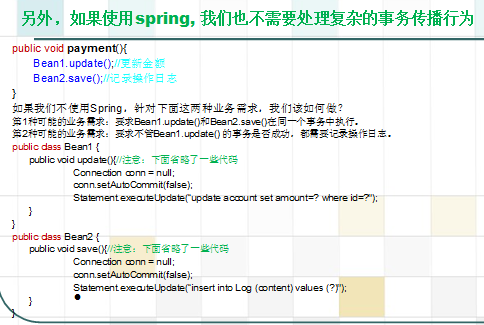
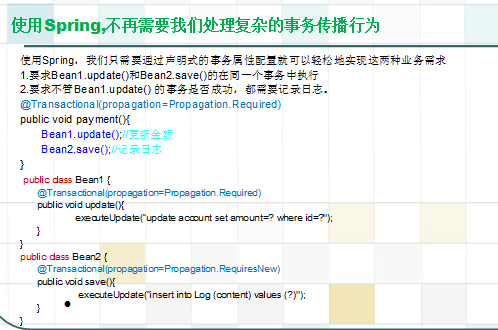
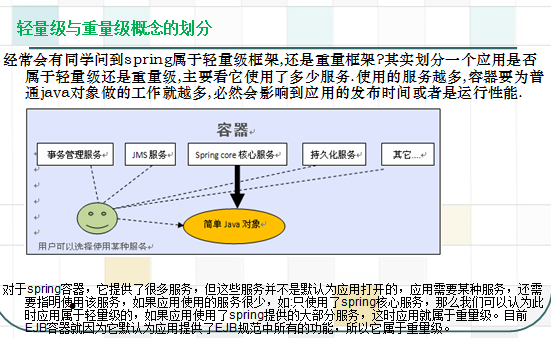
2)可以使用容器提供的眾多服務,如:事務管理服務、訊息服務等等。當我們使用容器管理事務時,開發人員就不再需要手工控制事務.也不需處理複雜的事務傳播。
3)容器提供單例模式支援,開發人員不再需要自己編寫實現程式碼。
容器提供了AOP技術,利用它很容易實現如許可權攔截、執行期監控等功能。
4)容器提供的眾多輔作類,使用這些類能夠加快應用的開發,如: JdbcTemplate、 HibernateTemplate。
Spring對於主流的應用框架提供了整合支援,如:整合Hibernate、JPA、Struts等,這樣更便於應用的開發。
3.Spring的其他注意事項
l spring的配置檔案模版
<?xml version="1.0" encoding="UTF-8"?>
<beans xmlns="http://www.springframework.org/schema/beans"
xmlns:xsi="http://www.w3.org/2001/XMLSchema-instance"
xsi:schemaLocation="http://www.springframework.org/schema/beans
http://www.springframework.org/schema/beans/spring-beans-2.5.xsd">
.....
</beans>
該配置模版可以從spring的參考手冊(spring幫助存放路徑下/spring-framework-3.2.2.RELEASE-dist/spring-framework-3.2.2.RELEASE/docs/spring-framework-reference/html/beans.html第五章的beans-factory-metadata下)或spring的例子中得到。配置檔案的取名可以任意,檔案可以存放在任何目錄下,但考慮到通用性,一般放在類路徑下。
l 編寫spring配置檔案時,不能出現幫助資訊
由於spring的schema檔案位於網路上,如果機器不能連線到網路,那麼在編寫配置資訊時候就無法出現提示資訊,解決方法有兩種:
1)讓機器上網,eclipse會自動從網路上下載schema檔案並快取在硬碟上。
2)手動新增schema檔案,方法如下:
windwos->preferences->myeclipse->files and editors->xml->xmlcatalog;點"add",在出現的視窗中的Key Type中選擇URI,在location中選"File system",然後在spring解壓目錄的dist/resources目錄中選擇spring-beans-2.5.xsd,回到設定視窗的時候不要急著關閉視窗,應把視窗中的Key Type改為Schema location,Key改為http://www.springframework.org/schema/beans/spring-beans-2.5.xsd
4.裝配Bean(第一講)
一、容納你的bean
bean工廠:最簡單的容器,提供了基礎的依賴注入支援。建立各種型別的Bean.
應用上下文:建立在bean工廠基礎之上,提供系統架構服務。
一.1 bean工廠介紹
工廠設計模式,建立分發各種bean。配置好它們之間的寫作關係,參與bean的生命週期。bean工廠只把bean的定義資訊載進來,用到的時候才例項化。
一.2使用應用上下文
ApplicationCotext,spring更加高階的容器。功能強大:
1).提供文字資訊解析工具,包括對國際化支援。
2).提供載入檔案資源的通用方法,如圖片。
3).可以向註冊為監聽器的bean傳送事件。
在很少的情況下,使用BeanFactory,如在移動裝置。
三種經常用到的實現:
1).ClassPathXmlApplicationContext:從類路徑中載入。
2).FileSystemXmlApplicationContext:從檔案系統載入。
3).XmlWebApplicationContext:從web系統中載入。
ApplicationContext context = new FileSystemXmlApplicationContext("c:\foo.xml");
ApplicationContext context = new ClassPathXmlApplicationContext("foo.xml");
除了應用上下文提供的附加功能外,應用上下文與bean工廠的另一個重要區別是關於單例bean如何被載入。bean工廠延遲載入所有bean,直到getBean()方法被呼叫。應用上下文會在啟動後預載入所有單例bean.這樣可確保應用不需要等待他們被建立。
4.案例:第一個spring java專案
改案例只列舉出重要配置檔案和測試類,其他類沒什麼營養就不再贅述了;下面列出的幾個配置檔案和關鍵類中都要需要注意的事項和相應的解釋註釋。
spring.xml

<?xml version="1.0" encoding="UTF-8"?>

<beans xmlns="http://www.springframework.org/schema/beans"

       xmlns:xsi="http://www.w3.org/2001/XMLSchema-instance"

       xsi:schemaLocation="http://www.springframework.org/schema/beans

           http://www.springframework.org/schema/beans/spring-beans.xsd">


     <import resource="spring-dao.xml"/>

     <import resource="spring-service.xml"/>


</beans>

spring-dao.xml

<?xml version="1.0" encoding="UTF-8"?>

<beans xmlns="http://www.springframework.org/schema/beans"

   xmlns:xsi="http://www.w3.org/2001/XMLSchema-instance"

   xsi:schemaLocation="http://www.springframework.org/schema/beans

           http://www.springframework.org/schema/beans/spring-beans.xsd">


   <!-- spring容器就是負責建立、管理、維護Bean 並且能夠依賴注入到相應元件上 -->

   <bean id="helloDaoImpl" class="www.csdn.spring.dao.impl.HelloDaoImpl"

      scope="prototype"></bean>

      <!-- spring-service.xml引用的改配置檔案,所以在前者中加入了lazy-init="false",這裡可以不寫也會起作用;

      lazy-init屬性的意思是:是否延遲載入,就是一建立 spring容器就去例項化對應容器物件,即執行改物件的構造器,而不是在使用的時候才去載入

      lazy-init="false" ,預設的值為default,但是default=false

      -->

</beans>

spring-service.xml

<?xml version="1.0" encoding="UTF-8"?>

<beans xmlns="http://www.springframework.org/schema/beans"

       xmlns:xsi="http://www.w3.org/2001/XMLSchema-instance"

       xsi:schemaLocation="http://www.springframework.org/schema/beans

           http://www.springframework.org/schema/beans/spring-beans.xsd">


     <bean id="helloServiceImpl" class="www.csdn.spring.service.impl.HelloServiceImpl" scope="singleton" lazy-init="false">

       <property name="helloDao" ref="helloDaoImpl"/>

     </bean>

</beans>

DemoTest類

package www.csdn.spring.test;


import org.junit.Test;

import org.springframework.context.ApplicationContext;

import org.springframework.context.support.ClassPathXmlApplicationContext;


import www.csdn.spring.dao.HelloDao;

import www.csdn.spring.dao.impl.HelloDaoImpl;

import www.csdn.spring.service.HelloService;

import www.csdn.spring.service.impl.HelloServiceImpl;


public class DemoTest {


       @Test

       public void testHello(){


              // 容器建立例項化容器;讀取 classes 路徑下面的檔案  引數動態引數、單個引數、陣列等

              ApplicationContext context = new ClassPathXmlApplicationContext("spring.xml");


              //使用dao和daoImpl的寫法

              //寫法一:使用dao獲取bean;這裡getBean括號內填寫的是對應spring的配置檔案中bean標籤的id屬性名

              HelloDao helloDao1 = (HelloDao) context.getBean("helloDaoImpl");

              //還可以這麼寫:但是一般不這麼寫,因為java中都是面向介面程式設計,所以宣告的時候儘量宣告介面的型別而不是實現類的型別

              HelloDaoImpl helloDaoImpl1 = (HelloDaoImpl) context.getBean("helloDaoImpl");


              //寫法二:同樣使用dao獲取bean,官網這麼寫,比較規範的寫法

              HelloDao helloDao2 = (HelloDao) context.getBean("helloDaoImpl",HelloDaoImpl.class);

              //還可以這麼寫:但是一般不這麼寫,因為java中都是面向介面程式設計,所以宣告的時候儘量宣告介面的型別而不是實現類的型別

              HelloDaoImpl helloDaoImpl2 = (HelloDaoImpl) context.getBean("helloDaoImpl");


              //使用service和serviceImpl的寫法

              //寫法三:使用service獲取bean

              HelloService helloService1 = (HelloService) context.getBean("helloServiceImpl");

              //還可以這麼寫:但是一般不這麼寫,因為java中都是面向介面程式設計,所以宣告的時候儘量宣告介面的型別而不是實現類的型別

              HelloServiceImpl helloServiceImpl1 = (HelloServiceImpl) context.getBean("helloServiceImpl");


              //寫法四:同樣使用service獲取bean,官網這麼寫,比較規範的寫法

              HelloService helloService2 = (HelloService) context.getBean("helloServiceImpl",HelloServiceImpl.class);

              //還可以這麼寫:但是一般不這麼寫,因為java中都是面向介面程式設計,所以宣告的時候儘量宣告介面的型別而不是實現類的型別

              HelloServiceImpl helloServiceImpl2 = (HelloServiceImpl) context.getBean("helloServiceImpl",HelloServiceImpl.class);


              helloService2.sayHello();

       }

}

HelloServiceImpl類;需要注意的是serviceImpl中的

package www.csdn.spring.service.impl;


import www.csdn.spring.dao.HelloDao;

import www.csdn.spring.service.HelloService;


public class HelloServiceImpl implements HelloService{


  private HelloDao helloDao;

  public HelloServiceImpl() {

         System.out.println("HelloServiceImpl例項化");

  }


  //set依賴注入很重要,不寫會報錯,不能讀寫helloDao這一屬性

  /*

   * org.springframework.beans.NotWritablePropertyException: Invalid property 'helloDao' of bean class

   */

  public void setHelloDao(HelloDao helloDao) {

         System.out

         .println("控制反轉:應用程式本身不在負責建立helloDao物件,而是由spring容器負責建立、管理、維護,這樣控制權轉移,稱為反轉。"

                       + "可以通過依賴注入方式注入該HelloDao物件");

         this.helloDao = helloDao;

  }

  @Override

  public void sayHello() {

         helloDao.sayHello();

  }

}
相關文章
- 原創:spring入門介紹第一講Spring
- Spring Shell入門介紹Spring
- Spring入門(一):建立Spring專案Spring
- Spring——4. Bean的載入(二)SpringBean
- Spring入門(六):條件化的beanSpringBean
- Spring Boot入門(一):搭建Spring Boot專案Spring Boot
- Spring入門(四):使用Maven管理Spring專案SpringMaven
- Spring原始碼之Bean的載入(四)Spring原始碼Bean
- Spring原始碼之Bean的載入(二)Spring原始碼Bean
- Spring原始碼之Bean的載入(三)Spring原始碼Bean
- Spring原始碼之Bean的載入(一)Spring原始碼Bean
- Spring如何控制Bean的載入順序SpringBean
- Spring bean詳細介紹SpringBean
- Spring容器 —— 深入 bean 的載入(五、初始化 bean)SpringBean
- spring bean定義與載入方式SpringBean
- spring註解@lazy,bean懶載入SpringBean
- Oracle認證介紹及入門心得Oracle
- Spring入門(七):Spring Profile使用講解Spring
- Spring boot入門(一):快速搭建Spring boot專案Spring Boot
- AndroidJNI入門第一篇——HelloWordAndroid
- Spring Boot入門-快速搭建web專案Spring BootWeb
- Java爬蟲入門(一)——專案介紹Java爬蟲
- Spring入門(二):自動化裝配beanSpringBean
- Scrapy入門-第一個爬蟲專案爬蟲
- spring-springmvc專案介紹SpringMVC
- spring boot初級入門書目錄Spring Boot
- 死磕Spring之IoC篇 - 開啟 Bean 的載入SpringBean
- Spring原始碼之Bean的載入(五) populateBean 和 DisposableBeanSpring原始碼Bean
- spring原始碼閱讀筆記08:bean載入之建立beanSpring原始碼筆記Bean
- Spring 入門Spring
- Spring系列—Spring入門Spring
- Spring Boot專案微信雲託管入門部署Spring Boot
- spring 載入配置檔案的方式Spring
- 【Java框架型專案從入門到裝逼】第一節 - Spring框架 IOCJava框架Spring
- spring-springmvc-mybatis專案介紹SpringMVCMyBatis
- spring原始碼深度解析— IOC 之 開啟 bean 的載入Spring原始碼Bean
- spring5入門與實踐第三講Spring的其他特性Spring
- Spring入門(三):通過JavaConfig裝配beanSpringJavaBean