Hadoop叢集(第9期)_MapReduce初級案例
Hadoop叢集(第9期)_MapReduce初級案例
1、資料去重
"資料去重"主要是為了掌握和利用並行化思想來對資料進行有意義的篩選。統計大資料集上的資料種類個數、從網站日誌中計算訪問地等這些看似龐雜的任務都會涉及資料去重。下面就進入這個例項的MapReduce程式設計。
1.1 例項描述
對資料檔案中的資料進行去重。資料檔案中的每行都是一個資料。
樣例輸入如下所示:
1)file1:
2012-3-1 a
2012-3-2 b
2012-3-3 c
2012-3-4 d
2012-3-5 a
2012-3-6 b
2012-3-7 c
2012-3-3 c
2)file2:
2012-3-1 b
2012-3-2 a
2012-3-3 b
2012-3-4 d
2012-3-5 a
2012-3-6 c
2012-3-7 d
2012-3-3 c
樣例輸出如下所示:
2012-3-1 a
2012-3-1 b
2012-3-2 a
2012-3-2 b
2012-3-3 b
2012-3-3 c
2012-3-4 d
2012-3-5 a
2012-3-6 b
2012-3-6 c
2012-3-7 c
2012-3-7 d
1.2 設計思路
資料去重的最終目標是讓原始資料中出現次數超過一次的資料在輸出檔案中只出現一次。我們自然而然會想到將同一個資料的所有記錄都交給一臺reduce機器,無論這個資料出現多少次,只要在最終結果中輸出一次就可以了。具體就是reduce的輸入應該以資料作為key,而對value-list則沒有要求。當reduce接收到一個
在MapReduce流程中,map的輸出
1.3 程式程式碼
程式程式碼如下所示:
package com.hebut.mr;
import java.io.IOException;
import org.apache.hadoop.conf.Configuration;
import org.apache.hadoop.fs.Path;
import org.apache.hadoop.io.IntWritable;
import org.apache.hadoop.io.Text;
import org.apache.hadoop.mapreduce.Job;
import org.apache.hadoop.mapreduce.Mapper;
import org.apache.hadoop.mapreduce.Reducer;
import org.apache.hadoop.mapreduce.lib.input.FileInputFormat;
import org.apache.hadoop.mapreduce.lib.output.FileOutputFormat;
import org.apache.hadoop.util.GenericOptionsParser;
public class Dedup {
//map將輸入中的value複製到輸出資料的key上,並直接輸出
public static class Map extends Mapper
private static Text line=new Text();//每行資料
//實現map函式
public void map(Object key,Text value,Context context)
throws IOException,InterruptedException{
line=value;
context.write(line, new Text(""));
}
}
//reduce將輸入中的key複製到輸出資料的key上,並直接輸出
public static class Reduce extends Reducer
{ //實現reduce函式
public void reduce(Text key,Iterable
values,Context context) throws IOException,InterruptedException{
context.write(key, new Text(""));
}
}
public static void main(String[] args) throws Exception{
Configuration conf = new Configuration();
//這句話很關鍵
conf.set("mapred.job.tracker", "192.168.1.2:9001");
String[] ioArgs=new String[]{"dedup_in","dedup_out"};
String[] therArgs = new GenericOptionsParser(conf, ioArgs).getRemainingArgs();
if (otherArgs.length != 2) {
System.err.println("Usage: Data Deduplication
"); System.exit(2);
}
Job job = new Job(conf, "Data Deduplication");
job.setJarByClass(Dedup.class);
//設定Map、Combine和Reduce處理類
job.setMapperClass(Map.class);
job.setCombinerClass(Reduce.class);
job.setReducerClass(Reduce.class);
//設定輸出型別
job.setOutputKeyClass(Text.class);
job.setOutputValueClass(Text.class);
//設定輸入和輸出目錄
FileInputFormat.addInputPath(job, new Path(otherArgs[0]));
FileOutputFormat.setOutputPath(job, new Path(otherArgs[1]));
System.exit(job.waitForCompletion(true) ? 0 : 1);
}
}
1.4 程式碼結果
1)準備測試資料
通過Eclipse下面的"DFS Locations"在"/user/hadoop"目錄下建立輸入檔案"dedup_in"資料夾(備註:"dedup_out"不需要建立。)如圖1.4-1所示,已經成功建立。

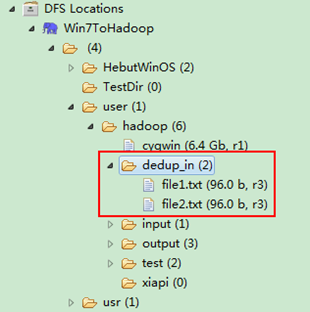
圖1.4-1 建立"dedup_in" 圖1.4.2 上傳"file*.txt"
然後在本地建立兩個txt檔案,通過Eclipse上傳到"/user/hadoop/dedup_in"資料夾中,兩個txt檔案的內容如"例項描述"那兩個檔案一樣。如圖1.4-2所示,成功上傳之後。
從SecureCRT遠處檢視"Master.Hadoop"的也能證實我們上傳的兩個檔案。

檢視兩個檔案的內容如圖1.4-3所示:

圖1.4-3 檔案"file*.txt"內容
2)檢視執行結果
這時我們右擊Eclipse的"DFS Locations"中"/user/hadoop"資料夾進行重新整理,這時會發現多出一個"dedup_out"資料夾,且裡面有3個檔案,然後開啟雙其"part-r-00000"檔案,會在Eclipse中間把內容顯示出來。如圖1.4-4所示。
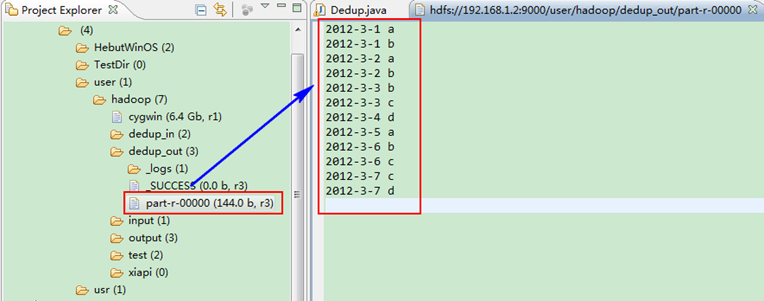
圖1.4-4 執行結果
此時,你可以對比一下和我們之前預期的結果是否一致。
2、資料排序
"資料排序"是許多實際任務執行時要完成的第一項工作,比如學生成績評比、資料建立索引等。這個例項和資料去重類似,都是先對原始資料進行初步處理,為進一步的資料操作打好基礎。下面進入這個示例。
2.1 例項描述
對輸入檔案中資料進行排序。輸入檔案中的每行內容均為一個數字,即一個資料。要求在輸出中每行有兩個間隔的數字,其中,第一個代表原始資料在原始資料集中的位次,第二個代表原始資料。
樣例輸入:
1)file1:
2
32
654
32
15
756
65223
2)file2:
5956
22
650
92
3)file3:
26
54
6
樣例輸出:
1 2
2 6
3 15
4 22
5 26
6 32
7 32
8 54
9 92
10 650
11 654
12 756
13 5956
14 65223
2.2 設計思路
這個例項僅僅要求對輸入資料進行排序,熟悉MapReduce過程的讀者會很快想到在MapReduce過程中就有排序,是否可以利用這個預設的排序,而不需要自己再實現具體的排序呢?答案是肯定的。
但是在使用之前首先需要瞭解它的預設排序規則。它是按照key值進行排序的,如果key為封裝int的IntWritable型別,那麼MapReduce按照數字大小對key排序,如果key為封裝為String的Text型別,那麼MapReduce按照字典順序對字串排序。
瞭解了這個細節,我們就知道應該使用封裝int的IntWritable型資料結構了。也就是在map中將讀入的資料轉化成IntWritable型,然後作為key值輸出(value任意)。reduce拿到
2.3 程式程式碼
程式程式碼如下所示:
package com.hebut.mr;
import java.io.IOException;
import org.apache.hadoop.conf.Configuration;
import org.apache.hadoop.fs.Path;
import org.apache.hadoop.io.IntWritable;
import org.apache.hadoop.io.Text;
import org.apache.hadoop.mapreduce.Job;
import org.apache.hadoop.mapreduce.Mapper;
import org.apache.hadoop.mapreduce.Reducer;
import org.apache.hadoop.mapreduce.lib.input.FileInputFormat;
import org.apache.hadoop.mapreduce.lib.output.FileOutputFormat;
import org.apache.hadoop.util.GenericOptionsParser;
public class Sort {
//map將輸入中的value化成IntWritable型別,作為輸出的key
public static class Map extends
Mapper
private static IntWritable data=new IntWritable();
//實現map函式
public void map(Object key,Text value,Context context)
throws IOException,InterruptedException{
String line=value.toString();
data.set(Integer.parseInt(line));
context.write(data, new IntWritable(1));
}
}
//reduce將輸入中的key複製到輸出資料的key上,
//然後根據輸入的value-list中元素的個數決定key的輸出次數
//用全域性linenum來代表key的位次
public static class Reduce extends
Reducer
{
private static IntWritable linenum = new IntWritable(1);
//實現reduce函式
public void reduce(IntWritable key,Iterable
values,Context context) throws IOException,InterruptedException{
for(IntWritable val:values){
context.write(linenum, key);
linenum = new IntWritable(linenum.get()+1);
}
}
}
public static void main(String[] args) throws Exception{
Configuration conf = new Configuration();
//這句話很關鍵
conf.set("mapred.job.tracker", "192.168.1.2:9001");
String[] ioArgs=new String[]{"sort_in","sort_out"};
String[] therArgs = new GenericOptionsParser(conf, ioArgs).getRemainingArgs();
if (otherArgs.length != 2) {
System.err.println("Usage: Data Sort
"); System.exit(2);
}
Job job = new Job(conf, "Data Sort");
job.setJarByClass(Sort.class);
//設定Map和Reduce處理類
job.setMapperClass(Map.class);
job.setReducerClass(Reduce.class);
//設定輸出型別
job.setOutputKeyClass(IntWritable.class);
job.setOutputValueClass(IntWritable.class);
//設定輸入和輸出目錄
FileInputFormat.addInputPath(job, new Path(otherArgs[0]));
FileOutputFormat.setOutputPath(job, new Path(otherArgs[1]));
System.exit(job.waitForCompletion(true) ? 0 : 1);
}
}
2.4 程式碼結果
1)準備測試資料
通過Eclipse下面的"DFS Locations"在"/user/hadoop"目錄下建立輸入檔案"sort_in"資料夾(備註:"sort_out"不需要建立。)如圖2.4-1所示,已經成功建立。
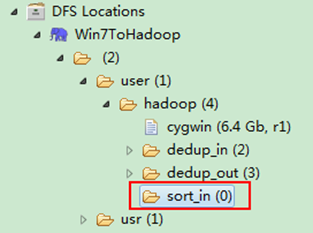
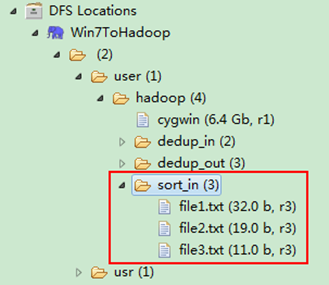
圖2.4-1 建立"sort_in" 圖2.4.2 上傳"file*.txt"
然後在本地建立三個txt檔案,通過Eclipse上傳到"/user/hadoop/sort_in"資料夾中,三個txt檔案的內容如"例項描述"那三個檔案一樣。如圖2.4-2所示,成功上傳之後。
從SecureCRT遠處檢視"Master.Hadoop"的也能證實我們上傳的三個檔案。

檢視兩個檔案的內容如圖2.4-3所示:

圖2.4-3 檔案"file*.txt"內容
2)檢視執行結果
這時我們右擊Eclipse的"DFS Locations"中"/user/hadoop"資料夾進行重新整理,這時會發現多出一個"sort_out"資料夾,且裡面有3個檔案,然後開啟雙其"part-r-00000"檔案,會在Eclipse中間把內容顯示出來。如圖2.4-4所示。
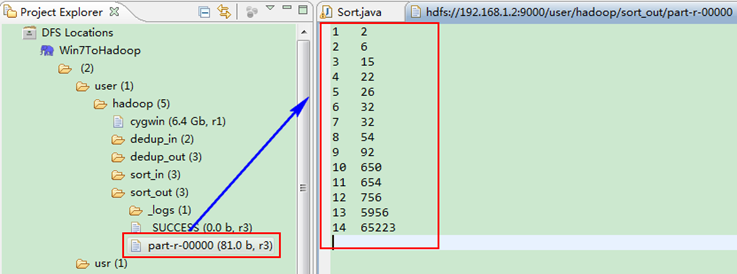
圖2.4-4 執行結果
3、平均成績
"平均成績"主要目的還是在重溫經典"WordCount"例子,可以說是在基礎上的微變化版,該例項主要就是實現一個計算學生平均成績的例子。
3.1 例項描述
對輸入檔案中資料進行就算學生平均成績。輸入檔案中的每行內容均為一個學生的姓名和他相應的成績,如果有多門學科,則每門學科為一個檔案。要求在輸出中每行有兩個間隔的資料,其中,第一個代表學生的姓名,第二個代表其平均成績。
樣本輸入:
1)math:
張三 88
李四 99
王五 66
趙六 77
2)china:
張三 78
李四 89
王五 96
趙六 67
3)english:
張三 80
李四 82
王五 84
趙六 86
樣本輸出:
張三 82
李四 90
王五 82
趙六 76
3.2 設計思路
計算學生平均成績是一個仿"WordCount"例子,用來重溫一下開發MapReduce程式的流程。程式包括兩部分的內容:Map部分和Reduce部分,分別實現了map和reduce的功能。
Map處理的是一個純文字檔案,檔案中存放的資料時每一行表示一個學生的姓名和他相應一科成績。Mapper處理的資料是由InputFormat分解過的資料集,其中InputFormat的作用是將資料集切割成小資料集InputSplit,每一個InputSlit將由一個Mapper負責處理。此外,InputFormat中還提供了一個RecordReader的實現,並將一個InputSplit解析成
Map的結果會通過partion分發到Reducer,Reducer做完Reduce操作後,將通過以格式OutputFormat輸出。
Mapper最終處理的結果對
3.3 程式程式碼
程式程式碼如下所示:
package com.hebut.mr;
import java.io.IOException;
import java.util.Iterator;
import java.util.StringTokenizer;
import org.apache.hadoop.conf.Configuration;
import org.apache.hadoop.fs.Path;
import org.apache.hadoop.io.IntWritable;
import org.apache.hadoop.io.LongWritable;
import org.apache.hadoop.io.Text;
import org.apache.hadoop.mapreduce.Job;
import org.apache.hadoop.mapreduce.Mapper;
import org.apache.hadoop.mapreduce.Reducer;
import org.apache.hadoop.mapreduce.lib.input.FileInputFormat;
import org.apache.hadoop.mapreduce.lib.input.TextInputFormat;
import org.apache.hadoop.mapreduce.lib.output.FileOutputFormat;
import org.apache.hadoop.mapreduce.lib.output.TextOutputFormat;
import org.apache.hadoop.util.GenericOptionsParser;
public class Score {
public static class Map extends
Mapper<LongWritable, Text, Text, IntWritable> {
// 實現map函式
public void map(LongWritable key, Text value, Context context)
throws IOException, InterruptedException {
// 將輸入的純文字檔案的資料轉化成String
String line = value.toString();
// 將輸入的資料首先按行進行分割
StringTokenizer tokenizerArticle = new StringTokenizer(line, "\n");
// 分別對每一行進行處理
while (tokenizerArticle.hasMoreElements()) {
// 每行按空格劃分
StringTokenizer tokenizerLine = new StringTokenizer(tokenizerArticle.nextToken());
String strName = tokenizerLine.nextToken();// 學生姓名部分
String strScore = tokenizerLine.nextToken();// 成績部分
Text name = new Text(strName);
int scoreInt = Integer.parseInt(strScore);
// 輸出姓名和成績
context.write(name, new IntWritable(scoreInt));
}
}
}
public static class Reduce extends
Reducer
{ // 實現reduce函式
public void reduce(Text key, Iterable
values, Context context) throws IOException, InterruptedException {
int sum = 0;
int count = 0;
Iterator
iterator = values.iterator(); while (iterator.hasNext()) {
sum += iterator.next().get();// 計算總分
count++;// 統計總的科目數
}
int average = (int) sum / count;// 計算平均成績
context.write(key, new IntWritable(average));
}
}
public static void main(String[] args) throws Exception {
Configuration conf = new Configuration();
// 這句話很關鍵
conf.set("mapred.job.tracker", "192.168.1.2:9001");
String[] ioArgs = new String[] { "score_in", "score_out" };
String[] therArgs = new GenericOptionsParser(conf, ioArgs).getRemainingArgs();
if (otherArgs.length != 2) {
System.err.println("Usage: Score Average
"); System.exit(2);
}
Job job = new Job(conf, "Score Average");
job.setJarByClass(Score.class);
// 設定Map、Combine和Reduce處理類
job.setMapperClass(Map.class);
job.setCombinerClass(Reduce.class);
job.setReducerClass(Reduce.class);
// 設定輸出型別
job.setOutputKeyClass(Text.class);
job.setOutputValueClass(IntWritable.class);
// 將輸入的資料集分割成小資料塊splites,提供一個RecordReder的實現
job.setInputFormatClass(TextInputFormat.class);
// 提供一個RecordWriter的實現,負責資料輸出
job.setOutputFormatClass(TextOutputFormat.class);
// 設定輸入和輸出目錄
FileInputFormat.addInputPath(job, new Path(otherArgs[0]));
FileOutputFormat.setOutputPath(job, new Path(otherArgs[1]));
System.exit(job.waitForCompletion(true) ? 0 : 1);
}
}
3.4 程式碼結果
1)準備測試資料
通過Eclipse下面的"DFS Locations"在"/user/hadoop"目錄下建立輸入檔案"score_in"資料夾(備註:"score_out"不需要建立。)如圖3.4-1所示,已經成功建立。

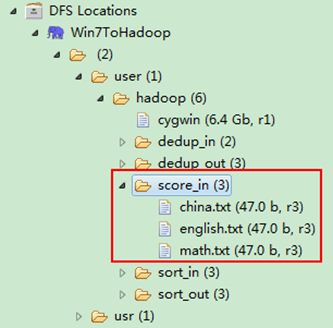
圖3.4-1 建立"score_in" 圖3.4.2 上傳三門分數
然後在本地建立三個txt檔案,通過Eclipse上傳到"/user/hadoop/score_in"資料夾中,三個txt檔案的內容如"例項描述"那三個檔案一樣。如圖3.4-2所示,成功上傳之後。
備註:文字檔案的編碼為"UTF-8",預設為"ANSI",可以另存為時選擇,不然中文會出現亂碼。
從SecureCRT遠處檢視"Master.Hadoop"的也能證實我們上傳的三個檔案。

檢視三個檔案的內容如圖3.4-3所示:
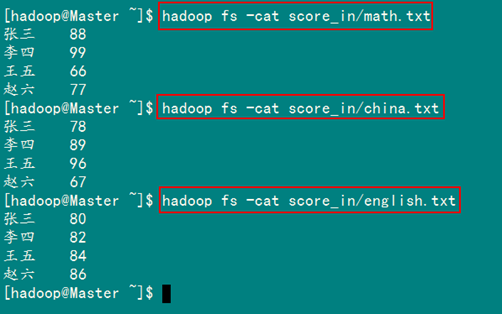
圖3.4.3 三門成績的內容
2)檢視執行結果
這時我們右擊Eclipse的"DFS Locations"中"/user/hadoop"資料夾進行重新整理,這時會發現多出一個"score_out"資料夾,且裡面有3個檔案,然後開啟雙其"part-r-00000"檔案,會在Eclipse中間把內容顯示出來。如圖3.4-4所示。
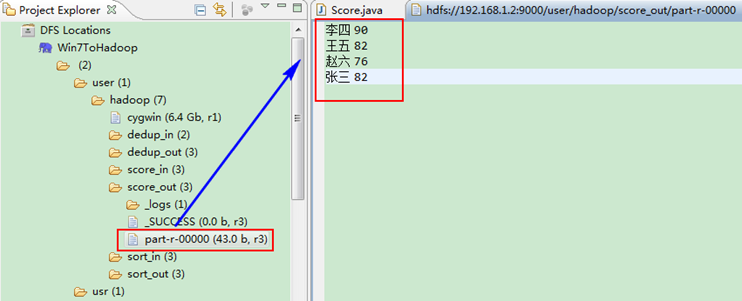
圖3.4-4 執行結果
4、單表關聯
前面的例項都是在資料上進行一些簡單的處理,為進一步的操作打基礎。"單表關聯"這個例項要求從給出的資料中尋找所關心的資料,它是對原始資料所包含資訊的挖掘。下面進入這個例項。
4.1 例項描述
例項中給出child-parent(孩子——父母)表,要求輸出grandchild-grandparent(孫子——爺奶)表。
樣例輸入如下所示。
file:
child parent
Tom Lucy
Tom Jack
Jone Lucy
Jone Jack
Lucy Mary
Lucy Ben
Jack Alice
Jack Jesse
Terry Alice
Terry Jesse
Philip Terry
Philip Alma
Mark Terry
Mark Alma
家族樹狀關係譜:

圖4.2-1 家族譜
樣例輸出如下所示。
file:
grandchild grandparent
Tom Alice
Tom Jesse
Jone Alice
Jone Jesse
Tom Mary
Tom Ben
Jone Mary
Jone Ben
Philip Alice
Philip Jesse
Mark Alice
Mark Jesse
4.2 設計思路
分析這個例項,顯然需要進行單表連線,連線的是左表的parent列和右表的child列,且左表和右表是同一個表。
連線結果中除去連線的兩列就是所需要的結果——"grandchild--grandparent"表。要用MapReduce解決這個例項,首先應該考慮如何實現表的自連線;其次就是連線列的設定;最後是結果的整理。
考慮到MapReduce的shuffle過程會將相同的key會連線在一起,所以可以將map結果的key設定成待連線的列,然後列中相同的值就自然會連線在一起了。再與最開始的分析聯絡起來:
要連線的是左表的parent列和右表的child列,且左表和右表是同一個表,所以在map階段將讀入資料分割成child和parent之後,會將parent設定成key,child設定成value進行輸出,並作為左表;再將同一對child和parent中的child設定成key,parent設定成value進行輸出,作為右表。為了區分輸出中的左右表,需要在輸出的value中再加上左右表的資訊,比如在value的String最開始處加上字元1表示左表,加上字元2表示右表。這樣在map的結果中就形成了左表和右表,然後在shuffle過程中完成連線。reduce接收到連線的結果,其中每個key的value-list就包含了"grandchild--grandparent"關係。取出每個key的value-list進行解析,將左表中的child放入一個陣列,右表中的parent放入一個陣列,然後對兩個陣列求笛卡爾積就是最後的結果了。
4.3 程式程式碼
程式程式碼如下所示。
package com.hebut.mr;
import java.io.IOException;
import java.util.*;
import org.apache.hadoop.conf.Configuration;
import org.apache.hadoop.fs.Path;
import org.apache.hadoop.io.IntWritable;
import org.apache.hadoop.io.Text;
import org.apache.hadoop.mapreduce.Job;
import org.apache.hadoop.mapreduce.Mapper;
import org.apache.hadoop.mapreduce.Reducer;
import org.apache.hadoop.mapreduce.lib.input.FileInputFormat;
import org.apache.hadoop.mapreduce.lib.output.FileOutputFormat;
import org.apache.hadoop.util.GenericOptionsParser;
public class STjoin {
public static int time = 0;
/*
* map將輸出分割child和parent,然後正序輸出一次作為右表,
* 反序輸出一次作為左表,需要注意的是在輸出的value中必須
* 加上左右表的區別標識。
*/
public static class Map extends Mapper
// 實現map函式
public void map(Object key, Text value, Context context)
throws IOException, InterruptedException {
String childname = new String();// 孩子名稱
String parentname = new String();// 父母名稱
String relationtype = new String();// 左右表標識
// 輸入的一行預處理文字
StringTokenizer itr=new StringTokenizer(value.toString());
String[] values=new String[2];
int i=0;
while(itr.hasMoreTokens()){
values[i]=itr.nextToken();
i++;
}
if (values[0].compareTo("child") != 0) {
childname = values[0];
parentname = values[1];
// 輸出左表
relationtype = "1";
context.write(new Text(values[1]), new Text(relationtype +
"+"+ childname + "+" + parentname));
// 輸出右表
relationtype = "2";
context.write(new Text(values[0]), new Text(relationtype +
"+"+ childname + "+" + parentname));
}
}
}
public static class Reduce extends Reducer
{
// 實現reduce函式
public void reduce(Text key, Iterable
values, Context context) throws IOException, InterruptedException {
// 輸出表頭
if (0 == time) {
context.write(new Text("grandchild"), new Text("grandparent"));
time++;
}
int grandchildnum = 0;
String[] grandchild = new String[10];
int grandparentnum = 0;
String[] grandparent = new String[10];
Iterator ite = values.iterator();
while (ite.hasNext()) {
String record = ite.next().toString();
int len = record.length();
int i = 2;
if (0 == len) {
continue;
}
// 取得左右表標識
char relationtype = record.charAt(0);
// 定義孩子和父母變數
String childname = new String();
String parentname = new String();
// 獲取value-list中value的child
while (record.charAt(i) != '+') {
childname += record.charAt(i);
i++;
}
i = i + 1;
// 獲取value-list中value的parent
while (i < len) {
parentname += record.charAt(i);
i++;
}
// 左表,取出child放入grandchildren
if ('1' == relationtype) {
grandchild[grandchildnum] = childname;
grandchildnum++;
}
// 右表,取出parent放入grandparent
if ('2' == relationtype) {
grandparent[grandparentnum] = parentname;
grandparentnum++;
}
}
// grandchild和grandparent陣列求笛卡爾兒積
if (0 != grandchildnum && 0 != grandparentnum) {
for (int m = 0; m < grandchildnum; m++) {
for (int n = 0; n < grandparentnum; n++) {
// 輸出結果
context.write(new Text(grandchild[m]), new Text(grandparent[n]));
}
}
}
}
}
public static void main(String[] args) throws Exception {
Configuration conf = new Configuration();
// 這句話很關鍵
conf.set("mapred.job.tracker", "192.168.1.2:9001");
String[] ioArgs = new String[] { "STjoin_in", "STjoin_out" };
String[] therArgs = new GenericOptionsParser(conf, ioArgs).getRemainingArgs();
if (otherArgs.length != 2) {
System.err.println("Usage: Single Table Join
"); System.exit(2);
}
Job job = new Job(conf, "Single Table Join");
job.setJarByClass(STjoin.class);
// 設定Map和Reduce處理類
job.setMapperClass(Map.class);
job.setReducerClass(Reduce.class);
// 設定輸出型別
job.setOutputKeyClass(Text.class);
job.setOutputValueClass(Text.class);
// 設定輸入和輸出目錄
FileInputFormat.addInputPath(job, new Path(otherArgs[0]));
FileOutputFormat.setOutputPath(job, new Path(otherArgs[1]));
System.exit(job.waitForCompletion(true) ? 0 : 1);
}
}
4.4 程式碼結果
1)準備測試資料
通過Eclipse下面的"DFS Locations"在"/user/hadoop"目錄下建立輸入檔案"STjoin_in"資料夾(備註:"STjoin_out"不需要建立。)如圖4.4-1所示,已經成功建立。
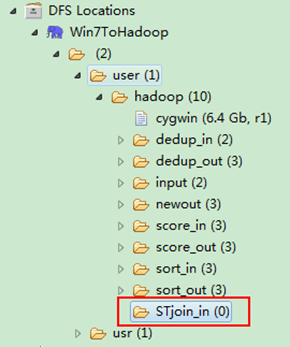

圖4.4-1 建立"STjoin_in" 圖4.4.2 上傳"child-parent"表
然後在本地建立一個txt檔案,通過Eclipse上傳到"/user/hadoop/STjoin_in"資料夾中,一個txt檔案的內容如"例項描述"那個檔案一樣。如圖4.4-2所示,成功上傳之後。
從SecureCRT遠處檢視"Master.Hadoop"的也能證實我們上傳的檔案,顯示其內容如圖4.4-3所示:
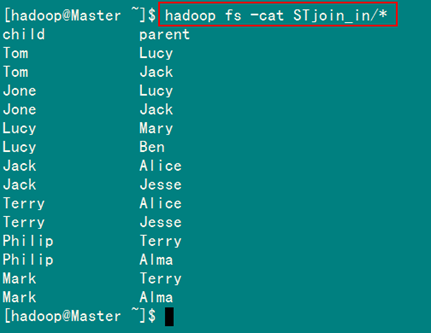
圖4.4-3 表"child-parent"內容
2)執行詳解
(1)Map處理:
map函式輸出結果如下所示。
child parent àà 忽略此行
Tom Lucy àà
Tom Jack àà
Jone Lucy àà
Jone Jack àà
Lucy Mary àà
Lucy Ben àà
Jack Alice àà
Jack Jesse àà
Terry Alice àà
Terry Jesse àà
Philip Terry àà
Philip Alma àà
Mark Terry àà
Mark Alma àà
(2)Shuffle處理
在shuffle過程中完成連線。
|
map函式輸出 |
排序結果 |
shuffle連線 |
|
,2+Mark+Terry> ,2+Mark+Alma> |
,2+Mark+Terry> ,2+Mark+Alma> |
1+Terry+Alice , 1+Philip+Alma, 1+Mark+Alma > 1+Jone+Jack, 2+Jack+Alice, 2+Jack+Jesse > 1+Terry+Jesse > 2+Jone+Jack> 1+Jone+Lucy, 2+Lucy+Mary, 2+Lucy+Ben> 2+Mark+Terry, 2+Mark+Alma> 2+Philip+Alma> 2+Terry+Jesse, 1+Philip+Terry, 1+Mark+Terry> 2+Tom+Jack> |
(3)Reduce處理
首先由語句"0 != grandchildnum && 0 != grandparentnum"得知,只要在"value-list"中沒有左表或者右表,則不會做處理,可以根據這條規則去除無效的shuffle連線。
|
無效的shuffle連線 |
有效的shuffle連線 |
|
1+Terry+Alice , 1+Philip+Alma, 1+Mark+Alma > 1+Terry+Jesse > 2+Jone+Jack> 2+Mark+Terry, 2+Mark+Alma> 2+Philip+Alma> 2+Tom+Jack> |
1+Jone+Jack, 2+Jack+Alice, 2+Jack+Jesse > 1+Jone+Lucy, 2+Lucy+Mary, 2+Lucy+Ben> 2+Terry+Jesse, 1+Philip+Terry, 1+Mark+Terry> |
然後根據下面語句進一步對有效的shuffle連線做處理。
// 左表,取出child放入grandchildren
if ('1' == relationtype) {
grandchild[grandchildnum] = childname;
grandchildnum++;
}
// 右表,取出parent放入grandparent
if ('2' == relationtype) {
grandparent[grandparentnum] = parentname;
grandparentnum++;
}
針對一條資料進行分析:
1+Jone+Jack,
2+Jack+Alice,
2+Jack+Jesse >
分析結果:左表用"字元1"表示,右表用"字元2"表示,上面的
根據上面針對左表與右表不同的處理規則,取得兩個陣列的資料如下所示:
|
grandchild |
Tom、Jone(grandchild[grandchildnum] = childname;) |
|
grandparent |
Alice、Jesse(grandparent[grandparentnum] = parentname;) |
然後根據下面語句進行處理。
for (int m = 0; m < grandchildnum; m++) {
for (int n = 0; n < grandparentnum; n++) {
context.write(new Text(grandchild[m]), new Text(grandparent[n]));
}
}

處理結果如下面所示:
|
Tom Jesse Tom Alice Jone Jesse Jone Alice |
其他的有效shuffle連線處理都是如此。
3)檢視執行結果
這時我們右擊Eclipse的"DFS Locations"中"/user/hadoop"資料夾進行重新整理,這時會發現多出一個"STjoin_out"資料夾,且裡面有3個檔案,然後開啟雙其"part-r-00000"檔案,會在Eclipse中間把內容顯示出來。如圖4.4-4所示。
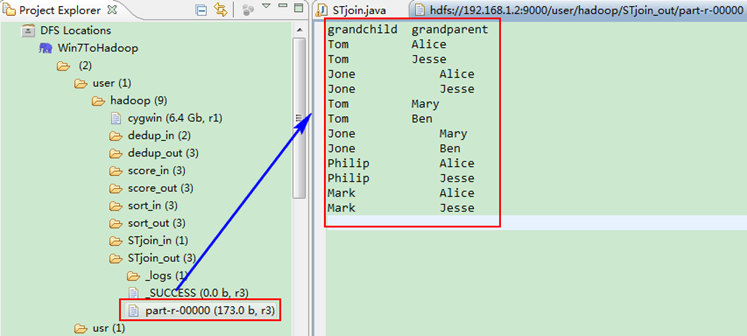
圖4.4-4 執行結果
5、多表關聯
多表關聯和單表關聯類似,它也是通過對原始資料進行一定的處理,從其中挖掘出關心的資訊。下面進入這個例項。
5.1 例項描述
輸入是兩個檔案,一個代表工廠表,包含工廠名列和地址編號列;另一個代表地址表,包含地址名列和地址編號列。要求從輸入資料中找出工廠名和地址名的對應關係,輸出"工廠名——地址名"表。
樣例輸入如下所示。
1)factory:
factoryname addressed
Beijing Red Star 1
Shenzhen Thunder 3
Guangzhou Honda 2
Beijing Rising 1
Guangzhou Development Bank 2
Tencent 3
Back of Beijing 1
2)address:
addressID addressname
1 Beijing
2 Guangzhou
3 Shenzhen
4 Xian
樣例輸出如下所示。
factoryname addressname
Back of Beijing Beijing
Beijing Red Star Beijing
Beijing Rising Beijing
Guangzhou Development Bank Guangzhou
Guangzhou Honda Guangzhou
Shenzhen Thunder Shenzhen
Tencent Shenzhen
5.2 設計思路
多表關聯和單表關聯相似,都類似於資料庫中的自然連線。相比單表關聯,多表關聯的左右表和連線列更加清楚。所以可以採用和單表關聯的相同的處理方式,map識別出輸入的行屬於哪個表之後,對其進行分割,將連線的列值儲存在key中,另一列和左右表標識儲存在value中,然後輸出。reduce拿到連線結果之後,解析value內容,根據標誌將左右表內容分開存放,然後求笛卡爾積,最後直接輸出。
這個例項的具體分析參考單表關聯例項。下面給出程式碼。
5.3 程式程式碼
程式程式碼如下所示:
package com.hebut.mr;
import java.io.IOException;
import java.util.*;
import org.apache.hadoop.conf.Configuration;
import org.apache.hadoop.fs.Path;
import org.apache.hadoop.io.IntWritable;
import org.apache.hadoop.io.Text;
import org.apache.hadoop.mapreduce.Job;
import org.apache.hadoop.mapreduce.Mapper;
import org.apache.hadoop.mapreduce.Reducer;
import org.apache.hadoop.mapreduce.lib.input.FileInputFormat;
import org.apache.hadoop.mapreduce.lib.output.FileOutputFormat;
import org.apache.hadoop.util.GenericOptionsParser;
public class MTjoin {
public static int time = 0;
/*
* 在map中先區分輸入行屬於左表還是右表,然後對兩列值進行分割,
* 儲存連線列在key值,剩餘列和左右表標誌在value中,最後輸出
*/
public static class Map extends Mapper
// 實現map函式
public void map(Object key, Text value, Context context)
throws IOException, InterruptedException {
String line = value.toString();// 每行檔案
String relationtype = new String();// 左右表標識
// 輸入檔案首行,不處理
if (line.contains("factoryname") == true
|| line.contains("addressed") == true) {
return;
}
// 輸入的一行預處理文字
StringTokenizer itr = new StringTokenizer(line);
String mapkey = new String();
String mapvalue = new String();
int i = 0;
while (itr.hasMoreTokens()) {
// 先讀取一個單詞
String token = itr.nextToken();
// 判斷該地址ID就把存到"values[0]"
if (token.charAt(0) >= '0' && token.charAt(0) <= '9') {
mapkey = token;
if (i > 0) {
relationtype = "1";
} else {
relationtype = "2";
}
continue;
}
// 存工廠名
mapvalue += token + " ";
i++;
}
// 輸出左右表
context.write(new Text(mapkey), new Text(relationtype + "+"+ mapvalue));
}
}
/*
* reduce解析map輸出,將value中資料按照左右表分別儲存,
* 然後求出笛卡爾積,並輸出。
*/
public static class Reduce extends Reducer
{
// 實現reduce函式
public void reduce(Text key, Iterable
values, Context context) throws IOException, InterruptedException {
// 輸出表頭
if (0 == time) {
context.write(new Text("factoryname"), new Text("addressname"));
time++;
}
int factorynum = 0;
String[] factory = new String[10];
int addressnum = 0;
String[] address = new String[10];
Iterator ite = values.iterator();
while (ite.hasNext()) {
String record = ite.next().toString();
int len = record.length();
int i = 2;
if (0 == len) {
continue;
}
// 取得左右表標識
char relationtype = record.charAt(0);
// 左表
if ('1' == relationtype) {
factory[factorynum] = record.substring(i);
factorynum++;
}
// 右表
if ('2' == relationtype) {
address[addressnum] = record.substring(i);
addressnum++;
}
}
// 求笛卡爾積
if (0 != factorynum && 0 != addressnum) {
for (int m = 0; m < factorynum; m++) {
for (int n = 0; n < addressnum; n++) {
// 輸出結果
context.write(new Text(factory[m]),
new Text(address[n]));
}
}
}
}
}
public static void main(String[] args) throws Exception {
Configuration conf = new Configuration();
// 這句話很關鍵
conf.set("mapred.job.tracker", "192.168.1.2:9001");
String[] ioArgs = new String[] { "MTjoin_in", "MTjoin_out" };
String[] therArgs = new GenericOptionsParser(conf, ioArgs).getRemainingArgs();
if (otherArgs.length != 2) {
System.err.println("Usage: Multiple Table Join
"); System.exit(2);
}
Job job = new Job(conf, "Multiple Table Join");
job.setJarByClass(MTjoin.class);
// 設定Map和Reduce處理類
job.setMapperClass(Map.class);
job.setReducerClass(Reduce.class);
// 設定輸出型別
job.setOutputKeyClass(Text.class);
job.setOutputValueClass(Text.class);
// 設定輸入和輸出目錄
FileInputFormat.addInputPath(job, new Path(otherArgs[0]));
FileOutputFormat.setOutputPath(job, new Path(otherArgs[1]));
System.exit(job.waitForCompletion(true) ? 0 : 1);
}
}
5.4 程式碼結果
1)準備測試資料
通過Eclipse下面的"DFS Locations"在"/user/hadoop"目錄下建立輸入檔案"MTjoin_in"資料夾(備註:"MTjoin_out"不需要建立。)如圖5.4-1所示,已經成功建立。

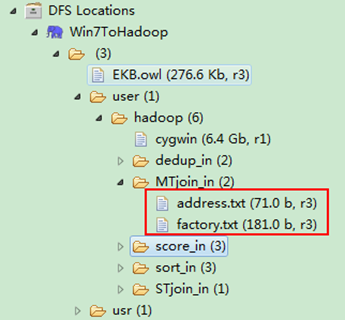
圖5.4-1 建立"MTjoin_in" 圖5.4.2 上傳兩個資料表
然後在本地建立兩個txt檔案,通過Eclipse上傳到"/user/hadoop/MTjoin_in"資料夾中,兩個txt檔案的內容如"例項描述"那兩個檔案一樣。如圖5.4-2所示,成功上傳之後。
從SecureCRT遠處檢視"Master.Hadoop"的也能證實我們上傳的兩個檔案。

圖5.4.3 兩個資料表的內容
2)檢視執行結果
這時我們右擊Eclipse的"DFS Locations"中"/user/hadoop"資料夾進行重新整理,這時會發現多出一個"MTjoin_out"資料夾,且裡面有3個檔案,然後開啟雙其"part-r-00000"檔案,會在Eclipse中間把內容顯示出來。如圖5.4-4所示。
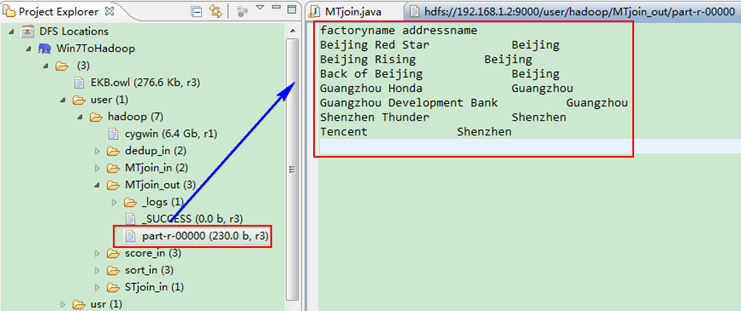
圖5.4-4 執行結果
6、倒排索引
"倒排索引"是文件檢索系統中最常用的資料結構,被廣泛地應用於全文搜尋引擎。它主要是用來儲存某個單詞(或片語)在一個文件或一組文件中的儲存位置的對映,即提供了一種根據內容來查詢文件的方式。由於不是根據文件來確定文件所包含的內容,而是進行相反的操作,因而稱為倒排索引(Inverted Index)。
6.1 例項描述
通常情況下,倒排索引由一個單詞(或片語)以及相關的文件列表組成,文件列表中的文件或者是標識文件的ID號,或者是指文件所在位置的URL,如圖6.1-1所示。

圖6.1-1 倒排索引結構
從圖6.1-1可以看出,單詞1出現在{文件1,文件4,文件13,……}中,單詞2出現在{文件3,文件5,文件15,……}中,而單詞3出現在{文件1,文件8,文件20,……}中。在實際應用中,還需要給每個文件新增一個權值,用來指出每個文件與搜尋內容的相關度,如圖6.1-2所示。

圖6.1-2 新增權重的倒排索引
最常用的是使用詞頻作為權重,即記錄單詞在文件中出現的次數。以英文為例,如圖6.1-3所示,索引檔案中的"MapReduce"一行表示:"MapReduce"這個單詞在文字T0中出現過1次,T1中出現過1次,T2中出現過2次。當搜尋條件為"MapReduce"、"is"、"Simple"時,對應的集合為:{T0,T1,T2}∩{T0,T1}∩{T0,T1}={T0,T1},即文件T0和T1包含了所要索引的單詞,而且只有T0是連續的。

圖6.1-3 倒排索引示例
更復雜的權重還可能要記錄單詞在多少個文件中出現過,以實現TF-IDF(Term Frequency-Inverse Document Frequency)演算法,或者考慮單詞在文件中的位置資訊(單詞是否出現在標題中,反映了單詞在文件中的重要性)等。
樣例輸入如下所示。
1)file1:
MapReduce is simple
2)file2:
MapReduce is powerful is simple
3)file3:
Hello MapReduce bye MapReduce
樣例輸出如下所示。
MapReduce file1.txt:1;file2.txt:1;file3.txt:2;
is file1.txt:1;file2.txt:2;
simple file1.txt:1;file2.txt:1;
powerful file2.txt:1;
Hello file3.txt:1;
bye file3.txt:1;
6.2 設計思路
實現"倒排索引"只要關注的資訊為:單詞、文件URL及詞頻,如圖3-11所示。但是在實現過程中,索引檔案的格式與圖6.1-3會略有所不同,以避免重寫OutPutFormat類。下面根據MapReduce的處理過程給出倒排索引的設計思路。
1)Map過程
首先使用預設的TextInputFormat類對輸入檔案進行處理,得到文字中每行的偏移量及其內容。顯然,Map過程首先必須分析輸入的

圖6.2-1 Map過程輸入/輸出
這裡存在兩個問題:第一,
這裡講單詞和URL組成key值(如"MapReduce:file1.txt"),將詞頻作為value,這樣做的好處是可以利用MapReduce框架自帶的Map端排序,將同一文件的相同單詞的詞頻組成列表,傳遞給Combine過程,實現類似於WordCount的功能。
2)Combine過程
經過map方法處理後,Combine過程將key值相同的value值累加,得到一個單詞在文件在文件中的詞頻,如圖6.2-2所示。如果直接將圖6.2-2所示的輸出作為Reduce過程的輸入,在Shuffle過程時將面臨一個問題:所有具有相同單詞的記錄(由單詞、URL和詞頻組成)應該交由同一個Reducer處理,但當前的key值無法保證這一點,所以必須修改key值和value值。這次將單詞作為key值,URL和詞頻組成value值(如"file1.txt:1")。這樣做的好處是可以利用MapReduce框架預設的HashPartitioner類完成Shuffle過程,將相同單詞的所有記錄傳送給同一個Reducer進行處理。

圖6.2-2 Combine過程輸入/輸出
3)Reduce過程
經過上述兩個過程後,Reduce過程只需將相同key值的value值組合成倒排索引檔案所需的格式即可,剩下的事情就可以直接交給MapReduce框架進行處理了。如圖6.2-3所示。索引檔案的內容除分隔符外與圖6.1-3解釋相同。
4)需要解決的問題
本例項設計的倒排索引在檔案數目上沒有限制,但是單詞檔案不宜過大(具體值與預設HDFS塊大小及相關配置有關),要保證每個檔案對應一個split。否則,由於Reduce過程沒有進一步統計詞頻,最終結果可能會出現詞頻未統計完全的單詞。可以通過重寫InputFormat類將每個檔案為一個split,避免上述情況。或者執行兩次MapReduce,第一次MapReduce用於統計詞頻,第二次MapReduce用於生成倒排索引。除此之外,還可以利用複合鍵值對等實現包含更多資訊的倒排索引。

圖6.2-3 Reduce過程輸入/輸出
6.3 程式程式碼
程式程式碼如下所示:
package com.hebut.mr;
import java.io.IOException;
import java.util.StringTokenizer;
import org.apache.hadoop.conf.Configuration;
import org.apache.hadoop.fs.Path;
import org.apache.hadoop.io.IntWritable;
import org.apache.hadoop.io.Text;
import org.apache.hadoop.mapreduce.Job;
import org.apache.hadoop.mapreduce.Mapper;
import org.apache.hadoop.mapreduce.Reducer;
import org.apache.hadoop.mapreduce.lib.input.FileInputFormat;
import org.apache.hadoop.mapreduce.lib.input.FileSplit;
import org.apache.hadoop.mapreduce.lib.output.FileOutputFormat;
import org.apache.hadoop.util.GenericOptionsParser;
public class InvertedIndex {
public static class Map extends Mapper
private Text keyInfo = new Text(); // 儲存單詞和URL組合
private Text valueInfo = new Text(); // 儲存詞頻
private FileSplit split; // 儲存Split物件
// 實現map函式
public void map(Object key, Text value, Context context)
throws IOException, InterruptedException {
// 獲得
對所屬的FileSplit物件 split = (FileSplit) context.getInputSplit();
StringTokenizer itr = new StringTokenizer(value.toString());
while (itr.hasMoreTokens()) {
// key值由單詞和URL組成,如"MapReduce:file1.txt"
// 獲取檔案的完整路徑
// keyInfo.set(itr.nextToken()+":"+split.getPath().toString());
// 這裡為了好看,只獲取檔案的名稱。
int splitIndex = split.getPath().toString().indexOf("file");
keyInfo.set(itr.nextToken() + ":"
+ split.getPath().toString().substring(splitIndex));
// 詞頻初始化為1
valueInfo.set("1");
context.write(keyInfo, valueInfo);
}
}
}
public static class Combine extends Reducer
{
private Text info = new Text();
// 實現reduce函式
public void reduce(Text key, Iterable
values, Context context) throws IOException, InterruptedException {
// 統計詞頻
int sum = 0;
for (Text value : values) {
sum += Integer.parseInt(value.toString());
}
int splitIndex = key.toString().indexOf(":");
// 重新設定value值由URL和詞頻組成
info.set(key.toString().substring(splitIndex + 1) + ":" + sum);
// 重新設定key值為單詞
key.set(key.toString().substring(0, splitIndex));
context.write(key, info);
}
}
public static class Reduce extends Reducer
{
private Text result = new Text();
// 實現reduce函式
public void reduce(Text key, Iterable
values, Context context) throws IOException, InterruptedException {
// 生成文件列表
String fileList = new String();
for (Text value : values) {
fileList += value.toString() + ";";
}
result.set(fileList);
context.write(key, result);
}
}
public static void main(String[] args) throws Exception {
Configuration conf = new Configuration();
// 這句話很關鍵
conf.set("mapred.job.tracker", "192.168.1.2:9001");
String[] ioArgs = new String[] { "index_in", "index_out" };
String[] therArgs = new GenericOptionsParser(conf, ioArgs)
.getRemainingArgs();
if (otherArgs.length != 2) {
System.err.println("Usage: Inverted Index
"); System.exit(2);
}
Job job = new Job(conf, "Inverted Index");
job.setJarByClass(InvertedIndex.class);
// 設定Map、Combine和Reduce處理類
job.setMapperClass(Map.class);
job.setCombinerClass(Combine.class);
job.setReducerClass(Reduce.class);
// 設定Map輸出型別
job.setMapOutputKeyClass(Text.class);
job.setMapOutputValueClass(Text.class);
// 設定Reduce輸出型別
job.setOutputKeyClass(Text.class);
job.setOutputValueClass(Text.class);
// 設定輸入和輸出目錄
FileInputFormat.addInputPath(job, new Path(otherArgs[0]));
FileOutputFormat.setOutputPath(job, new Path(otherArgs[1]));
System.exit(job.waitForCompletion(true) ? 0 : 1);
}
}
6.4 程式碼結果
1)準備測試資料
通過Eclipse下面的"DFS Locations"在"/user/hadoop"目錄下建立輸入檔案"index_in"資料夾(備註:"index_out"不需要建立。)如圖6.4-1所示,已經成功建立。

圖6.4-1 建立"index_in" 圖6.4.2 上傳"file*.txt"
然後在本地建立三個txt檔案,通過Eclipse上傳到"/user/hadoop/index_in"資料夾中,三個txt檔案的內容如"例項描述"那三個檔案一樣。如圖6.4-2所示,成功上傳之後。
從SecureCRT遠處檢視"Master.Hadoop"的也能證實我們上傳的三個檔案。
圖6.4.3 三個"file*.txt"的內容
2)檢視執行結果
這時我們右擊Eclipse的"DFS Locations"中"/user/hadoop"資料夾進行重新整理,這時會發現多出一個"index_out"資料夾,且裡面有3個檔案,然後開啟雙其"part-r-00000"檔案,會在Eclipse中間把內容顯示出來。如圖6.4-4所示。
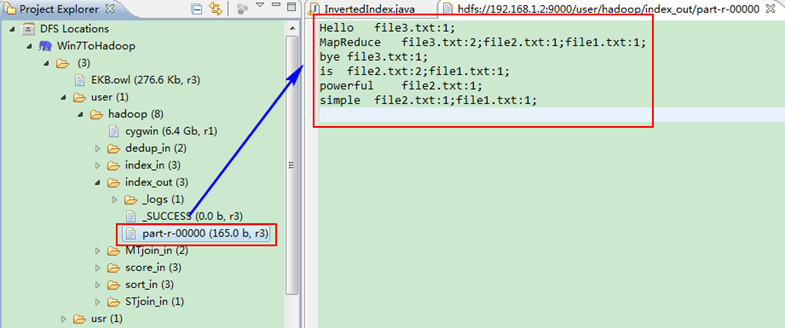
圖6.4-4 執行結果
文章下載地址:http://files.cnblogs.com/xia520pi/HadoopCluster_Vol.9.rar
來自 “ ITPUB部落格 ” ,連結:http://blog.itpub.net/42046/viewspace-763811/,如需轉載,請註明出處,否則將追究法律責任。
相關文章
- hadoop叢集篇--從0到1搭建hadoop叢集Hadoop
- Hadoop叢集搭建Hadoop
- Hadoop搭建叢集Hadoop
- Hadoop 叢集命令Hadoop
- memagent實現對memcache的初級叢集管理
- 初識kafka叢集Kafka
- Hadoop叢集面試題Hadoop面試題
- 4.4 Hadoop叢集搭建Hadoop
- Hadoop叢集搭建(一)Hadoop
- 如何部署hadoop叢集Hadoop
- Hadoop叢集(第10期副刊)_常用MySQL資料庫命令HadoopMySql資料庫
- Hadoop之MapReduce2基礎梳理及案例Hadoop
- Hadoop叢集(第5期副刊)_JDK和SSH無密碼配置HadoopJDK密碼
- hadoop分散式叢集搭建Hadoop分散式
- 使用docker部署hadoop叢集DockerHadoop
- Hadoop-叢集執行Hadoop
- Hadoop叢集搭建文件Hadoop
- Hadoop - Ambari叢集管理剖析Hadoop
- hadoop叢集環境搭建Hadoop
- hadoop2.2.0叢集搭建Hadoop
- Hadoop框架:MapReduce基本原理和入門案例Hadoop框架
- Hadoop MapReduce架構簡介(初學學習不錯)Hadoop架構
- MapReduce&&HadoopHadoop
- Hadoop叢集常用命令Hadoop
- Hadoop完全分散式叢集配置Hadoop分散式
- Hadoop HA叢集簡單搭建Hadoop
- Hadoop2.7.2叢集的部署Hadoop
- HADOOP SPARK 叢集環境搭建HadoopSpark
- Hadoop-2.7.4 叢集快速搭建Hadoop
- Hadoop分散式叢集搭建_1Hadoop分散式
- hadoop叢集配置和啟動Hadoop
- 小丸子學Hadoop系列之——部署Hadoop叢集Hadoop
- mongodb 3.4 叢集搭建升級版 五臺叢集MongoDB
- Hadoop叢集初始化啟動Hadoop
- Hadoop叢集之淺析安全模式Hadoop模式
- hadoop-2.5.0-cdh5.3.6叢集搭建HadoopH5
- Hadoop的叢集環境部署說明Hadoop
- Hadoop叢集是配置時間同步!Hadoop