[CentOS Python系列] 四.阿里雲伺服器CentOS連線遠端MySQL資料庫及pymsql
從2014年開始,作者主要寫了三個Python系列文章,分別是基礎知識、網路爬蟲和資料分析。
- Python基礎知識系列:Pythonj基礎知識學習與提升
- Python網路爬蟲系列:Python爬蟲之Selenium+Phantomjs+CasperJS
- Python資料分析系列:知識圖譜、web資料探勘及NLP


隨著人工智慧和深度學習的風暴來臨,Python變得越來越火熱,作者也準備從零學習這些知識,寫相關文章。本篇文章講解阿里雲伺服器CentOS系統連線遠端MySQL資料庫及配置過程,同時教大家如何編寫Python操作MySQL資料庫的基礎程式碼,為後面的網路爬蟲並儲存至伺服器打下基礎。
文章非常基礎,希望這系列文章對您有所幫助,如果有錯誤或不足之處,還請海涵~
系列文章:
[CentOS Python系列] 一.阿里雲伺服器安裝部署及第一個Python爬蟲程式碼實現
[CentOS Python系列] 二.pscp上傳下載伺服器檔案及phantomjs安裝詳解
[CentOS Python系列] 三.阿里雲MySQL資料庫開啟配置及SQL語句基礎知識
參考文獻:
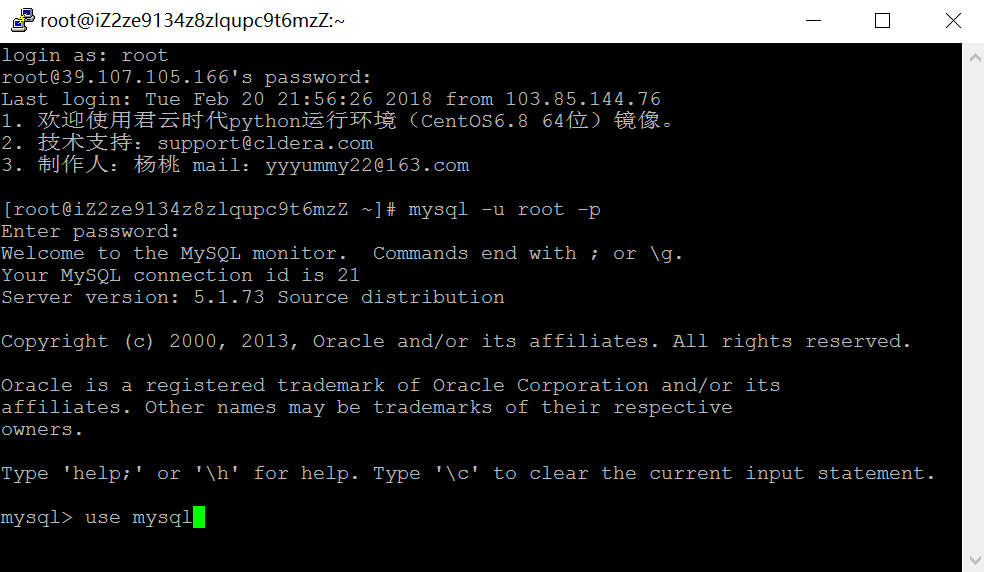
一. 建立新使用者
核心程式碼:
insert into mysql.user(Host,User,Password) value ("localhost","eastmount",password("123456"));
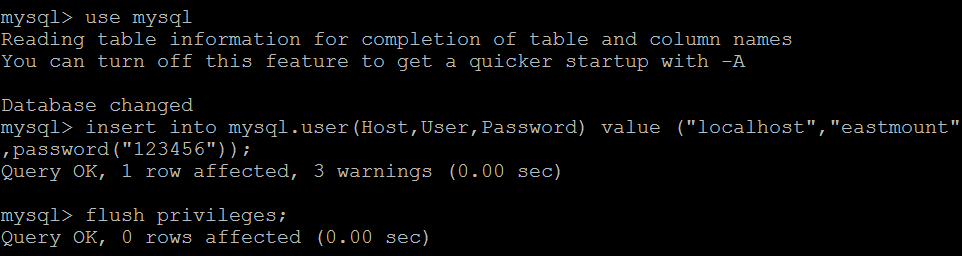
mysql> use mysql
Reading table information for completion of table and column names
You can turn off this feature to get a quicker startup with -A

Database changed
mysql> insert into mysql.user(Host,User,Password) value ("localhost","eastmount",password("123456"));
Query OK, 1 row affected, 3 warnings (0.00 sec)

mysql> flush privileges;
Query OK, 0 rows affected (0.00 sec)

mysql> select host,user,password from user;
+-------------------------+-----------+-------------------------------------------+
| host                    | user      | password                                  |
+-------------------------+-----------+-------------------------------------------+
| localhost               | root      | *6BB4837EB74329105EE4568DDA7DC67ED2CA2AD9 |
| izm5e2qvb8hl5w1gjowpsxz | root      | *6BB4837EB74329105EE4568DDA7DC67ED2CA2AD9 |
| 127.0.0.1               | root      | *6BB4837EB74329105EE4568DDA7DC67ED2CA2AD9 |
| localhost               |           |                                           |
| izm5e2qvb8hl5w1gjowpsxz |           |                                           |
| localhost               | yxz       | *6BB4837EB74329105EE4568DDA7DC67ED2CA2AD9 |
| localhost               | mysql     | *95FE99470B7B7CAF1E150B16ACCA48CDE7925813 |
| 39.107.105.166          | yxz       | *6BB4837EB74329105EE4568DDA7DC67ED2CA2AD9 |
| 39.107.105.166          | root      | *6BB4837EB74329105EE4568DDA7DC67ED2CA2AD9 |
| %                       | root      | *6BB4837EB74329105EE4568DDA7DC67ED2CA2AD9 |
| localhost               | eastmount | *6BB4837EB74329105EE4568DDA7DC67ED2CA2AD9 |
+-------------------------+-----------+-------------------------------------------+
11 rows in set (0.00 sec)
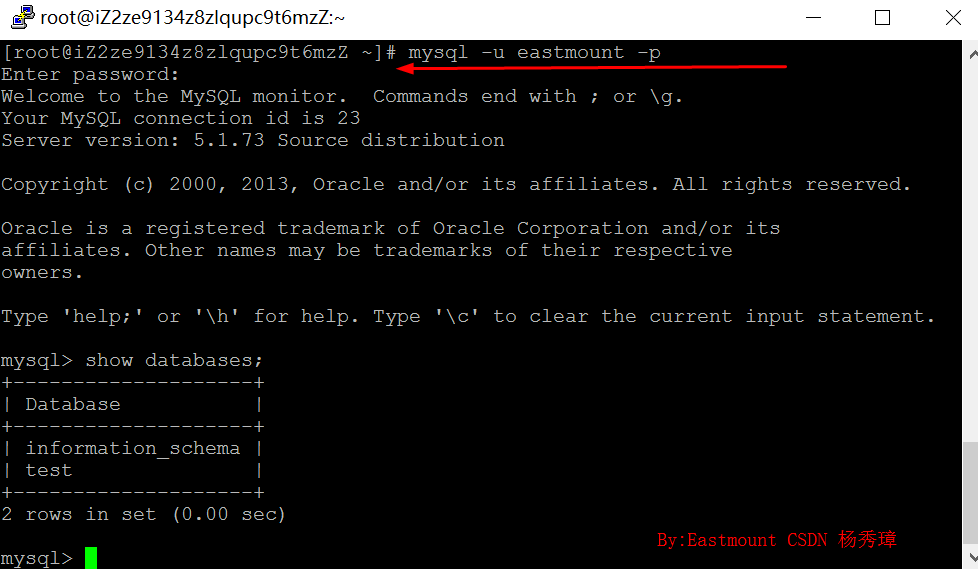
通過 select host, user, password from user 檢視主機、使用者和密碼,可以看到 (localhost, eastmount, 123456) 已經插入成功。
此時,使用者eastmount是可以登入了,通過語句 "mysql -u eastmount -p 123456"。
但是使用該使用者建立資料庫,報錯如下所示,這是需要先進行授權。
mysql> create database douban;
ERROR 1044 (42000): Access denied for user 'eastmount'@'localhost' to database 'douban'
2.root使用者登入再授權
核心程式碼:grant all privileges on *.* to eastmount@localhost identified by "eastmount";
mysql -u root -p
123456

use mysql;

grant all privileges on *.* to eastmount@localhost identified by "eastmount";

flush privileges;

quit;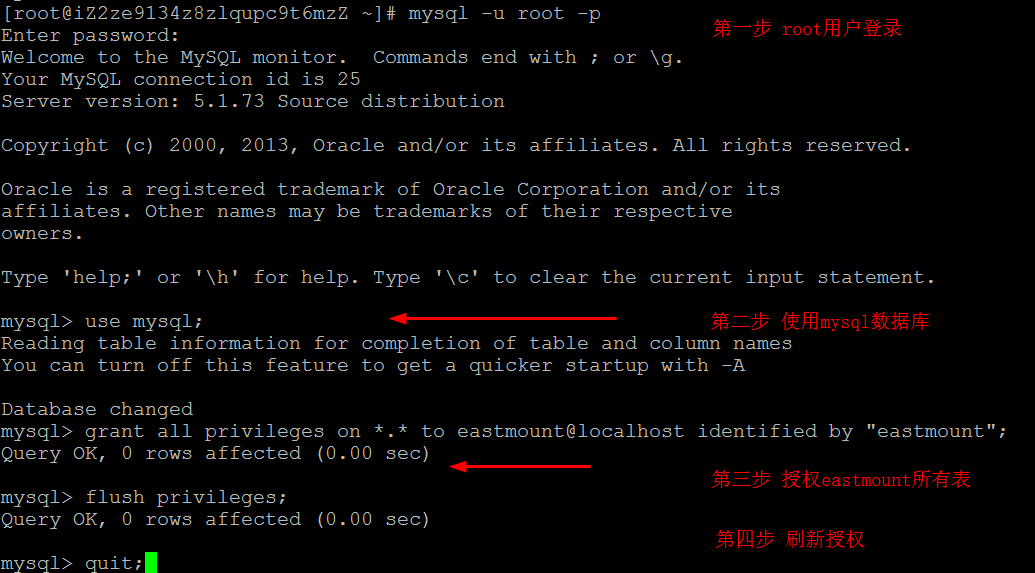
但是此時登入會報錯,如下所示:
[root@iZ2ze9134z8zlqupc9t6mzZ ~]# mysql -u eastmount -p
Enter password:
ERROR 1045 (28000): Access denied for user 'eastmount'@'localhost' (using password: YES)

3.關閉伺服器更新登入密碼再重新整理許可權
核心程式碼:update user set password=PASSWORD("123456") where user="eastmount";
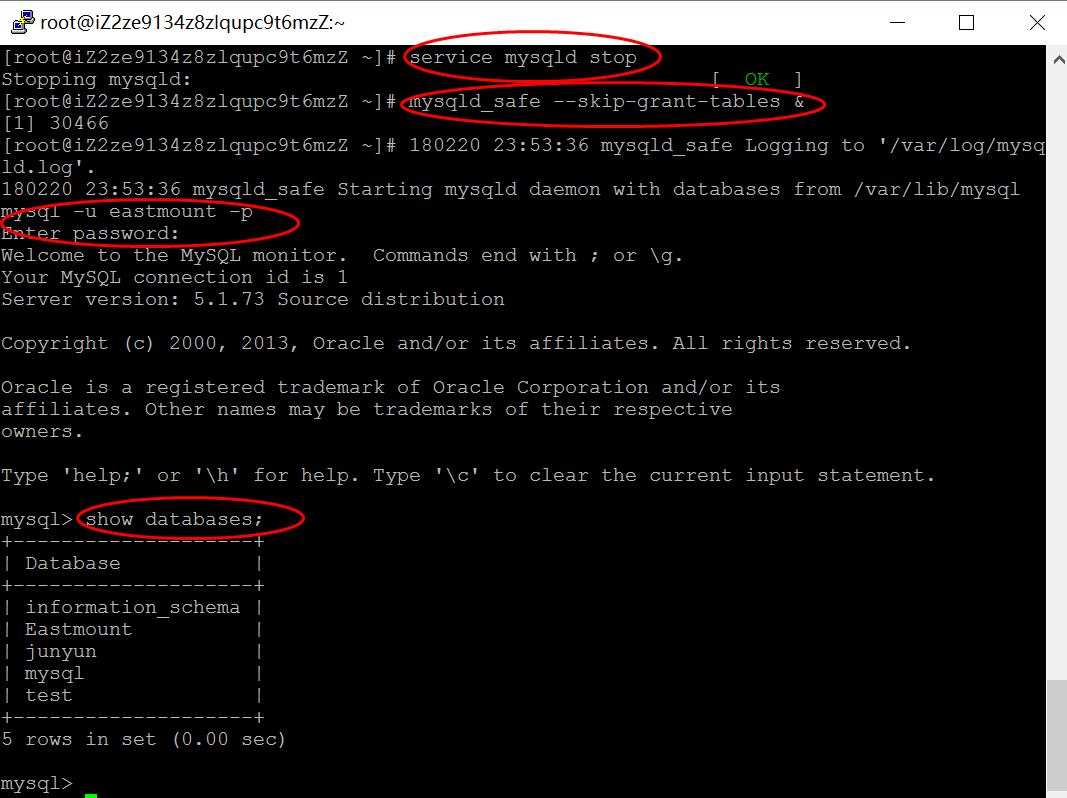
[root@iZ2ze9134z8zlqupc9t6mzZ ~]# service mysqld stop
Stopping mysqld:                                           [  OK  ]
[root@iZ2ze9134z8zlqupc9t6mzZ ~]# mysqld_safe --skip-grant-tables &
[1] 30466
[root@iZ2ze9134z8zlqupc9t6mzZ ~]# 180220 23:53:36 mysqld_safe Logging to '/var/log/mysqld.log'.
180220 23:53:36 mysqld_safe Starting mysqld daemon with databases from /var/lib/mysql
mysql -u eastmount -p
Enter password:
Welcome to the MySQL monitor.  Commands end with ; or \g.
Your MySQL connection id is 1
Server version: 5.1.73 Source distribution

Copyright (c) 2000, 2013, Oracle and/or its affiliates. All rights reserved.

Oracle is a registered trademark of Oracle Corporation and/or its
affiliates. Other names may be trademarks of their respective
owners.

Type 'help;' or '\h' for help. Type '\c' to clear the current input statement.

mysql> show databases;
+--------------------+
| Database           |
+--------------------+
| information_schema |
| Eastmount          |
| junyun             |
| mysql              |
| test               |
+--------------------+
5 rows in set (0.00 sec)
接下來更新eastmount使用者的密碼。
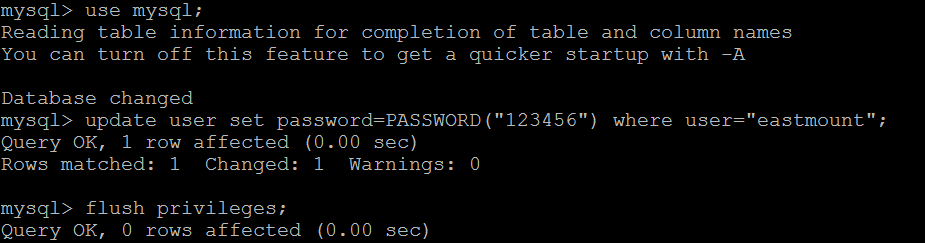
mysql> use mysql;
Reading table information for completion of table and column names
You can turn off this feature to get a quicker startup with -A

Database changed
mysql> update user set password=PASSWORD("123456") where user="eastmount";
Query OK, 1 row affected (0.00 sec)
Rows matched: 1  Changed: 1  Warnings: 0

mysql> flush privileges;
Query OK, 0 rows affected (0.00 sec)

mysql> quit;
4.重啟MySQL服務
核心程式碼:service mysqld restart

[root@iZ2ze9134z8zlqupc9t6mzZ ~]# service mysqld restart
180220 23:57:47 mysqld_safe mysqld from pid file /var/run/mysqld/mysqld.pid ended
Stopping mysqld:                                           [  OK  ]
Starting mysqld:                                           [  OK  ]
[1]+  Done                    mysqld_safe --skip-grant-tables
[root@iZ2ze9134z8zlqupc9t6mzZ ~]#
5.登入成功資料庫操作
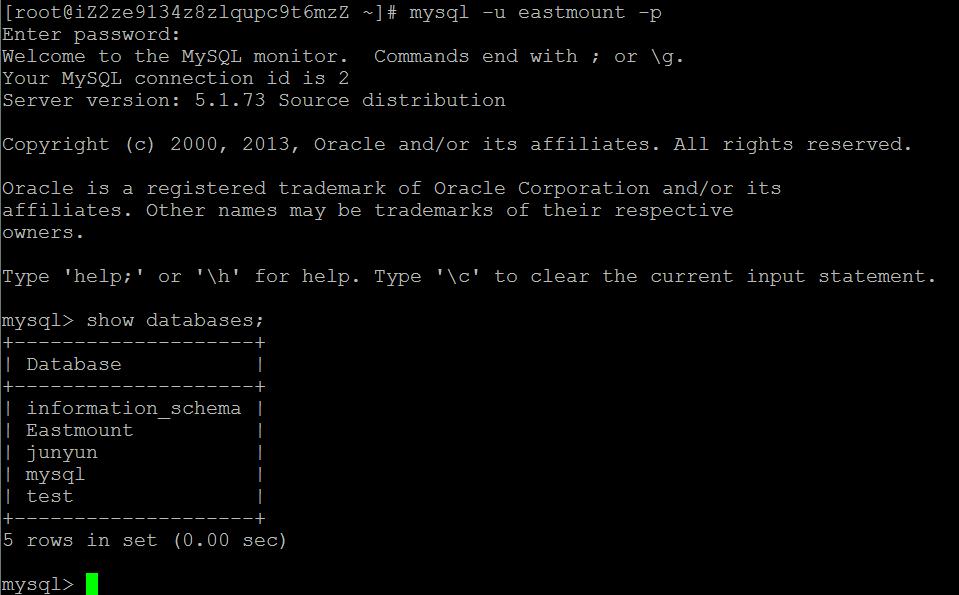
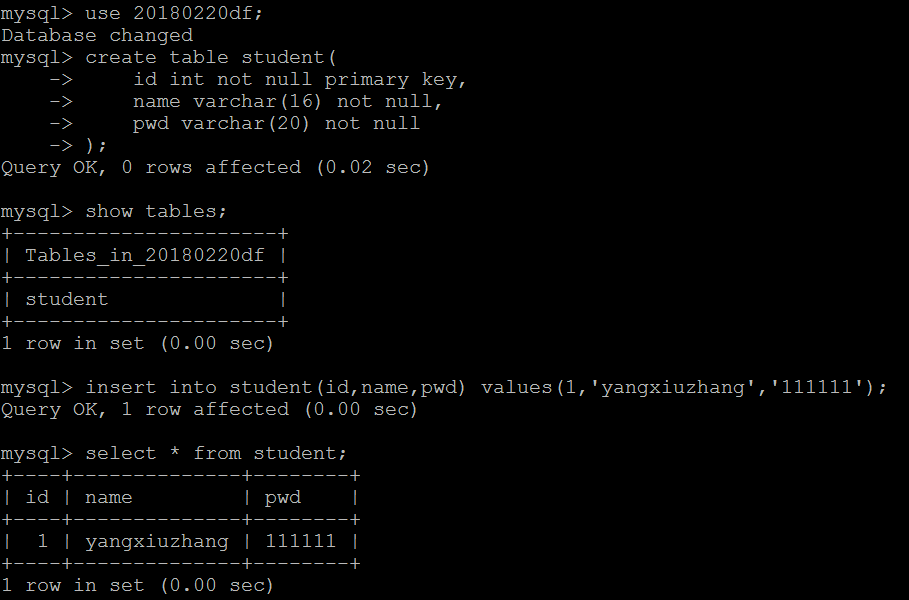
mysql> create database 20180220df;
Query OK, 1 row affected (0.00 sec)

mysql> show databases;
+--------------------+
| Database           |
+--------------------+
| information_schema |
| 20180220df         |
| Eastmount          |
| doubanl            |
| junyun             |
| mysql              |
| test               |
+--------------------+
7 rows in set (0.00 sec)


mysql> use 20180220df;
Database changed
mysql> create table student(
    ->     id int not null primary key,
    ->     name varchar(16) not null,
    ->     pwd varchar(20) not null
    -> );
Query OK, 0 rows affected (0.02 sec)

mysql> show tables;
+----------------------+
| Tables_in_20180220df |
+----------------------+
| student              |
+----------------------+
1 row in set (0.00 sec)

mysql> insert into student(id,name,pwd) values(1,'yangxiuzhang','111111');
Query OK, 1 row affected (0.00 sec)

mysql> select * from student;
+----+--------------+--------+
| id | name         | pwd    |
+----+--------------+--------+
|  1 | yangxiuzhang | 111111 |
+----+--------------+--------+
1 row in set (0.00 sec)
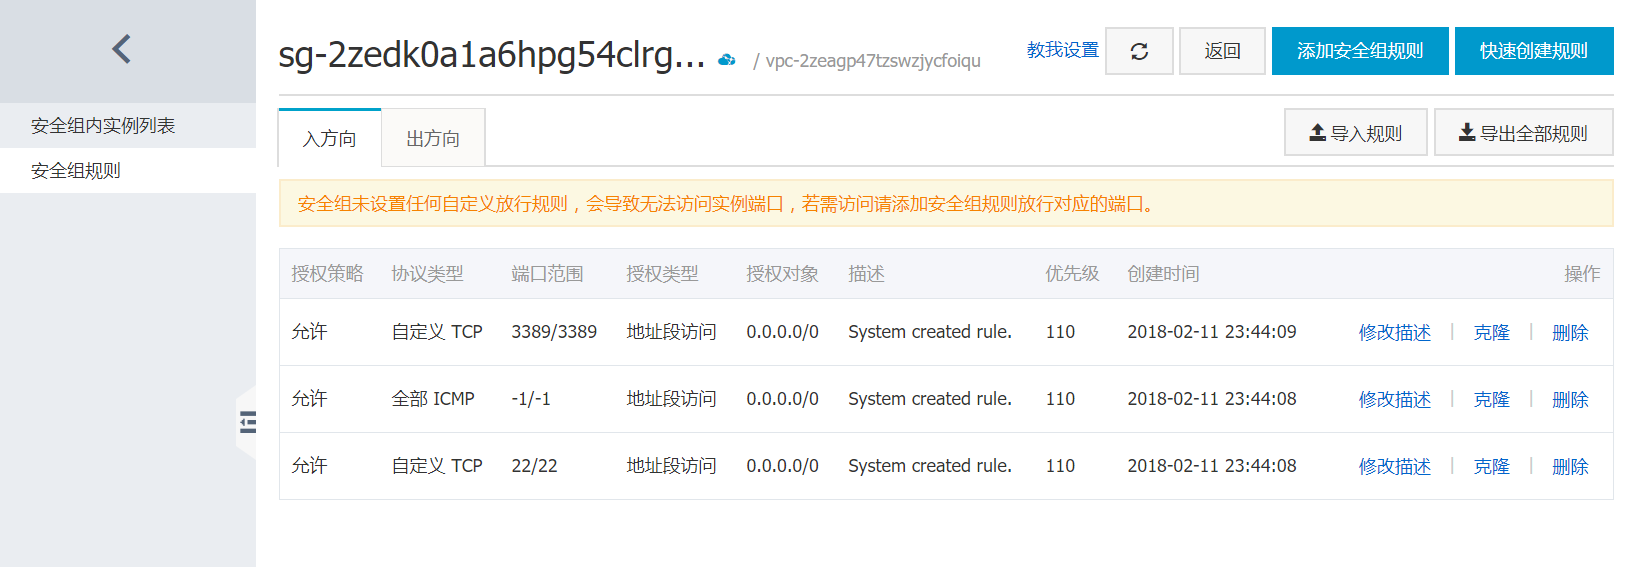
二. 遠端伺服器授權及埠開啟
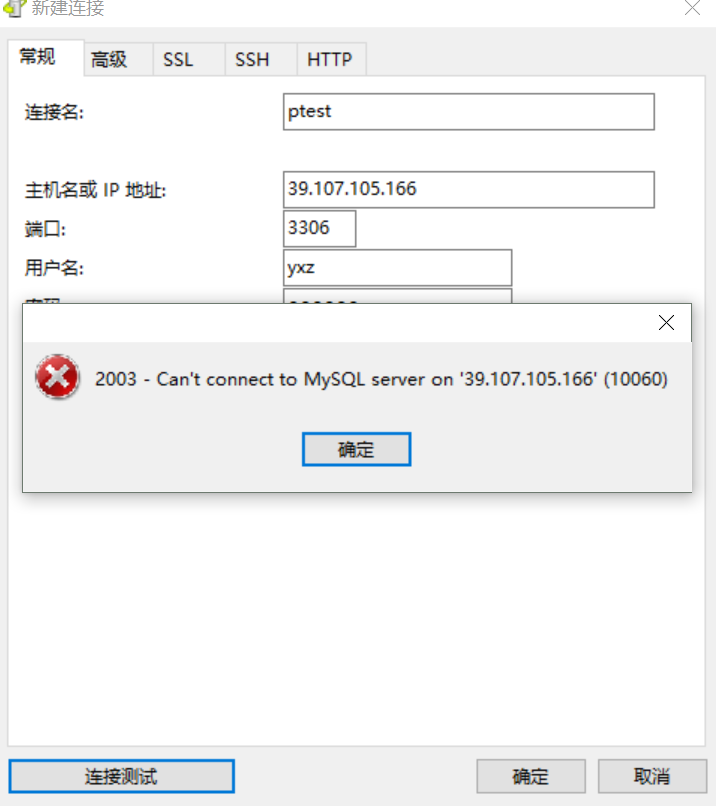
但此時連線遠端資料庫,仍然報錯“2003-can't connect to MySQL server on (10060)”。
這是需要開啟遠端伺服器並進行公網IP授權,同時開發3306埠號,流程如下:
(一) CentOS開通MySQL3306埠
1.vi /etc/sysconfig/iptables
2.加入如下程式碼,核心: -I INPUT -p tcp -m state --state NEW -m tcp --dport 3306 -j ACCEPT
#Firewall configuration written by system-config-firewall
#Manual customization of this file is not recommanded.
*filter
:INPUT ACCEPT [0:0]
:FORWARD ACCEPT [0:0]
:OUTPUT ACCEPT [0:0]
-A INPUT -m state --state ESTABLISHED,RELATED -j ACCEPT
-A INPUT -p icmp -j ACCEPT
-A INPUT -i lo -j ACCEPT
-A INPUT -m state --state NEW -m tcp -p tcp --dport 22 -j ACCEPT
-A INPUT -m state --state NEW -m tcp -p tcp --dport 3306 -j ACCEPT
-A INPUT -j REJECT --reject-with icmp-host-prohibited
-A FORWARD -j REJECT --reject-with icmp-host-prohibited
COMMIT
3.儲存退出
4.重啟防火牆:service iptables restart
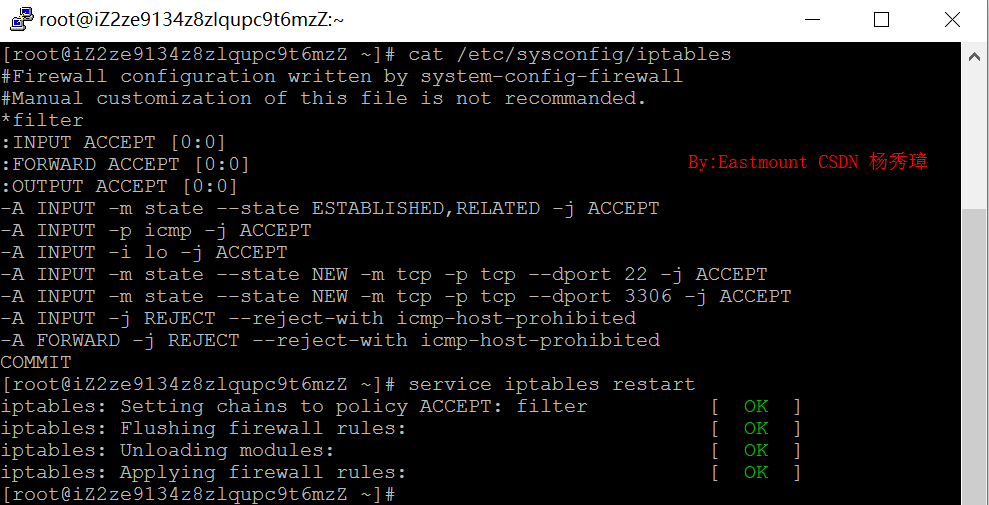
[root@iZ2ze9134z8zlqupc9t6mzZ ~]# service iptables restart
iptables: Setting chains to policy ACCEPT: filter          [  OK  ]
iptables: Flushing firewall rules:                         [  OK  ]
iptables: Unloading modules:                               [  OK  ]
iptables: Applying firewall rules: [ OK ](二) 開啟遠端訪問許可權
1.mysql -u eastmount -p 123456

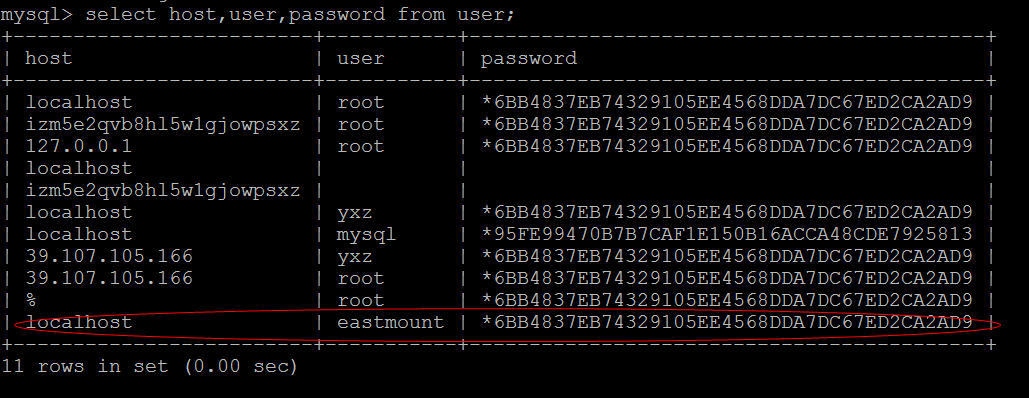
2.查詢主機、使用者名稱和密碼:select host,user,password from user;
3.授權:grant all privileges on *.* to eastmount@39.107.105.166 identified by "123456" with grant option;
mysql> use mysql;
Reading table information for completion of table and column names
You can turn off this feature to get a quicker startup with -A

Database changed
mysql> grant all privileges on *.* to eastmount@39.107.105.166 identified by "123456" with grant option;
Query OK, 0 rows affected (0.00 sec)

mysql> flush privileges;
Query OK, 0 rows affected (0.00 sec)

mysql> select host,user,password from user;
+-------------------------+-----------+-------------------------------------------+
| host                    | user      | password                                  |
+-------------------------+-----------+-------------------------------------------+
| localhost               | root      | *6BB4837EB74329105EE4568DDA7DC67ED2CA2AD9 |
| izm5e2qvb8hl5w1gjowpsxz | root      | *6BB4837EB74329105EE4568DDA7DC67ED2CA2AD9 |
| 127.0.0.1               | root      | *6BB4837EB74329105EE4568DDA7DC67ED2CA2AD9 |
| localhost               |           |                                           |
| izm5e2qvb8hl5w1gjowpsxz |           |                                           |
| localhost               | yxz       | *6BB4837EB74329105EE4568DDA7DC67ED2CA2AD9 |
| localhost               | mysql     | *95FE99470B7B7CAF1E150B16ACCA48CDE7925813 |
| 39.107.105.166          | yxz       | *6BB4837EB74329105EE4568DDA7DC67ED2CA2AD9 |
| 39.107.105.166          | root      | *6BB4837EB74329105EE4568DDA7DC67ED2CA2AD9 |
| %                       | root      | *6BB4837EB74329105EE4568DDA7DC67ED2CA2AD9 |
| localhost               | eastmount | *6BB4837EB74329105EE4568DDA7DC67ED2CA2AD9 |
| 39.107.105.166          | eastmount | *6BB4837EB74329105EE4568DDA7DC67ED2CA2AD9 |
+-------------------------+-----------+-------------------------------------------+
12 rows in set (0.00 sec)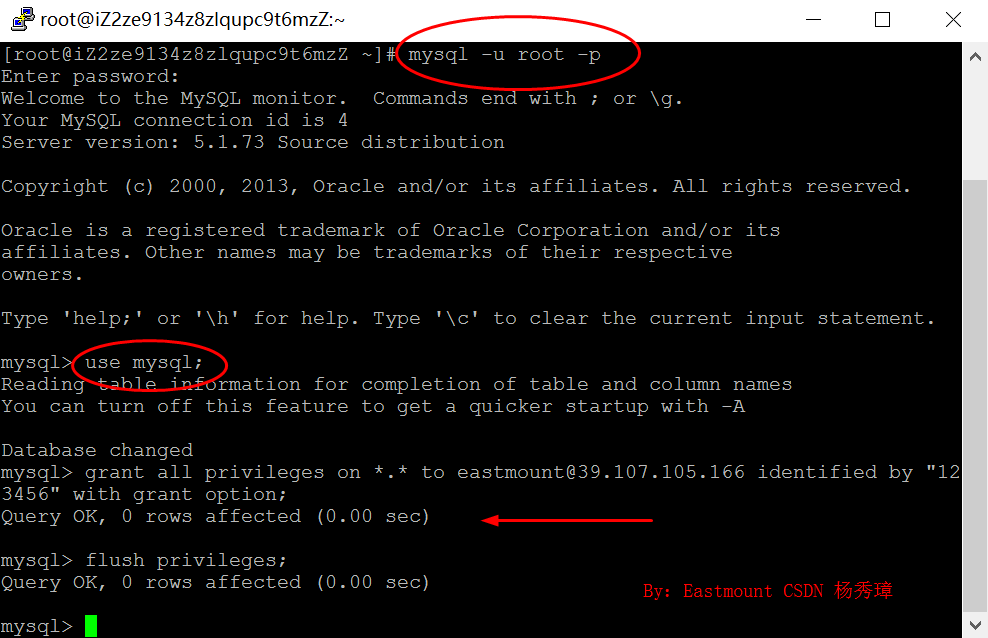
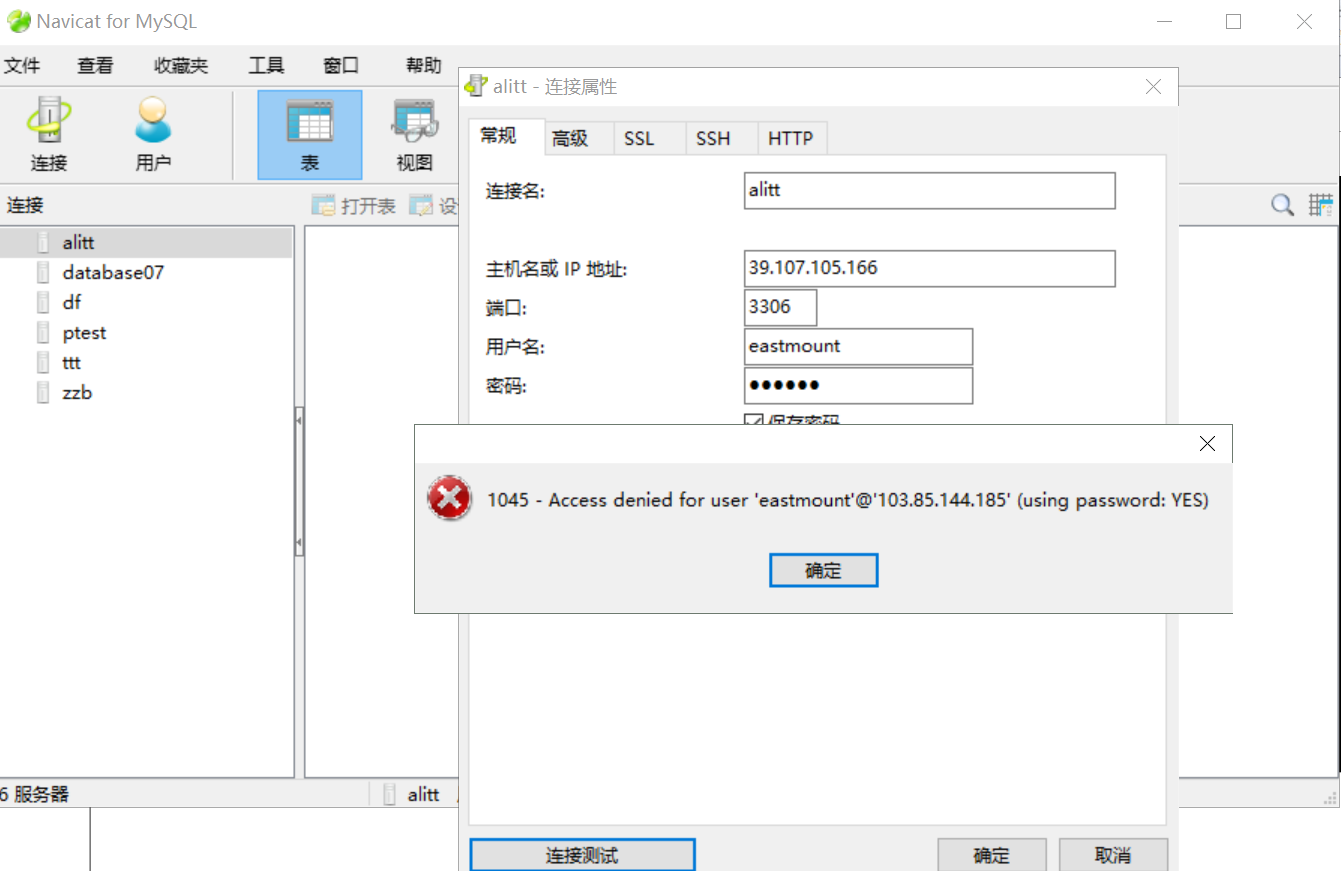
但仍然報錯“1045 - Access denied for user 'eastmount' (using password: YES)”。
4.為eastmount@'%'使用者授權
grant all privileges on *.* to eastmount@'%' identified by "123456" with grant option;
flush privileges;
service mysqld restart
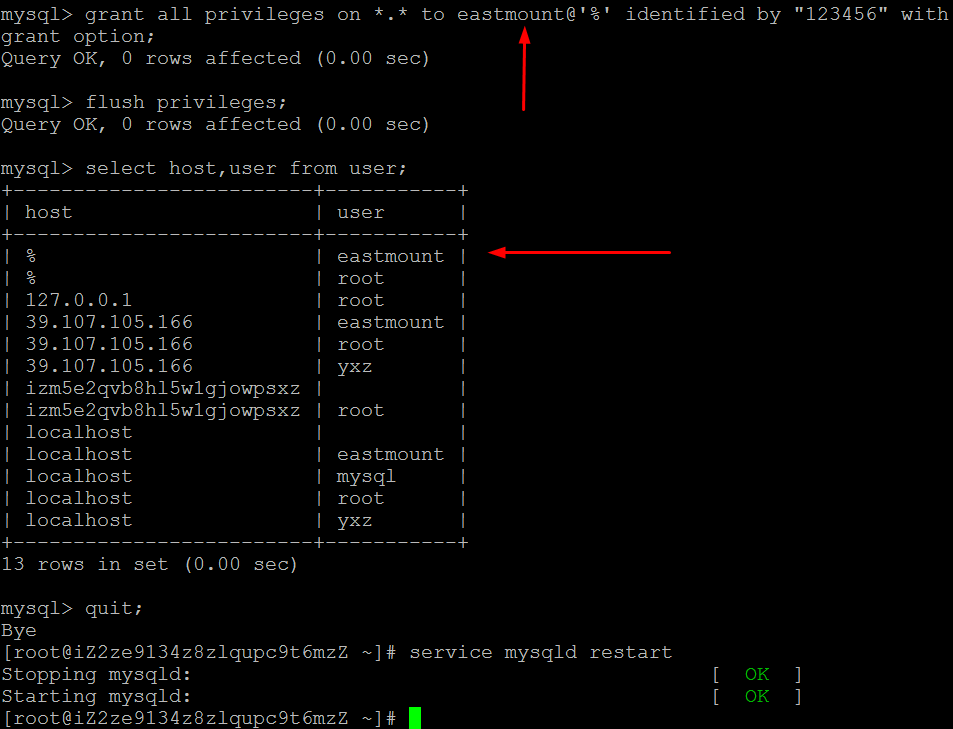
此時許可權開啟成功,同時伺服器的3306埠開啟。
三. 阿里雲伺服器安全設定
如果現在您仍然無法通過阿里雲主機CentOS連線遠端MySQL資料庫,那您需要設定阿里雲的安全組規則,而網上更多的資料忽略了該步驟。下面進行簡單敘述:
第一步:開啟阿里雲伺服器管理控制檯頁面,點選“管理”按鈕

第二步:在彈出的頁面中,選擇“本例項安全組”,然後點選“配置規則”
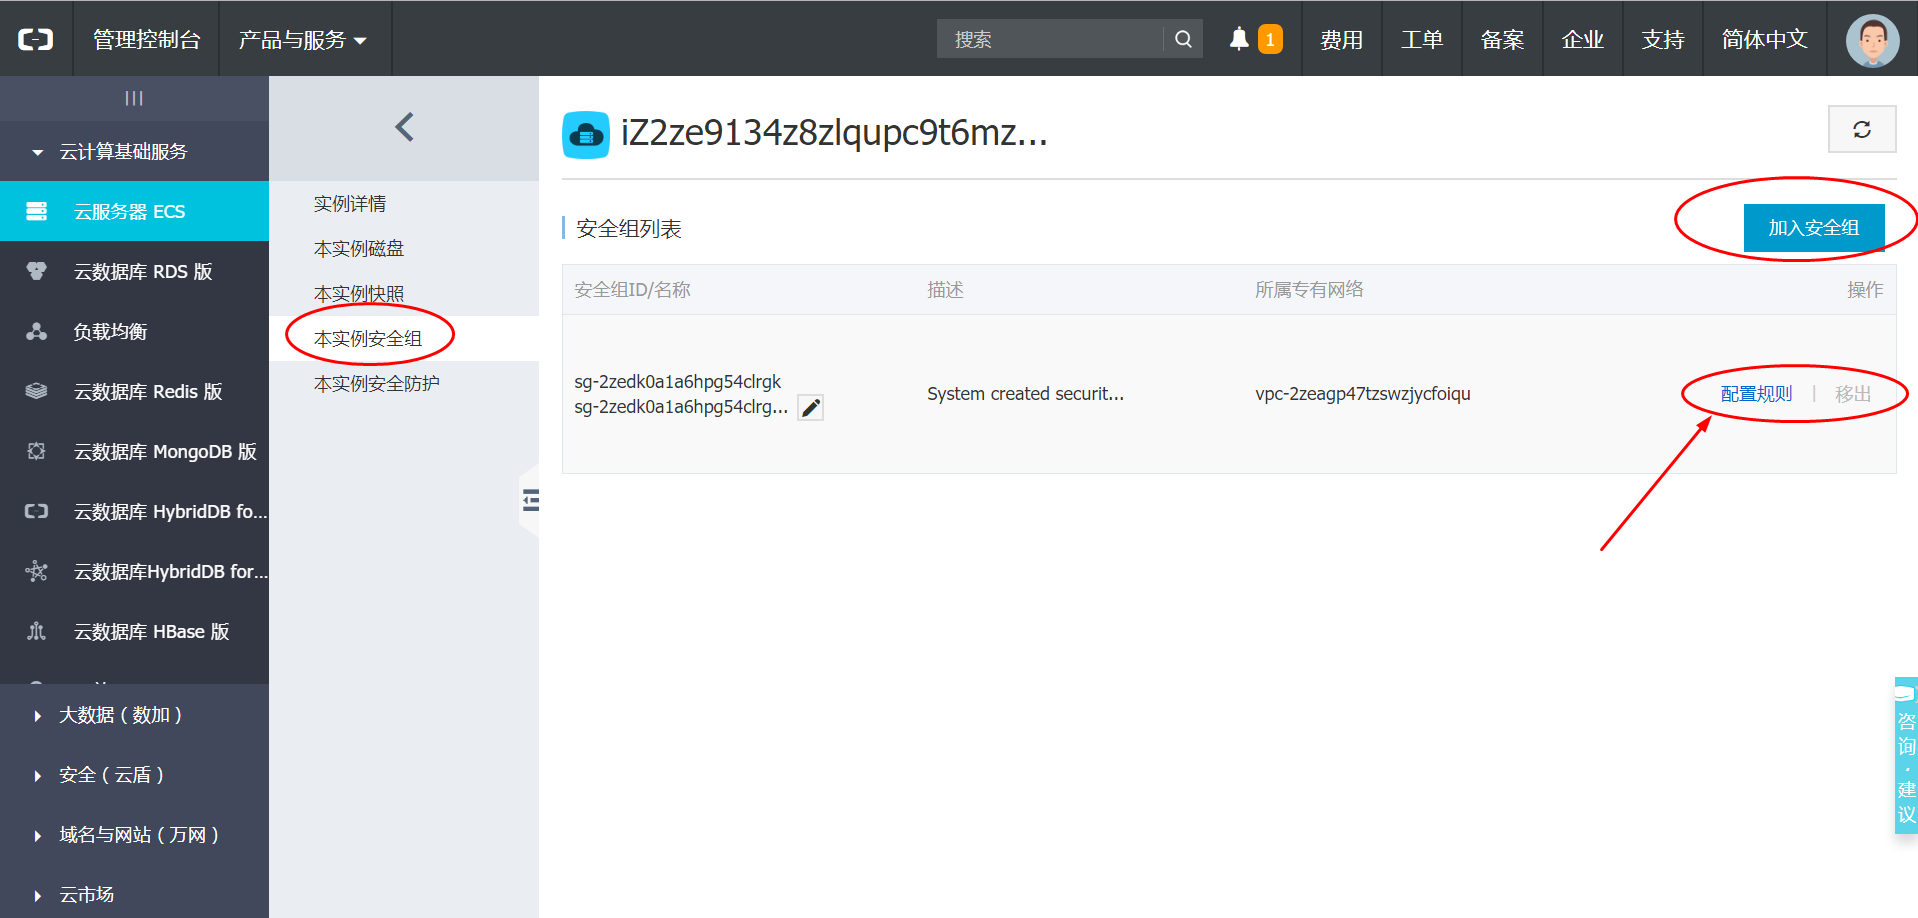
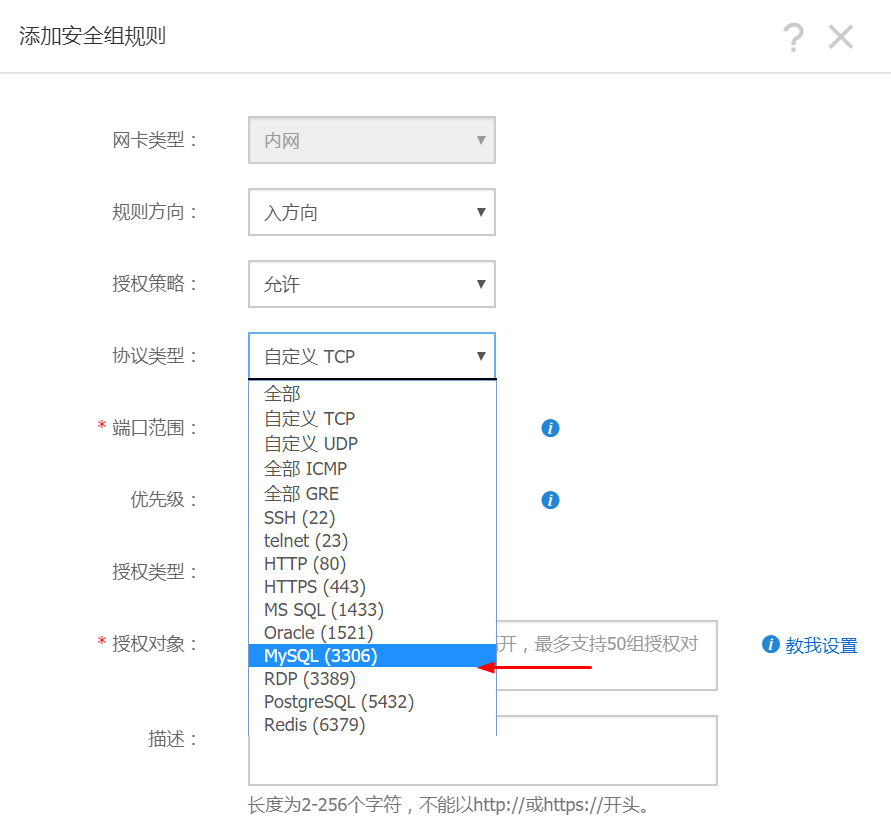
第三步:在彈出如下介面中點選“新增安全組規則”
第四步:在“新增安全組規則”介面選擇“MySQL(3306)”,其中3306是MySQL資料庫的埠號,同樣可以設定其他的埠。
第五步:授權物件填寫“0.0.0.0/0”,表示允許任意公網IP登入。
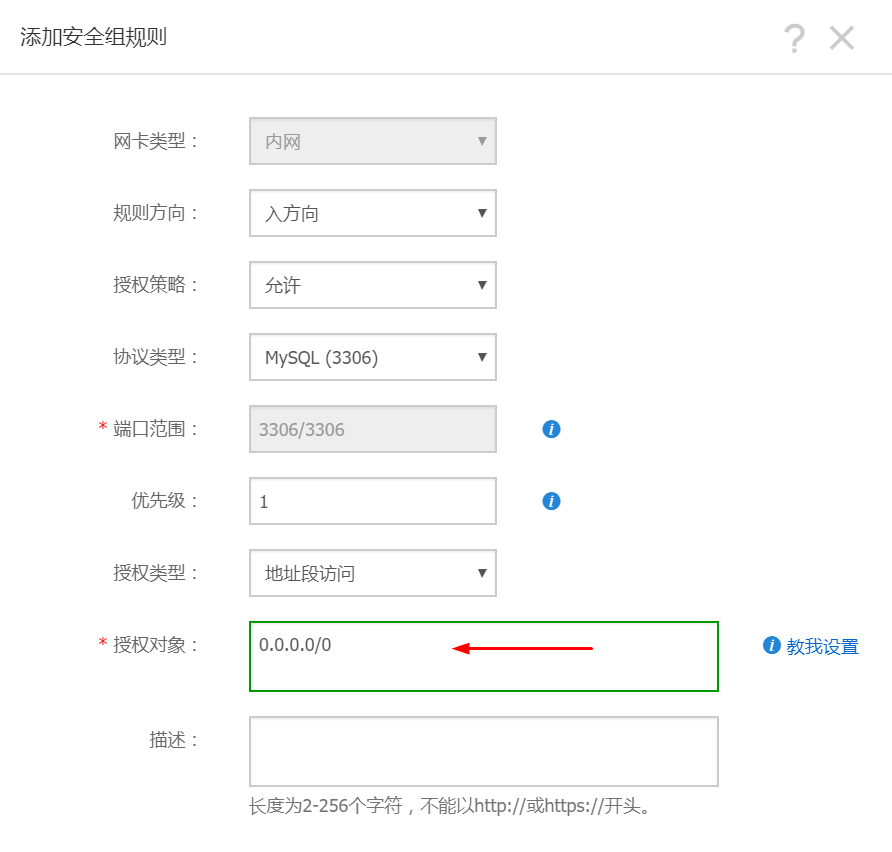
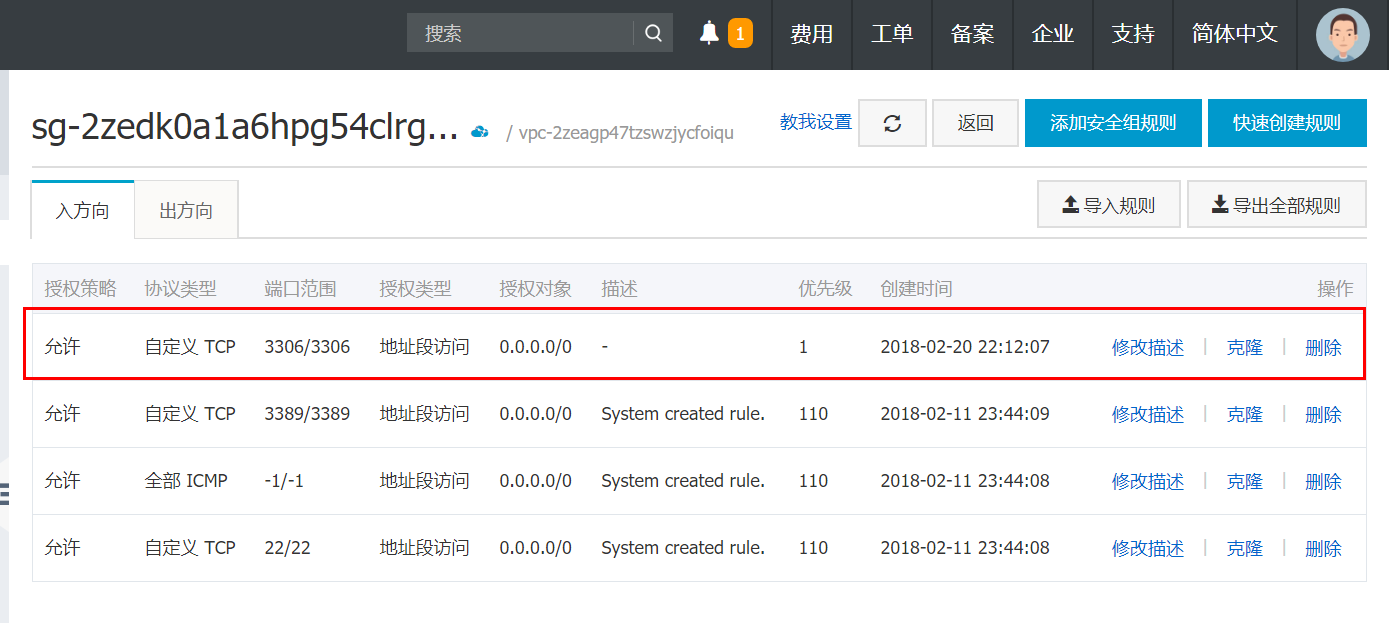
設定成功如下圖所示:
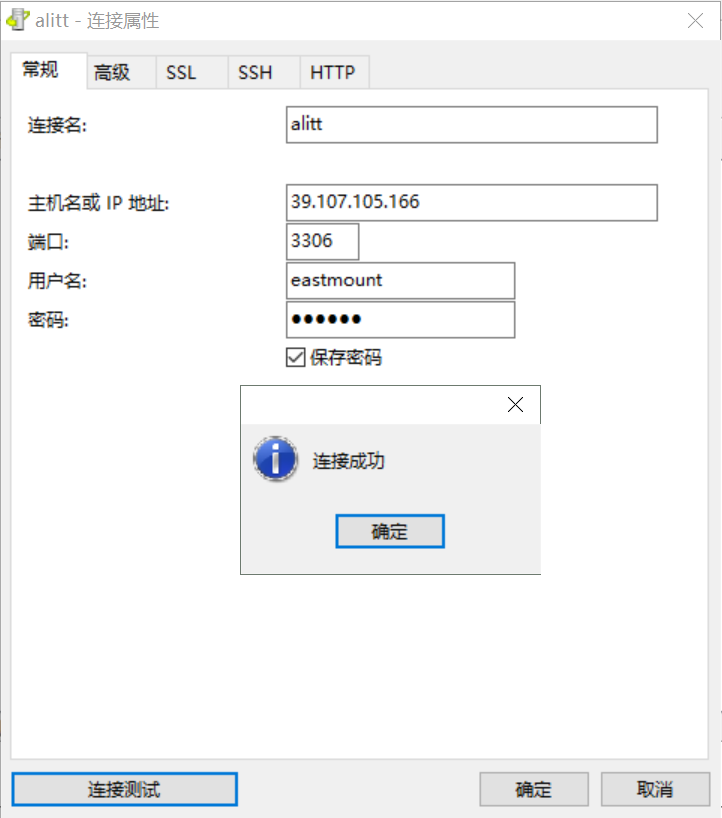
第六步:Navicat for MySQL軟體登入,輸入IP地址、使用者名稱和密碼,如下所示。
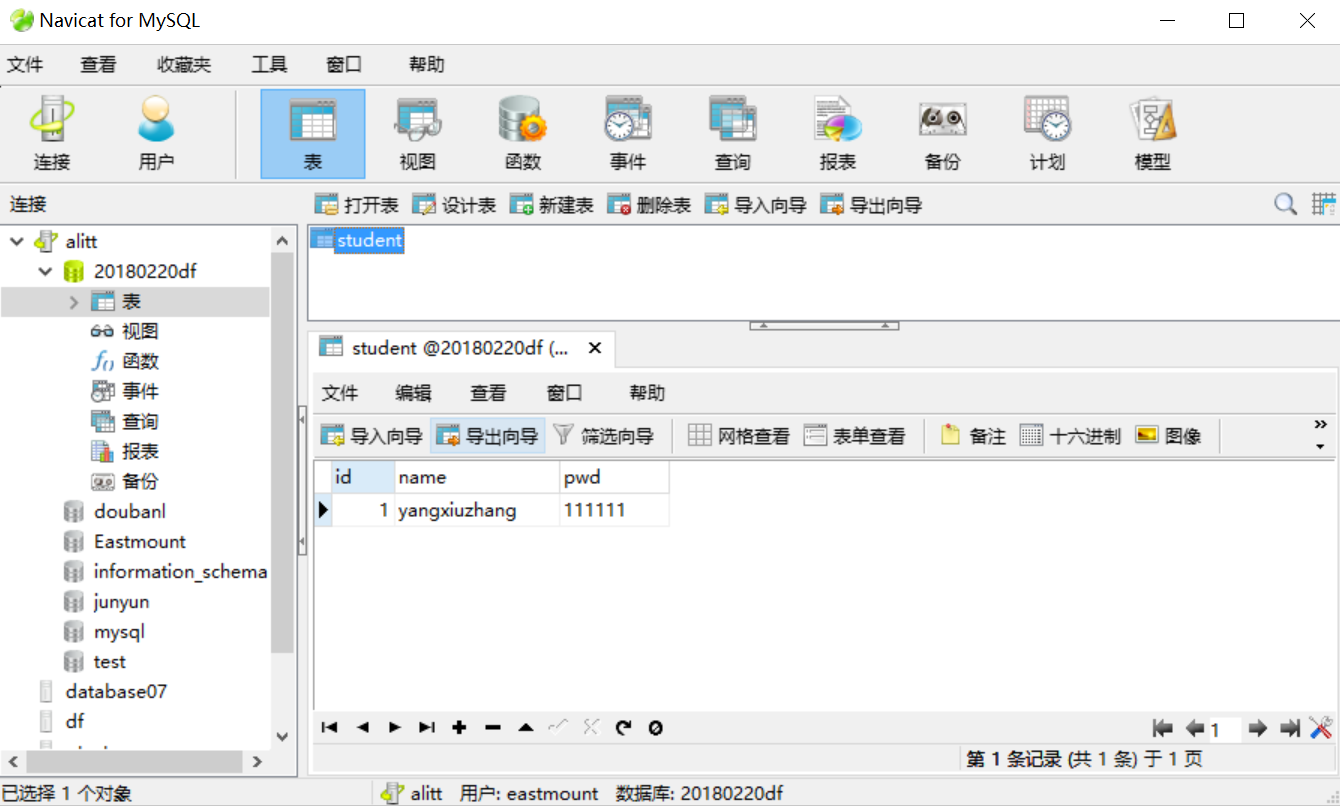
檢視20180220df資料庫的student表如下所示:
參考阿里雲官方文件:阿里雲伺服器安全組設定 - 應用案例
四. Python簡單運算元據庫
下面簡單給出pymsql庫操作MySQL資料庫的Python程式碼,這是查詢功能。
#!usr/bin/python
#coding: utf-8
#author: yxz
import pymysql

#建立連線
con = pymysql.Connect(host='localhost', user='yxz', passwd='123456', db="Eastmount")
#建立遊標
cur = con.cursor()
#執行SQL語句
cur.execute("select * from douban;")
#獲取所有執行結果
res = cur.fetchall()
print(res)
#執行語句提交
con.commit()
cur.close()
#關閉連線
con.close()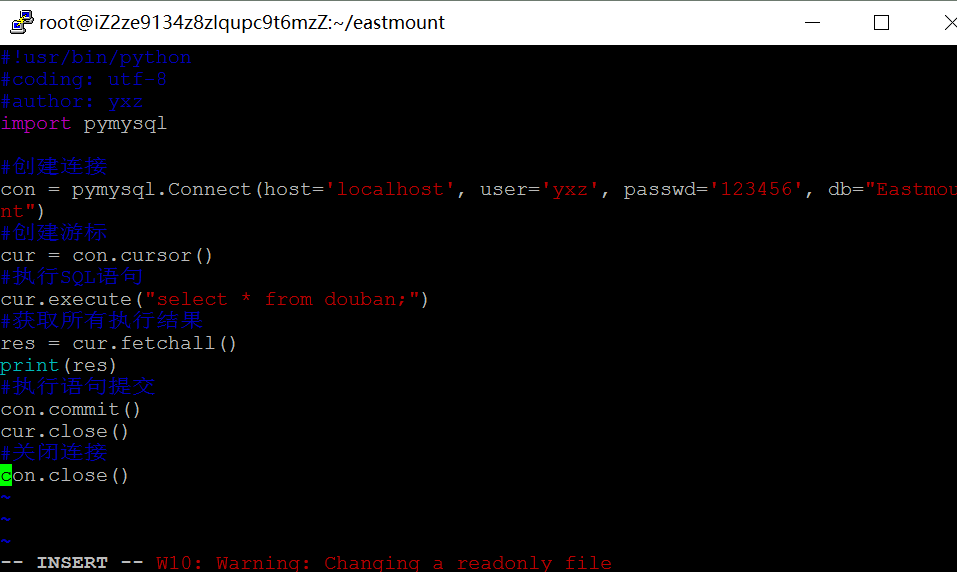
如果需要連線遠端伺服器的Python程式碼如下所示:
#!usr/bin/python
#coding: utf-8
#author: yxz
import pymysql

#建立連線
con = pymysql.Connect(host='39.107.105.166', user='eastmount', passwd='123456', db="20180220df")
#建立遊標
cur = con.cursor()
#執行SQL語句
cur.execute("insert into student(id,name,pwd) values('2','eastmount','20180222')")
cur.execute("select * from student;")
#獲取所有執行結果
res = cur.fetchall()
print(res)
#執行語句提交
con.commit()
cur.close()
#關閉連線
con.close()
執行結果如下所示:
[root@iZ2ze9134z8zlqupc9t6mzZ eastmount]# python test.py
((1, 'yangxiuzhang', '111111'), (2, 'eastmount', '20180222'))
[root@iZ2ze9134z8zlqupc9t6mzZ eastmount]#
總之,希望這篇基礎文章對您有所幫助,尤其是剛接觸雲伺服器的新手,如果您是高手,還請多提意見,共同提高。祝大家新年快樂,又一年過去了,娜我們來年一起進步加油。
( By:Eastmount CSDN 2018-02-22 中午11點 http://blog.csdn.net/Eastmount )
相關文章
- 遠端連線mysql資料庫MySql資料庫
- Windows遠端連線CentOS桌面WindowsCentOS
- CentOS使用配置VNC遠端連線CentOSVNC
- CentOS 7 配置 VNC 遠端桌面連線CentOSVNC
- CentOS 7 系統安裝與遠端連線 MySQL 5.7CentOSMySql
- MySQL資料庫遠端連線開啟方法MySql資料庫
- 設定如何遠端連線mysql資料庫MySql資料庫
- 如何快速讓MySQL資料庫伺服器支援遠端連線MRMySql資料庫伺服器
- 阿里雲之遠端連線mysql阿里MySql
- CentOS環境下mysql遠端連線和問題解決CentOSMySql
- CentOS下配置ODBC連線MySQL資料庫 V2.0CentOSMySql資料庫
- php遠端連線mysql資料庫的步驟PHPMySql資料庫
- [CentOS Python系列] 三.阿里雲MySQL資料庫開啟配置及SQL語句基礎知識CentOSPython阿里MySql資料庫
- 允許遠端連線到MySQL資料庫伺服器的步驟MySql資料庫伺服器
- 阿里雲伺服器的MySQL連線和vscode遠端連線阿里伺服器MySqlVSCode
- linux配置mysql資料庫遠端連線失敗LinuxMySql資料庫
- ORACLE 配置連線遠端資料庫Oracle資料庫
- 資料庫遠端連線失敗資料庫
- python遠端連線mysql以及pandas.DataFrame.to_sql寫入資料庫PythonMySql資料庫
- 阿里雲伺服器遠端連線redis阿里伺服器Redis
- linux centos7 mysql無法遠端連線解決辦法LinuxCentOSMySql
- Centos7下安裝Sql*Plus並連線遠端Oralce伺服器CentOSSQL伺服器
- 117 遠端連線mysql資料庫的幾種方式MySql資料庫
- 阿里雲伺服器無法遠端連線阿里伺服器
- Java連線遠端的Access資料庫Java資料庫
- 遠端連線MYSQLMySql
- Python連線MySQL資料庫PythonMySql資料庫
- CentOS安裝noVNC,以Web方式交付VNC遠端連線CentOSVNCWeb
- 阿里雲伺服器遠端連線及配置IIS釋出網站阿里伺服器網站
- 在CentOS6.0上配置Oracle資料庫可以遠端使用的遠端配置。CentOSOracle資料庫
- VNC遠端連線,如何VNC遠端連線伺服器VNC伺服器
- 連線資料之遠端呼叫Access資料庫(轉)資料庫
- PHP 遠端使用 PDO 連線 access 資料庫PHP資料庫
- PL/SQL Developer連線遠端Oracle資料庫SQLDeveloperOracle資料庫
- 用SQLyog或Navicat遠端連線資料庫SQL資料庫
- Oracle 11g連線遠端資料庫Oracle資料庫
- CentOs7 中mysql8 設定遠端連線CentOSMySql
- plsql本機不安裝資料庫連線遠端資料庫SQL資料庫