Python趣味程式碼整合之提升學生程式設計興趣
這篇文章主要是整合一些趣味程式碼,一方面自己對這些內容比較感興趣,另一方面希望這些程式碼能提升學生的程式設計興趣,其主旨是程式碼能在我的電腦上執行並有些趣味。
參考資料:
知乎 - 可以用 Python 程式語言做哪些神奇好玩的事情?
知乎 - 學習Python的迷茫,如何高效有趣地學習Python?
知乎 - 想知道大家都用python寫過哪些有趣的指令碼?
自學 python 後你用 Python 做過哪些有趣的專案
下載地址:
http://download.csdn.net/detail/eastmount/9662828
內容包括:
一.Python使用turtle繪製國旗
二.Python圖片轉換位字元畫
三.Python實現俄羅斯方塊
四.Python自動生成二維碼
五.Python實現飛機大戰
六.Python 25行程式碼實現人臉識別
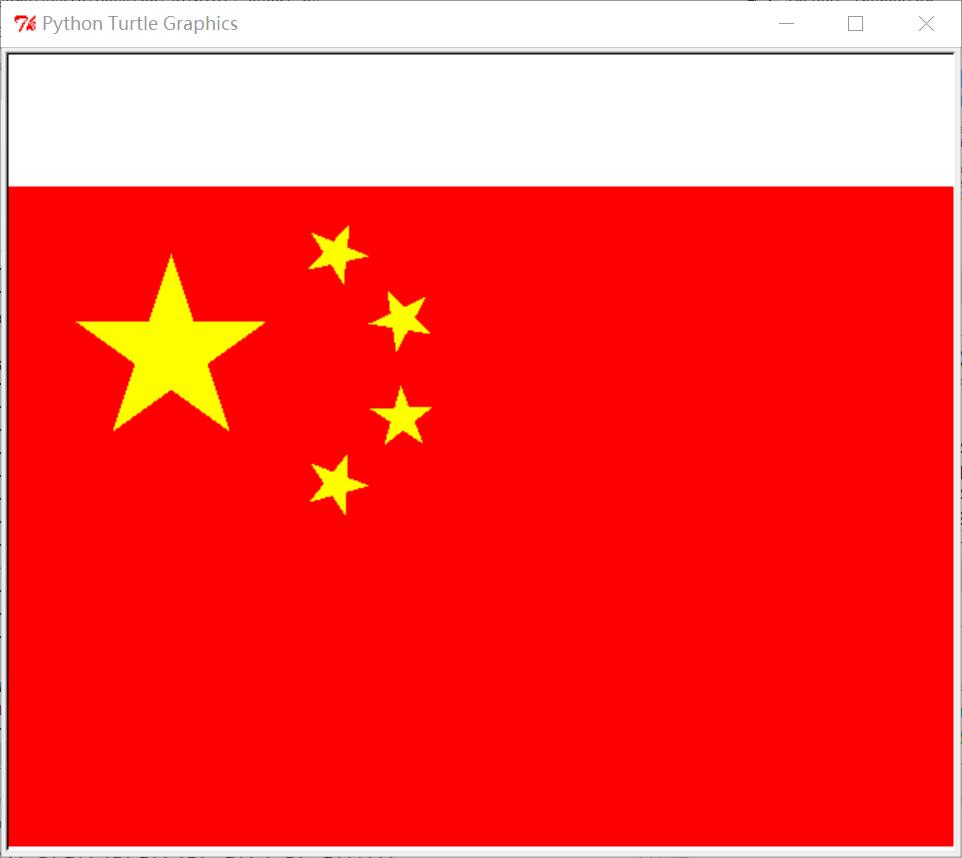
一. Python使用turtle繪製國旗
參考文章:http://blog.csdn.net/nancliu/article/details/37972855
http://www.oschina.net/code/snippet_103482_14802
程式碼如下:
# -*- coding: utf-8 -*-
import turtle
import time
import os
#
def  draw_square(org_x, org_y, x, y):
    turtle.setpos(org_x, org_y)  # to left and bottom connor
    turtle.color('red', 'red')
    turtle.begin_fill()
    turtle.fd(x)
    turtle.lt(90)
    turtle.fd(y)
    turtle.lt(90)
    turtle.fd(x)
    #print(turtle.pos())
    turtle.lt(90)
    turtle.fd(y)
    turtle.end_fill()

def draw_star(center_x, center_y, radius):
    print(center_x, center_y)
    turtle.pencolor('black')
    turtle.setpos(center_x, center_y)
    pt1 = turtle.pos()
    turtle.circle(-radius, 360 / 5)
    pt2 = turtle.pos()
    turtle.circle(-radius, 360 / 5)
    pt3 = turtle.pos()
    turtle.circle(-radius, 360 / 5)
    pt4 = turtle.pos()
    turtle.circle(-radius, 360 / 5)
    pt5 = turtle.pos()
    turtle.color('yellow', 'yellow')
    turtle.begin_fill()
    turtle.goto(pt3)
    turtle.goto(pt1)
    turtle.goto(pt4)
    turtle.goto(pt2)
    turtle.goto(pt5)
    turtle.end_fill()
print(turtle.pos())

turtle.pu()
draw_square(-320, -260, 660, 440)
star_part_x = -320
star_part_y = -260 + 440
star_part_s = 660 / 30
center_x, center_y = star_part_x + star_part_s * 5, star_part_y - star_part_s * 5
turtle.setpos(center_x, center_y)  # big star center
turtle.lt(90)
draw_star(star_part_x + star_part_s * 5, star_part_y - star_part_s * 2, star_part_s * 3)

# draw 1st small star
turtle.goto(star_part_x + star_part_s * 10, star_part_y - star_part_s * 2)    # go to 1st small star center
turtle.lt(round(turtle.towards(center_x, center_y)) - turtle.heading())
turtle.fd(star_part_s)
turtle.rt(90)
draw_star(turtle.xcor(), turtle.ycor(), star_part_s)

# draw 2nd small star
turtle.goto(star_part_x + star_part_s * 12, star_part_y - star_part_s * 4)    # go to 1st small star center
turtle.lt(round(turtle.towards(center_x, center_y)) - turtle.heading())
turtle.fd(star_part_s)
turtle.rt(90)
draw_star(turtle.xcor(), turtle.ycor(), star_part_s)

# draw 3rd small star
turtle.goto(star_part_x + star_part_s * 12, star_part_y - star_part_s * 7)    # go to 1st small star center
turtle.lt(round(turtle.towards(center_x, center_y)) - turtle.heading())
turtle.fd(star_part_s)
turtle.rt(90)
draw_star(turtle.xcor(), turtle.ycor(), star_part_s)

# draw 4th small star
turtle.goto(star_part_x + star_part_s * 10, star_part_y - star_part_s * 9)    # go to 1st small star center
turtle.lt(round(turtle.towards(center_x, center_y)) - turtle.heading())
turtle.fd(star_part_s)
turtle.rt(90)
draw_star(turtle.xcor(), turtle.ycor(), star_part_s)
turtle.ht()
time.sleep(5)
#os._exit(1) 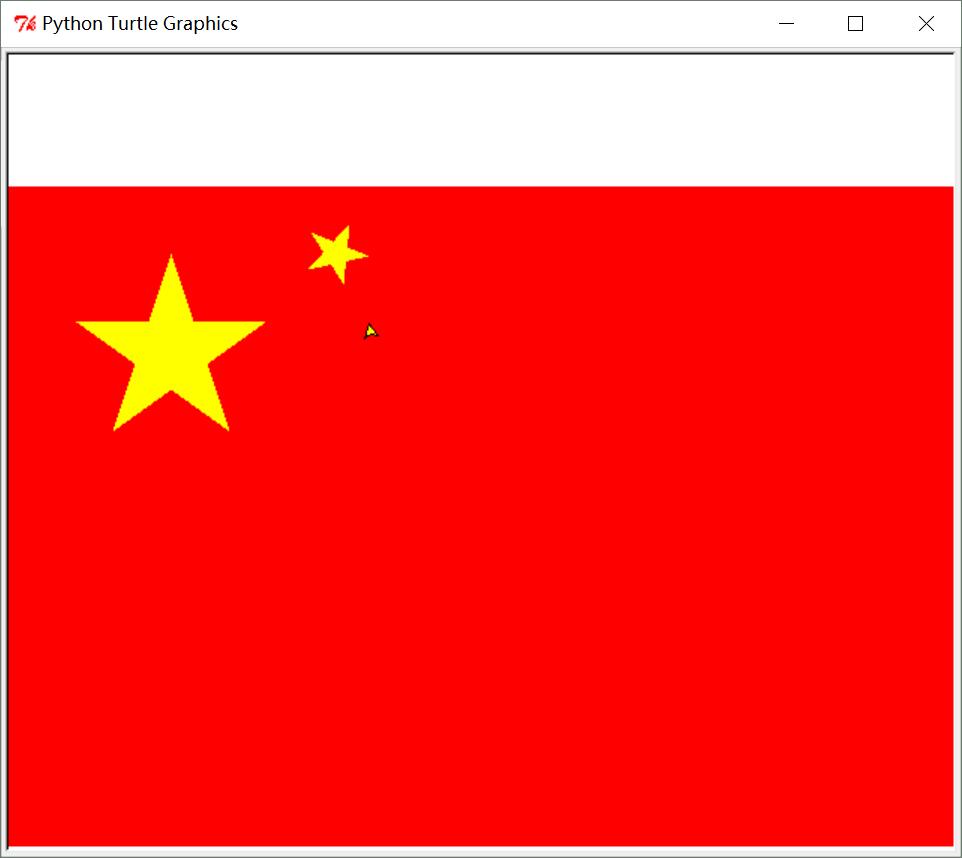
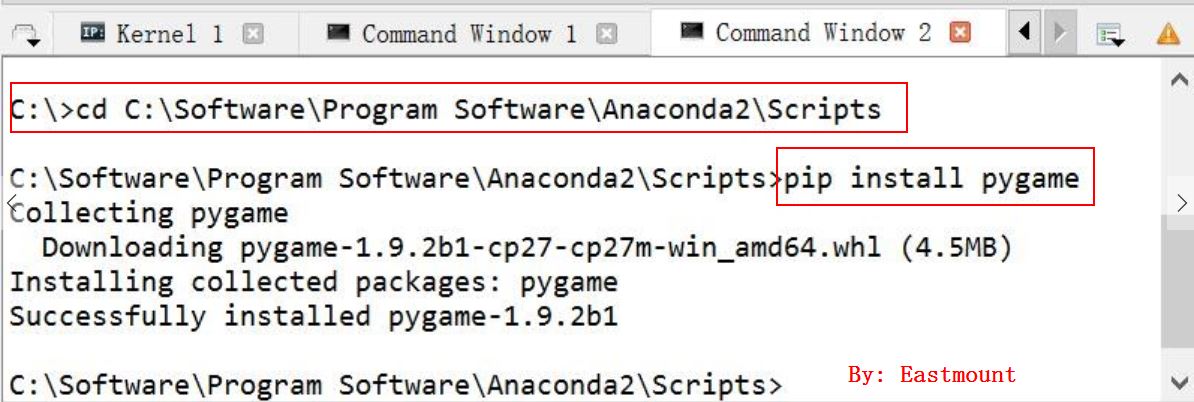
注意安裝第三方包的方法如下所示:
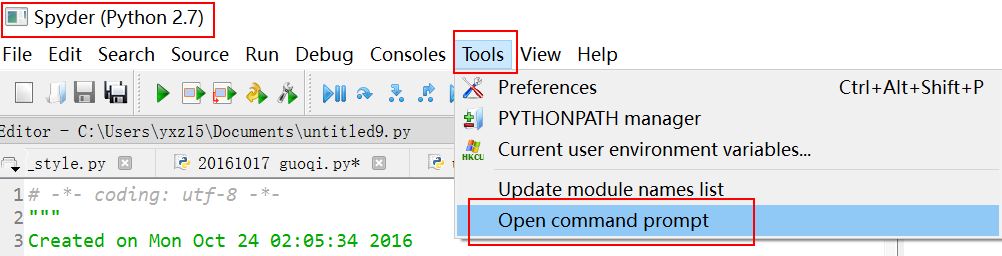
在Command Window介面下進入Anaconda2\Scripts資料夾,通過pip安裝。
二. Python圖片轉換位字元畫
程式碼如下:
# -*- coding: utf-8 -*-
"""
Created on Sun Oct 23 12:45:47 2016

@author: yxz15
"""

from PIL import Image
import os

serarr=['@','#','$','%','&','?','*','o','/','{','[','(','|','!','^','~','-','_',':',';',',','.','`',' ']
count=len(serarr)

def toText(image_file):
   image_file=image_file.convert("L")#轉灰度
   asd =''#儲存字串
   for h in range(0,  image_file.size[1]):#h
      for w in range(0, image_file.size[0]):#w
         gray =image_file.getpixel((w,h))
         asd=asd+serarr[int(gray/(255/(count-1)))]
      asd=asd+'\r\n'
   return asd

def toText2(image_file):
   asd =''#儲存字串
   for h in range(0,  image_file.size[1]):#h
      for w in range(0, image_file.size[0]):#w
         r,g,b =image_file.getpixel((w,h))
         gray =int(r* 0.299+g* 0.587+b* 0.114)
         asd=asd+serarr[int(gray/(255/(count-1)))]
      asd=asd+'\r\n'
   return asd


image_file = Image.open("test.jpg") # 開啟圖片
image_file=image_file.resize((int(image_file.size[0]*0.9), int(image_file.size[1]*0.5)))#調整圖片大小

print u'Info:',image_file.size[0],' ',image_file.size[1],' ',count
try:
   os.remove('./tmp.txt')
except  WindowsError:
    pass

tmp=open('tmp.txt','a')


tmp.write(toText2(image_file))

tmp.close()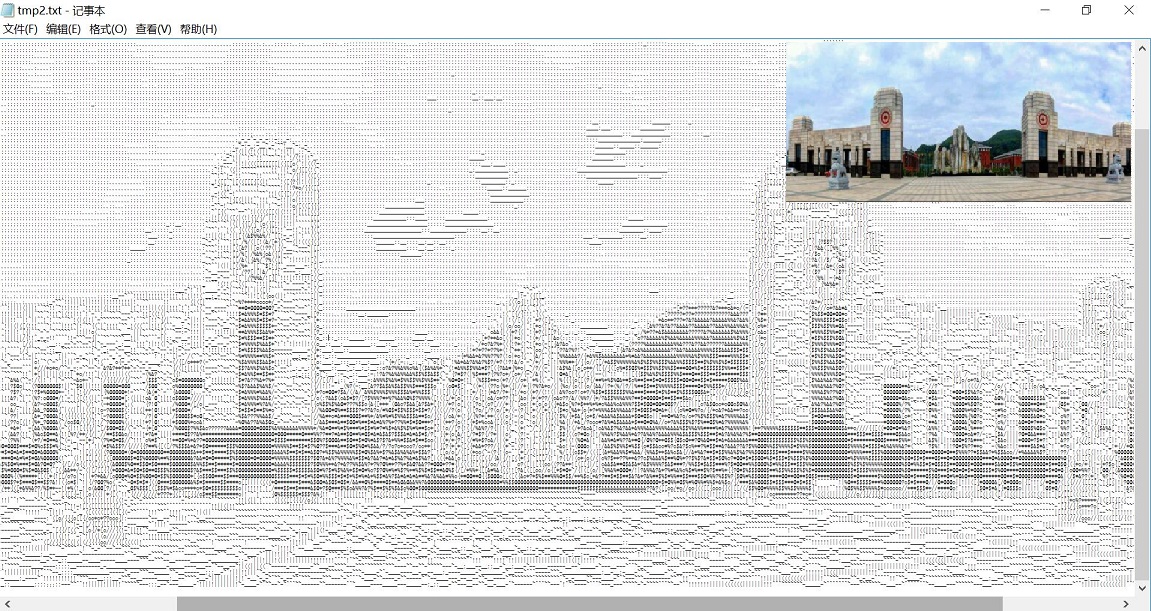
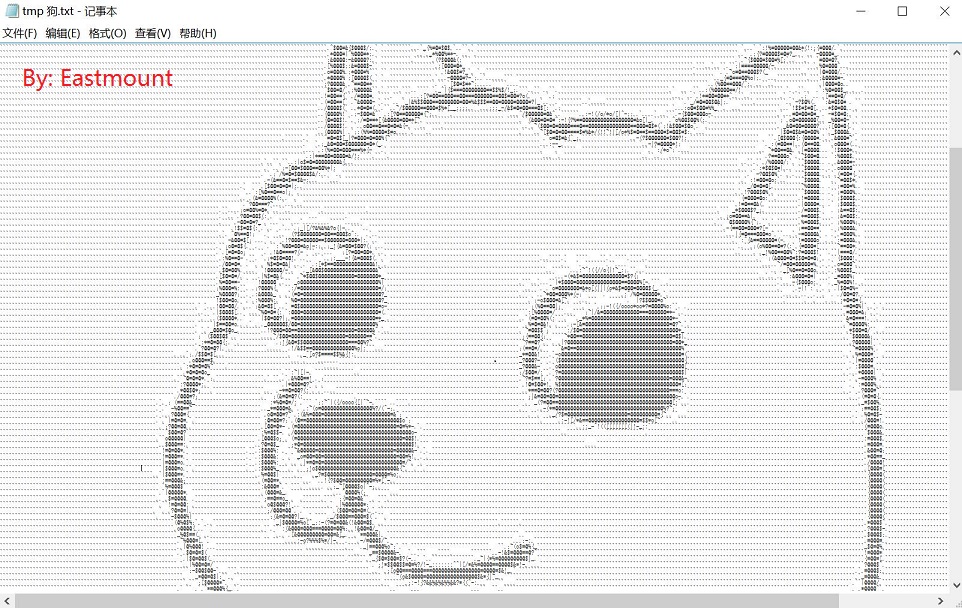
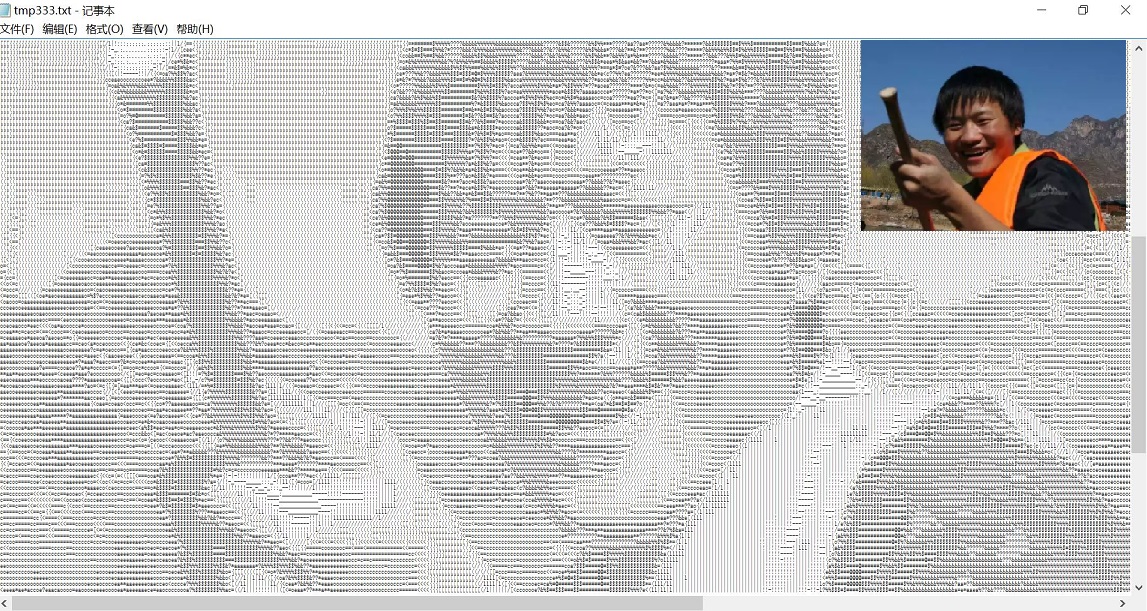
缺點:如何通過一個文字編輯器檢視原圖呢?txt只能設定宋體8號字型最小,但是不能顯示全部內容。
三. Python實現俄羅斯方塊
elsfk.cfg檔案內容如下:
;1,1,1,1;;
1,1,1,0;1,0,0,0;;
1,1,1,0;0,0,1,0;;
0,1,0,0;1,1,1,0;;
1,1,0,0;1,1,0,0;;
1,1,0,0;0,1,1,0;;
0,1,1,0;1,1,0,0;;# -*- coding:utf-8 -*-
'''
經典俄羅斯方塊
遊戲基於python2.7、pygame1.9.2b8編寫。
遊戲註解中出現的術語解釋:
舞臺:整個遊戲介面,包括堆疊區、成績等顯示區,下個出現方塊預告區。
堆疊區:遊戲方塊和活動方塊形狀堆放區域,遊戲中主要互動區。
方塊(基礎方塊):這裡的方塊是對基礎的小四方形統稱,每個方塊就是一個正方形。
方塊形狀:指一組以特定方式組合在一起的方塊,也就是大家常說的下落方塊形狀,比如長條,方形,L形等。
固實方塊:特指堆疊區中不能再進行移動,可被消除的基礎方塊集合。
version:1.0
author:lykyl
createdate:2016.9.29
'''
import sys
reload(sys)
sys.setdefaultencoding('utf8')
import random,copy
import pygame as pg
from pygame.locals import *
'''
常量宣告
'''
EMPTY_CELL=0 #空區標識,表示沒有方塊
FALLING_BLOCK=1 #下落中的方塊標識,也就是活動方塊。
STATIC_BLOCK=2 #固實方塊標識
'''
全域性變數宣告
變數值以sysInit函式中初始化後的結果為準
'''
defaultFont=None #預設字型
screen=None #螢幕輸出物件
backSurface=None #影象輸出緩衝畫板
score=0 #玩家得分記錄
clearLineScore=0 #玩家清除的方塊行數
level=1 #關卡等級
clock=None #遊戲時鐘
nowBlock=None #當前下落中的方塊
nextBlock=None #下一個將出現的方塊
fallSpeed=10 #當前方塊下落速度
beginFallSpeed=fallSpeed #遊戲初始時方塊下落速度
speedBuff=0 #下落速度緩衝變數
keyBuff=None #上一次按鍵記錄
maxBlockWidth=10 #舞臺堆疊區X軸最大可容納基礎方塊數
maxBlockHeight=18 #舞臺堆疊區Y軸最大可容納基礎方塊數
blockWidth=30 #以畫素為單位的基礎方塊寬度
blockHeight=30 #以畫素為單位的基礎方塊高度
blocks=[] #方塊形狀矩陣四維列表。第一維為不同的方塊形狀,第二維為每個方塊形狀不同的方向(以0下標起始,一共四個方向),第三維為Y軸方塊形狀佔用情況,第四維為X軸方塊形狀佔用情況。矩陣中0表示沒有方塊,1表示有方塊。
stage=[] #舞臺堆疊區矩陣二維列表,第一維為Y軸方塊佔用情況,第二維為X軸方塊佔用情況。矩陣中0表示沒有方塊,1表示有固實方塊,2表示有活動方塊。
gameOver=False #遊戲結束標誌
pause=False #遊戲暫停標誌
def printTxt(content,x,y,font,screen,color=(255,255,255)):
'''顯示文字
args:
content:待顯示文字內容
x,y:顯示座標
font:字型
screen:輸出的screen
color:顏色
'''
imgTxt=font.render(content,True,color)
screen.blit(imgTxt,(x,y))
class point(object):
'''平面座標點類
attributes:
x,y:座標值
'''
def __init__(self,x,y):
self.__x=x
self.__y=y
def getx(self):
return self.__x
def setx(self,x):
self.__x=x
x=property(getx,setx)
def gety(self):
return self.__y
def sety(self,y):
self.__y=y
y=property(gety,sety)
def __str__(self):
return "{x:"+"{:.0f}".format(self.__x)+",y:"+"{:.0f}".format(self.__y)+"}"
class blockSprite(object):
'''
方塊形狀精靈類
下落方塊的定義全靠它了。
attributes:
shape:方塊形狀編號
direction:方塊方向編號
xy,方塊形狀左上角方塊座標
block:方塊形狀矩陣
'''
def __init__(self,shape,direction,xy):
self.shape=shape
self.direction=direction
self.xy=xy
def chgDirection(self,direction):
'''
改變方塊的方向
args:
direction:1為向右轉,0為向左轉。
'''
dirNumb=len(blocks[self.shape])-1
if direction==1:
self.direction+=1
if self.direction>dirNumb:
self.direction=0
else:
self.direction-=1
if self.direction<0:
self.direction=dirNumb
def clone(self):
'''
克隆本體
return:
返回自身的克隆
'''
return blockSprite(self.shape,self.direction,point(self.xy.x,self.xy.y))
def _getBlock(self):
return blocks[self.shape][self.direction]
block = property(_getBlock)
def getConf(fileName):
'''
從配置檔案中讀取方塊形狀資料
每個方塊以4*4矩陣表示形狀,配置檔案每行代表一個方塊,用分號分隔矩陣行,用逗號分隔矩陣列,0表示沒有方塊,1表示有方塊。
因為此程式只針對俄羅斯方塊的經典版,所以方塊矩陣大小以硬編碼的形式寫死為4*4。
args:
fileName:配置檔名
'''
global blocks #blocks記錄方塊形狀。
with open(fileName,'rt') as fp:
for temp in fp.readlines():
blocks.append([])
blocksNumb=len(blocks)-1
blocks[blocksNumb]=[]
#每種方塊形狀有四個方向,以0~3表示。配置檔案中只記錄一個方向形狀,另外三個方向的矩陣排列在sysInit中通過呼叫transform計算出來。
blocks[blocksNumb].append([])
row=temp.split(";")
for r in range(len(row)):
col=[]
ct=row[r].split(",")
#對矩陣列資料做規整,首先將非“1”的值全修正成“0”以過濾空字串或回車符。
for c in range(len(ct)):
if ct[c]!="1":
col.append(0)
else:
col.append(1)
#將不足4列的矩陣通過補“0”的方式,補足4列。
for c in range(len(ct)-1,3):
col.append(0)
blocks[blocksNumb][0].append(col)
#如果矩陣某行沒有方塊,則配置檔案中可以省略此行,程式會在末尾補上空行資料。
for r in range(len(row)-1,3):
blocks[blocksNumb][0].append([0,0,0,0])
blocks[blocksNumb][0]=formatBlock(blocks[blocksNumb][0])
def sysInit():
'''
系統初始化
包括pygame環境初始化,全域性變數賦值,生成每個方塊形狀的四個方向矩陣。
'''
global defaultFont,screen,backSurface,clock,blocks,stage,gameOver,fallSpeed,beginFallSpeed,nowBlock,nextBlock,score,level,clearLineScore,pause
#pygame執行環境初始化
pg.init()
screen=pg.display.set_mode((500,550))
backSurface=pg.Surface((screen.get_rect().width,screen.get_rect().height))
pg.display.set_caption("block")
clock=pg.time.Clock()
pg.mouse.set_visible(False)
#遊戲全域性變數初始化
defaultFont=pg.font.Font("msyh.ttc",16) #yh.ttf這個字型檔案請自行上網搜尋下載,如果找不到就隨便用個ttf格式字型檔案替換一下。
nowBlock=None
nextBlock=None
gameOver=False
pause=False
score=0
level=1
clearLineScore=0
beginFallSpeed=20
fallSpeed=beginFallSpeed-level*2
#初始化遊戲舞臺
stage=[]
for y in range(maxBlockHeight):
stage.append([])
for x in range(maxBlockWidth):
stage[y].append(EMPTY_CELL)
#生成每個方塊形狀4個方向的矩陣資料
for x in range(len(blocks)):
#因為重新開始遊戲時會呼叫sysinit對系統所有引數重新初始化,為了避免方向矩陣資料重新生成,需要在此判斷是否已經生成,如果已經生成則跳過。
if len(blocks[x])<2:
t=blocks[x][0]
for i in range(3):
t=transform(t,1)
blocks[x].append(formatBlock(t))
#transform,removeTopBlank,formatBlock這三個函式只為生成方塊形狀4個方向矩陣使用,在遊戲其他環節無作用,在閱讀程式時可以先跳過。
def transform(block,direction=0):
'''
生成指定方塊形狀轉換方向後的矩陣資料
args:
block:方塊形狀矩陣引數
direction:轉換的方向,0代表向左,1代表向右
return:
變換方向後的方塊形狀矩陣引數
'''
result=[]
for y in range(4):
result.append([])
for x in range(4):
if direction==0:
result[y].append(block[x][3-y])
else:
result[y].append(block[3-x][y])
return result
def removeTopBlank(block):
'''
清除方塊矩陣頂部空行資料
args:
block:方塊開關矩陣
return:
整理後的方塊矩陣資料
'''
result=copy.deepcopy(block)
blankNumb=0
while sum(result[0])<1 and blankNumb<4:
del result[0]
result.append([0,0,0,0])
blankNumb+=1
return result
def formatBlock(block):
'''
整理方塊矩陣資料,使方塊在矩陣中處於左上角的位置
args:
block:方塊開關矩陣
return:
整理後的方塊矩陣資料
'''
result=removeTopBlank(block)
#將矩陣右轉,用於計算左側X軸線空行,計算完成後再轉回
result=transform(result, 1)
result=removeTopBlank(result)
result=transform(result,0)
return result
def checkDeany(sprite):
'''
檢查下落方塊是否與舞臺堆疊區中固實方塊發生碰撞
args:
sprite:下落方塊
return:
如果發生碰撞則返回True
'''
topX=sprite.xy.x
topY=sprite.xy.y
for y in range(len(sprite.block)):
for x in range(len(sprite.block[y])):
if sprite.block[y][x]==1:
yInStage=topY+y
xInStage=topX+x
if yInStage>maxBlockHeight-1 or yInStage<0:
return True
if xInStage>maxBlockWidth-1 or xInStage<0:
return True
if stage[yInStage][xInStage]==STATIC_BLOCK:
return True
return False
def checkLine():
'''
檢測堆疊區是否有可消除的整行固實方塊
根據檢測結果重新生成堆疊區矩陣資料,呼叫updateScore函式更新玩家積分等資料。
return:
本輪下落週期消除的固實方塊行數
'''
global stage
clearCount=0 #本輪下落週期消除的固實方塊行數
tmpStage=[] #根據消除情況新生成的堆疊區矩陣,在有更新的情況下會替換全域性的堆疊區矩陣。
for y in stage:
#因為固實方塊在堆疊矩陣裡以2表示,所以判斷方塊是否已經滿一整行只要計算矩陣行數值合計是否等於堆疊區X軸最大方塊數*2就可以。
if sum(y)>=maxBlockWidth*2:
tmpStage.insert(0,maxBlockWidth*[0])
clearCount+=1
else:
tmpStage.append(y)
if clearCount>0:
stage=tmpStage
updateScore(clearCount)
return clearCount
def updateStage(sprite,updateType=1):
'''
將下落方塊座標資料更新到堆疊區資料中。下落方塊涉及的座標在堆疊區中用數字1標識,固實方塊在堆疊區中用數字2標識。
args:
sprite:下落方塊形狀
updateType:更新方式,0代表清除,1代表動態加入,2代表固實加入。
'''
global stage
topX=sprite.xy.x
topY=sprite.xy.y
for y in range(len(sprite.block)):
for x in range(len(sprite.block[y])):
if sprite.block[y][x]==1:
if updateType==0:
if stage[topY+y][topX+x]==FALLING_BLOCK:
stage[topY+y][topX+x]=EMPTY_CELL
elif updateType==1:
if stage[topY+y][topX+x]==EMPTY_CELL:
stage[topY+y][topX+x]=FALLING_BLOCK
else:
stage[topY+y][topX+x]=STATIC_BLOCK
def updateScore(clearCount):
'''
更新玩家遊戲記錄,包括積分、關卡、消除方塊行數,並且根據關卡數更新方塊下落速度。
args:
clearCount:本輪下落週期內清除的方塊行數。
return:
當前遊戲的最新積分
'''
global score,fallSpeed,level,clearLineScore
prizePoint=0 #額外獎勵分數,同時消除的行數越多,獎勵分值越高。
if clearCount>1:
if clearCount<4:
prizePoint=clearCount**clearCount
else:
prizePoint=clearCount*5
score+=(clearCount+prizePoint)*level
#玩得再牛又有何用? :)
if score>99999999:
score=0
clearLineScore+=clearCount
if clearLineScore>100:
clearLineScore=0
level+=1
if level>(beginFallSpeed/2):
level=1
fallSpeed=beginFallSpeed
fallSpeed=beginFallSpeed-level*2
return score
def drawStage(drawScreen):
'''
在給定的畫布上繪製舞臺
args:
drawScreen:待繪製的畫布
'''
staticColor=30,102,76 #固實方塊顏色
activeColor=255,239,0 #方塊形狀顏色
fontColor=200,10,120 #文字顏色
baseRect=0,0,blockWidth*maxBlockWidth+1,blockHeight*maxBlockHeight+1 #堆疊區方框
#繪製堆疊區外框
drawScreen.fill((180,200,170))
pg.draw.rect(drawScreen, staticColor, baseRect,1)
#繪製堆疊區內的所有方塊,包括下落方塊形狀
for y in range(len(stage)):
for x in range(len(stage[y])):
baseRect=x*blockWidth,y*blockHeight,blockWidth,blockHeight
if stage[y][x]==2:
pg.draw.rect(drawScreen, staticColor, baseRect)
elif stage[y][x]==1:
pg.draw.rect(drawScreen, activeColor, baseRect)
#繪製下一個登場的下落方塊形狀
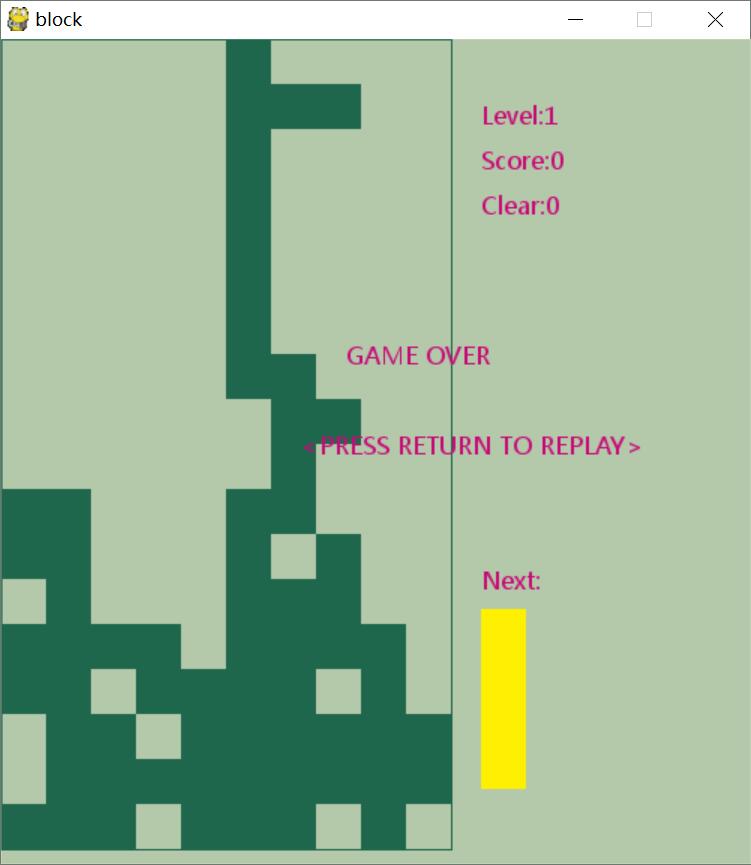
printTxt("Next:",320,350,defaultFont,backSurface,fontColor)
if nextBlock!=None:
for y in range(len(nextBlock.block)):
for x in range(len(nextBlock.block[y])):
baseRect=320+x*blockWidth,380+y*blockHeight,blockWidth,blockHeight
if nextBlock.block[y][x]==1:
pg.draw.rect(drawScreen, activeColor, baseRect)
#繪製關卡、積分、當前關卡消除整行數
printTxt("Level:%d" % level,320,40,defaultFont,backSurface,fontColor)
printTxt("Score:%d" % score,320,70,defaultFont,backSurface,fontColor)
printTxt("Clear:%d" % clearLineScore,320,100,defaultFont,backSurface,fontColor)
#特殊遊戲狀態的輸出
if gameOver:
printTxt("GAME OVER",230,200,defaultFont,backSurface,fontColor)
printTxt("<PRESS RETURN TO REPLAY>",200,260,defaultFont,backSurface,fontColor)
if pause:
printTxt("Game pausing",230,200,defaultFont,backSurface,fontColor)
printTxt("<PRESS RETURN TO CONTINUE>",200,260,defaultFont,backSurface,fontColor)
def process():
'''
遊戲控制及邏輯處理
'''
global gameOver,nowBlock,nextBlock,speedBuff,backSurface,keyBuff,pause
if nextBlock is None:
nextBlock=blockSprite(random.randint(0,len(blocks)-1),random.randint(0,3),point(maxBlockWidth+4,maxBlockHeight))
if nowBlock is None:
nowBlock=nextBlock.clone()
nowBlock.xy=point(maxBlockWidth//2,0)
nextBlock=blockSprite(random.randint(0,len(blocks)-1),random.randint(0,3),point(maxBlockWidth+4,maxBlockHeight))
#每次生成新的下落方塊形狀時檢測碰撞,如果新的方塊形狀一出現就發生碰撞,則顯然玩家已經沒有機會了。
gameOver=checkDeany(nowBlock)
#遊戲失敗後,要將活動方塊形狀做固實處理
if gameOver:
updateStage(nowBlock,2)
'''
對於下落方塊形狀操控以及移動,採用影子形狀進行預判斷。如果沒有碰撞則將變化應用到下落方塊形狀上,否則不變化。
'''
tmpBlock=nowBlock.clone() #影子方塊形狀
'''
處理使用者輸入
對於使用者輸入分為兩部分處理。
第一部分,將退出、暫停、重新開始以及形狀變換的操作以敲擊事件處理。
這樣做的好處是隻對敲擊一次鍵盤做出處理,避免使用者按住單一按鍵後程式反覆處理影響操控,特別是形狀變換操作,敲擊一次鍵盤換變一次方向,玩家很容易控制。
'''
for event in pg.event.get():
if event.type== pg.QUIT:
sys.exit()
pg.quit()
elif event.type==pg.KEYDOWN:
if event.key==pg.K_ESCAPE:
sys.exit()
pg.quit()
elif event.key==pg.K_RETURN:
if gameOver:
sysInit()
return
elif pause:
pause=False
else:
pause=True
return
elif not gameOver and not pause:
if event.key==pg.K_SPACE:
tmpBlock.chgDirection(1)
elif event.key==pg.K_UP:
tmpBlock.chgDirection(0)
if not gameOver and not pause:
'''
使用者輸入處理第二部分,將左右移動和快速下落的操作以按下事件處理。
這樣做的好處是不需要玩家反覆敲擊鍵盤進行操作,保證了操作的連貫性。
由於連續移動的速度太快,不利於定位。所以在程式中採用了簡單的輸入減緩處理,即通過keyBuff儲存上一次操作按鍵,如果此次按鍵與上一次按鍵相同,則跳過此輪按鍵處理。
'''
keys=pg.key.get_pressed()
if keys[K_DOWN]:
tmpBlock.xy=point(tmpBlock.xy.x,tmpBlock.xy.y+1)
keyBuff=None
elif keys[K_LEFT]:
if keyBuff!=pg.K_LEFT:
tmpBlock.xy=point(tmpBlock.xy.x-1,tmpBlock.xy.y)
keyBuff=pg.K_LEFT
else:
keyBuff=None
elif keys[K_RIGHT]:
if keyBuff!=pg.K_RIGHT:
tmpBlock.xy=point(tmpBlock.xy.x+1,tmpBlock.xy.y)
keyBuff=pg.K_RIGHT
else:
keyBuff=None
if not checkDeany(tmpBlock):
updateStage(nowBlock,0)
nowBlock=tmpBlock.clone()
#處理自動下落
speedBuff+=1
if speedBuff>=fallSpeed:
speedBuff=0
tmpBlock=nowBlock.clone()
tmpBlock.xy=point(nowBlock.xy.x,nowBlock.xy.y+1)
if not checkDeany(tmpBlock):
updateStage(nowBlock,0)
nowBlock=tmpBlock.clone()
updateStage(nowBlock,1)
else:
#在自動下落過程中一但發生活動方塊形狀的碰撞,則將活動方塊形狀做固實處理,並檢測是否有可消除的整行方塊
updateStage(nowBlock,2)
checkLine()
nowBlock=None
else:
updateStage(nowBlock,1)
drawStage(backSurface)
screen.blit(backSurface,(0,0))
pg.display.update()
clock.tick(40)
def main():
'''
主程式
'''
getConf("elsfk.cfg")
sysInit()
while True:
process()
if __name__ == "__main__":
main()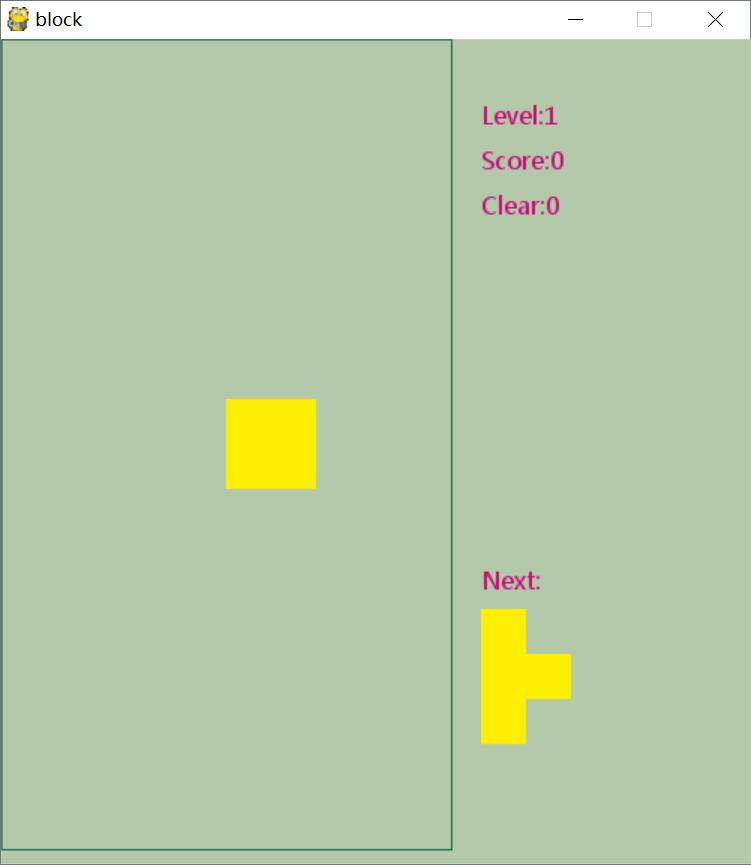
四. Python自動生成二維碼
中文地址:https://github.com/sylnsfar/qrcode/blob/master/README-cn.md
然後需要"pip install myqr"安裝包,命令列方式如下:
# 概括
myqr    Words
        [-v {1,2,3,...,40}]
        [-l {L,M,Q,H}]
        [-n output-filename]
        [-d output-directory]
        [-p picture_file]
        [-c]
        [-con contrast]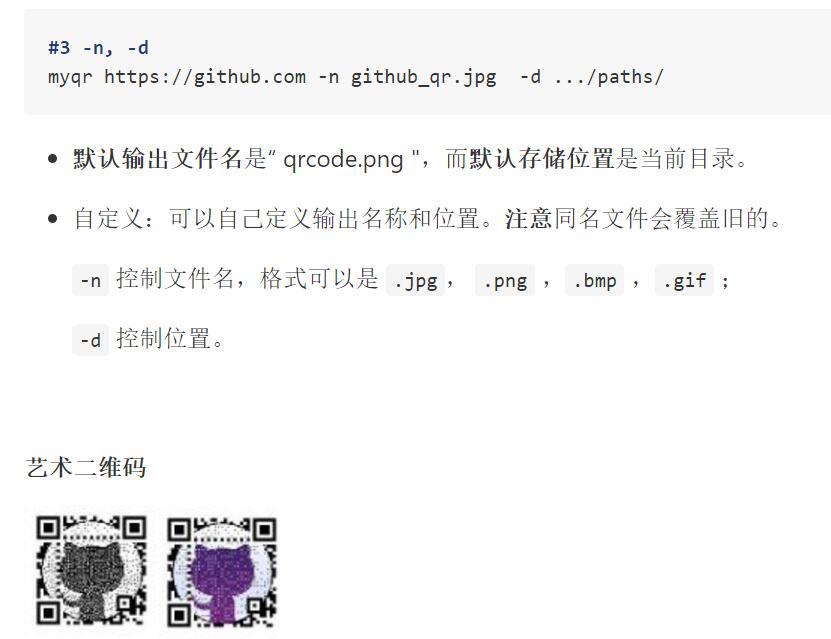
[-bri brightness]藝術二維碼 介紹了 -p, -c, -con, -bri
動態GIF二維碼 介紹了動態的生成方法和注意點
myqr https://github.com -n github_qr.jpg -d .../paths/
網址:http://www.amazing-qrcode.com/
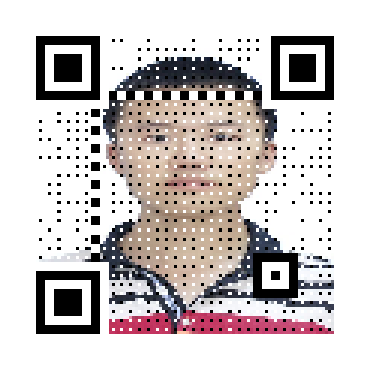
新增最近我申請的域名"www.eastmountyxz.com"並上傳圖片,如下所示:
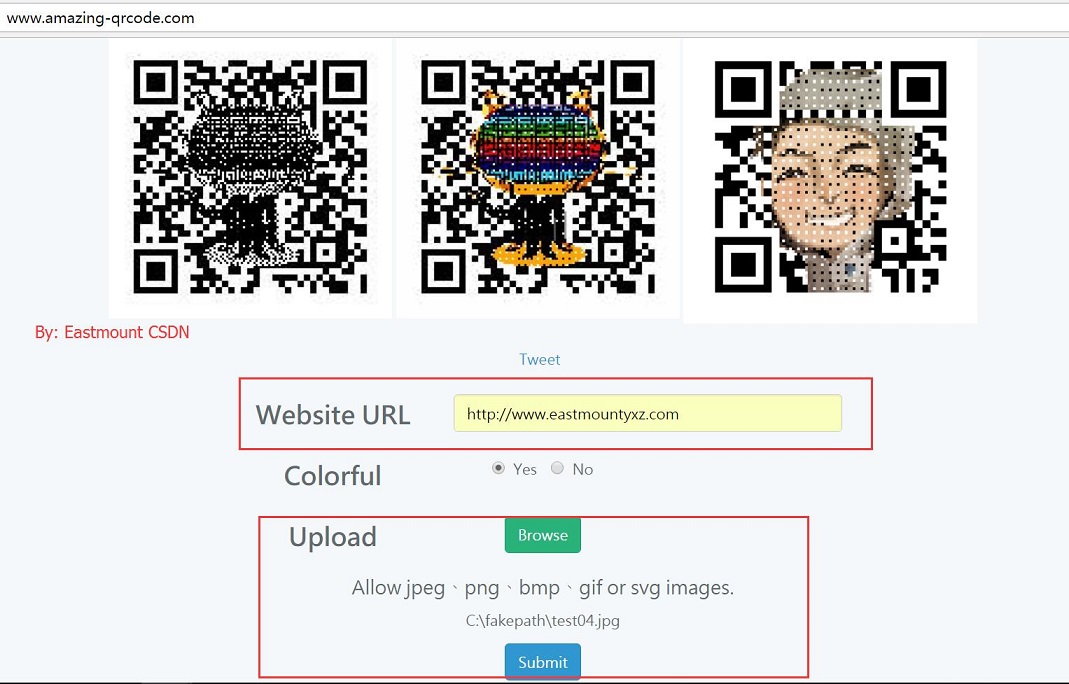
得到如下所示的二維碼,通過微信掃碼是可以訪問我的主頁的,不錯。
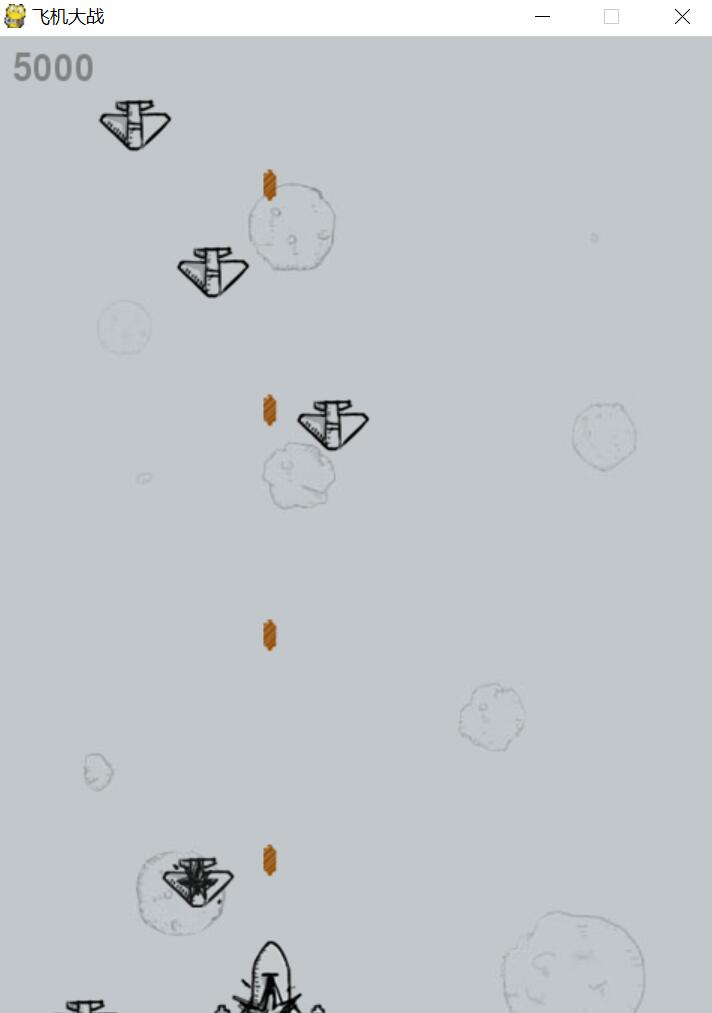
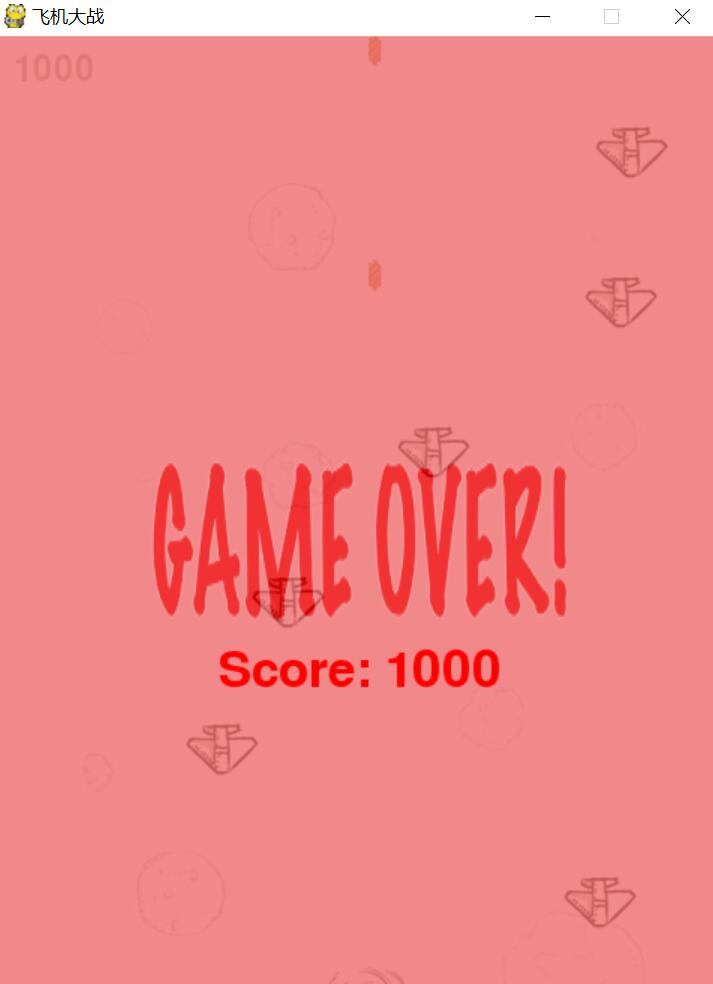
五. Python實現飛機大戰
下載地址:https://github.com/Kill-Console/PythonShootGame
第一步,顯示背景。
第二步,顯示飛機。
第三步,讓飛機動起來。

六. Python 25行程式碼實現人臉識別
攝像識別:藉助攝像頭在Python中實現人臉檢測 - Python部落
詳解推薦:http://www.cnblogs.com/hdu-2010/p/5861142.html
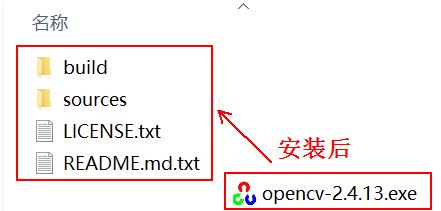
下載地址為:https://sourceforge.net/projects/opencvlibrary/files/opencv-win/2.4.13/opencv-2.4.13.exe/download
安裝後如下圖所示,選擇build\python\2.7\x86\cv2.pyd,複製到python-2.7.9\Lib\site-packages\中即可。
關於C或者JAVA介面的安裝,可參考build\doc\opencv_tutorials.pdf, 裡面各種平臺的詳細安裝步驟,以及結合IDE編譯的說明。
C:\>cd C:\Users\yxz15\Desktop\FaceDetect-master
python face_detect.py bbbb.jpg haarcascade_frontalface_default.xml

執行結果如下所示,可以看到人臉都識別出來了。
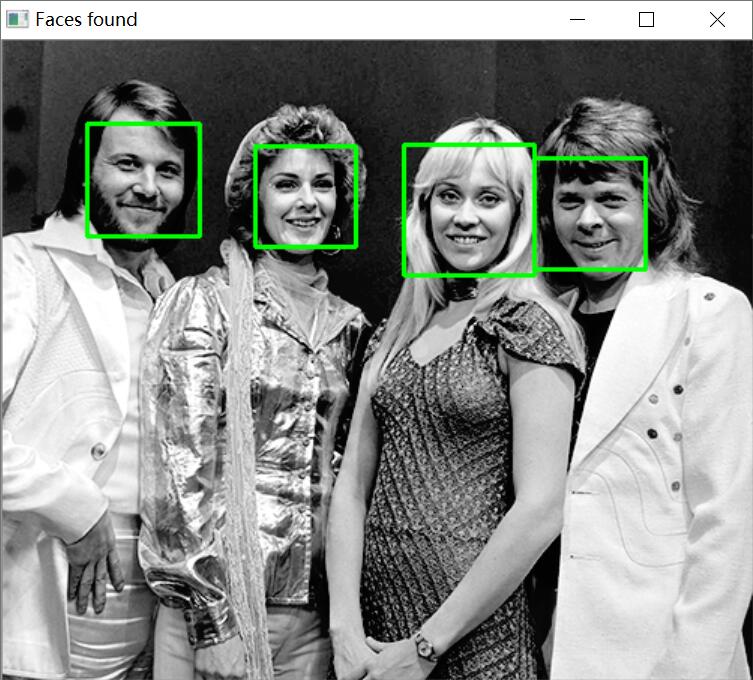
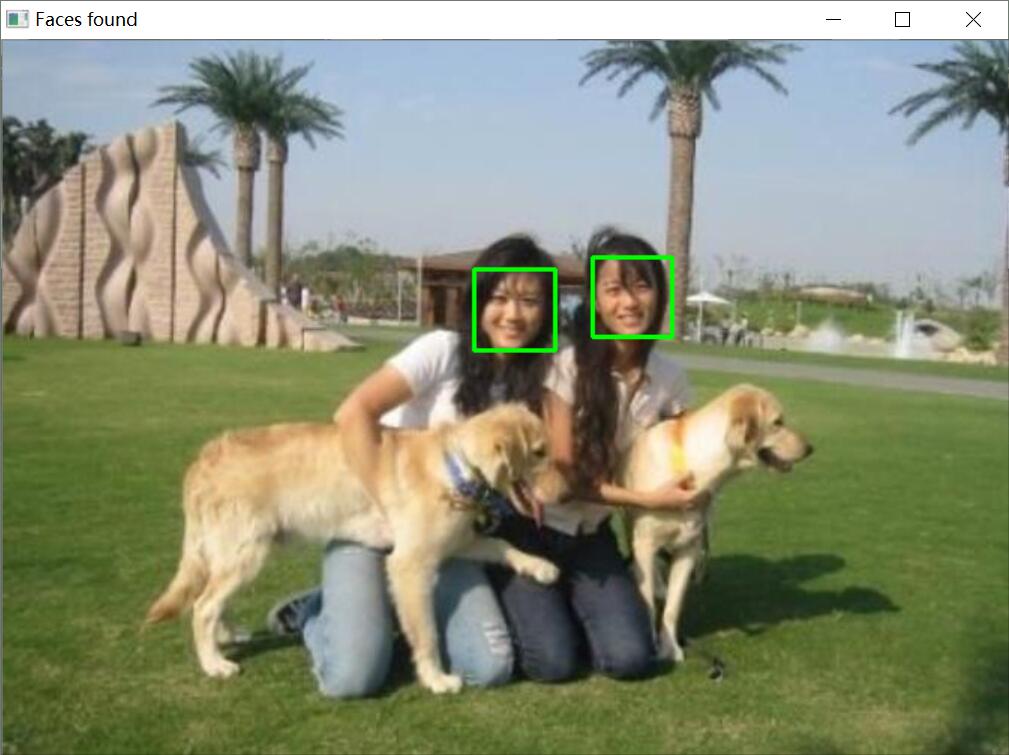
face_detect.py程式碼如下所示:
import cv2
import sys

# Get user supplied values
imagePath = sys.argv[1]
cascPath = sys.argv[2]

# Create the haar cascade
faceCascade = cv2.CascadeClassifier(cascPath)

# Read the image
image = cv2.imread(imagePath)
gray = cv2.cvtColor(image, cv2.COLOR_BGR2GRAY)

# Detect faces in the image
faces = faceCascade.detectMultiScale(
    gray,
    scaleFactor=1.1,
    minNeighbors=5,
    minSize=(30, 30)
    #flags = cv2.CV_HAAR_SCALE_IMAGE
)

print("Found {0} faces!".format(len(faces)))

# Draw a rectangle around the faces
for (x, y, w, h) in faces:
    cv2.rectangle(image, (x, y), (x+w, y+h), (0, 255, 0), 2)

cv2.imshow("Faces found", image)
cv2.waitKey(0)
Python趣味程式設計:定時給Ta講笑話
Genetic Programming: Evolution of Mona Lisa
https://github.com/andersbll/neural_artistic_style
最後文章對你有所幫助,上課內容還需要繼續探索,但enjoy myself~
(By:Eastmount 2016-10-24 下午6點半 http://blog.csdn.net/eastmount/ )
相關文章
- 探索 Python(6): 用 Python 程式設計 —— 興趣Python程式設計
- 為錢程式設計 vs 為興趣程式設計程式設計
- 趣味橫生的程式設計師搞怪程式碼註釋程式設計師
- 趣味python程式設計之經典俄羅斯方塊Python程式設計
- 其他感興趣的程式碼庫
- 紹興市大學生程式設計競賽程式設計
- 程式設計興趣真的是由“熱情”驅動的嗎?程式設計
- 幽默趣味:程式設計師如同妓女程式設計師
- Python趣味程式設計:定時給Ta講笑話Python程式設計
- 2018,程式設計師生活的兩個興趣愛好程式設計師
- 程式設計師成才的關鍵:內在興趣和善於發現程式設計師
- Delphi趣味程式設計例項三則程式設計
- 重構之提煉程式碼
- 程式設計師的奮鬥史(四)——興趣是第一驅動力程式設計師
- 程式設計師的燈下黑:管理還是技術?興趣優先程式設計師
- 趣文:Python程式設計師的進化史Python程式設計師
- 【趣解程式設計】變數程式設計變數
- 【趣解程式設計】函式程式設計函式
- 姬小光前端興趣班【第009期】- 切圖大法之程式碼的整理前端
- 程式碼生 成器:程式設計師生產力快速提升工具程式設計師
- python之超程式設計Python程式設計
- 《JavaScript DOM程式設計藝術》作者談:原型程式碼與生產程式碼之間的矛盾JavaScript程式設計原型
- 趣文:自從我做了程式設計師之後程式設計師
- 趣味幽默 程式設計師使用說明書程式設計師
- Python程式設計:探索有趣的程式碼設計模式Python程式設計設計模式
- 從程式設計到養生程式設計程式設計
- 趣文:程式設計師歪傳程式設計師
- python之非同步程式設計Python非同步程式設計
- 我的元件之產生式程式設計元件程式設計
- C語言趣味程式設計100例pdfC語言程式設計
- 《Python程式設計練習與解答》之程式設計概論Python程式設計
- 開發了一套程式設計師答題小程式。有興趣的可以一起開發。程式設計師
- 網友趣文:《東邪西毒》之程式設計師版 (轉)程式設計師
- 01 Python3程式設計之程式設計語法簡介Python程式設計
- 趣文:程式設計師相親指南程式設計師
- 趣文:程式設計其實是文科程式設計
- 趣科技:程式設計師那些事兒程式設計師
- 趣文:程式設計師是詩人程式設計師