nginx學習筆記(2):開發一個簡單的HTTP模組
準備工作
nginx模組需要用C(或者C++)語言來編碼實現,每個模組都要有自己的名字。我們這裡把編寫的HTTP模組命名為ngx_http_mytest_module,原始碼檔案命名為ngx_http_mytest_module.c。
定義自己的HTTP模組
定義HTTP模組的方式很簡單,例如:
ngx_module_t ngx_http_mytest_module;ngx_module_t是一個nginx模組的資料結構,如下所示:
typedef struct ngx_module_s ngx_module_t;
struct ngx_module_s {
    // 分類的模組計數器
    // nginx模組可以分為四種:core、event、http和mail
    // 每個模組都會各自計數,ctx_index就是每個模組在其所屬類組的計數
    ngx_uint_t ctx_index;

    // 模組計數器,按照每個模組在ngx_modules[]陣列中的宣告順序
    // 從0開始依次給每個模組賦值
    ngx_uint_t index;

    // 保留變數,暫未使用
    ngx_uint_t spare0;
    ngx_uint_t spare1;
    ngx_uint_t spare2;
    ngx_uint_t spare3;

    ngx_uint_t version;  // nginx模組版本

    // 模組的上下文,不同種類的模組有不同的上下文,因此實現了四種結構體
    void *ctx;

    ngx_command_t *commands;  // 處理模組中的配置項

    ngx_uint_t type;  // 模組型別,用於區分core,event,http和mail

    ngx_int_t  (*init_master)(ngx_log_t *log);  // 初始化master時執行
    ngx_int_t  (*init_module)(ngx_cycle_t *cycle);  // 初始化module時執行
    ngx_int_t  (*init_process)(ngx_cycle_t *cycle);  // 初始化process時執行
    ngx_int_t  (*init_thread)(ngx_cycle_t *cycle);   // 初始化thread時執行
    void (*exit_thread)(ngx_cycle_t *cycle);  // 退出thread時執行
    void (*exit_process)(ngx_cycle_t *cycle);  // 退出process時執行
    void (*exit_master)(ngx_cycle_t *cycle);  // 退出master時執行

    // 以下變數是保留欄位,暫未使用
    uintptr_t  spare_hook0;
    uintptr_t  spare_hook1;
    uintptr_t  spare_hook2;
    uintptr_t  spare_hook3;
    uintptr_t  spare_hook4;
    uintptr_t  spare_hook5;
    uintptr_t  spare_hook6;
    uintptr_t  spare_hook7;
};

該結構體在初始化時,需要用到兩個巨集定義:
#define NGX_MODULE_V1    0, 0, 0, 0, 0, 0, 1                // 初始化前七個成員
#define NGX_MODULE_V1_PADDING 0, 0, 0, 0, 0, 0, 0, 0 // 初始化後八個成員 定義HTTP模組時,最重要的是要設定ctx和commands這兩個成員:
(1)我們首先來定義mytest配置項的處理,並設定在出現mytest配置後的解析方法ngx_http_mytest,如下所示:
static ngx_command_t ngx_http_mytest_commands[] = {
    {
        ngx_string("mytest"),
NGX_HTTP_MAIN_CONF|NGX_HTTP_SRV_CONF|NGX_HTTP_LOC_CONF|NGX_HTTP_LMT_CONF|NGX_CONF_NOARGS,
        ngx_http_mytest,
        NGX_HTTP_LOC_CONF_OFFSET,
        0,
        NULL
    },

    ngx_null_command
};

static char *ngx_http_mytest(ngx_conf_t *cf, ngx_command_t *cmd, void *conf)
{
    ngx_http_core_loc_conf_t *clcf;
    // 找到mytest配置項所屬的配置塊
    clcf = ngx_http_conf_get_module_loc_conf(cf, ngx_http-core_module);
    // ngx_http_mytest_handler方法處理請求
    clcf->handler = ngx_http_mytest_handler;
    return NGX_CONF_OK;
}
(2)對於HTTP型別的模組來說,ngx_module_t中的ctx指標必須指向ngx_http_module_t介面。我們當前只是開發一個簡單的模組,如果沒有什麼工作是必須在HTTP框架初始化時完成的,那就不必實現ngx_http_module_t中的8個回撥方法,可以像下面這樣定義ngx_http_module_t介面:
static ngx_http_module_t ngx_http_mytest_module_ctx = {
    NULL,  /* preconfiguration */
    NULL,  /* postconfiguration */

    NULL,  /* create main configuration */
    NULL,  /* init main configuration */

    NULL,  /* create server configuration */
    NULL,  /* merge server configuration */

    NULL,  /* create location configration */
    NULL,  /* merge location configration */
};
最後,我們來定義mytest模組:
ngx_module_t  ngx_http_mytest_module = {
    NGX_MODULE_V1,
    &ngx_http_mytest_module_ctx,   /* module context */
    ngx_http_mytest_commands,      /* module directives */
    NGX_HTTP_MODULE,               /* module type */
    NULL,                          /* init master */
    NULL,                          /* init module */
    NULL,                          /* init process */
    NULL,                          /* init thread */
    NULL,                          /* exit thread */
    NULL,                          /* exit process */
    NULL,                          /* exit master */
    NGX_MODULE_V1_PADDING
};
這樣,mytest模組在編譯時就會被加入到ngx_modules全域性陣列中。
完整的ngx_http_mytest_handler處理方法
static ngx_int_t ngx_http_mytest_handler(ngx_http_request_t *r)
{
    // 必須是GET或HEAD方法,否則返回405 not allowed
    if (!(r->method & (NGX_HTTP_GET | NGX_HTTP_HEAD))) {
        return NGX_HTTP_NOT_ALLOWED;
    }

    // 丟棄請求中的包體(如果不想處理就丟棄掉)
    // 它的意義在於:有些客戶端可能會一直試圖傳送包體,而如果HTTP模組
    // 不接收發來的TCP流,有可能造成客戶端傳送超時
    ngx_int_t rc = ngx_http_discard_request_body(r);
    if (rc != NGX_OK) {
        return rc;
    }

    // 設定返回的Content-Type
    ngx_str_t type = ngx_string("text/plain");
    // 返回的包體內容
    ngx_str_t response = ngx_string("Hello World");
    // 設定返回狀態碼
    r->headers_out.status = NGX_HTTP_OK;
    // 響應包是有包體內容的,需要設定Content-Length長度
    r->headers_out.content_length_n = response.len;
    // 設定Content-Type
    r->headers_out.content_type = type;

    // 傳送HTTP頭部
    rc = ngx_http_send_header(r);
    if (rc == NGX_ERROR || rc > NGX_OK || r->header_only) {
        return rc;
    }

    // 構造ngx_buf_t結構體準備傳送包體
    ngx_buf_t *b;
    b = ngx_create_temp_buf(r->pool, response.len);
    if (b == NULL) {
        return NGX_HTTP_INTERNAL_SERVER_ERROR;
    }

    // 將包體內容即Hello World複製到ngx_buf_t所指向的記憶體
    ngx_memcpy(b->pos, response.data, response.len);
    // 一定要設定好last指標
    b->last = b->pos + response.len;
    // 宣告這是最後一塊緩衝區
    b->last_buf = 1;

    // 構造傳送時的ngx_chain_t結構體
    ngx_chain_t out;
    // 賦值ngx_buf_t
    out.buf = b;
    // 設定next為NULL
    out.next = NULL;

    // 最後一步為傳送包體
    // 傳送結束後HTTP框架會呼叫ngx_http_finalize_request方法結束請求
    return ngx_http_output_filter(r, &out);
}
將編寫的HTTP模組編譯進nginx
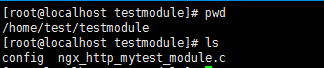
為了讓HTTP模組正常工作,首先需要把它編譯進nginx。
nginx提供的一種簡單的編譯方式是:首先把原始碼檔案全部放到一個目錄下,同時在該目錄中編寫一個檔案用於通知nginx如何編譯本模組,這個檔名必須為config。
config檔案的寫法:
如果只想開發一個HTTP模組,那麼config檔案中需要定義以下三個變數:
(1)ngx_addon_name:僅在configure執行時使用,一般設定為模組名稱;
(2)HTTP_MODULES:儲存所有的HTTP模組名稱,每個模組間由空格相連;
(3)NGX_ADDON_SRCS:用於指定新模組的原始碼,多個待編譯的原始碼之間可以用空格相連。注意,在設定這個變數時可以使用$ngx_addon_dir變數,它等價於configure執行時--add-module=PATH的PATH引數。

對於我們的mytest模組,可以這樣編寫config檔案:

ngx_addon_name=ngx_http_mytest_module
HTTP_MODULES="$HTTP_MODULES ngx_http_mytest_module"
NGX_ADDON_SRCS="$NGX_ADDON_SRCS $ngx_addon_dir/ngx_http_mytest_module.c"
這樣,只要在configure指令碼執行時加入引數–add-module=PATH(PATH就是我們的原始碼和config檔案的儲存目錄),就可以在執行正常編譯安裝流程時完成nginx編譯工作。
上述方法是最方便的,但有時我們需要更靈活的方式,比如重新決定各個模組的順序或者在編譯原始碼時加入一些獨特的編譯選項,我們可以在執行configure後,對生成的objs/ngx_modules.c和objs/Makefile檔案直接進行修改。(此種方法需慎用,不正確的修改可能導致nginx運作不正常,此處不詳述)
完整程式碼
config檔案:
ngx_addon_name=ngx_http_mytest_module
HTTP_MODULES="$HTTP_MODULES ngx_http_mytest_module"
NGX_ADDON_SRCS="$NGX_ADDON_SRCS $ngx_addon_dir/ngx_http_mytest_module.c"
原始碼 ngx_http_mytest_module.c
#include <ngx_config.h>
#include <ngx_core.h>
#include <ngx_http.h>

static ngx_int_t ngx_http_mytest_handler(ngx_http_request_t *r);

static char *
ngx_http_mytest(ngx_conf_t *cf, ngx_command_t *cmd, void *conf);

static ngx_command_t ngx_http_mytest_commands[] = {
    {
        ngx_string("mytest"),         NGX_HTTP_MAIN_CONF|NGX_HTTP_SRV_CONF|NGX_HTTP_LOC_CONF|NGX_HTTP_LMT_CONF|NGX_CONF_NOARGS,
        ngx_http_mytest,
        NGX_HTTP_LOC_CONF_OFFSET,
        0,
        NULL
    },
    ngx_null_command
};

static ngx_http_module_t ngx_http_mytest_module_ctx = {
    NULL,
    NULL,
    NULL,
    NULL,
    NULL,
    NULL,
    NULL,
    NULL
};

ngx_module_t ngx_http_mytest_module = {
    NGX_MODULE_V1,
    &ngx_http_mytest_module_ctx,
    ngx_http_mytest_commands,
    NGX_HTTP_MODULE,
    NULL,
    NULL,
    NULL,
    NULL,
    NULL,
    NULL,
    NULL,
    NGX_MODULE_V1_PADDING
};

static char *
ngx_http_mytest(ngx_conf_t *cf, ngx_command_t *cmd, void *conf)
{
    ngx_http_core_loc_conf_t *clcf;

    clcf = ngx_http_conf_get_module_loc_conf(cf, ngx_http_core_module);

    clcf->handler = ngx_http_mytest_handler;

    return NGX_CONF_OK;
}

static ngx_int_t ngx_http_mytest_handler(ngx_http_request_t *r)
{
    if (!(r->method & (NGX_HTTP_GET | NGX_HTTP_HEAD))) {
        return NGX_HTTP_NOT_ALLOWED;
    }

    ngx_int_t rc = ngx_http_discard_request_body(r);
    if (rc != NGX_OK) {
        return rc;
    }

    ngx_str_t type = ngx_string("text/plain");
    ngx_str_t response = ngx_string("Hello World");
    r->headers_out.status = NGX_HTTP_OK;
    r->headers_out.content_length_n = response.len;
    r->headers_out.content_type = type;

    rc = ngx_http_send_header(r);
    if (rc == NGX_ERROR || rc > NGX_OK || r->header_only) {
        return rc;
    }

    ngx_buf_t *b;
    b = ngx_create_temp_buf(r->pool, response.len);
    if (b == NULL) {
        return NGX_HTTP_INTERNAL_SERVER_ERROR;
    }

    ngx_memcpy(b->pos, response.data, response.len);
    b->last = b->pos + response.len;
    b->last_buf = 1;

    ngx_chain_t out;
    out.buf = b;
    out.next = NULL;

    return ngx_http_output_filter(r, &out);
} 
編譯及測試結果
編譯:
./configure --prefix=/usr/local/nginx(指定安裝部署後的根目錄) --add-module=/home/test/testmodule(新模組存放目錄)

make

make install 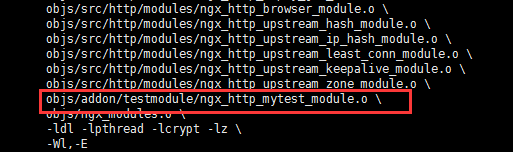
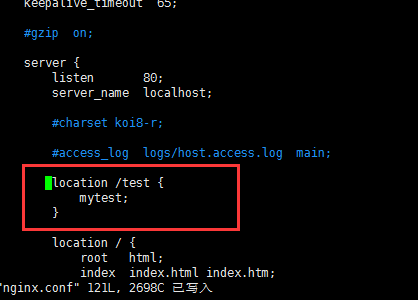
修改配置檔案:
配置檔案位於/usr/local/nginx/conf/nginx.conf,做如下修改:
location /test {
    mytest;
}
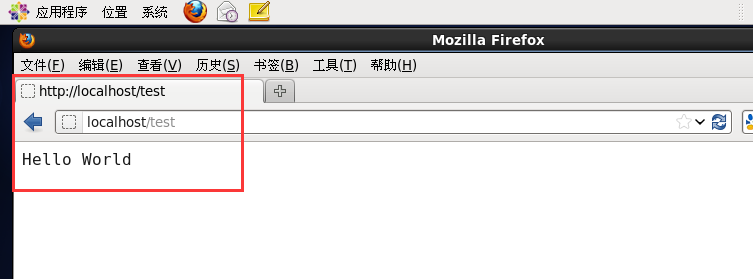
測試結果:
參考資料:
陶輝.深入理解Nginx 模組開發與架構解析.北京:機械工業出版社,2013
相關文章
- 《圖解HTTP》學習筆記(二):簡單的HTTP協議圖解HTTP筆記協議
- Nginx 學習筆記--程式與模組Nginx筆記
- Web開發學習筆記——HTTP 概述Web筆記HTTP
- Nginx 學習筆記--程式與模組(二)Nginx筆記
- Python 開發簡單爬蟲 (學習筆記)Python爬蟲筆記
- nginx 編寫簡單HTTP模組以及nginx http handler的hello world示例編寫NginxHTTP
- angular學習筆記(三十)-指令(9)-一個簡單的指令示例Angular筆記
- nginx學習-ngx_http_rewrite_module模組NginxHTTP
- 我的世界1.12.2模組開發學習筆記集合筆記
- Nginx學習筆記--Nginx圖片縮圖,水印處理模組Nginx筆記
- HTTP 協議 學習筆記一HTTP協議筆記
- http學習筆記HTTP筆記
- 開發一個簡單的 HTTP 伺服器應用HTTP伺服器
- Nginx 學習筆記Nginx筆記
- nginx學習筆記Nginx筆記
- <node.js學習筆記(4)>stream和http模組Node.js筆記HTTP
- 微信小程式開發學習筆記[2]微信小程式筆記
- Git 簡單使用學習筆記Git筆記
- HTTP2基本概念學習筆記HTTP筆記
- Symfony2學習筆記之HTTP Cache筆記HTTP
- Golang學習筆記 – 標準庫”net/http”的簡析及自制簡單路由框架Golang筆記HTTP路由框架
- ZooKeeper學習筆記三:使用ZooKeeper實現一個簡單的配置中心筆記
- 【Nginx學習筆記】-初識NginxNginx筆記
- Java學習筆記—開源框架Netty的簡單使用Java筆記框架Netty
- ZooKeeper學習筆記四:使用ZooKeeper實現一個簡單的分散式鎖筆記分散式
- HTTP Client 學習筆記 (一) 初遇篇HTTPclient筆記
- Web 開發學習筆記(1) — 搭建你的第一個 Web ServerWeb筆記Server
- Zookeeper學習筆記(一)基本概念和簡單使用筆記
- Dubbo學習筆記(一)基本概念與簡單使用筆記
- OCI學習筆記--簡介(一)筆記
- 學習 Nginx 的一些筆記,命令配置等Nginx筆記
- Web之http學習筆記WebHTTP筆記
- 解剖Nginx·模組開發篇(2)ngx_http_hello_world_module 模組基本結構定義NginxHTTP
- Python Web 開發學習 - 學習筆記(2)- 啟動PythonPythonWeb筆記
- 關於http(自己的學習筆記)HTTP筆記
- YYKit(Base模組)學習筆記筆記
- Open CV 學習開發筆記之概述(一)筆記
- Essential_SQLAlchemy2th學習筆記之Core模組SQL筆記