TabHost與TabWidget的簡單用法
Android的Tab控制元件,Tab控制元件可以達到分頁的效果,讓一個螢幕的內容儘量豐富,當然也會增加開發的複雜程度,在有必要的時候再使用。Android的Tab控制元件使用起來有點奇怪,必須包含和按照以下的順序:
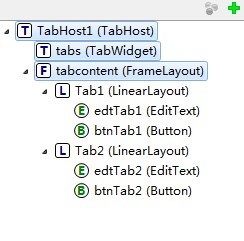
TabHost控制元件->TabWidget(必須命名為tabs)->FrameLayout(必須命名為tabcontent)。
接下來貼出本例執行的截圖:


main.xml的原始碼:
<?xml version="1.0" encoding="utf-8"?>
<TabHost android:layout_width="fill_parent"
android:layout_height="fill_parent" xmlns:android="http://schemas.android.com/apk/res/android" android:id="@android:id/TabHost1">
<TabWidget android:id="@android:id/tabs"
android:layout_height="wrap_content" android:layout_width="fill_parent">
</TabWidget>
<FrameLayout android:id="@android:id/tabcontent"
android:paddingTop="65px" android:layout_width="fill_parent" android:layout_height="fill_parent">
<LinearLayout android:layout_height="wrap_content" android:id="@+id/Tab1" android:orientation="vertical" android:layout_width="fill_parent">
<EditText android:layout_height="wrap_content" android:id="@+id/edtTab1" android:layout_width="fill_parent"></EditText>
<Button android:layout_width="wrap_content" android:layout_height="wrap_content" android:id="@+id/btnTab1" android:text="Tab1"></Button>
</LinearLayout>
<LinearLayout android:layout_height="wrap_content" android:id="@+id/Tab2" android:layout_width="fill_parent" android:orientation="horizontal">
<EditText android:layout_height="wrap_content" android:id="@+id/edtTab2" android:layout_width="wrap_content" android:layout_weight="300"></EditText>
<Button android:layout_width="wrap_content" android:layout_height="wrap_content" android:id="@+id/btnTab2" android:text="Tab2"></Button></LinearLayout>
</FrameLayout>
</TabHost>
程式原始碼:
package com.testTab;
import android.app.TabActivity;
import android.os.Bundle;
import android.view.View;
import android.widget.Button;
import android.widget.EditText;
import android.widget.TabHost;
import android.widget.TabHost.TabSpec;
public class testTab extends TabActivity {//基於TabActivity構建
Button btnTab1,btnTab2;
EditText edtTab1,edtTab2;
/** Called when the activity is first created. */
@Override
public void onCreate(Bundle savedInstanceState) {
super.onCreate(savedInstanceState);
setContentView(R.layout.main);
TabHost tabs = getTabHost();
//設定Tab1
TabSpec tab1 = tabs.newTabSpec("tab1");
tab1.setIndicator("tab1"); // 設定tab1的名稱
tab1.setContent(R.id.Tab1); // 關聯控制元件
tabs.addTab(tab1); // 新增tab1
btnTab1=(Button)this.findViewById(R.id.btnTab1);
edtTab1=(EditText)this.findViewById(R.id.edtTab1);
btnTab1.setOnClickListener(new ClickEvent());
//設定Tab2
TabSpec tab2 = tabs.newTabSpec("tab2");
tab2.setIndicator("tab2");
tab2.setContent(R.id.Tab2);
tabs.addTab(tab2);
btnTab2=(Button)this.findViewById(R.id.btnTab2);
edtTab2=(EditText)this.findViewById(R.id.edtTab2);
btnTab2.setOnClickListener(new ClickEvent());
tabs.setCurrentTab(0);
}
class ClickEvent implements View.OnClickListener {
@Override
public void onClick(View v) {
if(v==btnTab1)
{
edtTab1.setText("tab1");
}
else if(v==btnTab2)
{
edtTab2.setText("tab2");
}
}
}
}
相關文章
- TabWidget/TabHost的兩種使用方法
- xml方式的 android的 tabhost用法例項XMLAndroid
- WITH的簡單用法
- Promise的簡單用法Promise
- js的邏輯與&&運算子用法簡單介紹JS
- getComputedStyle的簡單用法
- javascript的this用法簡單介紹JavaScript
- execute immediate的簡單用法(oracle)Oracle
- android:ListView 的簡單用法AndroidView
- golang flag簡單用法Golang
- mysqldumpslow簡單用法MySql
- linux下mail的簡單用法LinuxAI
- UpdatePanel的簡單用法(非巢狀)巢狀
- git-stash簡單用法Git
- Android Scroller簡單用法Android
- Android AsyncTask簡單用法Android
- C++中const的簡單用法C++
- 簡單說說iOS之WKWebView的用法iOSWebView
- angularJS的router用法簡單介紹AngularJS
- javascript的分號(;)用法簡單介紹JavaScript
- struts2.01用法的簡單例子單例
- fstream中ifstream和ofstream的簡單用法
- Python中的selenium的簡單用法Python
- jQuery filter() 用法簡單介紹jQueryFilter
- js WebSocket用法簡單介紹JSWeb
- javascript arguments用法簡單介紹JavaScript
- onerror事件用法簡單介紹Error事件
- javascript this用法和簡單例項JavaScript單例
- linux read簡單用法Linux
- js isNaN函式的用法簡單介紹JSNaN函式
- js中大括號{}的用法簡單介紹JS
- jQuery的index()函式用法簡單介紹jQueryIndex函式
- js eval()函式的用法簡單介紹JS函式
- div和span元素的用法簡單介紹
- meta標籤的viewport用法簡單介紹View
- ifdef 的簡單用法(ChatGPT 4o 生成)ChatGPT
- python--事件event簡單用法Python事件
- 分散式系列七: zookeeper簡單用法分散式