在這篇隨筆裡將主要講解一下EditText和AutoCompleteTextView這個控制元件
1.EditText
首先我們先簡單來說說EditText這個控制元件,這個就相當於我們平常web開發中的文字輸入框,我們如果要使用EditText,可以在佈局檔案中宣告一個<EditText>這個元素即可,下面就是一個簡單的EditText的控制元件宣告:
<EditText
        android:id="@+id/username"
        android:layout_width="match_parent"
        android:layout_height="wrap_content"
        android:hint="username"/>
對於EditText來說,其最重要的一個屬性是 android:inputType,這個屬性不僅可以指定鍵盤的顯示型別,還能控制一些其他的操作,具體可以參考android的官方API,其預設屬性是 android:inputType="text",也就是普通的鍵盤框,如果我們設定其屬性為以下這些,那麼其鍵盤的型別會有所不同:
<EditText
        android:id="@+id/password"
        android:layout_width="match_parent"
        android:layout_height="wrap_content"
        android:hint="password"
        android:inputType="textPassword"/>  這個是我們的密碼框

    <EditText
        android:id="@+id/email"
        android:layout_width="match_parent"
        android:layout_height="wrap_content"
        android:hint="email"
        android:inputType="textEmailAddress"/>  當設定為textEmailAddress時,鍵盤會多出來一個 @ 符號

    <EditText
        android:id="@+id/blog"
        android:layout_width="match_parent"
        android:layout_height="wrap_content"
        android:hint="blog url"
        android:inputType="textUri"/>  設定為textUri時,鍵盤會多出一個 / 符號

    <EditText
        android:id="@+id/phone"
        android:layout_width="match_parent"
        android:layout_height="wrap_content"
        android:hint="phone"
        android:inputType="phone"/>  設定為phone時,鍵盤就會變成一個打電話時的鍵盤

    <EditText
        android:id="@+id/counts"
        android:layout_width="match_parent"
        android:layout_height="wrap_content"
        android:hint="counts"
        android:inputType="number"/>  設定為number時,鍵盤上全部都是數字鍵
對於輸入框來說,我們通常都要對其輸入的資料進行判斷,inputType這個屬性不會對我們輸入的內容進行校驗,如果我們要對輸入的內容進行校驗,我們需要在Activity裡面進行操作
EditText有一個setError的方法,當呼叫這個方法時,則表示輸入的資料不合法,我們來看看官方的API對該方法的解釋:
void android.widget.TextView.setError(CharSequence error)

Sets the right-hand compound drawable of the TextView to the "error" icon and sets an error message that will be displayed in a popup when the TextView has focus. The icon and error message will be reset to null when any key events cause changes to the TextView's text. If the error is null, the error message and icon will be cleared.
這個方法會給我們一個錯誤的小圖示以及彈出的一段錯誤提示資訊,當我們的這個EditText控制元件獲得焦點的時候,當我們在文字框中輸入了任何的值後,這個icon和message都會消失,例如:

EditText還有許多其他的方法,這個在以後實際用的的時候再闡述。
2.AutoCompleteTextView
AutoCompleteTextView這個是一個自動提示內容的文字框,其是EditText的一個子類,
An editable text view that shows completion suggestions automatically while the user is typing. The list of suggestions is displayed in a drop down menu from which the user can choose an item to replace the content of the edit box with.

The drop down can be dismissed at any time by pressing the back key or, if no item is selected in the drop down, by pressing the enter/dpad center key.
我們通常都是自己定義了一組資料集合,可以是array,可以是list,還可以是網路傳過來的資料,這組資料是以下拉選單的方式根據我們輸入的關鍵字來匹配我們資料集合中滿足條件的資料項,通過下拉選單,我們可以enter來選中我們需要的資料,而為AutoCompleteTextView這個控制元件提供內容的就是我們的 Adapter ,這個叫做介面卡,Adapter這個類的作用就是在我們的Data和我們的View之間架設一座橋樑,我們將我們的資料放置到一個Adapter當中,然後通過指定我們對這些資料的佈局方式,再將這個Adapter賦給我們的View。
Adapter是一個介面,其擁有許多的實現類,例如:
android.widget.Adapter

Known Indirect Subclasses:

ArrayAdapter<T>, BaseAdapter, CursorAdapter, HeaderViewListAdapter, ListAdapter, ResourceCursorAdapter, SimpleAdapter, SimpleCursorAdapter, SpinnerAdapter, WrapperListAdapter
我們看到,Android為我們提供了許多的Adapter,這是因為我們的資料可能來自不同的途徑,而且對於一些特殊的控制元件,例如Spinner,我們也要有指定的SpinnerAdapter才行,接下來我們就通過一個例子來實現我們的 AutoCompleteTextView 文字提示功能:
首先我們在我們的佈局檔案中定義一個 <AutoCompleteTextView>標籤,例如:
<?xml version="1.0" encoding="utf-8"?>
<RelativeLayout xmlns:android="http://schemas.android.com/apk/res/android"
    android:layout_width="match_parent"
    android:layout_height="match_parent" >

    <TextView
        android:id="@+id/country"
        android:layout_width="wrap_content"
        android:layout_height="wrap_content"
        android:text="所在國家:" />

    <AutoCompleteTextView
        android:id="@+id/auto"
        android:layout_width="match_parent"
        android:layout_height="wrap_content"
        android:layout_toRightOf="@id/country"/>

</RelativeLayout>
接下來我們看看Activity裡面的內容:
public class AutoCompleteActivity extends Activity
{
    private AutoCompleteTextView auto;

    @Override
    protected void onCreate(Bundle savedInstanceState)
    {
        super.onCreate(savedInstanceState);
        setContentView(R.layout.auto_complete);

        auto = (AutoCompleteTextView)findViewById(R.id.auto);

        List<String> countries = new ArrayList<String>();
        countries.add("Afghanistan");
        countries.add("Albania");
        countries.add("Algeria");
        countries.add("American");
        countries.add("Andorra");
        countries.add("Anguilla");
        countries.add("Angola");
        countries.add("Antarctica");
        countries.add("China");

        ArrayAdapter<String> adapter = new ArrayAdapter<String>(this, android.R.layout.simple_list_item_1, countries);

        auto.setAdapter(adapter);

    }
}
我們看到,在Activity裡面我們定義了一個ArrayAdapter這個類,其有許多的構造方法,我們來看看我們用的這個:
public ArrayAdapter (Context context, int resource, List<T> objects)

Parameters
context    The current context.
resource    The resource ID for a layout file containing a TextView to use when instantiating views.
objects    The objects to represent in the ListView.
第一個引數Context型別的物件,是我們的上下文物件,我們的Activity是Context類的子類,所以可以將當前的這個Activity傳進去,第二個引數是一個包含了TextView控制元件的佈局檔案的ID,當Adapter載入的時候,就會將我們的資料集合的每一個資料(item)繫結為我們這個佈局檔案中的每一個TextView控制元件上,android系統本身給我們提供了許多的預設的佈局檔案,我們這裡使用的是 android.R.layout.simple_list_item_1 這個佈局檔案(this is a layout provided by Android that provides a standard appearance for text in a list),第三個引數就是我們的資料集合,這裡我們傳入一個List進去,最後通過setAdapter(adapter)方法將其繫結到我們的AutoCompleteTextView控制元件上即可。
對於我們的資料集,我們除了可以在Activity中宣告一個List或者是Array以為,我們還可以寫在android的資原始檔中,通過資原始檔來得到我們的資料集,例如,我們在
res-->values-->strings.xml 這個檔案中指定我們的資料集:
<?xml version="1.0" encoding="utf-8"?>
<resources>

    <string name="app_name">Android_01</string>
    <string name="action_settings">Settings</string>
    <string name="hello_world">Hello world!</string>

    <string-array name="countries">
        <item>Bahrain</item>
        <item>Bangladesh</item>
        <item>Belarus</item>
        <item>Belize</item>
        <item>Brazil</item>
        <item>Cameroon</item>
        <item>Japan</item>
        <item>Hongkong</item>
        <item>Greece</item>
        <item>Germany</item>
        <item>France</item>
        <item>Djibouti</item>
        <item>Denmark</item>
        <item>Canada</item>
    </string-array>

</resources>
然後在程式碼中,我們可以通過下面這種方式來建立我們的Adapter物件:
String[] countries2 = getResources().getStringArray(R.array.countries);
ArrayAdapter<String> adapter = new ArrayAdapter<String>(this, android.R.layout.simple_list_item_1, countries2);
最後我們來看看效果圖:
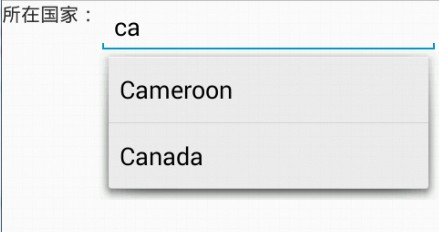
當我們輸入兩個字母時,就會有內容提示了,我們可以選擇我們需要的選項,點選enter即可。