現在你已經將關於碎片的重要知識點都掌握得差不多了,不過在靈活運用方面可能還有 些欠缺,因此又該進入我們本章的最佳實踐環節了。
前面有提到過,碎片很多時候都是在平板開發當中使用的,主要是為了解決螢幕空間不 能充分利用的問題。那是不是就表明,我們開發的程式都需要提供一個手機版和一個 Pad 版 呢?確實有不少公司都是這麼做的,但是這樣會浪費很多的人力物力。因為維護兩個版本的 程式碼成本很高,每當增加什麼新功能時,需要在兩份程式碼裡各寫一遍,每當發現一個 bug 時, 需要在兩份程式碼裡各修改一次。因此今天我們最佳實踐的內容就是,教你如何編寫同時相容 手機和平板的應用程式。
還記得在本章開始的時候提到過的一個新聞應用嗎?現在我們就將運用本章中所學的 知識來編寫一個簡易版的新聞應用,並且要求它是可以同時相容手機和平板的。新建好一個 FragmentBestPractice 專案,然後開始動手吧!
第一步我們要先準備好一個新聞的實體類,新建類 News,程式碼如下所示:
public class News { private String title; private String content;
public String getTitle() {
return title;
}
public void setTitle(String title) {
this.title = title;
}
public String getContent() {
return content;
}
public void setContent(String content) {
this.content = content;
}
}
News 類的程式碼還是比較簡單的,title 欄位表示新聞標題,content 欄位表示新聞內容。 接著新建一個 news_item.xml 佈局,用於作為新聞列表中子項的佈局:
<LinearLayout xmlns:android="http://schemas.android.com/apk/res/android" android:layout_width="match_parent" android:layout_height="match_parent"
android:orientation="vertical" >
<TextView android:id="@+id/news_title" android:layout_width="match_parent" android:layout_height="wrap_content" android:singleLine="true" android:ellipsize="end" android:textSize="18sp" android:paddingLeft="10dp" android:paddingRight="10dp" android:paddingTop="15dp" android:paddingBottom="15dp"
/>
</LinearLayout>
這段程式碼也非常簡單,只是在 LinearLayout 中放入了一個 TextView 用於顯示新聞的標
題。仔細觀察 TextView,你會發現其中有幾個屬性是我們之前沒有學過的。android:padding 表示給控制元件的周圍加上補白,這樣不至於讓文字內容會緊靠在邊緣上。android:singleLine 設 置為 true 表示讓這個 TextView 只能單行顯示。android:ellipsize 用於設定當文字內容超出控 件寬度時,文字的縮略方式,這裡指定成 end 表示在尾部進行縮略。
接下來需要建立新聞列表的介面卡,讓這個介面卡繼承自 ArrayAdapter,並將泛型指定 為 News 類。新建類 NewsAdapter,程式碼如下所示:
public class NewsAdapter extends ArrayAdapter<News> {
private int resourceId;
public NewsAdapter(Context context, int textViewResourceId, List<News>
objects) {
super(context, textViewResourceId, objects);
resourceId = textViewResourceId;
}
@Override
public View getView(int position, View convertView, ViewGroup parent) { News news = getItem(position);
View view;
if (convertView == null) {
view = LayoutInflater.from(getContext()).inflate(resourceId, null);
} else {
view = convertView;
}
TextView newsTitleText = (TextView) view.findViewById(R.id.news_title);
newsTitleText.setText(news.getTitle());
return view;
}
}
可以看到,在 getView()方法中,我們獲取到了相應位置上的 News 類,並讓新聞的標題 在列表中進行顯示。
這樣基本就把新聞列表部分的程式碼編寫完了,接下來我們看一下如何編寫新聞內容部分 的程式碼。新建佈局檔案 news_content_frag.xml,程式碼如下所示:
<RelativeLayout xmlns:android="http://schemas.android.com/apk/res/android" android:layout_width="match_parent" android:layout_height="match_parent" >
<LinearLayout android:id="@+id/visibility_layout" android:layout_width="match_parent" android:layout_height="match_parent" android:orientation="vertical" android:visibility="invisible" >
<TextView android:id="@+id/news_title" android:layout_width="match_parent" android:layout_height="wrap_content" android:gravity="center" android:padding="10dp" android:textSize="20sp" />
<ImageView android:layout_width="match_parent" android:layout_height="1dp" android:scaleType="fitXY" android:src="@drawable/spilt_line" />
<TextView android:id="@+id/news_content" android:layout_width="match_parent" android:layout_height="0dp" android:layout_weight="1" android:padding="15dp" android:textSize="18sp" />
</LinearLayout>
<ImageView android:layout_width="1dp" android:layout_height="match_parent" android:layout_alignParentLeft="true" android:scaleType="fitXY" android:src="@drawable/spilt_line_vertical" />
</RelativeLayout>
新聞內容的佈局主要可以分為兩個部分,頭部顯示完整的新聞標題,正文部分顯示新聞
內容,中間使用一條細線分隔開。這裡的細線是利用 ImageView 顯示了一張很窄的圖片來實 現的,將 ImageView 的 android:scaleType 屬性設定為 fitXY,表示讓這張圖片填充滿整個控 件的大小。
然後再新建一個 NewsContentFragment 類,繼承自 Fragment,程式碼如下所示:
public class NewsContentFragment extends Fragment {
private View view;
@Override
public View onCreateView(LayoutInflater inflater, ViewGroup container, Bundle savedInstanceState) {
view = inflater.inflate(R.layout.news_content_frag, container, false);
return view;
}
public void refresh(String newsTitle, String newsContent) {
View visibilityLayout = view.findViewById(R.id.visibility_layout);
visibilityLayout.setVisibility(View.VISIBLE);
TextView newsTitleText = (TextView) view.findViewById (R.id.news_title); TextView newsContentText = (TextView) view.findViewById(R.id.news_
content);
newsTitleText.setText(newsTitle); // 重新整理新聞的標題
newsContentText.setText(newsContent); // 重新整理新聞的內容
}
}
首先在 onCreateView()方法里載入了我們剛剛建立的 news_content_frag 佈局,這個沒什 麼好解釋的。接下來又提供了一個 refresh()方法,這個方法就是用於將新聞的標題和內容顯 示在介面上的。可以看到,這裡通過 findViewById()方法分別獲取到新聞的標題和內容控制元件, 然後將方法傳遞進來的引數設定進去。
接著要建立一個在活動中使用的新聞內容佈局,新建 news_content.xml,程式碼如下所示:
<LinearLayout xmlns:android="http://schemas.android.com/apk/res/android" android:layout_width="match_parent" android:layout_height="match_parent"
android:orientation="vertical" >
<fragment android:id="@+id/news_content_fragment" android:name="com.example.fragmentbestpractice.NewsContentFragment" android:layout_width="match_parent" android:layout_height="match_parent"
/>
</LinearLayout>
這裡我們充分發揮了程式碼的複用性,直接在佈局中引入了 NewsContentFragment,這樣 也就相當於把 news_content_frag 佈局的內容自動加了進來。
然後新建 NewsContentActivity,作為顯示新聞內容的活動,程式碼如下所示:
public class NewsContentActivity extends Activity {
public static void actionStart(Context context, String newsTitle, String newsContent) {
Intent intent = new Intent(context, NewsContentActivity.class); intent.putExtra("news_title", newsTitle); intent.putExtra("news_content", newsContent);
context.startActivity(intent);
}
@Override
protected void onCreate(Bundle savedInstanceState) { super.onCreate(savedInstanceState); requestWindowFeature(Window.FEATURE_NO_TITLE); setContentView(R.layout.news_content);
String newsTitle = getIntent().getStringExtra("news_title");
// 獲取傳入的新聞標題
String newsContent = getIntent().getStringExtra("news_content");
// 獲取傳入的新聞內容
NewsContentFragment newsContentFragment = (NewsContentFragment)
getFragmentManager()
.findFragmentById(R.id.news_content_fragment);
newsContentFragment.refresh(newsTitle, newsContent);
// 重新整理NewsContentFragment介面
}
}
可以看到,在 onCreate()方法中我們通過 Intent 獲取到了傳入的新聞標題和新聞內容,
然後呼叫 FragmentManager 的 findFragmentById()方法得到了 NewsContentFragment 的例項, 接著呼叫它的 refresh()方法,並將新聞的標題和內容傳入,就可以把這些資料顯示出來了。 注意這裡我們還提供了一個 actionStart()方法,還記得它的作用嗎?如果忘記的話就再去閱 讀一遍 2.6.3 節吧。
接下來還需要再建立一個用於顯示新聞列表的佈局,新建 news_title_frag.xml,程式碼如 下所示:
<LinearLayout xmlns:android="http://schemas.android.com/apk/res/android" android:layout_width="match_parent" android:layout_height="match_parent"
android:orientation="vertical" >
<ListView android:id="@+id/news_title_list_view" android:layout_width="match_parent" android:layout_height="match_parent" >
</ListView>
</LinearLayout>
這個佈局的程式碼就非常簡單了,裡面只有一個 ListView。不過想必你已經猜到了,這個 佈局並不是給活動使用的,而是給碎片使用的,因此我們還需要建立一個碎片來載入這個布 局。新建一個 NewsTitleFragment 類,繼承自 Fragment,程式碼如下所示:
public class NewsTitleFragment extends Fragment implements
OnItemClickListener {
private ListView newsTitleListView;
private List<News> newsList; private NewsAdapter adapter; private boolean isTwoPane;
@Override
public void onAttach(Activity activity) {
super.onAttach(activity);
newsList = getNews(); // 初始化新聞資料
adapter = new NewsAdapter(activity, R.layout.news_item, newsList);
}
@Override
public View onCreateView(LayoutInflater inflater, ViewGroup container, Bundle savedInstanceState) {
View view = inflater.inflate(R.layout.news_title_frag, container, false);
newsTitleListView = (ListView) view.findViewById(R.id.news_title_
list_view); newsTitleListView.setAdapter(adapter); newsTitleListView.setOnItemClickListener(this);
return view;
}
@Override
public void onActivityCreated(Bundle savedInstanceState) {
super.onActivityCreated(savedInstanceState);
if (getActivity().findViewById(R.id.news_content_layout) != null) {
isTwoPane = true; // 可以找到news_content_layout佈局時,為雙頁模式
} else {
isTwoPane = false; // 找不到news_content_layout佈局時,為單頁模式
}
}
@Override
public void onItemClick(AdapterView<?> parent, View view, int position, long id) {
News news = newsList.get(position);
if (isTwoPane) {
// 如果是雙頁模式,則重新整理NewsContentFragment中的內容
NewsContentFragment newsContentFragment = (NewsContentFragment)
getFragmentManager().findFragmentById(R.id.news_
content_fragment);
newsContentFragment.refresh(news.getTitle(), news.getContent());
} else {
// 如果是單頁模式,則直接啟動NewsContentActivity
NewsContentActivity.actionStart(getActivity(), news.getTitle(), news.getContent());
}
}
private List<News> getNews() {
List<News> newsList = new ArrayList<News>(); News news1 = new News();
news1.setTitle("Succeed in College as a Learning Disabled Student"); news1.setContent("College freshmen will soon learn to live with a roommate, adjust to a new social scene and survive less-than-stellar dining hall food. Students with learning disabilities will face these transitions while also grappling with a few more hurdles."); newsList.add(news1);
News news2 = new News();
news2.setTitle("Google Android exec poached by China's Xiaomi"); news2.setContent("China's Xiaomi has poached a key Google executive involved in the tech giant's Android phones, in a move seen as a coup for the rapidly growing Chinese smartphone maker."); newsList.add(news2);
return newsList;
}
}
這個類的程式碼有點長,我來重點解釋一下。根據碎片的生命週期,我們知道,onAttach() 方法會首先執行,因此在這裡做了一些資料初始化的操作,比如呼叫 getNews()方法獲取幾 條模擬的新聞資料,以及完成 NewsAdapter 的建立。然後在 onCreateView()方法中載入了 news_title_frag 佈局,並給新聞列表的 ListView 註冊了點選事件。接下來在 onActivityCreated() 方法中,我們通過是否能夠找到一個 id 為 news_content_layout 的 View 來判斷當前是雙頁 模式還是單頁模式,這個 id 為 news_content_layout 的 View 只在雙頁模式中才會出現,在 稍後的佈局裡你將會看到。然後在 ListView 的點選事件裡我們就可以判斷,如果當前是單 頁模式,就啟動一個新的活動去顯示新聞內容,如果當前是雙頁模式,就更新新聞內容碎 片裡的資料。
剩下工作就非常簡單了,修改 activity_main.xml 中的程式碼,如下所示:
<LinearLayout xmlns:android="http://schemas.android.com/apk/res/android" android:layout_width="match_parent" android:layout_height="match_parent" >
<fragment android:id="@+id/news_title_fragment" android:name="com.example.fragmentbestpractice.NewsTitleFragment"
android:layout_width="match_parent" android:layout_height="match_parent"
/>
</LinearLayout>
上述程式碼表示,在單頁模式下,只會載入一個新聞標題的碎片。然後新建 layout-sw600dp
資料夾,在這個資料夾下再新建一個 activity_main.xml 檔案,程式碼如下所示:
<LinearLayout xmlns:android="http://schemas.android.com/apk/res/android" android:layout_width="match_parent" android:layout_height="match_parent" >
<fragment android:id="@+id/news_title_fragment" android:name="com.example.fragmentbestpractice.NewsTitleFragment" android:layout_width="0dp"
android:layout_height="match_parent" android:layout_weight="1" />
<FrameLayout android:id="@+id/news_content_layout" android:layout_width="0dp" android:layout_height="match_parent" android:layout_weight="3" >
<fragment android:id="@+id/news_content_fragment" android:name="com.example.fragmentbestpractice.
NewsContentFragment" android:layout_width="match_parent" android:layout_height="match_parent" />
</FrameLayout>
</LinearLayout>
可以看出,在雙頁模式下我們同時引入了兩個碎片,並將新聞內容的碎片放在了一個 FrameLayout 佈局下,而這個佈局的 id 正是 news_content_layout。因此,能夠找到這個 id 的 時候就是雙頁模式,否則就是單面模式。
最後再將 MainActivity 稍作修改,把標題欄去除掉,程式碼如下所示:
public class MainActivity extends Activity {
@Override
protected void onCreate(Bundle savedInstanceState) { super.onCreate(savedInstanceState); requestWindowFeature(Window.FEATURE_NO_TITLE);
setContentView(R.layout.activity_main);
}
}
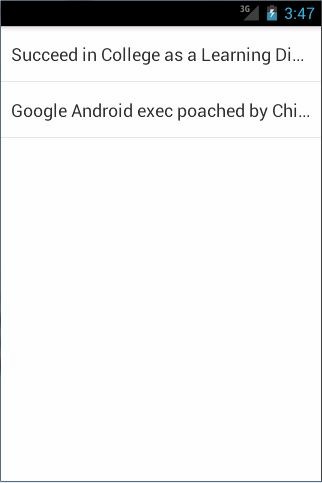
這樣我們所有的編寫工作就已經完成了,趕快來執行一下吧!首先在手機模擬器上執行, 效果如圖 4.15 所示。

圖 4.15
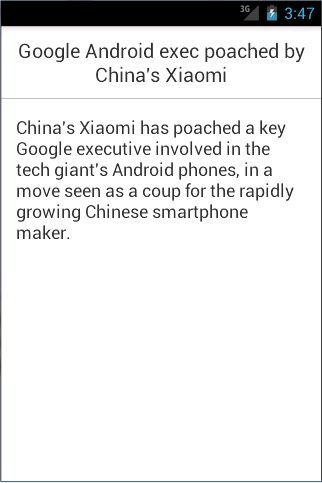
可以看到兩條新聞的標題,並且超出螢幕部分的文字是在尾部使用省略號代替的。 然後點選第二條新聞,會啟動一個新的活動來顯示新聞的內容,效果如圖 4.16 所示。

圖 4.16
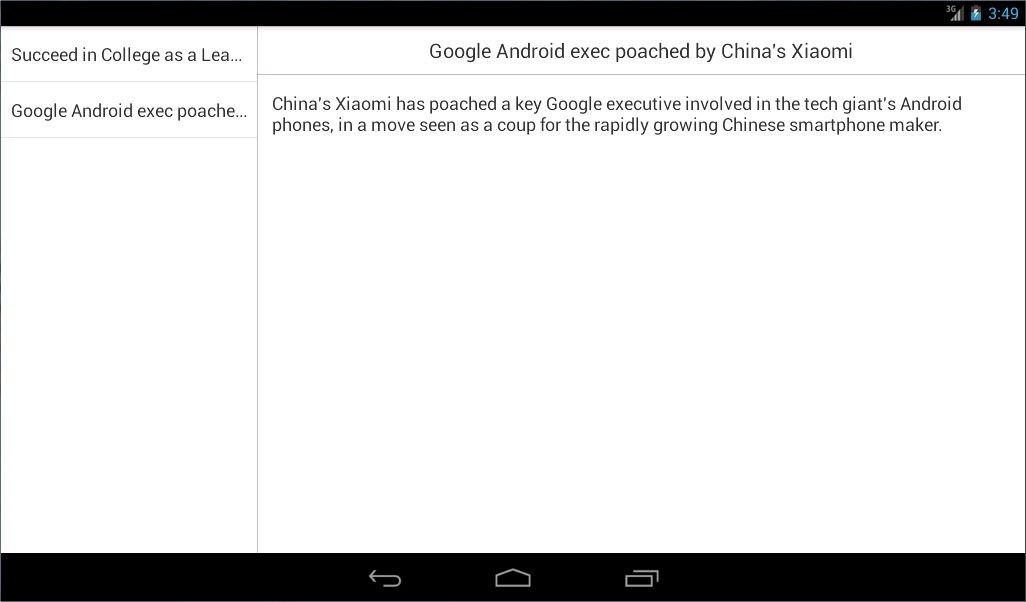
接下來將程式在平板模擬器上執行,同樣點選第二條新聞,效果如圖 4.17 所示。

圖 4.17