EditText 是程式用於和使用者進行互動的另一個重要控制元件,它允許使用者在控制元件裡輸入和編 輯內容,並可以在程式中對這些內容進行處理。EditText 的應用場景應該算是非常普遍了, 發簡訊、發微博、聊 QQ 等等,在進行這些操作時,你不得不使用到 EditText。那我們來看 一看如何在介面上加入 EditText 吧,修改 activity_main.xml 中的程式碼,如下所示:
<LinearLayout xmlns:android="http://schemas.android.com/apk/res/android" android:layout_width="match_parent" android:layout_height="match_parent"
android:orientation="vertical" >
……
<EditText android:id="@+id/edit_text" android:layout_width="match_parent" android:layout_height="wrap_content"
/>
</LinearLayout>
其實看到這裡,我估計你已經總結出 Android 控制元件的使用規律了,基本上用法都很相似, 給控制元件定義一個 id,再指定下控制元件的寬度和高度,然後再適當加入些控制元件特有的屬性就差不 多了。所以使用 XML 來編寫介面其實一點都不難,完全可以不用藉助任何視覺化工具來實 現。現在重新執行一下程式,EditText 就已經在介面上顯示出來了,並且我們是可以在裡面 輸入內容的,如圖 3.5 所示。
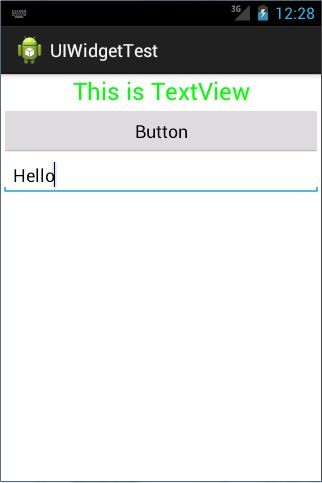
圖 3.5
細心的你平時應該會留意到,一些做得比較人性化的軟體會在輸入框裡顯示一些提示性 的文字,然後一旦使用者輸入了任何內容,這些提示性的文字就會消失。這種提示功能在 Android 裡是非常容易實現的,我們甚至不需要做任何的邏輯控制,因為系統已經幫我們都 處理好了。修改 activity_main.xml,如下所示:
<LinearLayout xmlns:android="http://schemas.android.com/apk/res/android" android:layout_width="match_parent" android:layout_height="match_parent"
android:orientation="vertical">
……
<EditText android:id="@+id/edit_text" android:layout_width="match_parent" android:layout_height="wrap_content" android:hint="Type something here"
/>
</LinearLayout>
這裡使用 android:hint 屬性來指定了一段提示性的文字,然後重新執行程式,效果如圖
3.6 所示。
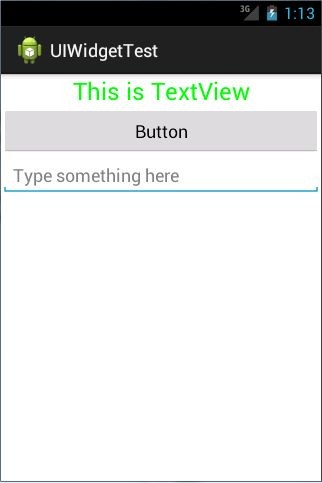
圖 3.6
可以看到,EditText 中顯示了一段提示性文字,然後當我們輸入任何內容時,這段文字 就會自動消失。
不過隨著輸入的內容不斷增多,EditText 會被不斷地拉長。這時由於 EditText 的高度指 定的是 wrap_content,因此它總能包含住裡面的內容,但是當輸入的內容過多時,介面就會 變得非常難看。我們可以使用 android:maxLines 屬性來解決這個問題,修改 activity_main.xml, 如下所示:
<LinearLayout xmlns:android="http://schemas.android.com/apk/res/android" android:layout_width="match_parent" android:layout_height="match_parent"
android:orientation="vertical" >
……
<EditText android:id="@+id/edit_text" android:layout_width="match_parent" android:layout_height="wrap_content"
android:hint="Type something here"
android:maxLines="2"
/>
</LinearLayout>
這裡通過 android:maxLines 指定了 EditText 的最大行數為兩行,這樣當輸入的內容超過 兩行時,文字就會向上滾動,而 EditText 則不會再繼續拉伸,如圖 3.7 所示。
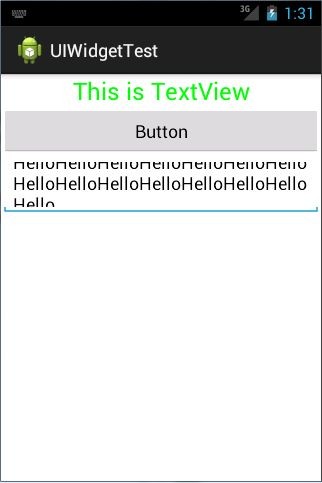
圖 3.7
我們還可以結合使用 EditText 與 Button 來完成一些功能,比如通過點選按鈕來獲取
EditText 中輸入的內容。修改 MainActivity 中的程式碼,如下所示:
public class MainActivity extends Activity implements OnClickListener {
private Button button;
private EditText editText;
@Override
protected void onCreate(Bundle savedInstanceState) { super.onCreate(savedInstanceState); setContentView(R.layout.activity_main);
button = (Button) findViewById(R.id.button);
editText = (EditText) findViewById(R.id.edit_text);
button.setOnClickListener(this);
}
@Override
public void onClick(View v) {
switch (v.getId()) {
case R.id.button:
String inputText = editText.getText().toString(); Toast.makeText(MainActivity.this, inputText,
Toast.LENGTH_SHORT).show();
break;
default:
break;
}
}
}
首先通過 findViewById() 方法得到 EditText 的例項,然後在按鈕的點選事件裡呼叫 EditText 的 getText()方法獲取到輸入的內容,再呼叫 toString()方法轉換成字串,最後仍 然還是老方法,使用 Toast 將輸入的內容顯示出來。重新執行程式,在 EditText 中輸入一段內容,然後點選按鈕,效果如圖 3.8 所示。
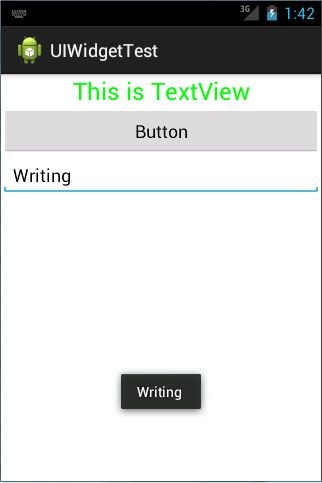
圖 3.8