前言
在專案開發中,可能遇到國際化的問題,而支援國際化卻是一件很頭疼的事。但spring boot給出了一個非常理想和方便的方案。
一、準備工作
pom.xml:

<?xml version="1.0" encoding="UTF-8"?>
<project xmlns="http://maven.apache.org/POM/4.0.0" xmlns:xsi="http://www.w3.org/2001/XMLSchema-instance"
    xsi:schemaLocation="http://maven.apache.org/POM/4.0.0 http://maven.apache.org/xsd/maven-4.0.0.xsd">
    <modelVersion>4.0.0</modelVersion>

    <groupId>com.example</groupId>
    <artifactId>spring-boot-14</artifactId>
    <version>0.0.1-SNAPSHOT</version>
    <packaging>jar</packaging>

    <name>spring-boot-14</name>
    <description>Demo project for Spring Boot</description>

    <parent>
        <groupId>org.springframework.boot</groupId>
        <artifactId>spring-boot-starter-parent</artifactId>
        <version>1.5.3.RELEASE</version>
        <relativePath/> <!-- lookup parent from repository -->
    </parent>

    <properties>
        <project.build.sourceEncoding>UTF-8</project.build.sourceEncoding>
        <project.reporting.outputEncoding>UTF-8</project.reporting.outputEncoding>
        <java.version>1.8</java.version>
    </properties>

    <dependencies>
        <dependency>
            <groupId>org.springframework.boot</groupId>
            <artifactId>spring-boot-starter-thymeleaf</artifactId>
        </dependency>
        <dependency>
            <groupId>org.springframework.boot</groupId>
            <artifactId>spring-boot-starter-web</artifactId>
        </dependency>

        <dependency>
            <groupId>org.springframework.boot</groupId>
            <artifactId>spring-boot-devtools</artifactId>
            <scope>runtime</scope>
        </dependency>
        <dependency>
            <groupId>org.springframework.boot</groupId>
            <artifactId>spring-boot-starter-test</artifactId>
            <scope>test</scope>
        </dependency>
    </dependencies>

    <build>
        <plugins>
            <plugin>
                <groupId>org.springframework.boot</groupId>
                <artifactId>spring-boot-maven-plugin</artifactId>
            </plugin>
        </plugins>
    </build>


</project>
App.java:

package com.example;

import org.springframework.boot.SpringApplication;
import org.springframework.boot.autoconfigure.SpringBootApplication;

@SpringBootApplication
public class App {

    public static void main(String[] args) {
        SpringApplication.run(App.class, args);
    }
}
建立國際化配置檔案:LocaleConfig.java
package com.example;

import java.util.Locale;

import org.springframework.boot.autoconfigure.EnableAutoConfiguration;
import org.springframework.context.annotation.Bean;
import org.springframework.context.annotation.ComponentScan;
import org.springframework.context.annotation.Configuration;
import org.springframework.web.servlet.LocaleResolver;
import org.springframework.web.servlet.config.annotation.InterceptorRegistry;
import org.springframework.web.servlet.config.annotation.WebMvcConfigurerAdapter;
import org.springframework.web.servlet.i18n.LocaleChangeInterceptor;
import org.springframework.web.servlet.i18n.SessionLocaleResolver;

@Configuration
@EnableAutoConfiguration
@ComponentScan
public class LocaleConfig extends WebMvcConfigurerAdapter {

    @Bean
    public LocaleResolver localeResolver() {
        SessionLocaleResolver slr = new SessionLocaleResolver();
        // 預設語言
        slr.setDefaultLocale(Locale.US);
        return slr;
    }

    @Bean
    public LocaleChangeInterceptor localeChangeInterceptor() {
        LocaleChangeInterceptor lci = new LocaleChangeInterceptor();
        // 引數名
        lci.setParamName("lang");
        return lci;
    }

    @Override
    public void addInterceptors(InterceptorRegistry registry) {
        registry.addInterceptor(localeChangeInterceptor());
    }
}
MainController.java:
package com.example;

import org.springframework.stereotype.Controller;
import org.springframework.web.bind.annotation.GetMapping;

/**
 * 控制器 部落格出處:http://www.cnblogs.com/GoodHelper/
 *
 */
@Controller
public class MainController {

    @GetMapping("/")
    public String index() {
        return "index";
    }

}
在resources目錄增加兩個properties檔案,分別為:
messages_en_US.properties:
hello=hello
messages_zh_CN.properties:
hello=\u4F60\u597D
二、前端呼叫
在thymeleaf模板引擎中使用#{}的標籤就能呼叫messages中的內容
index.html:
<!DOCTYPE html>
<html xmlns:th="http://www.thymeleaf.org">
<head>
<meta http-equiv="Content-Type" content="text/html; charset=UTF-8" />
<title>玩轉spring boot——國際化</title>
</head>
<body>
    <h1>玩轉spring boot——國際化</h1>
    <h4>
        <a href="http://www.cnblogs.com/GoodHelper/">from 劉冬的部落格</a>
    </h4>
    <br />
    <br />
    <a href="/?lang=en_US">English(US)</a>
    <a href="/?lang=zh_CN">簡體中文</a>
    <br />

    <h3 th:text="#{hello}"></h3>
    <br />
    <br />
    <a href="http://www.cnblogs.com/GoodHelper/">點選訪問原版部落格(www.cnblogs.com/GoodHelper)</a>
</body>
</html>
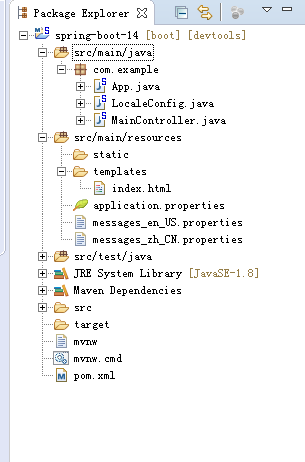
專案結構如下:

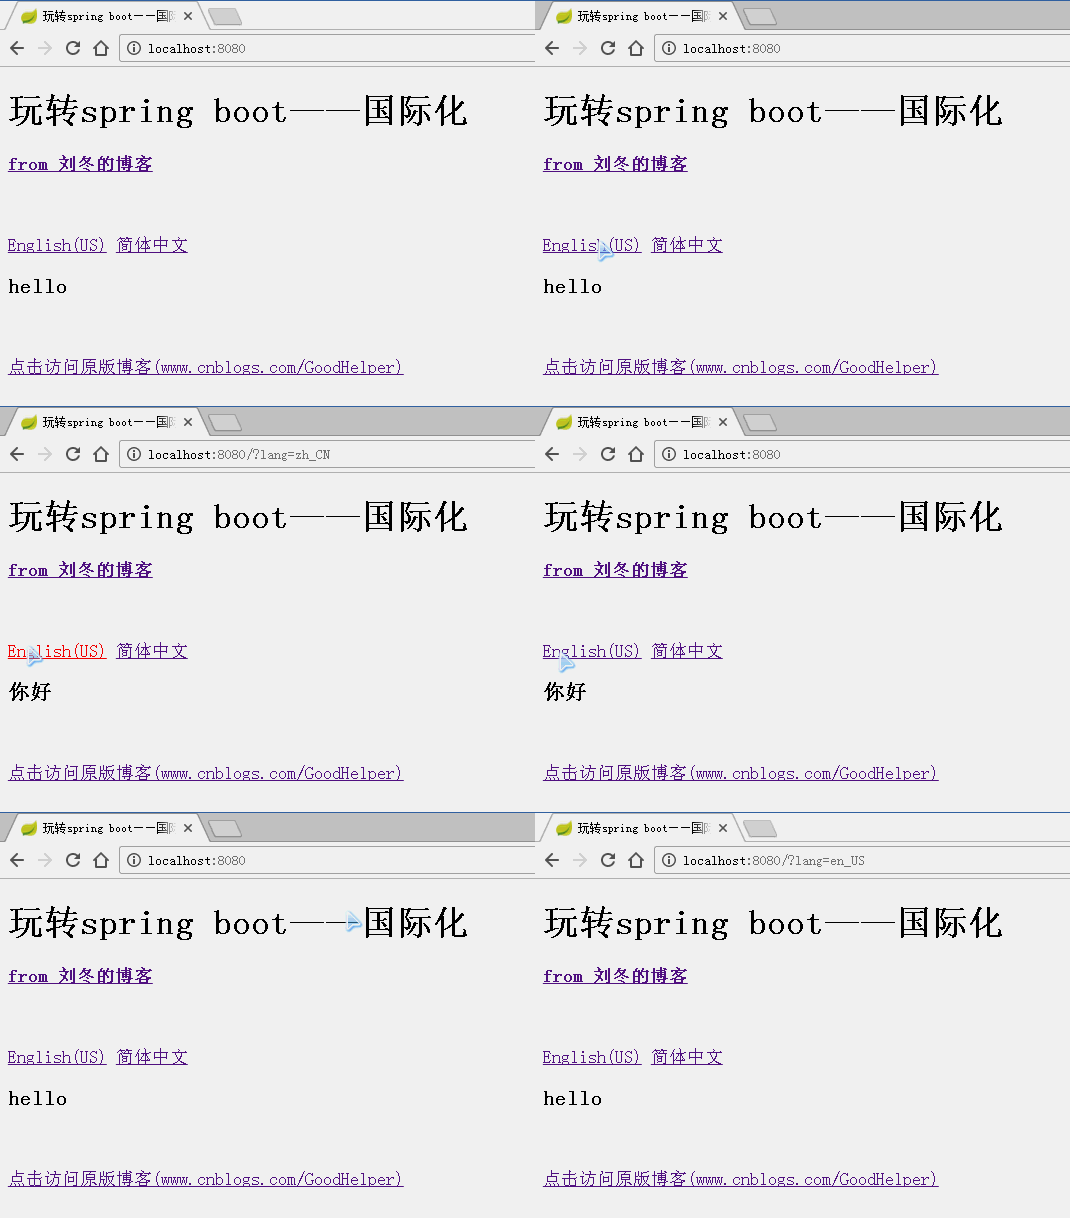
執行效果:

三、後端渲染
修改MainController類:
package com.example;

import java.util.Locale;

import org.springframework.beans.factory.annotation.Autowired;
import org.springframework.context.MessageSource;
import org.springframework.context.i18n.LocaleContextHolder;
import org.springframework.stereotype.Controller;
import org.springframework.ui.Model;
import org.springframework.web.bind.annotation.GetMapping;

/**
 * 控制器 部落格出處:http://www.cnblogs.com/GoodHelper/
 *
 */
@Controller
public class MainController {

    @Autowired
    private MessageSource messageSource;

    @GetMapping("/")
    public String index(Model model) {
        Locale locale = LocaleContextHolder.getLocale();
        model.addAttribute("world", messageSource.getMessage("world", null, locale));
        return "index";
    }

}
其中,MessageSource類可以獲取messages的內容。
index.html:
<!DOCTYPE html>
<html xmlns:th="http://www.thymeleaf.org">
<head>
<meta http-equiv="Content-Type" content="text/html; charset=UTF-8" />
<title>玩轉spring boot——國際化</title>
</head>
<body>
    <h1>玩轉spring boot——國際化</h1>
    <h4>
        <a href="http://www.cnblogs.com/GoodHelper/">from 劉冬的部落格</a>
    </h4>
    <br />
    <br />
    <a href="/?lang=en_US">English(US)</a>
    <a href="/?lang=zh_CN">簡體中文</a>
    <br />

    <h3 th:text="#{hello} + ' , ' + ${world}"></h3>
    <br />
    <br />
    <a href="http://www.cnblogs.com/GoodHelper/">點選訪問原版部落格(www.cnblogs.com/GoodHelper)</a>
</body>
</html>
一個使用了#{}標籤直接呼叫messages的內容,另一個使用了${}標籤來獲取後臺的值
執行效果:

總結
國際化就已經實現了,然而更完美的做法是當第一次請求時,在後臺透過Request獲取到一個初始的語言。當獲取到的語言和使用者所需要的語言不一直時,才需要在前端UI再去設定哪個語言是使用者所需要的。
程式碼下載:https://github.com/carter659/spring-boot-14.git

如果你覺得我的部落格對你有幫助,可以給我點兒打賞,左側微信,右側支付寶。
有可能就是你的一點打賞會讓我的部落格寫的更好:)
