React元件效能最佳化
前言
眾所周知,瀏覽器的重繪和重排版(reflows & repaints)(DOM操作都會引起)才是導致網頁效能問題的關鍵。而React虛擬DOM的目的就是為了減少瀏覽器的重繪和重排版。
說到React最佳化問題,就必須提下虛擬DOM。虛擬DOM是React核心,透過高新的比較演算法,實現了對介面上真正變化的部分進行實際的DOM操作(只是說在大部分場景下這種方式更加效率,而不是一定就是最效率的)。雖然虛擬DOM很牛逼(實際開發中我們根本無需關係其是如何執行的),但是也有缺點。如當React元件如下:
<Components>
  <Components-1 />
  <Components-2 />
  <Components-3 />
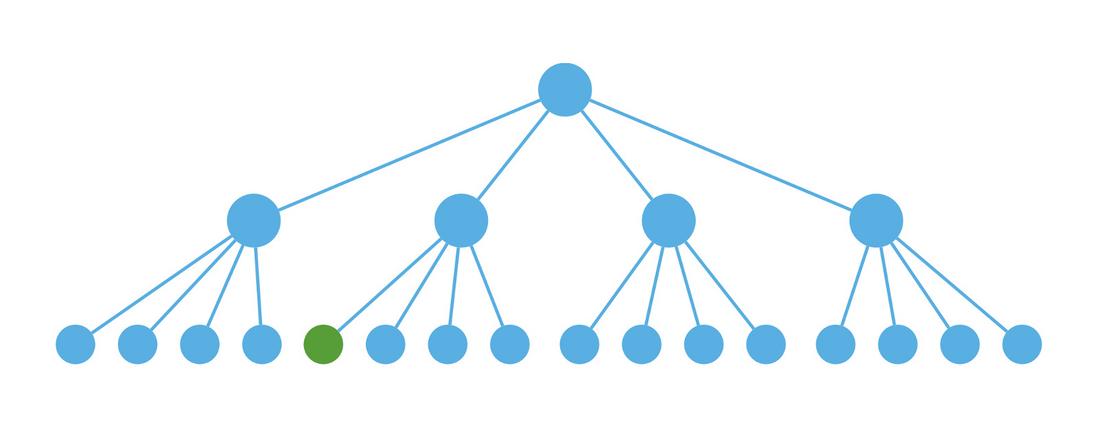
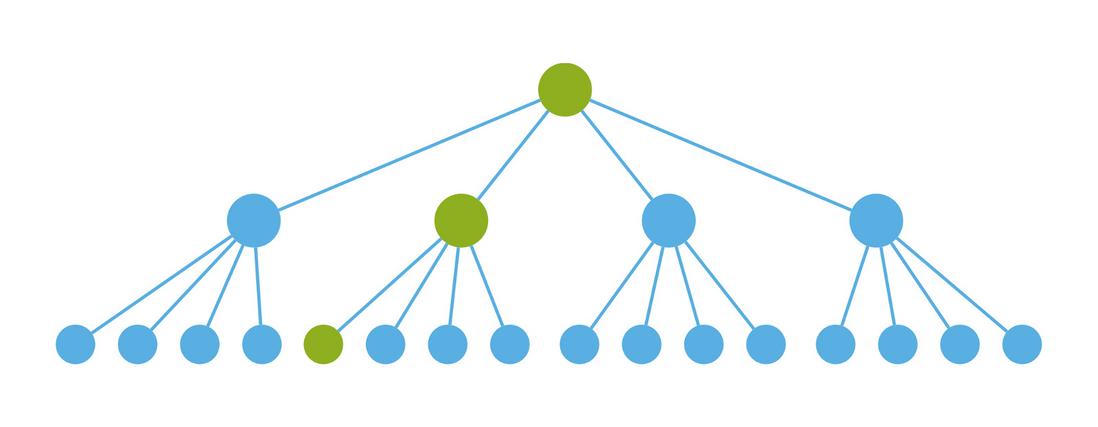
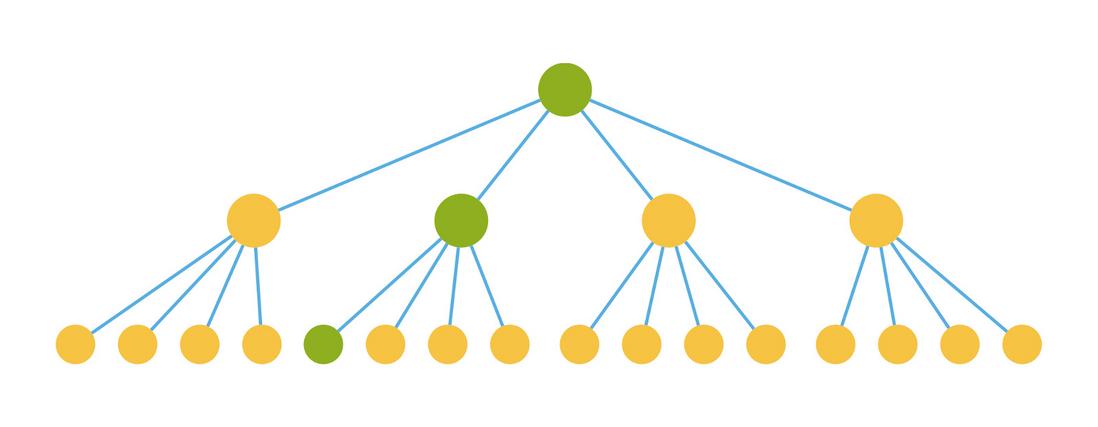
</Components>資料變化從Components->Components-1傳遞下來,React不會只重渲染Components-1和其父元件,React會以變化(props和state的變化)的最上層的元件為準生成對比的虛擬DOM,就導致了元件沒必要的重渲染(即元件render方法的執行)。下面的3張圖是借用網上的,是對上面元件更新的圖表說明。
更新綠色點元件(從根元件傳遞下來應用在綠色元件上的資料發生改變)
理想狀態我們想只更新綠色點的元件
實際圖中的元件都會重渲染(黃色的點是不必要的渲染,最佳化的方向)
React開發團隊也考慮到這個問題,為我們提供了一個元件函式處理資料量大的效能問題,shouldComponentUpdate,這個方法是我們的效能最佳化切入點。
虛擬DOM
虛擬DOM其實就是一個 JavaScript 物件。 React 使用虛擬DOM來渲染 UI,當元件狀態有更改的時候,React 會自動呼叫元件的 render 方法重新渲染整個元件的 UI。
當然如果真的這樣大面積的操作 DOM,效能會是一個很大的問題,所以 React 實現了一個虛擬 DOM,元件 DOM 結構就是對映到這個虛擬 DOM 上,React 在這個虛擬 DOM 上實現了一個 diff 演算法,當要更新元件的時候,會透過 diff 尋找到要變更的 DOM 節點,再把這個修改更新到瀏覽器實際的 DOM 節點上,所以實際上不是真的渲染整個 DOM 樹。這個虛擬 DOM 是一個純粹的 JS 資料結構,所以效能會比原生 DOM 快很多。
元件渲染方式
元件渲染方式有兩種初始渲染和更新渲染,而我們需要最佳化的地方就是更新渲染。
最佳化關鍵shouldComponentUpdate
元件更新生命週期中必呼叫shouldComponentUpdate,字面意思是元件是否應該更新。shouldComponentUpdate預設返回true,必更新。所有當我們判斷出元件沒必要更新是,shouldComponentUpdate可以返回false,就達到最佳化效果。那如何編寫判斷程式碼呢?看下以下幾種方式。
官方PureRenderMixin
React 官方提供了 PureRenderMixin 外掛,其使用方法如下:
//官方例子
import PureRenderMixin from 'react-addons-pure-render-mixin';
class FooComponent extends React.Component {
  constructor(props) {
    super(props);
    this.shouldComponentUpdate = PureRenderMixin.shouldComponentUpdate.bind(this);
  }

  render() {
    return <div className={this.props.className}>foo</div>;
  }
}
在 React 的最新版本里面,提供了 React.PureComponent 的基礎類,而不需要使用這個外掛。
這個外掛其實就是重寫了 shouldComponentUpdate 方法,但是這都是最上層物件淺顯的比較,沒有進行物件深度比較,場景有所限制。那就需要我們自己重寫新的PureRenderMixin。
自定義PureRenderMixin
以下重寫方式是採用ES6,和React高階元件寫法,使用了lodash進行深度比較。可以看我在CodePen的例子React元件最佳化之lodash深度對比
import _ from 'lodash';

function shallowEqual(objA, objB) {
  if (objA === objB) {
    return true;
  }

  if (typeof objA !== 'object' || objA === null || typeof objB !== 'object' || objB === null) {
    return false;
  }

  const keysA = Object.keys(objA);
  const keysB = Object.keys(objB);

  if (keysA.length !== keysB.length) {
    return false;
  }

  const bHasOwnProperty = hasOwnProperty.bind(objB);
  for (let i = 0; i < keysA.length; i++) {
    const keyA = keysA[i];

    if (objA[keyA] === objB[keyA]) {
      continue;
    }

    // special diff with Array or Object
    if (_.isArray(objA[keyA])) {
      if (!_.isArray(objB[keyA]) || objA[keyA].length !== objB[keyA].length) {
        return false;
      } else if (!_.isEqual(objA[keyA], objB[keyA])) {
        return false;
      }
    } else if (_.isPlainObject(objA[keyA])) {
      if (!_.isPlainObject(objB[keyA]) || !_.isEqual(objA[keyA], objB[keyA])) {
        return false;
      }
    } else if (!bHasOwnProperty(keysA[i]) || objA[keysA[i]] !== objB[keysA[i]]) {
      return false;
    }
  }

  return true;
}


function shallowCompare(instance, nextProps, nextState) {
  return !shallowEqual(instance.props, nextProps) || !shallowEqual(instance.state, nextState);
}

function shouldComponentUpdate(nextProps, nextState) {
  return shallowCompare(this, nextProps, nextState);
}
/* eslint-disable no-param-reassign */
function pureRenderDecorator(component) {
  //覆蓋了component中的shouldComponentUpdate方法
  component.prototype.shouldComponentUpdate = shouldComponentUpdate;
  return component;//Decorator不用返回,直接使用高階元件需要return
}
/*****
*使用ES6 class 語法糖如下,decorator的沒試過,decorator請使用上面的,不要return
*let pureRenderDecorator = component => class {
*  constructor(props) {
*    super(props);
*    component.prototype.shouldComponentUpdate = shouldComponentUpdate;
*  }
*  render(){
*    var Component = component;//自定義元件使用時要大寫
*   return (
*        <Component {...this.props}/>
*    )
*  }
*}
******/
export { shallowEqual };
export default pureRenderDecorator;這種方式可以確保props和state數無變化的情況下,不重新渲染元件。但是進行了物件深度比較,是比較不划算的。這點Facebook也是有考慮的,所以就有了immutable-js。
immutable-js
immutable-js這裡就不詳說,這裡貼一下React元件最佳化程式碼,重寫shouldComponentUpdate
import { is } from 'immutable'
...//省略程式碼
shouldComponentUpdate(nextProps = {}, nextState = {}){
  const thisProps = this.props || {},
  thisState = this.state || {};

  if (Object.keys(thisProps).length !== Object.keys(nextProps).length ||
    Object.keys(thisState).length !== Object.keys(nextState).length) {
    return true;
  }

  for (const key in nextProps) {
    if (thisProps[key] !== nextProps[key] || !is(thisProps[key], nextProps[key])) {
      //console.debug(thisProps[key],nextProps[key])
      return true;
    }
  }

  for (const key in nextState) {
    if (thisState[key] !== nextState[key] || !is(thisState[key], nextState[key])) {
      return true;
    }
  }
  return false;
}
...//省略程式碼
這裡面的處理前提是要使用immutable-js物件,上面的程式碼不是100%適合所有場景(如果全部的props和states都是immutable物件,這個是沒問題的),當props中有函式物件(原生的)時,這個就會失效,需要做些而外處理。
對於 Mutable 的物件(原生的js物件就是Mutable的)的低效率操作主要體現在 複製 和 比較 上,而 Immutable 物件就是解決了這兩大低效的痛點。
immutable-js的比較是比lodash深度物件比較是更有效率的。
總結
immutable-js的思想其實是跟React的虛擬DOM是一致的,都是為了減少不必要的消耗,提高效能。虛擬DOM內部處理比較複雜,而且可能還會帶有一些開發人員的副作用(render中執行了一些耗時的程式),演算法比較完後會相對耗時。而 immutable-js和lodash只是純淨的比較資料,效率是相對比較高的,是目前比較適合使用的PureRender方式。建議採用immutable-js,也可以根據專案性質決定。(ps:持續更新歡迎指正)


