代理伺服器英文全稱是Proxy Server,其功能就是代理網路使用者去取得網路資訊。
Squid是一個快取Internet 資料的軟體,其接收使用者的下載申請,並自動處理所下載的資料。當一個使用者想要下載一個主頁時,可以向Squid 發出一個申請,要Squid 代替其進行下載,然後Squid 連線所申請網站並請求該主頁,接著把該主頁傳給使用者同時保留一個備份,當別的使用者申請同樣的頁面時,Squid 把儲存的備份立即傳給使用者,使使用者覺得速度相當快。Squid 可以代理HTTP、FTP、GOPHER、SSL和WAIS等協議並且Squid 可以自動地進行處理,可以根據自己的需要設定Squid,使之過濾掉不想要的東西。
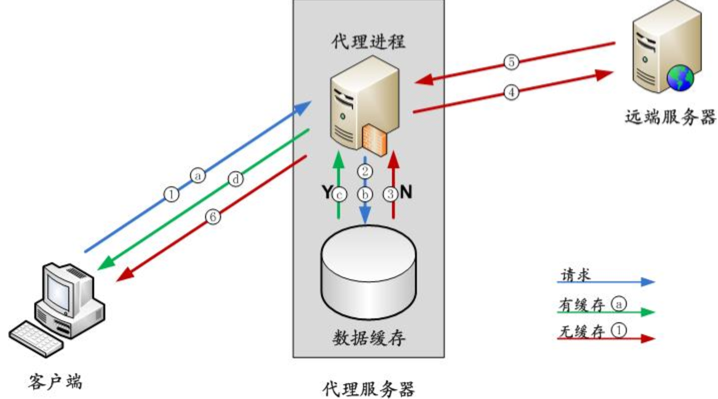
一、工作流程
當代理伺服器中有客戶端需要的資料時:
1)客戶端向代理伺服器傳送資料請求;
2)代理伺服器檢查自己的資料快取;
3)代理伺服器在快取中找到了使用者想要的資料,取出資料;
4)代理伺服器將從快取中取得的資料返回給客戶端。
當代理伺服器中沒有客戶端需要的資料時:
1)客戶端向代理伺服器傳送資料請求;
2)代理伺服器檢查自己的資料快取;
3)代理伺服器在快取中沒有找到使用者想要的資料;
4)代理伺服器向Internet 上的遠端伺服器傳送資料請求;
5)遠端伺服器響應,返回相應的資料;
6)代理伺服器取得遠端伺服器的資料,返回給客戶端,並保留一份到自己的資料快取中。
Squid代理伺服器工作在TCP/IP的應用層:

二、squid分類
按照代理型別的不同,可以將Squid代理分為正向代理和反向代理。
正向代理:根據實現方式的不同,又可以分為普通代理和透明代理。
1)普通代理:需要客戶機在瀏覽器中指定代理伺服器的地址、埠;
2)透明代理:適用於企業的閘道器主機(共享接入Internet)中,客戶機不需要指定代理伺服器地址、埠等資訊,代理伺服器需要設定防火牆策略將客戶機的Web訪問資料轉交給代理服務程式處理;
反向代理:是指以代理伺服器來接受internet上的連線請求,然後將請求轉發給內部網路上的伺服器,並將從伺服器上得到的結果返回給internet上請求連線的客戶端,此時代理伺服器對外就表現為一個伺服器。
三、squid代理快取環境部署過程:
1)關閉selinux和iptables
[root@server~]# vim /etc/sysconfig/selinux
.......
SELINUX=disabled
[root@server~]# /etc/init.d/iptables stop
2)檢查squid軟體是否安裝
[root@server~]# rpm -qa|grep squid
3)如果未安裝,則使用yum 方式安裝
[root@server~]# yum -y install squid
4) 設定開機自啟動,在3、5級別上自動執行squid服務
[root@server~]# chkconfig --level 35 squid on
5)squid伺服器的配置檔案說明
squid 的主配置檔案是 /etc/squid/squid.conf,所有squid的設定都是在這個檔案裡配置,這裡squid配置如下:
[root@server~]# vim /etc/squid/squid.conf
http_port 3128 #設定監聽的IP與埠號
cache_mem 64 MB #額外使用記憶體量,可根據你的系統記憶體在設定,一般為實際記憶體的1/3.比如這裡記憶體是200M,這裡設定1/3就是64MB
maximum_object_size 4 MB #設定squid磁碟快取最大檔案,超過4M的檔案不儲存到硬碟
minimum_object_size 0 KB #設定squid磁碟快取最小檔案
maximum_object_size_in_memory 4096 KB #設定squid記憶體快取最大檔案,超過4M的檔案不儲存到記憶體
cache_dir ufs /var/spool/squid 100 16 256 #定義squid的cache存放路徑 、cache目錄容量(單位M)、一級快取目錄數量、二級快取目錄數量
logformat combined %>a %ui %un [%tl] "%rm %ru HTTP/%rv" %Hs %<st "%{Referer}>h" "%{User-Agent}>h" %Ss:%Sh #log檔案日誌格式
access_log /var/log/squid/access.log combined #log檔案存放路徑和日誌格式
cache_log /var/log/squid/cache.log #設定快取日誌
logfile_rotate 60 #log輪循60天
cache_swap_high 95 #cache目錄使用量大於95%時,開始清理舊的cache
cache_swap_low 90 #cache目錄清理到90%時停止
acl localnet src 192.168.1.0/24 #定義本地網段
http_access allow localnet #允許本地網段使用
http_access deny all #拒絕所有
visible_hostname squid.david.dev #主機名
cache_mgr wangshibo@huanqiu.com #管理員郵箱
四、普通代理服務
即標準的、傳統的代理服務,需要客戶機在瀏覽器中指定代理伺服器的地址、埠。
實驗拓撲圖如下:
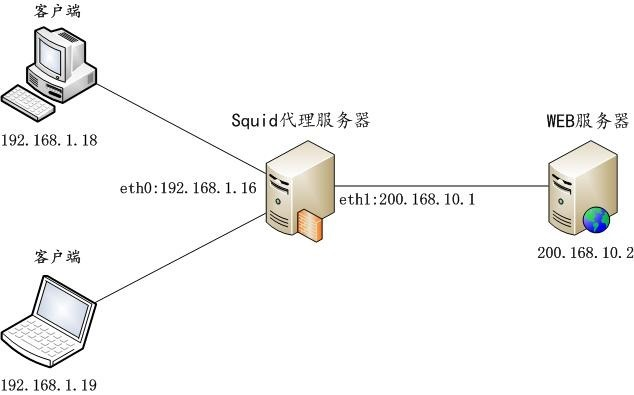
1)配置Squid 代理伺服器IP地址
將eth1的IP地址修改為200.168.10.1
[root@server~]# ifconfig eth1 200.168.10.1
2) 編輯squid 主配置檔案/etc/squid/squid.conf
[root@server~]# vim /etc/squid/squid.conf
http_port 3128
cache_mem 64 MB
maximum_object_size 4 MB
cache_dir ufs /var/spool/squid 100 16 256
access_log /var/log/squid/access.log
acl localnet src 192.168.1.0/24
http_access allow localnet
http_access deny all
visible_hostname squid.david.dev
cache_mgr wangshibo@huanqiu.com
3) 初始化
[root@server~]# squid –z
4) 啟動Squid
[root@server~]# /etc/init.d/squid start
5) 配置Web 伺服器
安裝Apache
[root@server~]# rpm -qa|grep httpd
[root@server~]# yum -y install httpd
啟動Apache並加入開機啟動
[root@server~]# /etc/init.d/httpd start
[root@server~]# chkconfig httpd on
建立index.html
[root@server~]# echo "<h1>Squid-Web1/200.168.10.2</h1>" > /var/www/html/index.html
修改Web伺服器IP地址
將web伺服器的IP地址修改為200.168.10.2
[root@server~]# ifconfig eth0 200.168.10.2
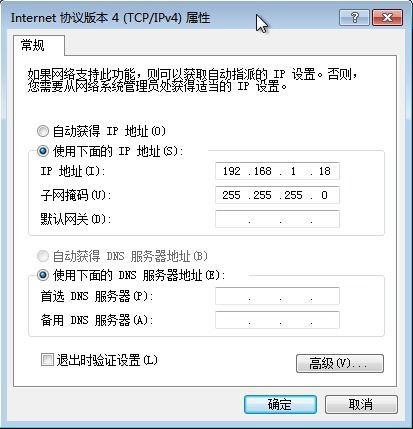
6) 配置客戶端IP地址
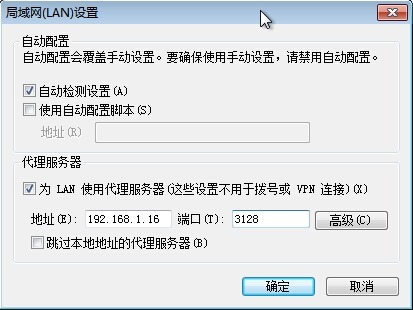
7) 配置瀏覽器代理
開啟瀏覽器(以IE為例,其他類似),選單欄 -> 工具 -> Internet 選項 -> 連線 -> 區域網設定 -> 代理伺服器,按照以下格式設定。
8) 測試

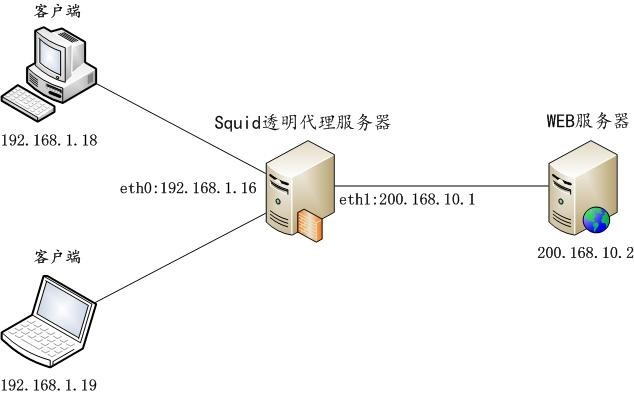
五、透明代理服務
適用於企業的閘道器主機,客戶機不需要指定代理伺服器地址、埠等資訊,通過iptables將客戶機的Web訪問資料轉交給代理服務程式處理。
實驗拓撲圖如下:
1)修改squid 主配置檔案/etc/squid/squid.conf
[root@server~]# vim /etc/squid/squid.conf
http_port 3128 transparent
cache_mem 64 MB
maximum_object_size 4 MB
cache_dir ufs /var/spool/squid 100 16 256
access_log /var/log/squid/access.log
acl localnet src 192.168.1.0/24
http_access allow localnet
http_access deny all
visible_hostname squid.david.dev
cache_mgr wangshibo@huanqiu.com
在http_port 3128 後新增transparent 關鍵字。
2) 重啟squid服務
[root@server~]# /etc/init.d/squid reload
3) 新增iptables規則,把內部的http請求重定向到3128埠
啟動iptables 服務
[root@server~]# /etc/init.d/iptables start
清除現有iptables filter 表規則
[root@server~]# iptables -F
儲存iptables 設定
[root@server~]# /etc/init.d/iptables save
檢視nat 表設定
[root@server~]# iptables -t nat -L -n
在nat表中新增一條規則
[root@server~]# iptables -t nat -I PREROUTING -i eth0 -s 192.168.1.0/24 -p tcp --dport 80 -j REDIRECT --to-port 3128
儲存iptables
[root@server~]# /etc/init.d/iptables save
設定iptables 開機啟動
[root@server~]# chkconfig iptables on
4) 修改客戶端IP地址
將預設閘道器設定為squid 伺服器的內網ip地址。

5) 在瀏覽器中,取消代理設定

6) 測試

透明代理測試成功。
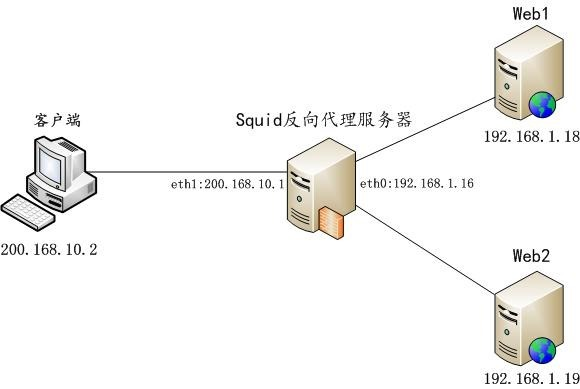
六、反向代理服務
為Internet使用者訪問企業Web站點提供快取加速。
實驗拓撲圖如下:
1) 關閉防火牆
# /etc/init.d/iptables stop
2) 修改Web Server 主頁
Web1:
[root@server~]#echo "<h1>Squid-Web1/192.168.1.18</h1>" > /var/www/html/index.html
Web2:
[root@server~]# echo "<h1>Squid-Web1/192.168.1.19</h1>" > /var/www/html/index.html
3) 配置squid
[root@server~]# vim /etc/squid/squid.conf
http_port 80 accel vhost
http_access allow all
cache_peer 192.168.1.18 parent 80 0 originserver round-robin weight=1
cache_peer 192.168.1.19 parent 80 0 originserver round-robin weight=1
visible_hostname squid.david.dev
cache_mgr mchina_tang@qq.com
4) 啟動Squid服務(在此啟動會報錯,是因為上面設定了80埠,和http埠衝突。關閉http即可成功啟動這裡的squid)
[root@server~]# /etc/init.d/squid reload
5) 測試
squid 採用了round-robin,所以客戶端的訪問將輪詢兩臺web伺服器,採用 "Ctrl + F5" 來深度重新整理測試。
Web1:

Web2:

6)檢視squid 的訪問日誌。

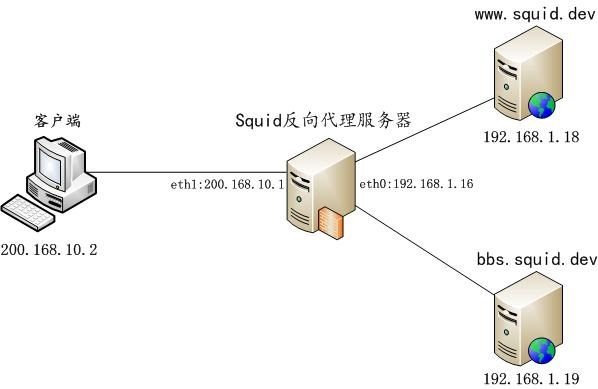
七、實際應用
下面實驗將模擬通過不同的域名訪問不同的機器,簡單實現企業應用中的負載均衡。客戶端在瀏覽器位址列中輸入www.squid.dev,將訪問192.168.1.18這臺機器,訪問bbs.squid.dev,將訪問192.168.1.19這臺機器。
實驗拓撲圖如下:
1) 修改Web Server 主頁
Web1:
[root@server~]# echo "<h1>www.squid.dev/192.168.1.18</h1>" > /var/www/html/index.html
Web2:
[root@server~]# echo "<h1>bbs.squid.dev/192.168.1.19</h1>" > /var/www/html/index.html
2) 配置Squid
[root@server~]# vim /etc/squid/squid.conf
http_port 80 accel vhost
http_access allow all
cache_peer 192.168.1.18 parent 80 0 originserver name=www
cache_peer 192.168.1.19 parent 80 0 originserver name=bbs
cache_peer_domain www www.squid.dev
cache_peer_domain bbs bbs.squid.dev
visible_hostname squid.david.dev
cache_mgr wangshibo@huanqiu.com
3) 配置客戶端
這裡可以使用DNS服務來解析,這裡我們為了方便,就在hosts 檔案裡直接指定。

4) 測試網路情況

5) 測試www.squid.dev

6) 測試bbs.squid.dev

7) 檢視squid 訪問日誌

8) 檢視兩臺伺服器的apache 訪問日誌
[root@server~]# tailf /var/log/httpd/access.log

測試成功。