搭建個人雲端儲存一般會想到ownCloud,堪稱是自建雲端儲存服務的經典。而Nextcloud是ownCloud原開發團隊打造的號稱是“下一代”儲存。初一看覺得“口氣”不小,剛推出來就重新“定義”了Cloud,真正試用過後就由衷地贊同這個Nextcloud:它是個人云儲存服務的絕佳選擇。可以說Nextcloud 是一款自由 (開源) 的類 Dropbox 軟體,由 ownCloud 分支演化形成。它使用 PHP 和 JavaScript 編寫,支援多種資料庫系統,比如 MySQL/MariaDB、PostgreSQL、Oracle 資料庫和 SQLite。它可以使你的桌面系統和雲伺服器中的檔案保持同步,Nextcloud 為 Windows、Linux、Mac、安卓以及蘋果手機都提供了客戶端支援。同時,Nextcloud 也並非只是 Dropbox 的克隆,它還提供了很多附加特性,如日曆、聯絡人、計劃任務以及流媒體 Ampache。
與ownCloud相比,Nextcloud的功能絲毫沒有減弱,甚至由於可以安裝雲端儲存服務應用,自制性更強,也更符合使用者的需求。Nextcloud官網的幫助文件寫得相當地詳細,幾乎任何關於Nextcloud的問題都可以找到答案,這說明Nextcloud開發團隊確實比ownCloud更加優秀。
一開始以為Nextcloud只是一個網盤雲端儲存,後來看到Nextcloud內建了Office文件、圖片相簿、日曆聯絡人、兩步驗證、檔案管理、RSS閱讀等豐富的應用,我發現Nextcloud已經僅僅可以用作個人或者團隊儲存與共享,還可以打造成為一個個人辦公平臺,幾乎相當於一個個人的Dropbox了。
以下內容將介紹如何在 CentOS 7 伺服器中安裝和配置最新版本的 Nextcloud 12,並且會通過 Nginx 和 PHP7-FPM 來執行 Nextcloud,同時使用 MariaDB 做為資料庫系統。Nextcloud雲盤環境部署後,可以實現web網頁端、手機移動端和桌面客戶端三者資料同步,其中桌面客戶端可以在本地設定一個資料夾,用於同步資料,這樣也就相當於在本地備份了資料。同時客戶端只要設定開機啟動,即只要是啟動狀態中,它和網頁端的資料就是自動同步的。廢話不多說了,直接看部署筆記:
部署機器的系統是Centos7.4版本
[root@nextcloud-server ~]# cat /etc/redhat-release
CentOS Linux release 7.4.1708 (Core)

一、安裝並配置Nginx和php-fpm
================================================================
將自帶的epel、nginx、php全部解除安裝(rpm -e ... --nodeps)
[root@nextcloud-server ~]# rpm -qa|grep php
[root@nextcloud-server ~]# rpm -qa|grep php-common
[root@nextcloud-server ~]# rpm -qa|grep nginx
===============================================================
CentOS預設的yum源中並不包含Nginx和php-fpm,首先要為CentOS新增epel源:
[root@nextcloud-server ~]# yum -y install epel-release
[root@nextcloud-server ~]# yum -y install nginx

需要再新增一個yum源來安裝php-fpm,可以使用webtatic(這個yum源對國內網路來說恐怕有些慢,當然你也可以選擇其它的yum源)
[root@nextcloud-server ~]# rpm -Uvh https://mirror.webtatic.com/yum/el7/webtatic-release.rpm

安裝php7-fpm和一些其它的必要的元件
[root@nextcloud-server ~]# yum -y install php70w-fpm php70w-cli php70w-gd php70w-mcrypt php70w-mysql php70w-pear php70w-xml php70w-mbstring php70w-pdo php70w-json php70w-pecl-apcu php70w-pecl-apcu-devel

完成後,檢查一下php-fpm是否已正常安裝
[root@nextcloud-server ~]# php -v
PHP 7.0.25 (cli) (built: Oct 29 2017 13:43:03) ( NTS )
Copyright (c) 1997-2017 The PHP Group
Zend Engine v3.0.0, Copyright (c) 1998-2017 Zend Technologies

配置php-fpm
[root@nextcloud-server ~]# vim /etc/php-fpm.d/www.conf
.....
user = nginx                                   //將使用者和組都改為nginx
group = nginx
.....
listen = 127.0.0.1:9000                        //php-fpm所監聽的埠為9000
......
env[HOSTNAME] = $HOSTNAME                     //去掉下面幾行註釋
env[PATH] = /usr/local/bin:/usr/bin:/bin
env[TMP] = /tmp
env[TMPDIR] = /tmp
env[TEMP] = /tmp

在/var/lib目錄下為session路徑建立一個新的資料夾,並將使用者名稱和組設為nginx
[root@nextcloud-server ~]# mkdir -p /var/lib/php/session
[root@nextcloud-server ~]# chown nginx:nginx -R /var/lib/php/session/
[root@nextcloud-server ~]# ll -d /var/lib/php/session/
drwxr-xr-x. 2 nginx nginx 4096 1月  25 09:47 /var/lib/php/session/

啟動Nginx和php-fpm服務,並新增開機啟動
[root@nextcloud-server ~]# systemctl start php-fpm
[root@nextcloud-server ~]# systemctl start nginx
[root@nextcloud-server ~]# systemctl enable php-fpm
[root@nextcloud-server ~]# systemctl enable nginx

二、安裝並配置MariaDB
使用MaraiDB作為Nextcloud資料庫。yum安裝MaraiDB服務
[root@nextcloud-server ~]# yum -y install mariadb mariadb-server

啟動MariaDB服務並新增開機啟動
[root@nextcloud-server ~]# systemctl start mariadb
[root@nextcloud-server ~]# systemctl enable mariadb

接下來設定MariaDB的root密碼
[root@nextcloud-server ~]# mysql_secure_installation        //按照提示設定密碼,首先會詢問當前密碼,密碼預設為空,直接回車即可
Enter current password for root (enter for none):          //直接回車
Set root password? [Y/n] Y
New password:                                              //輸入新密碼
Re-enter new password:                                     //再次輸入新密碼

Remove anonymous users? [Y/n] Y
Disallow root login remotely? [Y/n] Y
Remove test database and access to it? [Y/n] Y
Reload privilege tables now? [Y/n] Y
==============================================================================================
或者採用另一種修改密碼的方式:跳過授權表
1)在/etc/my.cnf檔案裡新增"skip-grant-tables"
2)重啟mariadb服務
3)無密碼登陸mariadb,然後重置mysql密碼
MariaDB [(none)]> update mysql.user set password=password("kevin@123") where user="root";
4)去掉/etc/my.cnf檔案裡的"skip-grant-tables"內容
5)重啟mariadb服務
6)這樣就可以使用上面重置的新密碼kevin@123登陸mariadb了
==============================================================================================

設定完MariaDB的密碼後,使用命令列登入MariaDB,併為Nextcloud建立相應的使用者和資料庫。
例如資料庫為nextcloud_db,使用者為nextclouduser,密碼為nextcloudpasswd:
[root@nextcloud-server ~]# mysql -p
......
MariaDB [(none)]> create database nextcloud_db;
MariaDB [(none)]> create user nextclouduser@localhost identified by 'nextcloudpasswd';
MariaDB [(none)]> grant all privileges on nextcloud_db.* to nextclouduser@localhost identified by 'nextcloudpasswd';
MariaDB [(none)]> flush privileges;

三、為Nextcloud生成自簽名SSL證照
為SSL證照建立一個新的資料夾:
[root@nextcloud-server ~]# cd /etc/nginx/cert/
[root@nextcloud-server cert]# openssl req -new -x509 -days 365 -nodes -out /etc/nginx/cert/nextcloud.crt -keyout /etc/nginx/cert/nextcloud.key
.....
Country Name (2 letter code) [XX]:cn                                           //國家
State or Province Name (full name) []:beijing                                  //省份
Locality Name (eg, city) [Default City]:beijing                                //地區名字
Organization Name (eg, company) [Default Company Ltd]:kevin                    //公司名
Organizational Unit Name (eg, section) []:Technology                           //部門
Common Name (eg, your name or your server's hostname) []:kevin                 //CA主機名
Email Address []:kevin@wangshibo.cn

然後將證照檔案的許可權設定為660
[root@nextcloud-server cert]# chmod 700 /etc/nginx/cert
[root@nextcloud-server cert]# chmod 600 /etc/nginx/cert/*

四、下載並安裝Nextcloud
[root@nextcloud-server ~]# yum -y install wget unzip
[root@nextcloud-server ~]# cd /usr/local/src/
[root@nextcloud-server src]# wget https://download.nextcloud.com/server/releases/nextcloud-12.0.4.zip
[root@nextcloud-server src]# unzip nextcloud-12.0.4.zip
[root@nextcloud-server src]# ls
nextcloud nextcloud-12.0.4.zip
[root@nextcloud-server src]# mv nextcloud /usr/share/nginx/html/

進入Nginx的root目錄,併為Nextcloud建立data目錄,將Nextcloud的使用者和組修改為nginx
[root@nextcloud-server src]# cd /usr/share/nginx/html/
[root@nextcloud-server html]# mkdir -p nextcloud/data/
[root@nextcloud-server html]# chown nginx:nginx -R nextcloud/
[root@nextcloud-server html]# ll -d nextcloud
drwxr-xr-x. 15 nginx nginx 4096 1月  24 17:04 nextcloud

五、設定Nginx虛擬主機
進入Nginx的虛擬主機配置檔案所在目錄並建立一個新的虛擬主機配置(記得修改兩個server_name為自己的域名):
[root@nextcloud-server ~]# cd /etc/nginx/conf.d/
[root@nextcloud-server conf.d]# vim nextcloud.conf
upstream php-handler {
    server 127.0.0.1:9000;
    #server unix:/var/run/php5-fpm.sock;
}

server {
    listen 80;
    server_name nextcloud.kevin-inc.com;
    # enforce https
    return 301 https://$server_name$request_uri;
}

server {
    listen 443 ssl;
    server_name nextcloud.kevin-inc.com;

    ssl_certificate /etc/nginx/cert/nextcloud.crt;
    ssl_certificate_key /etc/nginx/cert/nextcloud.key;

    # Add headers to serve security related headers
    # Before enabling Strict-Transport-Security headers please read into this
    # topic first.
    add_header Strict-Transport-Security "max-age=15768000;
    includeSubDomains; preload;";
    add_header X-Content-Type-Options nosniff;
    add_header X-Frame-Options "SAMEORIGIN";
    add_header X-XSS-Protection "1; mode=block";
    add_header X-Robots-Tag none;
    add_header X-Download-Options noopen;
    add_header X-Permitted-Cross-Domain-Policies none;

    # Path to the root of your installation
    root /usr/share/nginx/html/nextcloud/;

    location = /robots.txt {
        allow all;
        log_not_found off;
        access_log off;
    }

    # The following 2 rules are only needed for the user_webfinger app.
    # Uncomment it if you're planning to use this app.
    #rewrite ^/.well-known/host-meta /public.php?service=host-meta last;
    #rewrite ^/.well-known/host-meta.json /public.php?service=host-meta-json
    # last;

    location = /.well-known/carddav {
      return 301 $scheme://$host/remote.php/dav;
    }
    location = /.well-known/caldav {
      return 301 $scheme://$host/remote.php/dav;
    }

    # set max upload size
    client_max_body_size 512M;
    fastcgi_buffers 64 4K;

    # Disable gzip to avoid the removal of the ETag header
    gzip off;

    # Uncomment if your server is build with the ngx_pagespeed module
    # This module is currently not supported.
    #pagespeed off;

    error_page 403 /core/templates/403.php;
    error_page 404 /core/templates/404.php;

    location / {
        rewrite ^ /index.php$uri;
    }

    location ~ ^/(?:build|tests|config|lib|3rdparty|templates|data)/ {
        deny all;
    }
    location ~ ^/(?:\.|autotest|occ|issue|indie|db_|console) {
        deny all;
    }

    location ~ ^/(?:index|remote|public|cron|core/ajax/update|status|ocs/v[12]|updater/.+|ocs-provider/.+|core/templates/40[34])\.php(?:$|/) {
        include fastcgi_params;
        fastcgi_split_path_info ^(.+\.php)(/.*)$;
        fastcgi_param SCRIPT_FILENAME $document_root$fastcgi_script_name;
        fastcgi_param PATH_INFO $fastcgi_path_info;
        fastcgi_param HTTPS on;
        #Avoid sending the security headers twice
        fastcgi_param modHeadersAvailable true;
        fastcgi_param front_controller_active true;
        fastcgi_pass php-handler;
        fastcgi_intercept_errors on;
        fastcgi_request_buffering off;
    }

    location ~ ^/(?:updater|ocs-provider)(?:$|/) {
        try_files $uri/ =404;
        index index.php;
    }

    # Adding the cache control header for js and css files
    # Make sure it is BELOW the PHP block
    location ~* \.(?:css|js)$ {
        try_files $uri /index.php$uri$is_args$args;
        add_header Cache-Control "public, max-age=7200";
        # Add headers to serve security related headers (It is intended to
        # have those duplicated to the ones above)
        # Before enabling Strict-Transport-Security headers please read into
        # this topic first.
        add_header Strict-Transport-Security "max-age=15768000;includeSubDomains; preload;";
        add_header X-Content-Type-Options nosniff;
        add_header X-Frame-Options "SAMEORIGIN";
        add_header X-XSS-Protection "1; mode=block";
        add_header X-Robots-Tag none;
        add_header X-Download-Options noopen;
        add_header X-Permitted-Cross-Domain-Policies none;
        # Optional: Don't log access to assets
        access_log off;
    }

    location ~* \.(?:svg|gif|png|html|ttf|woff|ico|jpg|jpeg)$ {
        try_files $uri /index.php$uri$is_args$args;
        # Optional: Don't log access to other assets
        access_log off;
    }
}

接下來測試以下配置檔案是否有錯誤,確保沒有問題後重啟Nginx服務。
[root@nextcloud-server conf.d]# nginx -t
nginx: the configuration file /etc/nginx/nginx.conf syntax is ok
nginx: configuration file /etc/nginx/nginx.conf test is successful
[root@nextcloud-server conf.d]# systemctl restart nginx

六、為Nextcloud設定Firewalld防火牆和SELinux
可以選擇關閉Firewalld和SELinux
[root@nextcloud-server ~]# systemctl stop firewalld
[root@nextcloud-server ~]# systemctl disable firewalld
[root@nextcloud-server ~]# setenforce 0
[root@nextcloud-server ~]# getenforce
disable
[root@nextcloud-server ~]# cat /etc/sysconfig/selinux
......
SELINUX=disabled

如果開啟了防火牆,則需要設定Firewalld和SELinux
首先需要安裝SElinux管理工具policycoreutils-python
[root@nextcloud-server ~]# yum -y install policycoreutils-python

接著設定SELinux
[root@nextcloud-server ~]# semanage fcontext -a -t httpd_sys_rw_content_t '/usr/share/nginx/html/nextcloud/data(/.*)?'
[root@nextcloud-server ~]# semanage fcontext -a -t httpd_sys_rw_content_t '/usr/share/nginx/html/nextcloud/config(/.*)?'
[root@nextcloud-server ~]# semanage fcontext -a -t httpd_sys_rw_content_t '/usr/share/nginx/html/nextcloud/apps(/.*)?'
[root@nextcloud-server ~]# semanage fcontext -a -t httpd_sys_rw_content_t '/usr/share/nginx/html/nextcloud/assets(/.*)?'
[root@nextcloud-server ~]# semanage fcontext -a -t httpd_sys_rw_content_t '/usr/share/nginx/html/nextcloud/.htaccess'
[root@nextcloud-server ~]# semanage fcontext -a -t httpd_sys_rw_content_t '/usr/share/nginx/html/nextcloud/.user.ini'
[root@nextcloud-server ~]# restorecon -Rv '/usr/share/nginx/html/nextcloud/'

接下來設定Firewlld防火牆,為Nextcloud開放http和https兩個埠
[root@nextcloud-server ~]# systemctl start firewalld
[root@nextcloud-server ~]# systemctl enable firewalld
[root@nextcloud-server ~]# firewall-cmd --permanent --add-service=http
[root@nextcloud-server ~]# firewall-cmd --permanent --add-service=https
[root@nextcloud-server ~]# firewall-cmd --reload

七、安裝Nextcloud
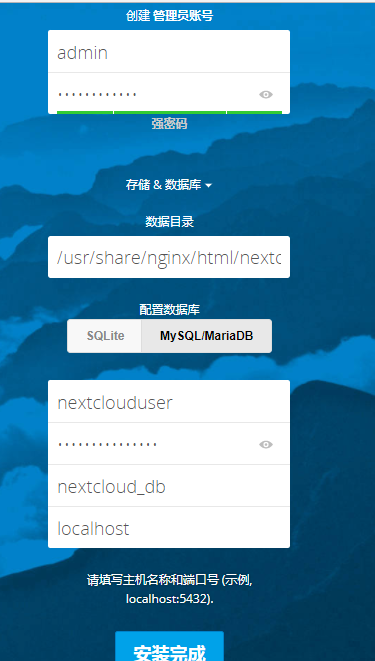
解析上面nginx中配置的域名nextcloud.kevin-inc.com,訪問訪問http://nextcloud.kevin-inc.com進行Nextcloud介面安裝(訪問http域名會自動跳轉到https,安裝提示安裝即可!)

==================NextCloud安全與效能優化==================
這種提示一般在NextCloud的伺服器管理中可以看到,建議快取類的直接安裝一個即可,安裝多了也沒有什麼用。
為了Nextcloud服務的安全和效能, 請將所有設定配置正確.

PHP 模組 ‘fileinfo’ 缺失. 我們強烈建議啟用此模組以便在 MIME 型別檢測時獲得最準確的結果.
HTTP 請求頭 “Strict-Transport-Security” 沒有配置為至少 “15552000” 秒. 出於增強安全性考慮, 推薦按照安全提示中的說明啟用HSTS.

記憶體快取未配置. 如果可用, 需要配置 memcache 以增強效能.
PHP 的元件 OPcache 沒有正確配置. 為了提供更好的效能, 我們建議在php.ini檔案中使用下列設定:

opcache.enable=1
opcache.enable_cli=1
opcache.interned_strings_buffer=8
opcache.max_accelerated_files=10000
opcache.memory_consumption=128
opcache.save_comments=1
opcache.revalidate_freq=1
==================NextCloud新增Memcached快取=============
修改nextcloud程式目錄下的config目錄中的config.php檔案,在配置檔案中新增如下,這個是多個Memcached例項,單個自己改:

'memcache.local' => '\OC\Memcache\APCu',
'memcache.distributed' => '\OC\Memcache\Memcached',
'memcached_servers' => array(
     array('localhost', 11211),
     array('server1.example.com', 11211),
     array('server2.example.com', 11211),
     ),

==================================================================
依據本篇如上安裝記錄,新增memcache快取的方法(本機單機安裝memcahced)
[root@nextcloud src]# yum -y install memcached
[root@nextcloud src]# cat /etc/sysconfig/memcached
PORT="11211"
USER="memcached"
MAXCONN="1024"
CACHESIZE="64"
OPTIONS=""
[root@nextcloud src]# systemctl start memcached
[root@nextcloud src]# systemctl enable memcached
Created symlink from /etc/systemd/system/multi-user.target.wants/memcached.service to /usr/lib/systemd/system/memcached.service.
[root@nextcloud src]# lsof -i:11211
COMMAND      PID      USER   FD   TYPE  DEVICE SIZE/OFF NODE NAME
memcached 146026 memcached   26u  IPv4 3320544      0t0  TCP *:memcache (LISTEN)
memcached 146026 memcached   27u  IPv6 3320545      0t0  TCP *:memcache (LISTEN)
memcached 146026 memcached   28u  IPv4 3320549      0t0  UDP *:memcache
memcached 146026 memcached   29u  IPv6 3320550      0t0  UDP *:memcache

修改nextcloud的config配置檔案,新增memcached快取配置
[root@nextcloud config]# pwd
/usr/share/nginx/html/nextcloud/config
[root@nextcloud config]# cp config.php config.php.bak
[root@nextcloud config]# vim config.php
......
  'memcache.local' => '\OC\Memcache\APCu',
  'memcache.distributed' => '\OC\Memcache\Memcached',
  'memcached_servers' => array(
   array('localhost', 11211),
     ),
==================NextCloud新增Redis快取==================
在nextcloud的config配置檔案中新增如下,這個是通過TCP連線的:
'memcache.local' => '\OC\Memcache\Redis',
'redis' => array(
     'host' => 'localhost',
     'port' => 6379,
      ),

還有效能更好的UNIX連線:
'memcache.local' => '\OC\Memcache\Redis',
'redis' => array(
     'host' => '/var/run/redis/redis.sock',
     'port' => 0,
     'dbindex' => 0,
     'password' => 'secret',
     'timeout' => 1.5,
      ),

同時,官方還推薦加入如下,來用於儲存檔案鎖:
'memcache.locking' => '\OC\Memcache\Redis',
========Nextcloud的郵件發信設定========
Nextcloud傳送郵件資訊的前提:每個使用者(包括管理員)都要事先設定好自己的郵箱地址!
1)使用管理員賬號登陸Nextcloud。點選右上角的設定圖示裡的"管理"-"其他設定"
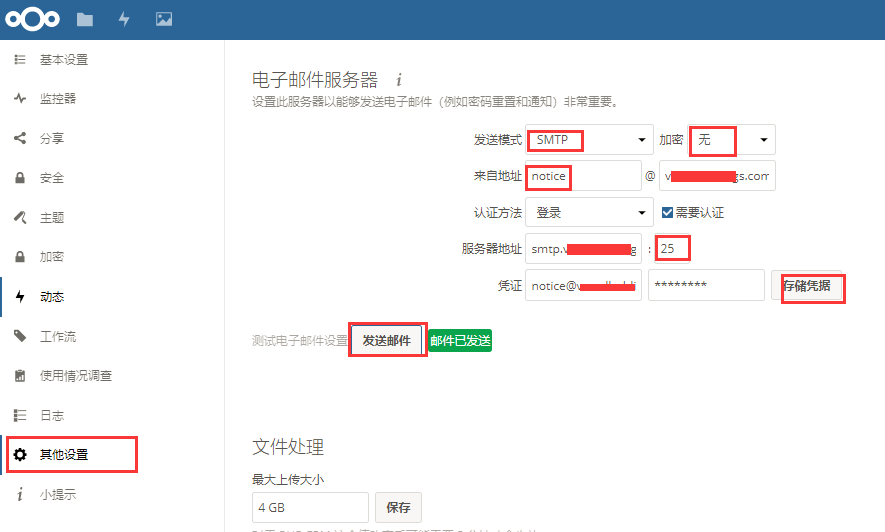
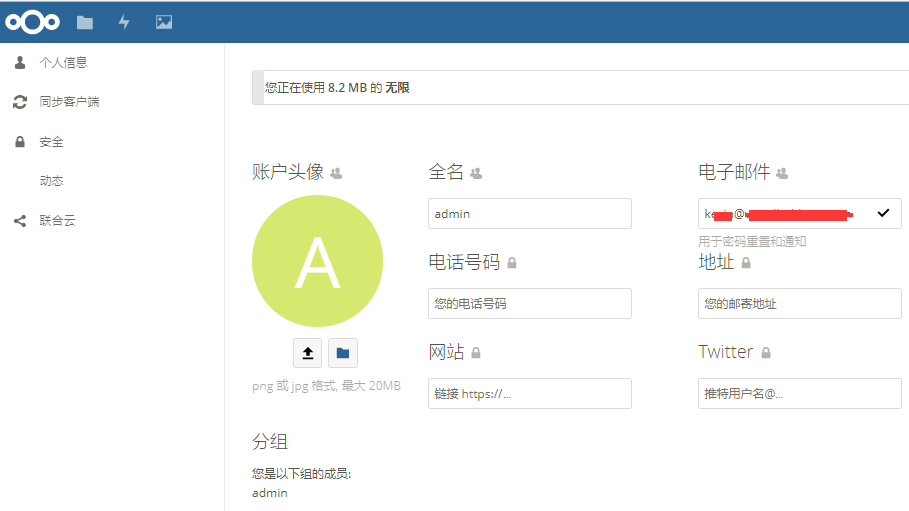
前提是管理員(admin)要事先設定好自己的郵箱地址。如下設定好郵箱地址後,按Enter鍵後就會顯示一個"對勾"
滿足條件:
1)在admin登陸後的"管理"->"其他設定"的後臺裡配置好"電子郵件伺服器"(配置後可以測試傳送郵件是否成功,前提是admin也要事先配置好自己的郵箱地址)
2)各使用者建立並登陸後,要記得配置各自的郵箱地址。比如wangshibo使用者登入後,配置自己的郵箱地址
3)在分享檔案的時候,只要使用對方賬號名進行分享,對方郵箱裡就會收到一封分享資訊的郵件!
如下,在admin賬號下分享Nextcloud Manual.pdf這個檔案給wangshibo使用者
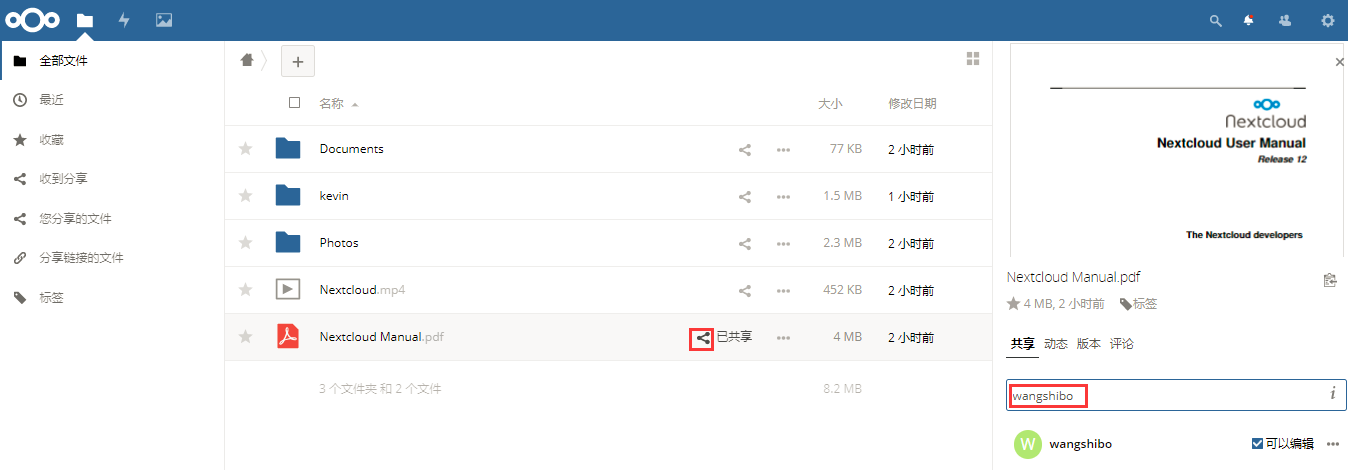
然後登陸wangshibo使用者,就會發現Nextcloud Manual.pdf檔案已經分享過來了

登陸wangshibo賬號配置的郵箱,就會發現有上面分享的郵件信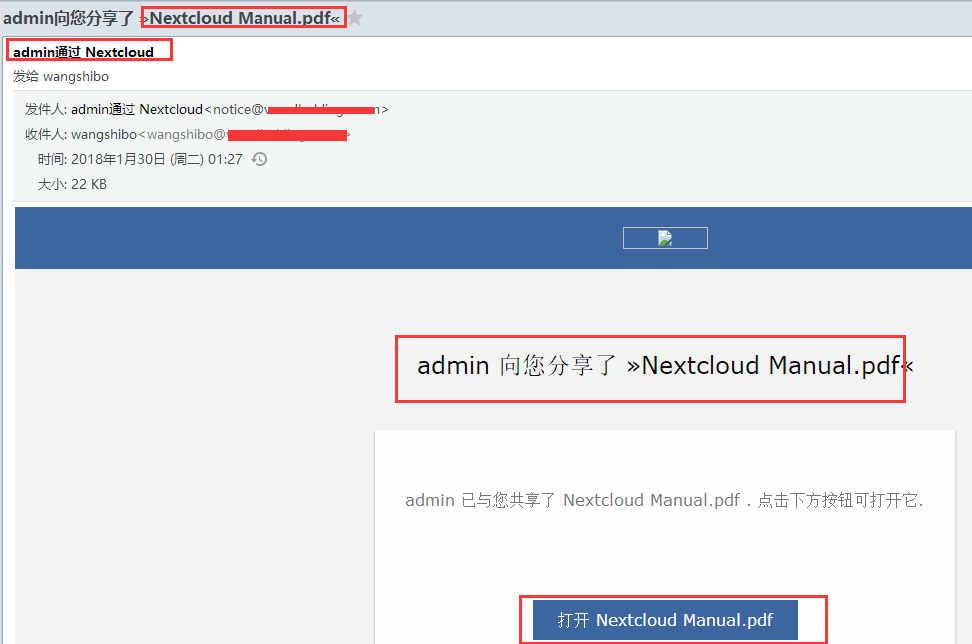
也可以在檔案來源方取消分享

==========雲盤上傳檔案大小限制==============
nextcloud上傳檔案大小的自身限制為512M,如果要想調整這個大小,操作方法如下:
1)修改php.ini上傳檔案大小限制
[root@nextcloud ~]# vim /etc/php.ini
......
max_execution_time = 0    #預設是30秒,改為0,表示沒有限制
......
post_max_size = 10800M    #設定 POST 資料所允許的最大大小,如果POST資料尺寸大於post_max_size $_POST 和 $_FILES superglobals 便會為空.
......
upload_max_filesize = 10240M   #表示所上傳的檔案的最大大小

#另外要說明的是,post_max_size 大於 upload_max_filesize 為佳.

2)修改nginx.conf
[root@nextcloud ~]# vim /etc/nginx/conf.d/nextcloud.conf
.....
client_max_body_size 10240M;

3)重啟php和nginx服務
[root@nextcloud ~]# systemctl restart php-fpm
[root@nextcloud ~]# systemctl restart nginx
==========雲盤建立新使用者==============
碰到一個問題:在admin管理員登入nextclod,點選右上角的"使用者",建立新使用者時候,點選"建立"無反應,即無法在web介面裡建立新使用者!
此時可以去資料庫中建立新使用者:
[root@nextcloud ~]# mysql -pnextcloud@123
Welcome to the MariaDB monitor.  Commands end with ; or \g.
Your MariaDB connection id is 53445
Server version: 5.5.56-MariaDB MariaDB Server

Copyright (c) 2000, 2017, Oracle, MariaDB Corporation Ab and others.

Type 'help;' or '\h' for help. Type '\c' to clear the current input statement.

MariaDB [(none)]> show databases;
+----------------------+
| Database             |
+----------------------+
| information_schema   |
| binlog               |
| mysql                |
| #mysql50#mysql.mysql |
| nextcloud_db         |
| performance_schema   |
+----------------------+
6 rows in set (0.00 sec)

MariaDB [(none)]> use nextcloud_db;
Reading table information for completion of table and column names
You can turn off this feature to get a quicker startup with -A

Database changed
MariaDB [nextcloud_db]> select * from oc_users;
+--------------+---------------------------+----------------------------------------------------------------+
| uid          | displayname               | password                                                       |
+--------------+---------------------------+----------------------------------------------------------------+
| admin        | NULL                      | 1|$2y$10$EeJacmgPRJW1VWcJVyEtA.u37fjWh3YRLvSKN1fxtdYDxRUdM4pSu |
| kevin        | 資訊科技部-kevin          | 1|$2y$10$GA18mMkIyZ58eDvE/e6eMuQMJQyWP7BgwyhymuUpykDgWLKQdFotC |
| grace        | 資訊科技部-grace          | 1|$2y$10$eCsuuK.ZrWx7qGrMKi88l.myL6GAj33TYtJ9x288SWq7qx25xiFN2 |

新增新使用者"wangshibo",密碼為"wangshibo@123"
MariaDB [nextcloud_db]> insert into oc_users(uid,password) valuses("wangshibo","wangshibo@123");

再次檢視:
MariaDB [nextcloud_db]> select * from oc_users;
+--------------+---------------------------+----------------------------------------------------------------+
| uid          | displayname               | password                                                       |
+--------------+---------------------------+----------------------------------------------------------------+
| admin        | NULL                      | 1|$2y$10$EeJacmgPRJW1VWcJVyEtA.u37fjWh3YRLvSKN1fxtdYDxRUdM4pSu |
| kevin        | 資訊科技部-kevin          | 1|$2y$10$GA18mMkIyZ58eDvE/e6eMuQMJQyWP7BgwyhymuUpykDgWLKQdFotC |
| grace        | 資訊科技部-grace          | 1|$2y$10$eCsuuK.ZrWx7qGrMKi88l.myL6GAj33TYtJ9x288SWq7qx25xiFN2 |
| grace        | NULL                      | wangshibo@123                                                  |

發現在資料庫中建立的新使用者的密碼是明文儲存的。

接著用admin管理員登入nextcloud,點選右上角"使用者",就能看到上面在資料庫中新建立的wangshibo使用者了,然後在這裡重置密碼!
(重置密碼時,輸入新密碼,然後按"Enter"鍵回車即可),最後確保用新重置的密碼登入wangshibo賬號的雲盤。

wangshibo賬號登入成功後,再登入資料庫發現,該使用者的密碼就會密文儲存了!

========================================================================
建立使用者組的正確方法:
點選右上角"使用者",在"分組"->"新增分組"。

也可以登入資料庫裡建立:
MariaDB [nextcloud_db]> select * from oc_groups;
MariaDB [nextcloud_db]> insert into oc_groups values("運維組");

可以將新使用者分組到對應的組內,也可以禁用或刪除使用者。
點選左下角的"設定",可以顯示使用者的儲存目錄,郵件地址等。