一. Ansible 介紹
Ansible是一個配置管理系統configuration management system, python 語言是運維人員必須會的語言, ansible 是一個基於python 開發的自動化運維工具, 其功能實現基於ssh遠端連線服務, ansible 可以實現批量系統配置,批量軟體部署,批量檔案拷貝,批量執行命令等功能, 除了ansible之外,還有saltstack 等批量管理軟體.
Ansible能做什麼?
ansible可以幫助運維人員完成一些批量任務,或者完成一些需要經常重複的工作。
比如:同時在100臺伺服器上安裝nginx服務,並在安裝後啟動服務。
比如:將某個檔案一次性拷貝到100臺伺服器上。
比如:每當有新伺服器加入工作環境時,運維人員都要為新伺服器部署某個服務,也就是說運維人員需要經常重複的完成相同的工作。
這些場景中運維人員都可以使用到ansible。
Ansible軟體特點?
ansible不需要單獨安裝客戶端,SSH相當於ansible客戶端。
ansible不需要啟動任何服務,僅需安裝對應工具即可。
ansible依賴大量的python模組來實現批量管理。
ansible配置檔案/etc/ansible/ansible.cfg。
Ansible是一種agentless(基於ssh),可實現批量配置、命令執行和控制,基於Python實現的自動化運維工具。Ansible的兩個特性:
- 模組化:通過呼叫相關模組,完成指定任務,且支援任何語言編寫的自定義模組;
- playbook:劇本,可根據需要一次執行完劇本中的所有任務或某些任務;

Ansible 架構
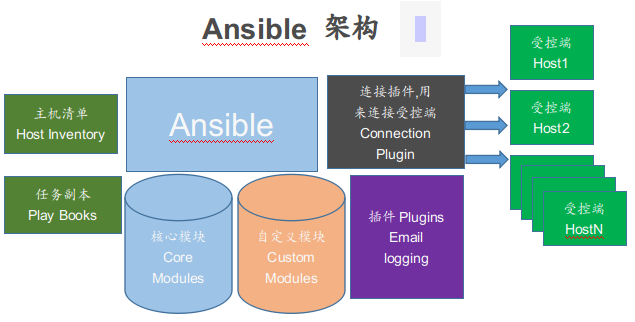
- 連線外掛(connectior plugins) 用於連線主機 用來連線被管理端。
- 核心模組(core modules) 連線主機實現操作, 它依賴於具體的模組來做具體的事情。
- 自定義模組(custom modules) 根據自己的需求編寫具體的模組。
- 外掛(plugins) 完成模組功能的補充。
- 劇本(playbooks)ansible的配置檔案,將多個任務定義在劇本中,由ansible自動執行。
- 主機清單(host inventory)定義ansible需要操作主機的範圍。
最重要的一點: ansible是模組化的, 它所有的操作都依賴於模組, 不需要單獨安裝客戶端(no agents),基於系統自帶的sshd服務,sshd就相當於ansible的客戶端, 不需要服務端(no sever),需要依靠大量的模組實現批量管理, 配置檔案 /etc/ansible/ansible.cfg (前期不用配置)。
二. Ansible命令使用
語法格式:
ansible <pattern_goes_here> -m <module_name> -a <arguments>
也就是:
ansible 匹配模式 -m 模組 -a '需要執行的內容'
解釋說明:
匹配模式:即哪些機器生效 (可以是某一臺, 或某一組, 或all) , 預設模組為command , 執行常規的shell命令.
-m name, --module-name=name: 指定執行使用的模組。
-u username, --user=username: 指定遠端主機以username執行命令。
-s, --sudo: 相當於linux系統下的sudo命令。
-usudo_username, --sudo-user=sudo_username: 使用sudo, 相當於linux系統下的sudo命令。
-C, --check: 只檢查不實際執行。
-e, 即extra_vars: 引用外部引數。
-i, 即inventory: 指定倉庫列表, 預設/etc/ansible/hosts。
--list-host: 列出執行主機列。
三. Ansible常用模組
ping 模組: 檢查指定節點機器是否還能連通,用法很簡單,不涉及引數,主機如果線上,則回覆pong 。
raw 模組: 執行原始的命令,而不是通過模組子系統。
yum 模組: RedHat和CentOS的軟體包安裝和管理工具。
apt 模組: Ubuntu/Debian的軟體包安裝和管理工具。
pip 模組 : 用於管理Python庫依賴項,為了使用pip模組,必須提供引數name或者requirements。
synchronize 模組: 使用rsync同步檔案,將主控方目錄推送到指定節點的目錄下。
template 模組: 基於模板方式生成一個檔案複製到遠端主機(template使用Jinjia2格式作為檔案模版,進行文件內變數的替換的模組。
copy 模組: 在遠端主機執行復制操作檔案。
user 模組 與 group 模組: user模組是請求的是useradd, userdel, usermod三個指令,goup模組請求的是groupadd, groupdel, groupmod 三個指令。
service 模組: 用於管理遠端主機的服務。
get_url 模組: 該模組主要用於從http、ftp、https伺服器上下載檔案(類似於wget)。
fetch 模組: 它用於從遠端機器獲取檔案,並將其本地儲存在由主機名組織的檔案樹中。
file 模組: 主要用於遠端主機上的檔案操作。
lineinfile 模組: 遠端主機上的檔案編輯模組
unarchive模組: 用於解壓檔案。
command模組 和 shell模組: 用於在各被管理節點執行指定的命令. shell和command的區別:shell模組可以特殊字元,而command是不支援
hostname模組: 修改遠端主機名的模組。
script模組: 在遠端主機上執行主控端的指令碼,相當於scp+shell組合。
stat模組: 獲取遠端檔案的狀態資訊,包括atime,ctime,mtime,md5,uid,gid等資訊。
cron模組: 遠端主機crontab配置。
mount模組: 掛載檔案系統。
find模組: 幫助在被管理主機中查詢符合條件的檔案,就像 find 命令一樣。
selinux模組:遠端管理受控節點的selinux的模組
四. Ansible 自動化運維操作記錄
1) 實驗環境準備
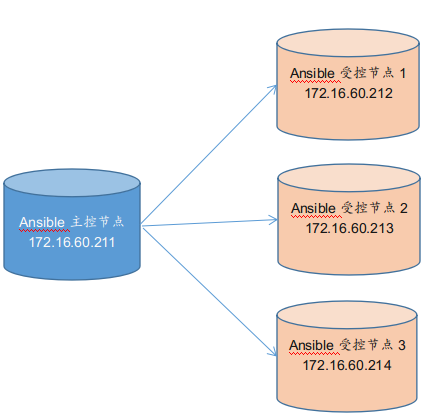
ip地址               主機名                 角色           系統版本
172.16.60.211       ansible-server        主控節點        centos7.5
172.16.60.212       ansible-node01        受控節點1       centos7.5
172.16.60.213       ansible-node02        受控節點2       centos7.5
172.16.60.214       ansible-node03        受控節點3       centos7.5

四個節點各自設定主機名
[root@ansible-server ~]# hostnamectl set-hostname ansible-server
[root@ansible-node01 ~]# hostnamectl set-hostname ansible-node01
[root@ansible-node02 ~]# hostnamectl set-hostname ansible-node02
[root@ansible-node03 ~]# hostnamectl set-hostname ansible-node03

設定主控節點到受控節點的ssh無密碼信任關係 (ansible應用環境下, 主控節點必須要設定ssh無密碼跳轉到受控節點的信任關係)

新增主控節點到受控節點的認證! 首先主控節點必須要生成公私金鑰對, 否則不能進行免密信任關係設定!!
[root@ansible-server ~]# ssh-keygen -t rsa                                 #一直回車即可
[root@ansible-server ~]# ssh-copy-id -i /root/.ssh/id_rsa.pub -p22 root@172.16.60.212      #回車, 輸入遠端登入的密碼即可
[root@ansible-server ~]# ssh-copy-id -i /root/.ssh/id_rsa.pub -p22 root@172.16.60.213
[root@ansible-server ~]# ssh-copy-id -i /root/.ssh/id_rsa.pub -p22 root@172.16.60.214

如果受控節點數量比較多的話, 可以使用expect進行遠端ssh連線的免密信任關係, 具體可參考: https://www.cnblogs.com/kevingrace/p/5900303.html
2) Ansible安裝部署
Ansible有兩種安裝方式: yum 和 pip 安裝方式

Ansible在epel的yum中有提供,所以配置好epel源,直接使用yum命令安裝即可.
CentOS系統, 可以使用預設的yum源直接安裝ansible

[root@ansible-server ~]# yum install -y ansible

配置檔案目錄:/etc/ansible/
執行檔案目錄:/usr/bin/
Lib庫依賴目錄:/usr/lib/pythonX.X/site-packages/ansible/
Help文件目錄:/usr/share/doc/ansible-X.X.X/
Man文件目錄:/usr/share/man/man1/

================================================
pip安裝方式
# yum -y install python-pip python-devel
# pip install ansible
================================================

ansible程式檔案
/usr/bin/ansible:  命令列工具
ansible命令通用格式: ansible <host-pattern> [options] [-m module_name] [-a args]
/usr/bin/ansible-doc: 幫助文件
/usr/bin/ansible-playbook: 劇本執行工具
/etc/ansible/ansible.cfg: 主配置檔案
/etc/ansible/hosts: 管理的主機清單
/etc/ansible/roles: 角色存放處

檢視ansible命令幫助
[root@ansible-server ~]# ansible -h

檢視支援的模組
[root@ansible-server ~]# ansible-doc -l
[root@ansible-server ~]# ansible-doc -l|grep copy    #檢視copy模組

檢視ansible的支援的模組個數
[root@ansible-server ~]# ansible-doc -l |wc -l
2080

檢視ansible版本
[root@ansible-server ~]# ansible --version
ansible 2.7.8
  config file = /etc/ansible/ansible.cfg
  configured module search path = [u'/root/.ansible/plugins/modules', u'/usr/share/ansible/plugins/modules']
  ansible python module location = /usr/lib/python2.7/site-packages/ansible
  executable location = /usr/bin/ansible
  python version = 2.7.5 (default, Apr 11 2018, 07:36:10) [GCC 4.8.5 20150623 (Red Hat 4.8.5-28)]
3) Ansible清單管理
inventory檔案通常用於定義要管理主機的認證資訊, 例如ssh登入使用者名稱、密碼以及key相關資訊。預設inventory檔案為/etc/hostsweb-nodes, ansible模組操作命令中可以省去預設inventory (即可以省去"-i /etc/hostsweb-nodes"), 如果inventory檔案定義了其他路徑,則在ansible模組操作命令中不能省去, 要加上"-i inventory路徑".
如何配置Inventory檔案?
主控節點:
- 支援主機名通配以及正規表示式,例如web[1:3].oldboy.com;
- 支援基於非標準的ssh埠,例如web1.oldboy.com:6666;
- 支援指定變數,可對個別主機的特殊配置,如登陸使用者,密碼等;
受控節點
- 支援巢狀組,例如[game:children],那麼在game模組下面的組都會被game所包含;
- 支援指定變數,例如[game:vars]在下面指定變數;
ansible的inventory清單檔案(/etc/ansible/hosts)中配置說明:
[ ] 中的名字代表組名
主機(hosts)部分可以使用域名、主機名、IP地址表示, 一般此類配置中多使用IP地址;
組名下的主機地址就是ansible可以管理的地址;
下面是/etc/ansible/hosts 檔案中清單的配置示例:
[root@ansible-server ~]# cd /etc/ansible/
[root@ansible-server ansible]# cp hosts hosts.bak
[root@ansible-server ansible]# vim hosts                      #如下, 這裡設定了兩組管理清單
...........
#可以使用受控節點的ip, 下面表示test-hosts組包括172.16.60.212, 172,16,60,213, 172.16.60.214
[test-hosts]
172.16.60.2[12:14]

#也可以使用受控節點的主機名, 前提是主控節點要能跟受控節點的主機名正常通訊
[web-nodes]
172.16.60.21[2:3]
#ansible-node03                #前提是要能ping通這個主機名, 即做好/etc/hosts主機名對映

簡單測試,可設定是否生效
檢視ansible清單裡所有節點的uptime情況
[root@ansible-server ansible]# ansible all -m command -a "uptime"
172.16.60.213 | CHANGED | rc=0 >>
 01:43:15 up 13 days, 22:19,  3 users,  load average: 0.00, 0.01, 0.05

172.16.60.214 | CHANGED | rc=0 >>
 01:43:15 up 13 days, 22:19,  3 users,  load average: 0.01, 0.03, 0.05

172.16.60.212 | CHANGED | rc=0 >>
 01:43:15 up 13 days, 23:30,  3 users,  load average: 0.00, 0.01, 0.05

檢視ansible清單裡test-hosts組的節點的主機名
[root@ansible-server ansible]# ansible test-hosts -m command -a "hostname"
172.16.60.213 | CHANGED | rc=0 >>
ansible-node02

172.16.60.214 | CHANGED | rc=0 >>
ansible-node03

172.16.60.212 | CHANGED | rc=0 >>
ansible-node01

檢視ansible清單裡web-nodes組的節點的系統時間
[root@ansible-server ansible]# ansible web-nodes -m command -a "date"
172.16.60.213 | CHANGED | rc=0 >>
Sun Mar 17 01:51:02 CST 2019

172.16.60.212 | CHANGED | rc=0 >>
Sun Mar 17 01:51:02 CST 2019

[root@ansible-server ansible]# ansible test-hosts --list-hosts
  hosts (3):
    172.16.60.212
    172.16.60.213
    172.16.60.214
[root@ansible-server ansible]# ansible web-nodes --list-hosts
  hosts (2):
    172.16.60.212
    172.16.60.213

[root@ansible-server ansible]# ansible -i /etc/ansible/hosts web-nodes -m command -a "cat /etc/redhat-release"
172.16.60.213 | CHANGED | rc=0 >>
CentOS Linux release 7.5.1804 (Core)

172.16.60.212 | CHANGED | rc=0 >>
CentOS Linux release 7.5.1804 (Core)
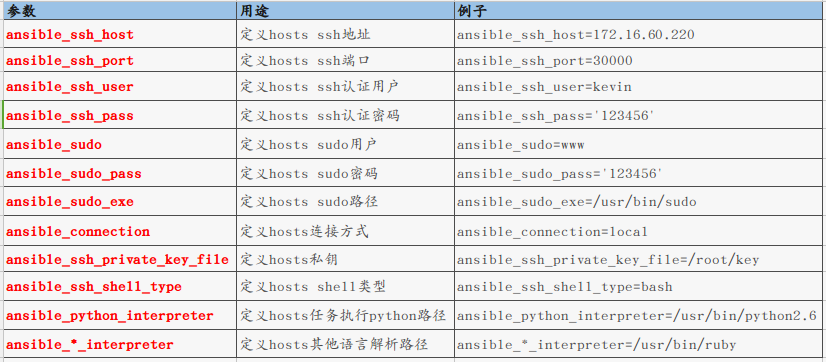
Ansible內建變數
驗證ansible, ansible是通過ssh埠探測通訊
[root@ansible-server ~]# cd /etc/ansible/
[root@ansible-server ansible]# cp hosts hosts.bak
[root@ansible-server ansible]# vim hosts                      #如下, 這裡設定了兩組管理清單
...........
#可以使用受控節點的ip
[test-hosts]
172.16.60.212
172.16.60.213
172.16.60.214

#也可以使用受控節點的主機名, 前提是主控節點要能跟受控節點的主機名正常通訊
[web-nodes]
172.16.60.212
172.16.60.213
#ansible-node03                #前提是要能ping通這個主機名, 即做好/etc/hosts主機名對映

簡單測試,可設定是否生效
檢視ansible清單裡所有節點的uptime情況
[root@ansible-server ansible]# ansible all -m command -a "uptime"
172.16.60.213 | CHANGED | rc=0 >>
 01:43:15 up 13 days, 22:19,  3 users,  load average: 0.00, 0.01, 0.05

172.16.60.214 | CHANGED | rc=0 >>
 01:43:15 up 13 days, 22:19,  3 users,  load average: 0.01, 0.03, 0.05

172.16.60.212 | CHANGED | rc=0 >>
 01:43:15 up 13 days, 23:30,  3 users,  load average: 0.00, 0.01, 0.05

檢視ansible清單裡test-hosts組的節點的主機名
[root@ansible-server ansible]# ansible test-hosts -m command -a "hostname"
172.16.60.213 | CHANGED | rc=0 >>
ansible-node02

172.16.60.214 | CHANGED | rc=0 >>
ansible-node03

172.16.60.212 | CHANGED | rc=0 >>
ansible-node01

檢視ansible清單裡web-nodes組的節點的系統時間
[root@ansible-server ansible]# ansible web-nodes -m command -a "date"
172.16.60.213 | CHANGED | rc=0 >>
Sun Mar 17 01:51:02 CST 2019

172.16.60.212 | CHANGED | rc=0 >>
Sun Mar 17 01:51:02 CST 2019

[root@ansible-server ansible]# ansible test-hosts --list-hosts
  hosts (3):
    172.16.60.212
    172.16.60.213
    172.16.60.214
[root@ansible-server ansible]# ansible web-nodes --list-hosts
  hosts (2):
    172.16.60.212
    172.16.60.213

[root@ansible-server ansible]# ansible -i /etc/ansible/hosts web-nodes -m command -a "cat /etc/redhat-release"
172.16.60.213 | CHANGED | rc=0 >>
CentOS Linux release 7.5.1804 (Core)

172.16.60.212 | CHANGED | rc=0 >>
CentOS Linux release 7.5.1804 (Core)
4) Ansible 常用模組
1. ping模組
檢查指定節點機器是否還能連通,用法很簡單,不涉及引數. 主機如果線上,則回覆pong. 測試連通性的模組.
[root@ansible-server ~]# ansible web-nodes -m ping
172.16.60.213 | SUCCESS => {
    "changed": false,
    "ping": "pong"
}
172.16.60.212 | SUCCESS => {
    "changed": false,
    "ping": "pong"
}

[root@ansible-server ~]# ansible -i /etc/ansible/hosts all -m ping
172.16.60.214 | SUCCESS => {
    "changed": false,
    "ping": "pong"
}
172.16.60.213 | SUCCESS => {
    "changed": false,
    "ping": "pong"
}
172.16.60.212 | SUCCESS => {
    "changed": false,
    "ping": "pong"
}

可以獲得該模組的說明
[root@ansible-server ~]# ansible-doc -v ping
2. raw模組
執行原始的命令,而不是通過模組子系統。在任何情況下,使用shell或command命令模組也是合適的。給定原始的引數直接通過配置的遠端shell執行。可返回標準輸出、錯誤輸出和返回程式碼。此模組沒有變更處理程式支援。 這個模組不需要遠端系統上的Python,就像指令碼模組一樣。此模組也支援Windows目標。raw, shell, command三個模組都能呼叫物件機器上的某條指令或者某個可執行檔案。raw和shell模組很像, 都支援管道; command模組不支援管道.
注意下三者之間的微妙區別, 如下會發現raw模組執行的是系統原始命令, 執行後會主動關閉到被控制節點的連線!
[root@ansible-server ~]# ansible -i /etc/ansible/hosts all -m raw -a "hostname"
172.16.60.212 | CHANGED | rc=0 >>
ansible-node01
Shared connection to 172.16.60.212 closed.

172.16.60.213 | CHANGED | rc=0 >>
ansible-node02
Shared connection to 172.16.60.213 closed.

172.16.60.214 | CHANGED | rc=0 >>
ansible-node03
Shared connection to 172.16.60.214 closed.

[root@ansible-server ~]# ansible -i /etc/ansible/hosts all -m shell -a "hostname"
172.16.60.214 | CHANGED | rc=0 >>
ansible-node03

172.16.60.213 | CHANGED | rc=0 >>
ansible-node02

172.16.60.212 | CHANGED | rc=0 >>
ansible-node01

[root@ansible-server ~]# ansible -i /etc/ansible/hosts all -m command -a "hostname"
172.16.60.214 | CHANGED | rc=0 >>
ansible-node03

172.16.60.213 | CHANGED | rc=0 >>
ansible-node02

172.16.60.212 | CHANGED | rc=0 >>
ansible-node01

raw和shell模組支援管道, command模組不支援管道
[root@ansible-server ~]# ansible -i /etc/ansible/hosts all -m raw -a "cat /etc/passwd|grep kevin"
172.16.60.213 | CHANGED | rc=0 >>
kevin:x:1001:1001::/home/kevin:/bin/bash
Shared connection to 172.16.60.213 closed.

172.16.60.212 | CHANGED | rc=0 >>
kevin:x:1003:1003::/home/kevin:/bin/bash
Shared connection to 172.16.60.212 closed.

172.16.60.214 | CHANGED | rc=0 >>
kevin:x:1000:1000::/home/kevin:/bin/bash
Shared connection to 172.16.60.214 closed.

[root@ansible-server ~]# ansible -i /etc/ansible/hosts all -m shell -a "cat /etc/passwd|grep kevin"
172.16.60.213 | CHANGED | rc=0 >>
kevin:x:1001:1001::/home/kevin:/bin/bash

172.16.60.214 | CHANGED | rc=0 >>
kevin:x:1000:1000::/home/kevin:/bin/bash

172.16.60.212 | CHANGED | rc=0 >>
kevin:x:1003:1003::/home/kevin:/bin/bash

[root@ansible-server ~]# ansible -i /etc/ansible/hosts all -m command -a "cat /etc/passwd|grep kevin"
172.16.60.213 | FAILED | rc=1 >>
cat: /etc/passwd|grep: No such file or directory
cat: kevin: No such file or directorynon-zero return code

172.16.60.212 | FAILED | rc=1 >>
cat: /etc/passwd|grep: No such file or directory
cat: kevin: No such file or directorynon-zero return code

172.16.60.214 | FAILED | rc=1 >>
cat: /etc/passwd|grep: No such file or directory
cat: kevin: No such file or directorynon-zero return code
3. yum模組
這個模組是RedHat 和 CentOS作為遠端受控節點OS的時候,用的最多的模組, 是RedHat / CentOS包管理工具的模組, 使用`yum’軟體包管理器管理軟體包,其選項有:
config_file:yum的配置檔案 (optional)
disable_gpg_check:關閉gpg_check (optional)
disablerepo:不啟用某個源 (optional)
enablerepo:啟用某個源(optional)
name:要進行操作的軟體包的名字,預設最新的程式包,指明要安裝的程式包,可以帶上版本號,也可以傳遞一個url或者一個本地的rpm包的路徑
state:表示是安裝還是解除安裝的狀態, 其中present、installed、latest 表示安裝, absent 、removed表示解除安裝刪除; present預設狀態, laster表示安裝最新版本.
溫馨提示:
要確保受控節點的python版本對應正確, 否則執行下面命令會報錯 (下面報錯說明受控節點需要python2版本, 而當前是python3):
"msg": "The Python 2 bindings for rpm are needed for this module. If you require Python 3 support use the `dnf` Ansible module instead..
The Python 2 yum module is needed for this module. If you require Python 3 support use the `dnf` Ansible module instead."

安裝httpd
[root@ansible-server ~]# ansible web-nodes -m yum -a 'name=httpd state=latest'
[root@ansible-server ~]# ansible web-nodes -m yum -a 'name=httpd state=present'
[root@ansible-server ~]# ansible web-nodes -m yum -a 'name=httpd state=installed'

[root@ansible-server ~]# ansible web-nodes -m yum -a 'name=http://nginx.org/packages/centos/6/noarch/RPMS/nginx-release-centos-6-0.el6.ngx.noarch.rpm state=present'
[root@ansible-server ~]# ansible web-nodes -m yum -a 'name="@Development tools" state=present'

解除安裝httpd
[root@ansible-server ~]# ansible web-nodes -m yum -a 'name=httpd state=absent'
[root@ansible-server ~]# ansible web-nodes -m yum -a 'name=httpd state=removed'
4. apt模組
這個模組是ubuntu作為遠端受控節點OS的時候,用的最多的模組。Apt是Ubuntu/Debian的包管理工具。
deb: 用於安裝遠端機器上的.deb字尾的軟體包(optional)
install_recommends: 這個引數可以控制遠端電腦上是否只是下載軟體包,還是下載後安裝,預設引數為true,設定為false的時候只下載軟體包,不安裝
update_cache: 當這個引數為yes的時候等於apt-get update(optional)
name: apt要下載的軟體包名字,支援name=git=1.6 這種制定版本的模式
state: 狀態(present,absent,latest),表示是安裝還是解除安裝. 其中present、installed、latest 表示安裝, absent 、removed表示解除安裝刪除; present預設狀態, laster表示安裝最新版本.
在安裝foo軟體包前更新然後安裝foo
# ansible web-nodes -m apt -a 'name=foo update_cache=yes'

移除foo軟體包
# ansible web-nodes -m apt -a 'name=foo state=absent'

安裝foo軟體包
# ansible web-nodes -m apt -a 'name=foo state=present'

安裝foo 1.0軟體包
# ansible web-nodes -m apt -a 'name=foo=1.00 state=present'

安裝nginx最新的名字為squeeze-backport釋出包,並且安裝前執行更新
# ansible web-nodes -m apt -a 'name=nginx state=latest default_release=squeeze-backports update_cache=yes'

只下載openjdk-6-jdk最新的軟體包,不安裝
# ansible web-nodes -m apt -a 'name=openjdk-6-jdk state=latest install_recommends=no'

安裝所有軟體包到最新版本
# ansible web-nodes -m apt -a 'upgrade=dist'

更新apt-get的list
# ansible web-nodes -m apt -a 'update_cache=yes'

3600秒後停止update_cache
# ansible web-nodes -m apt -a 'update_cache=yes cache_valid_time=3600'

安裝遠端節點上的/tmp/mypackage.deb軟體包
# ansible web-nodes -m apt -a 'deb=/tmp/mypackage.deb'
5. pip 模組
用於管理Python庫依賴項,為了使用pip模組,必須提供引數name或者requirements
chdir: 執行pip命令前cd進入的目錄
name:要安裝的Python庫的名稱或遠端包的URL。
requirements:一個pip requirements.txt檔案的路徑,它應該是遠端系統的本地檔案,如果使用chdir選項,則可以將檔案指定為相對路徑。
version:指定的Python庫的安裝版本。
extra_args:額外的引數傳遞給pip (後面使用雙引號)。
executable:顯式可執行檔案或可執行檔案的路徑名,用於為系統中安裝的特定版本的Python執行pip。 例如pip-3.3,如果系統中安裝了Python 2.7和3.3,並且想要為Python 3.3安裝執行pip。 它不能與“virtualenv”引數一起指定(在2.1中新增)。 預設情況下,它將採用適用於python直譯器的版本。 pip3在python 3上,pip2或pip在python 2上。
virtualenv:要安裝到的virtualenv目錄的可選路徑。 它不能與’executable’引數一起指定(在2.1中新增)。 如果virtualenv不存在,則將在安裝軟體包之前建立它。 可選的virtualenv_site_packages,virtualenv_command和virtualenv_python選項會影響virtualenv的建立。
virtualenv_command:用於建立虛擬環境的命令或路徑名。 例如pyvenv,virtualenv,virtualenv2,~/bin /virtualenv,/usr/local/bin/virtualenv。
virtualenv_python:用於建立虛擬環境的Python可執行檔案。 例如python3.5,python2.7。 未指定時,將使用用於執行ansible模組的Python版本。 當virtualenv_command使用pyvenv或-m venv模組時,不應使用此引數。
state:狀態(present,absent,latest, forcereinstall),表示是安裝還是解除安裝的狀態. 其中present表示預設安裝; lastest表示最新版本安裝; absent表示解除安裝和刪除; forcereinstall表示強制重新安裝, "forcereinstall"選項僅適用於可ansible 2.1及更高版本.
安裝bottle python包
[root@ansible-server ~]# ansible web-nodes -m pip -a 'name=bottle'
[root@ansible-server ~]# ansible web-nodes -m pip -a 'name=bottle state=present'          #預設的present狀態可以省略不寫

解除安裝bottle python包
[root@ansible-server ~]# ansible web-nodes -m pip -a 'name=bottle state=absent'

在0.4.6版安裝bottle python包
[root@ansible-server ~]# ansible web-nodes -m pip -a 'name=bottle version=0.4.6 state=present'

使用遠端協議(bzr +,hg +,git +,svn +)安裝MyApp。 不必在extra_args中提供'-e'選項。
[root@ansible-server ~]# ansible web-nodes -m pip -a 'name=svn+http://myrepo/svn/MyApp#egg=MyApp'

使用遠端協議(bzr +,hg +,git +)安裝MyApp。
[root@ansible-server ~]# ansible web-nodes -m pip -a 'name=git+http://myrepo/app/MyApp'

從本地壓縮包安裝MyApp
[root@ansible-server ~]# ansible web-nodes -m pip -a 'name=file:///path/to/MyApp.tar.gz'

將bottle安裝到指定的virtualenv中,繼承全域性安裝的模組
[root@ansible-server ~]# ansible web-nodes -m pip -a 'name=bottle virtualenv=/my_app/venv virtualenv_site_packages=yes'

使用Python 2.7將bottle安裝到指定的virtualenv中
[root@ansible-server ~]# ansible web-nodes -m pip -a 'name=bottle virtualenv=/my_app/venv virtualenv_command=virtualenv-2.7'

在使用者主目錄中安裝bottle (extra_args後面使用雙引號)
[root@ansible-server ~]# ansible web-nodes -m pip -a 'name=bottle extra_args="--user"'

安裝指定的python requirements
[root@ansible-server ~]# ansible web-nodes -m pip -a 'requirements=/my_app/requirements.txt'

在指定的virtualenv中安裝指定的python requirements
[root@ansible-server ~]# ansible web-nodes -m pip -a 'requirements=/my_app/requirements.txt virtualenv=/my_app/venv'

安裝指定的python requirements和自定義pip源URL
[root@ansible-server ~]# ansible web-nodes -m pip -a 'requirements=/my_app/requirements.txt extra_args="-i https://example.com/pypi/simple"'

專門為Python 3.3安裝bottle,使用'pip-3.3'可執行檔案
[root@ansible-server ~]# ansible web-nodes -m pip -a 'name=bottle executable=pip-3.3'

安裝 bottle,如果已安裝,強制重新安裝
[root@ansible-server ~]# ansible web-nodes -m pip -a 'name=bottle state=forcereinstall'
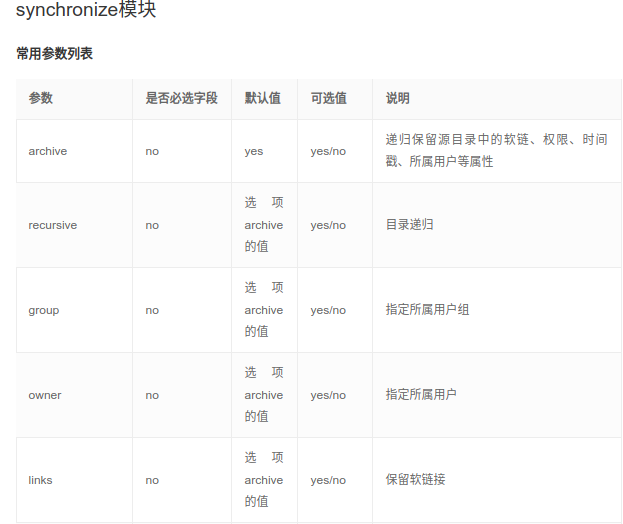
6. synchronize 模組
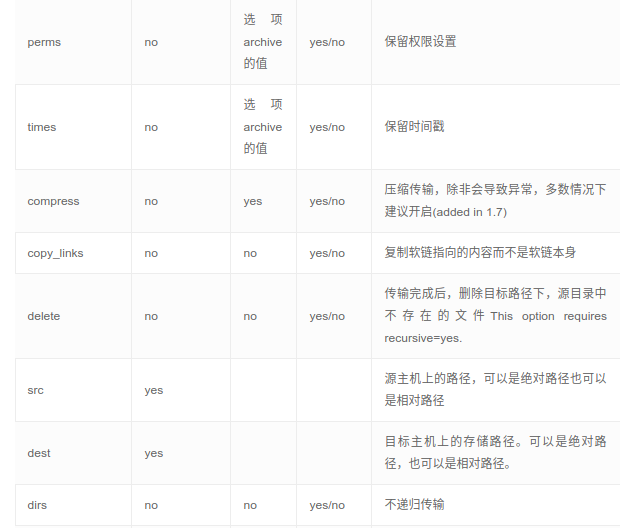
這個模組是使用rsync同步檔案,將主控方目錄推送到指定受控節點的目錄下。其引數如下:
delete: 刪除不存在的檔案,delete=yes 使兩邊的內容一樣(即以推送方為主),預設no
src: 要同步到目的地的源主機上的路徑; 路徑可以是絕對的或相對的。如果路徑使用”/”來結尾,則只複製目錄裡的內容,如果沒有使用”/”來結尾,則包含目錄在內的整個內容全部複製
dest:目的地主機上將與源同步的路徑; 路徑可以是絕對的或相對的。
dest_port:預設目錄主機上的埠 ,預設是22,走的ssh協議。
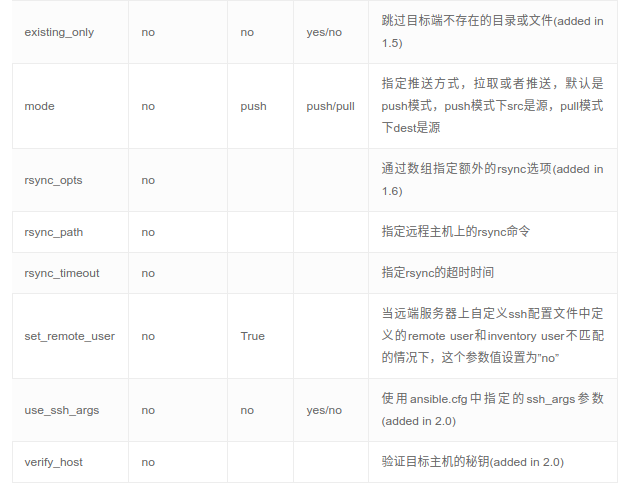
mode: push或pull,預設push,一般用於從本機向遠端主機上傳檔案,pull 模式用於從遠端主機上取檔案。
rsync_opts:通過傳遞陣列來指定其他rsync選項。
將主控節點上/data/kevin目錄同步到受控節點的/home目錄下
[root@ansible-server ~]# ansible web-nodes -m synchronize -a 'src=/data/kevin dest=/home'

將主控節點上/data/kevin/test.file檔案同步到受控節點的/opt目錄下
[root@ansible-server ~]# ansible web-nodes -m synchronize -a 'src=/data/kevin/test.file dest=/opt'

將主控節點上/data/kevin/test.file檔案同步到受控節點的/root/bobo.file檔案
[root@ansible-server ~]# ansible web-nodes -m synchronize -a 'src=/data/kevin/test.file dest=/root/bobo.file'

將主控節點上/opt/同步到受控節點的/opt/目錄, 使受控節點保持和主控節點的opt目錄一致, 不一樣的就刪除! 預設delete=no
[root@ansible-server ~]# ansible web-nodes -m synchronize -a 'src=/opt/ dest=/opt/ delete=yes'

注意命令中要加"/", 如果不加"/", 則主控節點的opt目錄就同步到受控節點的/opt目錄下即, 即/opt/opt
[root@ansible-server ~]# ansible web-nodes -m synchronize -a 'src=/opt dest=/opt delete=yes'

將主控節點上/data/kevin目錄同步到受控節點的/mnt/www目錄下. 但是bobo目錄排除在外!  rsync_opts可以進行多次傳遞.
[root@ansible-server ~]# ansible web-nodes -m synchronize -a 'src=/data/kevin/ dest=/mnt/www/ rsync_opts="--no-motd" rsync_opts="--exclude=bobo"'

強制兩邊同步保持一致! 跟主控節點源目錄保持一致!
[root@ansible-server ~]# ansible web-nodes -m synchronize -a 'src=/data/kevin/ dest=/mnt/www/ rsync_opts="--no-motd" rsync_opts="--exclude=bobo" delete=yes'

從遠端受控節點上將/usr/local/src/grace.file檔案拉取到主控節點的/root目錄下
[root@ansible-server ~]# ansible web-nodes -m synchronize -a 'src=/usr/local/src/grace.file dest=/root/ rsync_opts="-avpgolr" mode=pull '
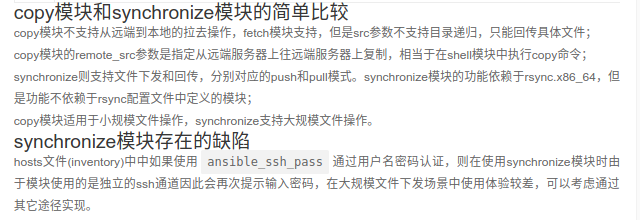
synchronize 模組相比copy模組來說, 同步速度增加很多.
7. template 模組
基於模板方式生成一個檔案複製到遠端主機(template使用Jinjia2格式作為檔案模版,進行文件內變數的替換的模組。它的每次使用都會被ansible標記為”changed”狀態。)
backup: 如果原目標檔案存在,則先備份目標檔案
src: 在ansible控制器上的Jinja2格式化模板的路徑。 這可以是相對或絕對的路徑。
dest: 將模板渲染到遠端機器上的位置。
force: 是否強制覆蓋,預設為yes
owner: 目標檔案屬主
group: 目標檔案屬組
mode: 目標檔案的許可權模式,模式可以被指定為符號模式(例如,u + rwx或u = rw,g = r,o = r)
[root@ansible-server ~]# ansible web-nodes -m template -a "src=/mytemplates/foo.j2 dest=/etc/file.conf owner=bin group=wheel  mode=0644"

同樣的例子,但使用等效於0644的符號模式
[root@ansible-server ~]# ansible web-nodes -m template -a "src=/mytemplates/foo.j2 dest=/etc/file.conf owner=bin group=wheel mode="u=rw,g=r,o=r""

具體用法, 可參考playbook劇本寫法.
8. copy 模組
把主控節點本地的檔案上傳同步到遠端受控節點上, 該模組不支援從遠端受控節點拉取檔案到主控節點上。 引數選項如下:
src:指定原始檔路徑,可以是相對路徑,也可以是絕對路徑,可以是目錄(並非是必須的,可以使用content,直接生成檔案內容). src即是要複製到遠端主機的檔案在本地的地址,可以是絕對路徑,也可以是相對路徑。如果路徑是一個目錄,它將遞迴複製。在這種情況下,如果路徑使用”/”來結尾,則只複製目錄裡的內容,如果沒有使用”/”來結尾,則包含目錄在內的整個內容全部複製,類似於rsync。
dest:指定目標檔案路徑,只能是絕對路徑,如果src是目錄,此項必須是目錄. 這個是必選項!
owner:指定屬主;
group:指定屬組;
mode:指定許可權,可以以數字指定比如0644;
content:代替src,直接往dest檔案中寫內容,可以引用變數,也可以直接使用inventory中的主機變數. 寫後會覆蓋原檔案內容!
backup:在覆蓋之前將原檔案備份,備份檔案包含時間資訊。有兩個選項:yes|no
force: 如果目標主機包含該檔案,但內容不同,如果設定為yes,則強制覆蓋,如果為no,則只有當目標主機的目標位置不存在該檔案時,才複製。預設為yes ;
directory_mode:遞迴的設定目錄的許可權,預設為系統預設許可權;
others:所有的file模組裡的選項都可以在這裡使用;
特別注意: src和content不能同時使用!!!!


[root@ansible-server ~]# ansible web-nodes -m copy -a 'src=/data/kevin/ dest=/mnt/www/ backup=yes'

[root@ansible-server ~]# ansible web-nodes -m copy -a 'src=/etc/hosts dest=/mnt/www/ owner=root group=root mode=0644'

[root@ansible-server ~]# ansible web-nodes -m copy -a 'src=/etc/hosts dest=/mnt/www/ owner=root group=root mode="u=rw,g=r,o=r"'

向遠端受控節點的/mnt/www/test.file檔案寫入內容, 把原內容覆蓋掉
[root@ansible-server ~]# ansible web-nodes -m copy -a 'content="\nMy age is 26" dest=/mnt/www/test.file'
9. user 模組 與 group 模組
user模組是請求的是useradd, userdel, usermod三個指令,goup模組請求的是groupadd, groupdel, groupmod 三個指令。
user模組
home: 指定使用者的家目錄, 需要與createhome配合使用。
groups: 指定使用者的屬組。
uid: 指定用的uid。
password: 設定使用者密碼, password引數需要接受md5加密後的值. 特別注意: 指定password引數時, 不能使用明文密碼, 因為後面這一串密碼會被直接傳送到被管理主機的/etc/shadow檔案中, 所以需要先將密碼字串進行加密處理, 然後將得到的字串放到password中即可。
name: 指定使用者名稱。
system: 是否為系統使用者。 表示預設建立為普通使用者, 而非系統使用者, 指定是用yes. 也就是說yes是預設建立為普通使用者, 而非系統使用者;
update_password: 修改使用者密碼, 其中always: 新密碼和舊密碼不同時進行修改; on_create: 為新建立的使用者指定密碼.
createhome: 建立家目錄, 其中yes表示預設項, 即建立使用者預設是有家目錄的; no表示建立使用者時不建立家目錄.
remove: 其中yes是刪除使用者家目錄, 需要指定此引數; no是預設項, 刪除使用者時預設不刪除使用者的家目錄. 當state=absent時, remove=yes則表示連同家目錄一起刪除, 等價於userdel -r。
state: 使用者狀態是建立還是刪除. (present, absent) ;預設為present; 其中present表示新增使用者; absent表示刪除使用者
shell: 指定使用者的shell環境。
generate_ssh_key: 是否為相關使用者生成SSH金鑰。 這不會覆蓋現有的SSH金鑰。
ssh_key_bits: 可選擇指定要建立的SSH金鑰中的位數。
ssh_key_passphrase: 設定SSH金鑰的密碼。 如果沒有提供密碼, SSH金鑰將預設沒有密碼。
ssh_key_file: 指定SSH金鑰檔名(可選). 如果這是一個相對的檔名, 那麼它將是相對於使用者的主目錄。
ssh_key_type: 指定要生成的SSH金鑰的型別(可選). 可用的SSH金鑰型別將取決於目標主機上的實現。
使用bash shell新增使用者haha,將組"管理員"和"開發人員"附加到使用者組
[root@ansible-server ~]# ansible web-nodes -m user -a "name=haha shell=/bin/bash groups=admins,developers append=yes"

增加使用者anhui (先對密碼做明文到密文的處理)
[root@ansible-server ~]# echo "anhui@123" | openssl passwd -1 -stdin
$1$rj74jCVy$NDW80bgY0DUTuHUlSunVv1
[root@ansible-server ~]# ansible web-nodes -m user -a 'name=anhui system=yes password=$1$rj74jCVy$NDW80bgY0DUTuHUlSunVv1 state=present'

刪除使用者anhui
[root@ansible-server ~]# ansible web-nodes -m user -a 'name=anhui remove=yes state=absent'

更新使用者kevin的密碼 (先對新密碼kevin@bj123做明文到密文的處理)
[root@ansible-server ~]# echo "kevin@bj123"| openssl passwd -1 -stdin
$1$5X5bH5.J$RwE6o6g6bX953W7vAaizv/
[root@ansible-server ~]# ansible web-nodes -m user -a 'name=kevin update_password=always password=$1$5X5bH5.J$RwE6o6g6bX953W7vAaizv/'

在~/.ssh/id_rsa中為使用者bobo建立一個2048位的SSH金鑰
[root@ansible-server ~]# ansible web-nodes -m user -a 'name=bobo generate_ssh_key=yes ssh_key_bits=2048 ssh_key_file=.ssh/id_rsa'

[root@ansible-server ~]# ansible web-nodes -m group -a "name=yang gid=888"
[root@ansible-server ~]# ansible web-nodes -m user -a "name=yang uid=888 group=888 shell=/sbin/nologin create_home=no"
group模組
gid: 指定用的gid。
name: 指定使用者名稱。
state: 是建立還是刪除, (present,absent);
system: 如果是,則表示建立的組是系統組;
[root@ansible-server ~]# ansible web-nodes -m group -a "name=huoqiu state=present"

[root@ansible-server ~]# ansible web-nodes -m group -a "name=chenzun gid=897 state=present"

[root@ansible-server ~]# ansible web-nodes -m group -a "name=huoqiu state=absent"
10. service 模組
管理服務的模組, service管理的服務必須是yum安裝的服務, 即預設的系統服務指令碼. 編譯安裝的服務不好使用service模組管理.
name: 服務名稱;
state: started/stopped/restarted/reloaded;
enabled: true/false;
runlevel: 執行級別;
sleep: 如果執行了restarted,在stop和start之間沉睡幾秒;
arguments: 給命令列提供一些選項;
[root@ansible-server ~]# ansible web-nodes -m service -a "name=sshd state=restarted"

[root@ansible-server ~]# ansible web-nodes -m service -a "enabled=on name=httpd state=started"
[root@ansible-server ~]# ansible web-nodes -m service -a "enabled=yes name=httpd state=started"

[root@ansible-server ~]# ansible web-nodes -m service -a "name=httpd state=reloaded"

[root@ansible-server ~]# ansible web-nodes -m service -a "name=httpd state=stopped"
11. get_url 模組
該模組主要用於從http、ftp、https伺服器上下載檔案(類似於wget), 主要有如下選項:
sha256sum: 下載完成後進行sha256 check;
timeout: 下載超時時間, 預設10s
url: 下載的URL
url_password、url_username: 主要用於需要使用者名稱密碼進行驗證的情況
dest: 將檔案下載到哪裡的絕對路徑。如果dest是目錄, 則使用伺服器提供的檔名, 或者如果沒有提供, 將使用遠端伺服器上的URL的基本名稱。
headers: 以格式“key: value, key: value”為請求新增自定義HTTP標頭
[root@ansible-server ~]# ansible web-nodes -m get_url -a "url=http://lan.Okay686.com/RDPWrap-v1.6.1.zip dest=/usr/local/src/"

[root@ansible-server ~]# ansible web-nodes -m get_url -a "url=http://10.0.8.50/ops.sh  dest=/opt/shell.sh mode=0440"

[root@ansible-server ~]# ansible web-nodes -m get_url -a 'url=http://10.0.8.50/ops.sh dest=/opt/shell.sh headers="key:value,key:value"'

[root@ansible-server ~]# ansible web-nodes -m get_url -a 'url=http://10.0.8.50/ops.sh dest=/opt/shell.sh checksum=sha256:b5bb9d8014a0f9b1d61e21e796d78dccdf1352f23cd32812f4850b878ae4944c'
12. fetch 模組 (從遠端拉取出來檔案)
它用於從遠端機器獲取檔案,並將其本地儲存在由主機名組織的檔案樹中。
src: 指定從遠端控制節點上要拉取的檔案, 記住: 這個只能拉取檔案!! 不能拉取目錄!!! 後續版本可能會支援遞迴提取。
dest: 將遠端節點拉取的檔案儲存到本地的目錄路徑. 例如,如果dest目錄是/backup,在主機host.example.com上命名為/ etc/profile的src檔案將被儲存到/backup/host.example.com/etc/profile。
flat: 允許覆蓋將目標檔案新增到主機名/path/to/file的預設行為。預設為no!! 如果設定為yes, 將不會顯示類似172.16.60.221/root/資訊. (即在dest的本機存放目錄下不會建立遠端節點ip命名的目錄)
將web-nodes組內的遠端節點的/root/bobo.file檔案拉取到主控節點的/tmp下
[root@ansible-server ~]# ansible web-nodes -m fetch -a "dest=/mnt/ src=/root/bobo.file"

拉取過來後, 會發現dest定義的檔案存放目錄下會有以遠端節點ip命名的目錄
[root@ansible-server ~]# ls /mnt/
172.16.60.212  172.16.60.213
[root@ansible-server ~]# ls /mnt/172.16.60.212/root/
bobo.file
[root@ansible-server ~]# ls /mnt/172.16.60.213/root/
bobo.file

flat引數,拉取的時候會自動建立設定的dest中不存在的目錄(同名檔案會覆蓋):
[root@ansible-server ~]# ansible web-nodes -m fetch -a "dest=/mnt/wangshibo/ src=/root/bobo.file"
172.16.60.213 | CHANGED => {
    "changed": true,
    "checksum": "804d716fc5844f1cc5516c8f0be7a480517fdea2",
    "dest": "/mnt/wangshibo/172.16.60.213/root/bobo.file",
    "md5sum": "4221d002ceb5d3c9e9137e495ceaa647",
    "remote_checksum": "804d716fc5844f1cc5516c8f0be7a480517fdea2",
    "remote_md5sum": null
}
172.16.60.212 | CHANGED => {
    "changed": true,
    "checksum": "804d716fc5844f1cc5516c8f0be7a480517fdea2",
    "dest": "/mnt/wangshibo/172.16.60.212/root/bobo.file",
    "md5sum": "4221d002ceb5d3c9e9137e495ceaa647",
    "remote_checksum": "804d716fc5844f1cc5516c8f0be7a480517fdea2",
    "remote_md5sum": null
}

[root@ansible-server ~]# ls /mnt/
172.16.60.212  172.16.60.213  wangshibo
[root@ansible-server ~]# ls /mnt/wangshibo/
172.16.60.212  172.16.60.213
[root@ansible-server ~]# ls /mnt/
172.16.60.212  172.16.60.213  wangshibo
[root@ansible-server ~]# ls /mnt/wangshibo/
172.16.60.212  172.16.60.213
[root@ansible-server ~]# ls /mnt/wangshibo/172.16.60.212/root/
bobo.file
[root@ansible-server ~]# ls /mnt/wangshibo/172.16.60.213/root/
bobo.file

如果不想要從遠端節點拉取過來的檔案在本機存放目錄裡已遠端節點ip命名的目錄裡面, 即去掉上面的/mnt裡面的172.16.60.212和172.16.60.213目錄
[root@ansible-server ~]# ansible web-nodes -m fetch -a "dest=/mnt/kevin/ src=/root/bobo.file flat=yes"
172.16.60.213 | CHANGED => {
    "changed": true,
    "checksum": "804d716fc5844f1cc5516c8f0be7a480517fdea2",
    "dest": "/mnt/kevin/bobo.file",
    "md5sum": "4221d002ceb5d3c9e9137e495ceaa647",
    "remote_checksum": "804d716fc5844f1cc5516c8f0be7a480517fdea2",
    "remote_md5sum": null
}
172.16.60.212 | CHANGED => {
    "changed": true,
    "checksum": "804d716fc5844f1cc5516c8f0be7a480517fdea2",
    "dest": "/mnt/kevin/bobo.file",
    "md5sum": "4221d002ceb5d3c9e9137e495ceaa647",
    "remote_checksum": "804d716fc5844f1cc5516c8f0be7a480517fdea2",
    "remote_md5sum": null
}

[root@ansible-server ~]# ls /mnt/
172.16.60.212  172.16.60.213  kevin  wangshibo
[root@ansible-server ~]# ls /mnt/kevin/
bobo.file
13. file 模組
file模組主要用於遠端主機上的檔案操作,file模組包含如下選項:
force: 需要在兩種情況下強制建立軟連結,一種是原始檔不存在但之後會建立的情況下;另一種是目標軟連結已存在,需要先取消之前的軟鏈,然後建立新的軟鏈,有兩個選項: yes|no
group: 定義檔案/目錄的屬組
mode: 定義檔案/目錄的許可權
owner: 定義檔案/目錄的屬主
path: 必選項,定義檔案/目錄的路徑
recurse: 遞迴的設定檔案的屬性,只對目錄有效
src: 要被連結的原始檔的路徑,只應用於state=link的情況
dest: 被連結到的路徑,只應用於state=link的情況
state: 表示file的狀態, 主要分為:
directory: 如果目錄不存在,建立目錄;
file: 即使檔案不存在,也不會被建立;
link: 建立軟連結;
hard: 建立硬連結;
touch: 如果檔案不存在,則會建立一個新的檔案,如果檔案或目錄已存在,則更新其最後修改時間;
absent: 刪除目錄、檔案或者取消連結檔案;
[root@ansible-server ~]# ansible web-nodes -m file -a "path=/data/test state=touch mode="600" owner=kevin group=kevin"

[root@ansible-server ~]# ansible web-nodes -m file -a "path=/data/haha state=directory mode="755" owner=kevin group=kevin"

[root@ansible-server ~]# ansible web-nodes -m file -a "path=/data/test state=absent"

[root@ansible-server ~]# ansible web-nodes -m file -a "path=/data/test state=touch mode="u+rw,g-wx,o-rwx" owner=kevin group=kevin"

檔案的軟連結和硬連結
[root@ansible-server ~]# ansible web-nodes -m file -a "src=/data/test dest=/opt/heihei state=link"

[root@ansible-server ~]# ansible web-nodes -m file -a "src=/data/test dest=/mnt/hh state=hard"

[root@ansible-server ~]# ansible web-nodes -m file -a "src=/etc/passwd dest=/opt/heihei state=link force=yes"

目錄做軟連結
[root@ansible-server ~]# ansible web-nodes -m file -a "src=/data/haha/ dest=/root/aaa state=link"
14. lineinfile 模組
用於對遠端受控節點的檔案編輯模組. 主要選項有:
path: 指定要修改的配置檔案, 包括:
regexp:匹配要修改的內容
line:要增加或者修改的內容
state: 狀態, 包括:
absent:表示刪除,當匹配到時進行刪除
present:表示增加,當匹配到時進行修改,當沒有匹配到時在最後增加一行,預設為此項
backrefs: 該引數值包括:
no:表示如果沒有匹配到,則增加line;如果匹配成功,則替換line;
yes:表示如果沒有匹配到,則不變line;如果匹配成功,則替換line;
backup: 該引數值包括:
no:表示如果沒有匹配到,則增加line;如果匹配成功,則替換line;不備份原檔案
yes:表示如果沒有匹配到,則增加line;如果匹配成功,則替換line;備份原檔案
insertafter(匹配的是此行): 在匹配到的行之後新增一行. (經測試, 發現是匹配到的行的最後一行的後面新增一行)
insertbefore(匹配的是此行): 在匹配到的行之前新增一行. (經測試, 發現是匹配到的行的最後一行的前面新增一行)
溫馨提示: 經測試,當不新增backerfs: yes引數時,匹配到後也會進行替換,但當匹配到的內容不存在時,會在最後增加一行;所以當不增加backerfs引數時,要確定匹配到的內容存在;
將遠端受控節點的/data/test檔案中的"123"欄位修改為"wangshibo"
[root@ansible-server ~]# ansible web-nodes -m lineinfile -a 'path=/data/test regexp="123" line="wangshibo" backrefs=no'

[root@ansible-server ~]# ansible web-nodes -m lineinfile -a 'path=/etc/sudoers regexp="SYSTEM,SOFTWARE" line="STAPLES_ADMIN ALL=(ROOT) NOPASSWD:NETWORKING,LOCATE,STORAGE,DELEGATING,DRIVERS,SYSTEM,SOFTWARE,SERVICES,PROCESSES,FILE" backrefs=no'

匹配到的行後增加一行
[root@ansible-server ~]# ansible web-nodes -m lineinfile -a 'dest=/data/test insertafter="wangshibo" line="huihui"'

匹配到的行前增加一行
[root@ansible-server ~]# ansible web-nodes -m lineinfile -a 'dest=/data/test insertbefore="root" line="huihui"'

刪除匹配到的行:
[root@ansible-server ~]# ansible web-nodes -m lineinfile -a 'path=/data/test regexp="123" state=absent'
15. unarchive模組
用於解壓檔案,模組包含如下選項:
copy: 在解壓檔案之前,是否先將檔案複製到遠端主機,預設為yes。若為no,則要求目標主機上壓縮包必須存在。
creates: 指定一個檔名,當該檔案存在時,則解壓指令不執行
dest: 遠端主機上的一個路徑,即檔案解壓的絕對路徑。 必須是一個目錄路徑!
group: 解壓後的目錄或檔案的屬組;
list_files: 如果為yes,則會列出壓縮包裡的檔案,預設為no,2.0版本新增的選項;
mode: 解壓後檔案的許可權;
src: 如果copy為yes,則需要指定壓縮檔案的源路徑;
owner: 解壓後檔案或目錄的屬主;
經測試, 該模組解壓時識別zip, tgz , tar.gz, tar.bz2 格式的壓縮包, gzip格式的測試時不支援.
將/usr/local/src/nginx.tgz解壓縮到/data/www中
[root@ansible-server ~]# ansible web-nodes -m unarchive -a "src=/usr/local/src/nginx.tgz dest=/data/www/"

解壓遠端受控節點上已存在的檔案
[root@ansible-server ~]# ansible web-nodes -m unarchive -a "src=/root/file.zip dest=/usr/local remote_src=yes"

解壓文件需要下載的檔案(2.0中新增)
[root@ansible-server ~]# ansible web-nodes -m unarchive -a "src=https://example.com/example.zip dest=/usr/local/bin remote_src=yes"
16. command模組 和 shell模組
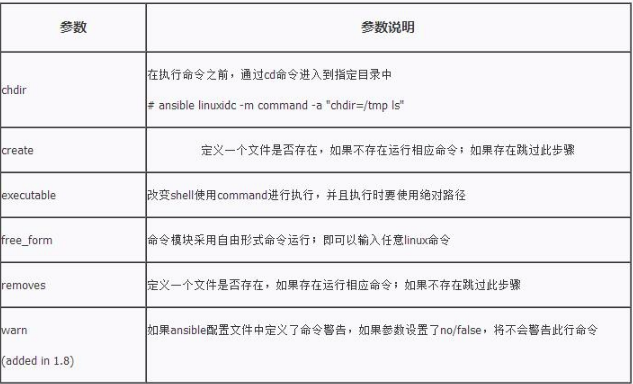
用於在各被管理節點執行指定的命令. shell和command的區別:shell模組可以特殊字元,而command是不支援!!
command 是ansible的預設模組, 即不指定模組的時候預設使用的模組就是command ! 使用ansible自帶模組執行命令 如果要用 > < | & ‘ ‘ 使用shell 模組, command是不支援管道符之類的。
[root@ansible-server ~]# ansible all -a "date"
172.16.60.214 | CHANGED | rc=0 >>
Sun Mar 17 15:24:55 CST 2019

172.16.60.212 | CHANGED | rc=0 >>
Sun Mar 17 15:24:55 CST 2019

172.16.60.213 | CHANGED | rc=0 >>
Sun Mar 17 15:24:55 CST 2019

[root@ansible-server ~]# ansible all -m command -a "date"
172.16.60.213 | CHANGED | rc=0 >>
Sun Mar 17 15:25:14 CST 2019

172.16.60.212 | CHANGED | rc=0 >>
Sun Mar 17 15:25:14 CST 2019

172.16.60.214 | CHANGED | rc=0 >>
Sun Mar 17 15:25:14 CST 2019

在命令執行之前, 先切換到指定的目錄路徑下
[root@ansible-server ~]# ansible web-nodes -m command -a "chdir=/tmp pwd"
172.16.60.213 | CHANGED | rc=0 >>
/tmp

172.16.60.212 | CHANGED | rc=0 >>
/tmp

creates 檔案是否存在,不存在就執行命令
[root@ansible-server ~]# ansible web-nodes -m command -a "creates=/etc/hosts date"
172.16.60.212 | SUCCESS | rc=0 >>
skipped, since /etc/hosts exists

172.16.60.213 | SUCCESS | rc=0 >>
skipped, since /etc/hosts exists

[root@ansible-server ~]# ansible web-nodes -m command -a "creates=/etc/hosts1231 date"
172.16.60.213 | CHANGED | rc=0 >>
Sun Mar 17 15:26:40 CST 2019

172.16.60.212 | CHANGED | rc=0 >>
Sun Mar 17 15:26:40 CST 2019

removes 檔案是否存在,不存在就不執行命令,
[root@ansible-server ~]# ansible web-nodes -m command -a "removes=/etc/hosts uptime"
172.16.60.213 | CHANGED | rc=0 >>
 15:33:01 up 14 days, 12:08,  2 users,  load average: 0.13, 0.04, 0.05

172.16.60.212 | CHANGED | rc=0 >>
 15:33:01 up 14 days, 13:20,  2 users,  load average: 0.06, 0.03, 0.05

[root@ansible-server ~]# ansible web-nodes -m command -a "removes=/etc/hosts1231 uptime"
172.16.60.213 | SUCCESS | rc=0 >>
skipped, since /etc/hosts1231 does not exist

172.16.60.212 | SUCCESS | rc=0 >>
skipped, since /etc/hosts1231 does not exist
shell 模組:這是個萬能模組, 執行linux命令時可以用遠端節點執行命令;
注意: shell 模組在遠端執行指令碼時,遠端主機上一定要有相應的指令碼;
[root@ansible-server ~]# ansible web-nodes -m shell -a "/bin/bash /opt/test.sh"
172.16.60.212 | CHANGED | rc=0 >>
ansible-node01
it is OK

172.16.60.213 | CHANGED | rc=0 >>
ansible-node02
it is OK

下面的shell模組命令中使用了特殊字元, 如果使用comand模組則就不行了!!
[root@ansible-server ~]# ansible web-nodes -m shell -a "cat /etc/passwd > /tmp/test"

使用command模組執行下面命令, 則就會報錯!  command模組不支援特殊字元!
[root@ansible-server ~]# ansible web-nodes -m command -a "cat /etc/passwd > /tmp/test"
17. hostname模組
修改遠端受控節點的主機名的模組
使用hostname模組修改遠端節點的主機名時, 最好指明遠端單節點ip地址進行設定主機名了. 因為不同節點的主機名不一樣

[root@ansible-server ~]# ansible 172.16.60.213 -m hostname -a 'name="web-node03"'
172.16.60.213 | CHANGED => {
    "ansible_facts": {
        "ansible_domain": "",
        "ansible_fqdn": "web-node03",
        "ansible_hostname": "web-node03",
        "ansible_nodename": "web-node03"
    },
    "changed": true,
    "name": "web-node03"
}
18. script模組
在遠端受控節點上執行主控節點的指令碼,相當於scp+shell組合
比如在遠端受控節點上執行主控節點的/opt/test.sh指令碼
[root@ansible-server ~]# ansible all -m script -a "/opt/test.sh"
需要注意: 使用scripts模組,不用將指令碼傳輸到遠端節點,指令碼本身不用進行授權,即可利用script模組執行。直接執行指令碼即可,不需要使用sh 或者 /bin/bash
19. stat模組
獲取遠端檔案的狀態資訊,包括atime,ctime,mtime,md5,uid,gid等資訊
[root@ansible-server ~]# ansible all -m stat -a "path=/data/test"
20. cron模組
遠端受控節點的crontab配置
設定指定的crontab計劃任務
[root@ansible-server ~]# ansible web-nodes -m cron -a "name='test' hour='2-5' minute='*/5' day='1' month='3,4' weekday='1' job='ls -l' user=root"
172.16.60.212 | CHANGED => {
    "changed": true,
    "envs": [],
    "jobs": [
        "test"
    ]
}
172.16.60.213 | CHANGED => {
    "changed": true,
    "envs": [],
    "jobs": [
        "test"
    ]
}

然後到172.16.60.212和172.16.60.213受控節點上檢視:
[root@ansible-node02 ~]# crontab -l
#Ansible: test
*/5 2-5 1 3,4 1 ls -l

刪除指定crontab
[root@ansible-server ~]# ansible web-nodes -m cron -a "name='test' state=absent"

======================================================
使用ansible新增一條定時任務
[root@ansible-server ~]# ansible web-nodes -m cron -a "minute=* hour=* day=* month=* weekday=*  job='/bin/sh /server/scripts/test.sh'"

遠端受控節點上檢視
[root@ansible-node02 ~]# crontab -l
#Ansible: None
* * * * * /bin/sh /server/scripts/test.sh

設定定時任務註釋資訊,防止重複,name設定一個名稱
[root@ansible-server ~]# ansible web-nodes -m cron -a "name='cron01' job='/bin/sh /server/scripts/test.sh'"
[root@ansible-server ~]# ansible web-nodes -m cron -a "name='cron02' job='/bin/sh /server/scripts/test2.sh'"

遠端受控節點上檢視
[root@ansible-node02 ~]# crontab -l
#Ansible: cron01
* * * * * /bin/sh /server/scripts/test.sh
#Ansible: cron02
* * * * * /bin/sh /server/scripts/test2.sh

刪除相應定時任務
[root@ansible-server ~]# ansible 172.16.60.212 -m cron -a "name='ansible cron02' minute=0 hour=0 job='/bin/sh /server/scripts/test.sh' state=absent"

註釋相應定時任務,使定時任務失效 (disabled=yes 表示註釋掉, 即無效; disabled=no 表示去掉註釋, 即有效)
[root@ansible-server ~]# ansible web-nodes -m cron -a "name='ansible cron01' minute=0 hour=0 job='/bin/sh /server/scripts/test.sh' disabled=yes"
21. mount模組
在遠端受控節點上掛載檔案系統。可用引數:
present: 開機掛載,僅將掛載配置寫入/etc/fstab(不常用)
mounted: 掛載裝置,並將配置寫入/etc/fstab
unmounted: 解除安裝裝置,不會清除/etc/fstab寫入的配置
absent: 解除安裝裝置,會清理/etc/fstab寫入的配置
mount已經使用path代替了原來的name引數,但是name引數還是可以使用的.
將受控節點的/dev/sd0裝置掛載到/mnt/data目錄上, 檔案格式為ext4, 只讀屬性
[root@ansible-server ~]# ansible web-nodes -m mount -a "path=/mnt/data src=/dev/sd0 fstype=ext4 ots=ro state=present"

僅將掛載的配置寫入/etc/fstab,並不會執行掛載操作
[root@ansible-server ~]# ansible web-nodes -m mount -a "src=172.16.60.220:/data path=/data fstype=nfs opts=defaults state=present"

臨時掛載裝置,並將掛載資訊寫入/etc/fstab
[root@ansible-server ~]# ansible web-nodes -m mount -a "src=172.16.60.220:/data path=/data fstype=nfs opts=defaults state=mounted"

臨時解除安裝,不會清理/etc/fstab
[root@ansible-server ~]# ansible web-nodes -m mount -a "src=172.16.60.220:/data path=/data fstype=nfs opts=defaults state=unmounted"

解除安裝,不僅臨時解除安裝,同時會清理/etc/fstab
[root@ansible-server ~]# ansible web-nodes -m mount -a "src=172.16.60.220:/data path=/data fstype=nfs opts=defaults state=absent"
22. find模組
幫助在被管理的受控主機中查詢符合條件的檔案,就像 find 命令一樣.
常用選項:
paths: 必須引數,指定在哪個目錄中查詢檔案,可以指定多個路徑,路徑間用逗號隔開,此引數有別名,使用別名 path 或者別名 name 可以代替 paths。
recurse: 預設情況下,只會在指定的目錄中查詢檔案,也就是說,如果目錄中還包含目錄,ansible 並不會遞迴的進入子目錄查詢對應檔案,如果想要遞迴的查詢檔案,需要使用 recurse 引數,當 recurse 引數設定為 yes 時,表示在指定目錄中遞迴的查詢檔案。
hidden: 預設情況下,隱藏檔案會被忽略,當 hidden 引數的值設定為 yes 時,才會查詢隱藏檔案。
file_type: 預設情況下,ansible 只會根據條件查詢”檔案”,並不會查詢”目錄”或”軟連結”等檔案型別,如果想要指定查詢的檔案型別,可以通過 file_type 指定檔案型別,可指定的檔案型別有 any、directory、file、link 四種。
patterns: 使用此引數指定需要查詢的檔名稱,支援使用 shell(比如萬用字元)或者正規表示式去匹配檔名稱,預設情況下,使用 shell 匹配對應的檔名,如果想要使用 python 的正則去匹配檔名,需要將 use_regex 引數的值設定為 yes。
use_regex:預設情況下,find 模組不會使用正規表示式去解析 patterns 引數中對應的內容,當 use_regex 設定為 yes 時,表示使用 python 正則解析 patterns 引數中的表示式,否則,使用 glob 萬用字元解析 patterns 引數中的表示式。
contains:使用此引數可以根據文章內容查詢檔案,此引數的值為一個正規表示式,find 模組會根據對應的正規表示式匹配檔案內容。
age: 使用此引數可以根據時間範圍查詢檔案,預設以檔案的 mtime 為準與指定的時間進行對比,比如,如果想要查詢 mtime 在3天之前的檔案,那麼可以設定 age=3d,如果想要查詢 mtime 在3天以內的檔案,可以設定 age=-3d,這裡所說的3天是按照當前時間往前推3天,可以使用的單位有秒(s)、分(m)、時(h)、天(d)、星期(w)。
age_stamp: 檔案的時間屬性中有三個時間種類,atime、ctime、mtime,當我們根據時間範圍查詢檔案時,可以指定以哪個時間種類為準,當根據時間查詢檔案時,預設以 mtime 為準。
size: 使用此引數可以根據檔案大小查詢檔案,比如,如果想要查詢大於3M的檔案,那麼可以設定 size=3m,如果想要查詢小於50k的檔案,可以設定 size=-50k,可以使用的單位有 t、g、m、k、b。
get_checksum: 當有符合查詢條件的檔案被找到時,會同時返回對應檔案的 sha1校驗碼,如果要查詢的檔案比較大,那麼生成校驗碼的時間會比較長
在受控主機的 /data目錄中查詢檔案內容中包含wang字串的檔案,隱藏檔案會被忽略,不會進行遞迴查詢。
[root@ansible-server ~]# ansible web-nodes -m find -a "paths=/data contains=".*wang.*""

在受控主機的的 /data目錄以及其子目錄中查詢檔案內容中包含wang字串的檔案,隱藏檔案會被忽略。
[root@ansible-server ~]# ansible web-nodes -m find -a "paths=/data contains=".*wang.*" recurse=yes"

在受控主機的的 /data目錄中查詢以 .sh 結尾的檔案,包括隱藏檔案,但是不包括目錄或其他檔案型別,不會進行遞迴查詢。
[root@ansible-server ~]# ansible web-nodes -m find -a 'paths=/data patterns="*.sh" file_type=any hidden=yes'

在受控主機的的 /data目錄中查詢以 .sh 結尾的檔案,只不過patterns對應的表示式為正規表示式,查詢範圍包括隱藏檔案,包括所有檔案型別,
但是不會進行遞迴查詢,不會對/data目錄的子目錄進行查詢。
[root@ansible-server ~]# ansible web-nodes -m find -a 'paths=/data patterns=".*\.sh" use_regex=yes file_type=any hidden=yes'

在受控主機的的 /data目錄中以及其子目錄中查詢 mtime 在1天以內的檔案,不包含隱藏檔案,不包含目錄或軟連結檔案等檔案型別。
[root@ansible-server ~]# ansible web-nodes -m find -a "path=/data age=-1d recurse=yes"

在受控主機的的 /data目錄中以及其子目錄中查詢大於 2g 的檔案,不包含隱藏檔案,不包含目錄或軟連結檔案等檔案型別。
[root@ansible-server ~]# ansible web-nodes -m find -a "paths=/data size=2g recurse=yes"

在受控主機的的 /data目錄中以及其子目錄中查詢以 .sh 結尾的檔案,並且返回符合條件檔案的 sha1 校驗碼,包括隱藏檔案
[root@ansible-server ~]# ansible web-nodes -m find -a "paths=/data patterns=*.sh get_checksum=yes hidden=yes recurse=yes"
23. selinux模組
管理遠端受控節點的selinux的模組
[root@ansible-server ~]# ansible web-nodes -m selinux -a 'state=disabled'
172.16.60.212 | SUCCESS => {
    "changed": false,
    "configfile": "/etc/selinux/config",
    "msg": "",
    "policy": "targeted",
    "reboot_required": false,
    "state": "disabled"
}
172.16.60.213 | SUCCESS => {
    "changed": false,
    "configfile": "/etc/selinux/config",
    "msg": "",
    "policy": "targeted",
    "reboot_required": false,
    "state": "disabled"
}
24. setup模組
用於收集遠端受控主機的一些基本資訊.
filter引數:用於進行條件過濾。如果設定,僅返回匹配過濾條件的資訊
不加過濾引數, 就會將受控主機的所有資訊都列印出來
[root@ansible-server ~]# ansible web-nodes -m setup

獲取受控主機的 IPV4 地址
[root@ansible-server ~]# ansible web-nodes -m setup -a "filter=ansible_all_ipv4_addresses"
172.16.60.212 | SUCCESS => {
    "ansible_facts": {
        "ansible_all_ipv4_addresses": [
            "172.16.60.212"
        ]
    },
    "changed": false
}
172.16.60.213 | SUCCESS => {
    "ansible_facts": {
        "ansible_all_ipv4_addresses": [
            "172.16.60.213",
            "172.19.0.1",
            "172.17.0.1"
        ]
    },
    "changed": false
}


獲取受控主機的記憶體資訊
[root@ansible-server ~]# ansible web-nodes -m setup -a "filter=ansible_memory_mb"
172.16.60.213 | SUCCESS => {
    "ansible_facts": {
        "ansible_memory_mb": {
            "nocache": {
                "free": 7244,
                "used": 578
            },
            "real": {
                "free": 4772,
                "total": 7822,
                "used": 3050
            },
            "swap": {
                "cached": 0,
                "free": 8063,
                "total": 8063,
                "used": 0
            }
        }
    },
    "changed": false
}
172.16.60.212 | SUCCESS => {
    "ansible_facts": {
        "ansible_memory_mb": {
            "nocache": {
                "free": 7194,
                "used": 628
            },
            "real": {
                "free": 3544,
                "total": 7822,
                "used": 4278
            },
            "swap": {
                "cached": 0,
                "free": 8063,
                "total": 8063,
                "used": 0
            }
        }
    },
    "changed": false
}


通過萬用字元實現模糊匹配,比如以”mb”關鍵字結尾的資訊
[root@ansible-server ~]# ansible web-nodes -m setup -a "filter=*mb"
172.16.60.212 | SUCCESS => {
    "ansible_facts": {
        "ansible_memfree_mb": 3543,
        "ansible_memory_mb": {
            "nocache": {
                "free": 7193,
                "used": 629
            },
            "real": {
                "free": 3543,
                "total": 7822,
                "used": 4279
            },
            "swap": {
                "cached": 0,
                "free": 8063,
                "total": 8063,
                "used": 0
            }
        },
        "ansible_memtotal_mb": 7822,
        "ansible_swapfree_mb": 8063,
        "ansible_swaptotal_mb": 8063
    },
    "changed": false
}
172.16.60.213 | SUCCESS => {
    "ansible_facts": {
        "ansible_memfree_mb": 4771,
        "ansible_memory_mb": {
            "nocache": {
                "free": 7243,
                "used": 579
            },
            "real": {
                "free": 4771,
                "total": 7822,
                "used": 3051
            },
            "swap": {
                "cached": 0,
                "free": 8063,
                "total": 8063,
                "used": 0
            }
        },
        "ansible_memtotal_mb": 7822,
        "ansible_swapfree_mb": 8063,
        "ansible_swaptotal_mb": 8063
    },
    "changed": false
}
其他常用資訊列出:
ansible_all_ipv4_addresses:僅顯示ipv4的資訊。
ansible_devices:僅顯示磁碟裝置資訊。
ansible_distribution:顯示是什麼系統,例:centos,suse等。
ansible_distribution_major_version:顯示是系統主版本。
ansible_distribution_version:僅顯示系統版本。
ansible_machine:顯示系統型別,例:32位,還是64位。
ansible_eth0:僅顯示eth0的資訊。
ansible_hostname:僅顯示主機名。
ansible_kernel:僅顯示核心版本。
ansible_lvm:顯示lvm相關資訊。
ansible_memtotal_mb:顯示系統總記憶體。
ansible_memfree_mb:顯示可用系統記憶體。
ansible_memory_mb:詳細顯示記憶體情況。
ansible_swaptotal_mb:顯示總的swap記憶體。
ansible_swapfree_mb:顯示swap記憶體的可用記憶體。
ansible_mounts:顯示系統磁碟掛載情況。
ansible_processor:顯示cpu個數(具體顯示每個cpu的型號)。
ansible_processor_vcpus:顯示cpu個數(只顯示總的個數).