繼上一篇部落格介紹了完整部署CentOS7.2+OpenStack+kvm 雲平臺環境(1)--基礎環境搭建,本篇繼續講述後續部分的內容
1 虛擬機器相關
1.1 虛擬機器位置介紹
openstack上建立的虛擬機器例項存放位置是/var/lib/nova/instances
如下,可以檢視到虛擬機器的ID
[root@linux-node2 ~]# nova list
+--------------------------------------+---------------+--------+------------+-------------+--------------------+
| ID | Name | Status | Task State | Power State | Networks |
+--------------------------------------+---------------+--------+------------+-------------+--------------------+
| 980fd600-a4e3-43c6-93a6-0f9dec3cc020 | kvm-server001 | ACTIVE | - | Running | flat=192.168.1.110 |
| e7e05369-910a-4dcf-8958-ee2b49d06135 | kvm-server002 | ACTIVE | - | Running | flat=192.168.1.111 |
| 3640ca6f-67d7-47ac-86e2-11f4a45cb705 | kvm-server003 | ACTIVE | - | Running | flat=192.168.1.112 |
| 8591baa5-88d4-401f-a982-d59dc2d14f8c | kvm-server004 | ACTIVE | - | Running | flat=192.168.1.113 |
+--------------------------------------+---------------+--------+------------+-------------+--------------------+
[root@linux-node2 ~]# cd /var/lib/nova/instances/
[root@linux-node2 instances]# ll
total 8
drwxr-xr-x. 2 nova nova 85 Aug 30 17:16 3640ca6f-67d7-47ac-86e2-11f4a45cb705 #虛擬機器的ID
drwxr-xr-x. 2 nova nova 85 Aug 30 17:17 8591baa5-88d4-401f-a982-d59dc2d14f8c
drwxr-xr-x. 2 nova nova 85 Aug 30 17:15 980fd600-a4e3-43c6-93a6-0f9dec3cc020
drwxr-xr-x. 2 nova nova 69 Aug 30 17:15 _base
-rw-r--r--. 1 nova nova 39 Aug 30 17:17 compute_nodes #計算節點資訊
drwxr-xr-x. 2 nova nova 85 Aug 30 17:15 e7e05369-910a-4dcf-8958-ee2b49d06135
drwxr-xr-x. 2 nova nova 4096 Aug 30 17:15 locks #鎖
[root@linux-node2 instances]# cd 3640ca6f-67d7-47ac-86e2-11f4a45cb705/
[root@linux-node2 3640ca6f-67d7-47ac-86e2-11f4a45cb705]# ll
total 6380
-rw-rw----. 1 qemu qemu 20856 Aug 30 17:17 console.log #vnc 的終端輸出
-rw-r--r--. 1 qemu qemu 6356992 Aug 30 17:43 disk #虛擬磁碟(不是全部,有後端檔案)
-rw-r--r--. 1 nova nova 162 Aug 30 17:16 disk.info #disk詳情
-rw-r--r--. 1 qemu qemu 197120 Aug 30 17:16 disk.swap
-rw-r--r--. 1 nova nova 2910 Aug 30 17:16 libvirt.xml #xml 配置,此檔案在虛擬機器啟動時動態生成的,改了也沒鳥用。
[root@linux-node2 3640ca6f-67d7-47ac-86e2-11f4a45cb705]# file disk
disk: QEMU QCOW Image (v3), has backing file (path /var/lib/nova/instances/_base/378396c387dd437ec61d59627fb3fa9a6), 10737418240 bytes #disk後端檔案
[root@openstack-server 3640ca6f-67d7-47ac-86e2-11f4a45cb705]# qemu-img info disk
image: disk
file format: qcow2
virtual size: 10G (10737418240 bytes)
disk size: 6.1M
cluster_size: 65536
backing file: /var/lib/nova/instances/_base/378396c387dd437ec61d59627fb3fa9a67f857de
Format specific information:
compat: 1.1
lazy refcounts: false
disk 是寫時複製的方式,後端檔案不變,變動的檔案放在 2.2M 的 disk 檔案中,不變的在後端檔案放置。 佔用更小的空間。
2 安裝配置 Horizon-dashboard(web 介面)
這個在http://www.cnblogs.com/kevingrace/p/5707003.html這篇中已經配置過了,這裡再贅述一下吧:
dashboard 通過 api 來通訊的
2.1 安裝配置 dashboard
1、安裝
[root@linux-node1 ~]# yum install -y openstack-dashboard
2、 修改配置檔案
[root@linux-node1 ~]# vim /etc/openstack-dashboard/local_settings
OPENSTACK_HOST = "192.168.1.17" #更改為keystone機器地址
OPENSTACK_KEYSTONE_DEFAULT_ROLE = "user" #預設的角色
ALLOWED_HOSTS = ['*'] #允許所有主機訪問
CACHES = {
'default': {
'BACKEND': 'django.core.cache.backends.memcached.MemcachedCache',
'LOCATION': '192.168.1.17:11211', #連線memcached
}
}
#CACHES = {
# 'default': {
# 'BACKEND': 'django.core.cache.backends.locmem.LocMemCache',
# }
#}
TIME_ZONE = "Asia/Shanghai" #設定時區
重啟 httpd 服務
[root@linux-node1 ~]# systemctl restart httpd
web 介面登入訪問dashboard
http://58.68.250.17/dashboard/
使用者密碼 demo 或者 admin(管理員)
3 虛擬機器建立流程(非常重要)

第一階段:
1、使用者通過 Dashboard 或者命令列,傳送使用者名稱密碼給 Keystone 進行驗證,驗證成功後,
返回 OS_TOKEN(令牌)
2、 Dashboard 或者命令列訪問 nova-api,我要建立虛擬機器
3、 nova-api 去找 keystone 驗證確認。
第二階段: nova 之間的元件互動
4、 nova-api 和 nova 資料庫進行互動,記錄
5-6、 nova-api 通過訊息佇列講資訊傳送給 nova-scheduler
7、 nova-scheduler 收到訊息後,和資料庫進行互動,自己進行排程
8、 nova-scheduler 通過訊息佇列將資訊傳送給 nova-compute
9-11、 nova-compute 通過訊息佇列和 nova-conductor 通訊,通過 nova-conductor 和資料庫進
行互動,獲取相關資訊。(圖上有點問題), nova-conductor 就是專門和資料庫進行通訊的。
第三階段:
12、 nova-compute 發起 api 呼叫 Glance 獲取映象。
13、 Glance 去找 keystone 認證,認證成功後將映象給 nova-compute
14、 nova-compute 找 Neutron 獲取網路
15、 Neutron 去找 keystone 認證,認證後為 nova-compute 提供網路
16-17 同理
第四階段:
nova-compute 通過 libvirt 呼叫 kvm 生成虛擬機器
18.、 nova-compute 和底層的 hypervisor 進行互動,如果是使用的 kvm,則通過 libvirt 呼叫
kvm 去建立虛擬機器,建立過程中 nova-api 會一直去資料庫輪詢檢視虛擬機器建立狀態。
*************************************************************************************************
細節:
新的計算節點第一次建立虛擬機器會慢
因為 glance 需要把映象上傳到計算節點上,即_bash 目錄下,之後才會建立虛擬機器
[root@linux-node2 _base]# pwd
/var/lib/nova/instances/_base
[root@openstack-server _base]# ll
total 10485764
-rw-r--r--. 1 nova qemu 10737418240 Aug 30 17:57 378396c387dd437ec61d59627fb3fa9a67f857de
-rw-r--r--. 1 nova qemu 1048576000 Aug 30 17:57 swap_1000
第一個虛擬機器建立後,後續在建立其他的虛擬機器時就快很多了。
建立虛擬機器操作,具體見:
http://www.cnblogs.com/kevingrace/p/5707003.html
************************************************************************************************
4 cinder 雲端儲存服務
4.1 儲存的分類
1、塊儲存
磁碟
2、檔案儲存
nfs
3、物件儲存
4.2 cinder 介紹
雲硬碟
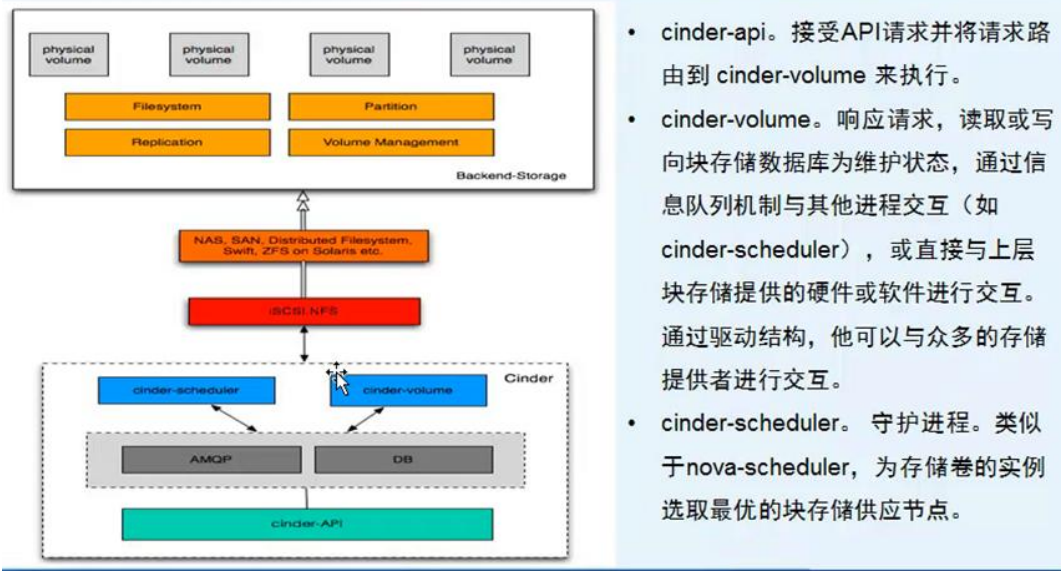
一般 cinder-api 和 cinder-scheduler 安裝在控制節點上, cinder-volume 安裝在儲存節點上。
4.3 cinder 控制節點配置
1、安裝軟體包
控制節點
[root@linux-node1 ~]#yum install -y openstack-cinder python-cinderclient
計算節點
[root@linux-node2 ~]#yum install -y openstack-cinder python-cinderclient
2、 建立 cinder 的資料庫
之前的一篇中已經建立了:http://www.cnblogs.com/kevingrace/p/5707003.html
3、修改配置檔案
[root@linux-node1 ~]# cat /etc/cinder/cinder.conf|grep -v "^#"|grep -v "^$"
[DEFAULT]
glance_host = 192.168.1.17
auth_strategy = keystone
rpc_backend = rabbit
[BRCD_FABRIC_EXAMPLE]
[CISCO_FABRIC_EXAMPLE]
[cors]
[cors.subdomain]
[database]
connection = mysql://cinder:cinder@192.168.1.17/cinder
[fc-zone-manager]
[keymgr]
[keystone_authtoken]
auth_uri = http://192.168.1.17:5000
auth_url = http://192.168.1.17:35357
auth_plugin = password
project_domain_id = default
user_domain_id = default
project_name = service
username = cinder
password = cinder
[matchmaker_redis]
[matchmaker_ring]
[oslo_concurrency]
lock_path = /var/lib/cinder/tmp
[oslo_messaging_amqp]
[oslo_messaging_qpid]
[oslo_messaging_rabbit]
rabbit_host = 192.168.1.17
rabbit_port = 5672
rabbit_userid = openstack
rabbit_password = openstack
[oslo_middleware]
[oslo_policy]
[oslo_reports]
[profiler]
在 nova 配置檔案中新增
[root@linux-node1 ~]# vim /etc/nova/nova.conf
os_region_name=RegionOne #在[cinder]區域裡新增
4、同步資料庫
[root@linux-node1 ~]# su -s /bin/sh -c "cinder-manage db sync" cinder
..................
2016-08-30 18:27:20.204 67111 INFO migrate.versioning.api [-] done
2016-08-30 18:27:20.204 67111 INFO migrate.versioning.api [-] 59 -> 60...
2016-08-30 18:27:20.208 67111 INFO migrate.versioning.api [-] done
5、 建立 keystone 使用者
[root@linux-node1 ~]# cd /usr/local/src/
[root@linux-node1 src]# source admin-openrc.sh
[root@linux-node1 src]# openstack user create --domain default --password-prompt cinder
User Password: #這裡我設定的是cinder
Repeat User Password:
+-----------+----------------------------------+
| Field | Value |
+-----------+----------------------------------+
| domain_id | default |
| enabled | True |
| id | 955a2e684bed4617880942acd69e1073 |
| name | cinder |
+-----------+----------------------------------+
[root@openstack-server src]# openstack role add --project service --user cinder admin
6、啟動服務
[root@linux-node1 ~]# systemctl restart openstack-nova-api.service
[root@linux-node1 ~]# systemctl enable openstack-cinder-api.service openstack-cinder-scheduler.service
[root@linux-node1 ~]# systemctl start openstack-cinder-api.service openstack-cinder-scheduler.service
7、在 keystone 上建立服務並註冊
v1 和 v2 都要註冊
[root@linux-node1 src]# source admin-openrc.sh
[root@linux-node1 src]# openstack service create --name cinder --description "OpenStack Block Storage" volume
+-------------+----------------------------------+
| Field | Value |
+-------------+----------------------------------+
| description | OpenStack Block Storage |
| enabled | True |
| id | 7626bd9be54a444589ae9f8f8d29dc7b |
| name | cinder |
| type | volume |
+-------------+----------------------------------+
[root@linux-node1 src]# openstack service create --name cinderv2 --description "OpenStack Block Storage" volumev2
+-------------+----------------------------------+
| Field | Value |
+-------------+----------------------------------+
| description | OpenStack Block Storage |
| enabled | True |
| id | 5680a0ce912b484db88378027b1f6863 |
| name | cinderv2 |
| type | volumev2 |
+-------------+----------------------------------+
[root@linux-node1 src]# openstack endpoint create --region RegionOne volume public http://192.168.1.17:8776/v1/%\(tenant_id\)s
+--------------+-------------------------------------------+
| Field | Value |
+--------------+-------------------------------------------+
| enabled | True |
| id | 10de5ed237d54452817e19fd65233ae6 |
| interface | public |
| region | RegionOne |
| region_id | RegionOne |
| service_id | 7626bd9be54a444589ae9f8f8d29dc7b |
| service_name | cinder |
| service_type | volume |
| url | http://192.168.1.17:8776/v1/%(tenant_id)s |
+--------------+-------------------------------------------+
[root@linux-node1 src]# openstack endpoint create --region RegionOne volume internal http://192.168.1.17:8776/v1/%\(tenant_id\)s
+--------------+-------------------------------------------+
| Field | Value |
+--------------+-------------------------------------------+
| enabled | True |
| id | f706552cfb40471abf5d16667fc5d629 |
| interface | internal |
| region | RegionOne |
| region_id | RegionOne |
| service_id | 7626bd9be54a444589ae9f8f8d29dc7b |
| service_name | cinder |
| service_type | volume |
| url | http://192.168.1.17:8776/v1/%(tenant_id)s |
+--------------+-------------------------------------------+
[root@linux-node1 src]# openstack endpoint create --region RegionOne volume admin http://192.168.1.17:8776/v1/%\(tenant_id\)s
+--------------+-------------------------------------------+
| Field | Value |
+--------------+-------------------------------------------+
| enabled | True |
| id | c9dfa19aca3c43b5b0cf2fe7d393efce |
| interface | admin |
| region | RegionOne |
| region_id | RegionOne |
| service_id | 7626bd9be54a444589ae9f8f8d29dc7b |
| service_name | cinder |
| service_type | volume |
| url | http://192.168.1.17:8776/v1/%(tenant_id)s |
+--------------+-------------------------------------------+
[root@linux-node1 src]# openstack endpoint create --region RegionOne volumev2 public http://192.168.1.17:8776/v2/%\(tenant_id\)s
+--------------+-------------------------------------------+
| Field | Value |
+--------------+-------------------------------------------+
| enabled | True |
| id | 9ac83d0fab134f889e972e4e7680b0e6 |
| interface | public |
| region | RegionOne |
| region_id | RegionOne |
| service_id | 5680a0ce912b484db88378027b1f6863 |
| service_name | cinderv2 |
| service_type | volumev2 |
| url | http://192.168.1.17:8776/v2/%(tenant_id)s |
+--------------+-------------------------------------------+
[root@linux-node1 src]# openstack endpoint create --region RegionOne volumev2 internal http://192.168.1.17:8776/v2/%\(tenant_id\)s
+--------------+-------------------------------------------+
| Field | Value |
+--------------+-------------------------------------------+
| enabled | True |
| id | 9d18eac0868b4c49ae8f6198a029d7e0 |
| interface | internal |
| region | RegionOne |
| region_id | RegionOne |
| service_id | 5680a0ce912b484db88378027b1f6863 |
| service_name | cinderv2 |
| service_type | volumev2 |
| url | http://192.168.1.17:8776/v2/%(tenant_id)s |
+--------------+-------------------------------------------+
[root@linux-node1 src]# openstack endpoint create --region RegionOne volumev2 admin http://192.168.1.17:8776/v2/%\(tenant_id\)s
+--------------+-------------------------------------------+
| Field | Value |
+--------------+-------------------------------------------+
| enabled | True |
| id | 68c93bd6cd0f4f5ca6d5a048acbddc91 |
| interface | admin |
| region | RegionOne |
| region_id | RegionOne |
| service_id | 5680a0ce912b484db88378027b1f6863 |
| service_name | cinderv2 |
| service_type | volumev2 |
| url | http://192.168.1.17:8776/v2/%(tenant_id)s |
+--------------+-------------------------------------------+
檢視註冊資訊:
[root@linux-node1 src]# openstack endpoint list
+----------------------------------+-----------+--------------+--------------+---------+-----------+-------------------------------------------+
| ID | Region | Service Name | Service Type | Enabled | Interface | URL |
+----------------------------------+-----------+--------------+--------------+---------+-----------+-------------------------------------------+
| 02fed35802734518922d0ca2d672f469 | RegionOne | keystone | identity | True | internal | http://192.168.1.17:5000/v2.0 |
| 10de5ed237d54452817e19fd65233ae6 | RegionOne | cinder | volume | True | public | http://192.168.1.17:8776/v1/%(tenant_id)s |
| 1a3115941ff54b7499a800c7c43ee92a | RegionOne | nova | compute | True | internal | http://192.168.1.17:8774/v2/%(tenant_id)s |
| 31fbf72537a14ba7927fe9c7b7d06a65 | RegionOne | glance | image | True | admin | http://192.168.1.17:9292 |
| 5278f33a42754c9a8d90937932b8c0b3 | RegionOne | nova | compute | True | admin | http://192.168.1.17:8774/v2/%(tenant_id)s |
| 52b0a1a700f04773a220ff0e365dea45 | RegionOne | keystone | identity | True | public | http://192.168.1.17:5000/v2.0 |
| 68c93bd6cd0f4f5ca6d5a048acbddc91 | RegionOne | cinderv2 | volumev2 | True | admin | http://192.168.1.17:8776/v2/%(tenant_id)s |
| 88df7df6427d45619df192979219e65c | RegionOne | keystone | identity | True | admin | http://192.168.1.17:35357/v2.0 |
| 8c4fa7b9a24949c5882949d13d161d36 | RegionOne | nova | compute | True | public | http://192.168.1.17:8774/v2/%(tenant_id)s |
| 9ac83d0fab134f889e972e4e7680b0e6 | RegionOne | cinderv2 | volumev2 | True | public | http://192.168.1.17:8776/v2/%(tenant_id)s |
| 9d18eac0868b4c49ae8f6198a029d7e0 | RegionOne | cinderv2 | volumev2 | True | internal | http://192.168.1.17:8776/v2/%(tenant_id)s |
| be788b4aa2ce4251b424a3182d0eea11 | RegionOne | glance | image | True | public | http://192.168.1.17:9292 |
| c059a07fa3e141a0a0b7fc2f46ca922c | RegionOne | neutron | network | True | public | http://192.168.1.17:9696 |
| c9dfa19aca3c43b5b0cf2fe7d393efce | RegionOne | cinder | volume | True | admin | http://192.168.1.17:8776/v1/%(tenant_id)s |
| d0052712051a4f04bb59c06e2d5b2a0b | RegionOne | glance | image | True | internal | http://192.168.1.17:9292 |
| ea325a8a2e6e4165997b2e24a8948469 | RegionOne | neutron | network | True | internal | http://192.168.1.17:9696 |
| f706552cfb40471abf5d16667fc5d629 | RegionOne | cinder | volume | True | internal | http://192.168.1.17:8776/v1/%(tenant_id)s |
| ffdec11ccf024240931e8ca548876ef0 | RegionOne | neutron | network | True | admin | http://192.168.1.17:9696 |
+----------------------------------+-----------+--------------+--------------+---------+-----------+-------------------------------------------+
4.4 cinder 儲存節點配置
1、 使用 ISCSI 方式建立雲硬碟
計算節點新增硬碟並建立 VG
[root@linux-node2 ~]# df -h
Filesystem Size Used Avail Use% Mounted on
/dev/sda2 100G 44G 57G 44% /
devtmpfs 10G 0 10G 0% /dev
tmpfs 10G 0 10G 0% /dev/shm
tmpfs 10G 90M 10G 1% /run
tmpfs 10G 0 10G 0% /sys/fs/cgroup
/dev/sda1 197M 127M 71M 65% /boot
tmpfs 6.3G 0 6.3G 0% /run/user/0
/dev/sda5 811G 33M 811G 1% /home
由於這裡我的計算節點上沒有多餘的硬碟和空間了
所以考慮將上面的home分割槽解除安裝,拿來做雲硬碟
解除安裝home分割槽前,將home分割槽下的資料備份。
等到home解除安裝後,再建立/home目錄,將備份資料拷貝到/home下
[root@linux-node2 ~]# umount /home
[root@linux-node2 ~]# df -h
Filesystem Size Used Avail Use% Mounted on
/dev/sda2 100G 44G 57G 44% /
devtmpfs 10G 0 10G 0% /dev
tmpfs 10G 0 10G 0% /dev/shm
tmpfs 10G 90M 10G 1% /run
tmpfs 10G 0 10G 0% /sys/fs/cgroup
/dev/sda1 197M 127M 71M 65% /boot
tmpfs 6.3G 0 6.3G 0% /run/user/0
[root@linux-node2 ~]# fdisk -l
Disk /dev/sda: 999.7 GB, 999653638144 bytes, 1952448512 sectors
Units = sectors of 1 * 512 = 512 bytes
Sector size (logical/physical): 512 bytes / 512 bytes
I/O size (minimum/optimal): 512 bytes / 512 bytes
Disk label type: dos
Disk identifier: 0x000b2db8
Device Boot Start End Blocks Id System
/dev/sda1 * 2048 411647 204800 83 Linux
/dev/sda2 411648 210126847 104857600 83 Linux
/dev/sda3 210126848 252069887 20971520 82 Linux swap / Solaris
/dev/sda4 252069888 1952448511 850189312 5 Extended
/dev/sda5 252071936 1952448511 850188288 83 Linux
這樣,home分割槽解除安裝的/dev/sda5可以拿來做lvm
[root@linux-node2 ~]# vim /etc/lvm/lvm.conf
filter = [ "a/sda5/", "r/.*/"]
其中:a 表示同意, r 是不同意
---------------------------------------------------------------------------------------------------------
上面的home分割槽沒有做lvm,裝置名是/dev/sda5,則/etc/lvm/lvm.conf可以如上設定。
如果home分割槽做了lvm,“df -h”命令檢視home分割槽的裝置名比如是/dev/mapper/centos-home
那麼/etc/lvm/lvm.conf這裡就要這樣配置了:
filter = [ "a|^/dev/mapper/centos-home$|", "r|.*/|" ]
--------------------------------------------------------------------------------------------------------
[root@linux-node2 ~]# pvcreate /dev/sda5
WARNING: xfs signature detected on /dev/sda5 at offset 0. Wipe it? [y/n]: y
Wiping xfs signature on /dev/sda5.
Physical volume "/dev/sda5" successfully created
[root@linux-node2 ~]# vgcreate cinder-volumes /dev/sda5
Volume group "cinder-volumes" successfully created
2、修改配置檔案
[root@linux-node1 ~]# scp /etc/cinder/cinder.conf 192.168.1.8:/etc/cinder/cinder.conf
需要更改
[root@linux-node2 ~]# vim /etc/cinder/cinder.conf
enabled_backends = lvm #在[DEFAULT]區域新增
[lvm] #檔案底部新增lvm區域設定
volume_driver = cinder.volume.drivers.lvm.LVMVolumeDriver
volume_group = cinder-volumes
iscsi_protocol = iscsi
iscsi_helper = lioadm
3、啟動服務
[root@linux-node2 ~]#systemctl enable openstack-cinder-volume.service target.service
[root@linux-node2 ~]#systemctl start openstack-cinder-volume.service target.service
4.5 建立雲硬碟
1、在控制節點上檢查
時間不同步可能會出現 down 的狀態,
[root@linux-node1 ~]# systemctl restart chronyd
[root@linux-node1 ~]# source admin-openrc.sh
[root@openstack-server ~]# cinder service-list
+------------------+----------------------+------+---------+-------+----------------------------+-----------------+
| Binary | Host | Zone | Status | State | Updated_at | Disabled Reason |
+------------------+----------------------+------+---------+-------+----------------------------+-----------------+
| cinder-scheduler | openstack-server | nova | enabled | up | 2016-08-31T07:50:06.000000 | - |
| cinder-volume | openstack-server@lvm | nova | enabled | up | 2016-08-31T07:50:08.000000 | - |
+------------------+----------------------+------+---------+-------+----------------------------+-----------------+
--------------------------------------------------------
這個時候,退出openstack的dashboard,再次登入!
就可以在左側欄的“計算”裡看見“雲硬碟”了

--------------------------------------------------------
2、使用 dashboard 建立雲硬碟
(注意:可以利用已有的虛擬機器做快照(快照做好後,這臺做快照的虛擬機器就會關機,需要之後再手動啟動),然後就能利用快照進行建立/啟動虛擬機器)
(注意:通過快照建立的虛擬機器,預設是沒有ip的,需要做下修改。修改參考另一篇部落格webvirtmgr中克隆虛擬機器後的修改方法:http://www.cnblogs.com/kevingrace/p/5822928.html)
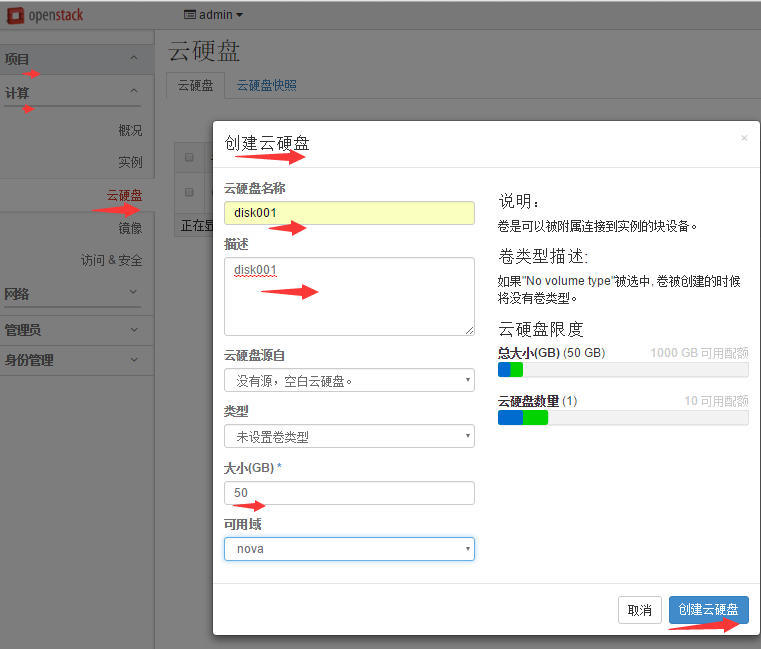

此時可以在計算節點上檢視到:
[root@linux-node2 ~]# lvdisplay
--- Logical volume ---
LV Path /dev/cinder-volumes/volume-efb1d119-e006-41a8-b695-0af9f8d35063
LV Name volume-efb1d119-e006-41a8-b695-0af9f8d35063
VG Name cinder-volumes
LV UUID aYztLC-jljz-esGh-UTco-KxtG-ipce-Oinx9j
LV Write Access read/write
LV Creation host, time openstack-server, 2016-08-31 15:55:05 +0800
LV Status available
# open 0
LV Size 50.00 GiB
Current LE 12800
Segments 1
Allocation inherit
Read ahead sectors auto
- currently set to 256
Block device 253:0
下面可將建立的雲硬碟掛載到相應的虛擬機器上了!

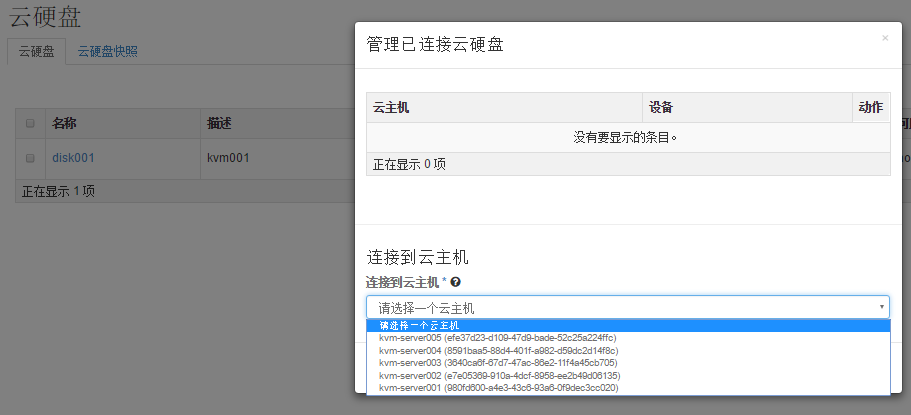

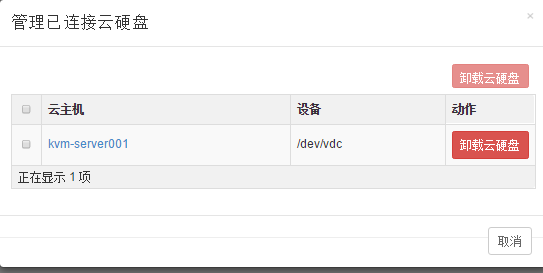
登陸虛擬機器kvm-server001檢視,就能發現掛載的雲硬碟了。掛載就能直接用了。
[root@kvm-server001 ~]# fdisk -l
Disk /dev/vda: 10.7 GB, 10737418240 bytes
16 heads, 63 sectors/track, 20805 cylinders
Units = cylinders of 1008 * 512 = 516096 bytes
Sector size (logical/physical): 512 bytes / 512 bytes
I/O size (minimum/optimal): 512 bytes / 512 bytes
Disk identifier: 0x00046e27
..............
Disk /dev/vdc: 53.7 GB, 53687091200 bytes
16 heads, 63 sectors/track, 104025 cylinders
Units = cylinders of 1008 * 512 = 516096 bytes
Sector size (logical/physical): 512 bytes / 512 bytes
I/O size (minimum/optimal): 512 bytes / 512 bytes
Disk identifier: 0x00000000
格式化連線過來的雲硬碟
[root@kvm-server001 ~]# mkfs.ext4 /dev/vdc
mke2fs 1.41.12 (17-May-2010)
............
Creating journal (32768 blocks): done
Writing superblocks and filesystem accounting information: done
建立掛載目錄/data
[root@kvm-server001 ~]# mkdir /data
然後掛載
[root@kvm-server001 ~]# mount /dev/vdc /data
[root@kvm-server001 ~]# df -h
Filesystem Size Used Avail Use% Mounted on
/dev/mapper/VolGroup00-LogVol00 8.2G 737M 7.1G 10% /
tmpfs 2.9G 0 2.9G 0% /dev/shm
/dev/vda1 194M 28M 156M 16% /boot
/dev/vdc 50G 180M 47G 1% /data
----------------------------------特別說明下----------------------------------------------------------
由於製作的虛擬機器的根分割槽很小,可以把掛載的雲硬碟製作成lvm,擴容到根分割槽上(根分割槽也是lvm)
操作記錄如下:
[root@localhost ~]# fdisk -l
............
............
Disk /dev/vdc: 161.1 GB, 161061273600 bytes #這是掛載的雲硬碟
16 heads, 63 sectors/track, 312076 cylinders
Units = cylinders of 1008 * 512 = 516096 bytes
Sector size (logical/physical): 512 bytes / 512 bytes
I/O size (minimum/optimal): 512 bytes / 512 bytes
Disk identifier: 0x00000000
[root@localhost ~]# df -h
Filesystem Size Used Avail Use% Mounted on
/dev/mapper/VolGroup00-LogVol00
8.1G 664M 7.0G 9% / #vm的根分割槽,可以進行手動lvm擴容
tmpfs 2.9G 0 2.9G 0% /dev/shm
/dev/vda1 190M 37M 143M 21% /boot
首先將掛載下來的雲硬碟製作新分割槽
[root@localhost ~]# fdisk /dev/vdc
Device contains neither a valid DOS partition table, nor Sun, SGI or OSF disklabel
Building a new DOS disklabel with disk identifier 0x3256d3cb.
Changes will remain in memory only, until you decide to write them.
After that, of course, the previous content won't be recoverable.
Warning: invalid flag 0x0000 of partition table 4 will be corrected by w(rite)
WARNING: DOS-compatible mode is deprecated. It's strongly recommended to
switch off the mode (command 'c') and change display units to
sectors (command 'u').
Command (m for help): p
Disk /dev/vdc: 161.1 GB, 161061273600 bytes
16 heads, 63 sectors/track, 312076 cylinders
Units = cylinders of 1008 * 512 = 516096 bytes
Sector size (logical/physical): 512 bytes / 512 bytes
I/O size (minimum/optimal): 512 bytes / 512 bytes
Disk identifier: 0x3256d3cb
Device Boot Start End Blocks Id System
Command (m for help): n
Command action
e extended
p primary partition (1-4)
p
Partition number (1-4): 1
First cylinder (1-312076, default 1):
Using default value 1
Last cylinder, +cylinders or +size{K,M,G} (1-312076, default 312076):
Using default value 312076
Command (m for help): w
The partition table has been altered!
Calling ioctl() to re-read partition table.
Syncing disks.
[root@localhost ~]# fdisk /dev/vdc
WARNING: DOS-compatible mode is deprecated. It's strongly recommended to
switch off the mode (command 'c') and change display units to
sectors (command 'u').
Command (m for help): p
Disk /dev/vdc: 161.1 GB, 161061273600 bytes
16 heads, 63 sectors/track, 312076 cylinders
Units = cylinders of 1008 * 512 = 516096 bytes
Sector size (logical/physical): 512 bytes / 512 bytes
I/O size (minimum/optimal): 512 bytes / 512 bytes
Disk identifier: 0x3256d3cb
Device Boot Start End Blocks Id System
/dev/vdc1 1 312076 157286272+ 83 Linux
開始進行根分割槽的lvm擴容:
[root@localhost ~]# pvcreate /dev/vdc1
Physical volume "/dev/vdc1" successfully created
[root@localhost ~]# lvdisplay
--- Logical volume ---
LV Path /dev/VolGroup00/LogVol01
LV Name LogVol01
VG Name VolGroup00
LV UUID xtykaQ-3ulO-XtF0-BUqB-Pure-LH1n-O2zF1Z
LV Write Access read/write
LV Creation host, time localhost.localdomain, 2016-09-05 22:21:00 -0400
LV Status available
# open 1
LV Size 1.50 GiB
Current LE 48
Segments 1
Allocation inherit
Read ahead sectors auto
- currently set to 256
Block device 253:0
--- Logical volume ---
LV Path /dev/VolGroup00/LogVol00 #這是虛擬機器的根分割槽的lvm邏輯卷,就是給這個擴容
LV Name LogVol00
VG Name VolGroup00
LV UUID 7BW8Wm-4VSt-5GzO-sIew-D1OI-pqLP-eXgM80
LV Write Access read/write
LV Creation host, time localhost.localdomain, 2016-09-05 22:21:00 -0400
LV Status available
# open 1
LV Size 8.28 GiB
Current LE 265
Segments 1
Allocation inherit
Read ahead sectors auto
- currently set to 256
Block device 253:1
[root@localhost ~]# vgdisplay
--- Volume group ---
VG Name VolGroup00
System ID
Format lvm2
Metadata Areas 1
Metadata Sequence No 5
VG Access read/write
VG Status resizable
MAX LV 0
Cur LV 2
Open LV 2
Max PV 0
Cur PV 1
Act PV 1
VG Size 9.78 GiB
PE Size 32.00 MiB
Total PE 313
Alloc PE / Size 313 / 9.78 GiB
Free PE / Size 0 / 0 #VolGroup00這個卷組沒有剩餘空間了,需要vg進行自身擴容
VG UUID tEEreQ-O2HZ-rm9d-vS8Y-VemY-D7uY-qAYdWU
[root@localhost ~]# vgextend VolGroup00 /dev/vdc1 #vg擴容
Volume group "VolGroup00" successfully extended
[root@localhost ~]# vgdisplay #vg擴容後再次檢視
--- Volume group ---
VG Name VolGroup00
System ID
Format lvm2
Metadata Areas 2
Metadata Sequence No 6
VG Access read/write
VG Status resizable
MAX LV 0
Cur LV 2
Open LV 2
Max PV 0
Cur PV 2
Act PV 2
VG Size 159.75 GiB
PE Size 32.00 MiB
Total PE 5112
Alloc PE / Size 313 / 9.78 GiB
Free PE / Size 4799 / 149.97 GiB #發現剩餘空間有了149.97G
VG UUID tEEreQ-O2HZ-rm9d-vS8Y-VemY-D7uY-qAYdWU
在上面查詢可知的vg所有的剩餘空間全部增加給邏輯卷/dev/VolGroup00/LogVol00
[root@localhost ~]# lvextend -l +4799 /dev/VolGroup00/LogVol00
Size of logical volume VolGroup00/LogVol00 changed from 8.28 GiB (265 extents) to 158.25 GiB (5064 extents).
Logical volume LogVol00 successfully resized.
修改邏輯卷大小後,通過resize2fs來修改檔案系統的大小
[root@localhost ~]# resize2fs /dev/VolGroup00/LogVol00
resize2fs 1.41.12 (17-May-2010)
Filesystem at /dev/VolGroup00/LogVol00 is mounted on /; on-line resizing required
old desc_blocks = 1, new_desc_blocks = 10
Performing an on-line resize of /dev/VolGroup00/LogVol00 to 41484288 (4k) blocks.
The filesystem on /dev/VolGroup00/LogVol00 is now 41484288 blocks long.
再次檢視,根分割槽已經擴容了!!
[root@localhost ~]# df -h
Filesystem Size Used Avail Use% Mounted on
/dev/mapper/VolGroup00-LogVol00
156G 676M 148G 1% /
tmpfs 2.9G 0 2.9G 0% /dev/shm
/dev/vda1 190M 37M 143M 21% /boot
--------------------------------------------------------------------------------------------
****************************************************************************************
雲硬碟新增是熱新增
注意:
虛擬機器上發現的雲硬碟格式化並掛載到如/data目錄下
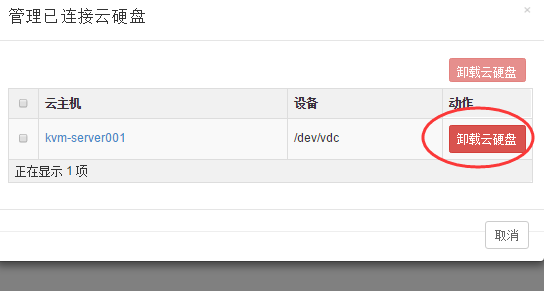
刪除雲硬碟需要先解除安裝【不僅在虛擬機器上解除安裝,在dashboard介面裡也要解除安裝】
-----------------------------------------------------------------------------------------------------------------------------------
可以在虛擬機器上對連線的雲硬碟做lvm邏輯卷,以便以後不夠用時,可以再加硬碟做lvm擴容,無縫擴容!
如下,虛擬機器kvm-server001連線了一塊100G的雲硬碟
現對這100G的硬碟分割槽,製作lvm
[root@kvm-server001 ~]# fdisk -l
Disk /dev/vda: 10.7 GB, 10737418240 bytes
16 heads, 63 sectors/track, 20805 cylinders
Units = cylinders of 1008 * 512 = 516096 bytes
Sector size (logical/physical): 512 bytes / 512 bytes
I/O size (minimum/optimal): 512 bytes / 512 bytes
Disk identifier: 0x00046e27
...........................
Disk /dev/vdc: 107.4 GB, 107374182400 bytes
16 heads, 63 sectors/track, 208050 cylinders
Units = cylinders of 1008 * 512 = 516096 bytes
Sector size (logical/physical): 512 bytes / 512 bytes
I/O size (minimum/optimal): 512 bytes / 512 bytes
Disk identifier: 0x00000000
先製作分割槽
[root@kvm-server001 ~]# fdisk /dev/vdc
Device contains neither a valid DOS partition table, nor Sun, SGI or OSF disklabel
Building a new DOS disklabel with disk identifier 0x4e0d7808.
Changes will remain in memory only, until you decide to write them.
After that, of course, the previous content won't be recoverable.
Command (m for help): p
Disk /dev/vdc: 107.4 GB, 107374182400 bytes
16 heads, 63 sectors/track, 208050 cylinders
Units = cylinders of 1008 * 512 = 516096 bytes
Sector size (logical/physical): 512 bytes / 512 bytes
I/O size (minimum/optimal): 512 bytes / 512 bytes
Disk identifier: 0x4e0d7808
Device Boot Start End Blocks Id System
Command (m for help): n
Command action
e extended
p primary partition (1-4)
p
Partition number (1-4): 1
First cylinder (1-208050, default 1): #回車
Using default value 1
Last cylinder, +cylinders or +size{K,M,G} (1-208050, default 208050): #回車,即使用全部剩餘空間建立新分割槽
Using default value 208050
Command (m for help): p
Disk /dev/vdc: 107.4 GB, 107374182400 bytes
16 heads, 63 sectors/track, 208050 cylinders
Units = cylinders of 1008 * 512 = 516096 bytes
Sector size (logical/physical): 512 bytes / 512 bytes
I/O size (minimum/optimal): 512 bytes / 512 bytes
Disk identifier: 0x4e0d7808
Device Boot Start End Blocks Id System
/dev/vdc1 1 208050 104857168+ 83 Linux
Command (m for help): w
The partition table has been altered!
Calling ioctl() to re-read partition table.
Syncing disks.
[root@kvm-server001 ~]# pvcreate /dev/vdc1 #製作pv
Physical volume "/dev/vdc1" successfully created
[root@kvm-server001 ~]# vgcreate vg0 /dev/vdc1 #製作vg
Volume group "vg0" successfully created
[root@kvm-server001 ~]# vgdisplay #檢視vg大小
--- Volume group ---
VG Name vg0
System ID
Format lvm2
Metadata Areas 1
Metadata Sequence No 1
VG Access read/write
VG Status resizable
MAX LV 0
Cur LV 0
Open LV 0
Max PV 0
Cur PV 1
Act PV 1
VG Size 100.00 GiB
PE Size 4.00 MiB
Total PE 25599
Alloc PE / Size 0 / 0
Free PE / Size 25599 / 100.00 GiB
VG UUID UIsTAe-oUzt-3atO-PVTw-0JUL-7Z8s-XVppIH
[root@kvm-server001 ~]# lvcreate -L +99.99G -n lv0 vg0 #lv邏輯卷大小不能超過vg大小
Rounding up size to full physical extent 99.99 GiB
Logical volume "lv0" created
[root@kvm-server001 ~]# mkfs.ext4 /dev/vg0/lv0 #格式化lvm邏輯卷
mke2fs 1.41.12 (17-May-2010)
Filesystem label=
OS type: Linux
Block size=4096 (log=2)
Fragment size=4096 (log=2)
Stride=0 blocks, Stripe width=0 blocks
6553600 inodes, 26212352 blocks
1310617 blocks (5.00%) reserved for the super user
First data block=0
Maximum filesystem blocks=4294967296
800 block groups
32768 blocks per group, 32768 fragments per group
8192 inodes per group
Superblock backups stored on blocks:
32768, 98304, 163840, 229376, 294912, 819200, 884736, 1605632, 2654208,
4096000, 7962624, 11239424, 20480000, 23887872
Writing inode tables: done
Creating journal (32768 blocks): done
Writing superblocks and filesystem accounting information: done
This filesystem will be automatically checked every 20 mounts or
180 days, whichever comes first. Use tune2fs -c or -i to override.
[root@kvm-server001 ~]# mkdir /data #建立掛載目錄
[root@kvm-server001 ~]# mount /dev/vg0/lv0 /data #掛載lvm
[root@kvm-server001 ~]# df -h
Filesystem Size Used Avail Use% Mounted on
/dev/mapper/VolGroup00-LogVol00 8.2G 842M 7.0G 11% /
tmpfs 2.9G 0 2.9G 0% /dev/shm
/dev/vda1 194M 28M 156M 16% /boot
/dev/mapper/vg0-lv0 99G 188M 94G 1% /data
****************************************************************************************
背景:
由於計算節點內網閘道器不存在,所以vm不能通過橋接模式自行聯網了。
要想使安裝後的vm聯網,還需要我們手動進行些特殊配置:
(1)計算節點部署squid代理環境,即vm對外的訪問請求通過計算節點機squid代理出去。
(2)vm對內的訪問請求通過計算節點的iptables進行nat埠轉發,web應用請求可以利用nginx或haproxy進行代理轉發。
---------------------------------------------------------------------------------------------------------
下面說的是http方式的squid代理;
如果是https的squid代理,可以參考我的另一篇技術部落格內容:
http://www.cnblogs.com/kevingrace/p/5853199.html
---------------------------------------------------------------------------------------------------------
(1)
1)計算節點上的操作:
yum命令直接線上安裝squid
[root@linux-node2 ~]# yum install squid
安裝完成後,修改squid.conf 檔案中的內容,修改之前可以先備份該檔案
[root@linux-node2 ~]# cd /etc/squid/
[root@linux-node2 squid]# cp squid.conf squid.conf_bak
[root@linux-node2 squid]# vim squid.conf
http_access allow all
http_port 192.168.1.17:3128
cache_dir ufs /var/spool/squid 100 16 256
然後執行下面命令,進行squid啟動前測試
[root@linux-node2 squid]# squid -k parse
2016/08/31 16:53:36| Startup: Initializing Authentication Schemes ...
..............
2016/08/31 16:53:36| Initializing https proxy context
在第一次啟動之前或者修改了cache路徑之後,需要重新初始化cache目錄。
[root@kvm-linux-node2 squid]# squid -z
2016/08/31 16:59:21 kid1| /var/spool/squid exists
2016/08/31 16:59:21 kid1| Making directories in /var/spool/squid/00
................
--------------------------------------------------------------------------------
如果有下面報錯:
2016/09/06 15:19:23 kid1| No cache_dir stores are configured.
解決辦法:
# vim squid.conf
cache_dir ufs /var/spool/squid 100 16 256 #開啟這行的註釋
#ll /var/spool/squid 確保這個目錄存在
再次squid -z初始化就ok了
--------------------------------------------------------------------------------
[root@kvm-linux-node2 squid]# systemctl enable squid
Created symlink from /etc/systemd/system/multi-user.target.wants/squid.service to /usr/lib/systemd/system/squid.service.
[root@kvm-server001 squid]# systemctl start squid
[root@kvm-server001 squid]# lsof -i:3128
COMMAND PID USER FD TYPE DEVICE SIZE/OFF NODE NAME
squid 62262 squid 16u IPv4 4275294 0t0 TCP openstack-server:squid (LISTEN)
如果計算節點開啟了iptables防火牆規則
這裡我的centos7.2系統上設定了iptables(關閉預設的firewalle)
則還需要在/etc/sysconfig/iptables裡新增下面一行:
-A INPUT -s 192.168.1.0/24 -p tcp -m state --state NEW -m tcp --dport 3128 -j ACCEPT
我這裡防火牆配置如下:
[root@linux-node2 squid]# cat /etc/sysconfig/iptables
# sample configuration for iptables service
# you can edit this manually or use system-config-firewall
# please do not ask us to add additional ports/services to this default configuration
*filter
:INPUT ACCEPT [0:0]
:FORWARD ACCEPT [0:0]
:OUTPUT ACCEPT [0:0]
-A INPUT -m state --state RELATED,ESTABLISHED -j ACCEPT
-A INPUT -p icmp -j ACCEPT
-A INPUT -i lo -j ACCEPT
-A INPUT -p tcp -m state --state NEW -m tcp --dport 22 -j ACCEPT
-A INPUT -s 192.168.1.0/24 -p tcp -m state --state NEW -m tcp --dport 3128 -j ACCEPT
-A INPUT -p tcp -m state --state NEW -m tcp --dport 80 -j ACCEPT
-A INPUT -p tcp -m state --state NEW -m tcp --dport 6080 -j ACCEPT
-A INPUT -p tcp -m state --state NEW -m tcp --dport 10050 -j ACCEPT
-A INPUT -j REJECT --reject-with icmp-host-prohibited
-A FORWARD -j REJECT --reject-with icmp-host-prohibited
COMMIT
然後重啟iptables服務
[root@linux-node2 ~]# systemctl restart iptables.service #最後重啟防火牆使配置生效
[root@linux-node2 ~]# systemctl enable iptables.service #設定防火牆開機啟動
-----------------------------------------------
2)下面是虛擬機器上的squid配置:
只需要在系統環境變數配置檔案/etc/profile裡新增下面一行即可(在檔案底部新增)
[root@kvm-server001 ~]# vim /etc/profile
.......
export http_proxy=http://192.168.1.17:3128
[root@kvm-server001 ~]# source /etc/profile #使上面的配置生效
測試虛擬機器是否能對外訪問:
[root@kvm-server001 ~]# curl http://www.baidu.com #能正常對外訪問
[root@kvm-server001 ~]# yum list #yum能正常線上使用
[root@kvm-server001 ~]# wget http://my.oschina.net/mingpeng/blog/293744 #能正常線上下載
這樣,虛擬機器的對外請求就可以通過squid順利代理出去了!
這裡,squid代理的是http方式,如果是https方式的squid代理,可以參考我的另一篇部落格:http://www.cnblogs.com/kevingrace/p/5853199.html
***********************************************
(2)
1)下面說下虛擬機器的對內請求的代理配置:
NAT埠轉發,可以參考我的另一篇部落格內容:http://www.cnblogs.com/kevingrace/p/5753193.html
在計算節點(即虛擬機器的宿主機)上配置iptables規則:
[root@linux-node2 ~]# cat iptables
# sample configuration for iptables service
# you can edit this manually or use system-config-firewall
# please do not ask us to add additional ports/services to this default configuration
*filter
:INPUT ACCEPT [0:0]
:FORWARD ACCEPT [0:0]
:OUTPUT ACCEPT [0:0]
-A INPUT -m state --state RELATED,ESTABLISHED -j ACCEPT
-A INPUT -p icmp -j ACCEPT
-A INPUT -i lo -j ACCEPT
-A INPUT -s 192.168.1.0/24 -p tcp -m state --state NEW -m tcp --dport 22 -j ACCEPT
-A INPUT -s 192.168.1.0/24 -p tcp -m state --state NEW -m tcp --dport 3128 -j ACCEPT #開放squid代理埠
-A INPUT -p tcp -m state --state NEW -m tcp --dport 80 -j ACCEPT #開放dashboard訪問埠
-A INPUT -p tcp -m state --state NEW -m tcp --dport 6080 -j ACCEPT #開放控制檯vnc訪問埠
-A INPUT -p tcp -m state --state NEW -m tcp --dport 15672 -j ACCEPT #開放RabbitMQ訪問埠
-A INPUT -p tcp -m state --state NEW -m tcp --dport 10050 -j ACCEPT
#-A INPUT -j REJECT --reject-with icmp-host-prohibited #注意,這兩行要註釋掉!不然,開啟這兩行後,虛擬機器之間就相互ping不通了!
#-A FORWARD -j REJECT --reject-with icmp-host-prohibited
COMMIT
--------------------------------------------------------------------------------------------------------------------------------
說明:
-A INPUT -j REJECT --reject-with icmp-host-prohibited
-A FORWARD -j REJECT --reject-with icmp-host-prohibited
這兩條的意思是在INPUT表和FORWARD表中拒絕所有其他不符合上述任何一條規則的資料包。並且傳送一條host prohibited的訊息給被拒絕的主機。
這個是iptables的預設策略,可以刪除這兩行,並且配置符合自己需求的策略。
這兩行策略開啟後,宿主機和虛擬機器之間的ping無阻礙
但虛擬機器之間就相互ping不通了,因為vm之間ping要經過宿主機,這兩條規則阻礙了他們之間的通訊!刪除即可~
--------------------------------------------------------------------------------------------------------------------------------
重啟虛擬機器
這樣,開啟防火牆後,宿主機和虛擬機器,虛擬機器之間都可以相互ping通~
[root@linux-node2 ~]# systemctl restart iptables.service
************************************************************************************************************************
openstack私有云環境,在一個計算節點上建立的虛擬機器,其實就是一個區域網內的機器群了。
如上述在宿主機上開啟防火牆,一番設定後,虛擬機器和宿主機之間/同一個節點下的虛擬機器之間/虛擬機器和宿主機同一內網段內的機器之間都是可以相互連線的,即能相互ping通
************************************************************************************************************************
2)虛擬機器的web應用的代理部署
兩種方案(宿主機上部署nginx或haproxy):
a.採用nginx的反向代理。即將各個域名解析到宿主機ip,在nginx的vhost裡配置,然後通過proxy_pass代理轉發到虛擬機器上。
b.採用haproxy代理。也是將各個域名解析到宿主機ip,然後通過域名進行轉發規則的設定。
這樣,就能保證通過宿主機的80埠,將各個域名的訪問請求轉發給相應的虛擬機器了。
nginx反向代理,可以參考下面兩篇部落格:
http://www.cnblogs.com/kevingrace/p/5839698.html
http://www.cnblogs.com/kevingrace/p/5865501.html
*****************************************************************
nginx反向代理思路:
在宿主機上啟動nginx的80埠,根據不通域名進行轉發;後端的虛擬機器上vhost下不同域名的配置要啟用不同的埠了~
比如:
在宿主機上下面兩個域名的代理配置(其他域名配置同理)
[root@linux-node1 vhosts]# cat www.world.com.conf
upstream 8080 {
server 192.168.1.150:8080;
}
server {
listen 80;
server_name www.world.com;
location / {
proxy_store off;
proxy_redirect off;
proxy_set_header X-Forwarded-For $proxy_add_x_forwarded_for;
proxy_set_header X-Real-IP $remote_addr;
proxy_set_header Host $http_host;
proxy_pass http://8080;
}
}
[root@linux-node1 vhosts]# cat www.tech.com.conf
upstream 8081 {
server 192.168.1.150:8081;
}
server {
listen 80;
server_name www.tech.com;
location / {
proxy_store off;
proxy_redirect off;
proxy_set_header X-Forwarded-For $proxy_add_x_forwarded_for;
proxy_set_header X-Real-IP $remote_addr;
proxy_set_header Host $http_host;
proxy_pass http://8081;
}
}
即www.world.com和www.tech.com域名都解析到宿主機的公網ip上,然後:
訪問http://www.world.com的請求就被宿主機代理到後端虛擬機器192.168.1.150的8080埠上,即在虛擬機器上這個域名配置的是8080埠;
訪問http://www.tech.com的請求就被宿主機代理到後端虛擬機器192.168.1.150的8081埠上,即在虛擬機器上這個域名配置的是8081埠;
要是後端虛擬機器配置了多個域名,那麼其他域名的配置和上面是一樣的~~~
另外:
最好在代理伺服器和後端真實伺服器上做host對映(/etc/hosts檔案裡將各個域名指定對應到127.0.0.1),不然,可能代理後訪問域名有問題~~
---------------------------------------------------------------------------------------------
由於宿主機上做web應用的代理轉發,需要用到80埠。
80埠已被dashboard佔用,這裡需要修改下dashboard的訪問埠,比如改為8080埠
則需要做如下修改:
1)vim /etc/httpd/conf/httpd.conf
將80埠修改為8080埠
Listen 8080
ServerName 192.168.1.8:8080
2)vim /etc/openstack-dashboard/local_settings #將下面兩處的埠由80改為8080
'from_port': '8080',
'to_port': '8080',
3)防火牆新增8080埠訪問規則
-A INPUT -p tcp -m state --state NEW -m tcp --dport 8080 -j ACCEPT
然後重啟http服務:
#systemctl restart httpd
這樣,dashboard訪問url:
http://58.68.250.17:8080/dashboard
---------------------------------------------------------------------------------------------