frontend webserver *:80 前端監聽在80埠,前端名稱為webserver
default_backend web
#---------------------------------------------------------------------
# static backend for serving up images, stylesheets and such
#---------------------------------------------------------------------
backend web 後端伺服器名稱web
balance roundrobin
server web1 192.168.223.137:80 check
server web2 192.168.223.146:80 check
當訪問瀏覽器:http://192.168.223.136/,會根據roundrobin演算法排程到後端伺服器
配置haproxy日誌:
1、將下面四行註釋掉
# Provides UDP syslog reception
$ModLoad imudp
$UDPServerRun 514
# Provides TCP syslog reception
$ModLoad imtcp
$InputTCPServerRun 514
2、新增如下一行
local2.* /var/log/haproxy.log
3、重啟rsyslog服務:service rsyslog restart
當請求訪問haproxy時,日誌內容如下:
[root@node1 ~]# tail -f /var/log/haproxy.log
Aug 5 21:55:42 localhost haproxy[66553]: 192.168.223.1:56443 [05/Aug/2017:21:55:41.900] webserver web/web2 168/0/0/0/168 200 297 - - ---- 1/1/0/1/0 0/0 "GET / HTTP/1.1"
Aug 5 21:55:42 localhost haproxy[66553]: 192.168.223.1:56443 [05/Aug/2017:21:55:42.068] webserver web/web1 158/0/0/1/159 200 260 - - ---- 1/1/0/0/0 0/0 "GET / HTTP/1.1"
可以看出實際的客戶端地址192.168.223.1,以及請求的前端伺服器名稱,後端伺服器的資訊
檢視後端伺服器資訊:(後端由一個nginx,一個httpd提供服務)
nginx日誌:
[root@wadeson html]# tail -f ../logs/access.log
192.168.223.136 "-" - - [05/Aug/2017:21:55:39 +0800] "GET / HTTP/1.1" "192.168.223.136" 200 30 "-" "Mozilla/5.0 (Windows NT 10.0; WOW64; Trident/7.0; rv:11.0) like Gecko" "192.168.223.1"
192.168.223.136 "-" - - [05/Aug/2017:21:55:40 +0800] "GET / HTTP/1.1" "192.168.223.136" 200 30 "-" "Mozilla/5.0 (Windows NT 10.0; WOW64; Trident/7.0; rv:11.0) like Gecko" "192.168.223.1"
而httpd日誌:
[root@wadeson ~]# tail -f /var/log/httpd/access_log
192.168.223.136 - - [05/Aug/2017:21:55:38 +0800] "GET / HTTP/1.1" 200 30 "-" "Mozilla/5.0 (Windows NT 10.0; WOW64; Trident/7.0; rv:11.0) like Gecko"
看不見真實客戶端的ip,如何獲取真實ip呢?
在haproxy配置檔案中預設定義了:option forwardfor except 127.0.0.0/8
這個引數的含義:允許在發往伺服器的請求首部中插入“X-Forwarded-For”,是haproxy請求發往後端伺服器的過程,只需要在後端伺服器的日誌格式中新增這個首部就能獲取到真實ip的值
nginx的日誌格式:
log_format main '$remote_addr "$http_x_real_ip" - $remote_user [$time_local] "$request" "$http_host" '
'$status $body_bytes_sent "$http_referer" '
'"$http_user_agent" "$http_x_forwarded_for"'; 已經預設自帶了這個首部,所以無需修改就可以看見
現在設定httpd的日誌格式:
LogFormat "%h %{X-Forwarded-For}i %l %u %t \"%r\" %>s %b \"%{Referer}i\" \"%{User-Agent}i\"" combined
CustomLog logs/access_log combined
在httpd的日誌格式中新增該首部,然後呼叫格式名稱,再次訪問網站,重新整理日誌如下:
192.168.223.136 - - [05/Aug/2017:21:55:43 +0800] "GET / HTTP/1.1" 200 30 "-" "Mozilla/5.0 (Windows NT 10.0; WOW64; Trident/7.0; rv:11.0) like Gecko"
192.168.223.136 192.168.223.1 - - [05/Aug/2017:22:23:02 +0800] "GET / HTTP/1.1" 200 30 "-" "Mozilla/5.0 (Windows NT 10.0; WOW64; Trident/7.0; rv:11.0) like Gecko"
至此,nginx和httpd兩個後端都能收到真實的客戶端的ip
haproxy的演算法:
backend web
balance source
hash-type consistent
server web1 192.168.223.137:80 check
server web2 192.168.223.146:80 check
檢視haproxy日誌:
Aug 5 22:32:25 localhost haproxy[66820]: Proxy webserver started.
Aug 5 22:32:25 localhost haproxy[66820]: Proxy web started.
Aug 5 22:32:31 localhost haproxy[66821]: 192.168.223.1:57002 [05/Aug/2017:22:32:31.349] webserver web/web2 1/0/0/1/2 200 297 - - ---- 1/1/0/1/0 0/0 "GET / HTTP/1.1"
Aug 5 22:32:31 localhost haproxy[66821]: 192.168.223.1:57002 [05/Aug/2017:22:32:31.351] webserver web/web2 198/0/0/1/199 304 149 - - ---- 1/1/0/1/0 0/0 "GET / HTTP/1.1"
Aug 5 22:32:31 localhost haproxy[66821]: 192.168.223.1:57002 [05/Aug/2017:22:32:31.551] webserver web/web2 183/0/1/1/185 304 149 - - ---- 1/1/0/1/0 0/0 "GET / HTTP/1.1"
可以看出請求都被髮往web2這臺後端伺服器了
2、uri的hash演算法:
現在將兩臺web伺服器都增加一個test.html檔案:
echo "<h1>test 192.168.223.137</h1>" > test.html
echo "<h1>test 192.168.223.146</h1>" > test.html
修改haproxy配置檔案:
backend web
balance uri
hash-type consistent
server web1 192.168.223.137:80 check
server web2 192.168.223.146:80 check
訪問網站:http://192.168.223.136/test.html
檢視haproxy日誌:
Aug 5 22:36:44 localhost haproxy[66860]: Proxy webserver started.
Aug 5 22:36:44 localhost haproxy[66860]: Proxy web started.
Aug 5 22:36:55 localhost haproxy[66861]: 192.168.223.1:57065 [05/Aug/2017:22:36:55.365] webserver web/web1 0/0/0/0/0 200 260 - - ---- 1/1/0/0/0 0/0 "GET /test.html HTTP/1.1"
Aug 5 22:36:57 localhost haproxy[66861]: 192.168.223.1:57065 [05/Aug/2017:22:36:55.366] webserver web/web1 1903/0/0/1/1904 304 173 - - ---- 1/1/0/0/0 0/0 "GET /test.html HTTP/1.1"
可以看出請求test.html的uri都被請求到web1這臺伺服器了
3、hdr(name),基於header內容的hash演算法
修改haproxy配置檔案:
backend web
balance hdr(User-Agent)
hash-type consistent
server web1 192.168.223.137:80 check
server web2 192.168.223.146:80 check
檢視haproxy日誌:
Aug 5 22:43:00 localhost haproxy[66910]: Proxy webserver started.
Aug 5 22:43:00 localhost haproxy[66910]: Proxy web started.
Aug 5 22:43:15 localhost haproxy[66911]: 192.168.223.1:57124 [05/Aug/2017:22:43:15.826] webserver web/web2 0/0/0/1/1 304 149 - - ---- 1/1/0/1/0 0/0 "GET / HTTP/1.1"
Aug 5 22:43:17 localhost haproxy[66911]: 192.168.223.1:57124 [05/Aug/2017:22:43:15.827] webserver web/web2 1916/0/0/0/1916 304 149 - - ---- 1/1/0/1/0 0/0 "GET / HTTP/1.1"
請求都被派發到了web2,而web2的日誌如下:
192.168.223.136 192.168.223.1 - - [05/Aug/2017:22:43:22 +0800] "GET / HTTP/1.1" 304 - "-" "Mozilla/5.0 (Windows NT 10.0; WOW64; Trident/7.0; rv:11.0) like Gecko"
192.168.223.136 192.168.223.1 - - [05/Aug/2017:22:43:22 +0800] "GET / HTTP/1.1" 304 - "-" "Mozilla/5.0 (Windows NT 10.0; WOW64; Trident/7.0; rv:11.0) like Gecko"
配置檔案說明:
1、代理
-defaults:用於為所有其他配置提供預設引數,這配置預設配置引數可由下一個“defaults”所重新設定
-frontend:用於定義一系列監聽的套接字,這些套接字可接受客戶端請求並與之建立連線
-backend:用於定義一系列後端伺服器,代理將會將對應客戶端的請求轉發至這些伺服器
-listen:把一個前端和一個後端綁在一起,通過關聯前端和後端定義了一個完整的代理,通常只對tcp流量有用
所有代理的名稱只能使用大寫字母、小寫字母、數字、-、_、點號、冒號,此外ACL名稱會區分字母大小寫
bind [<address>]:<port_range> [, ...] [param*]
在前端定義一個或多個地址或者埠
mode { tcp|http|health }
例項執行的模式或者協議
use_backend dynamic if url_dyn use_backend static if url_css url_img extension_img default_backend dynamiccookie SRV insert indirect nocachebackend web
balance roundrobin
cookie SRV insert indirect nocache 在原有的cookie資訊上insert上SRV:{web1_session|web2_session},實現cookie的繫結
server web1 192.168.223.137:80 check cookie web1_session
server web2 192.168.223.146:80 check cookie web2_session

Aug 5 23:38:17 localhost haproxy[67250]: Proxy webserver started.
Aug 5 23:38:17 localhost haproxy[67250]: Proxy web started.
Aug 5 23:38:22 localhost haproxy[67251]: 192.168.223.1:58602 [05/Aug/2017:23:38:22.923] webserver web/web1 0/0/1/0/1 200 260 - - --NI 1/1/0/0/0 0/0 "GET / HTTP/1.1"
Aug 5 23:38:23 localhost haproxy[67251]: 192.168.223.1:58602 [05/Aug/2017:23:38:22.924] webserver web/web1 558/0/1/0/559 304 173 - - --VN 1/1/0/1/0 0/0 "GET / HTTP/1.1"
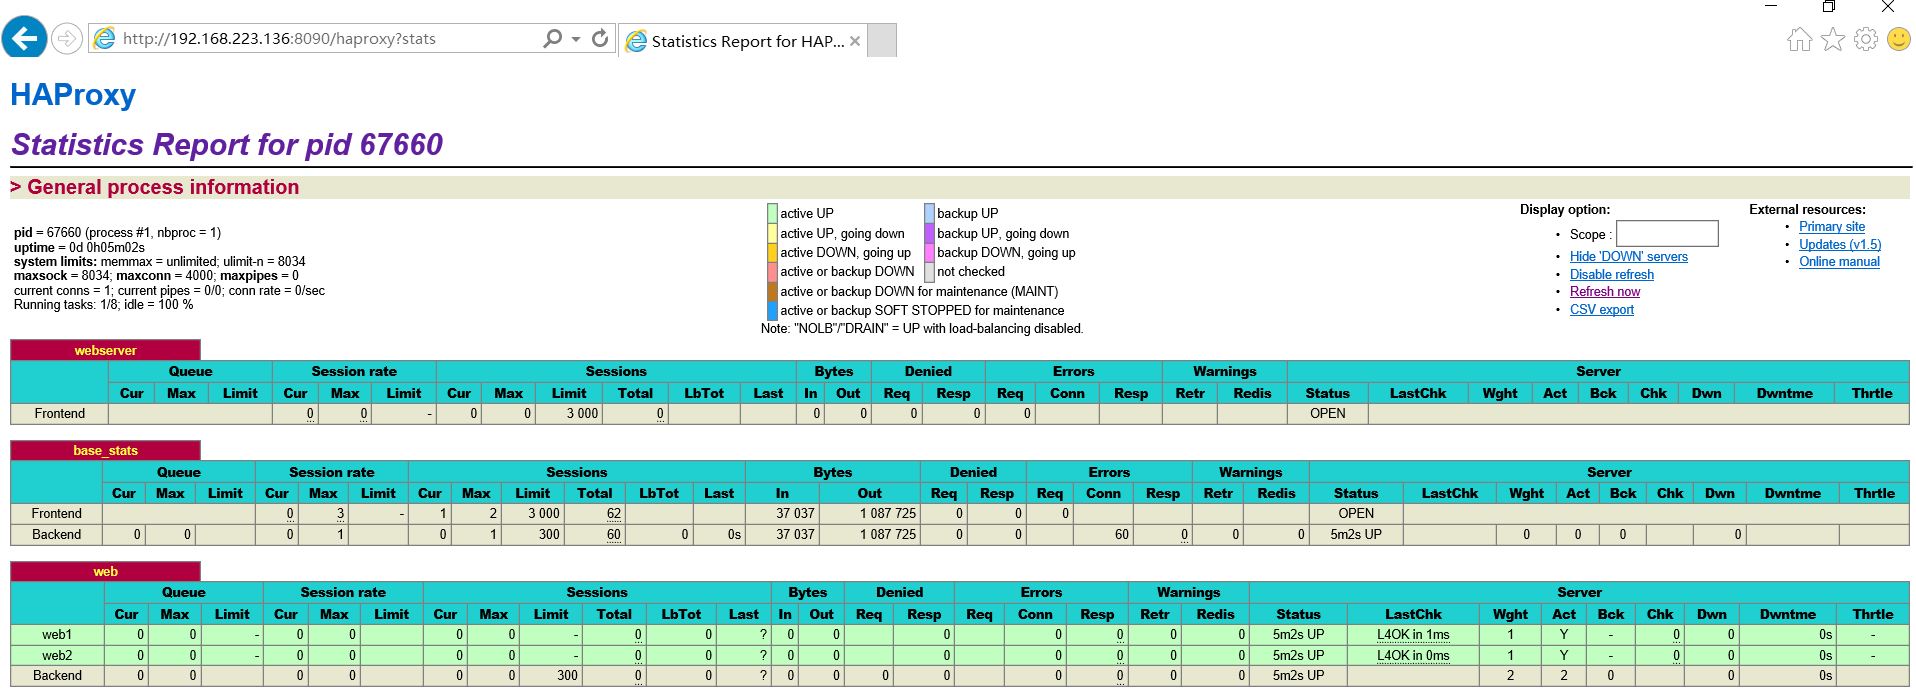
Aug 6 13:25:55 localhost haproxy[67660]: 192.168.223.1:53986 [06/Aug/2017:13:25:50.539] base_stats base_stats/<STATS> 5014/0/0/0/5015 200 18268 - - LR-- 1/1/0/0/0 0/0 "GET /haproxy?stats HTTP/1.1"
Aug 6 13:25:55 localhost haproxy[67660]: 192.168.223.1:54110 [06/Aug/2017:13:25:55.577] base_stats base_stats/<NOSRV> 0/-1/-1/-1/0 503 212 - - SC-- 1/1/0/0/0 0/0 "GET /favicon.ico HTTP/1.1"
日誌顯示也是五秒重新整理一條記錄
如果要做到在該頁面進行後端伺服器的操作,那麼可以加上stats admin if true這條指令:
frontend webserver *:80
default_backend web
listen base_stats
bind *:8090
stats enable
stats hide-version
stats uri /haproxy?stats
stats realm "haproxy statistics"
stats auth wadeson:redhat
stats admin if TRUE 如果認證通過就能管理節點server

capture request header <name> len <length>
捕獲請求首部,並指定首部長度
frontend webserver *:80
default_backend web
capture request header Host len 15
capture request header Referer len 60 ----》跳轉---》防盜鏈
檢視haproxy日誌:
Aug 6 13:32:11 localhost haproxy[67789]: Proxy web started.
Aug 6 13:32:21 localhost haproxy[67790]: 192.168.223.1:54212 [06/Aug/2017:13:32:21.201] webserver web/web1 0/0/0/0/0 304 173 - - --VN 1/1/0/0/0 0/0 {192.168.223.136} "GET / HTTP/1.1"
Aug 6 13:32:21 localhost haproxy[67790]: 192.168.223.1:54212 [06/Aug/2017:13:32:21.201] webserver web/web1 694/0/1/0/695 304 173 - - --VN 1/1/0/0/0 0/0 {192.168.223.136} "GET / HTTP/1.1"
可以看出標紅的就是捕獲的請求首部host的具體內容,捕獲的內容出現在日誌以{}出現
capture response header <name> len <length>
捕獲響應首部,並指定長度
frontend webserver *:80
default_backend web
capture request header Host len 15
capture request header X-Forwarded-For len 15
capture response header Content-length len 9
capture response header Location len 15
Aug 6 13:43:58 localhost haproxy[67911]: 192.168.223.1:54419 [06/Aug/2017:13:43:58.989] webserver web/web1 1/0/0/1/2 304 173 - - --VN 1/1/0/0/0 0/0 {192.168.223.136|} {|} "GET / HTTP/1.1"
Aug 6 13:43:59 localhost haproxy[67911]: 192.168.223.1:54419 [06/Aug/2017:13:43:58.991] webserver web/web1 782/0/0/0/782 304 173 - - --VN 1/1/0/0/0 0/0 {192.168.223.136|} {|} "GET / HTTP/1.1"
響應捕獲的首部{}不存在使用|為分隔符出現在日誌中
option httplog [ clf ]
啟用該引數,能夠看見在日誌中記錄更多內容,當然你也可以設定log-format,支援更多內建變數,該引數預設是開啟的
更早的記錄請求到日誌中
option dontlognull
啟用該項,日誌中將不會記錄空連線。所謂空連線就是在上游的負載均衡器或者監控系統為了探測該 服務是否存活可用時,需要定期的連線或者獲取某一固定的元件或頁面,或者探測掃描埠是否在監聽 或開放等動作被稱為空連線;官方文件中標註,如果該服務上游沒有其他的負載均衡器的話,建議不要使用該引數,因為網際網路上的惡意掃描或其他動作就不會被記錄下來
全域性配置段的一些引數:
nbproc <number>:只有執行在守護模式下才能建立更多程式數,因為一個程式所處理的檔案描述符的數量有限,haproxy也能工作在多程式條件下
ulimit-n <number>:設定一個程式所能處理的最大的檔案描述符的數量,it is automatically computed, so it is recommended not to use this option.,不建議更改
maxconn <number>:
[root@node1 haproxy]# haproxy -v
HA-Proxy version 1.5.18 2016/05/10
Copyright 2000-2016 Willy Tarreau <willy@haproxy.org
Build options :
TARGET = linux2628
CPU = generic
CC = gcc
CFLAGS = -O2 -g -fno-strict-aliasing
OPTIONS = USE_LINUX_TPROXY=1 USE_ZLIB=1 USE_REGPARM=1 USE_OPENSSL=1 USE_PCRE=1
Default settings :
maxconn = 2000, bufsize = 16384, maxrewrite = 8192, maxpollevents = 200
Encrypted password support via crypt(3): yes
Built with zlib version : 1.2.3
Compression algorithms supported : identity, deflate, gzip
Built with OpenSSL version : OpenSSL 1.0.1e-fips 11 Feb 2013
Running on OpenSSL version : OpenSSL 1.0.1e-fips 11 Feb 2013
OpenSSL library supports TLS extensions : yes
OpenSSL library supports SNI : yes
OpenSSL library supports prefer-server-ciphers : yes
Built with PCRE version : 7.8 2008-09-05
PCRE library supports JIT : no (USE_PCRE_JIT not set)
Built with transparent proxy support using: IP_TRANSPARENT IPV6_TRANSPARENT IP_FREEBIND
Available polling systems :
epoll : pref=300, test result OK
poll : pref=200, test result OK
select : pref=150, test result OK
Total: 3 (3 usable), will use epoll.
ACL:訪問控制列表
    acl <aclname> <criterrion> [flags][operator]<value>區分字元大小寫
    flags:
	-i:不區分字元大小
    path_beg <string>:path路徑以某字串開始
    path_end <string>:path路徑以什麼結尾(檔名副檔名都可以)
    path_reg <regex>:支援正則
    url <string>:整個後面的路徑
    method <string>
    acl url_static path_beg /static /images /img /css:定義以/images /img /css為開頭的url
    acl url_static path_end -i .gif .png .jpg .css .js:定義以它們結尾,不區分大小寫
    acl host_www hdr_beg(host) -i www  :hdr_reg(header) <regex>:對首部host進行正規表示式
    use_backend static if url_static  :如果滿足url_static控制列表定義的使用後端static組
    use_backend www if host_www   :如果滿足host_www控制列表定義的使用後端www組
    default_backend web    :其他沒有滿足的使用web後端組
例項:動靜分離
frontend webserver *:80
default_backend web
capture request header Host len 15
capture request header X-Forwarded-For len 15
capture response header Content-length len 9
capture response header Location len 15
capture response header Via len 15
acl url_static path_beg -i /static /images /javascript /stylesheets /css 以path的url開頭為條件
acl url_static path_end -i .jpg .jpeg .gif .png .css .js .html .htm 以結尾為條件
use_backend static_servers if url_static 當滿足url_static定義的條件時就使用靜態伺服器
default_backend dynamic_servers 預設使用動態伺服器
listen base_stats
bind *:8090
stats enable
stats hide-version
stats uri /haproxy?stats
stats realm "haproxy statistics"
stats auth wadeson:redhat
stats admin if TRUE
backend static_servers
balance roundrobin
server web2 192.168.223.146:80 check maxconn 6000
backend dynamic_servers
balance roundrobin
cookie SRV insert indirect nocache
參考另一篇:
http://huangsir007.blog.51cto.com/6159353/1840877
http://blog.csdn.net/wylfengyujiancheng/article/details/52336854