- 原文地址:Requiring modules in Node.js: Everything you need to know
- 原文作者:本文已獲原作者 Samer Buna 授權
- 譯文出自:掘金翻譯計劃
- 譯者:zhouzihanntu
- 校對者:lsvih, reid3290
Node.js 中模組化的工作原理
Node 提供了兩個核心模組來管理模組依賴:
require模組在全域性範圍內可用,不需要寫require('require').module模組同樣在全域性範圍內可用,不需要寫require('module').
你可以將 require 模組理解為命令,將 module 模組理解為所有引入模組的組織者。
在 Node 中引入一個模組其實並不是個多麼複雜的概念。
const config = require('/path/to/file');複製程式碼require 模組匯出的主物件是一個函式(如上例)。當 Node 將本地檔案路徑作為唯一引數呼叫 require() 時,Node 將執行以下步驟:
- 解析:找到該檔案的絕對路徑。
- 載入:確定檔案內容的型別。
- 打包:為檔案劃分私有作用域,這樣
require和module兩個物件對於我們要引入的每個模組來說就都是本地的。 - 評估:最後由虛擬機器對載入得到的程式碼做評估。
快取:當再次引用該檔案時,無需再重複以上步驟。
在本文中,我將嘗試舉例說明這些不同階段的工作原理,以及它們是如何影響我們在 Node 中編寫模組的方式的。
我先使用終端建立一個目錄來託管本文中的所有示例:
mkdir ~/learn-node && cd ~/learn-node複製程式碼 之後的所有命令都將在 ~/learn-node 目錄下執行。
解析本地路徑
首先,讓我來介紹一下 module 物件。你可以在一個簡單的 REPL 會話中檢視該物件:
~/learn-node $ node
> module
Module {
  id: '<repl>',
  exports: {},
  parent: undefined,
  filename: null,
  loaded: false,
  children: [],
  paths: [ ... ]}複製程式碼
每個模組物件都有一個用於識別該物件的 id 屬性。這個 id 通常是該檔案的完整路徑,但在 REPL 會話中只會顯示為 <repl>。
Node 模組與檔案系統中的檔案有著一對一的關係。我們通過載入模組對應的檔案內容到記憶體中來實現模組引用。
然而,由於 Node 允許使用多種方式引入檔案(例如,使用相對路徑或預先配置的路徑),我們需要在將檔案的內容載入到記憶體前找到該檔案的絕對位置。
例如,我們不宣告路徑,直接引入一個 'find-me' 模組時:
require('find-me');複製程式碼Node 會在 module.paths 宣告的所有路徑中依次查詢 find-me.js 。
~/learn-node $ node
> module.paths
[ '/Users/samer/learn-node/repl/node_modules',
  '/Users/samer/learn-node/node_modules',
  '/Users/samer/node_modules',
  '/Users/node_modules',
  '/node_modules',
  '/Users/samer/.node_modules',
  '/Users/samer/.node_libraries',
  '/usr/local/Cellar/node/7.7.1/lib/node' ]複製程式碼
Node 從當前目錄開始一級級向上尋找 node_modules 目錄,這個陣列大致就是當前目錄到所有 node_modules 目錄的相對路徑。其中還包括一些為了相容性保留的目錄,不推薦使用。
如果 Node 在以上路徑中都無法找到 find-me.js ,將丟擲一個 “找不到該模組” 錯誤。
~/learn-node $ node
> require('find-me')
Error: Cannot find module 'find-me'
    at Function.Module._resolveFilename (module.js:470:15)
    at Function.Module._load (module.js:418:25)
    at Module.require (module.js:498:17)
    at require (internal/module.js:20:19)
    at repl:1:1
    at ContextifyScript.Script.runInThisContext (vm.js:23:33)
    at REPLServer.defaultEval (repl.js:336:29)
    at bound (domain.js:280:14)
    at REPLServer.runBound [as eval] (domain.js:293:12)
    at REPLServer.onLine (repl.js:533:10)複製程式碼
如果你現在建立一個本地的 node_modules 目錄,並向目錄中新增一個 find-me.js 檔案,就能通過 require('find-me') 找到它了。
~/learn-node $ mkdir node_modules

~/learn-node $ echo "console.log('I am not lost');" > node_modules/find-me.js

~/learn-node $ node
> require('find-me');
I am not lost
{}
>複製程式碼
如果在其他路徑下也有 find-me.js 檔案呢?例如,我們在主目錄下的 node_modules 目錄中放置一個不同的 find-me.js 檔案:
$ mkdir ~/node_modules
$ echo "console.log('I am the root of all problems');" > ~/node_modules/find-me.js複製程式碼
當我們在 learn-node 目錄下執行 require('find-me') 時,learn-node 目錄會載入自己的 node_modules/find-me.js,主目錄下的 find-me.js 檔案並不會被載入:
~/learn-node $ node
> require('find-me')
I am not lost
{}
>複製程式碼
此時,如果我們將 ~/learn-node 下的 node_modules 移除,再一次引入 find-me 模組,那麼主目錄下的 node_modules 將會被載入:
~/learn-node $ rm -r node_modules/

~/learn-node $ node
> require('find-me')
I am the root of all problems
{}
>複製程式碼
引入資料夾
模組不一定是單個檔案。我們也可以在 node_modules 目錄下建立一個 find-me 資料夾,然後向其中新增一個 index.js 檔案。require('find-me') 會引用該資料夾下的 index.js 檔案:
~/learn-node $ mkdir -p node_modules/find-me

~/learn-node $ echo "console.log('Found again.');" > node_modules/find-me/index.js

~/learn-node $ node
> require('find-me');
Found again.
{}
>複製程式碼
注意,由於我們現在有一個本地目錄,它再次忽略了主目錄的
node_modules路徑。
當我們引入一個資料夾時,將預設使用 index.js 檔案,但是我們可以通過 package.json 中的 main 屬性指定主入口檔案。例如,要令 require('find-me') 解析到 find-me 資料夾下的另一個檔案,我們只需要在該資料夾下新增一個 package.json 檔案來宣告解析該資料夾時引用的檔案:
~/learn-node $ echo "console.log('I rule');" > node_modules/find-me/start.js

~/learn-node $ echo '{ "name": "find-me-folder", "main": "start.js" }' > node_modules/find-me/package.json

~/learn-node $ node
> require('find-me');
I rule
{}
>複製程式碼
require.resolve 方法
如果你只想解析模組而不執行,此時可以使用 require.resolve 函式。這個方法與 require 的主要功能完全相同,但是不載入檔案。如果檔案不存在,它仍會丟擲錯誤;如果找到了檔案,則會返回檔案的完整路徑。
> require.resolve('find-me');
'/Users/samer/learn-node/node_modules/find-me/start.js'
> require.resolve('not-there');
Error: Cannot find module 'not-there'
    at Function.Module._resolveFilename (module.js:470:15)
    at Function.resolve (internal/module.js:27:19)
    at repl:1:9
    at ContextifyScript.Script.runInThisContext (vm.js:23:33)
    at REPLServer.defaultEval (repl.js:336:29)
    at bound (domain.js:280:14)
    at REPLServer.runBound [as eval] (domain.js:293:12)
    at REPLServer.onLine (repl.js:533:10)
    at emitOne (events.js:101:20)
    at REPLServer.emit (events.js:191:7)
>複製程式碼
這個方法可以用於檢查一個可選安裝包是否安裝,並僅在該包可用時使用。
相對路徑和絕對路徑
除了從 node_modules 目錄中解析模組以外,我們還可以將模組放置在任意位置,使用相對路徑( ./ 和 ../ )或以 / 開頭的絕對路徑引入。
舉個例子,如果 find-me.js 檔案並不在 node_modules 中,而在 lib 資料夾中。我們可以使用以下程式碼引入它:
require('./lib/find-me');複製程式碼檔案間的父子關係
現在我們來建立一個 lib/util.js 檔案,向檔案新增一行 console.log 程式碼作為標識。列印出 module 物件本身:
~/learn-node $ mkdir lib
~/learn-node $ echo "console.log('In util', module);" > lib/util.js複製程式碼
同樣的,向 index.js 檔案中也新增一行列印 module 物件的程式碼,並在檔案中引入 lib/util.js,我們將使用 node 命令執行該檔案:
~/learn-node $ echo "console.log('In index', module); require('./lib/util');" > index.js複製程式碼用 node 執行 index.js 檔案:
~/learn-node $ node index.js
In index Module {
  id: '.',
  exports: {},
  parent: null,
  filename: '/Users/samer/learn-node/index.js',
  loaded: false,
  children: [],
  paths: [ ... ] }
In util Module {
  id: '/Users/samer/learn-node/lib/util.js',
  exports: {},
  parent:
   Module {
     id: '.',
     exports: {},
     parent: null,
     filename: '/Users/samer/learn-node/index.js',
     loaded: false,
     children: [ [Circular] ],
     paths: [...] },
  filename: '/Users/samer/learn-node/lib/util.js',
  loaded: false,
  children: [],
  paths: [...] }複製程式碼
注意:
index主模組(id: '.')現在被列為lib/util模組的父模組。但lib/util模組並沒有被列為index模組的子模組。相反,我們在這裡得到的值是[Circular],因為這是一個迴圈引用。如果 Node 列印lib/util模組物件,將進入一個無限迴圈。 因此 Node 使用[Circular]代替了lib/util引用。
重點來了,如果我們在 lib/util 模組中引入 index 主模組會發生什麼?這就是 Node 中所支援的迴圈依賴。
為了更好理解迴圈依賴,我們先來了解一些關於 module 物件的概念。
exports、module.exports 和模組非同步載入
在所有模組中,exports 都是一個特殊物件。你可能注意到了,以上我們每列印一個 module 物件時,它都有一個空的 exports 屬性。我們可以向這個特殊的 exports 物件新增任意屬性。例如,我們現在為 index.js 和 lib/util.js 的 exports 物件新增一個 id 屬性:
// 在 lib/util.js 頂部新增以下程式碼
exports.id = 'lib/util';

// 在 index.js 頂部新增以下程式碼
exports.id = 'index';複製程式碼
然後執行 index.js,我們將看到:
~/learn-node $ node index.js
In index Module {
  id: '.',
  exports: { id: 'index' },
  loaded: false,
  ... }
In util Module {
  id: '/Users/samer/learn-node/lib/util.js',
  exports: { id: 'lib/util' },
  parent:
   Module {
     id: '.',
     exports: { id: 'index' },
     loaded: false,
     ... },
  loaded: false,
... }複製程式碼為了保持示例簡短,我刪除了以上輸出中的一些屬性,但請注意:exports 物件現在擁有我們在各模組中定義的屬性。你可以向 exports 物件新增任意多的屬性,也可以直接將整個 exports 物件替換為其它物件。例如,我們可以通過以下方式將 exports 物件更改為一個函式:
// 將以下程式碼新增在 index.js 中的 console.log 語句前

module.exports = function() {};複製程式碼
再次執行 index.js,你將看到 exports 物件是一個函式:
~/learn-node $ node index.js
In index Module {
  id: '.',
  exports: [Function],
  loaded: false,
  ... }複製程式碼
注意:我們並沒有使用
exports = function() {}來將exports物件更改為函式。實際上,由於各模組中的exports變數僅僅是對管理輸出屬性的module.exports的引用,當我們對exports變數重新賦值時,引用就會丟失,因此我們只需要引入一個新的變數,而不是對module.exports進行修改。
各模組中的 module.exports 物件就是我們在引入該模組時 require 函式的返回值。例如,我們將 index.js 中的 require('./lib/util') 改為:
const UTIL = require('./lib/util');

console.log('UTIL:', UTIL);複製程式碼
以上程式碼會將 lib/util 輸出的屬性賦值給 UTIL 常量。我們現在執行 index.js,最後一行將輸出以下結果:
UTIL: { id: 'lib/util' }複製程式碼我們再來談談各模組中的 loaded 屬性。到目前為止我們列印的所有 module 物件中都有一個值為 false 的 loaded 屬性。
module 模組使用 loaded 屬性對模組的載入狀態進行跟蹤,判斷哪些模組已經載入完成(值為 true)以及哪些模組仍在載入(值為 false)。例如,我們可以使用 setImmediate 在下一個事件迴圈中列印出它的 module 物件,以此來判斷 index.js 模組是否已完全載入。
// index.js 中
setImmediate(() => {
  console.log('The index.js module object is now loaded!', module)
});複製程式碼
以上輸出將得到:
The index.js module object is now loaded! Module {
  id: '.',
  exports: [Function],
  parent: null,
  filename: '/Users/samer/learn-node/index.js',
  loaded: true,
  children:
   [ Module {
       id: '/Users/samer/learn-node/lib/util.js',
       exports: [Object],
       parent: [Circular],
       filename: '/Users/samer/learn-node/lib/util.js',
       loaded: true,
       children: [],
       paths: [Object] } ],
  paths:
   [ '/Users/samer/learn-node/node_modules',
     '/Users/samer/node_modules',
     '/Users/node_modules',
     '/node_modules' ] }複製程式碼
注意:這個延遲的
console.log的輸出顯示了lib/util.js和index.js都已完全載入。
在 Node 完成載入模組(並標記為完成)時,exports 物件也就完成了。引入一個模組的整個過程是 同步的,因此我們才能在一個事件迴圈後看見模組被完全載入。
這也意味著我們無法非同步地更改 exports 物件。例如,我們在任何模組中都無法執行以下操作:
fs.readFile('/etc/passwd', (err, data) => {
  if (err) throw err;

  exports.data = data; // 無效
});複製程式碼
模組的迴圈依賴
我們現在來回答關於 Node 中迴圈依賴的重要問題:當我們在模組1中引用模組2,在模組2中引用模組1時會發生什麼?
為了找到答案,我們在 lib/ 下建立 module1.js 和 module2.js 兩個檔案並讓它們互相引用:
// lib/module1.js

exports.a = 1;

require('./module2');

exports.b = 2;
exports.c = 3;

// lib/module2.js

const Module1 = require('./module1');
console.log('Module1 is partially loaded here', Module1);複製程式碼
執行 module1.js 後,我們將看到:
~/learn-node $ node lib/module1.js
Module1 is partially loaded here { a: 1 }複製程式碼
我們在 module1 載入完成前引用了 module2,而此時 module1 尚未載入完,我們從當前的 exports 物件中得到的是在迴圈依賴之前匯出的所有屬性。這裡被列出的只有屬性 a,因為屬性 b 和 c 都是在 module2 引入並列印了 module1 後才匯出的。
Node 使這個過程變得非常簡單。它在模組載入時構建 exports 物件。你可以在該模組完成載入前引用它,而你將得到此時已定義的部分匯出物件。
使用 JSON 檔案和 C/C++ 外掛
我們可以使用自帶的 require 函式引用 JSON 檔案和 C++ 外掛。你甚至不需要為此指定副檔名。
如果沒有指定副檔名,Node 會在第一時間嘗試解析 .js 檔案。如果沒有找到 .js 檔案,它將繼續尋找 .json 檔案並在找到一個 JSON 文字檔案後將其解析為 .json 檔案。隨後,Node 將會查詢二進位制的 .node 檔案。為了避免產生歧義,你最好在引用除 .js 檔案以外的檔案型別時指定副檔名。
如果你需要在檔案中放置的內容都是一些靜態的配置資訊,或者需要定期從外部來源讀取一些值時,使用 JSON 檔案將非常方便。例如,我們有以下 config.json 檔案:
{
  "host": "localhost",
  "port": 8080
}複製程式碼
我們可以這樣直接引用它:
const { host, port } = require('./config');

console.log(`Server will run at [http://${host}:${port}](http://$%7Bhost%7D:$%7Bport%7D`));複製程式碼
執行以上程式碼將輸出以下結果:
Server will run at [http://localhost:8080](http://localhost:8080)複製程式碼如果 Node 找不到 .js 或 .json 檔案,它會尋找 .node 檔案並將其作為一個編譯好的外掛模組進行解析。
Node 文件中有一個用 C++ 編寫的外掛示例,該示例模組提供了一個輸出 “world” 的 hello() 函式。
你可以使用 node-gyp 外掛將 .cc 檔案編譯成 .addon 檔案。只需要配置一個 binding.gyp 檔案來告訴 node-gyp 要做什麼。
有了 addon.node 檔案(你可以在 binding.gyp 中宣告任意檔名),你就可以像引用其他模組一樣引用它了。
const addon = require('./addon');

console.log(addon.hello());複製程式碼
我們可以在 require.extensions 中檢視 Node 對這三類副檔名的支援。
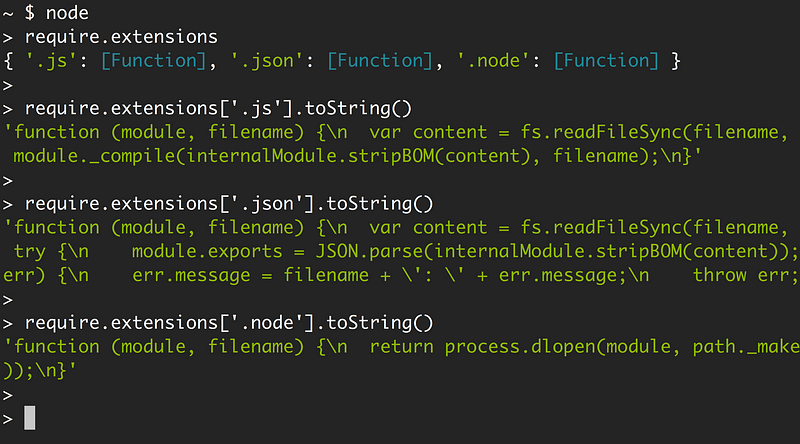
你可以看到每個副檔名分別對應的函式,從中瞭解 Node 會對它們做出怎樣的操作:對 .js 檔案使用 module._compile,對 .json 檔案使用 JSON.parse,對 .node 檔案使用 process.dlopen。
你在 Node 中寫的所有程式碼都將被封裝成函式
常常有人誤解 Node 的模組封裝。要了解它的原理,請回憶一下 exports 與 module.exports 的關係。
我們可以使用 exports 物件匯出屬性,但是由於 exports 物件僅僅是對 module.exports 的一個引用,我們無法直接對其執行替換操作。
exports.id = 42; // 有效

exports = { id: 42 }; // 無效

module.exports = { id: 42 }; // 有效複製程式碼
這個 exports 物件看起來對所有模組都是全域性的,它是如何被定義成 module 物件的引用的呢?
在解釋 Node 的封裝過程前,讓我們再來思考一個問題:
在瀏覽器中,我們在指令碼里宣告如下變數:
var answer = 42;複製程式碼answer 變數對宣告該變數的指令碼後的所有指令碼來說都是全域性的。
然而在 Node 中卻不是這樣的。我們在一個模組中定義了變數,專案中的其他模組卻將無法訪問該變數。那麼 Node 是如何神奇地做到為變數限定作用域的呢?
答案很簡單。在編譯模組前,Node 就將模組程式碼封裝在一個函式中,我們可以使用 module 模組的 wrapper 屬性來檢視。
~ $ node
> require('module').wrapper
[ '(function (exports, require, module, __filename, __dirname) { ',
  '\n});' ]
>複製程式碼
Node 並不會直接執行你在檔案中寫入的程式碼。它執行的是封裝著你的程式碼的函式。這就保證了所有模組中定義的頂級變數的作用域都被限定在該模組中。
這個封裝函式包含五個引數:exports、require、module、__filename 和 __dirname。這些引數看起來像是全域性的,實際上卻是每個模組特定的。
在 Node 執行封裝函式的同時,以上這幾個引數都獲取到了它們的值。exports 被定義為對上一級 module.exports 的引用。require 和 module 都是特定於被執行函式的,而 __filename/__dirname 變數將包含被封裝模組的檔名和目錄的絕對路徑。
如果你在一個指令碼的第一行編寫一行錯誤程式碼並執行它,你就能看到實際的封裝過程:
~/learn-node $ echo "euaohseu" > bad.js
~/learn-node $ node bad.js
~/bad.js:1
(function (exports, require, module, __filename, __dirname) { euaohseu
                                                              ^

ReferenceError: euaohseu is not defined複製程式碼
注意:這裡指令碼第一行是作為封裝函式中的程式碼報錯的,而不是錯誤的引用。
此外,由於每個模組都被封裝在一個函式中,我們可以使用 arguments 關鍵字訪問該函式的引數:
~/learn-node $ echo "console.log(arguments)" > index.js

~/learn-node $ node index.js
{ '0': {},
  '1':
   { [Function: require]
     resolve: [Function: resolve],
     main:
      Module {
        id: '.',
        exports: {},
        parent: null,
        filename: '/Users/samer/index.js',
        loaded: false,
        children: [],
        paths: [Object] },
     extensions: { ... },
     cache: { '/Users/samer/index.js': [Object] } },
  '2':
   Module {
     id: '.',
     exports: {},
     parent: null,
     filename: '/Users/samer/index.js',
     loaded: false,
     children: [],
     paths: [ ... ] },
  '3': '/Users/samer/index.js',
  '4': '/Users/samer' }複製程式碼
第一個引數是 exports 物件,初始值為空。require/module 物件都與當前執行的 index.js 檔案的例項關聯。它們不是全域性變數。最後兩個引數分別為當前檔案路徑和目錄路徑。
封裝函式的返回值是 module.exports。在封裝函式中,我們可以使用 exports 物件更改 module.exports 的屬性,但是由於它僅僅是一個引用,我們無法對其重新賦值。
情況大致如下:
function (require, module, __filename, __dirname) {
  let exports = module.exports;

  // 你的程式碼…

  return module.exports;
}複製程式碼
如果我們更改了整個 exports 物件,它將不再是對 module.exports 的引用。並不僅僅是在這個上下文中,JavaScript 在任何情況下引用物件都是這樣的。
require 物件
require 沒有什麼特別的。它作為一個函式物件,接收一個模組名稱或路徑,返回 module.exports 物件。我們也可以用我們自己的邏輯重寫 require 物件。
舉個例子,為了測試的目的,我們希望每個 require 的呼叫都返回一個偽造的 mocked 物件,而不是引用的模組所匯出的物件。這個對 require 的簡單重新賦值會這樣實現:
require = function() {

  return { mocked: true };

}複製程式碼
經過以上對 require 重新賦值後,指令碼中的每個 require('something') 呼叫都會返回 mocked 物件。
require 物件也有它自己的屬性。我們已經認識了 resolve 屬性,它是在 require 過程中負責解析步驟的函式。我們也見識了 require.extensions。
還有 require.main 屬性,有助於判斷當前指令碼是正被引用還是直接執行。
舉個例子,我們在 print-in-frame.js 中定義一個簡單的 printInFrame 函式:
// 在 print-in-frame.js 中

const printInFrame = (size, header) => {
  console.log('*'.repeat(size));
  console.log(header);
  console.log('*'.repeat(size));
};複製程式碼
該函式使用一個數字型引數 size 和一個字串型引數 header,並在我們指定大小的星號框中將標題列印出來。
我們希望通過兩種方式執行該檔案:
- 在命令列下直接執行:
~/learn-node $ node print-in-frame 8 Hello複製程式碼將 8 和 Hello 作為命令列引數,列印出由8個星號組成的框以及 “Hello”。
- 使用
require。假設被引用的模組會匯出printInFrame函式,我們可以這樣呼叫它:
const print = require('./print-in-frame');

print(5, 'Hey');複製程式碼
列印由五個星號組成的框以及其中的標題 “Hey”。
以上是兩種不同的用法。我們需要一種方法來確定該檔案是作為獨立指令碼執行還是被其他指令碼引用時執行。
此時我們可以使用簡單的 if 宣告語句:
if (require.main === module) {
  // 該檔案正被直接執行
}複製程式碼
所以我們可以使用該條件判斷來滿足上述使用需求,通過不同的方式呼叫 printInFrame 函式。
// 在 print-in-frame.js 中

const printInFrame = (size, header) => {
  console.log('*'.repeat(size));
  console.log(header);
  console.log('*'.repeat(size));
};

if (require.main === module) {
  printInFrame(process.argv[2], process.argv[3]);
} else {
  module.exports = printInFrame;
}複製程式碼
如果檔案不是被引用的,我們使用 process.argv 的引數來呼叫 printInFrame 函式。否則我們就將 module.exports 物件替換為 printInFrame 函式。
所有模組都將被快取
理解快取非常重要。下面我用一個簡單的例子來演示一下。
假設你有以下 ascii-art.js 檔案,它能列印出一個很酷的標題:
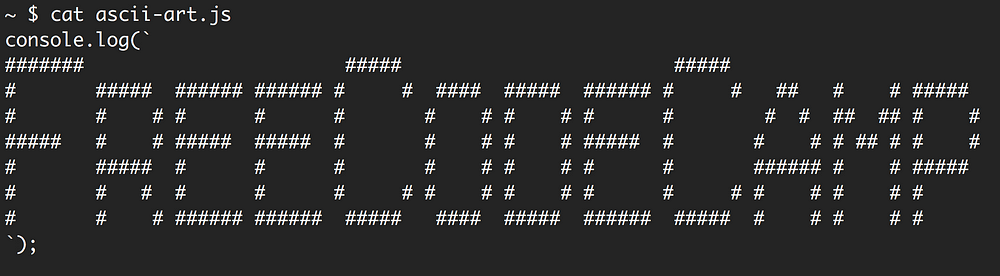
我們希望在每次 引用 該檔案時都顯示這個標題。因此如果我們引用了兩次該檔案,我們希望標題顯示兩次。
require('./ascii-art') // 顯示標題
require('./ascii-art') // 不顯示標題複製程式碼
由於模組快取,第二次的引用將不會顯示標題。Node 會在第一次呼叫時進行快取,在第二次呼叫時不再載入檔案。
我們可以通過在第一次引用後列印 require.cache 來檢視快取。管理快取的是一個物件,它的屬性值分別對應引用過的模組。這些屬性值即用於各模組的 module 物件。我們可以通過簡單地從 require.cache 物件中刪除一個屬性來令該快取失效,然後 Node 就會再次載入並快取該模組。
然而,這並不是應對這種情況最高效的解決方案。簡單的解決辦法是將 ascii-art.js 中的列印程式碼用一個函式封裝起來並匯出該函式。通過這種方式,每當我們引用 ascii-art.js 檔案時,我們就能獲取到一個可執行函式,以供我們多次呼叫列印程式碼:
require('./ascii-art')() // 顯示標題
require('./ascii-art')() // 顯示標題複製程式碼
以上就是我關於本次主題所要講述的全部內容。回見!