RecyclerView 列表控制元件中簡單實現時間線
時間
時間,時間,時間啊;走慢一點吧~
看見很多軟體中都有時間線的東西,貌似天氣啊,旅遊啊什麼的最多了;具體實現方式很多,在本篇文章中講解一種自定義View封裝的方式。
效果
先來看看效果。
分析
軟體中,可以看見前面的時間線也就是線條加上圓圈組成;當然這裡的圓圈與線條也都是可以隨意換成其他的,比如圖片等等。
當然這裡最簡單的來說,是上面一個線條,然後一個圓圈,然後下面一個線條;上線條在第一條資料時不做顯示,下線條在最後一條資料時不做顯示。
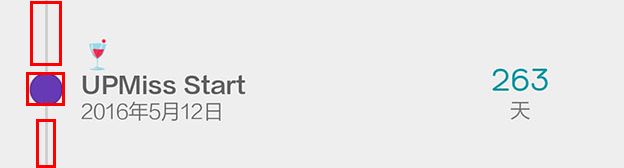
這裡自定義佈區域性分也就是把旁邊的線條與圓圈封裝到一起,並使用簡單的方法來控制是否顯示。
當封裝好了後,與旁邊的文字部分也就是水瓶方向的線性佈局了,然後設定為每一個的RecyclerView 的Item的佈局也就完成了。
控制元件
控制元件很簡單,首先我們繼承View,取名為 TimeLineMarker 就OK。
Attrs 屬性
開始控制元件之前先準備好需要的屬性。
<?xml version="1.0" encoding="utf-8"?>
<resources>
    <declare-styleable name="TimeLineMarker">
        <attr name="markerSize" format="dimension" />
        <attr name="marker" format="color|reference" />
        <attr name="beginLine" format="color|reference" />
        <attr name="endLine" format="color|reference" />
        <attr name="lineSize" format="dimension" />
    </declare-styleable>
</resources>
在這裡也就準備了線條的大小、開始線條、結束線條、中間標示部分及大小。
屬性與現實
    private int mMarkerSize = 24;
    private int mLineSize = 12;
    private Drawable mBeginLine;
    private Drawable mEndLine;
    private Drawable mMarkerDrawable;

    @Override
    protected void onDraw(Canvas canvas) {
        if (mBeginLine != null) {
            mBeginLine.draw(canvas);
        }

        if (mEndLine != null) {
            mEndLine.draw(canvas);
        }

        if (mMarkerDrawable != null) {
            mMarkerDrawable.draw(canvas);
        }

        super.onDraw(canvas);
    }
兩個大小屬性,3個具體的Drawable,然後在onDraw方法中進行具體的顯示也就OK。
構造與屬性初始化
在上面我們定義了屬性,在這裡我們在建構函式中獲取XML所設定的屬性。
    public TimeLineMarker(Context context) {
        this(context, null);
    }

    public TimeLineMarker(Context context, AttributeSet attrs) {
        this(context, attrs, 0);
    }

    public TimeLineMarker(Context context, AttributeSet attrs, int defStyle) {
        super(context, attrs, defStyle);
        init(attrs);
    }

    private void init(AttributeSet attrs) {
        // Load attributes
        final TypedArray a = getContext().obtainStyledAttributes(
                attrs, R.styleable.TimeLineMarker, 0, 0);

        mMarkerSize = a.getDimensionPixelSize(
                R.styleable.TimeLineMarker_markerSize,
                mMarkerSize);

        mLineSize = a.getDimensionPixelSize(
                R.styleable.TimeLineMarker_lineSize,
                mLineSize);

        mBeginLine = a.getDrawable(
                R.styleable.TimeLineMarker_beginLine);

        mEndLine = a.getDrawable(
                R.styleable.TimeLineMarker_endLine);

        mMarkerDrawable = a.getDrawable(
                R.styleable.TimeLineMarker_marker);

        a.recycle();

        if (mBeginLine != null)
            mBeginLine.setCallback(this);

        if (mEndLine != null)
            mEndLine.setCallback(this);

        if (mMarkerDrawable != null)
            mMarkerDrawable.setCallback(this);
    }
Drawable 的位置與大小初始化
屬性啥的有了,具體的Drawable 也有了,要顯示的地方呼叫也是OK了;但是如果沒有進行進行具體的位置調整這一切也都沒有意義。
    @Override
    protected void onSizeChanged(int w, int h, int oldw, int oldh) {
        super.onSizeChanged(w, h, oldw, oldh);
        initDrawableSize();
    }

    private void initDrawableSize() {
        int pLeft = getPaddingLeft();
        int pRight = getPaddingRight();
        int pTop = getPaddingTop();
        int pBottom = getPaddingBottom();

        int width = getWidth();
        int height = getHeight();

        int cWidth = width - pLeft - pRight;
        int cHeight = height - pTop - pBottom;

        Rect bounds;

        if (mMarkerDrawable != null) {
            // Size
            int markerSize = Math.min(mMarkerSize, Math.min(cWidth, cHeight));
            mMarkerDrawable.setBounds(pLeft, pTop,
                    pLeft + markerSize, pTop + markerSize);

            bounds = mMarkerDrawable.getBounds();
        } else {
            bounds = new Rect(pLeft, pTop, pLeft + cWidth, pTop + cHeight);
        }


        int halfLineSize = mLineSize >> 1;
        int lineLeft = bounds.centerX() - halfLineSize;

        if (mBeginLine != null) {
            mBeginLine.setBounds(lineLeft, 0, lineLeft + mLineSize, bounds.top);
        }

        if (mEndLine != null) {
            mEndLine.setBounds(lineLeft, bounds.bottom, lineLeft + mLineSize, height);
        }
    }
initDrawableSize 方法進行具體的運算,而運算的時間點就是當控制元件的大小改變(onSizeChanged)的時候。
在初始化中採用了一定的投機取巧;這裡利用了上內邊距與下內邊距分別作為上線條與下線條的長度;而線條與中間的標識都採用了水平距中。
其他設定方法
    public void setLineSize(int lineSize) {
        if (mLineSize != lineSize) {
            this.mLineSize = lineSize;
            initDrawableSize();
            invalidate();
        }
    }

    public void setMarkerSize(int markerSize) {
        if (this.mMarkerSize != markerSize) {
            mMarkerSize = markerSize;
            initDrawableSize();
            invalidate();
        }
    }

    public void setBeginLine(Drawable beginLine) {
        if (this.mBeginLine != beginLine) {
            this.mBeginLine = beginLine;
            if (mBeginLine != null) {
                mBeginLine.setCallback(this);
            }
            initDrawableSize();
            invalidate();
        }
    }

    public void setEndLine(Drawable endLine) {
        if (this.mEndLine != endLine) {
            this.mEndLine = endLine;
            if (mEndLine != null) {
                mEndLine.setCallback(this);
            }
            initDrawableSize();
            invalidate();
        }
    }

    public void setMarkerDrawable(Drawable markerDrawable) {
        if (this.mMarkerDrawable != markerDrawable) {
            this.mMarkerDrawable = markerDrawable;
            if (mMarkerDrawable != null) {
                mMarkerDrawable.setCallback(this);
            }
            initDrawableSize();
            invalidate();
        }
    }
在設定中,首先判斷是否更改,如果更改那麼就更新並重新計算位置;隨後重新整理介面。
到這裡,控制元件差不多準備OK了,其中還有很多可以完善的地方,比如加上快捷設定顏色什麼的,也可以加上大小計算的東西。同時還可以加上時間線是水瓶還是垂直等等。在這裡就不累贅介紹哪些了。下面來看看如何使用。
使用
XML佈局
ITEM佈局item_time_line.xml
<?xml version="1.0" encoding="utf-8"?>

<LinearLayout xmlns:android="http://schemas.android.com/apk/res/android"
    xmlns:app="http://schemas.android.com/apk/res-auto"
    xmlns:tools="http://schemas.android.com/tools"
    android:layout_width="match_parent"
    android:layout_height="wrap_content"
    android:orientation="horizontal"
    android:paddingLeft="@dimen/lay_16"
    android:paddingRight="@dimen/lay_16"
    tools:ignore="MissingPrefix">

    <net.qiujuer.example.timeline.widget.TimeLineMarker
        android:id="@+id/item_time_line_mark"
        android:layout_width="wrap_content"
        android:layout_height="match_parent"
        android:paddingBottom="@dimen/lay_16"
        android:paddingLeft="@dimen/lay_4"
        android:paddingRight="@dimen/lay_4"
        android:paddingTop="@dimen/lay_16"
        app:beginLine="@color/black_alpha_32"
        app:endLine="@color/black_alpha_32"
        app:lineSize="2dp"
        app:marker="@drawable/ic_timeline_default_marker"
        app:markerSize="24dp" />

    <TextView
        android:id="@+id/item_time_line_txt"
        android:layout_width="match_parent"
        android:layout_height="wrap_content"
        android:layout_gravity="center"
        android:paddingBottom="@dimen/lay_16"
        android:paddingLeft="@dimen/lay_4"
        android:paddingRight="@dimen/lay_4"
        android:paddingTop="@dimen/lay_16"
        android:textColor="@color/grey_600"
        android:textSize="@dimen/font_16" />

</LinearLayout>
在這裡我們之間使用順序佈局,左邊是TimelIne控制元件,右邊是一個簡單的字型控制元件,具體使用中可以細化一些。
在TImeLine控制元件中我們的Mark是使用的drawable/ic_timeline_default_marker;這個就是一個簡單的圓圈而已;對於自己美化可以使用一張圖片代替或者更加複雜的佈局;當然上面的線條就更加簡單了,就直接使用顏色代替。
<?xml version="1.0" encoding="utf-8"?>
<shape xmlns:android="http://schemas.android.com/apk/res/android"
    android:shape="oval">
    <solid android:color="@color/cyan_500" />
    <stroke
        android:width="1dp"
        android:color="@color/black_alpha_32" />
</shape>
主介面XML RecyclerView
<RelativeLayout xmlns:android="http://schemas.android.com/apk/res/android"
    xmlns:tools="http://schemas.android.com/tools"
    android:layout_width="match_parent"
    android:layout_height="match_parent"
    android:paddingBottom="@dimen/activity_vertical_margin"
    android:paddingLeft="@dimen/activity_horizontal_margin"
    android:paddingRight="@dimen/activity_horizontal_margin"
    android:paddingTop="@dimen/activity_vertical_margin"
    tools:context=".MainActivity">

    <android.support.v7.widget.RecyclerView
        android:id="@+id/time_line_recycler"
        android:layout_width="match_parent"
        android:layout_height="match_parent"
        android:clickable="true"
        android:fadeScrollbars="true"
        android:fadingEdge="none"
        android:focusable="true"
        android:focusableInTouchMode="true"
        android:overScrollMode="never"
        android:scrollbarSize="2dp"
        android:scrollbarThumbVertical="@color/cyan_500"
        android:scrollbars="vertical" />

</RelativeLayout>
在這裡就是加上了一個RecyclerView 控制元件在主介面就OK。
Java程式碼部分
在開始之前先來看看我們的檔案具體有些神馬。
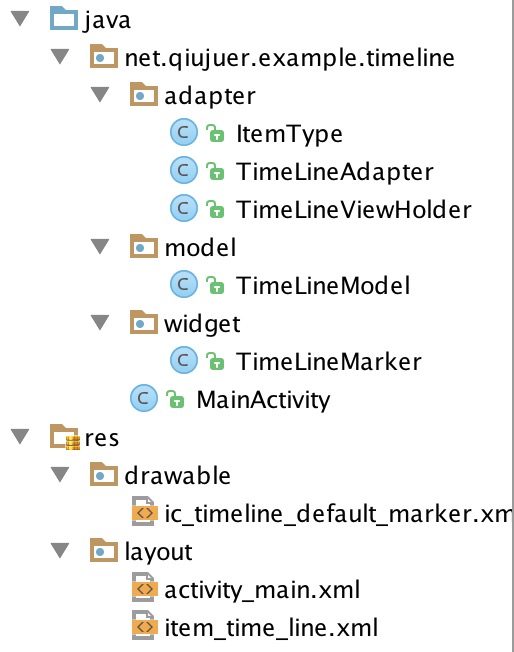
widget中就是具體的自定義控制元件,model是具體的資料模型,adapter部分,這裡有一個Recyclerview的adapter檔案,以及一個具體的Item TimeLineViewHolder,當然在這裡還定義了一個ItemType類,該類用來標示每個Item的型別,比如頭部,第一個,普通,最後一個,底部等等。
TimeLineModel.java
package net.qiujuer.example.timeline.model;

/**
 * Created by qiujuer
 * on 15/8/23.
 */
public class TimeLineModel {
    private String name;
    private int age;

    public TimeLineModel() {

    }

    public TimeLineModel(String name, int age) {
        this.name = name;
        this.age = age;
    }

    public int getAge() {
        return age;
    }

    public String getName() {
        return name;
    }

    public void setAge(int age) {
        this.age = age;
    }

    public void setName(String name) {
        this.name = name;
    }
}
一個名字,一個年齡也就OK。
ItemType.java
package net.qiujuer.example.timeline.adapter;

/**
 * Created by qiujuer
 * on 15/8/23.
 */
public class ItemType {
    public final static int NORMAL = 0;

    public final static int HEADER = 1;
    public final static int FOOTER = 2;

    public final static int START = 4;
    public final static int END = 8;

    public final static int ATOM = 16;
}
分別定義了幾個靜態值,分別代表普通、頭部、底部、開始、結束、原子;當然其中有些可以不用定義。
TimeLineViewHolder.java
package net.qiujuer.example.timeline.adapter;

import android.support.v7.widget.RecyclerView;
import android.view.View;
import android.widget.TextView;

import net.qiujuer.example.timeline.R;
import net.qiujuer.example.timeline.model.TimeLineModel;
import net.qiujuer.example.timeline.widget.TimeLineMarker;

/**
 * Created by qiujuer
 * on 15/8/23.
 */
public class TimeLineViewHolder extends RecyclerView.ViewHolder {
    private TextView mName;

    public TimeLineViewHolder(View itemView, int type) {
        super(itemView);

        mName = (TextView) itemView.findViewById(R.id.item_time_line_txt);

        TimeLineMarker mMarker = (TimeLineMarker) itemView.findViewById(R.id.item_time_line_mark);
        if (type == ItemType.ATOM) {
            mMarker.setBeginLine(null);
            mMarker.setEndLine(null);
        } else if (type == ItemType.START) {
            mMarker.setBeginLine(null);
        } else if (type == ItemType.END) {
            mMarker.setEndLine(null);
        }

    }

    public void setData(TimeLineModel data) {
        mName.setText("Name:" + data.getName() + " Age:" + data.getAge());
    }
}
該檔案為RecyclerView 的Adapter中每個Item需要實現的Holder類。
在該類中,我們在建構函式中需要傳入一個根View同時傳入一個當然item的狀態。
隨後使用find….找到控制元件,在這裡我們把TextView儲存起來,而TimeLineView找到後直接進行初始化設定。
根據傳入的ItemType來判斷是否是第一個,最後一個,以及原子;然後設定TimeLineView的屬性。
在下面的setData方法中我們顯示具體的Model資料。
TimeLineAdapter.java
介面卡部分,我們需要做的工作是;根據具體的資料渲染上對應的介面就OK。
package net.qiujuer.example.timeline.adapter;

import android.support.v7.widget.RecyclerView;
import android.view.LayoutInflater;
import android.view.View;
import android.view.ViewGroup;

import net.qiujuer.example.timeline.R;
import net.qiujuer.example.timeline.model.TimeLineModel;

import java.util.List;

/**
 * Created by qiujuer
 * on 15/8/23.
 */
public class TimeLineAdapter extends RecyclerView.Adapter<TimeLineViewHolder> {
    private List<TimeLineModel> mDataSet;

    public TimeLineAdapter(List<TimeLineModel> models) {
        mDataSet = models;
    }

    @Override
    public int getItemViewType(int position) {
        final int size = mDataSet.size() - 1;
        if (size == 0)
            return ItemType.ATOM;
        else if (position == 0)
            return ItemType.START;
        else if (position == size)
            return ItemType.END;
        else return ItemType.NORMAL;
    }

    @Override
    public TimeLineViewHolder onCreateViewHolder(ViewGroup viewGroup, int viewType) {
        // Create a new view.
        View v = LayoutInflater.from(viewGroup.getContext())
                .inflate(R.layout.item_time_line, viewGroup, false);
        return new TimeLineViewHolder(v, viewType);
    }

    @Override
    public void onBindViewHolder(TimeLineViewHolder timeLineViewHolder, int i) {
        timeLineViewHolder.setData(mDataSet.get(i));
    }

    @Override
    public int getItemCount() {
        return mDataSet.size();
    }
}
在這裡需要著重說一下:我複寫了getItemViewType方法;在該方法中我們需要設定對應的Item的型別;在這裡傳入的是item的座標,需要返回的是item的具體狀態,該狀態標示是int型別;在這裡我使用的是ItemType的靜態屬性。
該方法會在呼叫onCreateViewHolder方法之前呼叫;而onCreateViewHolder方法中的第二個引數int值也就是從getItemViewType之中來;所以我們可以在這裡進行對應的資料狀態標示。
而在onCreateViewHolder方法中我們返回一個:TimeLineViewHolder就OK,隨後在onBindViewHolder方法中進行資料初始化操作。
MainActivity.java
上面所有都準備好了,下面就進行具體的顯示。
在這裡就只貼出核心程式碼了;篇幅也是有些長。
    private RecyclerView mRecycler;

    @Override
    protected void onCreate(Bundle savedInstanceState) {
        super.onCreate(savedInstanceState);
        setContentView(R.layout.activity_main);

        mRecycler = (RecyclerView) findViewById(R.id.time_line_recycler);
        initRecycler();
    }

    private void initRecycler() {
        LinearLayoutManager layoutManager = new LinearLayoutManager(this);
        layoutManager.setOrientation(LinearLayoutManager.VERTICAL);

        TimeLineAdapter adapter = new TimeLineAdapter(getData());

        mRecycler.setLayoutManager(layoutManager);
        mRecycler.setAdapter(adapter);
    }

    private List<TimeLineModel> getData() {
        List<TimeLineModel> models = new ArrayList<TimeLineModel>();

        models.add(new TimeLineModel("XiaoMing", 21));
        models.add(new TimeLineModel("XiaoFang", 20));
        models.add(new TimeLineModel("XiaoHua", 25));
        models.add(new TimeLineModel("XiaoA", 22));
        models.add(new TimeLineModel("XiaoNiu", 23));

        return models;
    }
在這裡就是傻瓜的操作了,流程就是準備好對應的資料,裝進Adapter,準備好對應的佈局方式,然後都設定到RecyclerView中就OK。
效果
來看看具體的效果:
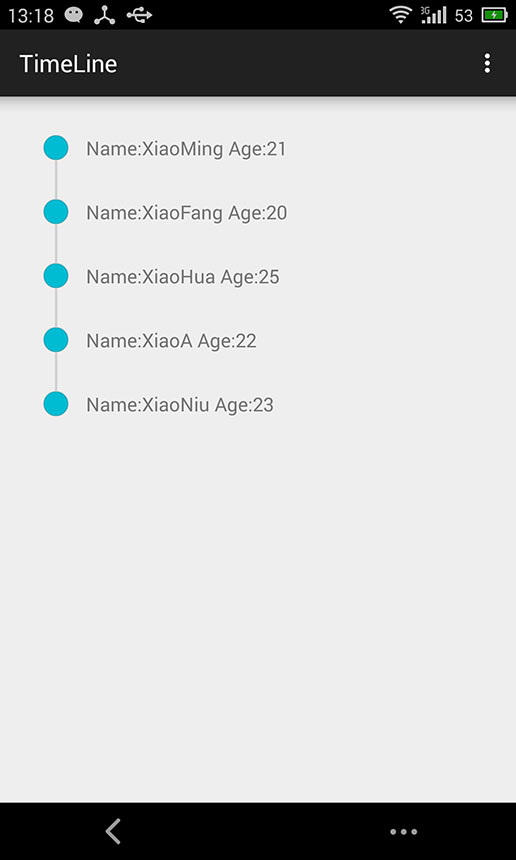
效果雖然簡單,但是也算是五臟具全;其中無非就是控制元件的自定義。這個自定義是可以擴充套件的,大家可以擴充套件為水平方向試試。
程式碼
部落格程式碼都開源到專案中了。
地址:https://github.com/qiujuer/BeFoot/tree/master/blog/sample/TimeLine
寫在最後
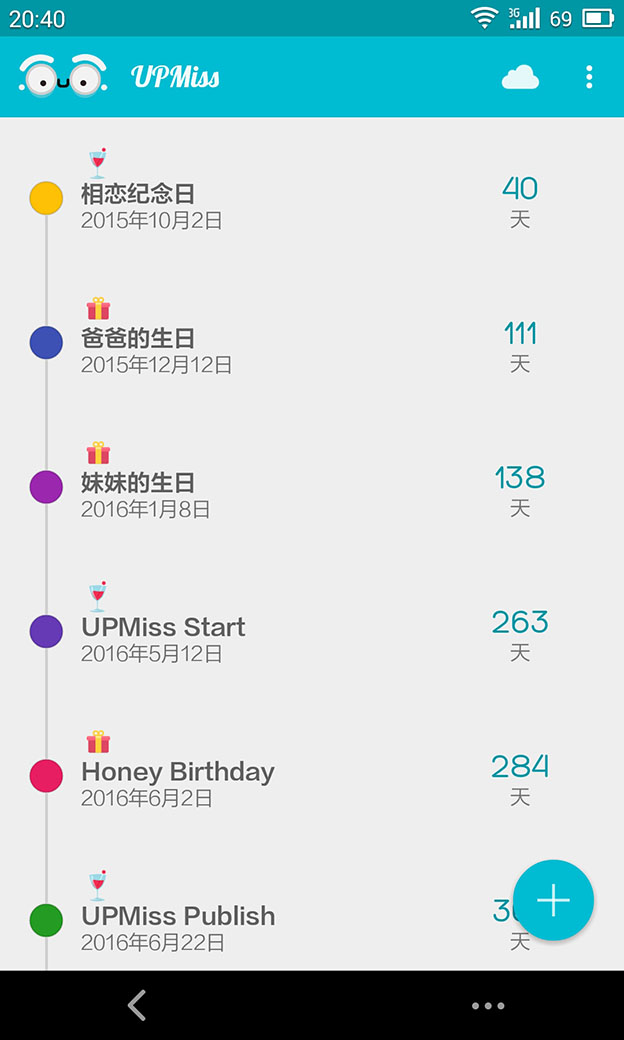
文章的開始截圖來源於:最近沒事兒搗鼓了一個APP[UPMiss],一個簡單的生日,紀念日提醒軟體;歡迎大家嚐鮮。
{UPMiss} 思念你的夏天
下載地址:
========================================================
作者:qiujuer
部落格:blog.csdn.net/qiujuer
網站:www.qiujuer.net
開源庫:github.com/qiujuer/Genius-Android
開源庫:github.com/qiujuer/Blink
轉載請註明出處:http://blog.csdn.net/qiujuer/article/details/47910185
—— 學之開源,用於開源;初學者的心態,與君共勉!
========================================================
相關文章
- Android 時間軸的實現(RecyclerView更簡單)AndroidView
- iOS 實現時間線列表效果iOS
- RecyclerView進階(一)RecyclerView實現雙列表聯動View
- 時間軸的實現(簡單到爆炸)
- Android使用RecyclerView實現二級列表AndroidView
- 用ListView簡單實現滑動列表View
- 超簡單實現iOS列表的索引功能iOS索引
- iOS 實現簡單的列表預載入iOS
- JS 實現在指定的時間點播放列表中的影片JS
- 一個RecyclerView實現多級摺疊列表(二)View
- 一個RecyclerView實現多級摺疊列表(TreeRecyclerView)View
- 簡單實現時間倒數計時與伺服器同步效果伺服器
- 一個簡單的時間視窗設計與實現
- RecyclerView的簡單使用View
- 簡單介紹SpringMVC RESTFul實現列表功能SpringMVCREST
- html裡列表滑動刪除的實現如此簡單HTML
- Pytorch 實現簡單線性迴歸PyTorch
- 時間條控制元件製作簡明教程控制元件
- 一個RecyclerView實現QQ空間相簿佈局View
- ListView 與 RecyclerView 簡單對比View
- iojs的jsdom庫實現同步系統時間簡單程式碼JS
- redis之列表型別(list)——佇列和棧簡單實現Redis型別佇列
- BCB:TEdit控制元件右對齊的簡單實現 (轉)控制元件
- 延時 (遲) 操作的 PHP 簡單實現PHP
- Node中EventEmitter理解與簡單實現MIT
- 從原始碼來看ItemTouchHelper實現RecyclerView列表的拖拽和側滑原始碼View
- 基於 RecyclerView 實現的歌詞滾動自定義控制元件View控制元件
- 用 Rust 實現簡單的光線追蹤Rust
- qt中實現實時的顯示當前時刻的時間QT
- SQL獲取時間列表及月份列表SQL
- 簡單延時訊息替代改造JOB實現
- Android中SharePreferences的簡單實現Android
- js中trim函式的簡單實現JS函式
- javascript時間物件Date常用時間日期函式簡單分享JavaScript物件函式
- iOS中獲取當前時間與簡單的處理iOS
- angular 時間控制元件Angular控制元件
- 列表(recyclerView、listView及其相關)View
- Promise 簡單實現Promise