Android Hal層簡要分析
Android Hal層簡要分析
Android Hal層(即 Hardware Abstraction Layer)是Google開發的Android系統裡上層應用對底層硬體操作遮蔽的一個軟體層次,說直白點,就是上層應用不必關心底層硬體具體是如何工作的,只需要呼叫底層提供的統一介面即可,這種設計思想廣泛的存在於當前的軟體的架構設計裡。個人感覺,以前在Linux系統下學習驅動程式的開發時,當驅動程式完成時,我們會編寫相應的使用者空間測試程式,感覺這就有點類似此處的硬體抽象層的工作,只不過原來是把測試程式用交叉工具鏈編譯成可執行程式然後下載到開發板上進行驗證,而在Android的硬體抽象層中,將測試程式再進行了一次封裝,把測試介面封裝起來傳遞給上一層呼叫,這樣就能隱藏硬體的實現細節和引數。
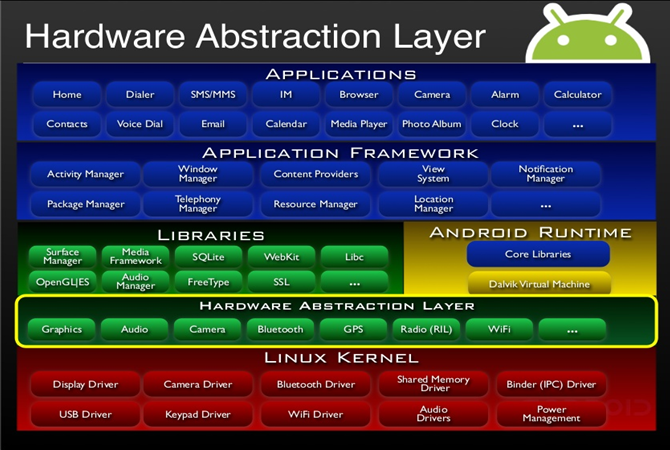
其實Android系統裡完全可以沒有HAL硬體抽象層,上層應用可以直接通過API呼叫到底層硬體,但是Android自出現一直打著開源的旗號,而一些硬體裝置廠商由於商業因素,不希望把自己的核心程式碼開源出來,而只是提供二進位制的程式碼。另外,Android系統裡使用的一些硬體裝置介面可能不是使用的Linux Kernel的統一介面,並且還有GPL版權的原因,所以Google在Android架構裡提出了Hal的概念,這個HAL其實就是獨立的意思,Android系統不僅依賴於某一個具體的硬體驅動,而是依賴於Hal程式碼,這樣,第三方廠商可以將自己不開源的程式碼封裝在HAL層,僅僅提供二進位制程式碼。在具體分析Android硬體抽象層之前,先從下圖瞭解下其在整個Android系統架構中所處的位置:
Android Hal架構分為兩種:
①舊的架構module
②新的架構module stub
下面我們就具體分析下兩種架構各自的特點:
一 Module架構
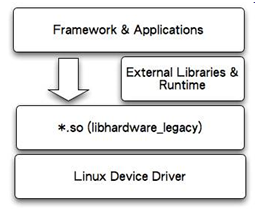
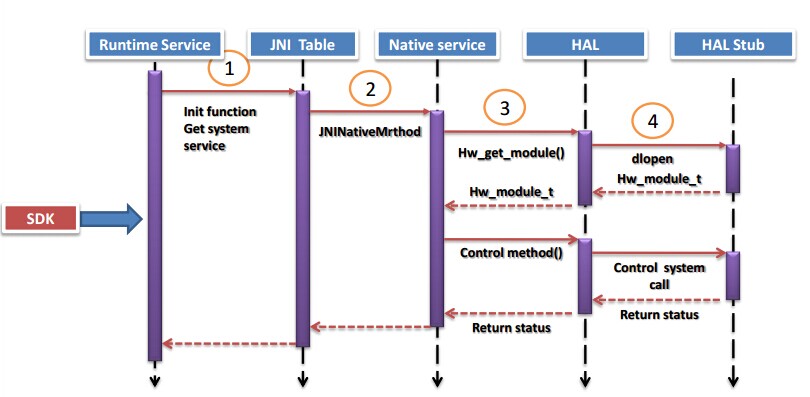
Android使用者應用程式或者框架層程式碼由JAVA實現,Java執行在Dalvik虛擬機器中,沒有辦法直接訪問底層硬體,只能通過呼叫so本地庫程式碼實現,在so原生程式碼裡有對底層硬體操作的程式碼,如下圖所示:
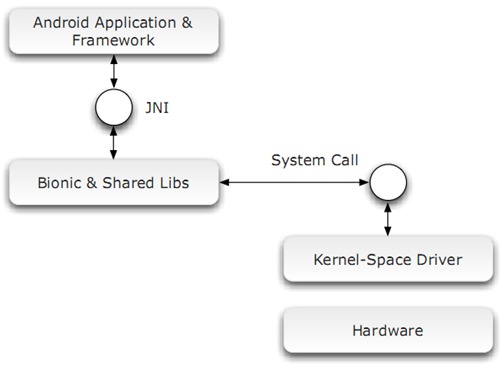
可以這樣說,應用層或者框架層Java程式碼,通過JNI技術呼叫C或C++寫的so庫程式碼,在so庫程式碼中呼叫底層驅動,從而實現上層應用操作底層硬體的目的。實現硬體操作的so庫為module.
其實現流程如下圖所示:
這種設計架構雖然滿足了Java應用訪問硬體的需要,但是,使得我們的程式碼上下層次間的耦合太高,使用者程式或者框架程式碼必須要去載入module庫,如果底層硬體有變化,module要從新編譯,上層也要做相應變化,另外,如果多個應用程式同時訪問硬體,都去載入module,同一module被多個程式對映多次,會有程式碼的重入問題。
二 新的Hal架構:
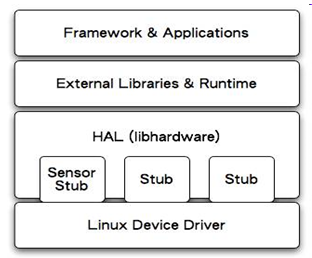
新的程式碼架構使用的是module stub方式.Stub是存根或者樁的意思,其實說白了,就是指一個物件代表的意思。上層應用層或者框架層程式碼載入so庫程式碼,so庫程式碼我們稱之為module,在Hal層註冊了每個硬體物件的存根stub,當上層需要訪問硬體的時候,就從當前註冊的硬體物件stub裡查詢,找到之後stub會向上層module提供該硬體物件的operations interface(操作介面),該操作介面就儲存在module中,上層應用或框架層再通過這個module操作介面來訪問硬體。其架構如下:
以上分別介紹了Module架構和Stub架構,下面做一個對比:
在Module架構中,原生程式碼由so庫實現,上層直接將so庫對映到程式空間,會有程式碼重入及裝置多次開啟的問題。新的Stub框架雖然也要載入module庫,但是這個module已經不包含操作底層硬體驅動的功能了,它裡面儲存的只是底層stub提供的操作介面,底層stub扮演了“介面提供者”的角色,當stub第一次被使用時載入到記憶體,後續再使用時僅返回硬體物件操作介面,不會存在裝置多次開啟的問題,並且由於多程式訪問時返回的只是函式指標,程式碼並沒有重入。
三 Hal Stub框架分析
Hal Stub的框架比較簡單,三個結構體、兩個常量、一個函式,簡稱321架構,它的定義在:
alps/hardware/libhardware/include/hardware/hardware.h
alps/hardware/libhardware/hardware.c
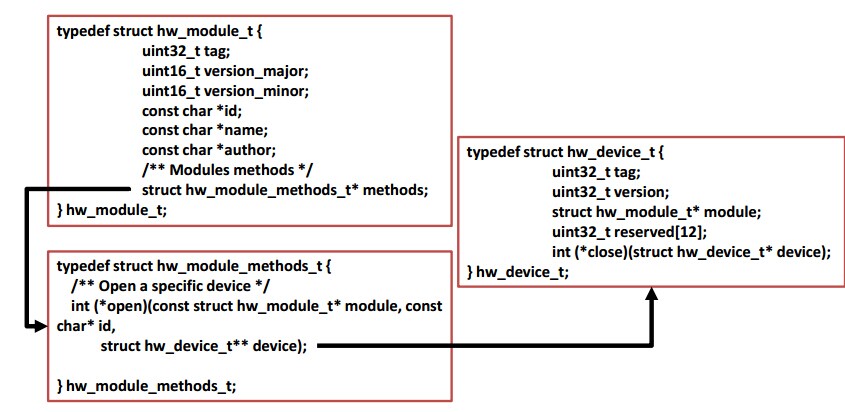
下面我們先看下三個重要的結構體,其包含在hardware.h中:
上述三個結構體之間關係緊密,每個硬體物件都由hw_module_t來描述,只要我們拿到了這個硬體物件,就可以呼叫它的open方法,返回這個硬體物件的硬體操作介面,然後就可以通過這些硬體操作介面來間接操作硬體。只不過,open方法被hw_module_methods_t結構封裝了一次,硬體操作介面被hw_device_t封裝了一次而已。下面這張圖可以反映出它們三者的關係:/** *每一個硬體都通過hw_module_t來描述,我們稱之為一個硬體物件。你可以去"繼承"這個hw_module_t *然後擴充套件自己的屬性,硬體物件必須定義為一個固定的名字HMI,即:Hardware Module Information的簡寫 *每個硬體物件裡都封裝了一個函式指標open用於開啟硬體,我們理解為硬體物件的open方法,open呼叫後 *返回這個硬體對應的操作介面集合 */ typedef struct hw_module_t { /** tag must be initialized to HARDWARE_MODULE_TAG */ uint32_t tag; //該值必須宣告為HARDWARE_MODULE_TAG /** * The API version of the implemented module. The module owner is * responsible for updating the version when a module interface has * changed. * * The derived modules such as gralloc and audio own and manage this field. * The module user must interpret the version field to decide whether or * not to inter-operate with the supplied module implementation. * For example, SurfaceFlinger is responsible for making sure that * it knows how to manage different versions of the gralloc-module API, * and AudioFlinger must know how to do the same for audio-module API. * * The module API version should include a major and a minor component. * For example, version 1.0 could be represented as 0x0100. This format * implies that versions 0x0100-0x01ff are all API-compatible. * * In the future, libhardware will expose a hw_get_module_version() * (or equivalent) function that will take minimum/maximum supported * versions as arguments and would be able to reject modules with * versions outside of the supplied range. */ uint16_t module_api_version; #define version_major module_api_version /** * version_major/version_minor defines are supplied here for temporary * source code compatibility. They will be removed in the next version. * ALL clients must convert to the new version format. */ /** * The API version of the HAL module interface. This is meant to * version the hw_module_t, hw_module_methods_t, and hw_device_t * structures and definitions. * * The HAL interface owns this field. Module users/implementations * must NOT rely on this value for version information. * * Presently, 0 is the only valid value. */ uint16_t hal_api_version; #define version_minor hal_api_version /** Identifier of module */ const char *id; //硬體id名,唯一標識module /** Name of this module */ const char *name; //硬體module的名字 /** Author/owner/implementor of the module */ const char *author; //作者 /** Modules methods */ //指向封裝有open函式指標的結構體 struct hw_module_methods_t* methods; /** module's dso */ void* dso; /** padding to 128 bytes, reserved for future use */ //128位元組補齊 uint32_t reserved[32-7]; } hw_module_t; //硬體物件的open方法描述結構體,它裡面只有一個元素:open函式指標 typedef struct hw_module_methods_t { /** Open a specific device */ int (*open)(const struct hw_module_t* module, const char* id, struct hw_device_t** device); } hw_module_methods_t; /** * Every device data structure must begin with hw_device_t * followed by module specific public methods and attributes. */ //硬體物件hw_module_t的open方法返回該硬體的Operation interface,它由hw_device_t結構體來描述 //我們稱之為該硬體的操作介面 typedef struct hw_device_t { /** tag must be initialized to HARDWARE_DEVICE_TAG */ uint32_t tag; //必須賦值為HARDWARE_DEVICE_TAG /** * Version of the module-specific device API. This value is used by * the derived-module user to manage different device implementations. * * The module user is responsible for checking the module_api_version * and device version fields to ensure that the user is capable of * communicating with the specific module implementation. * * One module can support multiple devices with different versions. This * can be useful when a device interface changes in an incompatible way * but it is still necessary to support older implementations at the same * time. One such example is the Camera 2.0 API. * * This field is interpreted by the module user and is ignored by the * HAL interface itself. */ uint32_t version; //版本號 /** reference to the module this device belongs to */ struct hw_module_t* module; //該裝置屬於哪個硬體物件,可以看成硬體操作介面與硬體物件的聯絡 /** padding reserved for future use */ uint32_t reserved[12]; //位元組補齊 /** Close this device */ int (*close)(struct hw_device_t* device); //該裝置的關閉函式指標 } hw_device_t;
接下來在看321架構中的:兩個符號常量和一個函式:
//HAL Stub物件固定的名字
#define HAL_MODULE_INFO_SYM         HMI

/**
 * Name of the hal_module_info as a string
 */

//字串形式的名字
#define HAL_MODULE_INFO_SYM_AS_STR  "HMI"

/**
 * Get the module info associated with a module by id.
 *
 * @return: 0 == success, <0 == error and *module == NULL
 */
 //通過硬體名來獲得硬體HAL Stub物件
int hw_get_module(const char *id, const struct hw_module_t **module);
使用者程式通過硬體的id名來拿到硬體,下面我們以android平臺下驅動的開發及測試框架概述(二)一文的例子來分析:註冊一個硬體物件的方法其實只需要宣告一個結構體即可,以註冊freg_module_t為例:
我們只需要宣告一個結構體freg_module_t,起名為HAL_MODULE_INFO_SYM,也就是固定的名字:HMI,然後將這個結構體填充好就行。struct freg_module_t HAL_MODULE_INFO_SYM = { common: { tag: HARDWARE_MODULE_TAG, version_major: 1, version_minor: 0, id: FREG_HARDWARE_MODULE_ID, name: MODULE_NAME, author: MODULE_AUTHOR, methods: &freg_module_methods, } //擴充套件屬性 };而freg_module_t結構是“繼承”的hw_module_t型別,建立自己的硬體物件,然後擴充套件自己的特有屬性。 <pre name="code" class="cpp">struct freg_module_t { struct hw_module_t common; };
上面的methods被初始化為freg_module_methods的地址,其結構為hw_methods_t型別的,其宣告程式碼如下:其僅有的open成員是個函式指標,它被指向freg_device_open函式:static struct hw_module_methods_t freg_module_methods = { open: freg_device_open };這個open函式主要做了以下幾件事:static int freg_device_open(const struct hw_module_t* module, const char* id, struct hw_device_t** device) { if(!strcmp(id, FREG_HARDWARE_DEVICE_ID)) { struct freg_device_t* dev; dev = (struct freg_device_t*)malloc(sizeof(struct freg_device_t)); if(!dev) { LOGE("Failed to alloc space for freg_device_t."); return -EFAULT; } memset(dev, 0, sizeof(struct freg_device_t)); dev->common.tag = HARDWARE_DEVICE_TAG; dev->common.version = 0; dev->common.module = (hw_module_t*)module; dev->common.close = freg_device_close; dev->set_val = freg_set_val; dev->get_val = freg_get_val; if((dev->fd = open(DEVICE_NAME, O_RDWR)) == -1) { LOGE("Failed to open device file /dev/freg -- %s.", strerror(errno)); free(dev); return -EFAULT; } *device = &(dev->common); LOGI("Open device file /dev/freg successfully."); return 0; } return -EFAULT; }
1:分配硬體裝置操作結構體freg_device_t,其描述了硬體操作行為
2:初始化freg_device_t的父結構體hw_device_t成員
3:初始化了freg_device_t中的擴充套件的操作介面
4:開啟裝置,將freg_device_t結構體以父結構體型別返回
其中freg_device_t和父結構體hw_device_t的關係:上面所涉及的擴充套件介面不再做進一步分析,其主要作用是直接和底層驅動打交道。struct freg_device_t { struct hw_device_t common; int fd; int (*set_val)(struct freg_device_t* dev, int val); int (*get_val)(struct freg_device_t* dev, int* val); };
小結一下:我們有一個硬體id名,通過這個id呼叫hw_get_module(const char *id, const struct hw_module_t **module)這個函式查詢註冊到當前系統中與id對應的硬體物件並返回,硬體物件裡有個通過hw_module_methods_t結構體封裝的open函式指標,回撥這個open函式,它返回封裝有硬體操作介面的freg_device_t結構體,這樣我們就可以通過這個硬體介面去間接訪問硬體了。可以用下面的圖來描述這個過程:
下面我們再來看hw_get_module這個函式的具體實現,其實現在hardware.c中:
    static const char *variant_keys[] = {
        “ro.hardware”,
        “ro.product.board”,
        “ro.board.platform”,
        “ro.arch”
    };
    // 由上面定義的字串陣列可知,HAL_VARIANT_KEYS_COUNT的值為4
    struct constint HAL_VARIANT_KEYS_COUNT = (sizeof(variant_keys)/sizeof(variant_keys[0]));

    int hw_get_module(const char *id, const struct hw_module_t **module){
        // 呼叫3個引數的hw_get_module_by_class函式
    return hw_get_module_by_class(id, NULL, module);
    }

    int hw_get_module_by_class(const char *class_id, const char *inst,
    const struct hw_module_t **module){
        int status;
        int i;
        // 宣告一個hw_module_t指標變數hmi
        const struct hw_module_t *hmi = NULL;
        char prop[PATH_MAX};
        char path[PATH_MAX];
        char name[PATH_MAX];
        // 由前面呼叫函式可知,inst = NULL,執行else部分,將硬體id名拷貝到name陣列裡
        if(inst)
            snprintf(name, PATH_MAX, “%s.%s”, class_id, inst);
        else
            strlcpy(name, class_id, PATH_MAX);
        // i 迴圈5次
        for(i=0; i<HAL_VARIANT_KEYS_COUNT+1; i++){
            if(i<HAL_VARIANT_KEYS_COUNT){
                // 從系統屬性裡依次查詢前面定義的4個屬性的值,找其中一個後,執行後面程式碼,找不到,進入else部分執行
                if(property_get(variant_keys[i], prop, NULL) == 0){
                    continue;
                }
                // 找到一個屬性值prop後,拼寫path的值為:/vendor/lib/hw/硬體id名.prop.so
                snprintf(path, sizeof(path), “%s/%s.%s.so”,
                    HAL_LIBRARY_PATH2, name, prop);
                if(access(path, R_OK) ==0) break;   // 如果path指向有效的庫檔案,退出for迴圈
                // 如果vendor/lib/hw目錄下沒有庫檔案,查詢/system/lib/hw目錄下有沒有:硬體id名.prop.so的庫檔案
                snprintf(path, sizeof(path), “%s/%s.%s.so”,
                    HAL_LIBRARY_PATH1, name, prop);
                If(access(path, R_OK) == 0) break;
            } else {
                // 如果4個系統屬性都沒有定義,則使用預設的庫名:/system/lib/hw/硬體id名.default.so
                snprintf(path, sizeof(path), “%s/%s.default.so”,
                    HAL_LIBRARY_PATH1, name);
                If(access(path, R_OK) == 0) break;
            }
        }
        status = -ENOENT;
        if(i<HAL_VARIANT_KEYS_COUNT+1){
            status = load(class_id, path, module);  // 難道是要載入前面查詢到的so庫??
        }
        return status;
    }

    static int load(const char *id, counst char *path, const struct hw_module_t **pHmi){
        void *handle;
        struct hw_module_t * hmi;
        // 通過dlopen開啟so庫
        handle = dlopen(path, RTLD_NOW);
        // sym的值為”HMI”,這個名字還有印象嗎?
        const char * sym = HAL_MODULE_INFO_SYM_AS_STR;
        // 通過dlsym從開啟的庫裡查詢”HMI”這個符號,如果在so程式碼裡有定義的函式名或變數名為HMI,dlsym返回其地址hmi,將該地址轉化成hw_module_t型別,即,硬體物件,這招夠狠,“殺雞取卵”
        hmi = (struct hw_module_t *)dlsym(handle, sym);
        // 判斷找到的硬體物件的id是否和要查詢的id名一致,不一致出錯退出
    // 取了卵還要驗證下是不是自己要的“卵”
        if(strcmp(id, hmi->) != 0){
            // 出錯退出處理
        }
        // 將庫的控制程式碼儲存到hmi硬體物件的dso成員裡
        hmi->dso = handle;
        // 將硬體物件地址送給load函式者,最終將硬體物件返回到了hw_get_module的呼叫者
        *pHmi = hmi;
        // 成功返回
    }
通過上面程式碼的註釋分析可知,硬體物件宣告的結構體程式碼被編譯成了so庫,由於該結構體宣告為const型別,被so庫包含在其靜態程式碼段裡,要找到硬體物件,首先要找到其對應的so庫,再通過dlopen,dlsym這種“殺雞取卵”的方式找到硬體物件,當然這兒的:“雞”是指:so庫,“卵”即硬體物件led_module_t結構。
在宣告結構體freg_module_t時,其名字統一定義為了HMI,而這麼做的目的就是為了通過dlsym來查詢Freg HAL Stub原始碼生成的so庫裡的”HMI”符號。現在很明顯了,我們寫的HAL Stub程式碼最終要編譯so庫檔案,並且庫檔名為:freg.default.so(當然可以設定四個系統屬性之一來指定名字為:freg.屬性值.so),並且庫的所在目錄為:/system/lib/hw/。
Android Hal層簡要分析大致都這樣了。
參考博文:http://blog.csdn.net/mr_raptor/article/details/8074549

相關文章
- android音訊hal層簡介Android音訊
- Android HAL 層框架分析以及程式碼示例Android框架
- android HAL層程式碼Android
- Android Framework 音訊子系統(12)HAL層分析AndroidFramework音訊
- Android中HAL如何向上層提供介面總結Android
- 硬體抽象層:HAL抽象
- Android硬體抽象層(HAL)模組編寫規範Android抽象
- android藍芽hal層程式碼跟蹤記錄Android藍芽
- HAL 硬體抽象層介紹抽象
- 拋棄硬體抽象層 (HAL)抽象
- Android 11(R) Power HAL AIDL簡析 -- 基本介面AndroidAI
- 簡要分析Android手機為啥不好用?Android
- 磁碟原理簡要分析
- android gps機制分析--定位資料HAL處理Android
- Access Animation破解的簡要分析
- Multidex(分包)實現簡要分析IDE
- spycop5.5簡要註冊分析
- 夢想CMS(lmxcms)1.4 簡要分析
- Android HAL模組的載入過程Android
- Android Thermal HAL 降龍十八掌Android
- gfx-hal Texture操作原始碼簡析原始碼
- AsyncTask與Thread+Handler簡要分析thread
- 【Camera專題】Qcom-Camera驅動框架淺析(Hal層->Driver層)框架
- Flutter之Android層面原始碼分析(一)FlutterAndroid原始碼
- 【Camera專題】你應該熟悉的Camera驅動框架一(Hal層->kernel層)框架
- hashCode()方法原始碼執行簡要分析原始碼
- linux程式管理子系統簡要分析Linux
- 一個android 的HAL示例中遇到的坑。Android
- HAL stub
- 簡單演算法---A Speeder V2.5破解的簡要分析!演算法
- 簡要分析Hacking Team 遠端控制系統
- 圖靈4本新書版式的簡要分析圖靈新書
- ORACLE關於執行計劃的簡要分析Oracle
- 影像處理軟體XFader的簡要分析
- 一隻android簡訊控制馬的簡單分析Android
- Android音訊驅動學習(一) Audio HALAndroid音訊
- Android Compose 入門,深入底層原始碼分析Android原始碼
- 簡要分析ZooKeeper基本原理及安裝部署