語音聊天室,或多人語音聊天,是即時通訊應用中常見的功能之一,比如,QQ的語音討論組就是我們用得比較多的。
這篇文章將實現一個簡單的語音聊天室,讓多個人可以進入同一個房間進行語音溝通。先看執行效果截圖:

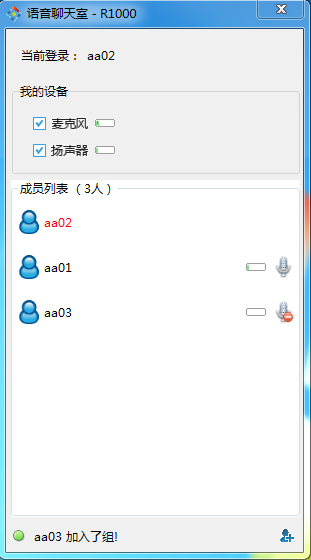
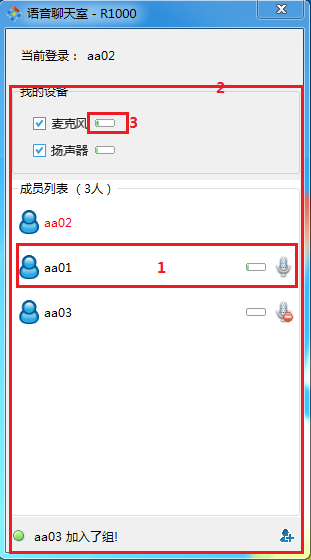
從左到右的三張圖分別是:登入介面、語音聊天室的主介面、標註了各個控制元件的主介面。
(如果覺得介面太醜,沒關係,後面下載原始碼後,你可以自己美化~~)
一. C/S結構
很明顯,我這個語音聊天室採用的是C/S結構,整個專案結構相對比較簡單,如下所示:
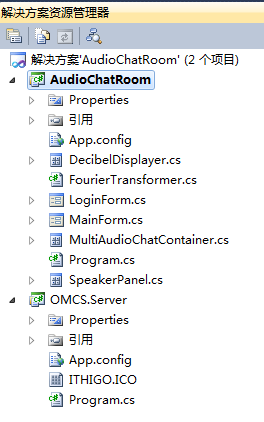
該專案的底層是基於OMCS構建的。這樣,服務端就基本沒寫程式碼,直接把OMCS服務端拿過來用;客戶端就比較麻煩些,下面我就重點講客戶端的開發。
二. 客戶端控制元件式開發
客戶端開發了多個自定義控制元件,然後將它們組裝到一起,以完成語音聊天室的功能。為了便於講解,我主介面的圖做了標註,以指示出各個自定義控制元件。
現在我們分別介紹各個控制元件:
1. 分貝顯示器
分貝顯示器用於顯示聲音的大小,比如麥克風採集到的聲音的大小,或揚聲器播放的聲音的大小。如上圖中3標註的。
(1)傅立葉變換
將聲音資料轉換成分貝強度使用的是傅立葉變換。其對應的是客戶端專案中的FourierTransformer靜態類。原始碼比較簡單,就不貼出來了,大家自己去看。
(2)聲音強度顯示控制元件 DecibelDisplayer
DecibelDisplayer 使用的是PrograssBar來顯示聲音強度的大小。
每當有聲音資料交給DecibelDisplayer顯示時,首先,DecibelDisplayer會呼叫上面的傅立葉變換將其轉換為分貝,然後,將其對映為PrograssBar的對應的Value。
2.發言者控制元件 SpeakerPanel
SpeakerPanel 用於表示聊天室中的一個成員,如上圖中1所示。它顯示了成員的ID,成員的聲音的強度(使用DecibelDisplayer控制元件),以及其麥克風的狀態(啟用、引用)。
這個控制元件很重要,我將其原始碼貼出來:
    public partial class SpeakerPanel : UserControl ,IDisposable
    {
        private ChatUnit chatUnit;

        public SpeakerPanel()
        {
            InitializeComponent();
            this.SetStyle(ControlStyles.ResizeRedraw, true);//調整大小時重繪
            this.SetStyle(ControlStyles.OptimizedDoubleBuffer, true);// 雙緩衝
            this.SetStyle(ControlStyles.AllPaintingInWmPaint, true);// 禁止擦除背景.
            this.SetStyle(ControlStyles.UserPaint, true);//自行繪製
            this.UpdateStyles();
        }

        public string MemberID
        {
            get
            {
                if (this.chatUnit == null)
                {
                    return null;
                }

                return this.chatUnit.MemberID;
            }
        }

        public void Initialize(ChatUnit unit)
        {
            this.chatUnit = unit;
            this.skinLabel_name.Text = unit.MemberID;

            this.chatUnit.MicrophoneConnector.ConnectEnded += new CbGeneric<OMCS.Passive.ConnectResult>(MicrophoneConnector_ConnectEnded);
            this.chatUnit.MicrophoneConnector.OwnerOutputChanged += new CbGeneric(MicrophoneConnector_OwnerOutputChanged);
            this.chatUnit.MicrophoneConnector.AudioDataReceived += new CbGeneric<byte[]>(MicrophoneConnector_AudioDataReceived);
            this.chatUnit.MicrophoneConnector.BeginConnect(unit.MemberID);
        }

        public void Initialize(string curUserID)
        {
            this.skinLabel_name.Text = curUserID;
            this.skinLabel_name.ForeColor = Color.Red;
            this.pictureBox_Mic.Visible = false;
            this.decibelDisplayer1.Visible = false;
        }

        void MicrophoneConnector_AudioDataReceived(byte[] data)
        {
            this.decibelDisplayer1.DisplayAudioData(data);
        }

        void MicrophoneConnector_OwnerOutputChanged()
        {
            if (this.InvokeRequired)
            {
                this.BeginInvoke(new CbGeneric(this.MicrophoneConnector_OwnerOutputChanged));
            }
            else
            {
                this.ShowMicState();
            }
        }

        private ConnectResult connectResult;
        void MicrophoneConnector_ConnectEnded(ConnectResult res)
        {
            if (this.InvokeRequired)
            {
                this.BeginInvoke(new CbGeneric<ConnectResult>(this.MicrophoneConnector_ConnectEnded), res);
            }
            else
            {
                this.connectResult = res;
                this.ShowMicState();
            }
        }

        public void Dispose()
        {
            this.chatUnit.Close();
        }

        private void ShowMicState()
        {
            if (this.connectResult != OMCS.Passive.ConnectResult.Succeed)
            {
                this.pictureBox_Mic.BackgroundImage = this.imageList1.Images[2];
                this.toolTip1.SetToolTip(this.pictureBox_Mic, this.connectResult.ToString());
            }
            else
            {
                this.decibelDisplayer1.Working = false;
                if (!this.chatUnit.MicrophoneConnector.OwnerOutput)
                {
                    this.pictureBox_Mic.BackgroundImage = this.imageList1.Images[1];
                    this.toolTip1.SetToolTip(this.pictureBox_Mic, "好友禁用了麥克風");
                    return;
                }

                if (this.chatUnit.MicrophoneConnector.Mute)
                {
                    this.pictureBox_Mic.BackgroundImage = this.imageList1.Images[1];
                    this.toolTip1.SetToolTip(this.pictureBox_Mic, "靜音");
                }
                else
                {
                    this.pictureBox_Mic.BackgroundImage = this.imageList1.Images[0];
                    this.toolTip1.SetToolTip(this.pictureBox_Mic, "正常");
                    this.decibelDisplayer1.Working = true;
                }
            }

        }

        private void pictureBox_Mic_Click(object sender, EventArgs e)
        {
            if (!this.chatUnit.MicrophoneConnector.OwnerOutput)
            {
                return;
            }

            this.chatUnit.MicrophoneConnector.Mute = !this.chatUnit.MicrophoneConnector.Mute;
            this.ShowMicState();
        }
    }
(1)在程式碼中,ChatUnit就代表當前這個聊天室中的成員。我們使用其MicrophoneConnector連線到目標成員的麥克風。
(2)預定MicrophoneConnector的AudioDataReceived事件,當收到語音資料時,將其交給DecibelDisplayer去顯示聲音的大小。
(3)預定MicrophoneConnector的ConnectEnded和OwnerOutputChanged事件,根據其結果來顯示SpeakerPanel空間上麥克風圖示的狀態(對應ShowMicState方法)。
3. MultiAudioChatContainer 控制元件
MultiAudioChatContainer對應上圖中2標註的控制元件,它主要做了以下幾件事情:
(1)在初始化時,加入聊天室:通過呼叫IMultimediaManager的ChatGroupEntrance屬性的Join方法。
(2)使用FlowLayoutPanel將聊天室中每個成員對應的SpeakerPanel羅列出來。
(3)當有成員加入或退出聊天室時(對應ChatGroup的SomeoneJoin和SomeoneExit事件),動態新增或移除對應的SpeakerPanel例項。
(4)通過CheckBox將自己裝置(麥克風和揚聲器)的控制權暴露出來。我們可以啟用或禁用我們自己的麥克風或揚聲器。
(5)注意,其提供了Close方法,這意味著,在關閉包含了該控制元件的宿主窗體時,要呼叫其Close方法以釋放其內部持有的麥克風聯結器等資源。
在完成MultiAudioChatContainer後,我們這個聊天室的核心就差不多了。接下來就是弄個主窗體,然後把MultiAudioChatContainer拖上去,初始化IMultimediaManager,並傳遞給MultiAudioChatContainer就大功告成了。
三. 原始碼下載
上面只是講了實現多人語音聊天室中的幾個重點,並不全面,大家下載下面的原始碼可以更深入的研究。
最後,跟大家說說部署的步驟:
(1)將服務端部署在一臺機器上,啟動服務端。
(2)修改客戶端配置檔案中的ServerIP為剛才伺服器的IP。
(3)在多臺機器上執行客戶端,以不同的帳號登入到同一個房間(如預設的R1000)。
(4)如此,多個使用者就處於同一個聊天室進行語音聊天了。
敬請了解:
ESFramework通訊框架 OMCS網路語音視訊框架 MFile語音視訊錄製元件 MCapture語音視訊採集元件 StriveEngine輕量級通訊引擎 OAUS 自動升級系統