本篇和大家分享的是一個 併發請求工具,併發往往代表的就是壓力,對於一些訂單量比較多的公司這種情況很普遍,也因此出現了很多應對併發的解決方案如:分散式,佇列,資料庫鎖等;
對於沒有遇到過或者不可能線上來處理併發問題的我們來說,需要模擬這種環境,不錯這就是寫併發請求工具的目的:
. 對於api介面做併發請求
. NetCore來寫的能跨平臺執行
. 允許配置多個目標地址,進行同時併發請求
. 支援Get,Post請求方式(post引數支援:xml,json格式)
工具設計的原理
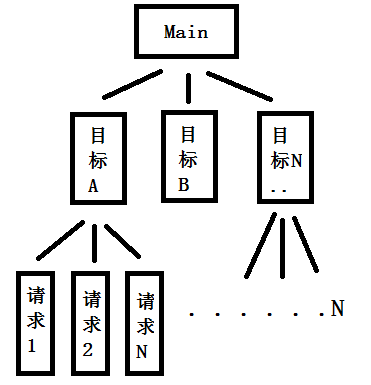
工具的全部程式碼都開源至:https://github.com/shenniubuxing3/PressureTool(不妨標個*),下面將舉例演示如何使用;工具設計的原理主要採用Task,通過配置目標地址,請求數量來拆分成多個Task,以此完成並行的請求:

由上圖可以看出,該工具主要有3層樹形結構,最底層是真實發出對目標url地址的請求,使用的Task,Task對於多核CPU來說效果更顯著;在講解例子前咋們先來看看配置檔案對應的實體類:
 1 #region 配置資訊
 2
 3         public class MoToolConf
 4         {
 5             /// <summary>
 6             /// 執行結果日誌記錄路徑(全域性,預設程式根目錄)
 7             /// </summary>
 8             public string ResultLogPath { get; set; }
 9
10             /// <summary>
11             /// 多個任務
12             /// </summary>
13             public List<MoTaskInfo> MoTaskInfoes { get; set; }
14         }
15
16         /// <summary>
17         /// 任務資訊
18         /// </summary>
19         public class MoTaskInfo
20         {
21
22             /// <summary>
23             /// 請求方式,目前支援:httpget,httppost
24             /// </summary>
25             public string Method { get; set; }
26
27             /// <summary>
28             /// 請求地址
29             /// </summary>
30             public string Url { get; set; }
31
32             /// <summary>
33             /// 連線數
34             /// </summary>
35             public int LinkNum { get; set; }
36
37             /// <summary>
38             /// 引數(post使用)
39             /// </summary>
40             public string Param { get; set; }
41
42             /// <summary>
43             /// 執行結果日誌記錄路徑(私有>全域性)
44             /// </summary>
45             public string ResultLogPath { get; set; }
46         }
47         #endregion
httpget請求的配置
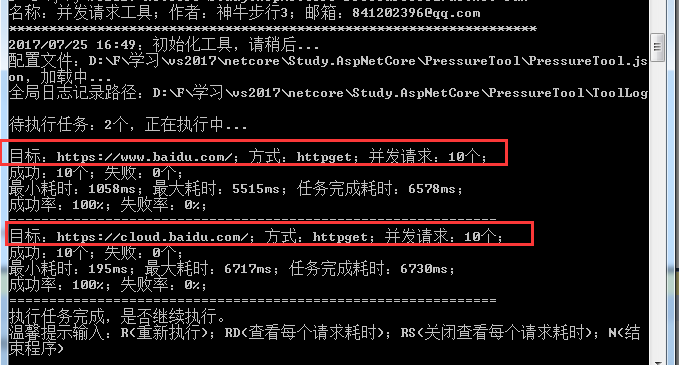
首先我們需要在根目錄下找到配置檔案:PressureTool.json,然後配置成如下get請求設定:
{
  "ResultLogPath": "",//預設不設定,日誌記錄在根目錄
  "MoTaskInfoes": [
    {
      "Method": "httpget",
      "Url": "https://www.baidu.com/",
      "LinkNum": 10,
      "Param": "",
      "ResultLogPath": ""
    },
    {
      "Method": "httpget",
      "Url": "https://cloud.baidu.com/",
      "LinkNum": 10,
      "Param": "",
      "ResultLogPath": ""
    }
  ]
}
httpget應該是最簡單的請求方式了,如果你需要傳遞什麼引數,就直接往您url上追加就行了,get請求方式是用不到Param引數的:

httppost請求的配置 - 引數為json
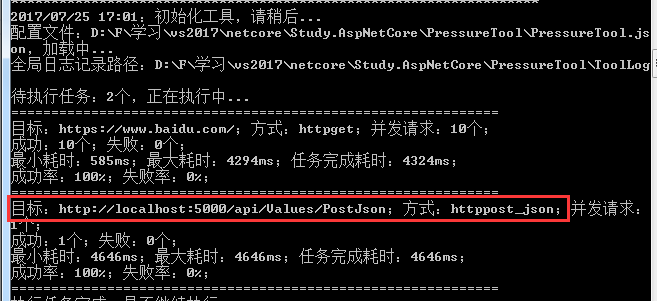
post的配置與get不同的是設定不同的Method引數( "Method": "httppost_json" ),並且如果你有引數那麼還需要配置Param節點( "Param": "{\"Number\": 1,\"Name\": \"張三\"}" ),參考如下配置:
{
  "ResultLogPath": "", //預設不設定,日誌記錄在根目錄
  "MoTaskInfoes": [
    {
      "Method": "httpget",
      "Url": "https://www.baidu.com/",
      "LinkNum": 10,
      "Param": "",
      "ResultLogPath": ""
    },
    {
      "Method": "httppost_json",
      "Url": "http://localhost:5000/api/Values/PostJson",
      "LinkNum": 1,
      "Param": "{\"Number\": 1,\"Name\": \"張三\"}",
      "ResultLogPath": ""
    }
  ]
}
這裡為了測試我寫了一個簡單的api介面,分別接收json和xml的引數,測試api介面程式碼如下:
 1 [Route("api/[controller]/[action]")]
 2     public class ValuesController : Controller
 3     {
 4         public static List<MoStudent> _students = new List<MoStudent>();
 5
 6         // GET api/values
 7         [HttpGet]
 8         public async Task<MoBaseResponse> Get()
 9         {
10
11             return new MoBaseResponse { Data = _students };
12         }
13
14         // GET api/values/5
15         [HttpGet("{id}")]
16         public string Get(int id)
17         {
18             return "value";
19         }
20
21         // POST api/values
22         [HttpPost]
23         public MoBaseResponse PostJson([FromBody]MoStudent student)
24         {
25             var response = new MoBaseResponse() { Msg = "新增失敗" };
26             if (student == null) { return response; }
27
28             _students.Add(student);
29             response.Msg = "新增成功";
30             response.Status = 1;
31
32             return response;
33         }
34
35         [HttpPost]
36         public async Task<MoBaseResponse> PostXml()
37         {
38             var response = new MoBaseResponse() { Msg = "新增失敗" };
39             var strReq = string.Empty;
40             using (var stream = Request.Body)
41             {
42                 using (var reader = new StreamReader(stream))
43                 {
44                     strReq = await reader.ReadToEndAsync();
45                 }
46             }
47
48             if (string.IsNullOrWhiteSpace(strReq)) { return response; }
49
50             var match = Regex.Match(strReq, "<Number>(?<number>[^<]+)</Number>[^<]*<Name>(?<name>[^<]+)</Name>");
51             if (match == null || match.Groups.Count <= 0) { return response; }
52
53             var student = new MoStudent();
54             student.Number = Convert.ToInt32(match.Groups["number"].Value);
55             student.Name = match.Groups["name"].Value;
56             _students.Add(student);
57
58             response.Msg = "新增成功";
59             response.Status = 1;
60             return response;
61         }
62     }
63
64     public class MoBaseResponse
65     {
66         public int Status { get; set; }
67
68         public string Msg { get; set; }
69
70         public object Data { get; set; }
71     }
72
73     public class MoStudent
74     {
75         public int Number { get; set; }
76
77         public string Name { get; set; }
78     }
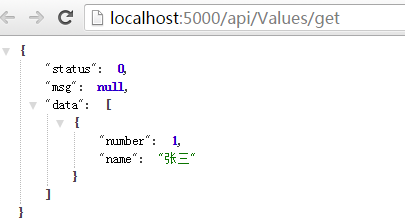
我們往測試api地址 http://localhost:5000/api/Values/PostJson 發出請求,傳遞學生基本資訊引數,然後通過api的get介面看看效果:

這裡演示的只請求一次api,如果你想測試你自己api介面併發情況,你可以設定引數: "LinkNum": 10 或者跟多:

httppost請求的配置 - 引數為xml
post方式傳遞xml引數的配置和json差不多,需要注意的是需要修改Method( "Method": "httppost_xml" ),因為工具吧xml和json的配置區分開了,下面來演示下json和xml分別配置5次請求數的效果:

然後通過api的get介面獲取下效果:

好了到這裡演示就完了,如果您覺得該工具可以你可以去git原始碼:https://github.com/shenniubuxing3/PressureTool ,或者加入 NineskyQQ官方群:428310563 獲取Framework版本的工具。