微信小程式開發之從相簿獲取圖片 使用相機拍照 本地圖片上傳
http://blog.csdn.net/qq_31383345/article/details/53014610
今天遇到微信小程式的使用者頭像設定功能,做筆記.
先上gif:
再上程式碼:
小demo,程式碼很簡單.
1.index.wxml
<!--index.wxml-->
<button style="margin:30rpx;" bindtap="chooseimage">獲取圖片</button>
<image src="{{tempFilePaths }}" mode="aspecFill" style="width: 100%; height: 450rpx"/>
2.index.js
//index.js
//獲取應用例項
var app = getApp()
Page({
  data: {
    tempFilePaths: ''
  },
  onLoad: function () {
  },
  chooseimage: function () {
    var _this = this;
    wx.chooseImage({
      count: 1, // 預設9
      sizeType: ['original', 'compressed'], // 可以指定是原圖還是壓縮圖,預設二者都有
      sourceType: ['album', 'camera'], // 可以指定來源是相簿還是相機,預設二者都有
      success: function (res) {
        // 返回選定照片的本地檔案路徑列表,tempFilePath可以作為img標籤的src屬性顯示圖片
        _this.setData({
          tempFilePaths:res.tempFilePaths
        })
      }
    })
  }
})
API 說明:
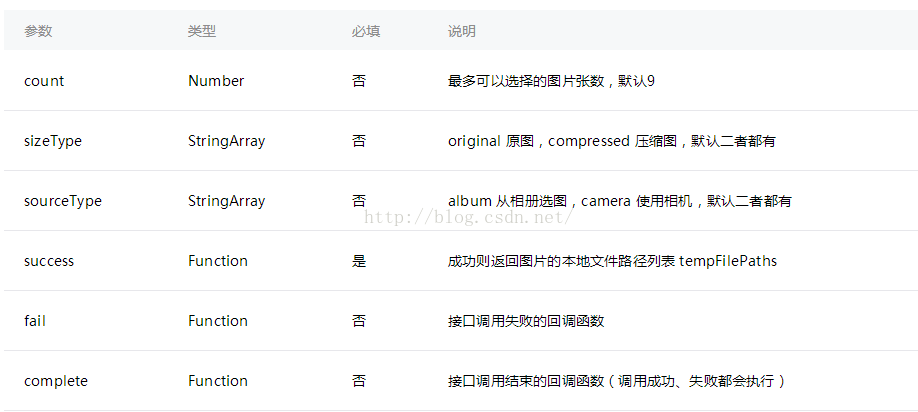
這裡說說sourcetype.預設是從相簿獲取和使用相機拍照,跟微信現在選擇圖片的介面一樣,第一格是拍照,後面的是相簿照片.
這裡注意:返回的是圖片在本地的路徑.如果需要將圖片上傳到伺服器,需要用到另一個API.
示例程式碼:
wx.chooseImage({
  success: function(res) {
    var tempFilePaths = res.tempFilePaths
    wx.uploadFile({
      url: 'http://example.weixin.qq.com/upload', //僅為示例,非真實的介面地址
      filePath: tempFilePaths[0],
      name: 'file',
      formData:{
        'user': 'test'
      },
      success: function(res){
        var data = res.data
        //do something
      }
    })
  }
})
相關文章
- Android本地圖片上傳(拍照+相簿)Android地圖
- Android中使用封裝的OKHttp上傳圖片,從相機和相簿中獲取圖片並剪下Android封裝HTTP
- Android上傳圖片之呼叫系統拍照和從相簿選擇圖片Android
- 獲取本地圖片或拍照,進行頭像圖片的上傳的工具類地圖
- 微信小程式 圖片上傳微信小程式
- Android 從手機相簿獲取圖片 uri 路徑 從相機獲取照片Android
- Uniapp開發微信小程式+Node ---- 圖片上傳APP微信小程式
- 微信小程式-拍照或選擇圖片並上傳檔案微信小程式
- 仿微信圖片選取、相機拍照—PhotoPicker(已整合GalleryView)View
- 微信小程式上傳圖片至七牛微信小程式
- 微信小程式開發-canves 圖片壓縮 獲取base64微信小程式
- android短視訊開發,呼叫相機、相簿,壓縮圖片後上傳Android
- 微信小程式 實現網路圖片本地快取微信小程式快取
- 小程式開發:上傳圖片到騰訊雲
- Android 從本地選取圖片或者拍照填充ImageViewAndroidView
- 微信小程式開發:上傳網路圖片到阿里雲oss微信小程式阿里
- 微信小程式圖片使用示例微信小程式
- 獲取本地圖片/視訊地圖
- 微信小程式簡單封裝圖片上傳元件微信小程式封裝元件
- 利用微信公眾號提供的官方API上傳圖片獲取永久圖片素材!當圖床用!API圖床
- php圖片上傳之圖片轉換PHP
- 微信小程式根據本地快取圖片路徑,生成縮圖的方法微信小程式快取
- 服務端使用 nodejs 獲取帶參微信小程式碼圖片服務端NodeJS微信小程式
- Android開發獲取相機拍照的原圖(並非縮圖)Android
- java,springboot + thymeleaf 上傳圖片、刪除圖片到伺服器、本地,壓縮圖片上傳(有些圖片會失真),原圖上傳JavaSpring Boot伺服器
- 微信小程式[第十一篇] -- 新增照片(小程式圖片上傳功能)微信小程式
- H5 和小程式拍照圖片旋轉、壓縮和上傳H5
- Android 之 遠端圖片獲取和本地快取Android快取
- 上傳圖片本地預覽例項程式碼
- Android 自定義本地圖片載入庫,仿微信相簿Android地圖
- 讀取本地圖片地圖
- android選擇圖片或拍照圖片上傳到伺服器(包括上傳引數)Android伺服器
- js獲取上傳圖片尺寸和格式程式碼例項JS
- 【API】隨機獲取圖片API隨機
- 微信小程式之裁剪圖片成圓形微信小程式
- 直播原始碼搭建教程之獲取相簿中的指定一個圖片後上傳原始碼
- WebRTC從攝像頭獲取圖片傳入canvasWebCanvas
- 微信小程式(canvas)畫圖儲存到本地相簿(wepy)微信小程式Canvas