BIEE建立DB認證的AuthProvider
BIEE建立Database認證的Authentication Provider
需求
通過資料庫表格來儲存使用者名稱,密碼和Group關係,然後將使用者相關表格在RPD建模,釋出到前端支援回寫,使管理員能夠在analytics中管理使用者,同時支援使用者在analytics中自己修改登入口令。
以下文件基於BIEE官方安全文件及metalink相關問題解決文件,並進行適當修改。
Configuring a Database as the Authentication Provider
資料庫後設資料建立
先建立資料庫需要使用的後設資料,插入基本資料。
Create user bi_auth identified by bi_auth account unlock;
Grant dba to bi_auth;
Conn bi_auth/bi_auth;
create table USERS(U_NAME varchar2(100),U_PASSWORD varchar2(100),U_DESCRIPTION varchar2(100));
create table GROUPS(G_NAME varchar2(100),G_DESCRIPTION varchar2(100));
create table GROUPMEMBERS(G_NAME varchar2(100),G_MEMBER varchar2(100));
insert into groups(g_name) values('AdminChannelUsers');
insert into groups(g_name) values('Administrators');
insert into groups(g_name) values('AppTesters');
insert into groups(g_name) values('BIAdministrators');
insert into groups(g_name) values('CrossDomainConnectot');
insert into groups(g_name) values('Deployers');
insert into groups(g_name) values('BIAuthors');
insert into groups(g_name) values('BIConsumers');
insert into groups(g_name) values('Monitors');
insert into groups(g_name) values('Operators');
insert into groups(g_name) values('OracleSystemGroup');
insert into USERS (U_NAME,U_PASSWORD,U_DESCRIPTION) values('ZC','zc123456','');
insert into GROUPS (G_NAME,G_DESCRIPTION) values('Administrators','Administrators');
insert into GROUPMEMBERS (G_NAME,G_MEMBER) values('Administrators','ZC');
commit;
CREATE OR REPLACE VIEW users_vw AS SELECT U_NAME, U_PASSWORD, RPAD(U_NAME, 16, '0') AS GUID FROM users;
注:注意紅色字型部分,因為BIEE認證需要guid保證16位長度,所以建立USERS_VW並生成16進位制的GUID欄位。
Configuring a Data Source Using the Oracle WebLogic Server Administration Console
To configure a data source using the Oracle WebLogic Server Administration Console:
-
Log in to Oracle WebLogic Server Administration Console, and click Lock & Edit in the Change Center.
-
Click Services in the left pane and click Data Sources.
-
In the Summary of Data Sources page, click New, and select Generic Data Source.
-
In the JDBC Data Sources Properties page, enter or select values for the following properties:
-
Name - For example, enter: UserGroupDS
-
JNDI Name - For example, enter: jdbc/UserGroupDS
-
Database Type - For example, select: Oracle
-
-
Click Next.
-
Select a database driver from the Database Driver drop down list.
For example, select: Oracle's Driver (Thin) for Service Connections; Releases:9.0.1 and later
-
Click Next.
-
Click Next.
-
On the Connection Properties page, enter values for the following properties:
-
Database Name - For example, enter: ora11g
-
Host Name - For example, enter: mymachine.example.com
-
Port - For example, enter: 1521
-
Database User Name
-
Password/Confirm Password
-
-
Click Next.
-
Check the details on the page are correct, and click Test Configuration.
-
Click Next.
-
In the Select Targets page select the servers or clusters for deploying the data source.
You should select the Administration Server and Managed server as your targets, for example:Select the AdminServer check box.
-
Click Finish.
-
In the Change Center, click Activate Changes.
-
Restart Oracle WebLogic Server.
Configuring a SQL Authenticator Using the Oracle WebLogic Server Administration Console
This task enables a suitably privileged user to log in to the Oracle WebLogic Server Administration Console using the WebLogic database authenticator.
To configure a SQL authenticator using the Oracle WebLogic Server Administration Console:
-
Log in to Oracle WebLogic Server Administration Console, and click Lock & Edit in the Change Center.
-
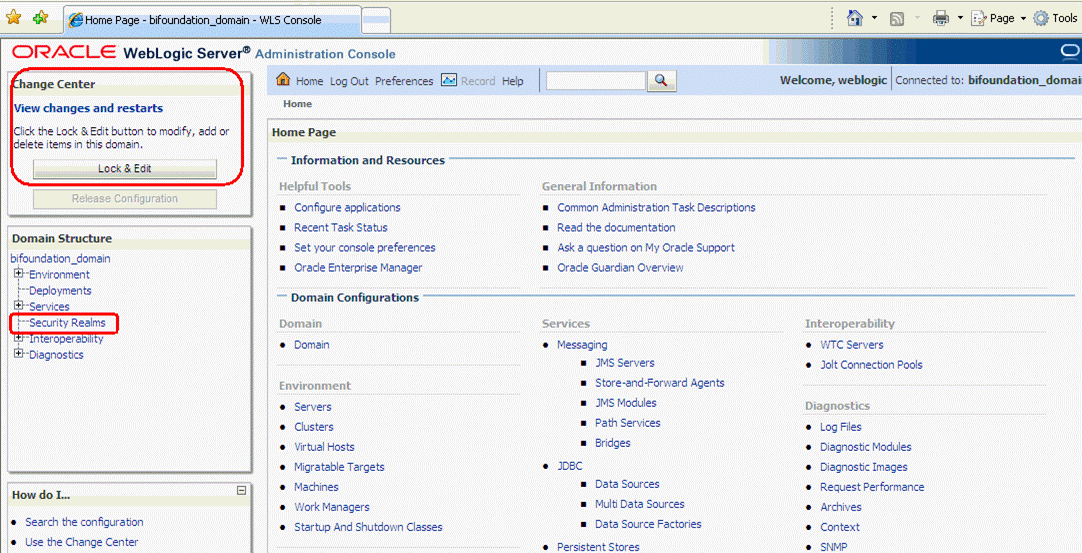
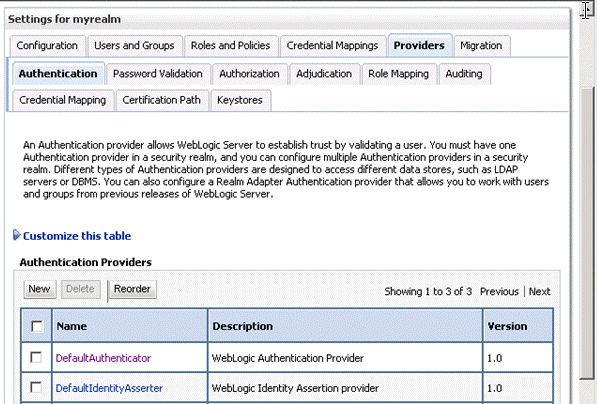
Select Security Realms from the left pane and click myrealm.
The default Security Realm is named myrealm.
-
Display the Providers tab, then display the Authentication sub-tab.
-
Click New to launch the Create a New Authentication Provider page.
-
Enter values in the Create a New Authentication Provider page as follows:
-
Name: Enter a name for the authentication provider. For example, UserGroupDBAuthenticator.
-
Type: Select SQLAuthenticator from the list.
-
Click OK to save the changes and display the authentication providers list updated with the new authentication provider.
-
-
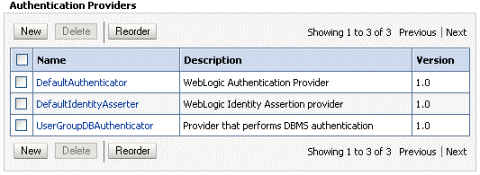
In the authentication providers table, click UserGroupDBAuthenticator in the Name column to display the Settings page.
-
Display the Provider Specific tab, and enter in the Data Source Name field, For example, UserGroupDS.
-
In the Provider Specific tab you specify the SQL statements used to query, and authenticate against, your database tables.
-
Enter all of the SQL statements appropriate to your Authenticator.
-
If your password column is in plain text (that is, if the result of the query supplied for the SQL Get Users Password column is not hashed or encrypted), select the Plaintext Password Enabled option.
If the Plaintext Password Enabled option is cleared, the SQLAuthenticator expects passwords to have been hashed using SHA-1 (default encryption algorithm). For more information on the supported encryption algorithms, see the documentation for the base SQLAuthenticator Mbean PasswordAlgorithm attribute.
-
Click Save.
-
Follow the steps described in "Configuring a New Trusted User (BISystemUser)" to ensure there is a trusted system user in your database, by replacing the credentials in the Credential store to point to this user's credentials.
此步驟可選,如同時還保留LDAP認證的話,可不進行此步驟.
-
Perform the following steps to configure default authenticator Control Flag setting:
-
At the main Settings for myrealm page, display the Providers tab, then display the Authentication sub-tab, then selectDefaultAuthenticator to display its configuration page.
-
Display the Configuration\Common tab and select 'SUFFICIENT' from the Control Flag list.
-
Click Save.
-
-
Perform the following steps to reorder the Authentication Providers:
-
Display the Providers tab.
-
Click Reorder to display the Reorder Authentication Providers page
-
Select UserGroupDBAuthenticator and use the arrow buttons to move it into the first position in the list.
-
Click OK to save your changes.
-
-
In the Change Center, click Activate Changes.
-
Restart the Oracle Business Intelligence components (use Fusion Middleware Control once the Administration Server has been restarted), Oracle WebLogic Server, and Managed servers.
Note:
Check the Users and Groups tab to confirm that the database users and groups appear there.
Configuring the Virtualized Identity Store
Configure the virtualized identity store as follows:
Enabling Virtualization by Configuring the Identity Store
You must configure the identity store to enable virtualization so that more than one Identity Store can be used with the identity store service, and therefore user profile information can be split across different authentication providers (identity stores).
Configuring a Database Adaptor
You configure a database adaptor to make the database appear like an LDAP server, which enables the virtualized identity store provider to retrieve user profile information from a database using the database adapter.
To configure a database adaptor:
This task shows how to edit and apply adapter templates that specify how to use your database tables as an identity store.
-
Create a file named adapter_template_usergroup1.xml.
This file describes the mapping of the user table to a virtual LDAP store.
-
Make sure that the file contains the following contents:
注:注意紅色字型部分,因為database認證的guid需要16位長度,所以紅色字型部分使用的是檢視USERS_VW的相關欄位。
-
Use the first, outer element (
) to declare mapping of the LDAP objectclass person. The cn attribute is used as its RDN (Relative Distinguished Name). The sub-elements then declare which LDAP attributes map to which tables and columns in the database. For example, the line
maps the USER_ID field of the USER table to the standard LDAP attribute uid (that is, a unique user id for each user). Next, you map groups using the same method.
-
Create a file named adapter_template_usergroup2.xml.
This file describes the mapping of the group table to a virtual LDAP store.
-
Add the following contents to the file:
-
Customize appropriate sections highlighted in bold, for the following elements,建議不要修改.
-
Copy the two adapter files into the following folder:
<MW_HOME>/oracle_common/modules/oracle.ovd_11.1.1/templates/
-
Open a command prompt/terminal at:
<MW_HOME>/oracle_common/bin
-
Ensure the following environment variables are set:
-
ORACLE_HOME=<MW_HOME>/Oracle_BI1
-
WL_HOME=<MW_HOME>/wlserver_10.3/
-
JAVA_HOME=<MW_HOME>/jdk160_24/(BI伺服器上最好已安裝java環境,可不配置此步驟)
-
-
Run the libovdadapterconfig script to create each of the two adapters from the template files.
libovdadapterconfig -adapterName userGroupAdapter1 -adapterTemplate adapter_template_usergroup1.xml -host use-pc -port 7001 -userName weblogic -domainPath D:\app\OBI\user_projects\domains\bifoundation_domain\ -dataStore DB -root cn=users,dc=oracle,dc=com -contextName default -dataSourceJNDIName jdbc/UserGroupDS
libovdadapterconfig -adapterName userGroupAdapter2 -adapterTemplate adapter_template_usergroup2.xml -host use-pc -port 7001 -userName weblogic -domainPath D:\app\OBI\user_projects\domains\bifoundation_domain\ -dataStore DB -root cn=users,dc=oracle,dc=com -contextName default -dataSourceJNDIName jdbc/UserGroupDS
The scripts should exit without error.
注:注意執行後,需要通過命令列進行互動,輸入weblogic使用者的口令。
-
Restart WebLogic Administration Server and Managed servers.建議等待下一步配置多個可用的Authentication Providers後再重啟。
-
Configuring Multiple Authentication Providers Using Fusion Middleware Control
This section describes how to configure Oracle Business Intelligence to use multiple authentication providers using Fusion Middleware Control.
To configure multiple authentication providers using Fusion Middleware Control:
-
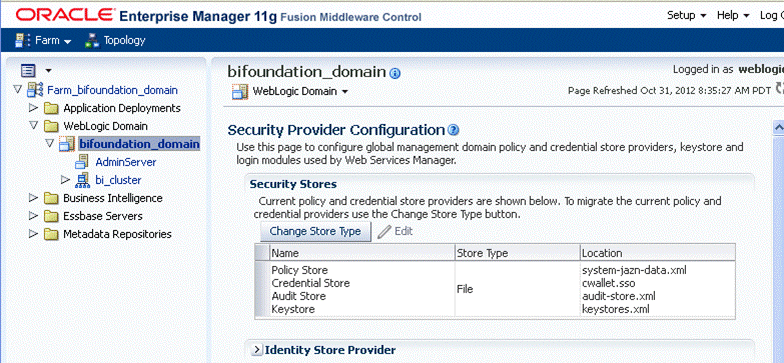
Log in to Fusion Middleware Control(EM).
-
Right-click bifoundation_domain and select Security, then Security Provider Configuration to display the Security Provider Configuration page.
-
In the Identity Store Provider area, click Configure to display the Identity Store Configuration page.
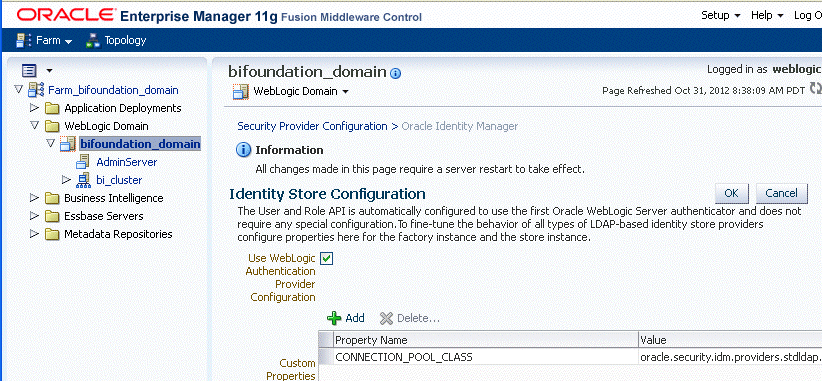
-
In the Custom Properties area, use the Add option to add a new custom property as follows:
Property Name=virtualize
Value=true
Note:
The Property Name virtualize must be lowercase.
Note:
If you set the virtualize custom property value to true, Oracle recommends that the BISystemUser must exist in only one identity store.建議只保留在LDAP的認證中。
Note:
If you are using multiple authentication providers, configure the Control Flag setting as follows:
-
If each user appears in only one authentication provider.
Set the value of Control Flag for all authentication providers to SUFFICIENT.
-
If users appear in more than one authentication provider.
Set the value of Control Flag for all authentication providers to OPTIONAL.
For example, if a user's group membership is spread across more than one authentication provider
-
-
Click OK to save the changes.
-
Restart the Administration Server and Managed Servers.
Correcting Database Adapter Errors by Deleting and Recreating the Adapter
You cannot modify an existing database adapter, so if you make an error in either the libovdadapter command, or the templates you use to create the adapters, you must delete then recreate the adapter using the following procedure.
To correct database adapter errors by deleting and recreating the adapter:
-
Log in to the WSLT console by running the WLST script.
For example:
MW_HOME\oracle_common\common\bin\wlst.cmd (Windows)
-
Connect to your Administration Server using the following syntax:
connect ('<WLS admin user name>','<WLS admin password>','t3://<admin server host>:<admin server port>')
For example:
connect('weblogic','weblogic123','t3://myserver:7001')
-
Delete the misconfigured adapter using the following syntax:
deleteAdapter(adapterName='<AdapterName>')
For example:
deleteAdapter(adapterName='userGroupAdapter2')
-
Exit the WLST console using the command exit() and recreate the adapter with the correct settings.
來自 “ ITPUB部落格 ” ,連結:http://blog.itpub.net/10009036/viewspace-1425656/,如需轉載,請註明出處,否則將追究法律責任。
相關文章
- DB2 10 認證DB2
- WebApi的建立,部署,Oauth身份認證(一)WebAPIOAuth
- 建立遷移檔案 auth 認證表 users
- Laravel使用JWT來建立使用者認證APILaravelJWTAPI
- 在身份認證後建立使用者物件ICurrentUser物件
- DB2建立DB linkDB2
- 計算機認證公司的認證網址 (轉)計算機
- Basic認證和Bearer Token認證的區別
- HTTP認證之基本認證——Basic(一)HTTP
- HTTP認證之基本認證——Basic(二)HTTP
- drf的JWT認證JWT
- wifi的web認證。WiFiWeb
- 【認證與授權】2、基於session的認證方式Session
- Oracle中兩種認證方式:OS認證與口令檔案認證Oracle
- 【登陸認證】oracle的作業系統認證和口令檔案認證方式(轉載)Oracle作業系統
- Java身份證實名認證、身份證識別介面讓您認證任性的“懶”Java
- [Oracle] 指令碼建立DBOracle指令碼
- 認證授權方案之JwtBearer認證JWT
- HTTP認證之摘要認證——Digest(一)HTTP
- Laravel 認證原理及完全自定義認證Laravel
- 網路身份認證——Kerberos配置及認證ROS
- Solon Auth 認證框架使用演示(更簡單的認證框架)框架
- oracle os認證和口令檔案認證的簡要解析Oracle
- IT界的黃金認證RedHat認證工程師(RHCE)(轉)Redhat工程師
- BIEE架構(轉)架構
- 增強版實名認證介面-Java身份證實名認證介面程式碼-身份認證Java
- Passport 認證Passport
- oracle的認證機制Oracle
- Java身份證實名認證介面解鎖認證新速度Java
- 使用OpenSSH證書認證
- 關於os認證和口令檔案認證
- 12 個全球認可的 Linux 認證Linux
- Kubernetes客戶端認證——基於CA證書的雙向認證方式客戶端
- 認證系統之登入認證系統的進階使用 (二)
- Kubernetes客戶端認證(二)—— 基於ServiceAccount的JWTToken認證客戶端JWT
- 關於os認證和口令檔案認證(轉)
- 關於HttpClient繞過SSL認證以及NTLM認證HTTPclient
- Oracle OS認證與口令檔案認證詳解Oracle