Android學習之 UI佈局優化
本篇內容就主要圍繞Android佈局優化來討論在日常開發中我們使用常用佈局需要注意的一些方面,同時介紹一款SDK自帶的UI效能檢測工具HierarchyViewer。
一、佈局原則:
通過一些慣用、有效的佈局原則,我們可以製作出載入效率高並且複用性高的UI。簡單來說,在Android UI佈局過程中,需要遵守的原則包括如下幾點:
1、熟練UI佈局屬性
2、儘量多使用RelativeLayout,不要使用絕對佈局AbsoluteLayout
3、將可複用的元件抽取出來並通過< include />標籤使用
4、使用< ViewStub />標籤來載入一些不常用的佈局
5、使用< merge />標籤減少佈局的巢狀層次
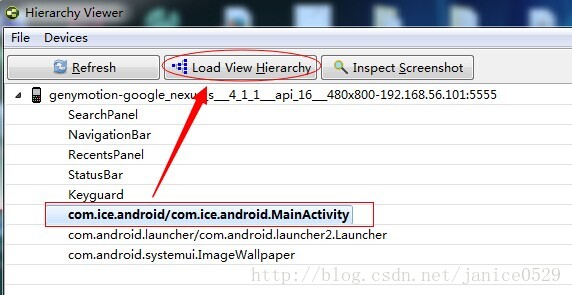
二、UI效能檢測工具HierarchyViewer的使用
該工具路徑在Android sdk目錄 tools下 hierarchyviewer.bat,找到HierarchyViewer.bat 並執行(此時保持你的模擬器或真機正在執行需要進行分析的App),雙擊我們正在顯示的這個App所代表的程式。 如下圖:

三、怎樣布好一個局?
1、熟讀官方的API文件
案例一:做一個帶箭頭的返回按鈕 如下圖:

做法一:
<RelativeLayout
        android:layout_width="wrap_content"
        android:layout_height="wrap_content"
        android:gravity="center" >

        <Button
            android:id="@+id/button1"
            android:layout_width="wrap_content"
            android:layout_height="wrap_content"
            android:background="@drawable/btn_headtita"
            android:textColor="#ffffff"
            android:text="@string/back" />

        <ImageView
            android:id="@+id/imageView1"
            android:layout_width="wrap_content"
            android:layout_height="wrap_content"
            android:layout_alignParentLeft="true"
            android:layout_centerVertical="true"
            android:src="@drawable/header_back" />

    </RelativeLayout>
使用hierarchyviewer來分析一下: 如下圖:
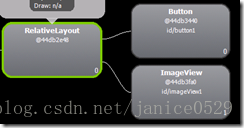
我們從這個圖中,我們可以看到,為了這麼一個按鈕我們用了view的三個節點去完成!
假設,我們的一個view 有三個類似的按鈕就意味著我們要用9個節點去完成,我們可以簡單得出這是一個3N級的複雜度佈局,我們可以嘗試去優化嗎?
做法二<更好 更有優化效果的佈局做法>:
<Button
        android:id="@+id/button1"
        android:layout_width="wrap_content"
        android:layout_height="wrap_content"
        android:background="@drawable/btn_headtita"
        android:drawableLeft="@drawable/header_back"
        android:gravity="center"
        android:padding="10dp"
        android:text="@string/back"
        android:textColor="#ffffff" />
使用hierarchyviewer來分析一下: 如下圖:

我們從這個圖中,我們可以看到,一個按鈕我們只用了view的一個節點就完成啦、相比上面做法一的佈局方式,做法二具有更好的效能。
2、模組化佈局:<include/>標籤的使用
include標籤常用於將佈局中的公共部分提取出來供其他layout共用,以實現佈局模組化,這在佈局編寫方便提供了大大的便利。
在一個佈局中用include引入另一個佈局foot.xml為例:
<?xml version="1.0" encoding="utf-8"?>
   <RelativeLayout xmlns:android="http://schemas.android.com/apk/res/android"
      android:layout_width="match_parent"
      android:layout_height="match_parent" >

      <ListView
         android:id="@+id/simple_list_view"
         android:layout_width="match_parent"
         android:layout_height="match_parent"
         android:layout_marginBottom="@dimen/dp_80" />

      <include layout="@layout/foot.xml" />

   </RelativeLayout>
3、合併沒有必要的節點:<merge/>的使用,降低佈局的巢狀層次
該標籤的主要使用場景主要包括兩種:
第一種是當xml檔案的根佈局是FrameLayout時,可以用merge作為根節點。理由是因為Activity的內容佈局中,預設就用了一個FrameLayout作為xml佈局根節點的父節點,比如:main.xml的根節點是一個RelativeLayout,其父節點就是一個FrameLayout,如果我們在main.xml裡面使用FrameLayout作為根節點的話,這時就可以使用merge來合併成一個FrameLayout,這樣就降低了佈局巢狀層次。
修改一下main.xml的內容,將根節點FrameLayout修改為merge標籤。
<merge xmlns:android="http://schemas.android.com/apk/res/android"
    xmlns:tools="http://schemas.android.com/tools"
    android:layout_width="match_parent"
    android:background="@android:color/darker_gray"
    android:layout_height="match_parent" >

    <include layout="@layout/common_navitationbar" />

</merge>
第二種情況是當用include標籤匯入一個共用佈局時,如果父佈局和子佈局根節點為同一型別,可以使用merge將子節點佈局的內容合併包含到父佈局中,這樣就可以減少一級巢狀層次。如 common_navitationbar.xml: <包含一個include子佈局>
   <RelativeLayout mlns:android="http://schemas.android.com/apk/res/android"
    xmlns:tools="http://schemas.android.com/tools"
    android:layout_width="match_parent"
    android:layout_height="wrap_content"
    android:background="@android:color/white"
    android:padding="10dip" >

    <Button
        android:layout_width="wrap_content"
        android:layout_height="wrap_content"
        android:layout_alignParentLeft="true"
        android:text="Back"
        android:textColor="@android:color/black" />

    <TextView
        android:layout_width="wrap_content"
        android:layout_height="wrap_content"
        android:layout_centerInParent="true"
        android:text="Title"
        android:textColor="@android:color/black" />

    <include layout="@layout/common_navi_right" />

</RelativeLayout> <RelativeLayout mlns:android="http://schemas.android.com/apk/res/android"
xmlns:tools="http://schemas.android.com/tools"
android:layout_width="wrap_content"
android:layout_height="wrap_content" >
<Button
android:layout_width="wrap_content"
android:layout_height="wrap_content"
android:layout_alignParentRight="true"
android:text="Ok"
android:textColor="@android:color/black" />
</RelativeLayout>common_navi_right.xml 修改後佈局方式:
<merge xmlns:android=
    "http://schemas.android.com/apk/res/android"
    xmlns:tools="http://schemas.android.com/tools"
    android:layout_width="wrap_content"
    android:layout_height="wrap_content" >

    <Button
        android:layout_width="wrap_content"
        android:layout_height="wrap_content"
        android:layout_alignParentRight="true"
        android:text="Ok"
        android:textColor="@android:color/black" />

</merge>
4、<ViewStub />的使用
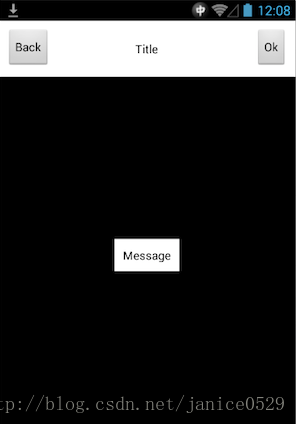
ViewStub是一個不可見的,能在執行期間延遲載入的大小為0的View,它直接繼承於View。當對一個ViewStub呼叫inflate()方法或設定它可見時,系統會載入在ViewStub標籤中引入的我們自己定義的View,然後填充在父佈局當中。也就是說,在對ViewStub呼叫inflate()方法或設定visible之前,它是不佔用佈局空間和系統資源的。它的使用場景可以是在我們需要載入並顯示一些不常用的View時,例如一些網路異常的提示資訊等。
<span style="font-family:Comic Sans MS;font-size:18px;">我們新建一個xml檔案common_msg.xml 用來顯示一個提示資訊:</span><RelativeLayout mlns:android="http://schemas.android.com/apk/res/android"
xmlns:tools="http://schemas.android.com/tools"
android:layout_width="wrap_content"
android:layout_height="wrap_content" >
<TextView
android:layout_width="wrap_content"
android:layout_height="wrap_content"
android:layout_centerInParent="true"
android:background="@android:color/white"
android:padding="10dip"
android:text="Message"
android:textColor="@android:color/black" />
</RelativeLayout>然後在main.xml裡面加入ViewStub的標籤引入上面的佈局:
<merge xmlns:android="http://schemas.android.com/apk/res/android"
    xmlns:tools="http://schemas.android.com/tools"
    android:layout_width="match_parent"
    android:background="@android:color/darker_gray"
    android:layout_height="match_parent" >

    <include layout="@layout/common_navitationbar" />

    <ViewStub
        android:id="@+id/msg_layout"
        android:layout_width="wrap_content"
        android:layout_height="wrap_content"
        android:layout_gravity="center"
        android:layout="@layout/common_msg" />

</merge>public class MainActivity extends Activity {
private View msgView;
private boolean flag = true;
@Override
protected void onCreate(Bundle savedInstanceState) {
super.onCreate(savedInstanceState);
setContentView(R.layout.activity_main);
this.findViewById(R.id.rightButton).
setOnClickListener(new OnClickListener() {
@Override
public void onClick(View arg0) {
System.out.print("111");
if(flag){
showMsgView();
}else{
closeMsgView();
}
flag = !flag;
}
});
}
private void showMsgView(){
if(msgView != null){
msgView.setVisibility(View.VISIBLE);
return;
}
ViewStub stub = (ViewStub)findViewById(R.id.msg_layout);
msgView = stub.inflate();
}
private void closeMsgView(){
if(msgView != null){
msgView.setVisibility(View.GONE);
}
}
}
5、其他點
(1) 用SurfaceView或TextureView代替普通View:
SurfaceView或TextureView可以通過將繪圖操作移動到另一個單獨執行緒上提高效能。
普通View的繪製過程都是在主執行緒(UI執行緒)中完成,如果某些繪圖操作影響效能就不好優化了,這時我們可以考慮使用SurfaceView和TextureView,他們的繪圖操作發生在UI執行緒之外的另一個執行緒上。因為SurfaceView在常規檢視系統之外,所以無法像常規試圖一樣移動、縮放或旋轉一個SurfaceView。TextureView是Android4.0引入的,除了與SurfaceView一樣在單獨執行緒繪製外,還可以像常規檢視一樣被改變。
本文部分內容參考於:http://www.infoq.com/cn/articles/android-optimise-layout
相關文章
- Android優化之佈局優化Android優化
- Android效能優化之佈局優化Android優化
- Android 佈局優化之includeAndroid優化
- Android 佈局優化Android優化
- Android 效能優化(二)之佈局優化面面觀Android優化
- Android效能優——佈局優化Android優化
- Android佈局優化技巧Android優化
- Android 優化之路(一)佈局優化Android優化
- Android學習—— Android佈局Android
- Android繪製優化(二)佈局優化Android優化
- Android入門教程 | UI佈局之RelativeLayout 相對佈局AndroidUI
- Android佈局檢測優化Android優化
- Android中佈局的優化Android優化
- Android入門教程 | UI佈局之LinearLayout 線性佈局AndroidUI
- Android佈局優化三劍客Android優化
- 視覺化拖拽 UI 佈局之拖拽篇視覺化UI
- 佈局優化優化
- UI設計教程學習分享:APP佈局UIAPP
- 轉:Android佈局優化三劍客Android優化
- Android佈局優化利器include和ViewStubAndroid優化View
- Flutter學習指南:UI佈局和控制元件FlutterUI控制元件
- Flutter學習之”相對佈局“Flutter
- HarmonyOS Java UI之DirectionalLayout佈局JavaUI
- Flutter學習之佈局、互動、動畫Flutter動畫
- Android佈局優化之ViewStub、include、merge使用與原始碼分析Android優化View原始碼
- 六、Android效能優化之UI卡頓分析之渲染效能優化Android優化UI
- 姿勢擺好,一招學會android的佈局優化!Android優化
- Android——ConstraintLayout的使用,優化佈局效能AndroidAI優化
- Android最佳效能實踐(4):佈局優化技巧Android優化
- 佈局優化之ViewStub、Include、merge使用分析優化View
- flex佈局學習Flex
- Android UI優化AndroidUI優化
- Android開發優化之——對介面UI的優化(1)Android優化UI
- Android開發優化之——對介面UI的優化(2)Android優化UI
- Android開發優化之——對介面UI的優化(3)Android優化UI
- Android學習筆記之檔案分類和線性佈局Android筆記
- Android之TableLayout(表格佈局)Android
- Android之佈局屬性Android