android Retrofit 2.0
一、介紹
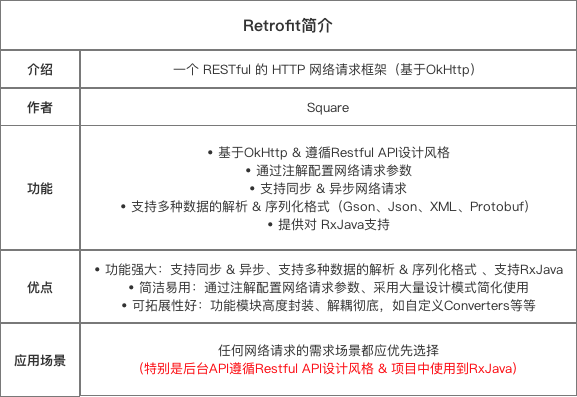
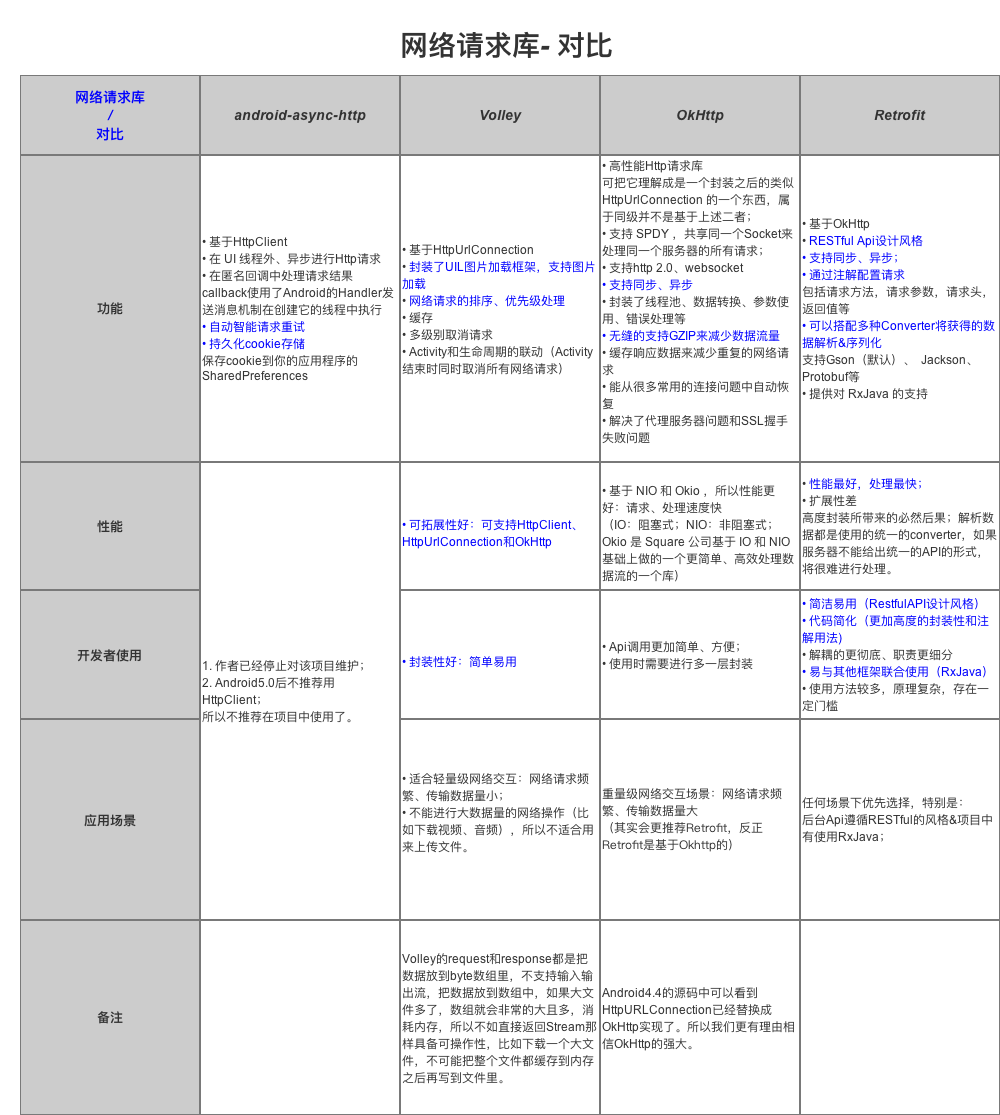
主流網路請求庫
Android-Async-Http:https://github.com/loopj/android-async-http
Volley :https://github.com/stormzhang/AndroidVolley
OkHttp:https://github.com/square/okhttp
Retrofit:https://github.com/square/retrofit
比較:
二、GET方式請求網路
1、導如到專案
    implementation 'com.squareup.okhttp3:okhttp:3.10.0'
    implementation 'com.squareup.retrofit2:retrofit:2.0.2'
    implementation  'com.squareup.retrofit2:converter-gson:2.0.2'
2、新增網路訪問許可權
<uses-permission android:name="android.permission.INTERNET"/>
3、自定義用來接收伺服器返回資料的Bean
package com.lht.liuhaitao;

public class UserBean {
    private String status;
    private Content content;
    private static class Content{
        private int id;
        private String name;
        private int age;

        public int getId() {
            return id;
        }

        public void setId(int id) {
            this.id = id;
        }

        public String getName() {
            return name;
        }

        public void setName(String name) {
            this.name = name;
        }

        public int getAge() {
            return age;
        }

        public void setAge(int age) {
            this.age = age;
        }

        @Override
        public String toString() {
            return "Content{" +
                    "id=" + id +
                    ", name='" + name + '\'' +
                    ", age=" + age +
                    '}';
        }
    }

    public String getStatus() {
        return status;
    }

    public void setStatus(String status) {
        this.status = status;
    }

    public Content getContent() {
        return content;
    }

    public void setContent(Content content) {
        this.content = content;
    }

    @Override
    public String toString() {
        return "UserBean{" +
                "status='" + status + '\'' +
                ", content=" + content +
                '}';
    }
}
4、定義介面
package com.lht.liuhaitao;

import retrofit2.Call;
import retrofit2.http.GET;

public interface IGetRequest {

    @GET("/test.php?id=1")
    Call<UserBean> getCall();
    // 註解裡傳入 網路請求 的部分URL地址
    // Retrofit把網路請求的URL分成了兩部分:一部分放在Retrofit物件裡,另一部分放在網路請求介面裡
    // 如果介面裡的url是一個完整的網址,那麼放在Retrofit物件裡的URL可以忽略
    // getCall()是接受網路請求資料的方法
}
5、處理返回資料
   @Override
    protected void onCreate(Bundle savedInstanceState) {
        super.onCreate(savedInstanceState);
        setContentView(R.layout.activity_main);
        but=findViewById(R.id.but_ok);
        imageView=findViewById(R.id.pothoImg);
        but.setOnClickListener(new View.OnClickListener() {
            @Override
            public void onClick(View v) {
                request();
            }
        });
    }

    private void request(){
        Retrofit retrofit=new Retrofit.Builder()
                .baseUrl("http://xxx.xxx.xxx.xxx/")//// 設定 網路請求 Url
                .addConverterFactory(GsonConverterFactory.create())//設定使用Gson解析(記得加入依賴)
                .build();
        //建立 網路請求介面 的例項
        IGetRequest request=retrofit.create(IGetRequest.class);
        // //對 傳送請求 進行封裝
        Call<UserBean> call=request.getCall();
        //傳送網路請求(非同步)
        call.enqueue(new Callback<UserBean>() {
            @Override
            public void onResponse(Call<UserBean> call, Response<UserBean> response) {
                UserBean userBean=response.body();
                Log.e(TAG, "onResponse: "+userBean);
            }

            @Override
            public void onFailure(Call<UserBean> call, Throwable t) {
                Log.e(TAG, "onFailure: "+t.getMessage() );
            }
        });
    }
三、POST方式網路請求
1、定義介面
public interface IPostRequest {

    @POST("test.php")
    @FormUrlEncoded
    Call<UserBean> getCall(@Field("id") String targetSentence);
    //採用@Post表示Post方法進行請求(傳入部分url地址)
    // 採用@FormUrlEncoded註解的原因:API規定採用請求格式x-www-form-urlencoded,即表單形式
    // 需要配合@Field 向伺服器提交需要的欄位,伺服器端用POST可以接收id的值
}
2、定義bean
package com.lht.liuhaitao;

public class UserBean {
    private String status;
    private Content content;
    private static class Content{
        private int id;
        private String name;
        private int age;

        public int getId() {
            return id;
        }

        public void setId(int id) {
            this.id = id;
        }

        public String getName() {
            return name;
        }

        public void setName(String name) {
            this.name = name;
        }

        public int getAge() {
            return age;
        }

        public void setAge(int age) {
            this.age = age;
        }

        @Override
        public String toString() {
            return "Content{" +
                    "id=" + id +
                    ", name='" + name + '\'' +
                    ", age=" + age +
                    '}';
        }
    }

    public String getStatus() {
        return status;
    }

    public void setStatus(String status) {
        this.status = status;
    }

    public Content getContent() {
        return content;
    }

    public void setContent(Content content) {
        this.content = content;
    }

    @Override
    public String toString() {
        return "UserBean{" +
                "status='" + status + '\'' +
                ", content=" + content +
                '}';
    }
}
3、
   private void request(){
        Retrofit retrofit=new Retrofit.Builder()
                .baseUrl("http://xxx.xxx.xxx.xxx/")//// 設定 網路請求 Url
                .addConverterFactory(GsonConverterFactory.create())//設定使用Gson解析(記得加入依賴)
                .build();
        //建立 網路請求介面 的例項
        IPostRequest request=retrofit.create(IPostRequest.class);
        // //對 傳送請求 進行封裝
        Call<UserBean> call=request.getCall("hello");
        //傳送網路請求(非同步)
        call.enqueue(new Callback<UserBean>() {
            @Override
            public void onResponse(Call<UserBean> call, Response<UserBean> response) {
                UserBean userBean=response.body();
                Log.e(TAG, "onResponse: "+userBean);
            }

            @Override
            public void onFailure(Call<UserBean> call, Throwable t) {
                Log.e(TAG, "onFailure: "+t.getMessage() );
            }
        });
    }
三、常用得到引數
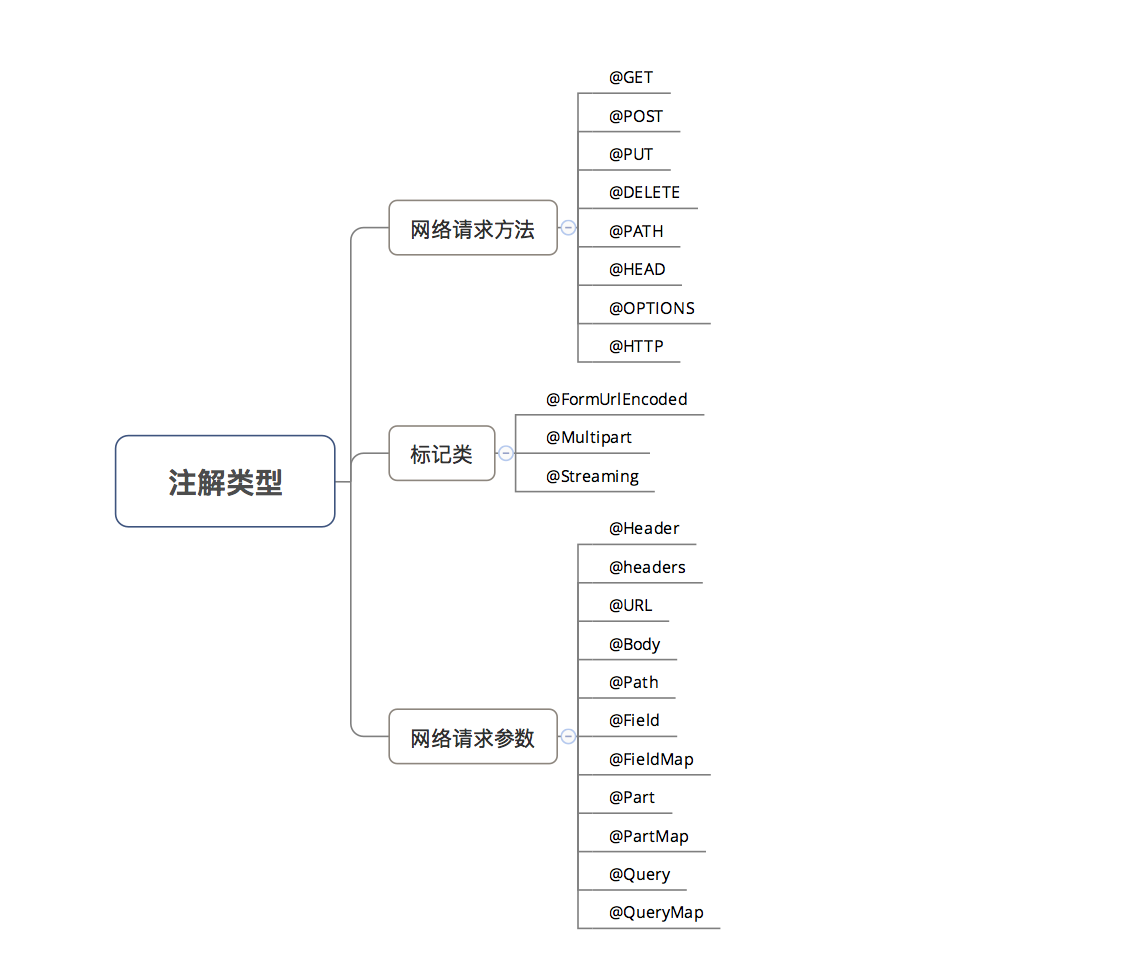
1、註解型別
2、註解說明
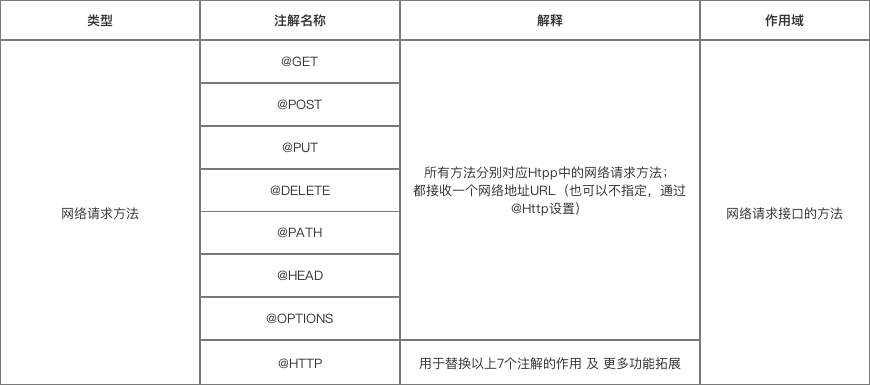
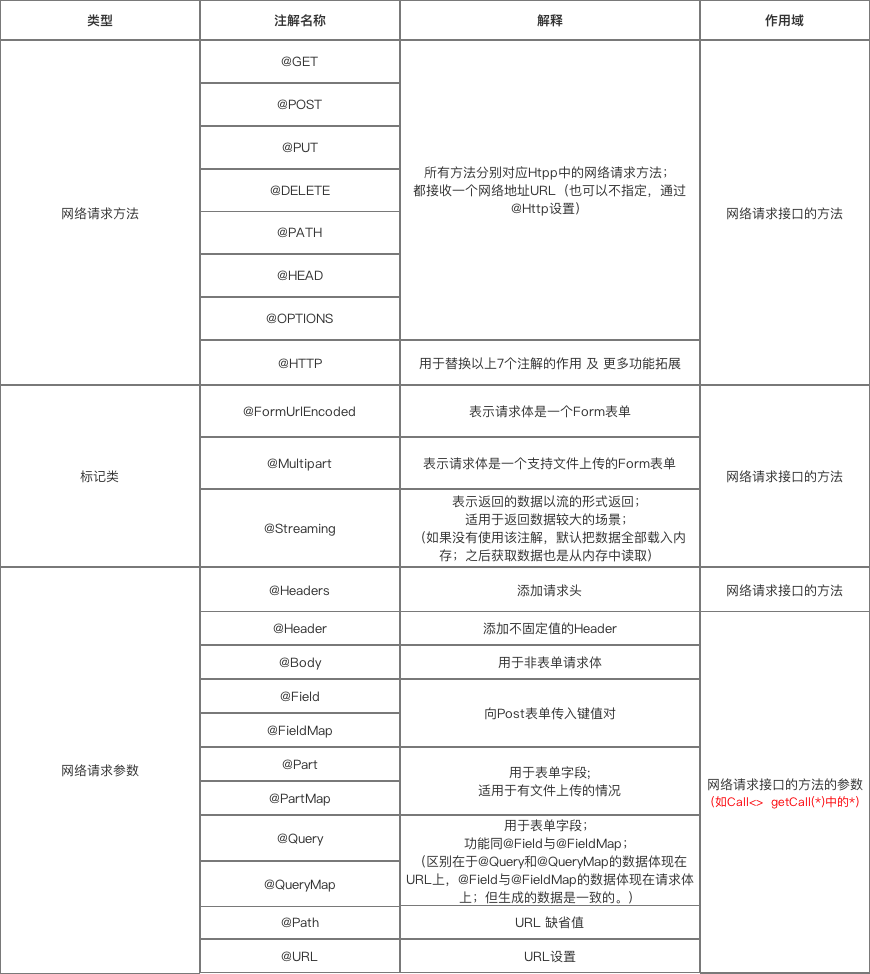
(1)第一類:網路請求方法
詳細說明:
a. @GET、@POST、@PUT、@DELETE、@HEAD
以上方法分別對應 HTTP中的網路請求方式
網路請求的完整 Url =在建立Retrofit例項時通過.baseUrl()設定 +網路請求介面的註解設定(下面稱 “path“ )
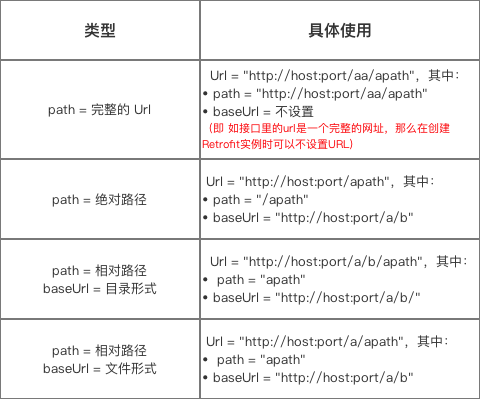
建議採用第三種方式來配置,並儘量使用同一種路徑形式。
@HTTP
- 作用:替換@GET、@POST、@PUT、@DELETE、@HEAD註解的作用 及 更多功能擴充
- 具體使用:通過屬性method、path、hasBody進行設定
public interface GetRequest_Interface {
    /**
     * method:網路請求的方法(區分大小寫)
     * path:網路請求地址路徑
     * hasBody:是否有請求體
     */
    @HTTP(method = "GET", path = "blog/{id}", hasBody = false)
    Call<ResponseBody> getCall(@Path("id") int id);
    // {id} 表示是一個變數
    // method 的值 retrofit 不會做處理,所以要自行保證準確
}
3、標記

@FormUrlEncoded:
- 作用:表示傳送form-encoded的資料
每個鍵值對需要用@Filed來註解鍵名,隨後的物件需要提供值。
b. @Multipart
- 作用:表示傳送form-encoded的資料(適用於 有檔案 上傳的場景)
每個鍵值對需要用@Part來註解鍵名,隨後的物件需要提供值。
具體使用如下:
GetRequest_Interface
public interface GetRequest_Interface {
        /**
         *表明是一個表單格式的請求(Content-Type:application/x-www-form-urlencoded)
         * <code>Field("username")</code> 表示將後面的 <code>String name</code> 中name的取值作為 username 的值
         */
        @POST("/form")
        @FormUrlEncoded
        Call<ResponseBody> testFormUrlEncoded1(@Field("username") String name, @Field("age") int age);

        /**
         * {@link Part} 後面支援三種型別,{@link RequestBody}、{@link okhttp3.MultipartBody.Part} 、任意型別
         * 除 {@link okhttp3.MultipartBody.Part} 以外,其它型別都必須帶上表單欄位({@link okhttp3.MultipartBody.Part} 中已經包含了表單欄位的資訊),
         */
        @POST("/form")
        @Multipart
        Call<ResponseBody> testFileUpload1(@Part("name") RequestBody name, @Part("age") RequestBody age, @Part MultipartBody.Part file);

}

// 具體使用
       GetRequest_Interface service = retrofit.create(GetRequest_Interface.class);
        // @FormUrlEncoded
        Call<ResponseBody> call1 = service.testFormUrlEncoded1("Carson", 24);

        //  @Multipart
        RequestBody name = RequestBody.create(textType, "Carson");
        RequestBody age = RequestBody.create(textType, "24");

        MultipartBody.Part filePart = MultipartBody.Part.createFormData("file", "test.txt", file);
        Call<ResponseBody> call3 = service.testFileUpload1(name, age, filePart);
4、網路請求引數
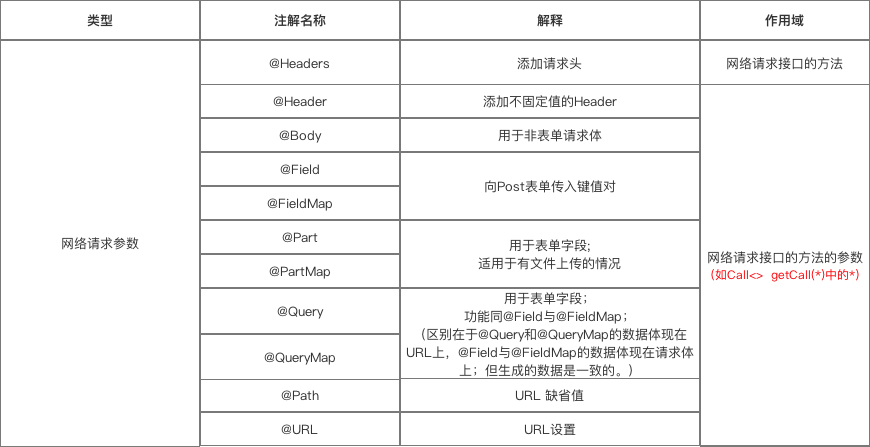
a. @Header & @Headers
- 作用:新增請求頭 &新增不固定的請求頭
-
// @Header
@GET("user")
Call<User> getUser(@Header("Authorization") String authorization)

// @Headers
@Headers("Authorization: authorization")
@GET("user")
Call<User> getUser()

// 以上的效果是一致的。
// 區別在於使用場景和使用方式
// 1. 使用場景:@Header用於新增不固定的請求頭,@Headers用於新增固定的請求頭
// 2. 使用方式:@Header作用於方法的引數;@Headers作用於方法
b. @Body
- 作用:以
Post方式 傳遞 自定義資料型別 給伺服器 - 特別注意:如果提交的是一個Map,那麼作用相當於
@Field
不過Map要經過
FormBody.Builder類處理成為符合 Okhttp 格式的表單,如:
FormBody.Builder builder = new FormBody.Builder();
builder.add("key","value");
c. @Field & @FieldMap
- 作用:傳送 Post請求 時提交請求的表單欄位
- 具體使用:與
@FormUrlEncoded註解配合使用
public interface GetRequest_Interface {
        /**
         *表明是一個表單格式的請求(Content-Type:application/x-www-form-urlencoded)
         * <code>Field("username")</code> 表示將後面的 <code>String name</code> 中name的取值作為 username 的值
         */
        @POST("/form")
        @FormUrlEncoded
        Call<ResponseBody> testFormUrlEncoded1(@Field("username") String name, @Field("age") int age);

/**
         * Map的key作為表單的鍵
         */
        @POST("/form")
        @FormUrlEncoded
        Call<ResponseBody> testFormUrlEncoded2(@FieldMap Map<String, Object> map);

}

// 具體使用
         // @Field
        Call<ResponseBody> call1 = service.testFormUrlEncoded1("Carson", 24);

        // @FieldMap
        // 實現的效果與上面相同,但要傳入Map
        Map<String, Object> map = new HashMap<>();
        map.put("username", "Carson");
        map.put("age", 24);
        Call<ResponseBody> call2 = service.testFormUrlEncoded2(map);
d. @Part & @PartMap
-
作用:傳送 Post請求 時提交請求的表單欄位
與@Field的區別:功能相同,但攜帶的引數型別更加豐富,包括資料流,所以適用於 有檔案上傳 的場景
-
具體使用:與
@Multipart註解配合使用
public interface GetRequest_Interface {

          /**
         * {@link Part} 後面支援三種型別,{@link RequestBody}、{@link okhttp3.MultipartBody.Part} 、任意型別
         * 除 {@link okhttp3.MultipartBody.Part} 以外,其它型別都必須帶上表單欄位({@link okhttp3.MultipartBody.Part} 中已經包含了表單欄位的資訊),
         */
        @POST("/form")
        @Multipart
        Call<ResponseBody> testFileUpload1(@Part("name") RequestBody name, @Part("age") RequestBody age, @Part MultipartBody.Part file);

        /**
         * PartMap 註解支援一個Map作為引數,支援 {@link RequestBody } 型別,
         * 如果有其它的型別,會被{@link retrofit2.Converter}轉換,如後面會介紹的 使用{@link com.google.gson.Gson} 的 {@link retrofit2.converter.gson.GsonRequestBodyConverter}
         * 所以{@link MultipartBody.Part} 就不適用了,所以檔案只能用<b> @Part MultipartBody.Part </b>
         */
        @POST("/form")
        @Multipart
        Call<ResponseBody> testFileUpload2(@PartMap Map<String, RequestBody> args, @Part MultipartBody.Part file);

        @POST("/form")
        @Multipart
        Call<ResponseBody> testFileUpload3(@PartMap Map<String, RequestBody> args);
}

// 具體使用
 MediaType textType = MediaType.parse("text/plain");
        RequestBody name = RequestBody.create(textType, "Carson");
        RequestBody age = RequestBody.create(textType, "24");
        RequestBody file = RequestBody.create(MediaType.parse("application/octet-stream"), "這裡是模擬檔案的內容");

        // @Part
        MultipartBody.Part filePart = MultipartBody.Part.createFormData("file", "test.txt", file);
        Call<ResponseBody> call3 = service.testFileUpload1(name, age, filePart);
        ResponseBodyPrinter.printResponseBody(call3);

        // @PartMap
        // 實現和上面同樣的效果
        Map<String, RequestBody> fileUpload2Args = new HashMap<>();
        fileUpload2Args.put("name", name);
        fileUpload2Args.put("age", age);
        //這裡並不會被當成檔案,因為沒有檔名(包含在Content-Disposition請求頭中),但上面的 filePart 有
        //fileUpload2Args.put("file", file);
        Call<ResponseBody> call4 = service.testFileUpload2(fileUpload2Args, filePart); //單獨處理檔案
        ResponseBodyPrinter.printResponseBody(call4);
}
e. @Query和@QueryMap
-
作用:用於
@GET方法的查詢引數(Query = Url 中 ‘?’ 後面的 key-value)如:url = http://www.println.net/?cate=android,其中,Query = cate
-
具體使用:配置時只需要在介面方法中增加一個引數即可:
   @GET("/")
   Call<String> cate(@Query("cate") String cate);
}

// 其使用方式同 @Field與@FieldMap,這裡不作過多描述
f. @Path
- 作用:URL地址的預設值
- 具體使用:
public interface GetRequest_Interface {

        @GET("users/{user}/repos")
        Call<ResponseBody>  getBlog(@Path("user") String user );
        // 訪問的API是:https://api.github.com/users/{user}/repos
        // 在發起請求時, {user} 會被替換為方法的第一個引數 user(被@Path註解作用)
    }
g. @Url
- 作用:直接傳入一個請求的 URL變數 用於URL設定
- 具體使用:
public interface GetRequest_Interface {

        @GET
        Call<ResponseBody> testUrlAndQuery(@Url String url, @Query("showAll") boolean showAll);
       // 當有URL註解時,@GET傳入的URL就可以省略
       // 當GET、POST...HTTP等方法中沒有設定Url時,則必須使用 {@link Url}提供

}
彙總
四、 Retrofit 的擴充使用
Retrofit的使用場景非常豐富,如支援RxJava和Prototocobuff
具體設定也非常簡單 & 方便:
<-- 主要在建立Retrofit物件中設定 -->
Retrofit retrofit = new Retrofit.Builder()
  .baseUrl(""http://fanyi.youdao.com/"")
  .addConverterFactory(ProtoConverterFactory.create()) // 支援Prototocobuff解析
  .addConverterFactory(GsonConverterFactory.create()) // 支援Gson解析
  .addCallAdapterFactory(RxJavaCallAdapterFactory.create()) // 支援RxJava
  .build();
相關文章
- Retrofit 2.0 使用教程
- Android:Retrofit 2.0 使用攻略(含例項講解)Android
- Android中RxJava+Retrofit2.0+MVP模式的整合AndroidRxJavaMVP模式
- Android Retrofit 2.0(二)使用教程OkHttp3 + Gson + RxJavaAndroidHTTPRxJava
- Android Retrofit 2.0(一)初次見面請多多關照Android
- Retrofit2.0- 原始碼分析原始碼
- Retrofit2.0使用詳解
- Android進階:七、Retrofit2.0原理解析之最簡流程Android
- RxJava2.0 及Retrofit2.0學習資源RxJava
- Android進階:七、Retrofit2.0原理解析之最簡流程【上】Android
- 拆Retrofit2.0 的create()方法流程
- Android Retrofit的使用Android
- Android:這是一份全面 & 詳細的Retrofit 2.0 原始碼分析指南Android原始碼
- Retrofit2.0:上傳圖片到PHPPHP
- Retrofit2.0+網路框架HTTP實戰框架HTTP
- Android Retrofit原始碼解析Android原始碼
- Android之Retrofit2.0 處理返回json報文並轉換成bean物件AndroidJSONBean物件
- Retrofit2.0使用——帶進度下載檔案
- [Android] Retrofit原始碼:流程解析Android原始碼
- Android 基於ijkplayer+Rxjava+Rxandroid+Retrofit2.0+MVP+Material Design的android萬能播放器aaaAndroidRxJavaMVPMaterial Design播放器
- 網路請求框架之Retrofit2.0基本講解框架
- MVP實戰心得---封裝Retrofit2.0+RxAndroid+RxBusMVP封裝Android
- Android Retrofit原始碼解析:都能看懂的Retrofit使用詳解Android原始碼
- Android中Retrofit的封裝使用Android封裝
- Android基於Retrofit2.0+RxJava 封裝的超好用的RetrofitClient工具類(完美結合RxJava)(六)...AndroidRxJava封裝client
- Android Retrofit 2.5.0使用基礎詳解Android
- Android 網路框架 Retrofit 原始碼解析Android框架原始碼
- Android開發之Retrofit小試牛刀Android
- Android框架第(五)篇---Retrofit基本使用Android框架
- Android進階必學retrofit原始碼解析Android原始碼
- Android 網路框架Retrofit的使用和解析Android框架
- Android網路程式設計:Retrofit原始碼解析Android程式設計原始碼
- Android實現Rxjava2+Retrofit完美封裝AndroidRxJava封裝
- Android專案框架搭建:mvp+retrofit+rxjava+rxbusAndroid框架MVPRxJava
- Retrofit和OkHttp實現 Android網路快取HTTPAndroid快取
- Android開源網路框架Retrofit(入門篇)Android框架
- 快速Android開發系列網路篇之RetrofitAndroid
- MVP+Dagger2+Retrofit2.0+Rxjava看這一個例子就夠了MVPRxJava