Android App外掛式換膚實現方案
背景
目前很多app都具有換膚功能,使用者可以根據需要切換不同的皮膚,為使我們的App支援換膚功能,給使用者提供更好的體驗,在這裡對換膚原理進行研究總結,並選擇一個合適的換膚解決方案。
換膚介紹
App換膚主要涉及的有頁面中文字的顏色、控制元件的背景顏色、一些圖片資源和主題顏色等資源。
為了實現換膚資源不與原專案混淆,儘量降低風險,可以將這些資源封裝在一個獨立的Apk資原始檔中。在App執行時,主程式動態的從Apk皮膚包中讀取相應的資源,無需Acitvity重啟即可實現皮膚的實時更換,皮膚包與原安裝包相分離,從而實現外掛式換膚。
換膚原理
1. 如何載入皮膚資原始檔
使用外掛式換膚,皮膚資源肯定不會在被封裝到主工程中,要怎麼載入外部的皮膚資源呢?
先看下 Apk 的打包流程
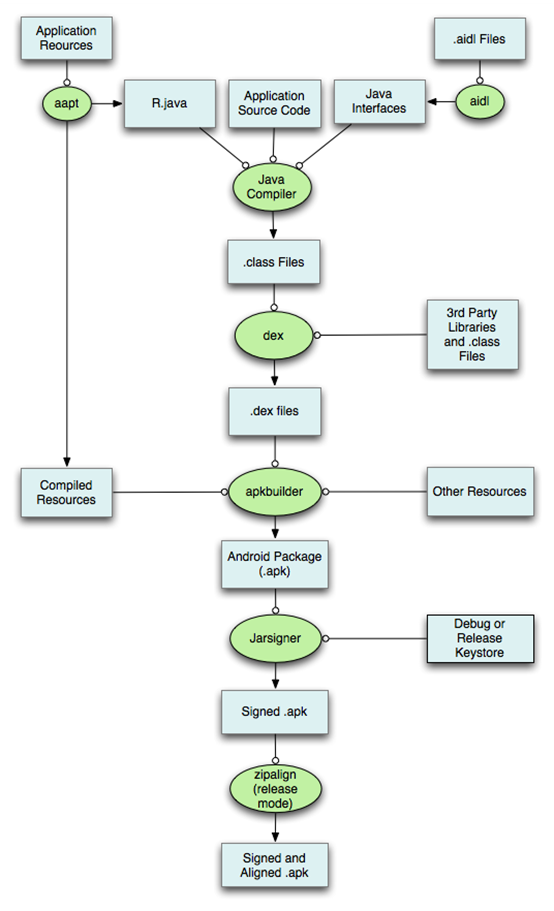
這裡流程中,有兩個關鍵點
1.R檔案的生成
R檔案是一個Java檔案,通過R檔案我們就可以找到對應的資源。R檔案就像一張對映表,幫助我們找到資原始檔。
2.資原始檔的打包生成
資原始檔經過壓縮打包,生成 resources 檔案,通過R檔案找到裡面儲存的對映的資原始檔。在 App 內部,我們一般通過下面程式碼,獲取資源:
|
1
2
3
|
context.getResource.getString(R.string.hello);context.getResource.getColor(R.color.black);context.getResource.getDrawable(R.drawable.splash); |
這個時獲取 App 內部的資源,能我們家在皮膚資源什麼思路嗎?載入外部資源的 Resources 能通過類似的思路嗎?
我們檢視下 Resources 類的原始碼,發現 Resources 的建構函式
|
1
2
3
|
public Resources(AssetManager
assets, DisplayMetrics metrics, Configuration config) { this(assets,
metrics, config, CompatibilityInfo.DEFAULT_COMPATIBILITY_INFO); } |
這裡關鍵是第一個引數如何獲取,第二和第三個引數可以通過 Activity 獲取到。我們再去看下 AssetManager 的程式碼,同時會發現下面的這個
|
1
2
3
4
5
6
7
8
9
10
11
12
13
|
/** *
Add an additional set of assets to the asset manager. This can be *
either a directory or ZIP file. Not for use by applications. Returns *
the cookie of the added asset, or 0 on failure. *
{@hide} */ public final int addAssetPath(String
path) { synchronized (this)
{ int res
= addAssetPathNative(path); makeStringBlocks(mStringBlocks); return res; } } |
AssetManager 可以載入一個zip 格式的壓縮包,而 Apk 檔案不就是一個 壓縮包嗎。我們通過反射的方法,拿到 AssetManager,載入 Apk 內部的資源,獲取到 Resources 物件,這樣再想辦法,把 R檔案裡面儲存的ID獲取到,這樣既可以拿到對應的資原始檔了。理論上我們的思路時成立的。
我們看下,如何通過程式碼獲取 Resources 物件。
|
1
2
3
4
5
6
|
AssetManager
assetManager = AssetManager.class.newInstance();Method
addAssetPath = assetManager.getClass().getMethod("addAssetPath",
String.class);addAssetPath.invoke(assetManager,
skinPkgPath);Resources
superRes = context.getResources();Resources
skinResource = new Resources(assetManager,superRes.getDisplayMetrics(),superRes.getConfiguration()); |
2. 如何標記需要換膚的View
找到資原始檔之後,我們要接著標記需要換膚的 View 。
找到需要換膚的 View
怎麼尋找哪些是我們要關注的 View 呢? 我們還是重 View 的建立時機尋找機會。我們新增一個佈局檔案時,會使用 LayoutInflater的 Inflater方法,我們看下這個方法是怎麼講一個View新增到Activity 中的。
LayoutInflater 中有個介面
|
1
2
3
4
5
6
7
8
9
10
11
12
13
14
15
16
17
18
19
20
|
public interface Factory
{ /** *
Hook you can supply that is called when inflating from a LayoutInflater. *
You can use this to customize the tag names available in your XML *
layout files. * *
<p> *
Note that it is good practice to prefix these custom names with your *
package (i.e., com.coolcompany.apps) to avoid conflicts with system *
names. * *
@param name Tag name to be inflated. *
@param context The context the view is being created in. *
@param attrs Inflation attributes as specified in XML file. * *
@return View Newly created view. Return null for the default *
behavior. */ public View
onCreateView(String name, Context context, AttributeSet attrs); } |
根據這裡的註釋描述,我們可以自己實現這個介面,在 onCreateView 方法中選擇我們需要標記的View,根據 AttributeSet 值,過濾不需要關注的View。
標記 View 與對應的資源
我們在 View 建立時,通過過濾 Attribute 屬性,找到我們要標記的 View ,下面我們就把這些View的屬性記下來
|
1
2
3
4
5
6
7
8
9
10
11
12
13
14
15
16
17
18
19
20
21
22
|
for (int i
= 0;
i < attrs.getAttributeCount(); i++){ String
attrName = attrs.getAttributeName(i); String
attrValue = attrs.getAttributeValue(i); if(!AttrFactory.isSupportedAttr(attrName)){ continue; } if(attrValue.startsWith("@")){ try { int id
= Integer.parseInt(attrValue.substring(1)); String
entryName = context.getResources().getResourceEntryName(id); String
typeName = context.getResources().getResourceTypeName(id); SkinAttr
mSkinAttr = AttrFactory.get(attrName, id, entryName, typeName); if (mSkinAttr
!= null)
{ viewAttrs.add(mSkinAttr); } } catch (NumberFormatException
e) { e.printStackTrace(); } catch (NotFoundException
e) { e.printStackTrace(); } } } |
然後把這些 View 和屬性值,一起封裝儲存起來
|
1
2
3
4
5
6
7
8
9
|
if(!ListUtils.isEmpty(viewAttrs)){ SkinItem
skinItem = new SkinItem(); skinItem.view
= view; skinItem.attrs
= viewAttrs; mSkinItems.add(skinItem); if(SkinManager.getInstance().isExternalSkin()){ skinItem.apply(); } } |
3. 如何做到及時更新UI
由於我們把需要更新的View 以及屬性值都儲存起來了,更新的時候只要把他們取出來遍歷一遍即可。
|
1
2
3
4
5
6
7
8
9
10
11
12
13
14
15
16
17
18
19
|
@Override public void onThemeUpdate()
{ if(!isResponseOnSkinChanging){ return; } mSkinInflaterFactory.applySkin(); }//applySkin
的具體實現public void applySkin(){ if(ListUtils.isEmpty(mSkinItems)){ return; } for(SkinItem
si : mSkinItems){ if(si.view
== null){ continue; } si.apply(); } } |
4. 如何製作皮膚包
皮膚包製作相對簡單
1.建立獨立工程 model,包名任意。
2.新增資原始檔到 model 中,不需要 java 程式碼
3.執行 build.gradle 指令碼,打包命令,生成apk檔案,修改名稱為 xxx.skin 皮膚包即可。
基於ThemeSkinning的換膚框架
根據以上換膚原理,在github上面選擇了一個第三方開源框架ThemeSkinning,具體使用方法如下:
1. 整合步驟:
1) 新增依賴 compile 'com.solid.skin:skinlibrary:1.3.1'
2) 使專案中的Application繼承於SkinBaseApplication
3) 使專案中的Activity繼承於SkinBaseActivity,如果使用了Fragment則繼承於SkinBaseFragment
4) 在需要換膚的根佈局上新增 xmlns:skin="http://schemas.android.com/android/skin" ,然後在需要換膚的View上加上 skin:enable="true"
5) 新建一個專案模組(只包含有資原始檔),其中包含的資原始檔的name一定要和原專案中有換膚需求的View所使用的資源name一致。
6) 打包皮膚檔案,放入assets中的skin目錄下(skin目錄是自己新建的)
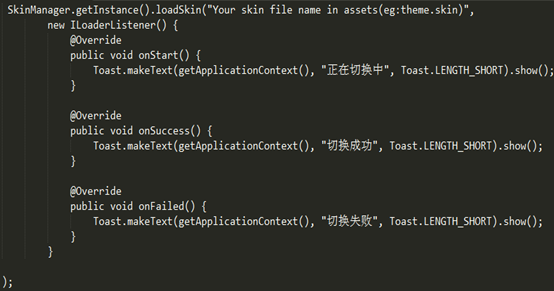
7) 呼叫換膚方法:
- 在 assets/skin 資料夾中的皮膚
2.換膚屬性的擴充套件
該開源庫預設僅支援View的textColor和background兩個屬性的換膚,如果需要對其他屬性進行換膚,那麼就需要去自定義了。
那麼如何自定義呢?看下面這個例子:
ImageView大家應該都用過吧。它的src屬性就是定義圖片資源引用,
新建一個ImageSrcAttr繼承於 SkinAttr,然後重寫apply方法。apply方法在換膚的時候就會被呼叫,程式碼的詳細實現:
public class ImageSrcAttr extends SkinAttr {
@Override
public void apply(View view) {
if (view instanceof ImageView) {
ImageView iv = (ImageView) view;
if (RES_TYPE_NAME_DRAWABLE.equals(attrValueTypeName)) {
Drawable drawable = SkinResourcesUtils.getDrawable(attrValueRefId);
iv.setImageDrawable(drawable);
}
} }
}
注:attrValueRefId:就是資源id。SkinResourcesUtils是用來獲取皮膚包裡的資源,這裡設定color或者drawable一定要使用本工具類。
當上面的工作完成之後,就到我們自己的Application的onCreate方法中加入 SkinConfig.addSupportAttr("src", new ImageSrcAttr());我們就可以正常使用了src屬性了。
此外,對於動態建立的view,我們需要動態新增支援,呼叫
dynamicAddSkinEnableView(View view, String attrName, int attrValueResId)方法新增支援。
3.其他一些重要的api
- SkinConfig.isDefaultSkin(context):判斷當前皮膚是否是預設皮膚
- SkinManager.getInstance().restoreDefaultTheme(): 重置預設皮膚
相關文章
- AppDomain實現【外掛式】開發APPAI
- 外掛式換膚框架搭建 setContentView原始碼閱讀框架View原始碼
- Android-動態載入外掛資源,皮膚包的實現原理Android
- 使用開源框架——AndroidChangeSkin,實現app換膚框架AndroidAPP
- Android換膚實現技術思路總結Android
- 多套主題怎麼靈動換膚?APP換膚方案詳細解析!APP
- Android QMUI實戰:實現APP換膚功能,並自動適配手機深色模式AndroidUIAPP模式
- 說說Android動態換膚實現原理吧Android
- 小程式 + 外掛 + App = 組裝式AppAPP
- Android 更換皮膚思路及解決方案Android
- 換膚功能實現過程
- Android外掛化的一種方案Android
- Android外掛式開發(一)Android
- Android 換膚指南Android
- 微信小程式實現換膚功能微信小程式
- Android 實現APP可切換多語言AndroidAPP
- PHP外掛系統的實現(七):外掛案例PHP
- Android外掛化技術之旅 1 開篇 - 實現啟動外掛與呼叫外掛中的Activity和ServiceAndroid
- 外掛化實現Android多主題功能原理剖析Android
- JS實現網頁換膚功能效果JS網頁
- 幫助你實現響應式導航的 jQuery 外掛jQuery
- PHP外掛系統的實現(五):觸發外掛PHP
- 利用Python實現漂亮的Django Markdown富文字app外掛PythonDjangoAPP
- QQ搶紅包外掛實現
- Flutter學習(9)——Flutter外掛實現(Flutter呼叫Android原生FlutterAndroid
- Android動態換膚原理解析及實踐Android
- 從零開始實現ASP.NET Core MVC的外掛式開發(四) - 外掛安裝ASP.NETMVC
- Xpatch:免Root實現App載入Xposed外掛的一種方法APP
- [外掛擴充套件]APP極光推送外掛!套件APP
- JavaScript原生實現樓梯外掛JavaScript
- 手動實現HTML外掛BeautifyHTML
- javascript實現的微信分享外掛JavaScript
- jQuery實現的cookie操作外掛jQueryCookie
- Android外掛化原理(一)Activity外掛化Android
- PHP外掛系統的實現(二):獲取全部外掛資訊PHP
- 外掛化知識梳理(10) Service 外掛化實現及原理
- webpack構建下換膚功能的實現思路Web
- 主流技術之網易雲換膚方案