Android四大元件之一之內容提供者ContentProvider
內容提供者(ContentProvider)
1.什麼是ContentProvider
定義類繼承ContentProvider, 實現增刪改查抽象方法
3.在手機上註冊內容提供者
將應用安裝到手機上即可, 可以不用執行程式
4.怎麼訪問內容提供者
獲取解析器ContentResolver, 指定Uri
通過ContentResolver.insert(), delete(), update(), query()方法訪問Uri關聯的ContentProvider
5.Uri的處理
使用UriMatcher可以檢查傳入的Uri是否和指定的匹配
1.什麼是ContentProvider
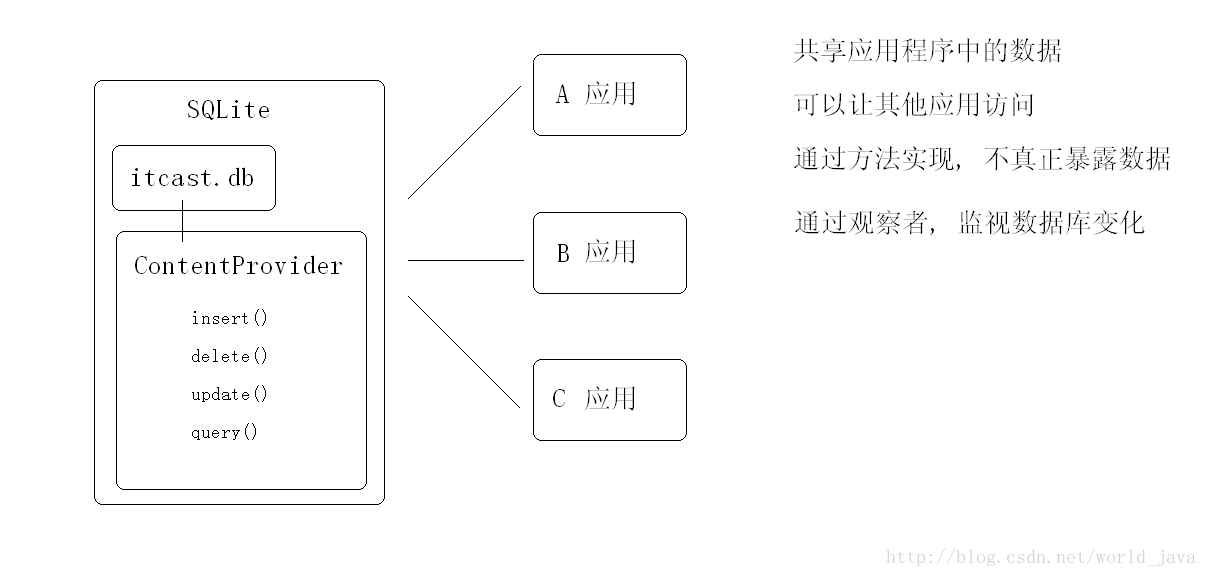
ContentProvider可以用來把程式中的資料對外進行共享, 提供增刪改查的方法(從而避免其他應用直接運算元據庫產生不必要的麻煩)
比如只給A應用提供查詢的方法,增刪改都不提供。
ContentProvider中可以註冊觀察者, 監聽資料的變化
定義類繼承ContentProvider, 實現增刪改查抽象方法
在清單檔案中註冊
<!--
內容提供者的路徑 相對於manifest標籤中的package來說的
內容提供者的別名  別的應用用 content://com.xxc.test.provider  來訪問此內容提供者
-->
<provider
    android:name=".provider.SQLiteProvider"
    android:authorities="com.xxc.test.provider"
/>
3.在手機上註冊內容提供者
將應用安裝到手機上即可, 可以不用執行程式
4.怎麼訪問內容提供者
獲取解析器ContentResolver, 指定Uri
通過ContentResolver.insert(), delete(), update(), query()方法訪問Uri關聯的ContentProvider
5.Uri的處理
使用UriMatcher可以檢查傳入的Uri是否和指定的匹配
如果Uri帶了id, 可以使用ContentUris獲取id, 插入方法可以使用ContentUris給Uri加上id
ContentUris.withAppendedId(contentUri, id)//向指定Uri後追加id
ContentUris.parseId(contentUri)//解析ID
內容提供者類
import android.content.ContentProvider;
import android.content.ContentUris;
import android.content.ContentValues;
import android.content.UriMatcher;
import android.database.Cursor;
import android.database.sqlite.SQLiteDatabase;
import android.net.Uri;

import com.xxc.dao.MySQLiteOpenHelper;

/**
 * 在別的應用呼叫內容提供者的方法
 * 1.內容提供者這個類要繼承ContentProvider,實現增刪改差和getType方法
 * 2.在別的應用中
 * 		ContentResolver resolver = getContext().getContentResolver();
 *      resolver.當前類裡的方法      在別的應用呼叫此類方法的時候必定要帶uri,指明呼叫哪個內容提供者
 */
public class SQLiteProvider extends ContentProvider {
	//Uri匹配器,用來匹配傳入的Uri
	private UriMatcher matcher = new UriMatcher(UriMatcher.NO_MATCH);//隨便傳一個參數列示沒有匹配上  傳入-1也行

	private static final int PERSON = 1;
	private static final int STUDENT = 2;
	private static final int PERSON_ID = 3;

	private MySQLiteOpenHelper helper;

	@Override
	public boolean onCreate() {//第一次啟動時執行,然後會長期駐留在後臺,除非殺死程式,否則不會再執行
		/* 第一個引數:是內容提供者的別名
		 * 第二個引數:表名(就是/後的內容是什麼)
		 * 第三個引數:匹配上以後,返回的值
		 */
		matcher.addURI("com.xxc.test.provider", "person", PERSON);
		matcher.addURI("com.xxc.test.provider", "person/#", PERSON_ID);
		matcher.addURI("com.xxc.test.provider", "student", STUDENT);
		helper = new MySQLiteOpenHelper(getContext());
		return true;//表示載入成功
	}

	@Override
	public Cursor query(Uri uri, String[] projection, String selection,	String[] selectionArgs, String sortOrder) {
		SQLiteDatabase db = helper.getReadableDatabase();
		Cursor c = null;
		switch (matcher.match(uri)) {//判斷uri匹配後返回的值
		case PERSON_ID:
			//獲取Uri最後的id內容
			long id = ContentUris.parseId(uri);
			//如果查詢條件為null,那麼就加上id的查詢條件,如果不為null,就在查詢條件的基礎上加上id查詢條件
			selection = selection==null?"id="+id: selection + " AND id="+id;
			//這裡不寫break,因為這裡的判斷必須經過
		case PERSON:
			c = db.query("person", projection, selection, selectionArgs, null, null, sortOrder);
			return c;
		case STUDENT:
			System.out.println("查詢學生表");
			return c;
		default:
			throw new RuntimeException("URI不能被識別---->"+uri);
		}
	}

	@Override
	public Uri insert(Uri uri, ContentValues values) {
		SQLiteDatabase db = helper.getWritableDatabase();
		switch (matcher.match(uri)) {
		case PERSON:
			long id = db.insert("person","name,balance", values);//插入資料,返回id值得
			return ContentUris.withAppendedId(uri, id);//將id值跟在uri後返回
		default:
			throw new RuntimeException("Uri不能識別--->"+uri);
		}
	}

	@Override
	public int delete(Uri uri, String selection, String[] selectionArgs) {
		SQLiteDatabase db = helper.getWritableDatabase();
		switch (matcher.match(uri)) {//判斷uri匹配後返回的值
		case PERSON_ID:
			long id = ContentUris.parseId(uri);
			selection = selection==null?"id="+id: selection + " AND id="+id;
		case PERSON:
			int count = db.delete("person", selection, selectionArgs);
			return count;
		default:
			throw new RuntimeException("URI不能被識別---->"+uri);
		}
	}

	@Override
	public int update(Uri uri, ContentValues values, String selection,	String[] selectionArgs) {
		SQLiteDatabase db = helper.getWritableDatabase();
		switch (matcher.match(uri)) {//判斷uri匹配後返回的值
		case PERSON_ID:
			long id = ContentUris.parseId(uri);
			selection = selection==null?"id="+id: selection + " AND id="+id;
		case PERSON:
			int count = db.update("person", values, selection, selectionArgs);
			return count;
		default:
			throw new RuntimeException("URI不能被識別---->"+uri);
		}
	}

	@Override
	public String getType(Uri uri) {
		switch (matcher.match(uri)) {//判斷uri匹配後返回的值
		case PERSON_ID:
			return "vnd.android.cursor.item/person";//返回mimetype  這個表示一條資料
		case PERSON:
			return "vnd.android.cursor.dir/person";//返回一堆資料
		default:
			throw new RuntimeException("URI不能被識別---->"+uri);
		}
	}

}
內容提供者所在應用的AndroidManifest.xml檔案
<?xml version="1.0" encoding="utf-8"?>
<manifest xmlns:android="http://schemas.android.com/apk/res/android"
    package="com.xxc.test"
    android:versionCode="1"
    android:versionName="1.0" >

    <uses-sdk android:minSdkVersion="10" />

    <application
        android:icon="@drawable/ic_launcher"
        android:label="@string/app_name" >
        <activity
            android:name=".SimpleCursorAdapterActivity"
            android:label="@string/app_name" >
            <intent-filter>
                <action android:name="android.intent.action.MAIN" />
                <category android:name="android.intent.category.LAUNCHER" />
            </intent-filter>
        </activity>
        <!-- 配置內容提供者 -->
        <provider
            android:name=".provider.SQLiteProvider"
            android:authorities="com.xxc.test.provider"
            />
    </application>

</manifest>
使用內容提供者的類
import android.content.ContentResolver;
import android.content.ContentValues;
import android.database.Cursor;
import android.net.Uri;
import android.test.AndroidTestCase;

import com.xxc.domain.Person;

public class ProviderTest extends AndroidTestCase {
	/**
	 * 雖然每個測試方法都用到
	 * ContentResolver resolver = getContext().getContentResolver();
	 * 但是這句話的建立動作不能寫在成員變數上,因為getContext()為null
	 * 寫在成員變數上的執行順序:
	 * .class->.dex->.apk->安裝->開啟程式(開啟主執行緒)->建立ProviderTest物件->getContext()->setContext()自動執行的->測試方法
	 * 寫在測試方法中的執行順序:
	 * .class->.dex->.apk->安裝->開啟程式(開啟主執行緒)->建立ProviderTest物件->setContext()自動執行的->測試方法->getContext()
	 */
	public void test1(){
		ContentResolver resolver = getContext().getContentResolver();

	}

	public void testQuery(){
		ContentResolver resolver = getContext().getContentResolver();
		Uri uri = Uri.parse("content://com.xxc.test.provider/person");
		Cursor c = resolver.query(uri, null, "balance>?", new String[]{"100"}, "balance DESC");
		while(c.moveToNext()){
			Person p = new Person(c.getInt(0),c.getString(1),c.getInt(2));
			System.out.println(p);
		}
	}

	public void testInsert(){
		ContentResolver resolver = getContext().getContentResolver();
		Uri uri = Uri.parse("content://com.xxc.test.provider/person");
		ContentValues values = new ContentValues();
		values.put("name", "xiaoxiongmao");
		values.put("balance", 2000);
		uri = resolver.insert(uri, values);
		System.out.println(uri);
	}

	public void testDelete(){
		ContentResolver resolver = getContext().getContentResolver();
		Uri uri = Uri.parse("content://com.xxc.test.provider/person");
		//由於Provider解析了url後帶的id,所以這邊就沒指定條件了,如果url後沒帶id就刪除所有的(update同理)
		int count = resolver.delete(uri, null, null);
		System.out.println("刪除了---->"+count+"條");
	}

	public void testUpdate(){
		ContentResolver resolver = getContext().getContentResolver();
		Uri uri = Uri.parse("content://com.xxc.test.provider/person/2");
		ContentValues values = new ContentValues();
		values.put("name", "xiaolaohu");
		values.put("balance", 10);
		int count = resolver.update(uri, values, null,null);
		System.out.println("更新了---->"+count+"條");
	}

	public void testGetType(){
		ContentResolver resolver = getContext().getContentResolver();
		String type1 = resolver.getType(Uri.parse("content://com.xxc.test.provider/person"));
		String type2 = resolver.getType(Uri.parse("content://com.xxc.test.provider/person/1"));
		System.out.println(type1);
		System.out.println(type2);
	}
}
相關文章
- 【Android】安卓四大元件之內容提供者Android安卓元件
- Android 四大元件之 ContentProviderAndroid元件IDE
- Android四大元件之ContentProviderAndroid元件IDE
- Android 四大元件之" ContentProvider "Android元件IDE
- Android四大元件之ContentProvider篇Android元件IDE
- Android必知必會的四大元件 -- ContentProvider篇Android元件IDE
- Android之四大元件Android元件
- Android探索之ContentProvider熟悉而又陌生的元件AndroidIDE元件
- Android 四大元件之 ServiceAndroid元件
- Android 四大元件之 ActivityAndroid元件
- Android四大元件之ActivityAndroid元件
- Android 四大元件之" Service "Android元件
- Android 四大元件之 " Activity "Android元件
- Android 四大元件之 BroadcastReceiverAndroid元件AST
- Android四大元件之Service篇Android元件
- Android四大元件之BroadcastReceiverAndroid元件AST
- Android四大元件之Activity篇Android元件
- Android 四大元件之“ BroadcastReceiver ”Android元件AST
- 詳解Android中的四大元件之一:Activity詳解Android元件
- Android四大元件之BroadcastReceiver篇Android元件AST
- Android四大元件之Service,以及IntentServiceAndroid元件Intent
- 【Android】安卓四大元件之Activity(二)Android安卓元件
- Android面試常客--四大元件之ActivityAndroid面試元件
- Android四大元件之——BroadcastReceiver介紹Android元件AST
- Android學習之四大元件(二)——serviceAndroid元件
- 完全看懂 Android 四大元件之 Activity(上)Android元件
- Android學習之四大元件(四)——BroadcastReceiverAndroid元件AST
- Android四大元件之Activity----重新認識Android(4)Android元件
- (一) Android 四大元件Android元件
- Android四大元件概述Android元件
- 四大元件之Activity元件
- 四大元件之 Service元件
- 廣播接收者 Receiver四大元件之一元件
- Android系統原始碼分析之-ContentProviderAndroid原始碼IDE
- Android之去掉文字內容的HTML標籤AndroidHTML
- 學習筆記|AS入門(八) 元件篇之ContentProvider筆記元件IDE
- Android 四大元件的解讀Android元件
- Android 入門(一)四大元件Android元件