注意:本文記錄作者在學習和使用vuejs開發中的點點滴滴,從vuejs1.0開始直到現在的vuejs2.0以後的版本。期中部分1.0的內容已經過時,僅作各位朋友參考,建議重點關注2.0相關的內容,會隨著我對vuejs有了更多的體會後不斷維護更新,也歡迎朋友們批評指正共同學習提高。
所有的vuejs元件都是被擴充套件的vue例項;
var MyComponent = Vue.extend({
//擴充套件選項物件
})
var myComponentInstance = new MyComponent();
每個Vue例項都會代理這個例項的data屬性物件裡的所有屬性:
var data = { a: 1 }
var vm = new Vue({
  data: data
})

vm.a === data.a // -> true

// 設定屬性也會影響到原始資料
vm.a = 2
data.a // -> 2

// ... 反之亦然
data.a = 3
vm.a // -> 3
所有Vue例項本身暴露的屬性和方法,都以$為頭來區別,對應Vue.set global API
例如:vm.$data,vm.$elvm.$watch,這個有利於和data屬性物件的資料來區分;
所有directive都以v-xxx形式存在:
<p v-if="greeting">Hello!</p> //根據greeting表示式的值真假來插入或者刪除p元素;
<a v-bind:href="url"></a> //href是argument,表示將a元素的href屬性和url表示式繫結起來
其對應的簡寫形式為:
<a :href="url"></a> //這個是一種縮寫的形式
<a v-on:click="doSomething"> //click是引數,表示on click時,執行doSomething這個表示式(函式)
<!-- 完整語法 -->
<a v-on:click="doSomething"></a>

<!-- 縮寫 -->
<a @click="doSomething"></a>
<a v-bind:href.literal="/a/b/c"></a> //href為argument,literal為修飾符,表示後面"/a/b/c"為字面值而不是表示式!!
<button :disabled="someDynamicCondition">Button</button>  // 繫結到一個布林值,如果真則disabled屬性就加在button上
directive object context暴露出來供update/bind函式使用的屬性:
el: the element the directive is bound to.
vm: the context ViewModel that owns this directive.
expression: the expression of the binding, excluding arguments and filters.
arg: the argument, if present.
name: the name of the directive, without the prefix.
modifiers: an object containing modifiers, if any.
descriptor: an object that contains the parsing result of the entire directive.
params: an object containing param attributes.
比如下面的directive例子中:
<div id="demo" v-demo:arghello.modifiera.modifierb="expmsg" :parax="xdata"></div>
// 注意需要watch directive的parameter才能實現xdata變化就能觸發directive內部的變化
Vue.directive('example', {
  params: ['parax'],
  paramWatchers: {
    parax: function (val, oldVal) {
      console.log('parax changed!')
    }
  }
})
繫結css class和style:
<div v-bind:style="styleObject"></div>
<li v-bind:class="{'j_current': currenttab=='login'}"> 這是class繫結的演示</li>
data: { styleObject: { color: 'red', fontSize: '13px' } }
<div v-bind:class="classObject"></div>
data: {
  classObject: {
    'class-a': true,
    'class-b': false
  }
}
v-if directive:條件渲染:
注意v-if會直接在DOM中插入刪除對應的元素
<h1 v-if="ok">Yes</h1>
<h1 v-else>No</h1>
<template v-if="ok">
  <h1>Title</h1>
  <p>Paragraph 1</p>
  <p>Paragraph 2</p>
</template>
v-show條件顯示
不會刪除元素,只會使用display:none css的方式
<h1 v-show="ok">Hello!</h1>
v-for列表資料渲染(注意在v-for子塊內可以訪問父元件作用域內的屬性,還有一個$index)
<ul id="example-2">
  <li v-for="(index, item)  of items">
   {{index}}  {{ parentMessage }} - {{ $index }} - {{ item.message }}
  </li>
</ul>
var example2 = new Vue({
  el: '#example-2',
  data: {
    parentMessage: 'Parent',
    items: [
      { message: 'Foo' },
      { message: 'Bar' }
    ]
  }
})
//結果:
0 Parent - 0 -Foo
1 Parent - 1 -Foo

//v-for也可以應用在template標籤上,這樣做的好處是:不用額外的無意義的tag,template tag不會被渲染出來
<ul>
  <template v-for="item in items">
    <li>{{ item.msg }}</li>
    <li class="divider"></li>
  </template>
</ul>
vuejs可以被應用在陣列的push,pop,shift,unshift,splice,sort,reverse方法改變陣列的場景,但是如果你使用下面的語法1. vm.items[0]={}; 2.vm.items.length=0改變陣列vuejs則無法感知這個變化,vuejs推薦的解決方案是:1.使用$set方法: example1.items.$set(0,{});
2.使用空陣列來替換items即可 example1.items = [];
vuejs也提供了直接刪除一個陣列一個元素的簡單方法 this.items.$remove(item)
v-for應用在物件上面(而不是陣列)
<ul id="repeat-object" class="demo">
  <li v-for="value in object">
    {{ $key }} : {{ value }}
  </li>
</ul>
new Vue({
  el: '#repeat-object',
  data: {
    object: {
      FirstName: 'John',
      LastName: 'Doe',
      Age: 30
    }
  }
})
//輸出一下結果
<ul id="repeat-object" class="demo">
  <li>
    FirstName : John
  </li><li>
    LastName : Doe
  </li><li>
    Age : 30
  </li>
</ul>
v-on內聯語句訪問event引數:如果是一個函式作為v-on繫結的表示式的話,該函式自動帶有(event引數),這個和普通的js事件處理函式是一樣的。
<button v-on:click="say('hello!', $event)">Submit</button>
// ...
methods: {
  say: function (msg, event) {
    // 現在我們可以訪問原生事件物件
    event.preventDefault()
  }
}
事件修飾符:
v-on:click.stop/v-on:submit.prevent/v-on:click.stop/v-on:click.capture/v-on:click.self="dothat"
v-model表單控制元件繫結:
http://vuejs.org.cn/guide/forms.html
過渡動畫
http://vuejs.org.cn/guide/transitions.html
元件:
需要確保在初始化root instance之前註冊了元件!
<div id="example">
  <my-component></my-component>
</div>
// 定義
var MyComponent = Vue.extend({
  template: '<div>A custom component!</div>'
})

// 註冊
Vue.component('my-component', MyComponent)

// 建立根例項
new Vue({
  el: '#example'
})
//結果:
<div id="example">
  <div>A custom component!</div>
</div>
注意:元件的模板會替換自定義元素my-component標籤,也就是說my-component只是作為一個掛載點而已,當然,這可以通過replace選項來改變這個預設行為
元件的區域性註冊:
有時我們可能希望一個元件只能在其他元件內使用,那麼可以用例項選項components來註冊:
var Child = Vue.extend({
template: '<div>A custom component!</div>'
})

var Parent = Vue.extend({
  template: '...',
  components: {
    // <my-component> 只能用在父元件模板內
    'my-component': Child
  }
})
元件註冊語法糖
上面全域性和局方方式註冊元件總是使用Vue.extend來定義元件,隨後傳入Vue.component()或者components選項,有時顯得很囉嗦,vuejs提供了一種簡化方式來宣告定義元件(引數傳入還是分兩種情況:全域性和區域性)
// 在一個步驟中擴充套件與註冊
Vue.component('my-component', {
  template: '<div>A custom component!</div>'
})

// 區域性註冊也可以這麼做
var Parent = Vue.extend({
  components: {
    'my-component': {
      template: '<div>A custom component!</div>'
    }
  }
})
元件選項資料隔離問題(data和el選項)
傳入Vue構造器的多數選項(new Vue({el,data,components,prop...}))都可以用在Vue.extend()中,但是data和el是兩個特例,不能直接簡單地把一個物件作為data選項傳給Vue.extend(),原因如下:
var data = { a: 1 }
var MyComponent = Vue.extend({
  data: data
})
如果直接傳入data物件給data選項,那麼所有的MyComponent元件的例項都將共享同一個data物件!!因此我們正確的做法是利用javascript的閉包的概念,使用一個函式來返回對應的資料:
var MyComponent = Vue.extend({
  data: function () {
    return { a: 1 }
  }
})
關於元件重用的一篇參考文章
http://www.tuicool.com/articles/3maEjiF
watch
watch: {
    // whenever question changes, this function will run
    question: function (newQuestion) {
      this.answer = 'Waiting for you to stop typing...'
      this.getAnswer()
    },
  deepwachedArrayOrObject: {

    handler: function(nv,ov){
             // watch handler function body
    },
       deep: true // 指示深度偵測

}
需要注意的是在vuejs2.0中初次mount的元件並不會呼叫這個watch,而只有資料變化後才會呼叫,不像1.0中初次mount時也會呼叫
注意: 對於object物件或者array物件最好使用deep: true的引數,否則可能不會對物件key值變更做出反應
Computed屬性
var vm = new Vue({
  el: '#example',
  data: {
    message: 'Hello'
  },
  computed: {
    // 計算屬性的 getter
    reversedMessage: function () {
      // `this` 指向 vm 例項
      return this.message.split('').reverse().join('')
    }
  }
})
模板解析問題:
vue的模板是DOM模板,使用的是瀏覽器原生的解析器,DOM模板必須是有效的HTML片段。我們必須注意有一些HTML元素對於什麼元素能夠放在他裡面是有限制的,比如:
a不能包含其他的互動元素(比如按鈕,連結)
ul/ol只能包含li
select只能包含option和optgroup,
table只能包含thead,tbody,tfoot,tr,caption,col,colgroup,
tr只能包含th,td
我們如果違反這些規則,比如把<ul> <my-component>這種方式來組織的話,瀏覽器會把my-component提到元素的外面,導致渲染不正確。
這時,如果我們又必須使用這樣的結構,總麼辦?
我們使用is屬性吧!!!
<table>
  <tr is="my-component"></tr>
</table>
元件component例項作用域
元件例項的scope作用域是孤立的,這意味著不能並且也不應該在子元件的模板內直接引用父元件的資料,但是我們可以使用props屬性來吧資料傳給子元件:
prop是元件資料的一個欄位,期望從父元件傳下來。子元件需要顯式地用props選項宣告props:
Vue.component('child', {
  // 宣告 props
  props: ['msg'],
  // prop 可以用在模板內
  // 可以用 `this.msg` 設定
  template: '<span>{{ msg }}</span>'
})
//傳入一個普通的字串給child元件的msg屬性
<child msg="hello!"></child>
camelCase和kebab-case的轉換
由於HTML屬性是不區分大小寫的,因此我們元件的prop使用camelCase來定義時,需要轉為短橫線隔開(這個和angular類似:
Vue.component('child', {
  // camelCase in JavaScript
  props: ['myMessage'],
  template: '<span>{{ myMessage }}</span>'
})
<!-- kebab-case in HTML -->
<child my-message="hello!"></child>
心法:camelCase in JavaScript : kebab-case in HTML
Vue.component('child', {
  // camelCase in JavaScript
  props: ['myMessage'],
  template: '<span>{{ myMessage }}</span>'
})
<!-- kebab-case in HTML -->
<child my-message="hello!"></child>
繫結自定義元件的屬性
類似於繫結一個普通的屬性到一個表示式,我們也可以使用v-bind來繫結自定義元件的props到父元件的資料,這樣每當父元件的資料發生變化時,也會傳導這個資料給子元件:
<div>
  <input v-model="parentMsg">
  <br>
  <child v-bind:my-message="parentMsg"></child>
</div>
//簡化版本:
<child :my-message="parentMsg"></child>
傳遞值給prop
初學者往往犯錯的是直接傳遞數值給prop,但是實際上是傳遞了一個字串,我們必須使用:字首,這樣告訴vue,我們後面的是一個表示式,而不是字面量:
<!-- 傳遞了一個字串 "1" -->
<comp some-prop="1"></comp>
<!-- 傳遞實際的數字  -->
<comp :some-prop="1"></comp>
prop從父親到兒子雙向繫結(在vuejs2.0中反向回傳是嚴正反對的!但v2.2之後又滿血復活了,久違啦)
預設情況下prop是單向繫結:當父元件屬性變化時,傳遞給子元件,但是反過來不會。你可以使用.sync或者.once繫結修飾符來顯式地強制雙向繫結或者單次繫結:
<!-- 預設為單向繫結 -->
<child :msg="parentMsg"></child>

<!-- 雙向繫結 -->
<child :msg.sync="parentMsg"></child>

<!-- 單次繫結 :注意單次繫結在資料傳入後就不會同步後面的任何變化了,適合傳入初始化資料的場景-->
<child :msg.once="parentMsg"></child>
需要注意的是:如果prop本身是一個物件或者陣列的話,由於javascript物件是引用方式,無論是什麼繫結方式都會是雙向繫結!!
父子元件通訊:
子元件可硬用this.$parent訪問父元件,this.$root訪問祖根例項,每個父元件都有一個陣列this.$children來包含所有子元素。
但是在vuejs2.0中,任何試圖在元件內修改通過props傳入的父元件資料都被認為是anti-pattern的,報以下錯誤:
Avoid mutating a prop directly since the value will be overwritten whenever the parent component re-renders
我們必須重新思考如何架構我們的應用:
1. 不要在元件內試圖修改props傳進來的父元件資料,資料只應該由該資料的源頭元件來負責app內的CRUD;
2. 資料永久性功能(就是和後臺資料庫互動儲存)最好是由需要處理資料的子元件來和資料庫互動,但是通過$emit一個事件通知該資料的源頭元件來更新web app的資料;(在子元件tag引用處以@resource-deleted來引用父元件的事件函式) 這種模式帶來的問題是資料來源和資料消費者有事件互動的強烈耦合。
還有一種小方案是將資料永久性功能以及web app內部的資料一致兩個功能合為一處,即:子元件需要修改源資料時,$emit訊息給父親,由owner來同時完成資料永久性儲存和內部app資料一致
3.對於大型web app可以使用vuex來實現解耦:父子之間通過vuex store state tree來保持聯絡,任何時候需要獲取資料則getter,如果需要修改資料則setter,資料修改後的reactive則由vuejs處理,這種方式最大限度地實現瞭解耦
4. 但是有時也需要一些平衡:難道每一片小資料都得通過$emit事件給資料來源頭來做修改嗎?由於如果傳入的資料是Object型別或者array型別的,則本身由於是reference傳參的,也就是說子元件prop傳入供子元件讀/寫的object/array和“源頭object/array”實際上是一個物件,因此只要我們不直接簡單粗暴以
this.objFromParent = newObjectCreatedByChild //這樣會導致vuejs報錯 Avoid mutating a prop directly ...
但是如果我們這樣操作,則是可以的,並且資料完全是同步的!
this.objFromParent.propertyChangedByChild = newObjectCreatedByChild.propertyChangedByChild //這樣資料就很輕鬆保持了一致性,而不用$emit訊息到資料來源來維護資料了!!!
5.第4點和vuex的機制比較類似。你可以在需要共享給兒子元件的資料(起源於hosted by本元件)存放在一個localStore物件的屬性中,將localStore物件作為屬性值傳給兒子元件,比如:pstore="localStore",在兒子元件中,則可以直接操作pstore.parentData = somedatahandledbyson ,曲線救國,繞過了vuejs2.0不允許對屬性賦值操作的限制。
6. 如果是需要共享給後代子孫的資料,則可以引入一種thisrootstore機制,所有這類資料作為thisrootstore的屬性物件存在,後代以this.rootstore.xxx來引用它。
5和6的好處是剔除大部分不需要$emit事件來sync資料的冗餘程式碼,更加易於實現元件功能的抽象和重用
7. 也可以考慮利用slot機制的特性: slot本身所在html js scope屬於父元件,這樣就可以以下面的形式來解決這個資料同步問題:
<!-- within parent template removeThisSon() resonsible for remove data which hosted by parent -->
<son v-for="son in sons">
  <div @click="removeThisSon(son)"> some operation affected parent data</div>
</son>
心法:對整個屬性物件替換(賦值),新增,或者刪除操作必須由資料來源來操作,但是對傳入的屬性物件的某些property修正,則可以在子元件內部直接操作,資料就同步反映到父元件中
心法:資料優先,你首先抽象驅動你的app的state,所有程式碼就圍繞著這些個state的變遷,而讓vuejs本身來執行構建和更新DOM的工作。
The whole idea is "data first". you define what the state of your application should look like, and let Vue build and update the DOM accordingly
自定義事件
Vue例項的事件系統獨立於DOM事件系統,做法有不同:
使用$on()監聽事件;
使用$emit()在這個元件上面觸發事件;
使用$dispatch()來派發事件,事件沿著父鏈冒泡;
$broadcast()廣播事件,從父親向下到所有後代;
子元件索引v-ref
<div id="parent">
  <user-profile v-ref:profile></user-profile>
</div>
var parent = new Vue({ el: '#parent' })
// 訪問子元件
var child = parent.$refs.profile
transclusion: slot分發內容
學過angular,你可能知道有一個非常晦澀難懂的概念:transclusion,在vuejs中也有類似的說法slot
我們先搞清楚編譯作用域吧,看看下面的程式碼:
<child>
  {{ msg }}
</child>
這個程式碼中的msg到底是繫結到父元件的資料,還是繫結到子元件的資料呢??正確答案是父元件。關於元件的作用域有以下心法,牢牢記住:
父元件模板的內容在父元件的作用域內編譯;子元件模板的內容在子元件作用域內編譯。
一個常見的錯誤是試圖在父元件的模板內將一個directive繫結到子元件的屬性和方法:
<!-- 無效:原因是這個模板是父元件的,而父元件模板不知道子元件的資料狀態! -->
<child v-show="someChildProperty"></child>
注意:分發內容是在父元件的作用域內編譯
v-for和元件共用:
v-for可以像普通元素上一樣在compent tag上面使用:
<my-component
  v-for="item in items"
  :item="item"
  :index="$index">
</my-component>
上例中每個my-component例項將會傳入item資料/index索引以便使用
async components:
有時候,我們的元件在render之前,可能需要一些資料準備的工作:比如從後端ajax過來資料,並且feed到元件中去,這時就需要使用async元件的概念了。
http://jsbin.com/maqagocise/edit?html,js,output
上面的程式碼例子可以參考:
Vue.component('async-example', function (resolve, reject) {
  setTimeout(function () {
    resolve({
      template: '<div>I am async!</div>'
    });
  }, 1000);
});
new Vue({
  el: '#body'
});
<async-example></async-example>
動態插入和刪除一個vue元件
你雖然可以通過以下程式碼實現動態插入和刪除vue元件的需求,但是這種方式的問題是:在vue devtool中並未看到資料鏈的關係,我們還是建議使用v-if來實現這種應用場景。
 methods:{
     attachNewPermission: function(){
         var vm = this;
         var html = '<async-example roleid='+this.roleid+' ></async-example> ';
         var vmtemp = Vue.extend({
                                     template: html,
                                     replace: false,
                         el: function(){
                             return vm.$el.getElementsByClassName('asyncloadednode')[0];
                         }
                             });
         new vmtemp();

     }
通過prop向子元件傳入父元件的函式作為callback,並且訪問子元件的資料
http://012.vuejs.org/guide/components.html#Passing_Callbacks_as_Props
prop傳入父元件資料例子
1 <!-- url為update-text-inplace元件的屬性,其值為/admin/roles/xx,其中role.id為在父元件的template可見的資料 -->
2 <update-text-inplace :url='"/admin/roles/"+role.id' fieldname="name">
3       <div class="role-name">@{{ role.name }}</div>
4 </update-text-inplace>
VUEJS 2.0新feature及變化
https://github.com/vuejs/vue/issues/2873
vue component定義及引用命名約定
// PascalCase
import TextBox from './components/text-box';
import DropdownMenu from './components/dropdown-menu';

export default {
  components: {
    // use in templates as <text-box> and <dropdown-menu>
    TextBox,
    DropdownMenu
  }
}
// in a component definition
components: {
  // register using camelCase
  myComponent: { /*... */ }
}
<!-- use dash case in templates -->
<my-component></my-component>
何為fragment instance
http://vuejs.org/guide/components.html#Fragment-Instance
ES6 moudle export/import
// flash-message.js
function alertMessage(message) {
   alert(message);
}

function logMessage(message) {
   console.log(message);
}

export {alertMessage, logMessage};

//app.js

import {alertMessage, logMessage} from './flash-message';

alertMessage("Hello");
logMessage("Hello");


//flash-message.js
export default function(message){
   alert(message);
}

//app.js
import flashMessage from './flast-message';

flashMessage("Hello");
http://www.cnblogs.com/Answer1215/p/5131548.html
注意root Vue instance不能多次初始化,否則可能會出現元件找不到的情況
javascript模組化開發模式:
每個檔案都組織為一個模組;
檔案的開頭通過import(es6)/require(cmd,amd)方式宣告需要從外部匯入的依賴;
每個檔案需要輸出的比如component defination object, function,object等通過export定義;
第三方元件通過npm install --save-dev或者bower install --save下載安裝,通過require('jquery')(這種方式是通過npm安裝的,可以不用傳入路徑)或者require('path/to/jquery/jquery')(這種是非npm安裝模式從本地檔案require)來引入
所有第三方元件(如果本身不支援CMD,AMD,ES6模組化載入的話)或者自己寫的過程式js檔案需要做簡單的改造,改造成ES6/CMD/AMD模組格式,以支援模組化開發模式
關於vuejs大小寫,camcase等
在使用vueify時,需要import一個元件的配置物件,這時建議全部使用首字母大寫的命名方式,下例:
import MyComponent from './my-component'

export default {
  components: {
    MyComponent // es2015 shorhand
  }
}
//然後在template中使用-代替非首單詞大寫字母:
<my-component></my-component>
以js模組化方式寫一個export一個singleton object:
var Spinner = require('spin.js');
// export singleton:這是由於require會cache一個object
module.exports = exports = new Spinner;
在需要引用該singleton object的地方:
var spin = require('./supportlibs/spinner');
var spin2 = require('./supportlibs/spinner');
spin===spin2 //返回true!
hot reloading
我們在使用browsersync這個工具做前端開發時,可以只對頁面的css進行注入,這個概念在vueify的元件開發中也是可以的
參考: http://vuex.vuejs.org/zh-cn/hot-reload.html
在browserify工具鏈下有以下plugin實現類似的功能: https://github.com/AgentME/browserify-hmr/

如何在Html inspection pannel中清楚檢視一段html屬於哪個元件?
在元件式開發模式下,我們的頁面就是一堆component元件按照邏輯關係堆砌出來的,很多時候我們發現找到對應的html片段屬於哪個元件的模版定義的不是一件容易的事情,如何處理這種棘手的問題使得開發更容易和有趣?
我總結下來一個簡單有效的方法是:在元件的root node下增加一行html註釋: <!-- yourcomponent-name -->, 這樣在html inspection介面就一眼看出是什麼元件了,對應你想修改的話,開啟那個元件.vue檔案修改即可。
vuejs元件vueify開發模式下的依賴問題
我們使用vueify開發模式來開發vuejs元件,將所有的程式碼:html+javascript+css都放在component.vue檔案中,這對於前端開發可以說是一種革命,大大地便利了元件的迭代式開發,大大增加了程式碼的可重用性,但是同時也帶來一些“問題”,其中一個問題就是:當我們更改一個component.vue後,必須重新編譯所有引用過這個vue檔案的bundle.js檔案才能自動使用最新的component邏輯,這在以往純粹<script>tag引入js的開發模式是不可想象的。之所以必須重新編譯那是因為每一個bundle.js檔案都是獨立編譯相應模版及components陣列中定義的依賴元件而最終形成一個包含所有js/css的bundle的。
Vuejs directive對應this.vm指向誰?
customized directive的bind函式中如果返回this.vm到底指向的是誰呢?這有時候還是容易混淆不清的。一般性原則:如果該directive attached到一個component的template內部,則該值指向VueComponent,如果該directive attached dom node並不屬於任何component,則這個值就直接指向root Vue instance.
Js開發中引用第三方庫的幾種方式
在js元件開發中,我們經常需要引用一些成熟的js元件,例如jquery datepicker, jquery select2, vue-mdl等庫,引用他們的方式有以下幾種:
首先我們通過npm install vue-strap來安裝vue-strap庫;
1. CommonJS:
var alert = require('vue-strap/src/alert');
// or
var alert = require('vue-strap').alert;

new Vue({
  components: {
    'alert': alert
  }
})
2.ES6
import alert from 'vue-strap/src/alert'
// or
import { alert } from 'vue-strap'

new Vue({
  components: {
    alert
  }
})
3.AMD(這種方式會非同步載入js,因此往往通過bower安裝,後序會載入到瀏覽器)
$ bower install vue-strap

define(['vue-strap'], function(VueStrap) { var alert = VueStrap.alert; ... });
4. Browser globals
以vue-strap為例,它會被以window.VueStrap全域性物件來暴露相應的介面:
<script src="path/to/vue.js"></script>
<script src="path/to/vue-strap.js"></script>
<script>
    var vm = new Vue({
        components: {
            alert: VueStrap.alert
        },
        el: "#app",
        data: {
            showRight: false,
            showTop: false
        }
    })
</script>
強烈建議參考 https://segmentfault.com/a/1190000004368132 該文章對各種模組化的寫法解釋的很清楚
動態load html並且編譯
如果你有一個元件,它會動態載入一部分html程式碼,而這個程式碼中包含一些vuejs程式碼,你需要使用$compile功能:
_self.vm.$compile(_self.vm.$el); //這個是不行的,因為dom已經是編譯過的
//下面的程式碼是獲取需要recompile的html node,並且$compile,這樣就形成了活動的程式碼了!
_.each($('[recompile]'), function(el){
                _self.vm.$compile(el);
            });
以上方法未經過驗證,也沒有完全搞清楚,但是替代方案我是親手測試過的: 1. 通過async component;2.通過v-if async元件的方式動態向後端獲取資料和模版,在resolve方法中將對應資料和模版及資料來繫結;通過v-if的方式可以將html partial作為一個變數方式繫結在模版中,當該partial資料ready時,v-if自然會啟動編譯過程
Dynamic components with prop data傳入
如果你需要在同一個mount point顯示不同的component,這時Dynamic components就很合適了。
<!-- html -->
<div id="app">
  by dynamic Component:
  <component
    v-for="item in items"
    :is="item.component"  //這裡根據item.component來決定渲染哪類元件
    :opts="item.options"> //同時通過opts傳入要渲染元件的props
  </component>
</div>
Vue.component('node', {
  template: "<div>node: {{ opts }}</div>",
  props: ['opts']
});

Vue.component('node2', {
  template: "<div>node2: {{ opts }}</div>",
  props: ['opts']
});

new Vue({
  el: '#app',
  data() {
    return {
      items: [{
        component: "node",  //node節點型別
        options: 'node節點資料'
      }, {
        component: "node2", //node2節點型別
        options: 'node2節點資料'
      }]
    };
  }
  methods: {
    addItem() {
      this.items.push(this.newItem);
      this.newItem = {
        component: "",
        options: ""
      }
    }
  }
});
https://jsfiddle.net/matiascx/qn29r3vt/
https://jsbin.com/nikimigaju/edit?html,output
webpack構建環境相關內容
什麼是webpack:
webpack是和browserify/gulp/grunt等相似的構建工具(Webpack is a module bundler. It takes a bunch of files, treating each as a module, figuring out the dependencies between them, and bundle them into static assets that are ready for deployment.),webpack比較完美地解決了前端模組化開發的工具鏈支援。特別是webpack的loader外掛機制使得可以任意載入第三方開發的外掛來擴充套件其支援的功能。接下來要說的vue-loader就是其中的一個典型案例;
什麼是loader:
Webpack 由於本身只能處理 JavaScript 模組(commonJS,AMD,ES6),如果要處理其他型別的檔案,就需要使用 loader 進行轉換。
Loader 可以理解為是模組和資源的轉換器,它本身是一個函式,接受原始檔作為引數,返回轉換的結果。這樣,我們就可以通過 require 來載入任何型別的模組或檔案,比如 CoffeeScript、 JSX、 LESS 或圖片。
先來看看 loader 有哪些特性?
- Loader 可以通過管道方式鏈式呼叫,每個 loader 可以把資源轉換成任意格式並傳遞給下一個 loader ,但是最後一個 loader 必須返回 JavaScript。
- Loader 可以同步或非同步執行。
- Loader 執行在 node.js 環境中,所以可以做任何可能的事情。
- Loader 可以接受引數,以此來傳遞配置項給 loader。
- Loader 可以通過副檔名(或正規表示式)繫結給不同型別的檔案。
- Loader 可以通過
npm釋出和安裝。 - 除了通過
package.json的main指定,通常的模組也可以匯出一個 loader 來使用。 - Loader 可以訪問配置。
- 外掛可以讓 loader 擁有更多特性。
- Loader 可以分發出附加的任意檔案。
Loader 本身也是執行在 node.js 環境中的 JavaScript 模組,它通常會返回一個函式。大多數情況下,我們通過 npm 來管理 loader,但是你也可以在專案中自己寫 loader 模組。
按照慣例,而非必須,loader 一般以 xxx-loader 的方式命名,xxx 代表了這個 loader 要做的轉換功能,比如 json-loader。
在引用 loader 的時候可以使用全名 json-loader,或者使用短名 json。這個命名規則和搜尋優先順序順序在 webpack 的 resolveLoader.moduleTemplates api 中定義。
什麼是vue-loader(browerify下對應vueify工具):
vue-loader是even you為了支援web元件在一個.vue檔案中組織js,css,html的夢幻開發模式,獨創性地定義了一種檔案型別component.vue, 這個vue檔案中用script,style, template來分別代表js,css,html,這種檔案格式是瀏覽器不認識的哦,webpack構建工具也是不認識的哦,要能使用必須先編譯打包成webpakc bundle,而在webpack生態系統中,vue-loader就是幹這個用的。一旦webpack遇到.vue檔案就會呼叫這個vue-loader分別將js,css,html抽取出來,並且呼叫對應的程式碼transpiler工具:比如css可能用less,也可能用sass;js可能用coffee,也可能用jsx;html可能用yaml等都需要轉換。這個工作就是vue-loader來完成的。
簡單一句話,vue-loader就是將一個.vue檔案轉換為一個js模組的
chrome下vue dev-tool無法顯示問題
Vue.config.devtools = true; //在new Vue()之前執行
//Vue.config.debug = true;
//window.__VUE_DEVTOOLS_GLOBAL_HOOK__.Vue = Vue;
directive的webpack引用
// diretive定義
module.exports = {
  update: function(newValue, oldValue) {
    console.log(newValue)
    console.log(oldValue)
  },
  bind: function() {

  },
  unbind: function() {

  }
}
// component定義應用directive
module.exports = {
  template: require('./template.html'),
  directives: {
    currency: require('./directives/currency.js')
  }
}
//在template中
<div v-currency>$1.00</div>
VueX
http://skyronic.com/2016/01/03/vuex-basics-tutorial/
vuex對於構建大型應用是非常重要的,主要解決資料狀態維護和傳遞的問題(比如不相干的多個元件需要更新資料,同時需要通知多個不相干的元件來應對這些資料的更新來更新檢視):整個應用只有一個地方負責對狀態資料的更新,任何一個地方都可以引用這個資料,需要更新則發訊息給vuex來完成更新操作,其他任何引用了這個狀態的地方都會reactive更新(computed屬性)
主要的思路是保持single source of truth,比如有兩個vue instance vmA和vmB,都依賴於一個狀態,這時如何保持狀態的同步就會是一個問題
var sourceOfTruth = {}

var vmA = new Vue({
  data: sourceOfTruth
})

var vmB = new Vue({
  data: sourceOfTruth
})
動態建立並且mount元件到dom中
import ExecPlayer from './components/pages/exercise/exec-player.vue'; //這裡exec-player只是export了一個component option object

var execplayercomp = Vue.extend(ExecPlayer); //這裡通過傳入定義好的component option object作為Vue.extend的引數,以寫程式的方式獲得了component的建構函式
                var execplayer = new execplayercomp({
//                    'el': '#execplayer',  //呼叫new xxx的方式來建立元件,如果給了el配置項,則無需再呼叫$mount
// 需要注意的是這種方式建立的元件在devtool中並不會顯示為rootvm的子元件,但是實際上他們是有父子關係的!!!
// 如果在html程式碼中直接以 <exec-player></exec-player>呼叫的方式來composite元件的話,則在devtool中能夠正確顯示父子關係~!
                    created(){
                        this.exercises = rootvm.exercises;
                    }
                }).$mount(document.getElementById('execplayer'));
vm.$set vs Vue.set vs Object.assign
1. For Vue instances, you can use the $set(path, value) instance method:
vm.$set('b', 2)
// `vm.b` and `data.b` are now reactive
2. For plain data objects, you can use the global Vue.set(object, key, value) method
Vue.set(data, 'c', 3)
// `vm.c` and `data.c` are now reactive
3. 如果想使用.assign來一次性給一個object新增多個屬性和value,需要注意:
// instead of `Object.assign(this.someObject, { a: 1, b: 2 })`
this.someObject = Object.assign({}, this.someObject, { a: 1, b: 2 })
vm.$nextTick() vs Vue.nextTick(callback)
到底nextTick是幹什麼的:
看一個牛人的回答: it's a way to execute a callback function after the data is set.
To add an example to that, lets say you have a jQuery plugin that creates a pie chart. The data on those charts are fetched and set by vuejs. You can't initialize the charts until after the data is set / until the "next tick". Here's a quick example...
https://jsfiddle.net/kr9b4o8f/
If you try to initialize the charts without nextTick(), it won't work because the data has not been changed yet.
<div id="example">{{msg}}</div>
var vm = new Vue({
  el: '#example',
  data: {
    msg: '123'
  }
})
vm.msg = 'new message' // change data
vm.$el.textContent === 'new message' // false
Vue.nextTick(function () {
  vm.$el.textContent === 'new message' // true
})

// 對於component下面的呼叫方法
Vue.component('example', {
  template: '<span>{{msg}}</span>',
  data: function () {
    return {
      msg: 'not updated'
    }
  },
  methods: {
    updateMessage: function () {
      this.msg = 'updated'
      console.log(this.$el.textContent) // => 'not updated'
      this.$nextTick(function () {
        console.log(this.$el.textContent) // => 'updated'
      })
    }
  }
})
通過extends選項繼承基礎元件,使用js程式碼建立新元件,作為獨立.vue檔案方式構建新組建的替代方案,無須多個.vue檔案
var CompA = { ... }

// extend CompA without having to call Vue.extend on either
var CompB = {
  extends: CompA,
  ...
}
心法:在同一類元件需要在同一個mount point載入時,這種場景下最好的方案就是使用dynamic component。而使用動態元件又有兩種方案:
1. 直接生成多個.vue元件,比如component-typeA.vue,component-typeB.vue,這種方式比較適合元件程式碼差異巨大的場景,具體應用時在使用該dynamic元件的父元件template中直接import這些.vue檔案,並且components option中引用這些元件的定義
import CompTypeA from 'comp-type-a.vue'
import CompTypeB from 'comp-type-b.vue'

export default {
  ...
  components: [ CompTypeA, CompTypeB ]
}

// html:
<component :is="comptype" :optionstoComp></component>
2. 只生成一個generic的.vue元件,隨後其他元件extends這個generic元件,在引用該dynamic元件的父元件的script中直接使用js程式碼方式"宣告"新的元件,並在父元件的template中使用:
import Comp from 'generic-comp.vue'

var CompTypeA = {
   extends: Comp,
   templates: 'A',
   methods: ..A..
}
var CompTypeB = {
   extends: Comp,
   templates: 'B',
   methods: ..B..
}
export default {
  ...
  components: [ CompTypeA, CompTypeB ]
}

// html:
<component :is="comptype" :optionstoComp></component>
vuejs中重用程式碼的幾種方案
1. 建立自包含的元件,可以任意重用
2. 建立抽象元件,比如node,實體元件extends這個抽象元件,再新增自己的options,形成新的concret元件
3. mixins: 部分程式碼可以被任意無關的類,元件共用,這部分最適合使用mixin
// mixin引用方法
import VuexStateGetterMixin from './mixin.js'
export default {
        mixins: [ VuexStateGetterMixin ],
}
4. 只負責對DOM操作的功能,則可以抽象為directive來重用
javascript中用到的各個版本術語 ES5,ES6,ES2016,ECMAScript
- ECMAScript:一個由 ECMA International 進行標準化,TC39 委員會進行監督的語言。通常用於指代標準本身。
- JavaScript:ECMAScript 標準的各種實現的最常用稱呼。這個術語並不侷限於某個特定版本的 ECMAScript 規範,並且可能被用於任何不同程度的任意版本的 ECMAScript 的實現。
- ECMAScript 5 (ES5):ECMAScript 的第五版修訂,於 2009 年完成標準化。這個規範在所有現代瀏覽器中都相當完全的實現了。
- ECMAScript 6 (ES6) / ECMAScript 2015 (ES2015):ECMAScript 的第六版修訂,於 2015 年完成標準化。這個標準被部分實現於大部分現代瀏覽器。可以查閱這張相容性表來檢視不同瀏覽器和工具的實現情況。
- ECMAScript 2016:預計的第七版 ECMAScript 修訂,計劃於明年夏季釋出。這份規範具體將包含哪些特性還沒有最終確定
- ECMAScript Proposals:被考慮加入未來版本 ECMAScript 標準的特性與語法提案,他們需要經歷五個階段:Strawman(稻草人),Proposal(提議),Draft(草案),Candidate(候選)以及 Finished (完成)。
ES6中的=> arrow function
// ES5
var total = values.reduce(function (a, b) {
  return a + b;
}, 0);

// ES6
var total = values.reduce((a, b) => a + b, 0);
// ES5
$("#confetti-btn").click(function (event) {
  playTrumpet();
  fireConfettiCannon();
});
// ES6
$("#confetti-btn").click(event => {
  playTrumpet();
  fireConfettiCannon();
});
arrow函式在vuejs event bus handler中的應用
vuejs2.0開始提倡使用event bus這個機制來實現程式碼解耦和任何模組之間的資料通訊,非常強大,但是使用中可能會遇到這樣的困惑:在event handler中的this指標怎麼才能夠引用到event handler所在的vue instance呢?這時ES6的=>arrow函式就起到了作用,因為它不會改變this指標:
this.pcomBus.$on('toggle-checked-all-for-role', e => {
                // 這裡this指標就指向的是定義這個pcomBus.$on呼叫的那個vue instance了!
}
ES6 destruturing解構
參考 http://www.zcfy.cc/article/498
const obj = { first: 'Jane', last: 'Doe' };
const {first: f, last: l} = obj;
    // f = 'Jane'; l = 'Doe'

// {prop} 是 {prop: prop} 的縮寫
const {first, last} = obj;
    // first = 'Jane'; last = 'Doe'
強烈建議參考 https://segmentfault.com/a/1190000004365693 講解ES6基礎語法
https://developer.mozilla.org/en/docs/Web/JavaScript/Reference/Functions/Arrow_functions
npm安裝vue, vuex等next分支上的最新版本:
npm install vue@next --save
npm install vuex@next --save
vue2.0版本檔案以及開發環境工具不匹配帶來的問題
$ npm run dev

Vue packages version mismatch:

- vue@2.0.0-rc.2
- vue-template-compiler@2.0.0-beta.7

This may cause things to work incorrectly. Make sure to use the same version for both.
If you are using vue-loader or vueify, re-installing them should bump vue-template-compiler to the latest.
解決辦法npm install vue-loader@next --save-dev
如何安裝或者更新vue相關元件?
vue,vuex,vue-router,vue-loader是我們需要安裝的元件,如果你已經使用了以前的版本,可以先npm uninstall, 然後再npm install他們即可
npm install vue-template-compiler
vuex mapActions匯入methods和local methods混用的語法
    import { mapActions } from 'vuex'
      export default {
        methods:{
          doJob: function(){
              this.changeme(content)
          },
          ...mapActions([
              'changeme'
          ])
        }
    }
vuejs1.0 v-for track-by vs vuejs2.0 :key="item.id"
在vue v-for渲染一個列表時,如果不用被操作的item資料id作為key的話,那麼vuejs會預設使用陣列index作為key,而這時如果資料列表發生變化,比如一個item被刪除,則可能會發生資料不同步的怪異錯誤,強烈建議永遠在v-for處理列表資料時,加上:key="item.id"!!!
v-for="skill in pskills" :key="skill.id"
什麼是抽象元件以(transition元件為例)?
抽象元件具有以下特點:
1. 它是以引入功能而不是構建檢視為目的而存在的
2. 它不會在DOM中有任何節點
3. 它也不會在inspect component hierarchy中顯示出來
抽象元件和無template的元件有什麼區別??
非常典型的例子是vuejs2.0中引入的transition元件:
<transition>
  <div v-if="ok">toggled content</div>
</transition>
transition元件支援以下props:
1. name: 用於自動產生transition class name,比如如果name=fade,則對應的transition class將有.fade-enter,.fade-enter-active,.fade-leave,.fade-leave-active
2. appear: 是否在初次渲染時引用transition,預設為false;
3. css: 是否引用css transition class。預設為true,如果是false的話,則僅觸發javascript hooks
4. type: 指定需要等待何種event來決定transition的結束。比如: "transition",或者"animation"
5. mode: 控制leaving/entering transition的timing sequence,可能的選項是:in-out或者out-in
6.enterClass,leaveClss,enterActiveClass,leaveActiveClass,appearClass,appearActiveClass分別用於設定對應的css class為客制內容.
比如:
<transition name="fade" mode="out-in" appear>
<!-- classname 為 fade,fade-active,fade-leave,fade-leave-active為transition class -->
<!-- 模式為先出再入,並且首次渲染時也應用transition -->
  <component :is="view"></component>
</transition>
支援的事件:
before-enter,enter,after-enter,before-leave,leave,after-leave,before-appear,appear,after-appear
例子:
<transition @after-enter="transitionComplete">
  <div v-show="ok">toggled content</div>
</transition>
<transition-group>元件
如果需要對多個元素執行transition效果,則需要使用transition-group元件。和transition元件所不同的是該元件須插入dom
Vue.component('fade', {
  functional: true,
  render (createElement, { children }) {
    const data = {
      props: {
        name: 'fade'
      },
      on: {
        beforeEnter () { /* ... */ }, // <-- Note hooks use camelCase in JavaScript (same as 1.x)
        afterEnter () { /* ... */ }
      }
    }
    return createElement('transition', data, children)
  }
})
<fade>
  <div v-if="ok">toggled content</div>
</fade>
參考 http://vuejs.org/guide/render-function#Functional-Components
vuejs compile和mount過程
當vuejs app啟動時,首先入口程式根據#el來找到本應用對應的html片段,該片段作為root的template,開始啟動編譯連結過程。每找到一個componennt,就開始walk through該元件的template,繼續compile,直到編譯完成。在vuejs2.0中由於沒有了compiled鉤子,我們可以理解created事件就是按照上面的timing來完成的。如果對應有v-for,則開始啟動loop過程,就像普通的js程式碼一樣,先把第一次Loop的資料傳給對應元件開始編譯,直到所有的loop都完成了,這時compile過程可以認為是完全完成了。mount過程則和compile完全相反,由compile形成的dom node map反序逐級mount。也就是說先子元件後父元件直到root元件被mounted.
比如,如果我們有下面的html結構,以及外圍loop兩次,a元件template內需要loop三次,則會按照下面的timing圖來執行:
<!-- html content for root management partial -->

<div id="root">
    <div class="root" v-for="(item,index) of outerloop2times"><!-- 外圍需要loop 2次 -->
        <a></a>
        <b></b>
    </div>
    <c></c>  <!-- 注意c元件是最後一個created和mounted to root的元素 -->
</div> <!-- root結束 -->
<script type="x/template" id="a-template">
    <div class="a-root">
        <a-sub v-for="(item,index) of innerloop3times"></a-sub> <!-- 需要loop 3次 -->
    </div>
</script>
<script type="x/template" id="b-template">
    <div class="b-root">
        <!-- standard html partial -->
    </div>
</script>
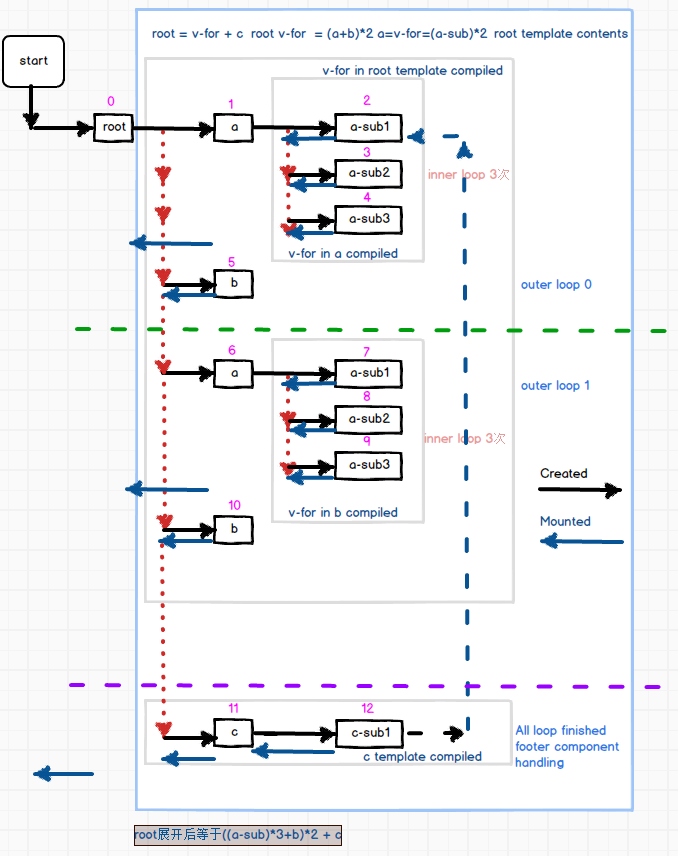
所有watcher程式碼都mounted之後才可能被觸發。
關於vue元件的styling探討
1. vuejs元件需要有一個container class來負責該vue元件的position, layout,display,float等style設定;
2. vue-root, vue-root-{skin}作為root元素的class
3. {skin}可以考慮通過global vuex state驅動傳入,方便換膚
新增屬性reactive注意事項:
新增單個屬性,可以使用:
Vue.set(vm.someobj,'newprop',propvalue)
新增多個屬性物件,可以使用:
this.someObject = Object.assign({}, this.someObject, { a: 1, b: 2 })
對於物件的操作整體替換,修改等強烈建議使用Vue.set因為這樣能夠確保vuejs能夠感知到這個變化
基於jqueryui select2元件在vuejs2.0(不支援prop.sync)下如何實現v-model模式的功能?
我們知道vuejs2.0一個重大的變化是不再支援prop.sync功能,也就是說從外部傳入的資料是不能通過vue元件內部邏輯直接來實現更新的。而我們在封裝jquery-ui的select2元件形成我們自己的select2元件時,又必須要實現v-model的功能,腫麼辦?還有就是如果銷燬vuejs select2元件,而其底層的jqueryuiselect2控制元件並不會自動銷燬,腫麼辦?
我們看看官方的封裝程式碼,解讀一下:
Vue.component('select2', {
  props: ['options', 'value'],
  template: '#select2-template',
  mounted: function () {
    var vm = this
    $(this.$el)
      .val(this.value)
      // init select2
      .select2({ data: this.options })
      // emit event on change.
      .on('change', function () {
        vm.$emit('input', this.value)  //這個非常重要,通過emit一個input事件來更新v-model資料
      })
  },
  watch: {
    value: function (value) {
      // update value
      $(this.$el).select2('val', value)
    },
    options: function (options) {
      // update options
      $(this.$el).select2({ data: options })
    }
  },
  destroyed: function () {
// 這裡也很重要,在vue元件銷燬時,jquery ui自己生成的dom並不會銷燬,我們要通過jquery ui select2的api來實現銷燬
    $(this.$el).off().select2('destroy')
  }
})
html
        <select2 v-model="selectedValue"
            <!-- 這裡selectedValue會作為value屬性傳入select2元件, 元件更新資料時通過$emit('input', select2internalValue)傳給selectedValue -->
         >
        </select2>
v-model internal
v-model無論用在input元素上還是custom component上,其工作機制是一樣的:
<input v-model="message">
<!-- roughly the same as: -->
<input v-bind:value="message" @input="message = $event.target.value">

<my-component v-model="message"></my-component>
<!-- roughly the same as: -->
<my-component v-bind:value="message" @input="setMessage"> </my-component>
<!-- setMessage provided by v-model, doing essentially:
       function (valuefrom$emittedInputEvent) { message = valuefrom$emittedInputEvent }
-->
參考官方v-model文件:
https://vuejs.org/v2/guide/components.html#Using-v-model-on-Components
custom input實現v-model的例子:
<custom-input
  v-bind:value="searchText"
  v-on:input-customized="searchText = $event"
></custom-input>
在這個custom-input例子中,內部的input元件必須:1.繫結value attribute到value prop;2.在內部input元素上,監聽input元素原生的input事件,並且轉化並emit customized input事件,並帶上new value。注意:實際上customized event並非須用input作為事件名稱
Vue.component('custom-input', {
  props: ['value'],
  template: `
    <input
      v-bind:value="value"
      v-on:input="$emit('input-customized', $event.target.value)"
    >
  `
})
這樣v-model就可以像下面來使用了:
<custom-input v-model="searchText"></custom-input>
v-model定製使用特定的prop而非預設的value及input事件
預設情況下v-model會使用valude作為prop,而input作為監聽的event。有的時候,可能並不是很合適,比如checkbox/radio都會使用value prop作為特殊目的,這時,我們可能希望使用一個新的prop,比如checked用作prop,change作為變更的event來監聽。
Vue.component('my-checkbox', {
  model: {
    prop: 'checked',
    event: 'change'
  },
  props: {
    // this allows using the `value` prop for a different purpose
    value: String,
    // use `checked` as the prop which take the place of `value`
    checked: {
      type: Number,
      default: 0
    }
  },
  // ...
})
<my-checkbox v-model="foo" value="some value"></my-checkbox>
以上兩段程式碼就等價於:
<my-checkbox
  :checked="foo"
  @change="val => { foo = val }"
  value="some value">
</my-checkbox>
vuejs2.0動態渲染模版
https://cinwell.com/post/vue-2-dynamic-template/
通過router-view給對應元件傳遞引數
<router-view class="view" :users="users"></router-view>
程式控制實現router路由變換
// literal string path
router.push('home')

// object
router.push({ path: 'home' })

// named route
router.push({ name: 'user', params: { userId: 123 }})

// with query, resulting in /register?plan=private
router.push({ path: 'register', query: { plan: 'private' }})
https://router.vuejs.org/en/essentials/navigation.html
vuejs巢狀路由
有時我們希望在routed 元件中進一步使用路由,這時就要用到巢狀路由的概念了:
<div id="app">
  <p>
    <router-link to="/user/foo">/user/foo</router-link>
    <router-link to="/user/foo/profile/greatinfo">/user/foo/profile</router-link>
    <router-link to="/user/foo/posts">/user/foo/posts</router-link>
  </p>
  <router-view></router-view>
</div>
<!- javascript ->
const User = {
  template: `
    <div class="user">
      <h2>User {{ $route.params.id }}</h2>
      <router-view></router-view>
    </div>
  `
}

const UserHome = { template: '<div>Home</div>' }
const UserProfile = { template: `<div>Profile for {{$route.params.id}} with info {{$route.params.info}}</div>` }
const UserPosts = { template: '<div>Posts</div>' }

const router = new VueRouter({
  routes: [
    { path: '/user/:id', component: User,
      children: [
        // UserHome will be rendered inside User's <router-view>
        // when /user/:id is matched
        { path: '', component: UserHome },

        // UserProfile will be rendered inside User's <router-view>
        // when /user/:id/profile is matched
        { path: 'profile/:info', component: UserProfile },

        // UserPosts will be rendered inside User's <router-view>
        // when /user/:id/posts is matched
        { path: 'posts', component: UserPosts }
      ]
    }
  ]
})

const app = new Vue({ router }).$mount('#app')
router-link不使用a標籤
在vue app中,有時候不希望使用預設的a標籤來渲染router-link,原因可能有:預渲染時,html中不會生成無意義的a標籤.這時,我們就可以使用tag屬性。同時,這時你也希望有一個類似a標籤的樣式存在,這時,就應該使用class來指定一個樣式.
比如:
<router-link tag="li" class="link" :to="{ name: 'previewhomework' , params: { homework: homework.id} }" >
     <span class="hwtitle">{{homework.title}}</>
</router-link>
<li class="link"><span class="hwtitle">口算能力訓練 </span>
</li>
響應route引數的變化
當route引數發生變化時,由於路由到相同的route,對應元件並不會自動再次建立,那麼我們如何響應這個引數的變化呢?
兩種方案:
1. 在元件中watch route引數
2.定義beforeRouteUpdate
watch: {
    '$route' (to, from) {
      // 對路由變化作出響應...
    }
  },
beforeRouteUpdate (to, from, next) {
    // react to route changes...
    // don't forget to call next()
  }
route路由命名檢視
有時我們需要為響應路由需要定義多個視部分圖,比如希望有sidebar,maincontent兩個檢視渲染在root路由中:
<router-view class="view one"></router-view>
<router-view class="view two" name="a"></router-view>
<router-view class="view three" name="b"></router-view>
const router = new VueRouter({
  routes: [
    {
      path: '/',
      components: {
        default: Foo,
        a: Bar,
        b: Baz
      }
    }
  ]
})
使用ES6的特性建立動態key值的物件
看下面的程式碼:
export default{
   data: function () {
        return {
            ["thisrootstore_"+this.$options.name]: {
                bus: new Vue()
            }
        }
    }
}
上面這段程式碼可以作為mixin來被每一個元件重用,動態建立包含本元件名稱的本地全域性資料變數 thisrootstore_xxname,其中的bus就可以用於本元件和其子孫元件事件通訊
並且可以被vuejs安全地merge,也就是說你可以再手工建立其他需要共享的資料在這個物件中
如何給webpack構建出來的bundle瘦身?
用過webpack你一定會發現往往就幾行程式碼加到entry裡面最終做出來的bundle卻好幾百k,對於頻寬資源非常昂貴的主機來說是一個噩夢,一方面載入龜速,另一方面如果是手機訪問更是噩夢。如何給他瘦身?首先找到哪些是我們需要的,哪些是不應該出現的,對解決問題就做對了一半:
source-map-explorer 這個工具可以對build出來的sourcemap做分析,給出依賴關係,你可以慢慢研究
webpack-bundle-analyzer : 這個也很棒,他可以視覺化地列出你的bundle最終是由哪些個js程式碼構成的,都是哪些臃腫的程式碼導致了你最終的bundle過於龐大了
http://www.tuicool.com/articles/BjIrEj6
如何在production build中自動將console.log清除掉?
strip-loader可以完成這個工作
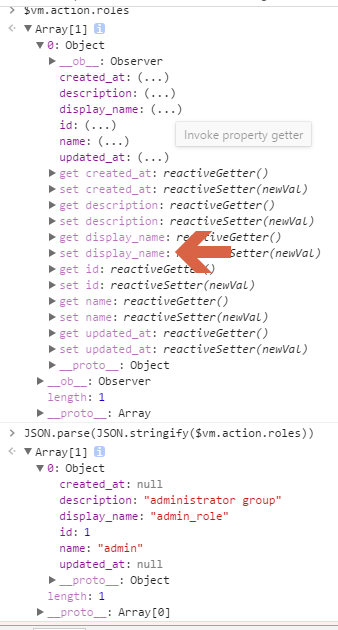
如何獲取vuejs powered plain data?
有時候我們可能需要一個未經vuejs define propery(get/set)處理過的原始js資料,一個workaround方案:
JSON.parse(JSON.stringify($vm.action.roles))
如何偵聽custom component的native事件,比如click? (使用.native修飾符)
<my-component v-on:click.native="doTheThing"></my-component>
如何繫結html元素屬性要麼為一個值,要麼就沒有?
<a :href="shouldhavehref ? 'http://xx.com/yy' : null">
上面的程式碼中判斷shouldhavehref data值,如果該值為真則在a元素上存在href="http://xx.com/yy",如果該值為假,則返回null,從而a元素上就不存在href屬性!
心法:只要expression的值為null,就會被清除掉!
v-if和v-for共存
如果v-if和v-for在同一個element上出現,則和angular類似,也有一個directive優先順序的問題。在vuejs中,v-for的優先順序要高於v-if,也就是說先做v-for的loop,隨後對每一個loop再應用v-if判斷,比如下面的程式碼:對loop後的每一個todo,只有在todo沒有完成的情況下,我們才render這個todo!!
<li v-for="todo in todos" v-if="!todo.isComplete">
  {{ todo }}
</li>
何時使用inline-template
通常,元件用於重用,但是有些時候,我們可能只需要在一個頁面增加一些互動性,這時我們可能使用Inline-template的元件就比較合適了,原因是其佈置非常方便
// 將這段程式碼放在你的html頁面中
<complete-progress inline-template>
You have complete {{ count }} lessons
<complete-progress>
// 這段程式碼放在html頁面引用的js檔案中
Vue.component('complete-progress',{
  data: function(){
    return {
     count: 50
 }
}
})
import Hello from '@/components/Hello'中的@是何意思?

在vue-cli建立的程式碼中,使用了webpack的resolve.alias來實現將@直接替換為src目錄的路徑,這樣就方便程式碼目錄管理,不用都使用./ ../等特殊相對路徑了。
再比如,上面的vue$實際上也設計成import vue from 'vue'就替換為import vue from 'vue/dist/vue.esm.js'了。
windows git bash下webpack build時的大小寫問題
WARNING in (webpack)/buildin/module.js
There are multiple modules with names that only differ in casing.
This can lead to unexpected behavior when compiling on a filesystem with other case-semantic.
Use equal casing. Compare these module identifiers:
* D:\devenv\js\vueapp\node_modules\webpack\buildin\module.js
    Used by 4 module(s), i. e.
    D:\devenv\js\vueapp\node_modules\.4.6.0@lodash.findindex\index.js
* d:\devenv\js\vueapp\node_modules\webpack\buildin\module.js
    Used by 2 module(s), i. e.
    d:\devenv\js\vueapp\node_modules\lodash.orderby\index.js
可能的解決方案:使用windows power shell,它不存在這個碟符大小寫問題;或者在git bash下 cd D/devenv/js/xxxx 再做build
再見了vue-resource,推薦使用axios
由於vuejs2.0以上特別推出了SSR(server side rendering),這個是要在服務端使用node.js做服務端渲染的,因此存在著在瀏覽器端和伺服器nodejs端同時使用http請求的需求,而axios正好滿足這個需求,因此evan就寫了一篇文章推薦使用axios,不再official推薦vue-resource plugin。
If you’d like to access this.$http like in vue-resource, you can just set Vue.prototype.$http = axios
https://github.com/axios/axios
如何解決v-if/v-show還未完全編譯時其{{message}}內容會閃現的問題?
使用v-cloak這個directive來解決:
<div v-cloak>
  {{ message }}
</div>
配合以下css
[v-cloak] {
  display: none;
}
如何安全地使用jquery plugin在vue app中?
https://dzone.com/articles/how-to-safely-use-a-jquery-plugin-with-vuejs
要點是設計一個vue wrapper元件,講jquery相關操作封裝為一個元件,並使用v-once使得update不會操作jquery已經更改過的dom