function () use ($x, &$y){}
自從PHP5.3開始有了closure/匿名函式的概念,在這裡的use關鍵詞的作用是允許匿名函式capture到父函式scope
記憶體在的$x和$y變數。其中&&y為引用方式capture,也就是說每次該匿名函式呼叫時,y的值如果
被修改了也反映在這裡,而$x則是靜態引用。
<?php
$message = "hello\n";


$example = function () {
    echo $message;
};
// Notice: Undefined variable: message
$example();


$example = function () use ($message) {
    echo $message;
};
// "hello"
$example();


// Inherited variable's value is from when the function is defined, not when called
$message = "world\n";
// "hello"
$example();


// Inherit by-reference
$message = "hello\n";
$example = function () use (&$message) {
    echo $message;
};
// "hello"
$example();
// The changed value in the parent scope is reflected inside the function call
$message = "world\n";
// "world"
$example();


// Closures can also accept regular arguments
$example = function ($arg) use ($message) {
    echo $arg . ' ' . $message;
};
// "hello world"
$example("hello");
PSR0,PSR2,PSR4
psr2是一種編碼規範,
PSR0,PSR4是PHP的autoloading機制中的目錄安排規範
詳情:
https://github.com/php-fig/fig-standards/tree/master/accepted
laravel中計劃設計編碼一個小功能的流程
1.規劃設計routes: /tasks ; /alice/tasks
Route::get('/tasks','TasksController@index');
2.建立上述controller
php artisan make:controller TasksController
Controller created successfully.
app/Http/Controllers/TasksController.php created
3.建立Task model
$ php artisan make:model Task
Model created successfully.
4. 建立tasks表
$ php artisan make:migration create_tasks_table --create --table="tasks"
Created Migration: 2016_04_09_134106_create_tasks_table
$ php artisan migrate
Migration table created successfully.
Migrated: 2014_10_12_000000_create_users_table
Migrated: 2014_10_12_100000_create_password_resets_table
Migrated: 2016_04_09_134106_create_tasks_table
注意:由於laravel自帶了users和password_resets兩個migration,所以我們執行php artisan migrate時有了3個表被建立
5. 建立view並在blade模版檢視resources.tasks.index中引用模型資料
        @foreach($tasks as $task)
            <li>
                <a href="{{ url('/tasks',$task->id) }}">{{ $task->title }}</a>
            </li>
        @endforeach
6.在控制器中獲取model資料並且assign給blade模版檢視resources.tasks.index
class TasksController extends Controller
{
    public function index(){
        $tasks = Task::all();
        return View::make('tasks.index',compact('tasks'));
    }
}
至此,tasks index 頁面的功能已經設計完畢。
從第5步驟我們看到,由於我們在檢視中對每一個task都建立了對應的連結,而該連結的頁面url為/tasks/{id},因此從這裡我們會發現我們接下來的工作是設計show頁面!@!
7.回到routes.php,我們建立show頁面的路由:
Route::get('/tasks/{task}','TasksController@show');
8,這時我們在index頁面點選連結時會報錯“TasksController::show() does not exist”, 這也就告訴我們需要建立show方法
    public function show(Task $task){
        return View::make('tasks.show',compact('task'));
    }
注意在這裡我們使用了laravel5提供的route model binding特性,我們在控制器中使用Task類typehinting了$task引數,而該$task引數和routes.php中定義的wildcast路由Route::get('tasks/{task}','xxx'}定義的task相匹配,因此laravel在呼叫我們的控制器時自動注入Task模型(以id為索引)。這個功能後續再做進一步的深入。
9,這時我們剩下來的工作就是設計show頁面模版了:
        <div class="task">
            <h1>{{$task->title}}</h1>
            <h2>{{$task->description}}</h2>
        </div>
至此,我們就完成了一個簡單的task crud的一部分功能的完整開發了。
但是上述兩個頁面存在html重複的問題,我們可以抽象出一個layout模版,由tasks.index和tasks.show兩個頁面來共享
使用php定界符完成大片字元和變數連線
<?php

$name = 'kitty';

$htmlstring = <<<Eof

<table height="20">

<tr><td>

{$name}<br/>

<script>

var p='hello world';

document.writeln(p);

</script>

</td></tr>

</table>

Eof;
允許laravel程式執行sudo shell指令碼
可以參考http://www.4wei.cn/archives/1001469詳情
有一點需要注意應該使用命令的全名稱(包含路徑),否則可能出問題: 執行sudo命令時command not found的解決辦法
編輯sudoers檔案,註釋掉Defaults requiretty這行
否則會出現sudo: sorry, you must have a tty to run sudo的錯誤
再新增一行:
apache ALL=(ALL) NOPASSWD:ALL
這行中apache是laravel執行時的使用者名稱,如果你不清楚到底apache/ngix使用者名稱是什麼可以用php的echo shell_exec("id -a")列印出來
這一行主要解決使用sudo命令時要求輸入密碼,而我們在網站程式中不可能輸入密碼的
建立resource controller
$php artisan make:controller --resource task/TasksController
resource controller中預設產生以下幾個路由項:
+--------+-----------+--------------------+---------------+----------------------------------------------+------------+
| Domain | Method    | URI                | Name          | Action                                       | Middleware |
+--------+-----------+--------------------+---------------+----------------------------------------------+------------+
|        | GET|HEAD  | tasks              | tasks.index   | App\Http\Controllers\TasksController@index   | web        |
|        | POST      | tasks              | tasks.store   | App\Http\Controllers\TasksController@store   | web        |
|        | GET|HEAD  | tasks/create       | tasks.create  | App\Http\Controllers\TasksController@create  | web        |
|        | DELETE    | tasks/{tasks}      | tasks.destroy | App\Http\Controllers\TasksController@destroy | web        |
|        | PUT|PATCH | tasks/{tasks}      | tasks.update  | App\Http\Controllers\TasksController@update  | web        |
|        | GET|HEAD  | tasks/{tasks}      | tasks.show    | App\Http\Controllers\TasksController@show    | web        |
|        | GET|HEAD  | tasks/{tasks}/edit | tasks.edit    | App\Http\Controllers\TasksController@edit    | web        |
+--------+-----------+--------------------+---------------+----------------------------------------------+------------+
laravel csrf
laravel中web middle會對Post操作做保護,必須有一個csrf的隱藏域放在form post data中,laravel才允許向下走。為了讓laravel通過這個保護驗證,我們需要在form中通過{{ csrf_field() }}來完成這個資料的存放:
{{ csrf_field() }}
//會在form中產生以下field:
<input type="hidden" name="_token" value="cbgekcEhbraIiU0ZaeNFgyQ5OIpg8xjIpBb7AXv9">
laravel REST API的put,patch,delete操作的實現
由於所有瀏覽器對於form提交時只支援get和post兩種method,而我們的REST API定義是由put,patch,delete,get,post完備的五種方法來實現的,一個workaround方案是和csrf類似,增加一個隱藏field , _method,
laravel也提供了對應的helper函式來完成這個工作:
{{ method_field('delete') }}
上面的blade模板編譯為:
<input type="hidden" name="_method" value="delete">
這樣操作以後,即使我們提交表單時使用的是post方法,但是laravel會檢查這個_method field,根據其對應的value來匹配到對應的路由,並且route到對應的控制器方法:比如update和destroy方法
laravel blade忽略{{}}的方法
有時候,我們不希望在laravel的模版引擎中解析對應的{{}}內部的內容,比如vuejs,angularjs都可能使用{{}}作為他們的前端模版的輸出函式,這時,我們就希望blade不要多此一舉地在服務端渲染,這個{{}}留到前端去解析渲染吧。很簡單隻要加上@{{}},laravel就會忽略這裡的{{}}
@{{ data_to_web_page_for_javascript }}
laravel自帶的前端編譯工具元件elixr/browserify/vuejs等開發工具安裝時問題解決
在一個全新的laravel專案下載後,通過執行npm install來安裝構建工具,windows下可能在安裝過程中會出現問題,一個可能的原因是你的git bash/cmd執行於administrator使用者下,而gulp-sass在安裝時只能用普通使用者許可權下安裝。
另外一點是在安裝該工具後,有可能你有自己的gulpfile,這時希望兩者都可用的話,可以通過--gulpfile來指定你自己的或者laravel自帶的gulpfile
gulp --gulpfile yourgulpfile.js
如果在執行npm install時,由於git預設情況下對檔名的長度是有限制的,那麼就有可能node module嵌入深度過長導致git add出錯:
fatal: cannot create directory at 'laravel-elixir-vueify/node_modules/babel-preset-es2015/node_modules/babel-plugin-transform-es2015-block-scoping/
node_modules/babel-traverse/node_modules/babel-code-frame/node_modules/chalk/node_modules/ansi-styles': Filename too long
可以通過設定git core的核心引數longpaths 為true開啟git不限制檔案長度的核心功能
[core]
    autocrlf = true
    filemode = false
    longpaths = true
bootstrap/cache/service.php無法寫入的問題
ErrorException in Filesystem.php line 109:
file_put_contents(/assets/www/newkidsitl5229/bootstrap/cache/services.php): failed to open stream: Permission denied
解決辦法:
php artisan cache:clear
laravel/PHP中的static::和self::
static::引用的是全域性作用域,而self::引用的是對本類的靜態方法的引用。比如一個類中定義了static方法或者屬性,子類中又重寫了這個static屬性,則static::staticProperty就引用的是子類的重寫值,而selft::staticProperty則返回在自己類作用域中的static
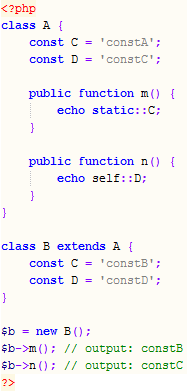
參考:
https://segmentfault.com/q/1010000002468880
new static($user) vs new self
class A {
  public static function get_self() {
    return new self();
  }

  public static function get_static() {
    return new static();
  }
}

class B extends A {}

echo get_class(B::get_self()); // A
echo get_class(B::get_static()); // B
echo get_class(A::get_static()); // A
http://www.jb51.net/article/54167.htm
self - 就是這個類,是程式碼段裡面的這個類。
static - PHP 5.3加進來的只得是當前這個類,有點像$this的意思,從堆記憶體中提取出來,訪問的是當前例項化的那個類,那麼 static 代表的就是那個類。
static和$this很像,代表的是子類,但是又可以應用於用靜態的方法
oauth2第三方登入
我們可以使用安正超的laravel-socialite package輕鬆實現第三方登入,然而在使用過程中,可能會由於CA的配置出現以下錯誤:
“cURL error 60: SSL certificate problem: unable to get local issuer certificate”
解決方案:
到以下網址: http://curl.haxx.se/ca/cacert.pem 拷貝整個網頁內容,隨後paste為一個檔案 "cacert.pem", 更改php.ini檔案中的
curl.cainfo = "[pathtothisfile]\cacert.pem"
最後重新啟動你的php,即可解決!
常用oauth2第三方登入:
qq需要qq互聯開通應用; http://connect.qq.com/
微信需要 https://open.weixin.qq.com
laravel5.2 session丟失問題
在開發鑑權模組時,當使用Auth::login($user),隨後dd(Auth::user())雖然可以列印出登入的使用者資訊,但是重新到另外一個page卻發現列印dd(Session::all())時,僅僅列印出_token的值,並且每次重新重新整理都會變化。
這個困擾了我有好幾個小時,後來發現是dd()呼叫惹的禍,由於dd會die(),而laravel使得session資料儲存是在index.php檔案的最後
$kernel->terminate($request, $response);來實現的,因此dd()呼叫時可能無法執行到此,因而session資料每次執行時都會丟失!!更改為var_dump後就好了!
還有以下幾點值得注意:
1. 不要var_dump,如果在程式碼中有var_dump,每次重新整理頁面都會生成一個新的session檔案!
2. 在routes.php中預設定義的都被包在'web' middleware中了(由RouteServiceProvider自動包含的!!),因此你不要在routes.php中再包一層'web' middleware了,或者你是一個偏執狂,你可以這樣用:
Route::group(['middlewareGroups'=>'web'],function(){
    Route::get('/', function () {
        return view('welcome');
    });
});
對於api型別的route,你可以這樣安排:
a).仍然在routes.php中,你使用'api'這個middle group;
b.)放到另外一個檔案中,比如叫做routes_api.php,並且在RouteServiceprovider中來引用!
具體請參考這個url: https://github.com/laravel/framework/issues/13000
PHP trait中的insteadof 關鍵字
由於PHP是單繼承語言,不支援從多個基類中繼承,php為了克服這個弱點,引入了trait的概念,使用trait我們可以不用使用傳統的繼承方式來繼承基類的方法,我們可以使用 use trait來直接引用到公共的方法。
一個PHP類可以use多個trait,這些trait中有可能會有命名衝突,這時我們可以通過insteadof關鍵字來指明我們使用哪個:
trait AuthenticatesAndRegistersUsers
{
    use AuthenticatesUsers, RegistersUsers {
        AuthenticatesUsers::redirectPath insteadof RegistersUsers;
        AuthenticatesUsers::getGuard insteadof RegistersUsers;
    }
}
關於trait更加詳細的描述,可以參考 http://www.cnblogs.com/CraryPrimitiveMan/p/4162738.html
Route group with namespace
有時我們希望將一組路由作為一個集合,這時可以給這個組一個namespace,以免每個controller都輸入其namespace的麻煩:
Route::group(['prefix'=>'admin','namespace'=>'Admin'],function(){
   Route::get('/', AdminController@index);
})
named route
在laravel中,如果我們直接引用一個絕對url,這本來沒有什麼問題,但是如果後面該url做了更改,那麼就需要很多地方來做更改,一個可行的方案是使用named route:命名路由:
Route::get('session/create',['as'=>'register','uses'=>'SessionCotroller@index']);
這樣其他地方使用link_to_route('register')則無論我們怎麼改變上面的url,這個route都能連結到正確的url!
http_build_query
在laravel form操作中,經常需要對post資料格式化,其中get method下往往需要根據相關資料形成一個query string,這時可以利用php自帶的http_build_query函式來實現:
<?php $data = array('foo'=>'bar', 'baz'=>'boom', 'cow'=>'milk', 'php'=>'hypertext processor'); echo http_build_query($data) . "\n"; echo http_build_query($data, '', '&'); ?> //輸出以下內容: foo=bar&baz=boom&cow=milk&php=hypertext+processor foo=bar&baz=boom&cow=milk&php=hypertext+processor
password_hash/password_verify
對於密碼欄位我們往往不希望明碼儲存,在PHP中原生提供了對password加密及驗證的函式password_hash和password_verify.其中hash支援兩種預設的演算法:PASSWORD_DEFAULT和PASSWORD_BCRYPT
/**
 * 在這個案例裡,我們為 BCRYPT 增加 cost 到 12。
 * 注意,我們已經切換到了,將始終產生 60 個字元。
 */
$options = [
    'cost' => 12,
];
echo password_hash("rasmuslerdorf", PASSWORD_BCRYPT, $options)."\n";
對應laravel中的facade及其函式是Hash::make(),Hash::check(),其底層使用了
github.com/ircmaxell/password_compat這個package
Redirect::intended()
對於保護的路由,我們有這樣的需求:一旦使用者登入並且有權訪問這個路由的話,我們希望直接redirect到先前的這個路由,這裡Redirect::intended()就是滿足這個場景的。
if(Auth::attempt([
 'email' =>$input['email'],
 'password' =>$input['password']
]) return Redirect::intended('home');
上面的程式碼中如果登入成功,則重定向到先前的page,或者是home頁面
Redirect::back()
一般用於登入未成功時返回前一頁面
flash message
當系統中發生了特定的事件,比如login成功時,我們可能需要給使用者一個提示。實現方式:
1. 在controller中redirect的同時,呼叫with('flash_message', 'some information');
if(Auth::attempt([
 'email' =>$input['email'],
 'password' =>$input['password']
]) return Redirect::intended('home')->with('flash_message','You are logged in!~~');

在模板中:

@if (Session::get('flash_message'))
  <div class = "flash">
     {{ Session::get('flash_message' }}
  </div>
@endif
2. 在模板中通過@if Session::get('flash_message')來判斷是否有flash message,如果有則顯示出來
Mass Assignment protection
在laravel中,controller接收到form資料後,非常常見的一個使用方法就是
User::create(Input::all());這種模式雖然建立新user時非常方便,但是對於hacker來說,提供了一種非常便利地修改後臺資料的方法,比如在user create form中,除了username,password外,hacker可能會在客戶端增加一個hidden field: active,在使用者提交username,password的同時,將active也設定為true,這時由於我們後臺程式碼未作保護,則自動把該user就建立為active的使用者了,而這,可能並不是我們想要的。解決方法: 1.要麼不要使用User::create(Input::all)呼叫模式,我們使用$user = new User; $user->username = Input::get('username');$user->password=Input::get('password'),這樣雖然form中有active欄位,但是我們卻棄之不用這樣就達到了保護的目的;
2.上面的方法雖然可行,但是如果一個form表單資料非常多,一條一條地這樣呼叫也顯得麻煩,但是同時又要防止上面未經同意的資料注入,可以使用laravel model的$guarded和$fillable
class User extends Eloquent{
  protected $guarded = ['active']; //指定哪些欄位不能被mass assignment
  protected $fillable = ['username','password'] ;  //指定哪些欄位可以mass assign

}
自動將password進行hash化後再儲存
對於密碼這類敏感資訊,我們不要使用明文儲存在資料庫中,但是每次呼叫save時都顯式呼叫Hash::make($password)也是一個比較繁瑣的事情,好在laravel的eleoquent modle提供了一個這樣的feature: 如果在model類中有setPasswordAttribute($password)這樣的方法存在,則在save之前laravel自動呼叫這個方法來格式化$password,同樣地,如果有getPasswordAttribute()方法的話,則每次訪問一個欄位時,都會呼叫getXXXXAtttribute()函式,其返回值作為真正獲取到的值。
class User extends eloquent{
 public setPasswordAttribute($password){
   $this->attributes['password'] = Hash::make($password);
}

}
Route::resource only引數
在定義路由時,我們使用Route::resource('sessions','SessionsController')雖然是一個不錯的選擇,但是有時候我們可能只對其中的兩三個方法感興趣,這時,我們可以使用only引數來明確指明只需要建立這幾個路由,其他的都忽略掉:
Route::resource('sessions','SessonsController',['only'=>['create','store','destroy']);
Illuminate\Database\Eloquent\Collection and User::first() and User::all()->first()
參考Arrays on Steroids.mp4
User::all()將返回上述Collection物件,該物件又實現了多個interface: ArrayAccess, ArrayableInterface, Countable, IteratorAggregate, JsonableInterface,也就是說返回的物件支援多種操作方式
>>> $users = App\User::all(); //在這裡會執行資料庫操作
=> Illuminate\Database\Eloquent\Collection {#690
     all: [],
   }
>>> count($users);
=> 0
>>> count($users);
=> 0
>>> count($users);
=> 0
>>> $users = App\User::all();
=> Illuminate\Database\Eloquent\Collection {#701
     all: [
       App\User {#702
         id: 6,
         name: "cnwedd",
         email: "dasd@ff.cc",
         created_at: null,
         updated_at: null,
         realname: "",
         imageurl: "",
         lastlogin: "2016-05-02 13:06:06",
         mobile: "",
       },
     ],
   }
>>> count($users);
=> 1
>>> $users->toJson();
=> "[{"id":6,"name":"cnwedd","email":"dasd@ff.cc","created_at":null,"updated_at":null,"rea
lname":"","imageurl":"","lastlogin":"2016-05-02 13:06:06","mobile":""}]"
>>>
$users->first()->toArray(); = User::first()->toArray之間有什麼區別?
$users->last()->toArray(); = User::last()->toArray之間有什麼區別?
$users->all()則不再訪問資料庫,因為User::all()已經返回了資料
 App\User::first(['name']);
=> App\User {#704
     name: "cnwedd",
   }
//注意這個操作會執行資料庫查詢,並且只獲取name欄位
我們也可以使用laravel的collection support helper類來使得任意陣列變成一個方便操作的collection:
$myusers = new Illuminate\Support\Collection($myuserarray);
隨後$myusers->first()/last()/toArray()等等
使用Form::macro快速構建form
注意FormBuilder從5.1開始已經不再在框架core中出現,由https://laravelcollective.com/docs/5.2/html 來維護。
這其中包括: linke_to_route等Helpe函式
laravel model cache
對於不經常變化而又頻繁訪問的資料,最好把這些資料cache起來,這樣每次訪問這些資料時,直接從cache中獲取而不用訪問資料庫,這會大大提高應用的效能。在laravel中起用cache非常簡單:
$users = User::remember(10,'users.all')->get();
//獲取users表中的所有資料,並且儲存在cache中10分鐘,cache的key為users.all
//cache預設使用file方式,你也可以使用memcache
如果你需要強制清除上面這個key的cache,則可以使用:
Cache::forget('users.all'); //該程式碼只清除'users.all'這個key的cache內容
Cache::flush();//該程式碼將所有cache都清除掉=php artisan cache:clear
參考:6-Cache Tags and Memcached.mp4
laravel cookie, session,cache
Cookie儲存在客戶的計算機上;Session儲存在服務端;Cookie和Session都是對使用者的,而cache則是系統級別的;
Cookie::forever('key','value');
Cookie::get('key');
Session::put('foo','bar');
Session::get('foo');
Cache::put('favorites',[1,2], Carbon\Carbon::now()->addMinutes(60));
Cache::get('favorites');
laravel upload file
在laravel中,upload檔案時需要注意一點是在Form::open中需要指定'files'=>true
{{ Form::open(['route' =>'posts.store', 'files'=>true }}

  <input type="file" name="thumbnail">
....
{{ Form::close() }}
注意上面的'files'=>true,FormBuilder會自動在form標籤中新增 enctype="multipart/form-data"屬性!
Input::file('thumbnail')將返回一個Symfony\Component\HttpFoundation\File\UploadedFile物件,你可以使用該物件的move方法將上傳的檔案轉存
public function store(){
$post = new Post;
$post->title = Input::get('title');
$post->body = Input::get('body');
if (Input::hasFile('thumbnail')){
  $file = Input::file('thumbnail');
  $file= $file->move(public_path().'/images/','myfile.img');//將上傳的檔案重新命名為myfile.img並且存放到public/images目錄中
  $post->thumbnail = $file->getRealPath();//返回絕對地址;或者使用getClientOriginalName返回檔名;
}
 $post->save();
  return "done";
}
$table->date('created_at')->nullable();
https://laravel.com/docs/5.2/migrations#creating-columns
database seeder and faker
在專案開發中,很多時候需要建立一些dummy data,方便快速原型開發,這時可以使用laravel的db seeder類,以及第三方faker庫
參考10-Seeds-and-Fakes.mp4.mp4
softDelete
有時我們不希望直接對資料庫執行永久刪除的操作,比如一個使用者我們可以deactivate,隨後當需要的時候我們再把他找回來,這時候就需要使用softDelete的功能了。
很簡單隻要在對應的model中新增一個protected欄位:
class User extends Eloquent{
 protected $table = 'users';

 portected $softDelete = true; //原理是:當執行User::delete(1)時,laravel只在資料庫的deleted_at欄位更新了內容
//隨後在查詢資料庫User::all()時並不會返回任何內容,
//除非使用User:withTrashed()->all()才會返回
}
$user = User::withTrashed()->find(2);
$user->restore();
$user->posts()->restore();
在上面三行程式碼例子中,我們對$user和$user的posts都設定了softDelete
如何通過PHP程式碼實現Cascade delete, update
雖然通過類似於下面的程式碼,可以借用mysql資料庫的聯動功能實現foreign key關聯的資源自動刪除,但是由於不是每一種資料庫都有這種功能,故而我們可以通過php程式碼來提供統一的方案:
        Schema::table('class_student', function (Blueprint $table) {
            $table->foreign('class_id')->references('id')->on('classes')
                ->onUpdate('cascade')->onDelete('cascade');
            $table->foreign('student_id')->references('id')->on('users')
                ->onUpdate('cascade')->onDelete('cascade');
            $table->primary(['class_id','student_id']);
        });
參考: http://stackoverflow.com/questions/34363224/laravel-cascade-not-working
protected static function boot() {
    parent::boot();
    static::deleting(function($ticket) {
        // delete related stuff ;)
        $reaction_ids = $ticket->reactions()->lists('id');
        Reaction::whereIn($reaction_ids)->delete();
    });
}
Form::model
當我們在edit一個資源時,我們可能希望edit form自動Populate資料庫中的內容,這時只需要將
Form::open替換為Form::model並且傳入對應的model即可,
比如{{ Form::model($user, ['method'=> 'PATCH', 'route'=> ['users.update', $user->id]]) }}
覆蓋預設relation所檢索的欄位
laravel中存在著一套預設的命名規約,比如project和user之間的relation,project屬於一個使用者,
我們在Project model中可以建立一個owner方法,該方法返回該project所屬的使用者,預設情況下,laravel會使用owner_id作為外來鍵,但是這肯定不是我們所要的,我們可以傳入第二個引數'user_id'即可解決這個問題:
class Project extends Eloquent{
 protected $fillable = ['user_id','title','description'};
 public function owner(){
  return $this->belongsTo('User','user_id');//注意預設情況下laravel會使用owner_id
}
}
監聽資料庫查詢,列印相關query,優化效能
laravel model非常強大易用,通過簡單的一兩行程式碼我們就可以建立強大的關係結構,但是隨著應用複雜度增大,系統的效能可能快速下降,這時通過監察系統對資料庫查詢的頻率就可以對優化有一些思路:
Event::listen('illuminate.query',function($sql){
  var_dump($sql); //通過監聽illuminate.query事件,就能大概搞清楚系統的瓶頸,對於relation操作往往會有一個N+1 problem可以優化
});
我們通過with方法一次性地取出資料記錄同時取出對應的relation資料,則可以大大優化資料庫查詢的次數:
$projects = Project::with('owner')->remember(10)->get();
上面的程式碼只需要執行2次資料庫查詢,同時放到cache中10分鐘,這將大大提高系統的效能.
laravel全文檢索
$query = Request::get('q');
$posts = Post::where('title','LIKE', "%$query%")->get();
//將返回title中包含$query字串的post
REST API nested resource
使用laravel構建REST API是非常常見的應用,laravel也提供了一種構建這種應用路由框架的簡單方法: route:resource('resourcename','controllername');但是很多情況下,我們可能需要嵌入式資源,比如user, user.task,
具體使用方法如下:
Route::resource('users','Auth\AuthController');
Route::resource('users.tasks','TasksController');
上面兩行程式碼將在laravel中形成以下標準的url路由:
|        | POST      | users                            | users.store         | App\Http\Controllers\Auth\AuthController@store                         | web,guest  |
|        | GET|HEAD  | users                            | users.index         | App\Http\Controllers\Auth\AuthController@index                         | web,guest  |
|        | GET|HEAD  | users/create                     | users.create        | App\Http\Controllers\Auth\AuthController@create                        | web,guest  |
|        | PUT|PATCH | users/{users}                    | users.update        | App\Http\Controllers\Auth\AuthController@update                        | web,guest  |
|        | GET|HEAD  | users/{users}                    | users.show          | App\Http\Controllers\Auth\AuthController@show                          | web,guest  |
|        | DELETE    | users/{users}                    | users.destroy       | App\Http\Controllers\Auth\AuthController@destroy                       | web,guest  |
|        | GET|HEAD  | users/{users}/edit               | users.edit          | App\Http\Controllers\Auth\AuthController@edit                          | web,guest  |
|        | POST      | users/{users}/tasks              | users.tasks.store   | App\Http\Controllers\TasksController@store                             | web        |
|        | GET|HEAD  | users/{users}/tasks              | users.tasks.index   | App\Http\Controllers\TasksController@index                             | web        |
|        | GET|HEAD  | users/{users}/tasks/create       | users.tasks.create  | App\Http\Controllers\TasksController@create                            | web        |
|        | DELETE    | users/{users}/tasks/{tasks}      | users.tasks.destroy | App\Http\Controllers\TasksController@destroy                           | web        |
|        | PUT|PATCH | users/{users}/tasks/{tasks}      | users.tasks.update  | App\Http\Controllers\TasksController@update                            | web        |
|        | GET|HEAD  | users/{users}/tasks/{tasks}      | users.tasks.show    | App\Http\Controllers\TasksController@show                              | web        |
|        | GET|HEAD  | users/{users}/tasks/{tasks}/edit | users.tasks.edit    | App\Http\Controllers\TasksController@edit                              | web        |
除此之外,可能還不夠,比如我們可能需要對結果過濾,這時可以在對應url上新增query string來實現更加複雜的url結構GET /users/5/tasks?status=completed
Dependency Inversion
高層程式碼不要依賴於實體物件,而應依賴於abstractions;
高層程式碼:不關心具體的細節;
底層程式碼:關心具體的細節;
一個類不要被強制依賴於具體的底層實現細節;相反應該依賴於一個contract,或者說依賴於一個interface;
比如:你的房子有一個電源介面,所有可以插電的裝置,比如TV,電燈,空調等如果需要使用電源,就必須conform to(遵循)電源這個介面的規範,再看下面的程式碼:
interface ConnectionInterface{
  public function connect();
}
class DbConnection implements ConnectionInterface{

}

class PasswordReminder{
   private $dbConnection;
   public function __construct(MySQLConnection $dbConnection){
    $this->dbConnection = $dbConnection;
   //這裡應該更改為:
   public function __construct(ConnectionInterface $dbConnection){
   $this->dbConnection = $dbConnection;
}
}

}
//需要問一下:為什麼PasswordReminder需要關心是MySQLConnection,而不是SQLServer?
//也就是說PasswordReminder不應該關心具體這個Connection是什麼
IoC container
IoC container is a mini-framework for managing the composition of complex objects
Model event
當儲存一個model時會有saving事件發生,對應的saving函式將被呼叫
Order::saving(function($model){
dd($modal);  //Order model在儲存時會呼叫這個函式
return false; // 如果返回false,則通知laravel不要儲存這個model
return $model->validate(); // 利用上面特性,我們在model中定義一個validate方法,只有檢查通過才能儲存!
}
但是上面的程式碼組織顯然不是很好,我們可以放到model的類定義中:
class Order extends Eloquent{

  public static function boot(){
   parent::boot();  //boot函式在Order建立時會被呼叫
   static::saving(function($model){
    return $model->validate();
  });
 }
}
使用cache將全站靜態化
思路:使用before/after filter,以url為key來做快取,如果不存在則儲存$response->getContent() (返回渲染好的html檔案),如已存在則直接返回。 Caching Essentials.mp4
laravel的Exception處理
function do_something(){

  //do some function

  throw new Exception('I take exception to that.');
}

Route::get('/', function(){
 try{
    do_something();
 }
catch(Exception $e){
   return $e->getMessage(); //獲取上面丟擲異常時的訊息
}
});
blade中不escape html的方法
在blade模版中,預設情況下{{ $html }}將會把$html變數純文字展示,如果你希望 $html變數中的html程式碼作為頁面html的一部分,則需要使用
{!! $html !!} //將$html的內容原封不動(不做escape操作)地輸出到view中
laravel使用php artisan命令建立帶namespace的model
php artisan make:model Models\\RBAC\\Role
//上述命令將在app/Models/RBAC目錄下建立Role模型,牛的是:如果目錄不存在會自動建立!
使能Redis cache store driver
Redis是一款提供in-memory快速快取服務的軟體元件,另一方面她也提供將記憶體中的資料永久化的手段:即寫到磁碟中,每次重新啟動後直接從磁碟中恢復。要用她:
1. 首先需要安裝這款軟體,windows上從https://github.com/MSOpenTech/redis/releases下載安裝,linux下直接從原始碼build安裝;
參考http://www.cnblogs.com/linjiqin/archive/2013/05/27/3101694.html windows下的安裝測試
2. 在config/cache.php中選擇預設的cache driver為redis
'default' => env('CACHE_DRIVER', 'redis'),
3.你還需要通過composer安裝一個php package predis/predis package (~1.0)(該package實際上就是redis client的php實現,相當於redis-cli中直接執行對應的redis 協議命令)
composer require predis/predis:~1.0
laravel關於redis的配置資訊放在config/database.php中的redis section中,主要就是host,port,password引數,這些引數對於Redis::put/get操作時在初始化tcp連線時會使用;
同時laravel又統一做了封裝放在Cache這個facade中(從而可以提供更高階的功能,比如指定cache timeout的時間為10分鐘,Cache::put('foo','bar',10)),只要config/cache.php中的driver選擇為redis(最好我們還是在.env檔案中來定義):
CACHE_DRIVER=redis
SESSION_DRIVER=redis

REDIS_HOST=127.0.0.1
REDIS_PASSWORD=null
REDIS_PORT=6379
在linux下安裝 :
1. wget http://download.redis.io/releases/redis-3.0.7.tar.gz;
2. tar xvfz redis-3.0.7.tar.gz;
3. cd redis-3.0.7
4; make && make install;
5. cp redis.conf /etc/redis
6. 更改redis.conf中的daemonize yes
7. redis-server /etc/redis/redis.conf
8. 在/etc/init.d/目錄建立redis啟動指令碼,程式碼如下:
#!/bin/sh
# chkconfig:   2345 90 10
# description:  Redis is a persistent key-value database
# redis    Startup script for redis processes
# processname: redis
redis_path="/usr/local/bin/redis-server"
redis_conf="/etc/redis/redis.conf"
redis_pid="/var/run/redis.pid"
# Source function library.
. /etc/rc.d/init.d/functions
[ -x $redis_path ] || exit 0
RETVAL=0
prog="redis"
# Start daemons.
start() {
if [ -e $redis_pid -a ! -z $redis_pid ];then
echo $prog" already running...."
exit 1
fi
echo -n $"Starting $prog "
# Single instance for all caches
$redis_path $redis_conf
RETVAL=$?
[ $RETVAL -eq 0 ] && {
touch /var/lock/subsys/$prog
success $"$prog"
}
echo
return $RETVAL
}
# Stop daemons.
stop() {
echo -n $"Stopping $prog "
killproc -d 10 $redis_path
echo
[ $RETVAL = 0 ] && rm -f $redis_pid /var/lock/subsys/$prog
RETVAL=$?
return $RETVAL
}
# See how we were called.
case "$1" in
start)
start
;;
stop)
stop
;;
status)
status $prog
RETVAL=$?
;;
restart)
stop
start
;;
condrestart)
if test "x`pidof redis`" != x; then
stop
start
fi
;;
*)
echo $"Usage: $0 {start|stop|status|restart|condrestart}"
exit 1
esac
exit $RETVAL
9.設定為開機啟動:
chkconfig --add redis
chkconfig --level 2345 redis on
service restart redis
通過Redis::publish/subscribe實現實時通訊
思路:laravel中在一個channel中publish一條訊息,在Nodejs中subscribe這個channel,一旦laravel publish了這條訊息,nodejs對應的subscribe會被執行,並且broadcast到所有的socket.io.js建立的connection
實現/user/username來訪問users/id
一般地,對於user資源,我們都是使用id來訪問的,但是這種url是非常不友好的,我們可以簡單做一下修改,在laravel中就能實現以使用者名稱作為url的引數,這樣看起來就方便多了,主要有幾個步驟:
1. 在路由中做wildcast , 比如Route::get(users/{username},'usersController@show'}
2. 在RouteServiceProvider的boot方法中註冊路由模型繫結:
$router->bind( 'username',
            function ( $username )
            {
                return \App\User::where( 'name', $username )->firstOrFail( );
            }
        );
通過上面第2.步,則laravel在接收到/users/yourname這條路由時,就會自動查詢name為yourname的User,並且返回這個model,在你的控制器中注入使用!
javascript中使用動態變數名
在專案開發中,有一個場景我需要使用動態變數名稱給一個data object增加屬性,隨後post到伺服器端,這時務必使用obj[dynamicvariablename]這種格式才會起作用:
postdata._token = token;
postdata._method = method;
postdata[this.fieldname] = inputdata;
this.$http.post(this.url,postdata).then(
。。。
)
laravel自動對request表單資料驗證的方法
1. php aritisan make:request userLoginRequest;
2. 在該類中,定義$rules;
3. 在controller中type hint,laravel自動會在收到這個post請求時做validation;
CSS子元素撐開不定高父元素增加一個mask效果的辦法
思路:在父元素中嵌入一個專門用於mask的元素,絕對定位
http://demo.doyoe.com/css/auto-height/
laravel-exlixir多個任務處理方式:
elixir雖然使用方便,但是有一個很大的問題是:如果你希望分開多個task,分別通過gulp/gulp watch來執行的話,是沒有簡單的方法的。
我現在使用的workaround是:另外建立一個gulpfile,在這個gulpfile中定義構建任務對應要做的工作,隨後通過gulp --gulpfile yournewtaskfile來執行
browserify打包存在的缺陷:
在實際使用中發現,browserify打包只能處理簡單的語法詞法問題,比如缺少一個' , '號,import不存在的檔案這樣的問題,對於比如在components中定義了一個不存在的component類這類"runtime"的錯誤,它並不檢查,甚至比如我們import了一個類,但是components陣列引用中使用另外一個不存在的類名,這類問題在browserify打包過程中並不會發現,只有執行時在瀏覽器console終端中顯示出來。
Eloquent relation/表結構對映
laravel提供了將資料表row對映為model的簡單強大的機制,我們可以使用model來訪問對應的資料集,同樣地,laravel eloquent也支援模型之間的relation.這些relation包含以下幾種:
one-to-one
one-to-many
在一對多這種模式中(比如user和task的關係:user hasMany(Task): tasksCreatedByMe, tasksOwnedByMe; Task belongsTo(User): createdBy, ownedBy
上述幾對關係中:
User model: tasksCreatedByMe .vs. Task model: createdBy
User model: tasksOwnedByMe .vs. Task model: ownedBy
都依賴於以下表結構: tasks表中必須分別有兩個外來鍵owner和creator分別引用users表中的id欄位。
表格的結構需要在Task表中有兩個欄位: owner/creator
many-to-many
laravel find with
假設下面的場景: 需要查詢返回一個user及其所有tasks,並且只能使用一次資料庫查詢,user和task之間有hasMany, belongsTo的relation:
$userinfo = User::with('tasks')->where('id','=',$user->id)->first(); //注意:first()返回的是User model, get()返回的是一個集合
Eager loading with nested resource
有時,你希望一次性地獲取資源對應的relation,並且可能希望巢狀的relation也能獲取,比如,一本書Book屬於一個author,一個author又有對應的contacts資訊,你希望一次性獲取一本書對應的作者以及作者對應的聯絡資訊.可以通過以下方法一次性搞定(使用dot語法!!!):
$books = App\Book::with('author.contacts')->get();
Eager loading with nested resource and selected columns
有時,你希望一次性地獲取資源對應的relation,並且可能希望巢狀的relation也能獲取,並且限制兩層relation對應需要選擇的欄位(減少網路傳輸,提高效能)比如,一本書Book屬於一個author,一個author又有對應的contacts資訊,你希望一次性獲取一本書對應的作者(name,id欄位)以及作者對應的聯絡資訊(address,user_id欄位).可以通過以下方法一次性搞定(使用dot語法!!!):
$books = App\Book::with(['author'=>function($q){
 $q->select(['id','name']);
}, 'author.contacts'=>function($q){
 $q->select(['address','user_id']; // 注意user_id欄位是必選的哦,因為這是user和address表的外來鍵!
})->get();
再來一個例子:
$query->with([
    'child' => function ($q) {
        $q->with(['grandchild' => function ($q) {
            $q->where(‘someOtherCol’, ‘someOtherVal’); //constraint on grandchild
        }])
        ->where(’someCol', ’someVal’)->select(['childcol1','childcol2']); //constraint on child
    }
]);
表單驗證方法1:custom form request for validation
對於form表單的驗證時後端開發常見的技術要求,我們可以通過N種方案來實現這個要求,但是到底哪種可以作為最佳實踐呢?隨著laravel5.0引入了custom form request的feature,這個功能專門就是徹底解決這個問題的,可以說是laravel後端表單認證的最佳實踐,並且你可以方便地指定誰有相關許可權執行這個操作,以及對應的validation rule。
同時你也可以通過overwrite messages方法來自定義你希望展示的錯誤資訊。
使用流程:
1. php artisan make:request YourCustomizedRequest;
2. 在該YourCustomizedRequest類中,定義authorize來指定對該request訪問的授權規則
public function authorize()
{
    $commentId = $this->route('comment');

    return Comment::where('id', $commentId)
                  ->where('user_id', Auth::id())->exists();
}
public function messages()
{
    return [
        'title.required' => 'A title is required',
        'body.required'  => 'A message is required',
    ];
}
3.通過overwirte messages方法來自定義驗證錯誤資訊;
4.通過TypeHinting YourCustomizedRequest這個Request來呼叫這個request中定義的authorize策略
表單驗證方法2:手工在控制器方法中建立validator執行自定義的validate,推薦
public function store(Request $request)
    {
        $validator = Validator::make($request->all(), [
            'title' => 'bail|required|unique:posts|max:255', //注意:bail關鍵字表示只要第一個驗證失敗後面就不驗了,提高效率,具體rules可以參考:
//https://www.laravel.com/docs/5.2/validation#available-validation-rules
            'body' => 'required',
        ]);
//在這裡我們可以通過after方法引入一個callback,做我們自己的額外處理
$validator->after(function($validator) {
    if ($this->somethingElseIsInvalid()) {
        $validator->errors()->add('field', 'Something is wrong with this field!');
    }
});

        if ($validator->fails()) {
            return redirect('post/create')
                        ->withErrors($validator, 'login') //注意這裡login是可選的namespace引數,
//這時,使用{{ $errors->login->first('email') }}的名稱空間方式引用error bag
                        ->withInput();
        }

        // Store the blog post...
    }
使用Laravel自帶的控制器trait方法實現簡單表單資料驗證:
$this->validate($request, [
    'title' => 'required|unique:posts|max:255',
    'author.name' => 'required',
    'author.description' => 'required',
]);
laravel authenticate and authorize相關知識點
authenticate: 就是告訴系統你是誰,這個往往是通過你登入系統,laravel在session中儲存User來實現的;
authorize: 就是系統告訴你你有做什麼事情的許可權,比如你可以檢視敏感資料,可以刪除修改部分資源
middleware: 就是一個http request到達你的業務邏輯(控制器方法)前必須做的必要檢查,只有這些middleware層層通過後,才能最後呼叫你的控制器方法邏輯;
實現一個應用授權謹慎讓應該有對應許可權的人做對應許可權的事是laravel應用的訴求。如何具體實現不是一個簡單的事情,需要認真思考。我梳理總結以下原則和策略:
1. 凡是通用的適用於大片entry point的監察邏輯都通過應用對應的middleware到路由集(Route::group)上去來實現:
比如,我們所有/admin/xx的路由都必須有管理員許可權的角色才能夠訪問,再比如只有vip登入使用者才能訪問受保護的資源,最好的方法就是在受保護的路由集中使用middleware來控制
Route::group(['prefix'=>'admin','middleware'=> ['role:admin']],function(){
// 應用一個role:admin這個middleware到/admin/xxx的路由集上
    /* admin/roles */
    Route::get('/roles',['as'=>'adminroles','uses'=>'Admin\AdminRolesController@index']);
    。。。
});
2.對於在一個控制器中的部分方法需要保護,比如如果你希望建立修改刪除一個task,那麼可能涉及到幾個action和對應的頁面: create, store, update,delete,能夠訪問這些頁面的前提是你必須登入後才能執行。那麼這時比較合適的方式可能是在控制器建構函式中引入middleware:
public function __construct()
    {
// 我們在Controller建構函式中應用定製的mustloggedin middleware,指定只對create/store/update/delete做保護,其他的action全部放行
        $this->middleware('mustloggedin',['only'=>['create','store','update','delete']]);
    }
// mustloggedin middleware定義:
class MustLoggedIn
{
    /**
     * Handle an incoming request.
     *
     * @param  \Illuminate\Http\Request  $request
     * @param  \Closure  $next
     * @return mixed
     */
    public function handle($request, Closure $next, $guard = null)
    {
        if (Auth::guard($guard)->guest()) {
            if ($request->ajax() || $request->wantsJson()) {
                return response('Unauthorized.', 401);
            } else {
                return redirect()->guest('/')->withErrors('您必須登入後才能訪問頁面: '.$request->fullUrl());
            }
        }
        return $next($request);
    }
}
3. 對於要求更具體的一些action,比如update一個task的內容,你可能要求必須是task owner才能有許可權編輯更改task的內容,這時,比較合適的方法就是使用custom request來實現。具體可以參考上面custom form request的部分
Middleware parameters
middleware很好用,但是很多人可能不清楚如何向middleware傳入引數及使用方法:
1. 在路由或者控制器中引入帶引數的middleware(使用);
public function __construct()
    {
        $this->middleware('role:admin',['only'=>['create','store','update']]);
    }
2. 在kernel.php的對應routeMiddleware section中新增role middleware的宣告
protected $routeMiddleware = [
        'auth' => \App\Http\Middleware\Authenticate::class,
        'auth.basic' => \Illuminate\Auth\Middleware\AuthenticateWithBasicAuth::class,
        'can' => \Illuminate\Foundation\Http\Middleware\Authorize::class,
        'guest' => \App\Http\Middleware\RedirectIfAuthenticated::class,
        'throttle' => \Illuminate\Routing\Middleware\ThrottleRequests::class,
        // entrust middleware
        'role' => \Zizaco\Entrust\Middleware\EntrustRole::class,
        'permission' => \Zizaco\Entrust\Middleware\EntrustPermission::class,
        'ability' => \Zizaco\Entrust\Middleware\EntrustAbility::class,
        // my middleware
        'mustloggedin' => \App\Http\Middleware\MustLoggedIn::class,

    ];
3.在role middleware的handle函式中,你傳入的引數就以第三個引數來訪問了(定義)
public function handle($request, Closure $next, $roles)
    {//這裡$roles就是在middle引用的時候傳入的引數
        if ($this->auth->guest() || !$request->user()->hasRole(explode('|', $roles))) {
            abort(403,"您不具有 ".$roles." 的角色!"." 無權訪問 ".$request->fullUrl());
        }

        return $next($request);
    }
什麼是laravel policy?
policy提供了一種定義對一個action訪問控制的機制,policy class中的所有方法都對應著controller的對應action.
比如PostPolicy的一個update方法可能定義了誰有許可權update一個post,而在PostController的update方法中,我們使用if(Gate::denies('update',$post)){abort('403');}
PHP get_class($object) 返回該object對應的class名稱
laravel balde和對應plain PHP程式碼的對映
| Plain PHP views (.php) | Blade views (.blade.php) |
|---|---|
| Outputting data in PHP | Outputting data using Blade |
<?php echo(date('Y')); ?> |
{{ date('Y') }} |
| Looping through data with PHP | Looping through data with Blade |
<?php foreach($users as $user){ ?> |
@foreach($users as $user) |
<p> |
<p> |
<?php echo($userelname); ?><br> |
{{ $userelname }}<br> |
<?php echo($usereladdress); ?> |
{{ $usereladdress }} |
</p> |
</p> |
<?php } ?> |
@endforeach |
| Using conditional statements in PHP | Using conditional statements in Blade |
<?php if($category == 'blog') { ?> |
@if($category == 'blog') |
... |
... |
<?php } else { ?> |
@else |
... |
... |
<?php } ?> |
@endif |
laravel /login路由對於已經登陸使用者是如何保護的?
對於受控資源的訪問控制,比如必須登陸之後才允許發表評論,這樣的場景我們應該會司空見慣。但是如果已經登入了系統,如果再次訪問/login路由的話,系統自動重定向到主頁,這個功能到底是怎麼工作的呢?
laravel自帶了幾個middleware,其中一個就是guest middleware,它就是實現這個功能的。通過php artisan route:list我們可以列出對應的路由中包含了guest middleware的保護引用。
GET|HEAD  | login                                |                     | App\Http\Controllers\Auth\AuthController@showLoginForm                 | web,guest
//該guest middleware的定義為:
public function handle($request, Closure $next, $guard = null)
    {
        if (Auth::guard($guard)->check()) {
            return redirect('/');
        }

        return $next($request);
    }
我們可能會用auth
POLYMORPHIC RELATIONSHIPS
這個多型關係是個什麼鬼?簡單說就是一個model可以belongsTo多個其他的model ,貌似比較傻,可以有很多其他的解決方案的
http://www.richardbagshaw.co.uk/laravel-user-types-and-polymorphic-relationships/
laravel elixir
elixir是laravel前端構建工具集,它包裝了gulp,所有gulp task都由elixir來包裝管理。其配置檔案在config.js中,可以在gulpfile.js檔案中通過elixir.config.*來overwrite,
預設的配置項及值有:
generic:
    assetsPath: 'resources/assets',
    publicPath: 'public',
    appPath: 'app',
    viewPath: 'resources/views',
css:
        folder: 'css',
        outputFolder: 'css',
        autoprefix: {
            enabled: true,

            // https://www.npmjs.com/package/gulp-autoprefixer#api
            options:  {
                browsers: ['last 2 versions'],
                cascade: false
            }
        }
less: {
            folder: 'less'}
js:
        folder: 'js',
        outputFolder: 'js',
        babel: {
            // https://www.npmjs.com/package/gulp-babel#babel-options
            options: {
                presets: ['es2015', 'react']
            }
        }
laravel pagination with query parameter
使用laravel, 分頁pagination實在再簡單不過了,但是有時我們需要同時支援search查詢的功能,這時分頁點選時,我們也還是希望看到的是查詢內容裡面的分頁。很簡單:
public function apidata(Request $request)
    {
        $search = $request->query('title');
        if($search){
            // appends方法自動將query string加到pagination的url中
            // search方法是scoped query,自動返回like $search string的結果集
            // paginate則以分頁方式返回結果集
            return Skill::whereLevel(1)->with(['cates.parents','children'])->search($search)->paginate(5)->appends($request->input());
        };
}
orderBy relation eager loading
當eager loading一個relation時,可以方便地對結果集排序,比如Node model其children(是遞迴的)就可以用updated_at來排序
class Node extend eloquent{
public function children($recursive = false){
        return $this->child()->with('children')->orderBy('updated_at','DESC');
    }
}
constrain for eager loading: 只選中部分欄位():
return Classroom::with(['teachers'=>function($query){
            $query->select('teacher_id', 'name','realname');  //teacher_id欄位必選選中,否則不work
        }])->paginate(10);
laravel大表分割槽共用一個model
如果一張表格非常大,你可能希望將表格根據時間分為小表,比如orders_201501,orders_201506等等,但是希望使用一個Order model,底層的table則需要根據時間來選擇。
http://stackoverflow.com/questions/26757452/laravel-eloquent-accessing-properties-and-dynamic-table-names
laravel whereRAW呼叫sql函式
$namelength = iconv_strlen($prefix)+4;
$existusers = User::where('name','like','%' . $prefix . '%')->whereRaw('LENGTH(name) = ?', array($namelength))->orderBy('name','desc')->pluck('name')->toArray();
上面的例子檢索所有name欄位長度為$prefix+4,並且name包含$prefix字串的記錄
laravel eager loading relation constrain:限定relation的條目數
參考以下: https://softonsofa.com/tweaking-eloquent-relations-how-to-get-n-related-models-per-parent/
定製custom relation vs hydrate
laravel eloquent雖然非常強大基本上都能夠滿足所有資料庫關係,但是仍然有很多時候無法簡單地通過一個belongsTo, belongsToMany, hasOne這種簡單的關係來實現,有兩個可能的思路:
1. 定製你自己的custom relationship方法,隨心所欲滿足你的定製化要求,但是需要對laravel model relation類有比較清晰的理解,典型引用案例就是eager loading with limits(因為你無法對eager loading的relation限制條目!)
"
I needed a complex sql to resolve the relationship. What I ended up doing is extending the base class for relations and creating my own, right now in laravel 5.2 that is Illuminate\Database\Eloquent\Relations\Relation. It's quite self-explanatory implementing the abstract methods, but if you need any examples you can see the implementations of HasMany, BelongsTo, etc. all the relations that come with laravel out of the box.
"
https://laravel.io/forum/06-15-2015-custom-relationship-queries
https://github.com/johnnyfreeman/laravel-custom-relation
https://laracasts.com/discuss/channels/eloquent/create-a-custom-relationship-method
2. 直接使用raw sql來獲取到你的model,隨後hydrate到你的model中去,這個方法不支援eager loading
"
In another note, you can always create your custom queries or getting information wherever you want and create a collection of laravel models using the static ::hydrate() and ::hydrateRaw() methods in your model classes.
"
詳細的hydrate呼叫案例:
http://stackoverflow.com/questions/22312586/laravel-select-from-derived-table#answer-25069239
如何在laravel middleware中訪問request的parameter?
我們在開發自己的授權系統時,往往會用到強大的middleware功能,在middleware中做相應的檢檢視看使用者是否有對資源的訪問許可權,這個資源本身往往由route+parameter來共同決定。
這些個資訊可以通過以下程式碼來訪問:
public function handle($request, Closure $next)
    {
        $parameters = $request->route()->parameters();
        $routename = $request->route()->getName();
            return $next($request);
    }
https://scotch.io/tutorials/get-laravel-route-parameters-in-middleware
laravel如何獲取$_GET大陣列中的query url variable?
$title = Input::get('title'); // 這段程式碼等同於下面
        try {
            $title = $_GET['title']; // get query string title value xxxx ?title=xxxx
        }catch (\Exception $e){}
如何eager loading relation with count?
$posts = Post::leftJoin('comments', 'comments.post_id', '=', 'posts.id')
  ->select('posts.*', 'count(*) as commentsCount')
  ->groupBy('posts.id')
  ->get();

$posts = Post::leftJoin('comments', 'comments.post_id', '=', 'posts.id')
  ->select('posts.*', 'count(*) as commentsCount')
  ->groupBy('posts.id')
  ->get();
https://softonsofa.com/tweaking-eloquent-relations-how-to-get-hasmany-relation-count-efficiently/
PHP 類的Magic methods/functions
__counstruct
建構函式,每一個類在初始化時自動呼叫,你可以執行依賴的注入,引數初始化等
__set($name,$value)
當試圖給一個不能訪問的屬性來賦值時被自動呼叫,比如如果試圖執行$obj->privatePropery = $value這個程式碼時,由於privateProperty是私有的,因此無法通過這種$obj->property來訪問,這時這個__set函式就將被執行,並且將$name的property賦值為$valuclass xx {
private $privatepropery = '';
  private $username;  // 可以被讀以及寫(通過__set)
  private $password;  // 可以被寫,但是不可讀(通過__get)
  private $age;
  private $accessibles = ['username'];
  private $fillables = ['username','password'];
  public function __get($name){
     if(!in_array($name,$this->accesibles)){
          // 如果訪問的屬性不在$accessibles陣列定義的白名單中,則不允許訪問
         return Null;
      }
     if(isset($name)){
        return $this->$name; // 首先判斷該類中是否有這個屬性,有則賦值,沒有則忽略
     }
  }
public function __set($name,$value){
     if(!in_array($name,$this->fillables)){
          // 如果訪問的屬性不在$fillable陣列定義的白名單中,則不允許賦值
         return false;
      }
     if(isset($name)){
        $this->$name=$value; // 首先判斷該類中是否有這個屬性,有則賦值,沒有則忽略
     }
  }
} $obj = new xx; $obj->username //可以訪問 $obj->password // 返回null $obj->nonexist //返回null
__get($name)
當試圖訪問一個私有屬性時,則該magic方法被呼叫
__toString
當物件被cast to string時自動呼叫,比如echo $obj這時由於$obj不是string,那麼就會自動呼叫$obj的__toString方法
http://php.net/manual/en/language.oop5.magic.php
__construct(), __destruct(), __call(), __callStatic(), __get(), __set(), __isset(), __unset(),__sleep(), __wakeup(), __toString(), __invoke(), __set_state(), __clone() and __debugInfo()
__call($name,$arguments)
is triggered when invoking inaccessible methods in an object context.
如果在物件呼叫的context中,被呼叫的方法不存在,則自動呼叫這個__call方法。 $obj->nonexist();
__callStatic($name,$arguments)
is triggered when invoking inaccessible methods in an object context.
如果在static環境中呼叫不存在的方法,則自動呼叫這個__call方法。 ClassName::nonexist();
<?php
class MethodTest
{
    public function __call($name, $arguments)
    {
        // Note: value of $name is case sensitive.
        echo "Calling object method '$name' "
             . implode(', ', $arguments). "\n";
    }

    /**  As of PHP 5.3.0  */
    public static function __callStatic($name, $arguments)
    {
        // Note: value of $name is case sensitive.
        echo "Calling static method '$name' "
             . implode(', ', $arguments). "\n";
    }
}

$obj = new MethodTest;
$obj->runTest('in object context');

MethodTest::runTest('in static context');  // As of PHP 5.3.0
?>
上面的__call和__callStatic在laravel中非常常用,比如facade都定義了__callStatic,以靜態方式寫程式碼,但是實際上最終用這個__callStatic首先解析出obj然後呼叫到真正的實體物件的方法
PHP子類過載父類並通過parent::method呼叫父類的方法
class User{
   public function login(){
      var_dump('user logged in...');
   }
}
class Administrator extends User{
   public function login(){
      parent::login(); //呼叫子類的login方法
      var_dump('user logged in as administrator!');
   }
}

(new Administrator)->login();
// "user logged in..."
// "user logged in as administrator!"
如何判斷session是否timeout?
在laravel應用中,session的預設為120,一旦超過這個時間,服務端的session就將timeout被刪除,而這時如果有ajax請求就會莫名其妙地出錯,但是使用者卻可能不知情。最好是能夠主動在後端判斷session是否timeout,如果已經過期則回覆對應的訊息,提示使用者重新登入:
http://stackoverflow.com/questions/14688853/check-for-session-timeout-in-laravel
if ((time() - Session::activity()) > (Config::get('session.lifetime') * 60))
{
   // Session expired
}
可以做成一個middleware,在每個request處理時觸發
如何使能redis session driver?
通過配置.env檔案中的
SESSION_DRIVER=redis
如何獲取http://xxx.com/yy?q=zz#/urlafterhashbound/mm整個url?
我們知道url中的#後面的內容是為瀏覽器客戶端來使用的,永遠不會送往server端,那麼如果伺服器端希望得到這個資訊,又該如何處理呢?一個可行的方案是在url中將#後面的內容轉換為querystring,這樣後端就能夠得到這個資訊加上fullurl()函式就能拼湊出整個url
Laravel 使用 env 讀取環境變數為 null問題
在使用laravel env()函式來讀取.env檔案中的配置資訊過程中,偶爾你會發現獲取不到。後來再通過執行php artisan config:cache命令來模擬問題出現場景,發現該命令執行後,在tinker中執行env就永遠無法獲取。看看下面的laravel程式碼Illuminate/Foundation/Bootstrap/DetectEnvironment.php line 18
public function bootstrap(Application $app)
{
    if (! $app->configurationIsCached()) {
        $this->checkForSpecificEnvironmentFile($app);

        try {
            (new Dotenv($app->environmentPath(), $app->environmentFile()))->load();
        } catch (InvalidPathException $e) {
            //
        }
    }
}
上述這段程式碼說明了如果存在快取配置檔案,就不會去設定環境變數了,配置都讀快取配置檔案,而不會再讀環境變數了。
因此,在配置檔案即 app/config 目錄下的其他地方,讀取配置不要使用 env 函式去讀環境變數,這樣你一旦執行 php artisan config:cache 之後,env 函式就不起作用了。所有要用到的環境變數,在 app/config 目錄的配置檔案中通過 env 讀取,其他地方要用到環境變數的都統一讀配置檔案而不是使用 env 函式讀取。
whereIn 排序
很多時候,我們會通過whereIn([1,5,8])這種方式來查詢對應資料庫記錄,但是mysql會自動按照自然升序排列結果集,而這可能不是我們想要的。
解決辦法是mysql的order by field來實現,對應laravel就是orderByRaw()
select * from `persons` where `id` in (1437, 1436, 1435, 1434, 1429) order by FIELD(id, 1437,1436,1435,1434,1429)
$implode(',',$idsarray);
Person::whereIn('id',$idsarray)->orderByRaw(DB::raw("FIELD(id, ${idsorderstr})"))->get();
如何將PHP array轉換為sql查詢中的in欄位
$arraydata = [1,5];
$idquery = join("','",$arraydata);
$ids = \DB::select("select cf.id as pid from cates cf join cates cs on cf.id = cs.root where cs.id in ('$idquery')  order by cf.id ");
DB::raw使用PHP變數以及subquery的使用方法
return \DB::table(\DB::raw("
            (select * from (select *,SUM(CASE isright

        WHEN 1 THEN 1

        ELSE 0

    END) AS right_count  from useranswers where class_id = '$classid%' and user_id='$uid%' group by user_id) as mine
    union
select * from (select *,SUM(CASE isright

        WHEN 1 THEN 1

        ELSE 0

    END) AS right_count  from useranswers where class_id = '$classid%' group by user_id order by right_count desc limit 2) as top2) as answerrights
            "))->get();
如何訪問Content-Type: application/x-www-form-urlencoded的post body內容?
有時候需要訪問post body的內容,雖然$request->get('keyname')絕大多數時間是可以滿足需求的,但是還是有很多時候我們希望能夠完全得到post body的內容並且按照自己的方式來處理。方法是:
$bodyContent = $request->getContent();
$decodedBody = json_decode($bodyContent);
// 下面就可以直接對decodedBody物件操作了
MySQL資料庫設計nullable考慮
建議不要使用nullable修飾,因為會影響效能並且佔用空間,最好使用laravel的預設NOT NULL
http://blog.csdn.net/dsislander/article/details/8573666
如何在eager loading時對relationship做orderby操作?
我們知道在laravel中返回結果集時,只能對最外層的model做orderby操作,如何在eager loading一個關係relation時同時以該對該relation做排序呢?
答案是:
在定義關係函式時,直接在query builder中新增order by 欄位
public function comments()
{
    return $this->hasMany('Comment')->orderBy('column');
}
如何在返回model時自動附加上另外一個屬性? appends+getterXXXAttribute
在某些場景下,當我們返回model時希望自動加上一個額外的屬性,比如返回post model時希望自動加上其user資訊,返回班級classroom時,自動返回其已經佈置的作業數目等,這時就需要使用laravel model的appends功能了:
class classroom extends Model{
  public $table = 'classrooms';
  protected $appends = ['homework_count'];
  /**
     * @return mixed accessor for homeworkCount attribute
     */
    public function getHomeworkCountAttribute() {
        $homeworkscount = $this->homework()->count('homeworks.id');
        return $homeworkscount;
    }
}
如何簡化DB::table('xxx')->get()返回的obj陣列為純粹values以便減顯著少傳輸位元組數?
在DB::table('xxx')->get()返回的物件陣列中,如果資料量很大,欄位數也比較多的話,一般情況下欄位長度都比較長,欄位的value本身卻很短,因此,有效載荷是很小的,浪費傳輸頻寬降低網站響應速度。一個有效的優化方法就是直接去除這些物件陣列中的key值傳輸,只傳value。具體方法如下:
$draftdata = DB::table(DB::raw("xxxSQL"))->get(['id','title','someotherfield']);
$temp = array_map(function($v){
                return array_values(get_object_vars($v));
            },$draftdata);
// 經過上面的array_values(只返回array的value而忽略對應的key)和get_object_vars操作(將物件修改為array)變換後就返回了已經簡化的資料
// [ [1,'這是title','第三個欄位'],[2,'這是第二個title','第三個欄位的value']]
            return ($temp);
laravel圖片驗證碼package整合 mews/captcha
下面是validator的擴充套件程式碼,這樣就可以在controller中使用captcha這個rule了,其底層邏輯由captcha_check來實現
        // Validator extensions
        $this->app['validator']->extend('captcha', function($attribute, $value, $parameters)
        {
            return captcha_check($value);
        });
如何在NotFoundHttpException中訪問session?
由於laravel startsession middleware本身預設情況下只有在順利通過了route檢查後才能啟動,這樣就會導致在Http not found exception中無法訪問到session,如果你確實需要在任何情況下都能訪問session,應該怎麼辦?方法很簡單,將Session\Middleware\StartSession::class,這個middleware放到kernel.php的$middleware定義中
    protected $middleware = [
        \Illuminate\Foundation\Http\Middleware\CheckForMaintenanceMode::class,
        \Illuminate\Session\Middleware\StartSession::class,
    ];
composer update one vendor(或者希望安裝一個composer的特定版本)
有的時候我們只希望更新composer.json中的某一個vendor的package,而其他的package都保持不變,有什麼辦法呢?
1. 首先在composer.json中增加你希望安裝的package以及版本要求;
2. 執行composer update vendor/package的命令就好了!
如何動態地隱藏model及relation的欄位
$notification->setHidden(['segmentednotification']);
Carbon和PHP date之間的各種轉換
carbon本身是一個非常好用的PHP date package,但是有的時候我們還希望用到php原生的函式功能,比如format成微信開發需要的20180120112305的字串格式
$n = new \Carbon\Carbon();
$ts =  $n->getTimestamp();
return date('YmdHis',$ts);  // 20180104161547
$u = User::orderBy('created_at','desc')->first();
$ts = $u->created_at; // 被laravel自動cast為carbon object
return date('YmdHis',$ts->getTimestamp());  // 20180104161547
微信公眾號開發相關的幾個PHP典型函式實現
public function MakeSign()
    {
        //簽名步驟一:按字典序排序引數
        ksort($this->values);
        $string = $this->ToUrlParams();
        //簽名步驟二:在string後加入KEY
        $string = $string . "&key=".WxPayConfig::KEY;
        //簽名步驟三:MD5加密
        $string = md5($string);
        //簽名步驟四:所有字元轉為大寫
        $result = strtoupper($string);
        return $result;
    }
public function SetSign()
    {
        $sign = $this->MakeSign();
        $this->values['sign'] = $sign;
        return $sign;
    }

public static function getNonceStr($length = 32)
    {
        $chars = "abcdefghijklmnopqrstuvwxyz0123456789";
        $str ="";
        for ( $i = 0; $i < $length; $i++ )  {
            $str .= substr($chars, mt_rand(0, strlen($chars)-1), 1);
        }
        return $str;
    }

public function ToXml()
    {
        if(!is_array($this->values)
            || count($this->values) <= 0)
        {
            throw new WxPayException("陣列資料異常!");
        }

        $xml = "<xml>";
        foreach ($this->values as $key=>$val)
        {
            if (is_numeric($val)){
                $xml.="<".$key.">".$val."</".$key.">";
            }else{
                $xml.="<".$key."><![CDATA[".$val."]]></".$key.">";
            }
        }
        $xml.="</xml>";
        return $xml;
    }

    /**
     * 將xml轉為array
     * @param string $xml
     * @throws WxPayException
     */
    public function FromXml($xml)
    {
        if(!$xml){
            throw new WxPayException("xml資料異常!");
        }
        //將XML轉為array
        //禁止引用外部xml實體
        libxml_disable_entity_loader(true);
        $this->values = json_decode(json_encode(simplexml_load_string($xml, 'SimpleXMLElement', LIBXML_NOCDATA)), true);
        return $this->values;
    }
使用call_user_func_array呼叫動態傳入的function或者$obj->method並使用到對應引數
<?php
function foobar($arg, $arg2) {
    echo __FUNCTION__, " got $arg and $arg2\n";
}
class foo {
    function bar($arg, $arg2) {
        echo __METHOD__, " got $arg and $arg2\n";
    }
}


// Call the foobar() function with 2 arguments
call_user_func_array("foobar", array("one", "two"));

// Call the $foo->bar() method with 2 arguments
$foo = new foo;
call_user_func_array(array($foo, "bar"), array("three", "four"));
?>
微信公眾平臺開發中的網頁授權域只能設定一個如何滿足多個域名的網頁授權需求?
http://www.cnblogs.com/lyzg/p/6159617.html
laravel路由注意不要有 trailing slash / !!!否則會額外多一個redirect,這個可能是由.htaccess來強制跳轉的
如何將laravel object/array直接通過html傳給javascript?
<script>
var user = {!! json_encode(userobj()) !!} // userobj是laravel拉取資料庫形成的PHP物件或陣列
</script>
上面的程式碼將使得PHP的輸出不經過htmlentities這個php函式來過濾轉換html相關的內容,直接原封不動的輸出給js
laravel session flash data如何在連續redirect時保持?
有時候存在這樣的場景:我們在前一個request處理時使用withErrors('error information')在laravel session store中flash了一個errors,本來在下一個request中我們是可以訪問到這個error的,但是可能在middleware中又強制做了一個redirect,而這時是不再帶errors的,這時由於laravel的session store機制會將flash.old清空,因此在最終的request處理函式中就無法獲取到該error,怎麼辦?一個可行的策略是:
$request->session()->reflash(); // 將flash data保留到下一次訪問
Composer錯誤處理 Please create a github oauth token
$ composer create-project --prefer-dist laravel/laravel lara56

Installing laravel/laravel (v5.4.30)
  - Installing laravel/laravel (v5.4.30): Downloading (connecting...)
Could not fetch https://api.github.com/repos/laravel/laravel/zipball/098b8a48830c0e4e6ba6540979bf2459c8a6a49e, please create a GitHub OAuth token to go over the API rate limit
Head to https://github.com/settings/tokens/new?scopes=repo&description=Composer+on+USER-20151001BU+2018-03-01+1407
to retrieve a token. It will be stored in "C:/Users/Administrator/AppData/Roaming/Composer/auth.json" for future use by Composer.
Token (hidden):
No token given, aborting.
You can also add it manually later by using "composer config --global --auth github-oauth.github.com <token>"
    Failed to download laravel/laravel from dist: Could not authenticate against github.com
    Now trying to download from source
  - Installing laravel/laravel (v5.4.30):
解決辦法:
1. 通過:https://github.com/settings/tokens建立一個token
2. composer config --global github-oauth.github.com 23bc35a888235f66032ef68c7a8023b7b28e0f6
如何使用composer安裝laravel的一個特定版本?
1. 在packagist中查詢對應framework的版本: https://packagist.org/packages/laravel/framework
2. composer create-project laravel/laravel lara560 --prefer-dist 5.6.0
但是要注意的是laravel/laravel可能和laravel/framework的版本並不會很快同步的哦, 比如laravel/framekwork在v5.6.7版本時,而laravel/laravel卻可能只在v5.6.0上
laravel Mix build 無法使用sourcemap的問題
解決辦法, 在webpack.mix.js中,使用以下程式碼,之後再呼叫你自己的mix.js.sass等任務
mix.webpackConfig({
    devtool: "inline-source-map"
});
RuntimeException: No supported encrypter found. The cipher and / or key length are invalid解決辦法
php artisan config:cache
如何在laravel中增加自己的config並使用.env檔案拋入對應敏感配置資料?
1. 在config目錄下增加一個yourcfg.php
2.該php檔案中
return [
 'myconfigkey1' => env('MYCONFIGKEY1',DEFAULTVALUE
]
3. 執行
php artisan config:cache
上面這條命令將使得所有config cache起來,這時你如果修改你的env檔案你會發現並不會立即生效,那麼要麼再次執行上述config:cache命令,要麼執行以下命令:
php artisan config:clear以便清除掉config的cache內容,但是這樣做會有個效能的損失"
wherePivot, wherePivotIn針對多對多的pivot表來查詢:
    public function category()
    {
        return $this->belongsToMany(Category::class)->wherePivotIn('id', [1]);
    }
model relationship with itself: 對自己建立關係
https://heera.it/laravel-model-relationship