Hibernate(二):Hibernate搭建開發環境+簡單例項
本文轉載自:http://blog.csdn.net/jiuqiyuliang/article/details/39380465
hibernate是非常典型的持久層框架,持久化的思想是非常值得我們學習和研究的。這篇博文,我們主要以例項的形式學習Hibernate,不深究Hibernate的思想和原理,否則,一味追求,苦學思想和原理,到最後可能什麼也學不會,從實踐入手,熟能生巧,思想和原理自然而然領悟。
上篇博文:【SSH進階之路】Hibernate基本原理,我們介紹了Hibernate的基本概念、Hibernate的核心以及Hibernate的執行原理,可以很好幫助我們認識Hibernate,再看這篇部落格之前,請先回顧上篇博文內容。這篇博文,我們從實踐角度,動手搭建一個簡單的Hibernate例項。
一、開發環境
Win8 + jdk1.7 + MyEclipse + Tomcat5.0 + MySQL
說明:其實Hibernate是非常獨立的框架,根本不需要MyEclipse,Eclipse,Tomcat,Log4J等,他們只不過是能滿足我們其他的需求,才把他們引進來的。
二、下載檔案
你需要Java SDK、 Hibernate包、和JDBC Driver。
1、Hibernate包下載地址:
http://prdownloads.sourceforge.net/hibernate/?sort_by=date&sort=desc
2、JDBC Driver根據你的資料庫來定,一般database官網都有。Hibernate支援常用的資料庫,比如
MySQL, Oracle等等。這兩個資料庫是現在比較常用的,都有JDBC Driver:
Oracle JDBC Driver下載地址(下載前必須同意Oracle協議書)
http://otn.oracle.com/software/htdocs/distlic.html?/software/tech/java/sqlj_jdbc/htdocs/jdbc9201.html
MySQL JDBC Driver下載地址
http://dev.mysql.com/downloads/connector/j/3.0.html
三、所需jar包
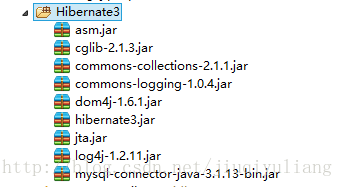
hibernate3.jar Hibernate的核心包
dom4j-1.6.1.jar dom4j讀取xml檔案包
mysql-connector-Java-3.1.13-bin.jar MySQL的jdbc驅動包
Hibernate的作用:讓我們以物件導向的方式或思維來考慮怎麼向關係型資料庫存取資料。它需要與相應的資料庫打交道,所以需要相應的jdbc驅動。我們的database用的是MySQL,所以需要引入MySQL的jdbc驅動。
log4j-1.2.11.jar 記錄日誌框架
由於log4j的記錄日誌比jdk自帶的記錄日誌功能更加美觀,簡單,易配置日誌級別,便於除錯,我們選擇使用log4j。
必須要引入的jar:
commons-logging-1.0.4.jar 抽象的日誌記錄框架
本身並沒有實現真正的寫日誌能力(看包結構即可知道)而是結合其它的日誌系統如Log4j或者java本身的java.util.logging作為日誌輸出元件,來實現日誌記錄的功能。
commons-collections-2.1.1jar 各種集合類和集合工具類的封裝
cglib-2.1.3.jar 動態代理,Hibernate用它來實現PO位元組碼的動態生成
asm.jar cglib需要依賴的jar,ASM位元組碼庫
注:作為初學者不提倡這種做法,只需要將hibernate所要依賴的第三方jar包都引入即可,否則做其他例項時會報NoClassDefFoundError的錯誤,解決方案:只需將對應jar引入即可。由於這是一個簡單例項,僅僅需要引入這些jar。
四、程式碼展示
1、在IDE中建立java專案(比較簡單不再演示)
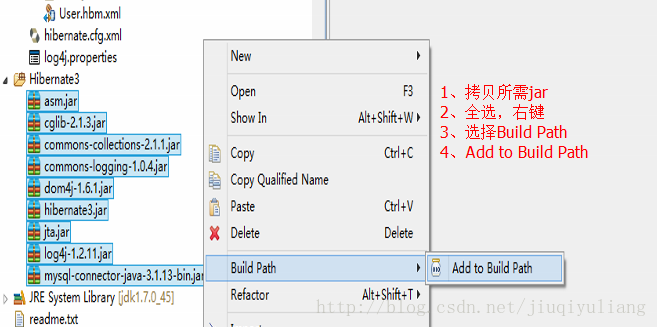
2、建立source folder,命名為Hibernate3,在Hibernate下載檔案中找到我們所需要的三個配置檔案和所有jar包,拷貝所需jar檔案,構建依賴包
3、提供hibernate.cfg.xml檔案,完成基本配置
4、寫程式碼
(1)建立實體類User.java
(2)提供User.hbm.xml檔案,完成實體類對映
(3)將User.hbm.xml檔案加入到hibernate.cfg.xml檔案中
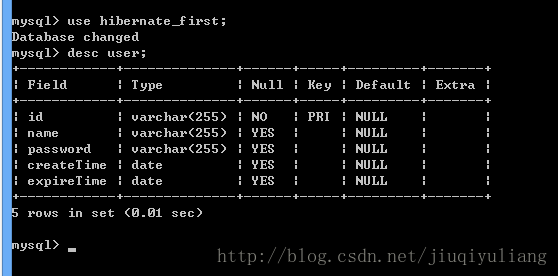
(4)編寫工具類ExportDB.java,將hbm生成ddl,也就是hbm2ddl
測試之前,要提前建立資料庫hibernate_first,測試如下:
控制檯列印的SQL語句:
資料庫表結構:
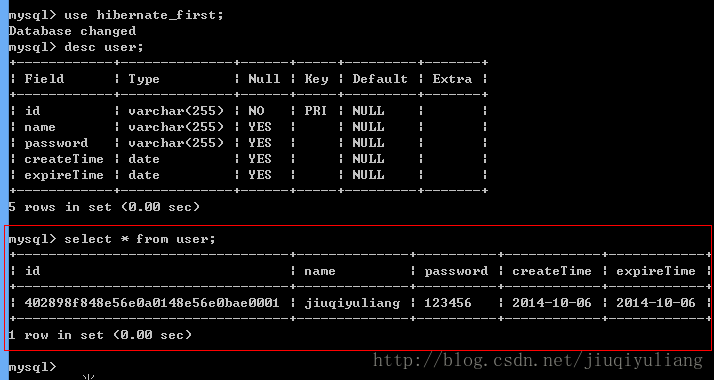
(5)建立客戶端類Client,新增使用者資料到mySQL
右鍵debug執行,測試完成之後,我們查詢一下測試結果:
5、為了在除錯過程中能觀察到Hibernate的日誌輸出,最好加入log4j.properties配置檔案、在CLASSPATH中新建log4j.properties配置檔案或將該配置檔案拷貝到src下,便於程式除錯。
內容如下:
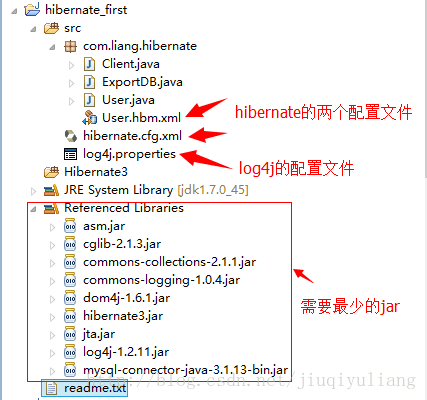
配置完成後,專案結構如下圖所示:
五、最後
自己動手豐衣足食,實踐出真理,紙上得來終覺淺,絕知此事要躬行。雖然這個例項非常簡單,但是我們踏進了持久層框架的大門。
從上面的簡單例項可以看到,我們只是使用Hibernate對User這一個實體進行了對映,比較簡單,但是完全不符合實際。如何像關係型資料庫一樣表示多種關聯關係,例如:一對一,一對多,多對多等等,我們還需要深入。下篇博文,我們介紹Hibernate的基本對映原理以及關聯關係對映。
相關文章
- 【Hibernate】—Hibernate+mysql 環境搭建+入門例項MySql
- Java開發-搭建hibernate環境Java
- Struts+spring+Hibernate+Mysql--環境搭建SpringMySql
- ASM單例項(Oracle 11.2.0.4)環境(二)ASM單例Oracle
- 懶載入例項--hibernate
- 簡易的開發環境搭建開發環境
- java中Hibernate的環境配置Java
- ArcGIS API for JavaScript開發環境搭建及第一個例項demoAPIJavaScript開發環境
- mac搭建hadoop開發環境(二)MacHadoop開發環境
- SSM開發環境的搭建(方式二)SSM開發環境
- 搭建Hyperledger Fabric 2.3.2開發環境及簡單案例執行開發環境
- rust學習一、入門之搭建簡單開發環境Rust開發環境
- Rest Webservice 環境搭建流程和例項RESTWeb
- jafka環境搭建步驟--例項可用
- 單機環境配置ASM例項ASM
- Flutter入門教程(二)開發環境搭建Flutter開發環境
- Superset Windows二次開發環境搭建Windows開發環境
- Struts2,Hibernate,Spring 環境配置Spring
- Istio Mixer Adapter開發 (二)Istio環境搭建APT
- SQL稽核 | SQLE 二次開發環境搭建SQL開發環境
- 第二課 如何在WINDOWS環境下搭建以太坊開發環境Windows開發環境
- 1 – 搭建開發環境開發環境
- rollup 開發環境搭建開發環境
- 搭建go開發環境Go開發環境
- Androdi開發環境搭建開發環境
- 前端開發環境搭建前端開發環境
- Theia 開發環境搭建開發環境
- QEMU 開發環境搭建開發環境
- Cordova 開發環境搭建開發環境
- 搭建VUE開發環境Vue開發環境
- 安卓開發環境搭建安卓開發環境
- 搭建Layui開發環境UI開發環境
- 搭建scala開發環境開發環境
- EBS開發環境搭建開發環境
- andriod開發環境搭建,開發環境
- Erlang開發環境搭建開發環境
- Kafka開發環境搭建Kafka開發環境
- Qt開發環境搭建QT開發環境