OkHttp 3.7原始碼分析(二)——攔截器&一個實際網路請求的實現
前一篇部落格中我們介紹了OkHttp的總體架構,接下來我們以一個具體的網路請求來講述OkHttp進行網路訪問的具體過程。由於該部分與OkHttp的攔截器概念緊密聯絡在一起,所以將這兩部分放在一起進行講解。
1.構造Demo
首先構造一個簡單的非同步網路訪問Demo:
OkHttpClient client = new OkHttpClient();
Request request = new Request.Builder()
  .url("http://publicobject.com/helloworld.txt")
  .build();

client.newCall(request).enqueue(new Callback() {
  @Override
  public void onFailure(Call call, IOException e) {
    Log.d("OkHttp", "Call Failed:" + e.getMessage());
  }

  @Override
  public void onResponse(Call call, Response response) throws IOException {
    Log.d("OkHttp", "Call succeeded:" + response.message());
  }
});
- 1
- 2
- 3
- 4
- 5
- 6
- 7
- 8
- 9
- 10
- 11
- 12
- 13
- 14
- 15
- 16
- 17
- 1
- 2
- 3
- 4
- 5
- 6
- 7
- 8
- 9
- 10
- 11
- 12
- 13
- 14
- 15
- 16
- 17
2. 發起請求
OkHttpClient.newCall實際是建立一個RealCall例項:
  /**
   * Prepares the {@code request} to be executed at some point in the future.
   */
  @Override public Call newCall(Request request) {
    return new RealCall(this, request, false /* for web socket */);
}- 1
- 2
- 3
- 4
- 5
- 6
- 1
- 2
- 3
- 4
- 5
- 6
RealCall.enqueue實際就是講一個RealCall放入到任務佇列中,等待合適的機會執行:
  @Override public void enqueue(Callback responseCallback) {
    synchronized (this) {
      if (executed) throw new IllegalStateException("Already Executed");
      executed = true;
    }
    captureCallStackTrace();
    client.dispatcher().enqueue(new AsyncCall(responseCallback));
}- 1
- 2
- 3
- 4
- 5
- 6
- 7
- 8
- 1
- 2
- 3
- 4
- 5
- 6
- 7
- 8
從程式碼中可以看到最終RealCall被轉化成一個AsyncCall並被放入到任務佇列中,任務佇列中的分發邏輯這裡先不說,相關實現會放在OkHttp原始碼分析——任務佇列疑問進行介紹。這裡只需要知道AsyncCall的excute方法最終將會被執行:
[RealCall.java]
@Override protected void execute() {
      boolean signalledCallback = false;
      try {
        Response response = getResponseWithInterceptorChain();
        if (retryAndFollowUpInterceptor.isCanceled()) {
          signalledCallback = true;
          responseCallback.onFailure(RealCall.this, new IOException("Canceled"));
        } else {
          signalledCallback = true;
          responseCallback.onResponse(RealCall.this, response);
        }
      } catch (IOException e) {
        if (signalledCallback) {
          // Do not signal the callback twice!
          Platform.get().log(INFO, "Callback failure for " + toLoggableString(), e);
        } else {
          responseCallback.onFailure(RealCall.this, e);
        }
      } finally {
        client.dispatcher().finished(this);
      }
    }
}- 1
- 2
- 3
- 4
- 5
- 6
- 7
- 8
- 9
- 10
- 11
- 12
- 13
- 14
- 15
- 16
- 17
- 18
- 19
- 20
- 21
- 22
- 23
- 24
- 1
- 2
- 3
- 4
- 5
- 6
- 7
- 8
- 9
- 10
- 11
- 12
- 13
- 14
- 15
- 16
- 17
- 18
- 19
- 20
- 21
- 22
- 23
- 24
execute方法的邏輯並不複雜,簡單的說就是:
- 呼叫
getResponseWithInterceptorChain獲取伺服器返回 - 通知任務分發器(
client.dispatcher)該任務已結束
getResponseWithInterceptorChain構建了一個攔截器鏈,通過依次執行該攔截器鏈中的每一個攔截器最終得到伺服器返回。
3. 構建攔截器鏈
首先來看下getResponseWithInterceptorChain的實現:
[RealCall.java]
Response getResponseWithInterceptorChain() throws IOException {
    // Build a full stack of interceptors.
    List<Interceptor> interceptors = new ArrayList<>();
    interceptors.addAll(client.interceptors());
    interceptors.add(retryAndFollowUpInterceptor);
    interceptors.add(new BridgeInterceptor(client.cookieJar()));
    interceptors.add(new CacheInterceptor(client.internalCache()));
    interceptors.add(new ConnectInterceptor(client));
    if (!forWebSocket) {
      interceptors.addAll(client.networkInterceptors());
    }
    interceptors.add(new CallServerInterceptor(forWebSocket));

    Interceptor.Chain chain = new RealInterceptorChain(
        interceptors, null, null, null, 0, originalRequest);
    return chain.proceed(originalRequest);
}- 1
- 2
- 3
- 4
- 5
- 6
- 7
- 8
- 9
- 10
- 11
- 12
- 13
- 14
- 15
- 16
- 17
- 18
- 1
- 2
- 3
- 4
- 5
- 6
- 7
- 8
- 9
- 10
- 11
- 12
- 13
- 14
- 15
- 16
- 17
- 18
其邏輯大致分為兩部分:
- 建立一系列攔截器,並將其放入一個攔截器陣列中。這部分攔截器即包括使用者自定義的攔截器也包括框架內部攔截器
- 建立一個攔截器鏈
RealInterceptorChain,並執行攔截器鏈的proceed方法
接下來看下RealInterceptorChain的實現邏輯:
[RealInterceptorChain.java]
public final class RealInterceptorChain implements Interceptor.Chain {
  private final List<Interceptor> interceptors;
  private final StreamAllocation streamAllocation;
  private final HttpCodec httpCodec;
  private final RealConnection connection;
  private final int index;
  private final Request request;
  private int calls;

  public RealInterceptorChain(List<Interceptor> interceptors, StreamAllocation streamAllocation,
                              HttpCodec httpCodec, RealConnection connection, int index, Request request) {
    this.interceptors = interceptors;
    this.connection = connection;
    this.streamAllocation = streamAllocation;
    this.httpCodec = httpCodec;
    this.index = index;
    this.request = request;
  }

  @Override public Connection connection() {
    return connection;
  }

  public StreamAllocation streamAllocation() {
    return streamAllocation;
  }

  public HttpCodec httpStream() {
    return httpCodec;
  }

  @Override public Request request() {
    return request;
  }

  @Override public Response proceed(Request request) throws IOException {
    return proceed(request, streamAllocation, httpCodec, connection);
  }

  public Response proceed(Request request, StreamAllocation streamAllocation, HttpCodec httpCodec,
      RealConnection connection) throws IOException {

    ......
    // Call the next interceptor in the chain.
    RealInterceptorChain next = new RealInterceptorChain(
        interceptors, streamAllocation, httpCodec, connection, index + 1, request);
    Interceptor interceptor = interceptors.get(index);
    Response response = interceptor.intercept(next);

    ......

    return response;
  }
}- 1
- 2
- 3
- 4
- 5
- 6
- 7
- 8
- 9
- 10
- 11
- 12
- 13
- 14
- 15
- 16
- 17
- 18
- 19
- 20
- 21
- 22
- 23
- 24
- 25
- 26
- 27
- 28
- 29
- 30
- 31
- 32
- 33
- 34
- 35
- 36
- 37
- 38
- 39
- 40
- 41
- 42
- 43
- 44
- 45
- 46
- 47
- 48
- 49
- 50
- 51
- 52
- 53
- 54
- 55
- 1
- 2
- 3
- 4
- 5
- 6
- 7
- 8
- 9
- 10
- 11
- 12
- 13
- 14
- 15
- 16
- 17
- 18
- 19
- 20
- 21
- 22
- 23
- 24
- 25
- 26
- 27
- 28
- 29
- 30
- 31
- 32
- 33
- 34
- 35
- 36
- 37
- 38
- 39
- 40
- 41
- 42
- 43
- 44
- 45
- 46
- 47
- 48
- 49
- 50
- 51
- 52
- 53
- 54
- 55
在proceed方法中的核心程式碼可以看到,proceed實際上也做了兩件事:
- 建立下一個攔截鏈。傳入
index + 1使得下一個攔截器鏈只能從下一個攔截器開始訪問 - 執行索引為
index的intercept方法,並將下一個攔截器鏈傳入該方法
接下來再看下第一個攔截器RetryAndFollowUpInterceptor的intercept方法:
[RetryAndFollowUpInterceptor.java]

public final class RetryAndFollowUpInterceptor implements Interceptor {
    @Override public Response intercept(Chain chain) throws IOException {
    Request request = chain.request();

    streamAllocation = new StreamAllocation(
        client.connectionPool(), createAddress(request.url()), callStackTrace);

    int followUpCount = 0;
    Response priorResponse = null;
    while (true) {
      if (canceled) {
        streamAllocation.release();
        throw new IOException("Canceled");
      }

      Response response = null;
      boolean releaseConnection = true;
      try {
       //執行下一個攔截器鏈的proceed方法
        response = ((RealInterceptorChain) chain).proceed(request, streamAllocation, null, null);
        releaseConnection = false;
      } catch (RouteException e) {
        // The attempt to connect via a route failed. The request will not have been sent.
        if (!recover(e.getLastConnectException(), false, request)) {
          throw e.getLastConnectException();
        }
        releaseConnection = false;
        continue;
      } catch (IOException e) {
        // An attempt to communicate with a server failed. The request may have been sent.
        boolean requestSendStarted = !(e instanceof ConnectionShutdownException);
        if (!recover(e, requestSendStarted, request)) throw e;
        releaseConnection = false;
        continue;
      } finally {
        // We're throwing an unchecked exception. Release any resources.
        if (releaseConnection) {
          streamAllocation.streamFailed(null);
          streamAllocation.release();
        }
      }

      // Attach the prior response if it exists. Such responses never have a body.
      ......

      Request followUp = followUpRequest(response);


      closeQuietly(response.body());
      ...
    }
  }
}- 1
- 2
- 3
- 4
- 5
- 6
- 7
- 8
- 9
- 10
- 11
- 12
- 13
- 14
- 15
- 16
- 17
- 18
- 19
- 20
- 21
- 22
- 23
- 24
- 25
- 26
- 27
- 28
- 29
- 30
- 31
- 32
- 33
- 34
- 35
- 36
- 37
- 38
- 39
- 40
- 41
- 42
- 43
- 44
- 45
- 46
- 47
- 48
- 49
- 50
- 51
- 52
- 53
- 54
- 55
- 1
- 2
- 3
- 4
- 5
- 6
- 7
- 8
- 9
- 10
- 11
- 12
- 13
- 14
- 15
- 16
- 17
- 18
- 19
- 20
- 21
- 22
- 23
- 24
- 25
- 26
- 27
- 28
- 29
- 30
- 31
- 32
- 33
- 34
- 35
- 36
- 37
- 38
- 39
- 40
- 41
- 42
- 43
- 44
- 45
- 46
- 47
- 48
- 49
- 50
- 51
- 52
- 53
- 54
- 55
這段程式碼最關鍵的程式碼是:
response = ((RealInterceptorChain) chain).proceed(request, streamAllocation, null, null);- 1
- 1
這行程式碼就是執行下一個攔截器鏈的proceed方法。而我們知道在下一個攔截器鏈中又會執行下一個攔截器的intercept方法。所以整個執行鏈就在攔截器與攔截器鏈中交替執行,最終完成所有攔截器的操作。這也是OkHttp攔截器的鏈式執行邏輯。而一個攔截器的intercept方法所執行的邏輯大致分為三部分:
- 在發起請求前對request進行處理
- 呼叫下一個攔截器,獲取response
- 對response進行處理,返回給上一個攔截器
這就是OkHttp攔截器機制的核心邏輯。所以一個網路請求實際上就是一個個攔截器執行其intercept方法的過程。而這其中除了使用者自定義的攔截器外還有幾個核心攔截器完成了網路訪問的核心邏輯,按照先後順序依次是:
- RetryAndFollowUpInterceptor
- BridgeInterceptor
- CacheInterceptor
- ConnectIntercetot
- CallServerInterceptor
4 RetryAndFollowUpInterceptor
如上文程式碼所示,RetryAndFollowUpInterceptor負責兩部分邏輯:
- 在網路請求失敗後進行重試
- 當伺服器返回當前請求需要進行重定向時直接發起新的請求,並在條件允許情況下複用當前連線
5 BridgeInterceptor
public final class BridgeInterceptor implements Interceptor {
  private final CookieJar cookieJar;

  public BridgeInterceptor(CookieJar cookieJar) {
    this.cookieJar = cookieJar;
  }

  @Override public Response intercept(Chain chain) throws IOException {
    Log.e("haha", "BridgeInterceptor.intercept");
    Request userRequest = chain.request();
    Request.Builder requestBuilder = userRequest.newBuilder();

    RequestBody body = userRequest.body();
    if (body != null) {
      MediaType contentType = body.contentType();
      if (contentType != null) {
        requestBuilder.header("Content-Type", contentType.toString());
      }

      long contentLength = body.contentLength();
      if (contentLength != -1) {
        requestBuilder.header("Content-Length", Long.toString(contentLength));
        requestBuilder.removeHeader("Transfer-Encoding");
      } else {
        requestBuilder.header("Transfer-Encoding", "chunked");
        requestBuilder.removeHeader("Content-Length");
      }
    }

    if (userRequest.header("Host") == null) {
      requestBuilder.header("Host", hostHeader(userRequest.url(), false));
    }

    if (userRequest.header("Connection") == null) {
      requestBuilder.header("Connection", "Keep-Alive");
    }

    // If we add an "Accept-Encoding: gzip" header field we're responsible for also decompressing
    // the transfer stream.
    boolean transparentGzip = false;
    if (userRequest.header("Accept-Encoding") == null && userRequest.header("Range") == null) {
      transparentGzip = true;
      requestBuilder.header("Accept-Encoding", "gzip");
    }

    List<Cookie> cookies = cookieJar.loadForRequest(userRequest.url());
    if (!cookies.isEmpty()) {
      requestBuilder.header("Cookie", cookieHeader(cookies));
    }

    if (userRequest.header("User-Agent") == null) {
      requestBuilder.header("User-Agent", Version.userAgent());
    }

    Response networkResponse = chain.proceed(requestBuilder.build());

    HttpHeaders.receiveHeaders(cookieJar, userRequest.url(), networkResponse.headers());

    Response.Builder responseBuilder = networkResponse.newBuilder()
        .request(userRequest);

    if (transparentGzip
        && "gzip".equalsIgnoreCase(networkResponse.header("Content-Encoding"))
        && HttpHeaders.hasBody(networkResponse)) {
      GzipSource responseBody = new GzipSource(networkResponse.body().source());
      Headers strippedHeaders = networkResponse.headers().newBuilder()
          .removeAll("Content-Encoding")
          .removeAll("Content-Length")
          .build();
      responseBuilder.headers(strippedHeaders);
      responseBuilder.body(new RealResponseBody(strippedHeaders, Okio.buffer(responseBody)));
    }

    return responseBuilder.build();
  }
}
- 1
- 2
- 3
- 4
- 5
- 6
- 7
- 8
- 9
- 10
- 11
- 12
- 13
- 14
- 15
- 16
- 17
- 18
- 19
- 20
- 21
- 22
- 23
- 24
- 25
- 26
- 27
- 28
- 29
- 30
- 31
- 32
- 33
- 34
- 35
- 36
- 37
- 38
- 39
- 40
- 41
- 42
- 43
- 44
- 45
- 46
- 47
- 48
- 49
- 50
- 51
- 52
- 53
- 54
- 55
- 56
- 57
- 58
- 59
- 60
- 61
- 62
- 63
- 64
- 65
- 66
- 67
- 68
- 69
- 70
- 71
- 72
- 73
- 74
- 75
- 76
- 77
BridgeInterceptor主要負責以下幾部分內容:
- 設定內容長度,內容編碼
- 設定gzip壓縮,並在接收到內容後進行解壓。省去了應用層處理資料解壓的麻煩
- 新增cookie
- 設定其他報頭,如
User-Agent,Host,Keep-alive等。其中Keep-Alive是實現多路複用的必要步驟
6. CacheInterceptor
[CacheInterceptor.intercept]

  @Override public Response intercept(Chain chain) throws IOException {
    Log.e("haha", "CacheInterceptor.intercept");
    Response cacheCandidate = cache != null
        ? cache.get(chain.request())
        : null;

    long now = System.currentTimeMillis();

    CacheStrategy strategy = new CacheStrategy.Factory(now, chain.request(), cacheCandidate).get();
    Request networkRequest = strategy.networkRequest;
    Response cacheResponse = strategy.cacheResponse;

    if (cache != null) {
      cache.trackResponse(strategy);
    }

    if (cacheCandidate != null && cacheResponse == null) {
      closeQuietly(cacheCandidate.body()); // The cache candidate wasn't applicable. Close it.
    }

    // If we're forbidden from using the network and the cache is insufficient, fail.
    if (networkRequest == null && cacheResponse == null) {
      return new Response.Builder()
          .request(chain.request())
          .protocol(Protocol.HTTP_1_1)
          .code(504)
          .message("Unsatisfiable Request (only-if-cached)")
          .body(Util.EMPTY_RESPONSE)
          .sentRequestAtMillis(-1L)
          .receivedResponseAtMillis(System.currentTimeMillis())
          .build();
    }

    // If we don't need the network, we're done.
    if (networkRequest == null) {
      return cacheResponse.newBuilder()
          .cacheResponse(stripBody(cacheResponse))
          .build();
    }

    Response networkResponse = null;
    try {
      networkResponse = chain.proceed(networkRequest);
    } finally {
      // If we're crashing on I/O or otherwise, don't leak the cache body.
      if (networkResponse == null && cacheCandidate != null) {
        closeQuietly(cacheCandidate.body());
      }
    }

    // If we have a cache response too, then we're doing a conditional get.
    if (cacheResponse != null) {
      if (networkResponse.code() == HTTP_NOT_MODIFIED) {
        Response response = cacheResponse.newBuilder()
            .headers(combine(cacheResponse.headers(), networkResponse.headers()))
            .sentRequestAtMillis(networkResponse.sentRequestAtMillis())
            .receivedResponseAtMillis(networkResponse.receivedResponseAtMillis())
            .cacheResponse(stripBody(cacheResponse))
            .networkResponse(stripBody(networkResponse))
            .build();
        networkResponse.body().close();

        // Update the cache after combining headers but before stripping the
        // Content-Encoding header (as performed by initContentStream()).
        cache.trackConditionalCacheHit();
        cache.update(cacheResponse, response);
        return response;
      } else {
        closeQuietly(cacheResponse.body());
      }
    }

    Response response = networkResponse.newBuilder()
        .cacheResponse(stripBody(cacheResponse))
        .networkResponse(stripBody(networkResponse))
        .build();

    if (cache != null) {
      if (HttpHeaders.hasBody(response) && CacheStrategy.isCacheable(response, networkRequest)) {
        // Offer this request to the cache.
        CacheRequest cacheRequest = cache.put(response);
        return cacheWritingResponse(cacheRequest, response);
      }

      if (HttpMethod.invalidatesCache(networkRequest.method())) {
        try {
          cache.remove(networkRequest);
        } catch (IOException ignored) {
          // The cache cannot be written.
        }
      }
    }

    return response;
}- 1
- 2
- 3
- 4
- 5
- 6
- 7
- 8
- 9
- 10
- 11
- 12
- 13
- 14
- 15
- 16
- 17
- 18
- 19
- 20
- 21
- 22
- 23
- 24
- 25
- 26
- 27
- 28
- 29
- 30
- 31
- 32
- 33
- 34
- 35
- 36
- 37
- 38
- 39
- 40
- 41
- 42
- 43
- 44
- 45
- 46
- 47
- 48
- 49
- 50
- 51
- 52
- 53
- 54
- 55
- 56
- 57
- 58
- 59
- 60
- 61
- 62
- 63
- 64
- 65
- 66
- 67
- 68
- 69
- 70
- 71
- 72
- 73
- 74
- 75
- 76
- 77
- 78
- 79
- 80
- 81
- 82
- 83
- 84
- 85
- 86
- 87
- 88
- 89
- 90
- 91
- 92
- 93
- 94
- 95
- 96
- 97
- 1
- 2
- 3
- 4
- 5
- 6
- 7
- 8
- 9
- 10
- 11
- 12
- 13
- 14
- 15
- 16
- 17
- 18
- 19
- 20
- 21
- 22
- 23
- 24
- 25
- 26
- 27
- 28
- 29
- 30
- 31
- 32
- 33
- 34
- 35
- 36
- 37
- 38
- 39
- 40
- 41
- 42
- 43
- 44
- 45
- 46
- 47
- 48
- 49
- 50
- 51
- 52
- 53
- 54
- 55
- 56
- 57
- 58
- 59
- 60
- 61
- 62
- 63
- 64
- 65
- 66
- 67
- 68
- 69
- 70
- 71
- 72
- 73
- 74
- 75
- 76
- 77
- 78
- 79
- 80
- 81
- 82
- 83
- 84
- 85
- 86
- 87
- 88
- 89
- 90
- 91
- 92
- 93
- 94
- 95
- 96
- 97
CacheInterceptor的職責很明確,就是負責Cache的管理
- 當網路請求有符合要求的Cache時直接返回Cache
- 當伺服器返回內容有改變時更新當前cache
- 如果當前cache失效,刪除
7 ConnectInterceptor
[ConnectInterceptor.java]
public final class ConnectInterceptor implements Interceptor {
  public final OkHttpClient client;

  public ConnectInterceptor(OkHttpClient client) {
    this.client = client;
  }

  @Override public Response intercept(Chain chain) throws IOException {
    Log.e("haha", "ConnectInterceptor.intercept");
    RealInterceptorChain realChain = (RealInterceptorChain) chain;
    Request request = realChain.request();
    StreamAllocation streamAllocation = realChain.streamAllocation();

    // We need the network to satisfy this request. Possibly for validating a conditional GET.
    boolean doExtensiveHealthChecks = !request.method().equals("GET");
    HttpCodec httpCodec = streamAllocation.newStream(client, doExtensiveHealthChecks);
    RealConnection connection = streamAllocation.connection();

    return realChain.proceed(request, streamAllocation, httpCodec, connection);
  }
}- 1
- 2
- 3
- 4
- 5
- 6
- 7
- 8
- 9
- 10
- 11
- 12
- 13
- 14
- 15
- 16
- 17
- 18
- 19
- 20
- 21
- 22
- 1
- 2
- 3
- 4
- 5
- 6
- 7
- 8
- 9
- 10
- 11
- 12
- 13
- 14
- 15
- 16
- 17
- 18
- 19
- 20
- 21
- 22
ConnectInterceptor的intercept方法只有一行關鍵程式碼:
RealConnection connection = streamAllocation.connection();- 1
- 1
即為當前請求找到合適的連線,可能複用已有連線也可能是重新建立的連線,返回的連線由連線池負責決定。
8. CallServerInterceptor
[CallServerInterceptor.java]
@Override public Response intercept(Chain chain) throws IOException {
    RealInterceptorChain realChain = (RealInterceptorChain) chain;
    HttpCodec httpCodec = realChain.httpStream();
    StreamAllocation streamAllocation = realChain.streamAllocation();
    RealConnection connection = (RealConnection) realChain.connection();
    Request request = realChain.request();

    long sentRequestMillis = System.currentTimeMillis();
    httpCodec.writeRequestHeaders(request);

    Response.Builder responseBuilder = null;
    ......

    httpCodec.finishRequest();

    if (responseBuilder == null) {
      responseBuilder = httpCodec.readResponseHeaders(false);
    }

    Response response = responseBuilder
        .request(request)
        .handshake(streamAllocation.connection().handshake())
        .sentRequestAtMillis(sentRequestMillis)
        .receivedResponseAtMillis(System.currentTimeMillis())
        .build();

    int code = response.code();
    if (forWebSocket && code == 101) {
      // Connection is upgrading, but we need to ensure interceptors see a non-null response body.
      response = response.newBuilder()
          .body(Util.EMPTY_RESPONSE)
          .build();
    } else {
      response = response.newBuilder()
          .body(httpCodec.openResponseBody(response))
          .build();
    }

    if ("close".equalsIgnoreCase(response.request().header("Connection"))
        || "close".equalsIgnoreCase(response.header("Connection"))) {
      streamAllocation.noNewStreams();
    }

    if ((code == 204 || code == 205) && response.body().contentLength() > 0) {
      throw new ProtocolException(
          "HTTP " + code + " had non-zero Content-Length: " + response.body().contentLength());
    }

    return response;
}- 1
- 2
- 3
- 4
- 5
- 6
- 7
- 8
- 9
- 10
- 11
- 12
- 13
- 14
- 15
- 16
- 17
- 18
- 19
- 20
- 21
- 22
- 23
- 24
- 25
- 26
- 27
- 28
- 29
- 30
- 31
- 32
- 33
- 34
- 35
- 36
- 37
- 38
- 39
- 40
- 41
- 42
- 43
- 44
- 45
- 46
- 47
- 48
- 49
- 50
- 51
- 1
- 2
- 3
- 4
- 5
- 6
- 7
- 8
- 9
- 10
- 11
- 12
- 13
- 14
- 15
- 16
- 17
- 18
- 19
- 20
- 21
- 22
- 23
- 24
- 25
- 26
- 27
- 28
- 29
- 30
- 31
- 32
- 33
- 34
- 35
- 36
- 37
- 38
- 39
- 40
- 41
- 42
- 43
- 44
- 45
- 46
- 47
- 48
- 49
- 50
- 51
CallServerInterceptor負責向伺服器發起真正的訪問請求,並在接收到伺服器返回後讀取響應返回。
8.整體流程
以上就是整個網路訪問的核心步驟,總結起來如下圖所示: 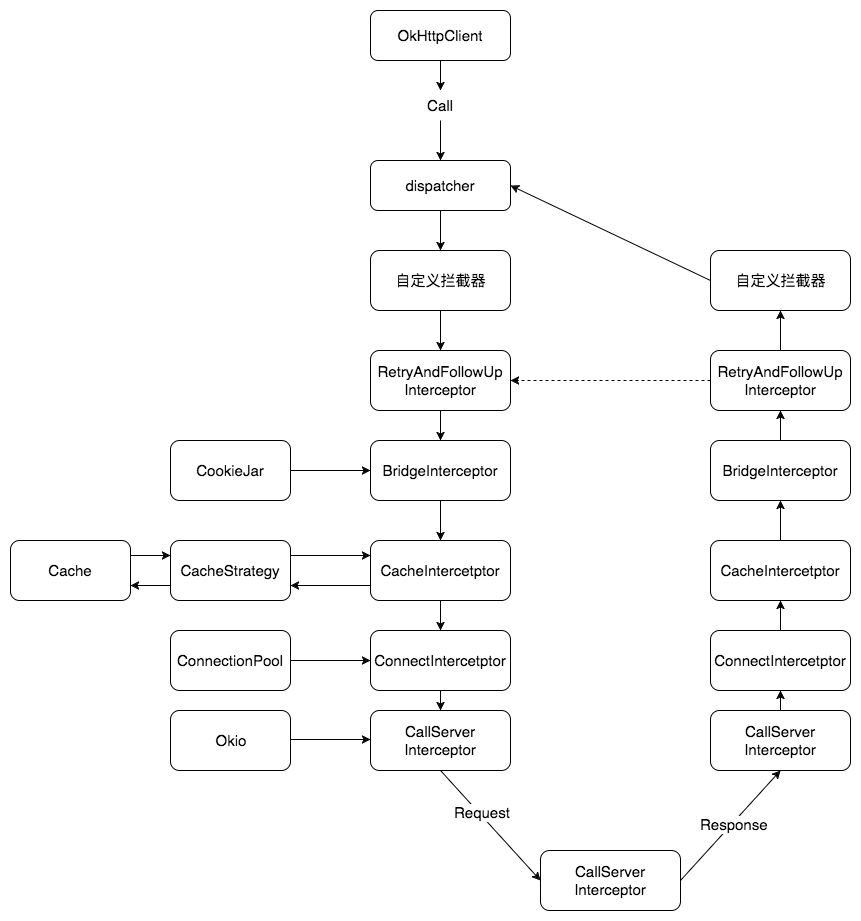
轉自:http://blog.csdn.net/asialiyazhou/article/details/72598335
相關文章
- 從網路請求過程看OkHttp攔截器HTTP
- OkHttp 原始碼剖析系列(一)——請求的發起及攔截器機制概述HTTP原始碼
- OkHttp 原始碼剖析系列(二)——攔截器整體流程分析HTTP原始碼
- 原始碼分析三:OkHttp(2)—攔截器簡介原始碼HTTP
- Okhttp的Interceptor攔截器原始碼解析HTTP原始碼
- OkHttp 原始碼分析(一)—— 請求流程HTTP原始碼
- OKHttp原始碼解析(6)----攔截器CallServerInterceptorHTTP原始碼Server
- OKHttp原始碼解析(2)----攔截器RetryAndFollowUpInterceptorHTTP原始碼
- OKHttp原始碼解析(3)----攔截器BridgeInterceptorHTTP原始碼
- OKHttp原始碼解析(4)----攔截器CacheInterceptorHTTP原始碼
- OKHttp原始碼解析(5)----攔截器ConnectInterceptorHTTP原始碼
- Okhttp同步請求原始碼分析HTTP原始碼
- React、Axios、MockJs實現Ajax的請求攔截ReactiOSMockJS
- axios原始碼分析——攔截器iOS原始碼
- 自定義攔截器,攔截到了某個請求就返回給前端一個JSON串前端JSON
- SpringBoot攔截器及原始碼分析Spring Boot原始碼
- 深入OKHttp原始碼分析(一)----同步和非同步請求流程和原始碼分析HTTP原始碼非同步
- 二次封裝axios,根據引數來實現多個請求多次攔截封裝iOS
- Java實現的攔截器Java
- Android網路請求(3) 網路請求框架OkHttpAndroid框架HTTP
- OkHttp、rxJava、Retrofit聯合網路請求(二)HTTPRxJava
- 如何實現一個HTTP請求庫——axios原始碼閱讀與分析HTTPiOS原始碼
- 有沒有什麼網路請求攔截的庫?
- 安卓okhttp3進行網路請求,一個簡單的登入頁面的實現安卓HTTP
- OkHttp 攔截器的一些騷操作HTTP
- OKHttp原始碼學習同步請求和非同步請求(二)HTTP原始碼非同步
- 聊聊如何實現一個帶有攔截器功能的SPI
- vue+axois 封裝請求+攔截器(請求鎖+統一處理錯誤碼)Vue封裝
- OkHttp、rxJava、Retrofit聯合網路請求(一)HTTPRxJava
- 實戰SpringCloud通用請求欄位攔截處理SpringGCCloud
- Struts2 原始碼分析-----攔截器原始碼解析 --- ParametersInterceptor原始碼
- SpringMVC中的攔截器Interceptor實現SpringMVC
- OkHttp3原始碼解析(一)之請求流程HTTP原始碼
- OKHttp網路請求原理流程解析HTTP
- 精盡Spring MVC原始碼分析 - HandlerMapping 元件(二)之 HandlerInterceptor 攔截器SpringMVC原始碼APP元件
- Flume內建攔截器與自定義攔截器(程式碼實戰)
- Springboot通過攔截器攔截請求資訊收集到日誌Spring Boot
- SpringBoot 攔截器獲取http請求引數Spring BootHTTP
- Mybatis 分頁:Pagehelper + 攔截器實現MyBatis