Android逆向之旅---解析編譯之後的Resource.arsc檔案格式
一、前言
快過年了,先提前祝賀大家新年快樂,這篇文章也是今年最後一篇了。今天我們繼續來看逆向的相關知識,前篇文章中我們介紹瞭如何解析Android中編譯之後的AndroidManifest.xml檔案格式:http://blog.csdn.net/jiangwei0910410003/article/details/50568487
當時我說到其實後續還要繼續介紹兩個檔案一個是resource.arsc和classes.dex,今天我們就來看看resource.arsc檔案個格式解析,classes.dex的解析要等年後了。
二、準備工作
我們在使用apktool工具進行反編譯的時候,會發現有一個:res/values/public.xml這個檔案:

我們檢視一下public.xml檔案內容:

看到了,這個檔案就儲存了apk中所有的型別和對應的id值,我們看到這裡面的每個條目內容都是:
type:型別名
name:資源名
id:資源的id
型別的話有這麼幾種:
drawable,menu,layout,string,attr,color,style等
所以我們會在反編譯之後的資料夾中看到這幾個型別的檔案xml內容。
上面我們介紹瞭如何使用apktool反編譯之後的內容,下面我們要做的事情就是如何來解析resource.arsc檔案,解析出這些檔案。
我們解壓一個apk得到對應的resource.arsc檔案。按照國際慣例,每個檔案的格式描述都是有對應的資料結構的,resource也不例外:frameworks\base\include\androidfw\ResourceTypes.h,這就是resource中定義的所有資料結構。
下面再來看一張神圖:

每次我們在解析檔案的時候都會有一張神圖,我們按照這張圖來進行資料解析工作。
三、資料結構定義

這個是專案工程結構,我們看到定義了很多的資料結構
第一、頭部資訊
Resources.arsc檔案格式是由一系列的chunk構成,每一個chunk均包含如下結構的ResChunk_header,用來描述這個chunk的基本資訊
package com.wjdiankong.parseresource.type;

import com.wjdiankong.parseresource.Utils;

/**
struct ResChunk_header
{
    // Type identifier for this chunk.  The meaning of this value depends
    // on the containing chunk.
    uint16_t type;

    // Size of the chunk header (in bytes).  Adding this value to
    // the address of the chunk allows you to find its associated data
    // (if any).
    uint16_t headerSize;

    // Total size of this chunk (in bytes).  This is the chunkSize plus
    // the size of any data associated with the chunk.  Adding this value
    // to the chunk allows you to completely skip its contents (including
    // any child chunks).  If this value is the same as chunkSize, there is
    // no data associated with the chunk.
    uint32_t size;
};
 * @author i
 *
 */
public class ResChunkHeader {

	public short type;
	public short headerSize;
	public int size;

	public int getHeaderSize(){
		return 2+2+4;
	}

	@Override
	public String toString(){
		return "type:"+Utils.bytesToHexString(Utils.int2Byte(type))+",headerSize:"+headerSize+",size:"+size;
	}

}
headerSize:是當前這個chunk的頭部大小
size:是當前這個chunk的大小
第二、資源索引表的頭部資訊
Resources.arsc檔案的第一個結構是資源索引表頭部。其結構如下,描述了Resources.arsc檔案的大小和資源包數量。
package com.wjdiankong.parseresource.type;

/**
struct ResTable_header
{
    struct ResChunk_header header;

    // The number of ResTable_package structures.
    uint32_t packageCount;
};
 * @author i
 *
 */
public class ResTableHeader {

	public ResChunkHeader header;
	public int packageCount;

	public ResTableHeader(){
		header = new ResChunkHeader();
	}

	public int getHeaderSize(){
		return header.getHeaderSize() + 4;
	}

	@Override
	public String toString(){
		return "header:"+header.toString()+"\n" + "packageCount:"+packageCount;
	}

}
header:就是標準的Chunk頭部資訊格式
packageCount:被編譯的資源包的個數
Android中一個apk可能包含多個資源包,預設情況下都只有一個就是應用的包名所在的資源包
例項:
圖中藍色高亮的部分就是資源索引表頭部。通過解析,我們可以得到如下資訊,這個chunk的型別為RES_TABLE_TYPE,頭部大小為0XC,整個chunk的大小為1400252byte,有一個編譯好的資源包。

第三、資源項的值字串資源池
緊跟著資源索引表頭部的是資源項的值字串資源池,這個字串資源池包含了所有的在資源包裡面所定義的資源項的值字串,字串資源池頭部的結構如下。
package com.wjdiankong.parseresource.type;

/**
struct ResStringPool_header
{
    struct ResChunk_header header;

    // Number of strings in this pool (number of uint32_t indices that follow
    // in the data).
    uint32_t stringCount;

    // Number of style span arrays in the pool (number of uint32_t indices
    // follow the string indices).
    uint32_t styleCount;

    // Flags.
    enum {
        // If set, the string index is sorted by the string values (based
        // on strcmp16()).
        SORTED_FLAG = 1<<0,

        // String pool is encoded in UTF-8
        UTF8_FLAG = 1<<8
    };
    uint32_t flags;

    // Index from header of the string data.
    uint32_t stringsStart;

    // Index from header of the style data.
    uint32_t stylesStart;
};
 * @author i
 *
 */
public class ResStringPoolHeader {

	public ResChunkHeader header;
	public int stringCount;
	public int styleCount;

	public final static int SORTED_FLAG = 1;
	public final static int UTF8_FLAG = (1<<8);

	public int flags;
	public int stringsStart;
	public int stylesStart;

	public ResStringPoolHeader(){
		header = new ResChunkHeader();
	}

	public int getHeaderSize(){
		return header.getHeaderSize() + 4 + 4 + 4 + 4 + 4;
	}

	@Override
	public String toString(){
		return "header:"+header.toString()+"\n" + "stringCount:"+stringCount+",styleCount:"+styleCount+",flags:"+flags+",stringStart:"+stringsStart+",stylesStart:"+stylesStart;
	}

}
header:標準的Chunk頭部資訊結構
stringCount:字串的個數
styleCount:字串樣式的個數
flags:字串的屬性,可取值包括0x000(UTF-16),0x001(字串經過排序)、0X100(UTF-8)和他們的組合值
stringStart:字串內容塊相對於其頭部的距離
stylesStart:字串樣式塊相對於其頭部的距離
例項:

圖中綠色高亮的部分就是字串資源池頭部,通過解析,我們可以得到如下資訊,這個chunk的型別為RES_STRING_POOL_TYPE,即字串資源池。頭部大小為0X1C,整個chunk的大小為369524byte,有8073條字串,72個字串樣式,為UTF-8編碼,無排序,字串內容塊相對於此chunk頭部的偏移為0X7F60,字串樣式塊相對於此chunk頭部的偏移為0X5A054。
緊接著頭部的的是兩個偏移陣列,分別是字串偏移陣列和字串樣式偏移陣列。這兩個偏移陣列的大小分別等於stringCount和styleCount的值,而每一個元素的型別都是無符號整型。整個字元中資源池結構如下。

字串資源池中的字串前兩個位元組為字串長度,長度計算方法如下。另外如果字串編碼格式為UTF-8則字串以0X00作為結束符,UTF-16則以0X0000作為結束符。
len = (((hbyte & 0x7F) << 8)) | lbyte;
字串與字串樣式有一一對應的關係,也就是說如果第n個字串有樣式,則它的樣式描述位於樣式塊的第n個元素。 字串樣式的結構包括如下兩個結構體,ResStringPool_ref和ResStringPool_span。 一個字串可以對應多個ResStringPool_span和一個ResStringPool_ref。ResStringPool_span在前描述字串的樣式,ResStringPool_ref在後固定值為0XFFFFFFFF作為佔位符。樣式塊最後會以兩個值為0XFFFFFFFF的ResStringPool_ref作為結束。
package com.wjdiankong.parseresource.type;

/**
 struct ResStringPool_ref
 {
     uint32_t index;
 };

 * @author i
 *
 */
public class ResStringPoolRef {

	public int index;

	public int getSize(){
		return 4;
	}

	@Override
	public String toString(){
		return "index:"+index;
	}

}
例項:

圖中藍色高亮的部分就是樣式內容塊,按照格式解析可以得出,第一個字串和第二字串無樣式,第三個字串第4個字元到第7個字元的位置樣式為字串資源池中0X1F88的字元,以此類推。
第四、Package資料塊
接著資源項的值字串資源池後面的部分就是Package資料塊,這個資料塊記錄編譯包的後設資料,頭部結構如下:
package com.wjdiankong.parseresource.type;

/**
struct ResTable_package
{
    struct ResChunk_header header;

    // If this is a base package, its ID.  Package IDs start
    // at 1 (corresponding to the value of the package bits in a
    // resource identifier).  0 means this is not a base package.
    uint32_t id;

    // Actual name of this package, \0-terminated.
    char16_t name[128];

    // Offset to a ResStringPool_header defining the resource
    // type symbol table.  If zero, this package is inheriting from
    // another base package (overriding specific values in it).
    uint32_t typeStrings;

    // Last index into typeStrings that is for public use by others.
    uint32_t lastPublicType;

    // Offset to a ResStringPool_header defining the resource
    // key symbol table.  If zero, this package is inheriting from
    // another base package (overriding specific values in it).
    uint32_t keyStrings;

    // Last index into keyStrings that is for public use by others.
    uint32_t lastPublicKey;
};
 * @author i
 *
 */
public class ResTablePackage {

	public ResChunkHeader header;
	public int id;
	public char[] name = new char[128];
	public int typeStrings;
	public int lastPublicType;
	public int keyStrings;
	public int lastPublicKey;

	public ResTablePackage(){
		header = new ResChunkHeader();
	}

	@Override
	public String toString(){
		return "header:"+header.toString()+"\n"+",id="+id+",name:"+name.toString()+",typeStrings:"+typeStrings+",lastPublicType:"+lastPublicType+",keyStrings:"+keyStrings+",lastPublicKey:"+lastPublicKey;
	}

}
id:包的ID,等於Package Id,一般使用者包的值Package Id為0X7F,系統資源包的Package Id為0X01;這個值很重要的,在後面我們構建前面說到的那個public.xml中的id值的時候需要用到。
name:包名
typeString:型別字串資源池相對頭部的偏移
lastPublicType:最後一個匯出的Public型別字串在型別字串資源池中的索引,目前這個值設定為型別字串資源池的元素個數。在解析的過程中沒發現他的用途
keyStrings:資源項名稱字串相對頭部的偏移
lastPublicKey:最後一個匯出的Public資源項名稱字串在資源項名稱字串資源池中的索引,目前這個值設定為資源項名稱字串資源池的元素個數。在解析的過程中沒發現他的用途
例項:

圖中紫色高亮的部分就是ResTable_package,按照上面的格式解析資料,我們可以得出,此Chunk的Type為RES_TABLE_PACKAGE_TYPE,頭部大小為0X120,整個chunk的大小為1030716byte,Package Id為0X7F,包名稱為co.runner.app,型別字串資源池距離頭部的偏移是0X120,有15條字串,資源項名稱字串資源池0X1EC,有6249條字串。
Packege資料塊的整體結構,可以用以下的示意圖表示:

其中Type String Pool和Key String Pool是兩個字串資源池,結構和資源項的值字串資源池結構相同,分別對應型別字串資源池和資源項名稱字串資源池。
再接下來的結構體可能是型別規範資料塊或者型別資源項資料塊,我們可以通過他們的Type來識別,型別規範資料塊的Type為RES_TABLE_TYPE_SPEC_TYPE,型別資源項資料塊的Type為RES_TABLE_TYPE_TYPE。
第五、型別規範資料塊
型別規範資料塊用來描述資源項的配置差異性。通過這個差異性描述,我們就可以知道每一個資源項的配置狀況。知道了一個資源項的配置狀況之後,Android資源管理框架在檢測到裝置的配置資訊發生變化之後,就可以知道是否需要重新載入該資源項。型別規範資料塊是按照型別來組織的,也就是說,每一種型別都對應有一個型別規範資料塊。其資料塊頭部結構如下。
package com.wjdiankong.parseresource.type;

/**
struct ResTable_typeSpec
{
    struct ResChunk_header header;

    // The type identifier this chunk is holding.  Type IDs start
    // at 1 (corresponding to the value of the type bits in a
    // resource identifier).  0 is invalid.
    uint8_t id;

    // Must be 0.
    uint8_t res0;
    // Must be 0.
    uint16_t res1;

    // Number of uint32_t entry configuration masks that follow.
    uint32_t entryCount;

    enum {
        // Additional flag indicating an entry is public.
        SPEC_PUBLIC = 0x40000000
    };
};
 * @author i
 *
 */
public class ResTableTypeSpec {

	public final static int SPEC_PUBLIC = 0x40000000;

	public ResChunkHeader header;
	public byte id;
	public byte res0;
	public short res1;
	public int entryCount;

	public ResTableTypeSpec(){
		header = new ResChunkHeader();
	}

	@Override
	public String toString(){
		return "header:"+header.toString()+",id:"+id+",res0:"+res0+",res1:"+res1+",entryCount:"+entryCount;
	}

}
id:標識資源的Type ID,Type ID是指資源的型別ID。資源的型別有animator、anim、color、drawable、layout、menu、raw、string和xml等等若干種,每一種都會被賦予一個ID。
res0:保留,始終為0
res1:保留,始終為0
entryCount:等於本型別的資源項個數,指名稱相同的資源項的個數。
例項:

圖中綠色高亮的部分就是ResTable_typeSpec,按照上面的格式解析資料,我們可以得出,此Chunk的Type為RES_TABLE_TYPE_SPEC_TYPE,頭部大小為0X10,整個chunk的大小為564byte,資源ID為1,本型別資源項數量為137。
ResTable_typeSpec後面緊跟著的是一個大小為entryCount的uint32_t陣列,每一個陣列元素都用來描述一個資源項的配置差異性的。
第六、資源型別項資料塊
型別資源項資料塊用來描述資源項的具體資訊, 這樣我們就可以知道每一個資源項的名稱、值和配置等資訊。 型別資源項資料同樣是按照型別和配置來組織的,也就是說,一個具有n個配置的型別一共對應有n個型別資源項資料塊。其資料塊頭部結構如下
package com.wjdiankong.parseresource.type;

/**
struct ResTable_type
{
    struct ResChunk_header header;

    enum {
        NO_ENTRY = 0xFFFFFFFF
    };

    // The type identifier this chunk is holding.  Type IDs start
    // at 1 (corresponding to the value of the type bits in a
    // resource identifier).  0 is invalid.
    uint8_t id;

    // Must be 0.
    uint8_t res0;
    // Must be 0.
    uint16_t res1;

    // Number of uint32_t entry indices that follow.
    uint32_t entryCount;

    // Offset from header where ResTable_entry data starts.
    uint32_t entriesStart;

    // Configuration this collection of entries is designed for.
    ResTable_config config;
};
 * @author i
 *
 */
public class ResTableType {

	public ResChunkHeader header;

	public final static int NO_ENTRY = 0xFFFFFFFF;

	public byte id;
	public byte res0;
	public short res1;
	public int entryCount;
	public int entriesStart;

	public ResTableConfig resConfig;

	public ResTableType(){
		header = new ResChunkHeader();
		resConfig = new ResTableConfig();
	}

	public int getSize(){
		return header.getHeaderSize() + 1 + 1 + 2 + 4 + 4;
	}

	@Override
	public String toString(){
		return "header:"+header.toString()+",id:"+id+",res0:"+res0+",res1:"+res1+",entryCount:"+entryCount+",entriesStart:"+entriesStart;
	}

}
id:標識資源的Type ID
res0:保留,始終為0
res1:保留,始終為0
entryCount:等於本型別的資源項個數,指名稱相同的資源項的個數。
entriesStart:等於資源項資料塊相對頭部的偏移值。
resConfig:指向一個ResTable_config,用來描述配置資訊,地區,語言,解析度等
例項:

圖中紅色高亮的部分就是ResTable_type,按照上面的格式解析資料,我們可以得出,RES_TABLE_TYPE_TYPE,頭部大小為0X44,整個chunk的大小為4086byte,資源ID為1,本型別資源項數量為137,資源資料塊相對於頭部的偏移為0X268。
ResTable_type後接著是一個大小為entryCount的uint32_t陣列,每一個陣列元素都用來描述一個資源項資料塊的偏移位置。 緊跟在這個偏移陣列後面的是一個大小為entryCount的ResTable_entry陣列,每一個陣列元素都用來描述一個資源項的具體資訊。ResTable_entry的結構如下:
package com.wjdiankong.parseresource.type;

import com.wjdiankong.parseresource.ParseResourceUtils;

/**
struct ResTable_entry
{
    // Number of bytes in this structure.
    uint16_t size;

    enum {
        // If set, this is a complex entry, holding a set of name/value
        // mappings.  It is followed by an array of ResTable_map structures.
        FLAG_COMPLEX = 0x0001,
        // If set, this resource has been declared public, so libraries
        // are allowed to reference it.
        FLAG_PUBLIC = 0x0002
    };
    uint16_t flags;

    // Reference into ResTable_package::keyStrings identifying this entry.
    struct ResStringPool_ref key;
};
 * @author i
 *
 */
public class ResTableEntry {

	public final static int FLAG_COMPLEX = 0x0001;
	public final static int FLAG_PUBLIC = 0x0002;

	public short size;
	public short flags;

	public ResStringPoolRef key;

	public ResTableEntry(){
		key = new ResStringPoolRef();
	}

	public int getSize(){
		return 2+2+key.getSize();
	}

	@Override
	public String toString(){
		return "size:"+size+",flags:"+flags+",key:"+key.toString()+",str:"+ParseResourceUtils.getKeyString(key.index);
	}

}
package com.wjdiankong.parseresource.type;

/**
 struct ResTable_map_entry : public ResTable_entry
 {
     //指向父ResTable_map_entry的資源ID,如果沒有父ResTable_map_entry,則等於0。
     ResTable_ref parent;
     //等於後面ResTable_map的數量
     uint32_t count;
 };
 * @author i
 *
 */
public class ResTableMapEntry extends ResTableEntry{

	public ResTableRef parent;
	public int count;

	public ResTableMapEntry(){
		parent = new ResTableRef();
	}

	@Override
	public int getSize(){
		return super.getSize() + parent.getSize() + 4;
	}

	@Override
	public String toString(){
		return super.toString() + ",parent:"+parent.toString()+",count:"+count;
	}

}
package com.wjdiankong.parseresource.type;

/**
 struct ResTable_map
 {
     //bag資源項ID
     ResTable_ref name;
     //bag資源項值
     Res_value value;
 };
 * @author i
 *
 */
public class ResTableMap {

	public ResTableRef name;
	public ResValue value;

	public ResTableMap(){
		name = new ResTableRef();
		value = new ResValue();
	}

	public int getSize(){
		return name.getSize() + value.getSize();
	}

	@Override
	public String toString(){
		return name.toString()+",value:"+value.toString();
	}

}
例項:

圖中顏色由深到淺就是一個完整的flags為1的資源項,現在就一起來解讀這段資料的含義,這個資源項頭部的大小為0X10,flags為1所以後面跟隨的是ResTable_map陣列,名稱沒有在資源項引用池中,沒有父map_entry,有一個ResTable_map。
如果flags此位為0,則ResTable_entry其後跟隨的是一個Res_value,描述一個普通資源的值,Res_value結構如下。
package com.wjdiankong.parseresource.type;

import com.wjdiankong.parseresource.ParseResourceUtils;

/**
struct Res_value
 {
     //Res_value頭部大小
     uint16_t size;
     //保留,始終為0
     uint8_t res0;

     enum {
         TYPE_NULL = 0x00,
         TYPE_REFERENCE = 0x01,
         TYPE_ATTRIBUTE = 0x02,
         TYPE_STRING = 0x03,
         TYPE_FLOAT = 0x04,
         TYPE_DIMENSION = 0x05,
         TYPE_FRACTION = 0x06,
         TYPE_FIRST_INT = 0x10,
         TYPE_INT_DEC = 0x10,
         TYPE_INT_HEX = 0x11,
         TYPE_INT_BOOLEAN = 0x12,
         TYPE_FIRST_COLOR_INT = 0x1c,
         TYPE_INT_COLOR_ARGB8 = 0x1c,
         TYPE_INT_COLOR_ARGB8 = 0x1c,
         TYPE_INT_COLOR_RGB8 = 0x1d,
         TYPE_INT_COLOR_ARGB4 = 0x1e,
         TYPE_INT_COLOR_RGB4 = 0x1f,
         TYPE_LAST_COLOR_INT = 0x1f,
         TYPE_LAST_INT = 0x1f
     };
     //資料的型別,可以從上面的列舉型別中獲取
     uint8_t dataType;

     //資料對應的索引
     uint32_t data;
 };
 * @author i
 *
 */
public class ResValue {

	//dataType欄位使用的常量
	public final static int TYPE_NULL = 0x00;
	public final static int TYPE_REFERENCE = 0x01;
	public final static int TYPE_ATTRIBUTE = 0x02;
	public final static int TYPE_STRING = 0x03;
	public final static int TYPE_FLOAT = 0x04;
	public final static int TYPE_DIMENSION = 0x05;
	public final static int TYPE_FRACTION = 0x06;
	public final static int TYPE_FIRST_INT = 0x10;
	public final static int TYPE_INT_DEC = 0x10;
	public final static int TYPE_INT_HEX = 0x11;
	public final static int TYPE_INT_BOOLEAN = 0x12;
	public final static int TYPE_FIRST_COLOR_INT = 0x1c;
	public final static int TYPE_INT_COLOR_ARGB8 = 0x1c;
	public final static int TYPE_INT_COLOR_RGB8 = 0x1d;
	public final static int TYPE_INT_COLOR_ARGB4 = 0x1e;
	public final static int TYPE_INT_COLOR_RGB4 = 0x1f;
	public final static int TYPE_LAST_COLOR_INT = 0x1f;
	public final static int TYPE_LAST_INT = 0x1f;

	public static final int
    COMPLEX_UNIT_PX			=0,
    COMPLEX_UNIT_DIP		=1,
    COMPLEX_UNIT_SP			=2,
    COMPLEX_UNIT_PT			=3,
    COMPLEX_UNIT_IN			=4,
    COMPLEX_UNIT_MM			=5,
	COMPLEX_UNIT_SHIFT		=0,
    COMPLEX_UNIT_MASK		=15,
    COMPLEX_UNIT_FRACTION	=0,
    COMPLEX_UNIT_FRACTION_PARENT=1,
    COMPLEX_RADIX_23p0		=0,
    COMPLEX_RADIX_16p7		=1,
    COMPLEX_RADIX_8p15		=2,
    COMPLEX_RADIX_0p23		=3,
    COMPLEX_RADIX_SHIFT		=4,
    COMPLEX_RADIX_MASK		=3,
    COMPLEX_MANTISSA_SHIFT	=8,
    COMPLEX_MANTISSA_MASK	=0xFFFFFF;


	public short size;
	public byte res0;
	public byte dataType;
	public int data;

	public int getSize(){
		return 2 + 1 + 1 + 4;
	}

	public String getTypeStr(){
		switch(dataType){
			case TYPE_NULL:
				return "TYPE_NULL";
			case TYPE_REFERENCE:
				return "TYPE_REFERENCE";
			case TYPE_ATTRIBUTE:
				return "TYPE_ATTRIBUTE";
			case TYPE_STRING:
				return "TYPE_STRING";
			case TYPE_FLOAT:
				return "TYPE_FLOAT";
			case TYPE_DIMENSION:
				return "TYPE_DIMENSION";
			case TYPE_FRACTION:
				return "TYPE_FRACTION";
			case TYPE_FIRST_INT:
				return "TYPE_FIRST_INT";
			case TYPE_INT_HEX:
				return "TYPE_INT_HEX";
			case TYPE_INT_BOOLEAN:
				return "TYPE_INT_BOOLEAN";
			case TYPE_FIRST_COLOR_INT:
				return "TYPE_FIRST_COLOR_INT";
			case TYPE_INT_COLOR_RGB8:
				return "TYPE_INT_COLOR_RGB8";
			case TYPE_INT_COLOR_ARGB4:
				return "TYPE_INT_COLOR_ARGB4";
			case TYPE_INT_COLOR_RGB4:
				return "TYPE_INT_COLOR_RGB4";
		}
		return "";
	}

	/*public String getDataStr(){
		if(dataType == TYPE_STRING){
			return ParseResourceUtils.getResString(data);
		}else if(dataType == TYPE_FIRST_COLOR_INT){
			return Utils.bytesToHexString(Utils.int2Byte(data));
		}else if(dataType == TYPE_INT_BOOLEAN){
			return data==0 ? "false" : "true";
		}
		return data+"";
	}*/

	public String getDataStr() {
		if (dataType == TYPE_STRING) {
			return ParseResourceUtils.getResString(data);
		}
		if (dataType == TYPE_ATTRIBUTE) {
			return String.format("?%s%08X",getPackage(data),data);
		}
		if (dataType == TYPE_REFERENCE) {
			return String.format("@%s%08X",getPackage(data),data);
		}
		if (dataType == TYPE_FLOAT) {
			return String.valueOf(Float.intBitsToFloat(data));
		}
		if (dataType == TYPE_INT_HEX) {
			return String.format("0x%08X",data);
		}
		if (dataType == TYPE_INT_BOOLEAN) {
			return data!=0?"true":"false";
		}
		if (dataType == TYPE_DIMENSION) {
			return Float.toString(complexToFloat(data))+
				DIMENSION_UNITS[data & COMPLEX_UNIT_MASK];
		}
		if (dataType == TYPE_FRACTION) {
			return Float.toString(complexToFloat(data))+
				FRACTION_UNITS[data & COMPLEX_UNIT_MASK];
		}
		if (dataType >= TYPE_FIRST_COLOR_INT && dataType <= TYPE_LAST_COLOR_INT) {
			return String.format("#%08X",data);
		}
		if (dataType >= TYPE_FIRST_INT && dataType <= TYPE_LAST_INT) {
			return String.valueOf(data);
		}
		return String.format("<0x%X, type 0x%02X>",data, dataType);
	}

	private static String getPackage(int id) {
		if (id>>>24==1) {
			return "android:";
		}
		return "";
	}

	public static float complexToFloat(int complex) {
		return (float)(complex & 0xFFFFFF00)*RADIX_MULTS[(complex>>4) & 3];
	}

	private static final float RADIX_MULTS[]={
		0.00390625F,3.051758E-005F,1.192093E-007F,4.656613E-010F
	};

	private static final String DIMENSION_UNITS[]={
		"px","dip","sp","pt","in","mm","",""
	};

	private static final String FRACTION_UNITS[]={
		"%","%p","","","","","",""
	};

	@Override
	public String toString(){
		return "size:"+size+",res0:"+res0+",dataType:"+getTypeStr()+",data:"+getDataStr();
	}

}
size:ResValue的頭部大小
res0:保留,始終為0
dataType:資料的型別,可以從上面的列舉型別中獲取
data:資料對應的索引
這裡我們看到了有一個轉化的方法,這個我們在解析AndroidManifest檔案的時候也用到了這個方法。
圖中畫紅線的部分就是一個ResTable_entry其後跟隨的是一個Res_value的例子,從中我們可以得出以下資訊,這個頭部大小為8,flags等於0,所以後面跟隨的是Res_value,在資源項名稱字串資源池中的索引為150,對應的值是badge_continue_months,Res_value的大小為8,資料的型別是TYPE_STRING,在資源項的值字串資源池的索引為1912,對應的值是res/drawable-nodpi-v4/badge_continue_months.png。
當我們對arsc的檔案格式有了瞭解過後,我們就可以開始我們的探索之旅了,由於在使用Android studio除錯Apktool原始碼的時候遇到很多障礙,在前輩的指導下才能夠順利進行除錯,所以下面簡單介紹下設定Android studio除錯Apktool原始碼的方法。

四、解析程式碼分析
因為篇幅的原因,這裡就不把所有的程式碼都貼上出來了,後面會列出來程式碼下載地址
package com.wjdiankong.parseresource;

import java.io.ByteArrayOutputStream;
import java.io.FileInputStream;

public class ParseResourceMain {

	public static void main(String[] args){

		byte[] srcByte = null;
		FileInputStream fis = null;
		ByteArrayOutputStream bos = null;
		try{
			fis = new FileInputStream("resource/resources_gdt1.arsc");
			bos = new ByteArrayOutputStream();
			byte[] buffer = new byte[1024];
			int len = 0;
			while((len=fis.read(buffer)) != -1){
				bos.write(buffer, 0, len);
			}
			srcByte = bos.toByteArray();
		}catch(Exception e){
			System.out.println("read res file error:"+e.toString());
		}finally{
			try{
				fis.close();
				bos.close();
			}catch(Exception e){
				System.out.println("close file error:"+e.toString());
			}
		}

		if(srcByte == null){
			System.out.println("get src error...");
			return;
		}

		System.out.println("parse restable header...");
		ParseResourceUtils.parseResTableHeaderChunk(srcByte);
		System.out.println("++++++++++++++++++++++++++++++++++++++");
		System.out.println();

		System.out.println("parse resstring pool chunk...");
		ParseResourceUtils.parseResStringPoolChunk(srcByte);
		System.out.println("++++++++++++++++++++++++++++++++++++++");
		System.out.println();

		System.out.println("parse package chunk...");
		ParseResourceUtils.parsePackage(srcByte);
		System.out.println("++++++++++++++++++++++++++++++++++++++");
		System.out.println();

		System.out.println("parse typestring pool chunk...");
		ParseResourceUtils.parseTypeStringPoolChunk(srcByte);
		System.out.println("++++++++++++++++++++++++++++++++++++++");
		System.out.println();

		System.out.println("parse keystring pool chunk...");
		ParseResourceUtils.parseKeyStringPoolChunk(srcByte);
		System.out.println("++++++++++++++++++++++++++++++++++++++");
		System.out.println();

		int resCount = 0;
		while(!ParseResourceUtils.isEnd(srcByte.length)){
			resCount++;
			boolean isSpec = ParseResourceUtils.isTypeSpec(srcByte);
			if(isSpec){
				System.out.println("parse restype spec chunk...");
				ParseResourceUtils.parseResTypeSpec(srcByte);
				System.out.println("++++++++++++++++++++++++++++++++++++++");
				System.out.println();
			}else{
				System.out.println("parse restype info chunk...");
				ParseResourceUtils.parseResTypeInfo(srcByte);
				System.out.println("++++++++++++++++++++++++++++++++++++++");
				System.out.println();
			}
		}
		System.out.println("res count:"+resCount);

	}

}
第一、解析頭部資訊
/**
 * 解析頭部資訊
 * @param src
 */
public static void parseResTableHeaderChunk(byte[] src){
	ResTableHeader resTableHeader = new ResTableHeader();

	resTableHeader.header = parseResChunkHeader(src, 0);

	resStringPoolChunkOffset = resTableHeader.header.headerSize;

	//解析PackageCount個數(一個apk可能包含多個Package資源)
	byte[] packageCountByte = Utils.copyByte(src, resTableHeader.header.getHeaderSize(), 4);
	resTableHeader.packageCount = Utils.byte2int(packageCountByte);

}
第二、解析資源字串內容
/**
 * 解析Resource.arsc檔案中所有字串內容
 * @param src
 */
public static void parseResStringPoolChunk(byte[] src){
	ResStringPoolHeader stringPoolHeader = parseStringPoolChunk(src, resStringList, resStringPoolChunkOffset);
	packageChunkOffset = resStringPoolChunkOffset + stringPoolHeader.header.size;
}
/**
 * 統一解析字串內容
 * @param src
 * @param stringList
 * @param stringOffset
 * @return
 */
public static ResStringPoolHeader parseStringPoolChunk(byte[] src, ArrayList<String> stringList, int stringOffset){
	ResStringPoolHeader stringPoolHeader = new ResStringPoolHeader();

	//解析頭部資訊
	stringPoolHeader.header = parseResChunkHeader(src, stringOffset);

	System.out.println("header size:"+stringPoolHeader.header.headerSize);
	System.out.println("size:"+stringPoolHeader.header.size);

	int offset = stringOffset + stringPoolHeader.header.getHeaderSize();

	//獲取字串的個數
	byte[] stringCountByte = Utils.copyByte(src, offset, 4);
	stringPoolHeader.stringCount = Utils.byte2int(stringCountByte);

	//解析樣式的個數
	byte[] styleCountByte = Utils.copyByte(src, offset+4, 4);
	stringPoolHeader.styleCount = Utils.byte2int(styleCountByte);

	//這裡表示字串的格式:UTF-8/UTF-16
	byte[] flagByte = Utils.copyByte(src, offset+8, 4);
	System.out.println("flag:"+Utils.bytesToHexString(flagByte));
	stringPoolHeader.flags = Utils.byte2int(flagByte);

	//字串內容的開始位置
	byte[] stringStartByte = Utils.copyByte(src, offset+12, 4);
	stringPoolHeader.stringsStart = Utils.byte2int(stringStartByte);
	System.out.println("string start:"+Utils.bytesToHexString(stringStartByte));

	//樣式內容的開始位置
	byte[] sytleStartByte = Utils.copyByte(src, offset+16, 4);
	stringPoolHeader.stylesStart = Utils.byte2int(sytleStartByte);
	System.out.println("style start:"+Utils.bytesToHexString(sytleStartByte));

	//獲取字串內容的索引陣列和樣式內容的索引陣列
	int[] stringIndexAry = new int[stringPoolHeader.stringCount];
	int[] styleIndexAry = new int[stringPoolHeader.styleCount];

	System.out.println("string count:"+stringPoolHeader.stringCount);
	System.out.println("style count:"+stringPoolHeader.styleCount);

	int stringIndex = offset + 20;
	for(int i=0;i<stringPoolHeader.stringCount;i++){
		stringIndexAry[i] = Utils.byte2int(Utils.copyByte(src, stringIndex+i*4, 4));
	}

	int styleIndex = stringIndex + 4*stringPoolHeader.stringCount;
	for(int i=0;i<stringPoolHeader.styleCount;i++){
		styleIndexAry[i] = Utils.byte2int(Utils.copyByte(src,  styleIndex+i*4, 4));
	}

	//每個字串的頭兩個位元組的最後一個位元組是字串的長度
	//這裡獲取所有字串的內容
	int stringContentIndex = styleIndex + stringPoolHeader.styleCount*4;
	System.out.println("string index:"+Utils.bytesToHexString(Utils.int2Byte(stringContentIndex)));
	int index = 0;
	while(index < stringPoolHeader.stringCount){
		byte[] stringSizeByte = Utils.copyByte(src, stringContentIndex, 2);
		int stringSize = (stringSizeByte[1] & 0x7F);
		if(stringSize != 0){
			String val = "";
			try{
				val = new String(Utils.copyByte(src, stringContentIndex+2, stringSize), "utf-8");
			}catch(Exception e){
				System.out.println("string encode error:"+e.toString());
			}
			stringList.add(val);
		}else{
			stringList.add("");
		}
		stringContentIndex += (stringSize+3);
		index++;
	}
	for(String str : stringList){
		System.out.println("str:"+str);
	}

	return stringPoolHeader;

}解析結果:

第三、解析包資訊
/**
 * 解析Package資訊
 * @param src
 */
public static void parsePackage(byte[] src){
	System.out.println("pchunkoffset:"+Utils.bytesToHexString(Utils.int2Byte(packageChunkOffset)));
	ResTablePackage resTabPackage = new ResTablePackage();
	//解析頭部資訊
	resTabPackage.header = parseResChunkHeader(src, packageChunkOffset);

	System.out.println("package size:"+resTabPackage.header.headerSize);

	int offset = packageChunkOffset + resTabPackage.header.getHeaderSize();

	//解析packId
	byte[] idByte = Utils.copyByte(src, offset, 4);
	resTabPackage.id = Utils.byte2int(idByte);
	packId = resTabPackage.id;

	//解析包名
	System.out.println("package offset:"+Utils.bytesToHexString(Utils.int2Byte(offset+4)));
	byte[] nameByte = Utils.copyByte(src, offset+4, 128*2);//這裡的128是這個欄位的大小,可以檢視型別說明,是char型別的,所以要乘以2
	String packageName = new String(nameByte);
	packageName = Utils.filterStringNull(packageName);
	System.out.println("pkgName:"+packageName);

	//解析型別字串的偏移值
	byte[] typeStringsByte = Utils.copyByte(src, offset+4+128*2, 4);
	resTabPackage.typeStrings = Utils.byte2int(typeStringsByte);
	System.out.println("typeString:"+resTabPackage.typeStrings);

	//解析lastPublicType欄位
	byte[] lastPublicType = Utils.copyByte(src, offset+8+128*2, 4);
	resTabPackage.lastPublicType = Utils.byte2int(lastPublicType);

	//解析keyString字串的偏移值
	byte[] keyStrings = Utils.copyByte(src, offset+12+128*2, 4);
	resTabPackage.keyStrings = Utils.byte2int(keyStrings);
	System.out.println("keyString:"+resTabPackage.keyStrings);

	//解析lastPublicKey
	byte[] lastPublicKey = Utils.copyByte(src, offset+12+128*2, 4);
	resTabPackage.lastPublicKey = Utils.byte2int(lastPublicKey);

	//這裡獲取型別字串的偏移值和型別字串的偏移值
	keyStringPoolChunkOffset = (packageChunkOffset+resTabPackage.keyStrings);
	typeStringPoolChunkOffset = (packageChunkOffset+resTabPackage.typeStrings);

}解析結果:

第四、解析資源型別的字串內容
/**
 * 解析型別字串內容
 * @param src
 */
public static void parseTypeStringPoolChunk(byte[] src){
	System.out.println("typestring offset:"+Utils.bytesToHexString(Utils.int2Byte(typeStringPoolChunkOffset)));
	ResStringPoolHeader stringPoolHeader = parseStringPoolChunk(src, typeStringList, typeStringPoolChunkOffset);
	System.out.println("size:"+stringPoolHeader.header.size);
}解析結果:

第五、解析資源值字串內容
/**
 * 解析key字串內容
 * @param src
 */
public static void parseKeyStringPoolChunk(byte[] src){
	System.out.println("keystring offset:"+Utils.bytesToHexString(Utils.int2Byte(keyStringPoolChunkOffset)));
	ResStringPoolHeader stringPoolHeader  = parseStringPoolChunk(src, keyStringList, keyStringPoolChunkOffset);
	System.out.println("size:"+stringPoolHeader.header.size);
	//解析完key字串之後,需要賦值給resType的偏移值,後續還需要繼續解析
	resTypeOffset = (keyStringPoolChunkOffset+stringPoolHeader.header.size);
}解析結果:

第六、解析正文內容
這裡說到的正文內容就是ResValue值,也就是開始構建public.xml中的條目資訊,和型別的分離不同的xml檔案,所以這部分的內容的解析工作有點複雜
int resCount = 0;
while(!ParseResourceUtils.isEnd(srcByte.length)){
	resCount++;
	boolean isSpec = ParseResourceUtils.isTypeSpec(srcByte);
	if(isSpec){
		System.out.println("parse restype spec chunk...");
		ParseResourceUtils.parseResTypeSpec(srcByte);
		System.out.println("++++++++++++++++++++++++++++++++++++++");
		System.out.println();
	}else{
		System.out.println("parse restype info chunk...");
		ParseResourceUtils.parseResTypeInfo(srcByte);
		System.out.println("++++++++++++++++++++++++++++++++++++++");
		System.out.println();
	}
}
System.out.println("res count:"+resCount);我們如果仔細看上面的那張神圖的話,就可以看到,後面的ResType和ResTypeSpec他們兩個內容是交替出現的,直到檔案結束。
所以isEnd方法就是判斷是否到達檔案結束位置:
/**
 * 判斷是否到檔案末尾了
 * @param length
 * @return
 */
public static boolean isEnd(int length){
	if(resTypeOffset>=length){
		return true;
	}
	return false;
}
還有一個方法就是判斷是ResType還是ResTypeSpec,這個可以通過Chunk中頭部資訊來區分的:
/**
 * 判斷是不是型別描述符
 * @param src
 * @return
 */
public static boolean isTypeSpec(byte[] src){
	ResChunkHeader header = parseResChunkHeader(src, resTypeOffset);
	if(header.type == 0x0202){
		return true;
	}
	return false;
}1、解析ResTypeSpec
主要得到Res的每個型別名
/**
 * 解析ResTypeSepc型別描述內容
 * @param src
 */
public static void parseResTypeSpec(byte[] src){
	System.out.println("res type spec offset:"+Utils.bytesToHexString(Utils.int2Byte(resTypeOffset)));
	ResTableTypeSpec typeSpec = new ResTableTypeSpec();
	//解析頭部資訊
	typeSpec.header = parseResChunkHeader(src, resTypeOffset);

	int offset = (resTypeOffset + typeSpec.header.getHeaderSize());

	//解析id型別
	byte[] idByte = Utils.copyByte(src, offset, 1);
	typeSpec.id = (byte)(idByte[0] & 0xFF);
	resTypeId = typeSpec.id;

	//解析res0欄位,這個欄位是備用的,始終是0
	byte[] res0Byte = Utils.copyByte(src, offset+1, 1);
	typeSpec.res0 = (byte)(res0Byte[0] & 0xFF);

	//解析res1欄位,這個欄位是備用的,始終是0
	byte[] res1Byte = Utils.copyByte(src, offset+2, 2);
	typeSpec.res1 = Utils.byte2Short(res1Byte);

	//entry的總個數
	byte[] entryCountByte = Utils.copyByte(src, offset+4, 4);
	typeSpec.entryCount = Utils.byte2int(entryCountByte);

	System.out.println("res type spec:"+typeSpec);

	System.out.println("type_name:"+typeStringList.get(typeSpec.id-1));

	//獲取entryCount個int陣列
	int[] intAry = new int[typeSpec.entryCount];
	int intAryOffset = resTypeOffset + typeSpec.header.headerSize;
	System.out.print("int element:");
	for(int i=0;i<typeSpec.entryCount;i++){
		int element = Utils.byte2int(Utils.copyByte(src, intAryOffset+i*4, 4));
		intAry[i] = element;
		System.out.print(element+",");
	}
	System.out.println();

	resTypeOffset += typeSpec.header.size;

}
解析結果:

2、解析ResType
主要得到每個res型別的所有條目內容
/**
 * 解析型別資訊內容
 * @param src
 */
public static void parseResTypeInfo(byte[] src){
	System.out.println("type chunk offset:"+Utils.bytesToHexString(Utils.int2Byte(resTypeOffset)));
	ResTableType type = new ResTableType();
	//解析頭部資訊
	type.header = parseResChunkHeader(src, resTypeOffset);

	int offset = (resTypeOffset + type.header.getHeaderSize());

	//解析type的id值
	byte[] idByte = Utils.copyByte(src, offset, 1);
	type.id = (byte)(idByte[0] & 0xFF);

	//解析res0欄位的值,備用欄位,始終是0
	byte[] res0 = Utils.copyByte(src, offset+1, 1);
	type.res0 = (byte)(res0[0] & 0xFF);

	//解析res1欄位的值,備用欄位,始終是0
	byte[] res1 = Utils.copyByte(src, offset+2, 2);
	type.res1 = Utils.byte2Short(res1);

	byte[] entryCountByte = Utils.copyByte(src, offset+4, 4);
	type.entryCount = Utils.byte2int(entryCountByte);

	byte[] entriesStartByte = Utils.copyByte(src, offset+8, 4);
	type.entriesStart = Utils.byte2int(entriesStartByte);

	ResTableConfig resConfig = new ResTableConfig();
	resConfig = parseResTableConfig(Utils.copyByte(src, offset+12, resConfig.getSize()));
	System.out.println("config:"+resConfig);

	System.out.println("res type info:"+type);

	System.out.println("type_name:"+typeStringList.get(type.id-1));

	//先獲取entryCount個int陣列
	System.out.print("type int elements:");
	int[] intAry = new int[type.entryCount];
	for(int i=0;i<type.entryCount;i++){
		int element = Utils.byte2int(Utils.copyByte(src, resTypeOffset+type.header.headerSize+i*4, 4));
		intAry[i] = element;
		System.out.print(element+",");
	}
	System.out.println();

	//這裡開始解析後面對應的ResEntry和ResValue
	int entryAryOffset = resTypeOffset + type.entriesStart;
	ResTableEntry[] tableEntryAry = new ResTableEntry[type.entryCount];
	ResValue[] resValueAry = new ResValue[type.entryCount];
	System.out.println("entry offset:"+Utils.bytesToHexString(Utils.int2Byte(entryAryOffset)));

	//這裡存在一個問題就是如果是ResMapEntry的話,偏移值是不一樣的,所以這裡需要計算不同的偏移值
	int bodySize = 0, valueOffset = entryAryOffset;
	for(int i=0;i<type.entryCount;i++){
		int resId = getResId(i);
		System.out.println("resId:"+Utils.bytesToHexString(Utils.int2Byte(resId)));
		ResTableEntry entry = new ResTableEntry();
		ResValue value = new ResValue();
		valueOffset += bodySize;
		System.out.println("valueOffset:"+Utils.bytesToHexString(Utils.int2Byte(valueOffset)));
		entry = parseResEntry(Utils.copyByte(src, valueOffset, entry.getSize()));

		//這裡需要注意的是,先判斷entry的flag變數是否為1,如果為1的話,那就ResTable_map_entry
		if(entry.flags == 1){
			//這裡是複雜型別的value
			ResTableMapEntry mapEntry = new ResTableMapEntry();
			mapEntry = parseResMapEntry(Utils.copyByte(src, valueOffset, mapEntry.getSize()));
			System.out.println("map entry:"+mapEntry);
			ResTableMap resMap = new ResTableMap();
			for(int j=0;j<mapEntry.count;j++){
				int mapOffset = valueOffset + mapEntry.getSize() + resMap.getSize()*j;
				resMap = parseResTableMap(Utils.copyByte(src, mapOffset, resMap.getSize()));
				System.out.println("map:"+resMap);
			}
			bodySize = mapEntry.getSize() + resMap.getSize()*mapEntry.count;
		}else{
			System.out.println("entry:"+entry);
			//這裡是簡單的型別的value
			value = parseResValue(Utils.copyByte(src, valueOffset+entry.getSize(), value.getSize()));
			System.out.println("value:"+value);
			bodySize = entry.getSize()+value.getSize();
		}

		tableEntryAry[i] = entry;
		resValueAry[i] = value;

		System.out.println("======================================");
	}

	resTypeOffset += type.header.size;

}

/**
 * 解析ResEntry內容
 * @param src
 * @return
 */
public static ResTableEntry parseResEntry(byte[] src){
	ResTableEntry entry = new ResTableEntry();

	byte[] sizeByte = Utils.copyByte(src, 0, 2);
	entry.size = Utils.byte2Short(sizeByte);

	byte[] flagByte = Utils.copyByte(src, 2, 2);
	entry.flags = Utils.byte2Short(flagByte);

	ResStringPoolRef key = new ResStringPoolRef();
	byte[] keyByte = Utils.copyByte(src, 4, 4);
	key.index = Utils.byte2int(keyByte);
	entry.key = key;

	return entry;
}

/**
 * 解析ResMapEntry內容
 * @param src
 * @return
 */
public static ResTableMapEntry parseResMapEntry(byte[] src){
	ResTableMapEntry entry = new ResTableMapEntry();

	byte[] sizeByte = Utils.copyByte(src, 0, 2);
	entry.size = Utils.byte2Short(sizeByte);

	byte[] flagByte = Utils.copyByte(src, 2, 2);
	entry.flags = Utils.byte2Short(flagByte);

	ResStringPoolRef key = new ResStringPoolRef();
	byte[] keyByte = Utils.copyByte(src, 4, 4);
	key.index = Utils.byte2int(keyByte);
	entry.key = key;

	ResTableRef ref = new ResTableRef();
	byte[] identByte = Utils.copyByte(src, 8, 4);
	ref.ident = Utils.byte2int(identByte);
	entry.parent = ref;
	byte[] countByte = Utils.copyByte(src, 12, 4);
	entry.count = Utils.byte2int(countByte);

	return entry;
}

/**
 * 解析ResValue內容
 * @param src
 * @return
 */
public static ResValue parseResValue(byte[] src){
	ResValue resValue = new ResValue();
	byte[] sizeByte = Utils.copyByte(src, 0, 2);
	resValue.size = Utils.byte2Short(sizeByte);

	byte[] res0Byte = Utils.copyByte(src, 2, 1);
	resValue.res0 = (byte)(res0Byte[0] & 0xFF);

	byte[] dataType = Utils.copyByte(src, 3, 1);
	resValue.dataType = (byte)(dataType[0] & 0xFF);

	byte[] data = Utils.copyByte(src, 4, 4);
	resValue.data = Utils.byte2int(data);

	return resValue;
}

/**
 * 解析ResTableMap內容
 * @param src
 * @return
 */
public static ResTableMap parseResTableMap(byte[] src){
	ResTableMap tableMap = new ResTableMap();

	ResTableRef ref = new ResTableRef();
	byte[] identByte = Utils.copyByte(src, 0, ref.getSize());
	ref.ident = Utils.byte2int(identByte);
	tableMap.name = ref;

	ResValue value = new ResValue();
	value = parseResValue(Utils.copyByte(src, ref.getSize(), value.getSize()));
	tableMap.value = value;

	return tableMap;

}

/**
 * 解析ResTableConfig配置資訊
 * @param src
 * @return
 */
public static ResTableConfig parseResTableConfig(byte[] src){
	ResTableConfig config = new ResTableConfig();

	byte[] sizeByte = Utils.copyByte(src, 0, 4);
	config.size = Utils.byte2int(sizeByte);

	//以下結構是Union
	byte[] mccByte = Utils.copyByte(src, 4, 2);
	config.mcc = Utils.byte2Short(mccByte);
	byte[] mncByte = Utils.copyByte(src, 6, 2);
	config.mnc = Utils.byte2Short(mncByte);
	byte[] imsiByte = Utils.copyByte(src, 4, 4);
	config.imsi = Utils.byte2int(imsiByte);

	//以下結構是Union
	byte[] languageByte = Utils.copyByte(src, 8, 2);
	config.language = languageByte;
	byte[] countryByte = Utils.copyByte(src, 10, 2);
	config.country = countryByte;
	byte[] localeByte = Utils.copyByte(src, 8, 4);
	config.locale = Utils.byte2int(localeByte);

	//以下結構是Union
	byte[] orientationByte = Utils.copyByte(src, 12, 1);
	config.orientation = orientationByte[0];
	byte[] touchscreenByte = Utils.copyByte(src, 13, 1);
	config.touchscreen = touchscreenByte[0];
	byte[] densityByte = Utils.copyByte(src, 14, 2);
	config.density = Utils.byte2Short(densityByte);
	byte[] screenTypeByte = Utils.copyByte(src, 12, 4);
	config.screenType = Utils.byte2int(screenTypeByte);

	//以下結構是Union
	byte[] keyboardByte = Utils.copyByte(src, 16, 1);
	config.keyboard = keyboardByte[0];
	byte[] navigationByte = Utils.copyByte(src, 17, 1);
	config.navigation = navigationByte[0];
	byte[] inputFlagsByte = Utils.copyByte(src, 18, 1);
	config.inputFlags = inputFlagsByte[0];
	byte[] inputPad0Byte = Utils.copyByte(src, 19, 1);
	config.inputPad0 = inputPad0Byte[0];
	byte[] inputByte = Utils.copyByte(src, 16, 4);
	config.input = Utils.byte2int(inputByte);

	//以下結構是Union
	byte[] screenWidthByte = Utils.copyByte(src, 20, 2);
	config.screenWidth = Utils.byte2Short(screenWidthByte);
	byte[] screenHeightByte = Utils.copyByte(src, 22, 2);
	config.screenHeight = Utils.byte2Short(screenHeightByte);
	byte[] screenSizeByte = Utils.copyByte(src, 20, 4);
	config.screenSize = Utils.byte2int(screenSizeByte);

	//以下結構是Union
	byte[] sdVersionByte = Utils.copyByte(src, 24, 2);
	config.sdVersion = Utils.byte2Short(sdVersionByte);
	byte[] minorVersionByte = Utils.copyByte(src, 26, 2);
	config.minorVersion = Utils.byte2Short(minorVersionByte);
	byte[] versionByte = Utils.copyByte(src, 24, 4);
	config.version = Utils.byte2int(versionByte);

	//以下結構是Union
	byte[] screenLayoutByte = Utils.copyByte(src, 28, 1);
	config.screenLayout = screenLayoutByte[0];
	byte[] uiModeByte = Utils.copyByte(src, 29, 1);
	config.uiMode = uiModeByte[0];
	byte[] smallestScreenWidthDpByte = Utils.copyByte(src, 30, 2);
	config.smallestScreenWidthDp = Utils.byte2Short(smallestScreenWidthDpByte);
	byte[] screenConfigByte = Utils.copyByte(src, 28, 4);
	config.screenConfig = Utils.byte2int(screenConfigByte);

	//以下結構是Union
	byte[] screenWidthDpByte = Utils.copyByte(src, 32, 2);
	config.screenWidthDp = Utils.byte2Short(screenWidthDpByte);
	byte[] screenHeightDpByte = Utils.copyByte(src, 34, 2);
	config.screenHeightDp = Utils.byte2Short(screenHeightDpByte);
	byte[] screenSizeDpByte = Utils.copyByte(src, 32, 4);
	config.screenSizeDp = Utils.byte2int(screenSizeDpByte);

	byte[] localeScriptByte = Utils.copyByte(src, 36, 4);
	config.localeScript = localeScriptByte;

	byte[] localeVariantByte = Utils.copyByte(src, 40, 8);
	config.localeVariant = localeVariantByte;
	return config;
}ResValue,ResTableMap,ResTableMapEntry,ResTableEntry,ResConfig
關於每個資料結構如何解析這裡就不多說了,就是讀取位元組即可。這裡有一個核心的程式碼:
//這裡需要注意的是,先判斷entry的flag變數是否為1,如果為1的話,那就ResTable_map_entry
if(entry.flags == 1){
	//這裡是複雜型別的value
	ResTableMapEntry mapEntry = new ResTableMapEntry();
	mapEntry = parseResMapEntry(Utils.copyByte(src, valueOffset, mapEntry.getSize()));
	System.out.println("map entry:"+mapEntry);
	ResTableMap resMap = new ResTableMap();
	for(int j=0;j<mapEntry.count;j++){
		int mapOffset = valueOffset + mapEntry.getSize() + resMap.getSize()*j;
		resMap = parseResTableMap(Utils.copyByte(src, mapOffset, resMap.getSize()));
		System.out.println("map:"+resMap);
	}
	bodySize = mapEntry.getSize() + resMap.getSize()*mapEntry.count;
}else{
	System.out.println("entry:"+entry);
	//這裡是簡單的型別的value
	value = parseResValue(Utils.copyByte(src, valueOffset+entry.getSize(), value.getSize()));
	System.out.println("value:"+value);
	bodySize = entry.getSize()+value.getSize();
}解析結果:
看到解析結果,還是挺欣慰的,因為最難的地方我們解析成功了,而且看到結果我們很激動,就是我們想要的結果,但是這裡需要解釋的是,有了這些值我們構建public.xml內容和各個型別的xml內容是很簡單,當然這裡我們去構建了,感興趣的同學可以去嘗試一下。

注意:這裡的ResId的構造方法是:
/**
 * 獲取資源id
 * 這裡高位是packid,中位是restypeid,地位是entryid
 * @param entryid
 * @return
 */
public static int getResId(int entryid){
	return (((packId)<<24) | (((resTypeId) & 0xFF)<<16) | (entryid & 0xFFFF));
}他的最高兩個位元組表示packId,系統資源id是:0x01,普通應用資源id是:0x7F
他的中間的兩個位元組表示resTypeId,型別id,這個值從0開始,比如我們例子中第一個型別是attr,那麼他的resTypeId就是00
他的最低四個位元組表示這個資源的順序id,從1開始,逐漸累加1
專案下載地址:http://download.csdn.net/detail/jiangwei0910410003/9426712
五、技術概述
上面我們就很蛋疼的解析完了所有的resource.arsc檔案,當然內容有點多,所以有些地方可能沒介紹清楚或者是有錯誤的地方,請多指正。當然關於Android編譯之後的四個檔案格式,我們已經介紹了三個了:
so檔案格式、AndroidManifest.xml格式/資原始檔.xml、resource.arsc
那麼剩下就只有classes.dex這一個檔案格式了,我們就算大功告成了。但是我想在這裡說的是,這篇文章我們主要是介紹解析resource.arsc檔案格式,那麼寫這篇文章的目的是什麼呢?
有兩個:
1、我們在使用apktool工具進行反編譯的時候,經常出現一些莫名的一場資訊,最多的就是NotFound ResId 0x0000XXX這些內容,那麼這時候我們就可以去修復了,當然我們可以得到apktool的原始碼來解決這個問題,還可以就是使用我們自己寫的這套解析程式碼也是可以的。
2、我們之前提過,解析resource.arsc檔案之後,對resource.arsc檔案格式如果有了解了之後,可以對資原始檔名進行混淆,從而來減小apk包大小,我在之前的一篇文章:
Apk的簽名機制:http://blog.csdn.net/jiangwei0910410003/article/details/50402000
因為META-INF資料夾下的三個檔案大小很大,原因就是他們內部儲存了每個資源名稱,我們在專案中有時候為了不造成衝突,就把資源名起的很長,那麼這樣就會導致apk的包很大。
同樣resource.arsc檔案也會很大,因為資源名都是需要儲存的,但是我們知道Android中的混淆是不會對資原始檔進行混淆的,所以這時候我們就可以通過這個思路來減小包apk的大小了。這個後續我會繼續講解的。
注意:
到這裡我們還需要告訴一件事,那就是其實我們上面的解析工作,有一個更簡單的方法就可以搞定了?那就是aapt命令?關於這個aapt是幹啥的?網上有很多資料,他其實很簡單就是將Android中的資原始檔打包成resource.arsc即可:

只有那些型別為res/animator、res/anim、res/color、res/drawable(非Bitmap檔案,即非.png、.9.png、.jpg、.gif檔案)、res/layout、res/menu、res/values和res/xml的資原始檔均會從文字格式的XML檔案編譯成二進位制格式的XML檔案
這些XML資原始檔之所要從文字格式編譯成二進位制格式,是因為:
1. 二進位制格式的XML檔案佔用空間更小。這是由於所有XML元素的標籤、屬性名稱、屬性值和內容所涉及到的字串都會被統一收集到一個字串資源池中去,並且會去重。有了這個字串資源池,原來使用字串的地方就會被替換成一個索引到字串資源池的整數值,從而可以減少檔案的大小。
2. 二進位制格式的XML檔案解析速度更快。這是由於二進位制格式的XML元素裡面不再包含有字串值,因此就避免了進行字串解析,從而提高速度。
將XML資原始檔從文字格式編譯成二進位制格式解決了空間佔用以及解析效率的問題,但是對於Android資源管理框架來說,這只是完成了其中的一部分工作。Android資源管理框架的另外一個重要任務就是要根據資源ID來快速找到對應的資源。
那麼下面我們用aapt命令就可以檢視一下?
aapt命令在我們的AndroidSdk目錄中:

看到路徑了:Android-SDK目錄/build-tools/下面
我們也就知道了,這個目錄下全是Android中build成一個apk的所有工具,這裡再看一下這些工具的用途:
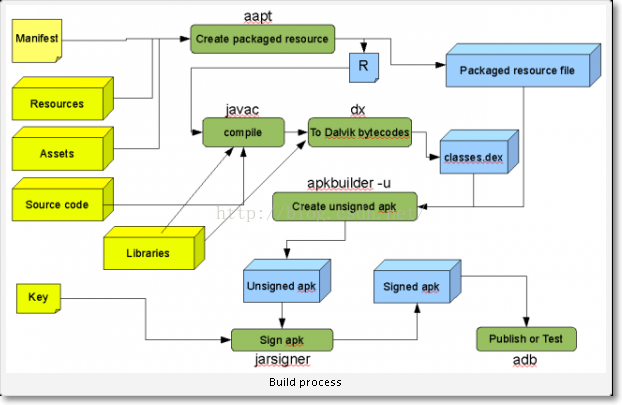
1、使用Android SDK提供的aapt.exe生成R.java類檔案
2、使用Android SDK提供的aidl.exe把.aidl轉成.java檔案(如果沒有aidl,則跳過這一步)
3、使用JDK提供的javac.exe編譯.java類檔案生成class檔案
4、使用Android SDK提供的dx.bat命令列指令碼生成classes.dex檔案
5、使用Android SDK提供的aapt.exe生成資源包檔案(包括res、assets、androidmanifest.xml等)
6、使用Android SDK提供的apkbuilder.bat生成未簽名的apk安裝檔案
7、使用jdk的jarsigner.exe對未簽名的包進行apk簽名
看到了吧。我們原來可以不借助任何IDE工具,也是可以出一個apk包的。哈哈~~
繼續看aapt命令的用法,命令很簡單:
aapt l -a apk名稱 > demo.txt
將輸入的結果定向到demo.txt中

看到我們弄出來的內容,發現就是我們上面解析的AndroidManifest.xml內容,所以這個也是一個方法,當然aapt命令這裡我為什麼最後說呢?之前我們講解的AndroidManifest.xml格式肯定是有用的,aapt命令只是系統提供給我們一個很好的工具,我們可以在反編譯的過程中藉助這個工具也是不錯的選擇。所以這裡我就想說,以後我們記得有一個aapt命令就好了,他的用途還是很多的,可以單獨編譯成一個resource.arsc檔案來,我們後面會用到這個命令。
六、總結
這篇文章篇幅有點長,所以我寫的很蛋疼,但是得耐心的看,因為resource.arsc檔案格式比AndroidManifest.xml檔案格式複雜得多,所以解析起來很費勁的。也希望你們看完之後能多多支援,後面還有一篇解析classes.dex檔案格式,當然這篇文章要等年後來才能動筆了,所以盡請期待,最好注大家新年快樂~~
相關文章
- Android逆向之旅---解析編譯之後的Dex檔案格式Android編譯
- Android逆向之旅---解析編譯之後的AndroidManifest檔案格式Android編譯
- Android逆向之旅---SO(ELF)檔案格式詳解Android
- iOS逆向之五 MACH O檔案解析iOSMac
- Android逆向之旅---Android應用的安全的攻防之戰Android
- 使用Reflector和Filedisassembler逆向編譯反編譯.cs.dll檔案程式碼編譯
- iOS逆向之旅(基礎篇) — Macho檔案iOSMac
- Go語言專案編譯之後找不到配置檔案Go編譯
- VirtualView Android實現詳解(一)—— 檔案格式與模板編譯ViewAndroid編譯
- Android之XML檔案解析AndroidXML
- 安卓逆向之Luac解密反編譯安卓解密編譯
- BVH檔案格式解析
- Android-ffmpeg編譯so檔案Android編譯
- Qt的.pro檔案格式解析QT
- 文字檔案的編碼格式
- Reflector反編譯.NET檔案後修復編譯
- java class 檔案格式解析Java
- Android逆向之旅---反編譯利器Apktool和Jadx原始碼分析以及錯誤糾正Android編譯APK原始碼
- 如何修改檔案的編碼格式
- Android逆向之旅--免Root實現微信訊息同步原理解析Android
- Reflector反編譯.NET檔案後修復【轉】編譯
- MP4檔案格式解析
- Java解析ELF檔案:ELF檔案格式規範Java
- iOS逆向之旅(基礎篇) — 彙編(五) — 彙編下的BlockiOSBloC
- Android.mk各種檔案編譯彙總Android編譯
- 檔案上傳之解析漏洞編輯器安全
- PE檔案格式詳細解析(一)
- C語言編譯器開發之旅(二):解析器C語言編譯
- gcc編譯cpp檔案GC編譯
- maven編專案編譯後在target下的zip檔案損壞無法開啟Maven編譯
- iOS逆向之旅(基礎篇) — 彙編(四) — 彙編下的函式iOS函式
- iOS逆向之旅(基礎篇) — 彙編(二) — 彙編下的 IF語句iOS
- iOS逆向之旅(基礎篇) — 彙編(一)— 彙編基礎iOS
- Android Apk 檔案反編譯和重新打包的過程分析AndroidAPK編譯
- android解析plist檔案Android
- android: AAC檔案解析Android
- [轉]andriod的apk檔案相關的編譯反編譯工具APK編譯
- Android逆向之旅---Android中的sharedUserId屬性詳解Android