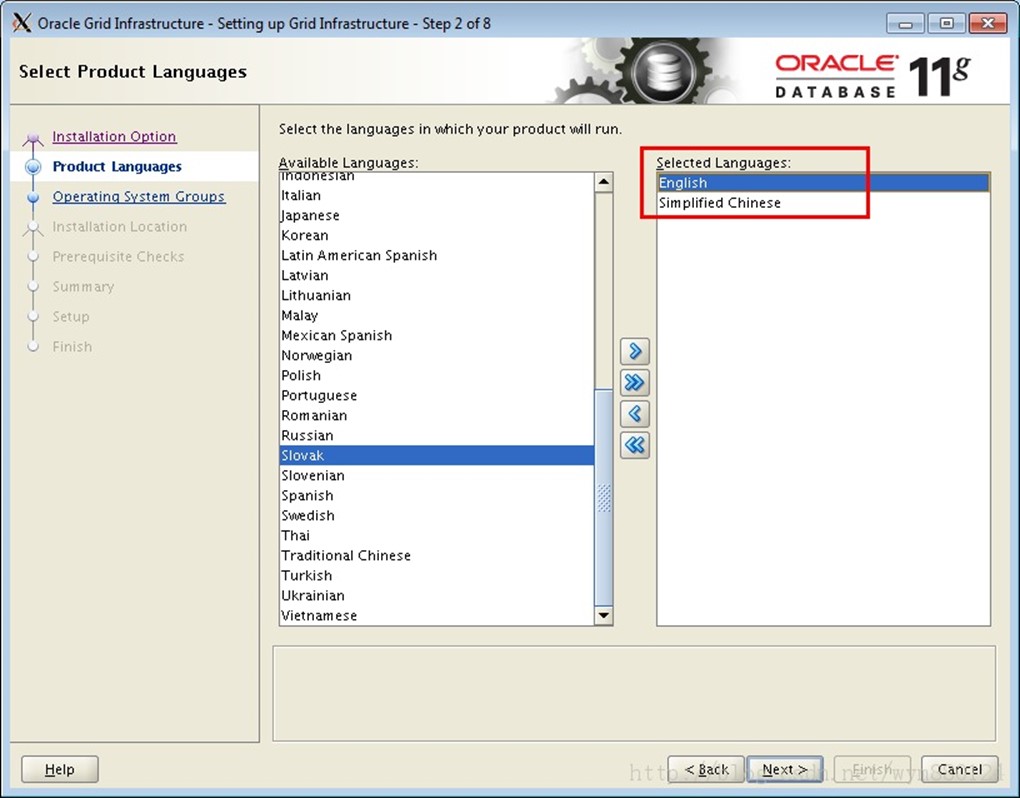
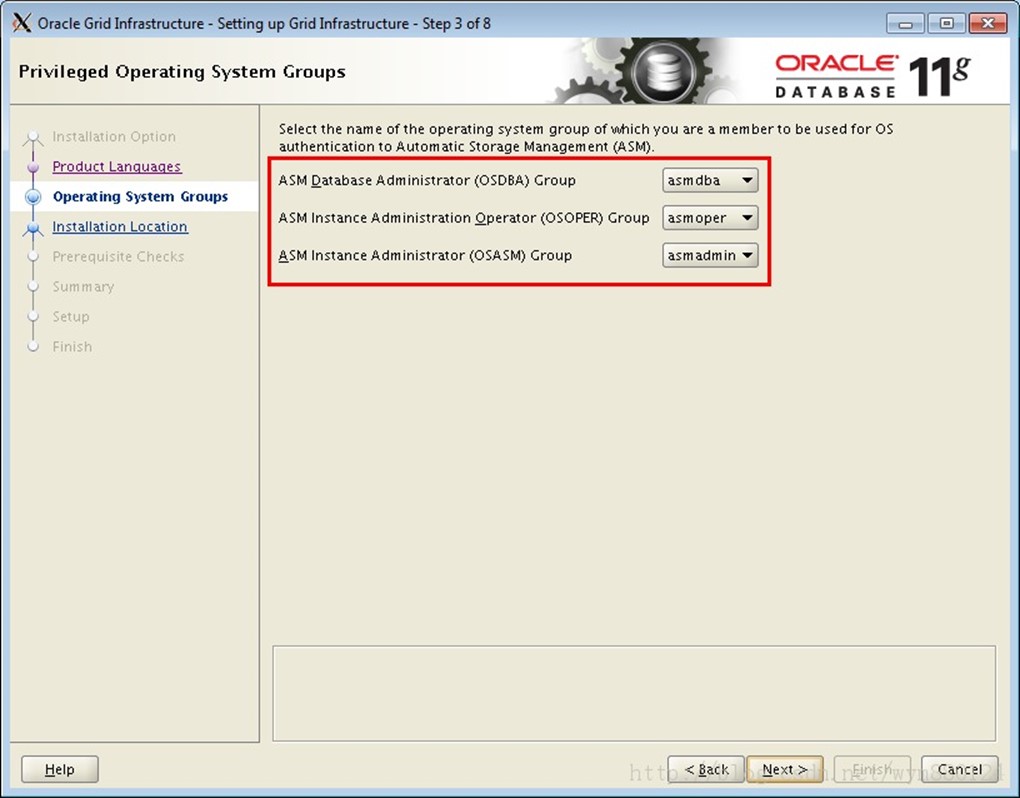
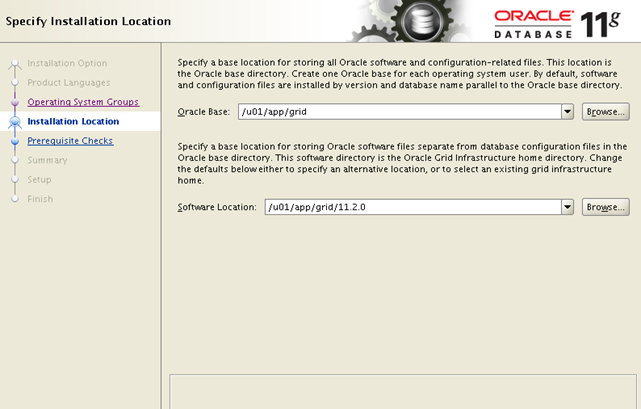
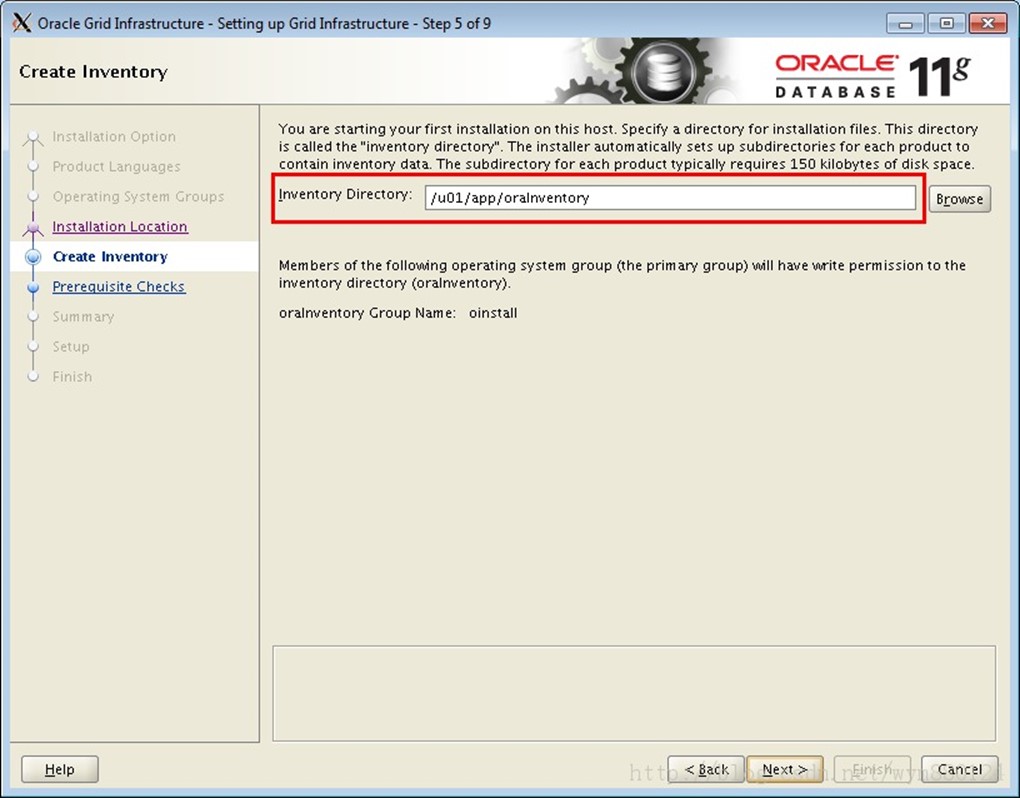
【ASM】Oracle ASM + 11gR2 + RHEL6.5 安裝
【ASM】Oracle ASM + 11gR2 + RHEL6.5 安裝
1.1 簡介
1.1.1 ASMLib
1.1.2 什麼是 udev
1.1.3 Why ASMLIB and why not
1.2 在 RHEL 6.4 上安裝 Oracle 11gR2 + ASM --使用udev
1.2.1 檢查硬體
1.2.2 安裝軟體包檢查
1.2.3 修改主機名
1.2.4 網路配置
1.2.5 磁碟準備
1.2.6 配置目錄、使用者等
1.2.7 使用udev管理磁碟
1.2.8 系統核心引數修改
1.2.9 為 Linux 系統配置本地 YUM 源
1.2.10 安裝grid
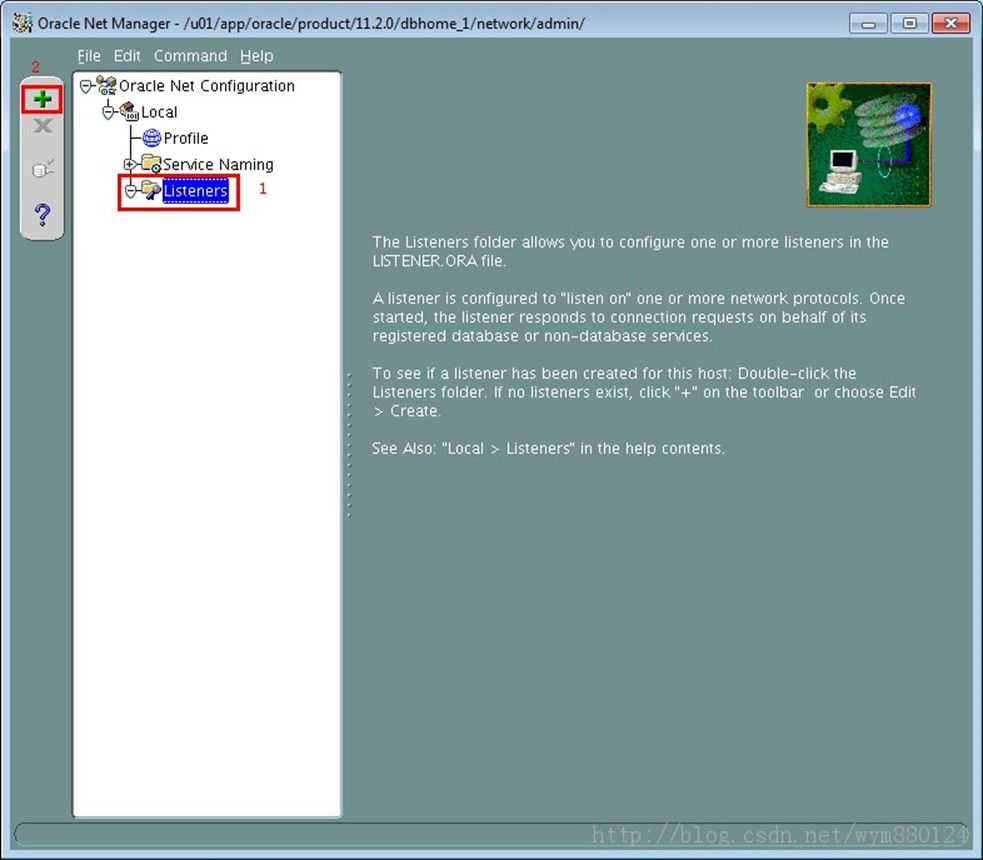
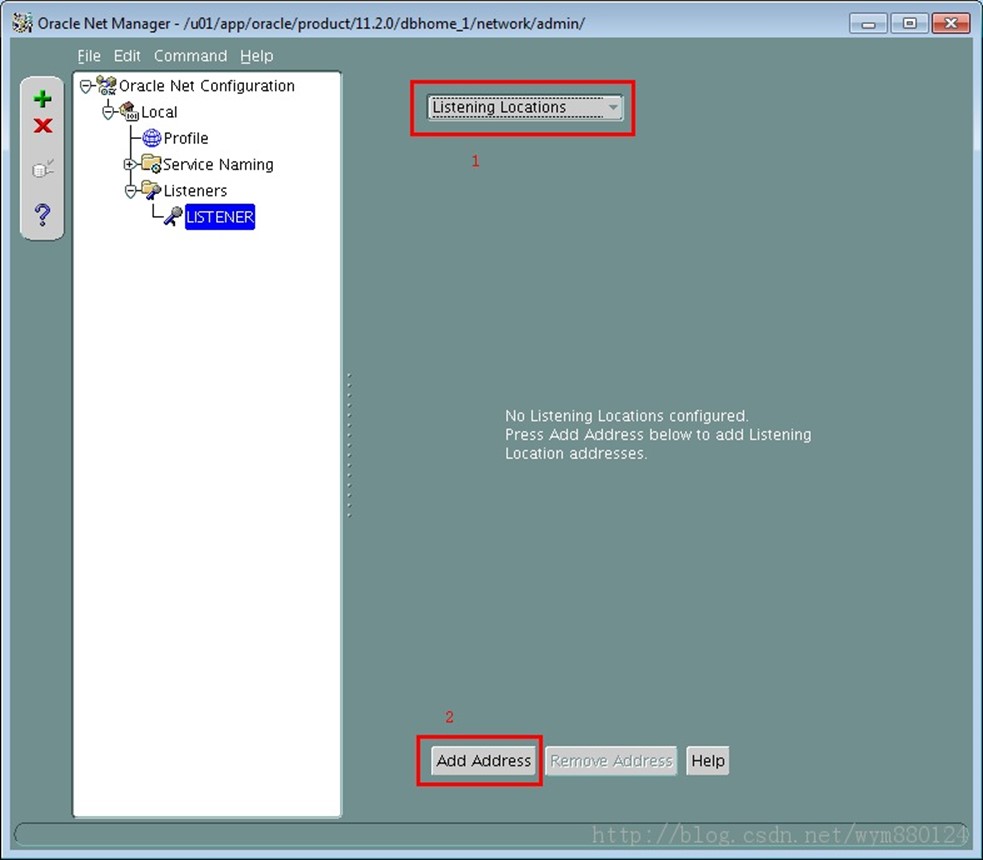
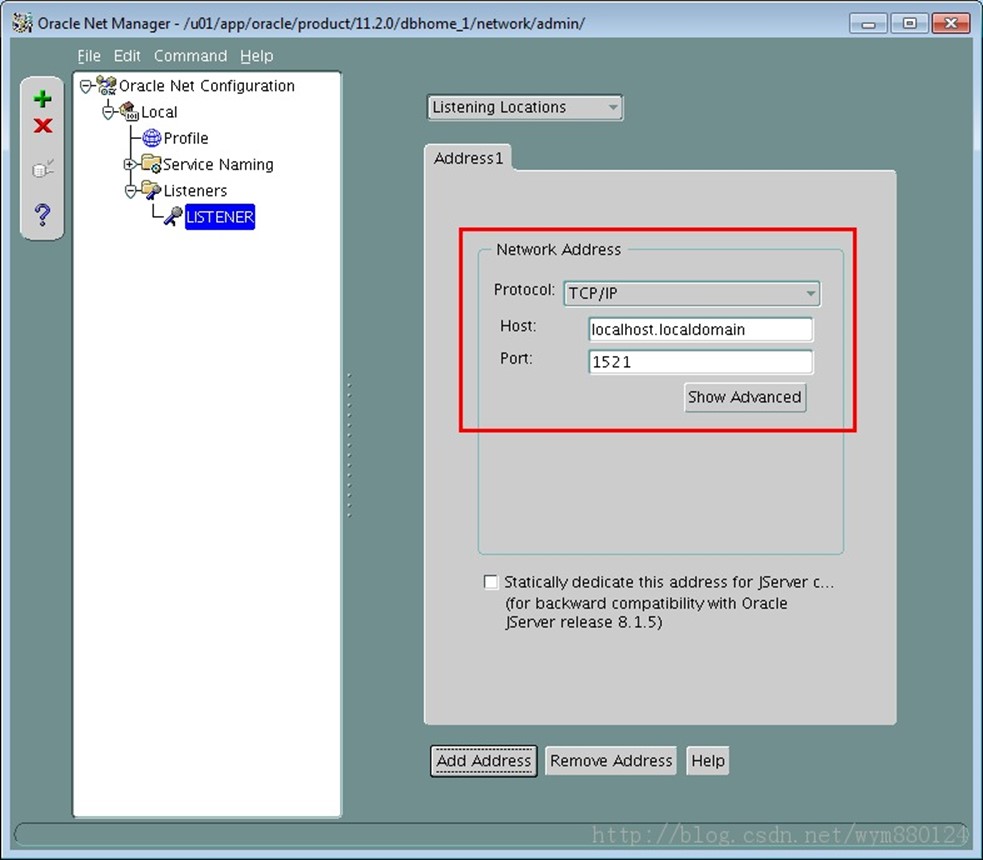
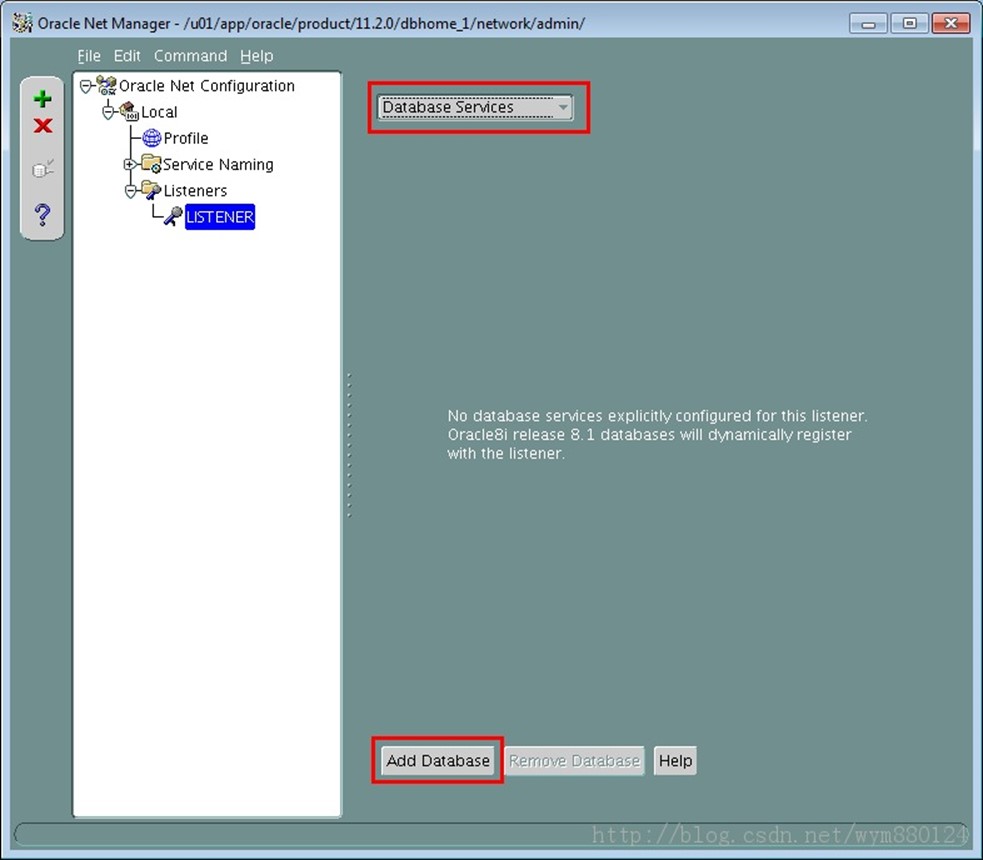
1.2.11 使用netmgr建立監聽
1.2.12 開始搭建 Oracle 資料庫
1.2.13 使用 netmgr 建立監聽--Oracle使用者不需要建立
1.2.14 使用 dbca 建立資料庫
1.2.15 配置ORACLE自動啟動
1.2.16 驗證
1.3 啟動crs
1.4 報錯:
1.4.1 Oracle 11gR2 RAC ohasd failed to start 解決方法
1.4.2 CRS-4639: Could not contact Oracle High Availability Services
1.4.3 ORA-29701: unable to connect to Cluster Synchronization Service
1.4.4 asm 例項無法載入diskgroups,ORA-15110: no diskgroups mounted
1.4.5 在啟動DB時報錯ORA-27154 ORA-27300 ORA-27301 ORA-27302
1.4.6 ORA-29786: SIHA attribute GET failed
1.4.7 11gR2手動建立ASM例項ORA-29786錯誤解決方法
1.4.8 ORACLE dbca 找不到asm disks
1.4.9 ora-15077,ASM磁碟組不能掛載
Readme
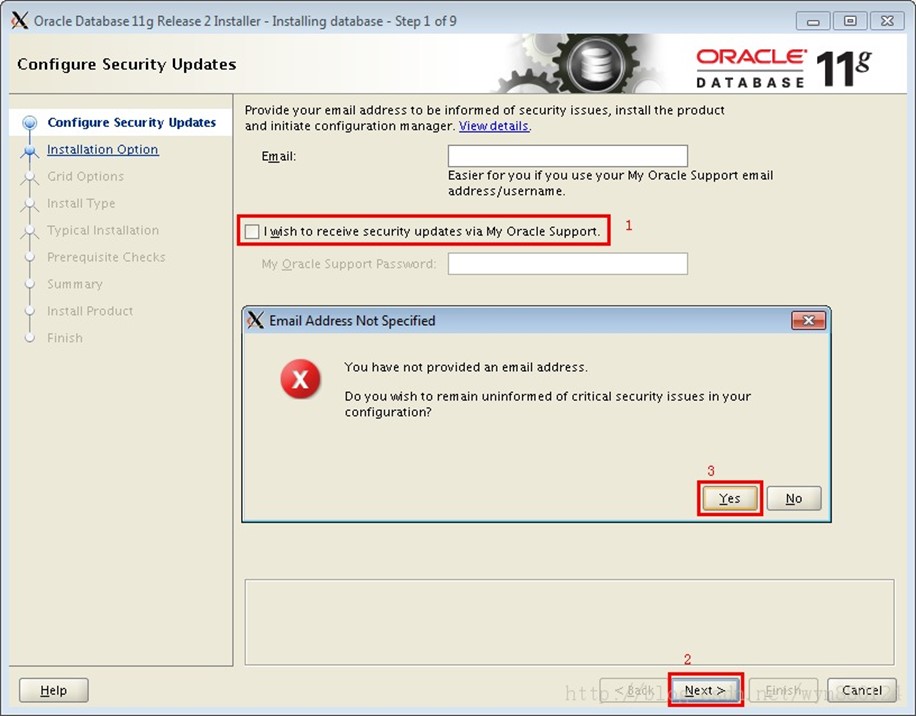
看到群上還有人糾結ASM的安裝,我很痛心,不過想想自己當時安裝的時候花了將近一週的時間才安裝好,主要是白天上班,又沒有網路,所以只好晚上安裝了,自己開始安裝的時候是11.2.0.1.0,這個版本安裝有很多bug,雖然安裝成功了但是很痛苦,後來參加OCP培訓,老師給了11.2.0.3.0版本,安裝的時候很順利,沒有報錯了。
第一次安裝的時候,涉及到ASMlib,udev神馬的一堆,學習Oracle沒有好的導師痛苦呀,最後經過大量百度,自己摸索才把這一推問題解決了。大家看這篇博文的時候注意文件的層次結構,很鬱悶,發表博文不能很好的把文章結構發出來。。。文章最後收錄了一些安裝過程中可能會出現的一些問題,供大家參考,如果有什麼意見請大家留言或加QQ,謝謝大家的來訪。
-
簡介
-
ASMLib
-
在Red Hat Enterprise Linux (RHEL)6以前,Oracle均是使用ASMLib這個核心支援庫配置ASM。ASMLIB是一種基於Linux module,專門為Oracle Automatic Storage Management特性設計的核心支援庫(kernel support library)。但是,在2011年5月,甲骨文發表了一份Oracle資料庫ASMLib的宣告,宣告中稱甲骨文將不再提供Red Hat Enterprise Linux (RHEL)6的ASMLib和相關更新。
甲骨文在這份宣告中表示,ASMLib更新將透過Unbreakable Linux Network (ULN)來發布,並僅對Oracle Linux客戶開放。ULN雖然為甲骨文和紅帽的客戶服務,但如果客戶想要使用ASMlib,就必須使用Oracle的kernel來替換掉紅帽的。
這份宣告詳見Oracle Metalink文件:
Oracle ASMLib Software Update Policy for Red Hat Enterprise Linux Supported by Red Hat [ID 1089399.1]
Software Update Policy for ASMLib running on future releases of Red Hat Enterprise Linux Red Hat Enterprise Linux 6 (RHEL6)For RHEL6 or Oracle Linux 6, Oracle will only provide ASMLib software and updates when configuredUnbreakable Enterprise Kernel (UEK). Oracle will not provide ASMLib packages for kernels distributedby Red Hat as part of RHEL 6 or the Red Hat compatible kernel in Oracle Linux 6. ASMLib updates will be delivered via Unbreakable Linux Network(ULN) which is available to customers with Oracle Linux support. ULN works with both Oracle Linux or Red Hat Linux installations, but ASMlib usage will require replacing any Red Hat kernel with UEK
因此,在Red Hat Enterprise Linux (RHEL)6上使用ASMLib已不再現實,另外ASMLib也有一定的缺點,詳見文件說明:
因此,目前在Red Hat Enterprise Linux (RHEL)6上使用Oracle+ASM,已不再使用ASMLib,而是採用udev裝置檔案來配置ASM。
-
什麼是 udev
udev 是Linux2.6 核心裡的一個功能,它替代了原來的devfs,成為當前Linux 預設的裝置管理工具。udev 以守護程式的形式執行,透過偵聽核心發出來的uevent 來管理/dev目錄下的裝置檔案。不像之前的裝置管理工具,udev 在使用者空間(user space) 執行,而不在核心空間(kernel space) 執行。
-
Why ASMLIB and why not?
ASMLIB是一種基於Linux module,專門為Oracle Automatic Storage Management特性設計的核心支援庫(kernel support library)。
長久以來我們對ASMLIB的認識並不全面,這裡我們來具體瞭解一下使用ASMLIB的優缺點。
理論上我們可以從ASMLIB API中得到的以下益處:
-
總是使用direct,async IO
-
解決了永久性裝置名的問題,即便在重啟後裝置名已經改變的情況下
-
解決了檔案許可權、擁有者的問題
-
減少了I/O期間從使用者模式到核心模式的上下文切換,從而可能降低cpu使用率
-
減少了檔案控制程式碼的使用量
-
ASMLIB API提供了傳遞如I/O優先順序等元資訊到儲存裝置的可能
雖然從理論上我們可以從ASMLIB中得到效能收益,但實踐過程中這種優勢是幾乎可以忽略的,沒有任何效能報告顯示ASMLIB對比Linux上原生態的udev裝置管理服務有任何效能上的優勢。在Oracle官方論壇上有一篇討論ASMLIB效能收益的帖子,你可以從中看到"asmlib wouldn't necessarily give you much of an io performance benefit, it's mainly for ease of management as it will find/discover the right devices for you, the io effect of asmlib is large the same as doing async io to raw devices."的評論,實際上使用ASMLIB和直接使用裸裝置(raw device)在效能上沒有什麼差別。
ASMLIB Performance vs UdevRAC+ASM 3 years in production Stories to shareASMLib and Linux block devices
-
在 RHEL 6.4 上安裝 Oracle 11gR2 + ASM --使用udev
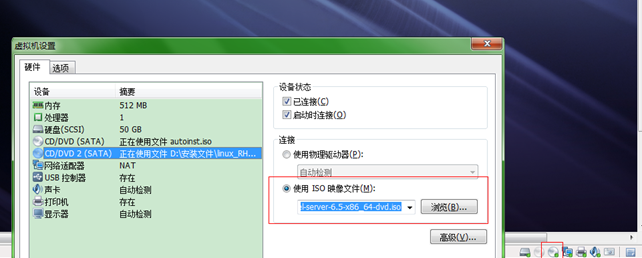
實驗環境:
OS: Oracle Linux Server release 6.4 x64 或 RHEL6.4
Database: Oracle Database 11gR2 x64 (11.2.0.1.0)
VMware: VMware Workstation 10.0.0 build-812388
軟體:
- xmanager-passive
-
XSHELL
-
檢查硬體
在正式安裝開始前,請先檢查你的軟硬體條件是否滿足安裝需要。
硬體上可以使用命令檢視記憶體情況和 CPU 特性:
#more /proc/meminfo
#more /proc/cpuinfo
其中記憶體的要求是不低於 1G
下面的不是必須的,可選使用
#df –k /dev/shm 檢查共享記憶體
#df –k /tmp 檢查臨時磁碟空間
#more /proc/version 檢查作業系統版本
#uname –r 檢查核心版本
記憶體
# grep MemTotal /proc/meminfo
交換空間
# grep SwapTotal /proc/meminfo
磁碟空間
# df -ah
# free
#free -m
Minimum: 1 GB of RAM
Recommended: 2 GB of RAM or more
?
To determine the RAM size, enter the following command:
# grep MemTotal /proc/meminfo
swap檢查
Between 1 GB and 2 GB 1.5 times the size of the RAM
Between 2 GB and 16 GB Equal to the size of the RAM
More than 16 GB 16 GB
# grep SwapTotal /proc/meminfo
To determine the available RAM and swap space, enter the following command:
# free -m
?The following tables describe the disk space requirements for software files and data files for each installation type on Linux x86:
Installation Type Requirement for Software Files (GB)
Enterprise Edition 3.95
Standard Edition 3.88
Installation Type Disk Space for Data Files (GB)
Enterprise Edition 1.7
Standard Edition 1.5
[root@yutian ~]# cat /proc/version
Linux version 2.6.18-164.el5 (mockbuild@x86-002.build.bos.redhat.com) (gcc version 4.1.2 20080704 (Red Hat 4.1.2-46)) #1 SMP Tue Aug 18 15:51:54 EDT 2009
[root@yutian ~]# lsb_release -id
Distributor ID: RedHatEnterpriseServer
Description: Red Hat Enterprise Linux Server release 5.4 (Tikanga)
[root@yutian ~]#
-
安裝軟體包檢查
可以統一檢查:
rpm -q binutils \
compat-libstdc++-33 \
elfutils-libelf \
gcc \
gcc-c++ \
glibc \
glibc-common \
glibc-devel \
glibc-headers \
ksh \
libaio \
libaio-devel \
libgomp \
libgcc \
libstdc++ \
libstdc++-devel \
make \
sysstat \
unixODBC \
unixODBC-devel \
numactl-devel
我們可以看到沒有安裝過的包會已is not installed 出現:
[root@rhel6_lhr ~]# rpm -q binutils \
> compat-libstdc++-33 \
> elfutils-libelf \
> gcc \
> gcc-c++ \
> glibc \
> glibc-common \
> glibc-devel \
> glibc-headers \
> ksh \
> libaio \
> libaio-devel \
> libgomp \
> libgcc \
> libstdc++ \
> libstdc++-devel \
> make \
> sysstat \
> unixODBC \
> unixODBC-devel \
> numactl-devel
binutils-2.20.51.0.2-5.36.el6.x86_64
compat-libstdc++-33-3.2.3-69.el6.x86_64
compat-libstdc++-33-3.2.3-69.el6.i686
elfutils-libelf-0.152-1.el6.x86_64
gcc-4.4.7-4.el6.x86_64
gcc-c++-4.4.7-4.el6.x86_64
glibc-2.12-1.132.el6.x86_64
glibc-common-2.12-1.132.el6.x86_64
glibc-devel-2.12-1.132.el6.x86_64
glibc-headers-2.12-1.132.el6.x86_64
package ksh is not installed
libaio-0.3.107-10.el6.x86_64
libaio-devel-0.3.107-10.el6.x86_64
libaio-devel-0.3.107-10.el6.i686
libgomp-4.4.7-4.el6.x86_64
libgcc-4.4.7-4.el6.x86_64
libstdc++-4.4.7-4.el6.x86_64
libstdc++-devel-4.4.7-4.el6.x86_64
libstdc++-devel-4.4.7-4.el6.i686
make-3.81-20.el6.x86_64
sysstat-9.0.4-22.el6.x86_64
unixODBC-2.2.14-12.el6_3.x86_64
unixODBC-2.2.14-12.el6_3.i686
unixODBC-devel-2.2.14-12.el6_3.i686
unixODBC-devel-2.2.14-12.el6_3.x86_64
package numactl-devel is not installed
[root@rhel6_lhr ~]#
如果部分包不存在
可以批次更新安裝,但如果依賴關係缺失,可能需要多執行兩遍
或者手工調整
-
-
檢查下列包是否安裝,若未安裝則要先安裝:
rpm -qa | grep binutils-
rpm -qa | grep compat-libstdc++-
rpm -qa | grep elfutils-libelf-
rpm -qa | grep elfutils-libelf-devel-
rpm -qa | grep glibc-
rpm -qa | grep glibc-common-
rpm -qa | grep glibc-devel-
rpm -qa | grep gcc-
rpm -qa | grep gcc-c++-
rpm -qa | grep libaio-
rpm -qa | grep libaio-devel-
rpm -qa | grep libgcc-
rpm -qa | grep libstdc++-
rpm -qa | grep libstdc++-devel-
rpm -qa | grep make-
rpm -qa | grep sysstat-
rpm -qa | grep unixODBC-
rpm -qa | grep unixODBC-devel-
binutils-2.17.50.0.6-2.el5
compat-libstdc++-33-3.2.3-61
elfutils-libelf-0.125-3.el5
elfutils-libelf-devel-0.125
glibc-2.5-12
glibc-common-2.5-12
glibc-devel-2.5-12
gcc-4.1.1-52
gcc-c++-4.1.1-52
libaio-0.3.106
libaio-devel-0.3.106
libgcc-4.1.1-52
libstdc++-4.1.1
libstdc++-devel-4.1.1-52.e15
make-3.81-1.1
sysstat-7.0.0
unixODBC-2.2.11
unixODBC-devel-2.2.11
# rpm -qa | grep make gcc glibc compat openmotif21 setarch 等等
建議你用 rpm –q packagename 逐個檢查,因為是官方要求,所以為了不在安裝時出現不必要的麻煩,還是確認都全部安裝為好。
雖然我是全新安裝的系統也存在 3 個包沒安裝:Libaio-devel numactl-devel sysstat
掛載 Linux 5 光碟,查詢包的完整路徑名稱:
[root@localhost ~]# mkdir /media/cdrom ; mount /dev/cdrom /media/cdrom
[root@localhost ~]# ll /media/cdrom/Server/ |grep libaio-devel
[root@localhost ~]# ll /media/cdrom/Server/ |grep numactl-devel
[root@localhost ~]# ll /media/cdrom/Server/ |grep sysstat
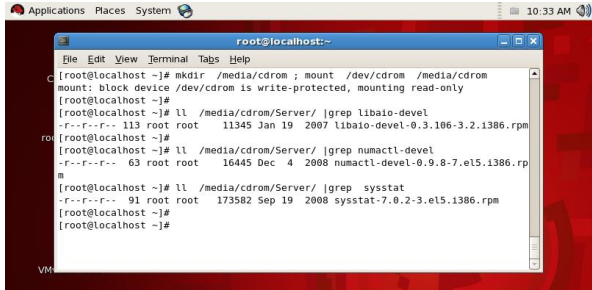
安裝 RPM 包:
[root@localhost ~]# rpm -ivh /media/cdrom/Server/libaio-devel-0.3.106-3.2.i386.rpm
[root@localhost ~]# rpm -ivh /media/cdrom/Server/numactl-devel-0.9.8-7.el5.i386.rpm
[root@localhost ~]# rpm -ivh /media/cdrom/Server/sysstat-7.0.2-3.el5.i386.rpm
rpm -ivh compat-libstdc++-33-3.2.3-69.el6.i686.rpm --force --nodeps
[root@localhost RHEL_6.5 x86_64 Disc 1]# pwd
/media/RHEL_6.5 x86_64 Disc 1
[root@localhost RHEL_6.5 x86_64 Disc 1]#
另外,為了支援 ODBC 建議順便安裝下面兩個包:
unixODBC-2.2.11 (32 bit) or later
unixODBC-devel-2.2.11 (32 bit) or later

-
修改主機名
永久生效:
[root@zijuan /]# vim /etc/sysconfig/network
NETWORKING=yes
NETWORKING_IPV6=yes
HOSTNAME=zijuan
HOSTNAME=zijuan表示主機設定為zijuan.
注意:修改主機名後,需要重啟系統後生效,或者切換個使用者然後切換回來就OK
檢視/etc/hosts檔案中必須包含a fully qualified name for the server
[root@localhost lhr]# cat /etc/hosts
127.0.0.1 localhost localhost.localdomain localhost4 localhost4.localdomain4
::1 localhost localhost.localdomain localhost6 localhost6.localdomain6
192.168.128.131 rhel6_linux_asm
[root@localhost lhr]# hostname
localhost.localdomain
[root@localhost lhr]# hostname rhel6.5_linux
[root@localhost lhr]# hostname
rhel6_linux_asm
修改/etc/hosts檔案
[root@oracle ~]#vim/etc/hosts
127.0.0.1 localhost.localdomainlocalhost
::1 localhost6.localdomain6localhost6
192.168.137.112 oracle.domain.comoracle
注意將主機名對應到真實ip地址,否則oracle有可能將監聽程式僅僅建立在127.0.0.1上
-
網路配置
如果要配置em的話,這裡最後把系統的ip地址設定成靜態的ip地址,不然可能導致em訪問的時候改變了資料庫伺服器的ip地址,從而導致其它問題的出現,具體靜態ip地址配置參考( o()︿))o 唉。。。。這一塊內容還沒有寫部落格,大家可以百度或者私聊我)
-
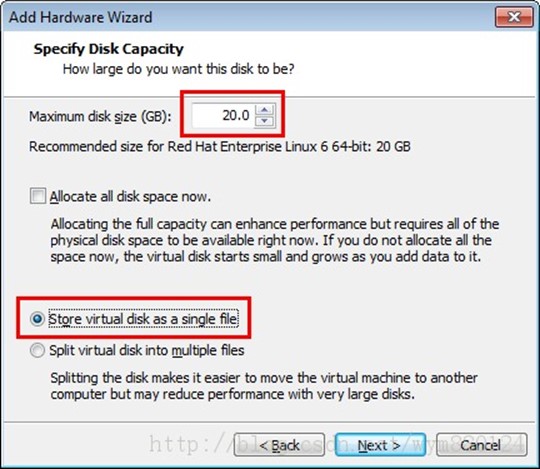
磁碟準備
這裡我們準備5塊硬碟
1塊硬碟安裝作業系統
234塊用於實現ASM 儲存資料
5塊硬碟用於儲存FRA
-
新增磁碟
1.1. 編輯虛擬機器配置

1.2. 新增硬體

1.3. 新增第一塊硬碟
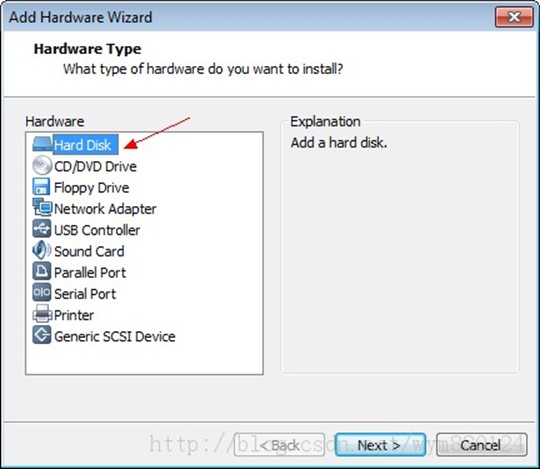
1.4. 建立新的虛擬磁碟

1.5. 選擇磁碟型別
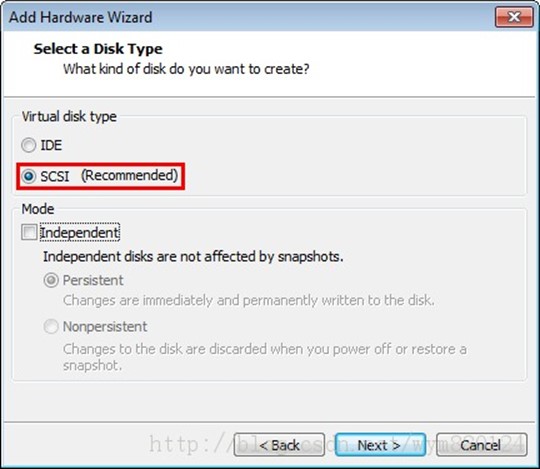
1.6. 設定磁碟大小
1.7. 完成

1.8.
新增第二、三、四、五 塊磁碟:重複步驟 1~7
1.9.
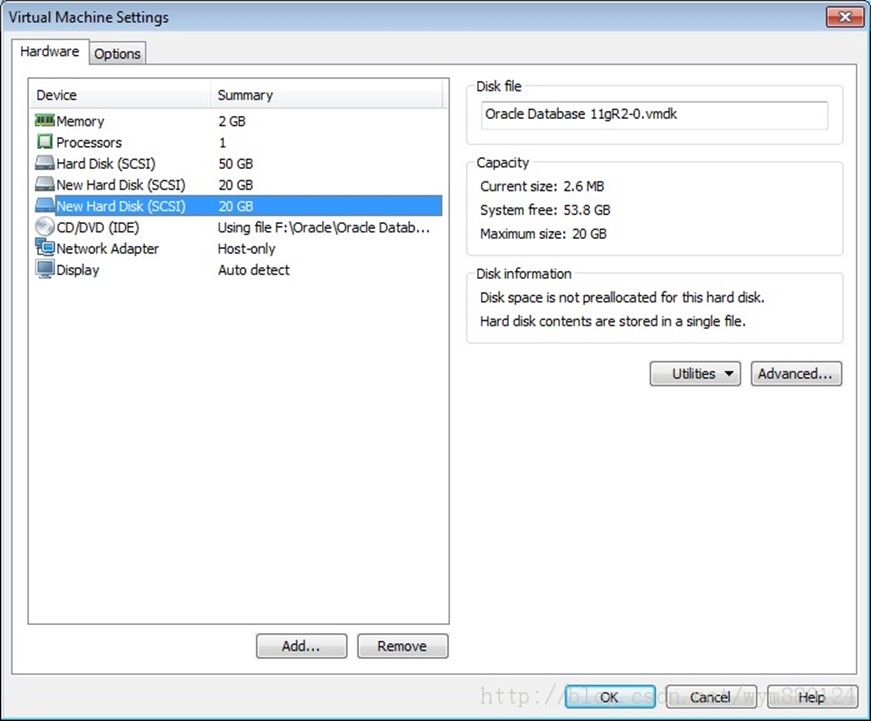
這裡5塊磁碟新增完畢後,為了避免後邊再重啟一次,可以先把後邊需要的一個步驟做了,就是找到虛擬機器的配置檔案,在最後新增一行 disk.EnableUUID="TRUE",這裡注意修改檔案的時候一定要在關機的狀態下修改該引數檔案。
-
對磁碟進行分割槽
磁碟新增完成後,啟動虛擬機器,作為 root 使用者登入系統,格式化新新增的兩塊磁碟。
[root@localhost share]# fdisk -l | grep "Disk /dev/sd"
Disk /dev/sde: 10.7 GB, 10737418240 bytes
Disk /dev/sdd: 10.7 GB, 10737418240 bytes
Disk /dev/sda: 53.7 GB, 53687091200 bytes
Disk /dev/sdb: 10.7 GB, 10737418240 bytes
Disk /dev/sdc: 10.7 GB, 10737418240 bytes

磁碟分割槽完成後,檢視所有磁碟情況。
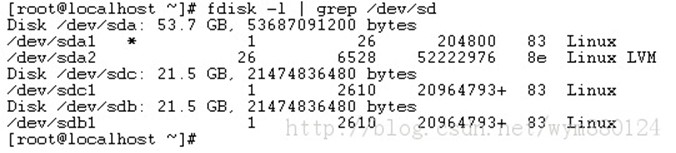
注意這裡只做磁碟的分割槽,並不做磁碟的格式化和掛載
-
配置目錄、使用者等
-
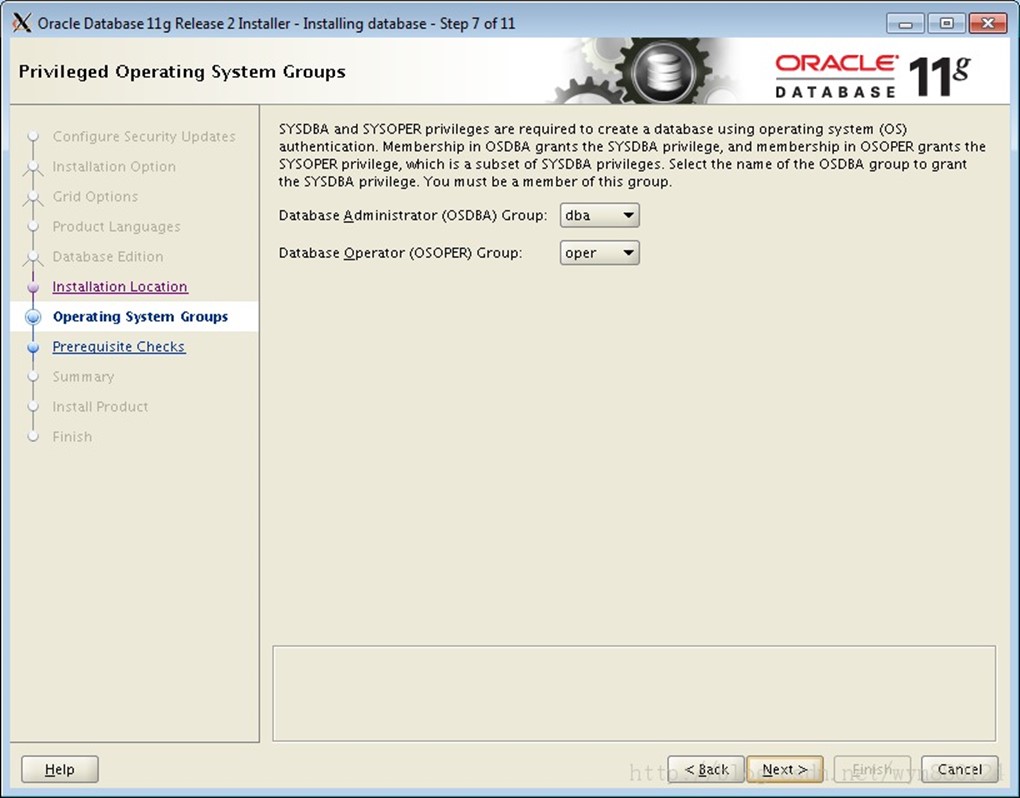
配置使用者及使用者組
利用 /usr/sbin/groupadd 命令
------這裡Oracle使用者可能已經安裝過的,沒有影響:
程式碼:
groupadd oinstall
groupadd dba
groupadd oper
groupadd asmadmin
groupadd asmoper
groupadd asmdba
--新增使用者到組
useradd -g oinstall -G dba,asmdba,oper,asmadmin oracle
useradd -g oinstall -G asmadmin,asmdba,asmoper,dba grid
--修改密碼
passwd oracle
passwd grid
echo oracle | passwd --stdin lhr
echo grid | passwd --stdin lhr
---檢視屬主
[root@rhel_linux_asm ~]# id oracle
uid=501(oracle) gid=502(dba) groups=502(dba),501(oinstall),504(asmadmin),506(asmdba)
[root@rhel_linux_asm ~]# id grid
uid=502(grid) gid=501(oinstall) groups=501(oinstall),502(dba),504(asmadmin),505(asmoper),506(asmdba)
[root@rhel_linux_asm ~]#
-
建立目錄並且配置 grid 和 oracle 使用者的配置檔案
程式碼:
--root使用者下:
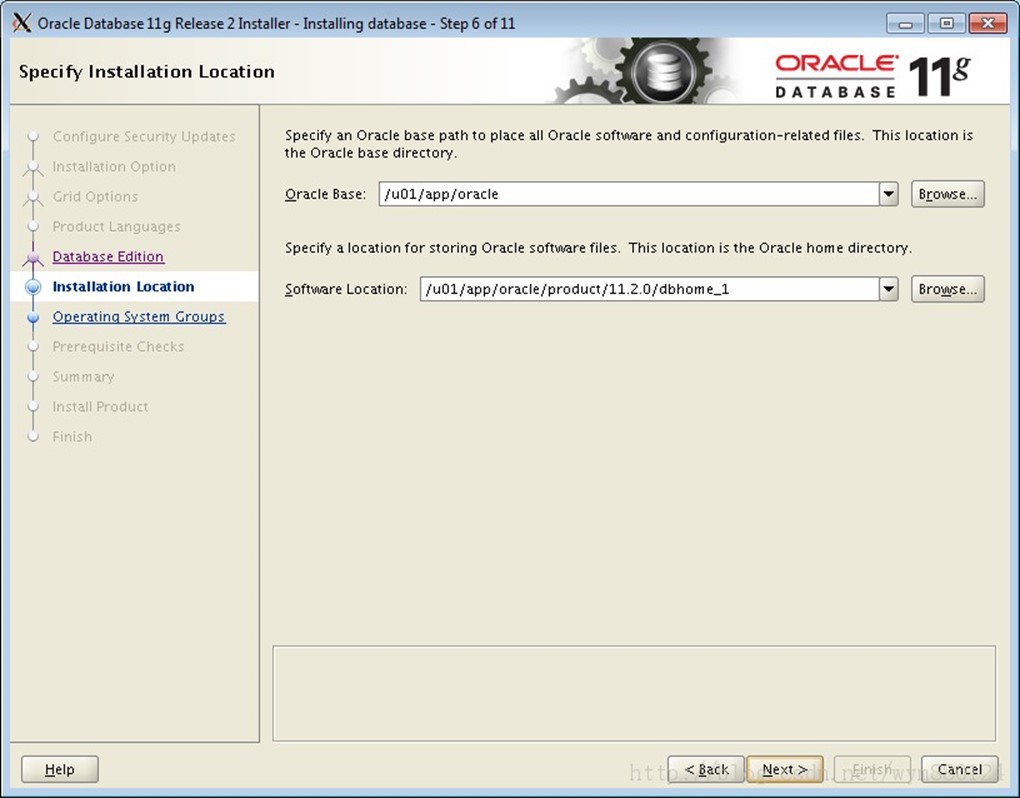
mkdir -p /u01/app/oracle
mkdir -p /u01/app/grid
mkdir -p /u01/app/grid/11.2.0
chown -R grid:oinstall /u01/app/grid --把/u01/app/grid 的所有者改為grid
chown -R oracle:oinstall /u01/app/oracle
chmod -R 775 /u01
--------Oracle User----切換到Oracle使用者下------
[root@rhel_linux_asm ~]# su - oracle
[grid@rhel_linux_asm ~]$ vi ~/.bash_profile
export ORACLE_SID=orcl
export ORACLE_BASE=/u01/app/oracle
export ORACLE_HOME=$ORACLE_BASE/product/11.2.0/dbhome_1
export LD_LIBRARY_PATH=$ORACLE_HOME/lib
export TMP=/tmp
export TMPDIR=$TMP
export PATH=$PATH:$ORACLE_HOME/bin
--------Grid User-----切換到grid使用者下-----
cd /home/grid
vim .bash_profile
export ORACLE_SID=+ASM
export ORACLE_BASE=/u01/app/grid
export ORACLE_HOME=/u01/app/grid/11.2.0
export LD_LIBRARY_PATH=$ORACLE_HOME/lib
export PATH=$ORACLE_HOME/bin:$PATH
umask 022
[oracle@dbserver1 ~]$ source .bash_profile
-
使用udev管理磁碟
-
配置 udev 繫結的 scsi_id
注意以下兩點:
首先切換到root使用者下:
5.1. 不同的作業系統,scsi_id 命令的位置不同。
[root@localhost ~]# cat /etc/issue
Oracle Linux Server release 6.4
Kernel \r on an \m
[root@localhost ~]# which scsi_id
/sbin/scsi_id
[root@localhost ~]#
5.2. 編輯 /etc/scsi_id.config 檔案,如果該檔案不存在,則建立該檔案並新增如下行:
[root@localhost ~]# vi /etc/scsi_id.config
options=--whitelisted --replace-whitespace
[root@localhost ~]#
5.3. 如果是使用 VMware 虛擬機器,直接輸入 scsi_id 命令可能無法獲取 id,需修改 VMware 檔案引數,這一步如果在新增磁碟的時候做過這一步的話就可以跳過了,直接獲取uuid即可
[root@localhost ~]# scsi_id --whitelisted --replace-whitespace --device=/dev/sdb
[root@localhost ~]# scsi_id --whitelisted --replace-whitespace --device=/dev/sdc
D:\VMs\Oracle Database 11gR2\Oracle Database 11gR2.vmx
使用文字編輯器編輯該檔案,在尾部新增一行引數:
disk.EnableUUID="TRUE"
儲存檔案,重新啟動虛擬機器。這裡注意修改檔案的時候一定要在關機的狀態下修改,或者 scsi_id -g -u /dev/sdc 來獲得uuid,-g -u引數在rhel6以後已經不用了
[root@localhost share]# scsi_id --whitelisted --replace-whitespace --device=/dev/sdb
36000c29fbe57659626ee89b4fba07616
[root@localhost share]# scsi_id --whitelisted --replace-whitespace --device=/dev/sdc
36000c29384cde894e087e5f0fcaa80f4
[root@localhost share]# scsi_id --whitelisted --replace-whitespace --device=/dev/sdd
36000c29022aee23728231ed9b1f9743d
[root@localhost share]# scsi_id --whitelisted --replace-whitespace --device=/dev/sde
36000c2938f431664218d1d2632ff1352
-
建立並配置 udev rules 檔案
[root@localhost ~]# vi /etc/udev/rules.d/99-oracle-asmdevices.rules
KERNEL=="sd*", SUBSYSTEM=="block", PROGRAM=="/sbin/scsi_id --whitelisted --replace-whitespace --device=/dev/$name",RESULT=="36000c29fe0fc917d7e9982742a28ce7c", NAME="asm-diskb", OWNER="grid",GROUP="asmadmin", MODE="0660"
KERNEL=="sd*", SUBSYSTEM=="block", PROGRAM=="/sbin/scsi_id --whitelisted --replace-whitespace --device=/dev/$name",RESULT=="36000c293ffc0900fd932348de4b6baf8", NAME="asm-diskc", OWNER="grid",GROUP="asmadmin", MODE="0660"
根據步驟 5 獲取的 ID 修改 RESULT 值
這裡需要注意,一個KERNEL就是一行,不能換行的,我之前就是犯了這個錯誤的

新增4塊硬碟:
KERNEL=="sd*", SUBSYSTEM=="block", PROGRAM=="/sbin/scsi_id --whitelisted --replace-whitespace --device=/dev/$name",RESULT=="36000c29346c1344ffb26f0e5603d519e", NAME="asm-diskb", OWNER="grid",GROUP="asmadmin", MODE="0660"
KERNEL=="sd*", SUBSYSTEM=="block", PROGRAM=="/sbin/scsi_id --whitelisted --replace-whitespace --device=/dev/$name",RESULT=="36000c29d08ee059a345571054517cd03", NAME="asm-diskc", OWNER="grid",GROUP="asmadmin", MODE="0660"
KERNEL=="sd*", SUBSYSTEM=="block", PROGRAM=="/sbin/scsi_id --whitelisted --replace-whitespace --device=/dev/$name",RESULT=="36000c295037a910bfb765af8f400aa07", NAME="asm-diskd", OWNER="grid",GROUP="asmadmin", MODE="0660"
KERNEL=="sd*", SUBSYSTEM=="block", PROGRAM=="/sbin/scsi_id --whitelisted --replace-whitespace --device=/dev/$name",RESULT=="36000c2982bda048f642acd3c429ec983", NAME="asm-diske", OWNER="grid",GROUP="asmadmin", MODE="0660"

注意:這裡的GROUP="asmadmin", 最好修改成 GROUP="asmdba",不然最後可能用dbca建立資料庫例項的時候找不見磁碟組。

-
新增完成後,重啟 udev,不同 Linux 發行版本重啟方式不一樣。
該步驟慢一點,大約可能需要30秒左右吧,等等等等。。。。。。
[root@localhost ~]# start_udev
Starting udev: [ OK ]
[root@localhost ~]#
-
檢視繫結的 asm,如果此時還是看不到 asm disk,請重啟作業系統後再檢視。
[root@localhost ~]# ll /dev/asm*
brw-rw---- 1 grid asmadmin 8, 17 Oct 17 14:26 /dev/asm-diskb
brw-rw---- 1 grid asmadmin 8, 33 Oct 17 14:26 /dev/asm-diskc

-
系統核心引數修改
-
編輯 /etc/security/limits.conf 檔案,在檔案尾部新增如下內容:
-
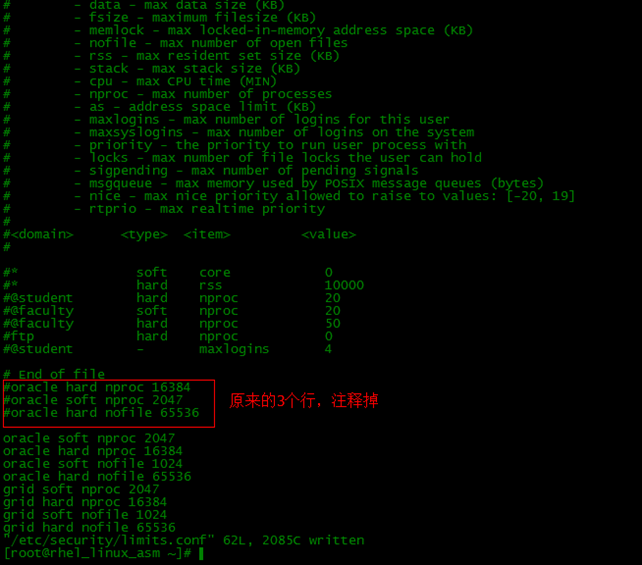
[root@localhost ~]# tail -8 /etc/security/limits.conf
# add by lhr for oracle and grid on 2014-05-02
oracle soft nproc 2047
oracle hard nproc 16384
oracle soft nofile 1024
oracle hard nofile 65536
grid soft nproc 2047
grid hard nproc 16384
grid soft nofile 1024
grid hard nofile 65536
-
編輯 /etc/pam.d/login 檔案,在檔案尾部新增如下內容:
[root@localhost ~]# tail -1 /etc/pam.d/login
session required pam_limis.so
[root@localhost ~]#
-
編輯 /etc/profile 檔案,設定 shell 限制,在檔案尾部新增如下內容:
[root@localhost ~]# tail -9 /etc/profile
if [ /$USER = "oracle" ] || [ /$USER = "grid" ]; then
if [ /$SHELL = "/bin/ksh" ]; then
ulimit -p 16384
ulimit -n 65536
else
ulimit -u 16384 -n 65536
fi
umask 022
fi
-
/etc/sysctl.conf
Configuring Kernel Parameters for Linux
vim /etc/sysctl.conf
fs.aio-max-nr = 1048576
fs.file-max = 6815744
kernel.shmall = 2097152
kernel.shmmax = 4294967295
kernel.shmmni = 4096
kernel.sem = 250 32000 100 128
net.ipv4.ip_local_port_range = 9000 65500
net.core.rmem_default = 262144
net.core.rmem_max = 4194304
net.core.wmem_default = 262144
net.core.wmem_max = 1048576
生效
# /sbin/sysctl -p
-
安裝grid
-
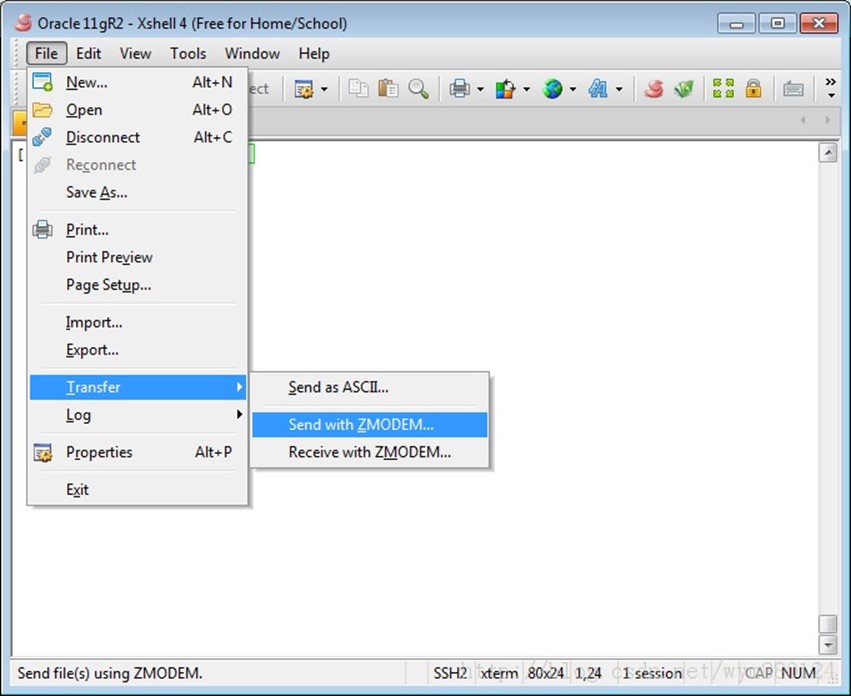
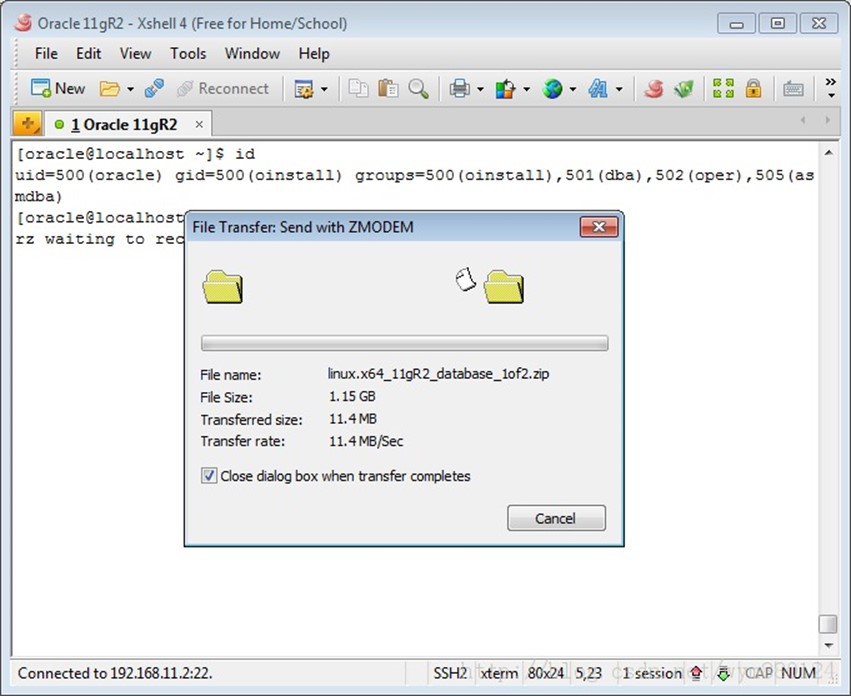
透過 ZMODEM 上傳檔案 linux.x64_11gR2_grid.zip 至grid使用者家目錄 /home/grid/
這步當然也可以使用其它軟體來替代上傳軟體包:

[root@localhost ~]# ll /home/grid/
total 1028228
-rw-r--r-- 1 root root 1052897657 Oct 16 13:22 linux.x64_11gR2_grid.zip
[root@localhost ~]#
-
解壓檔案
[root@localhost grid]# unzip linux.x64_11gR2_grid.zip
[root@localhost grid]# ll
total 1028232
drwxr-xr-x 8 root root 4096 Aug 21 2009 grid
-rw-r--r-- 1 root root 1052897657 Oct 16 13:22 linux.x64_11gR2_grid.zip
[root@localhost grid]#
-
作為 grid 使用者登入系統,執行安裝程式。
-
日誌
-
安裝過程中的日誌生成地址:
/u01/app/oraInventory/logs/installActions2014-06-14_10-32-53PM.log
16.1. 檢查安裝指令碼是否具有可執行許可權
[grid@localhost grid]$ id
uid=501(grid) gid=500(oinstall) groups=500(oinstall),501(dba),503(asmadmin),504(asmoper),505(asmdba)
[grid@localhost grid]$ ll runInstaller
-rwxr-xr-x 1 root root 3227 Aug 15 2009 runInstaller
[grid@localhost grid]$
如果無可執行許可權,執行以下命令進行授權:
[root@localhost ~]# chown -R grid:oinstall /home/grid/grid/
[root@localhost ~]# ll /home/grid/grid/runInstaller
-rwxr-xr-x 1 grid oinstall 3227 Aug 15 2009 /home/grid/grid/runInstaller
[root@localhost ~]#
16.2. 執行安裝指令碼 /home/grid/grid/runInstaller
首先開啟Xmanager - Passive 軟體, 然後在 Xshell 會話設定如下:
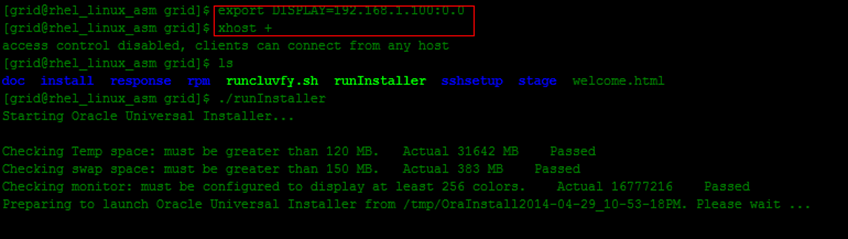
[grid@rhel_linux_asm grid]$ clear
[grid@rhel_linux_asm grid]$ export DISPLAY=192.168.1.100:0.0 ---這裡的ip地址就是本機的ip地址(ipconfig)
[grid@rhel_linux_asm grid]$ xhost +
access control disabled, clients can connect from any host
[grid@rhel_linux_asm grid]$ ls
doc install response rpm runcluvfy.sh runInstaller sshsetup stage welcome.html
[grid@rhel_linux_asm grid]$ ./runInstaller
Starting Oracle Universal Installer...
Checking Temp space: must be greater than 120 MB. Actual 31642 MB Passed
Checking swap space: must be greater than 150 MB. Actual 383 MB Passed
Checking monitor: must be configured to display at least 256 colors. Actual 16777216 Passed
Preparing to launch Oracle Universal Installer from /tmp/OraInstall2014-04-29_10-53-18PM. Please wait ...[grid@rhel_linux_asm grid]$
截圖如下:
17. 安裝過程
[grid@localhost ~]$ /home/grid/grid/runInstaller
Starting Oracle Universal Installer...
Checking Temp space: must be greater than 120 MB. Actual 38826 MB Passed
Checking swap space: must be greater than 150 MB. Actual 4095 MB Passed
Checking monitor: must be configured to display at least 256 colors. Actual 16777216 Passed
Preparing to launch Oracle Universal Installer from /tmp/OraInstall2013-10-17_03-31-41PM. Please wait ...[grid@localhost ~]$
17.1.
17.2.
17.3.
17.4.
 17.5.
17.5.
17.6.
17.6.1. 檢查安裝條件

17.6.2.
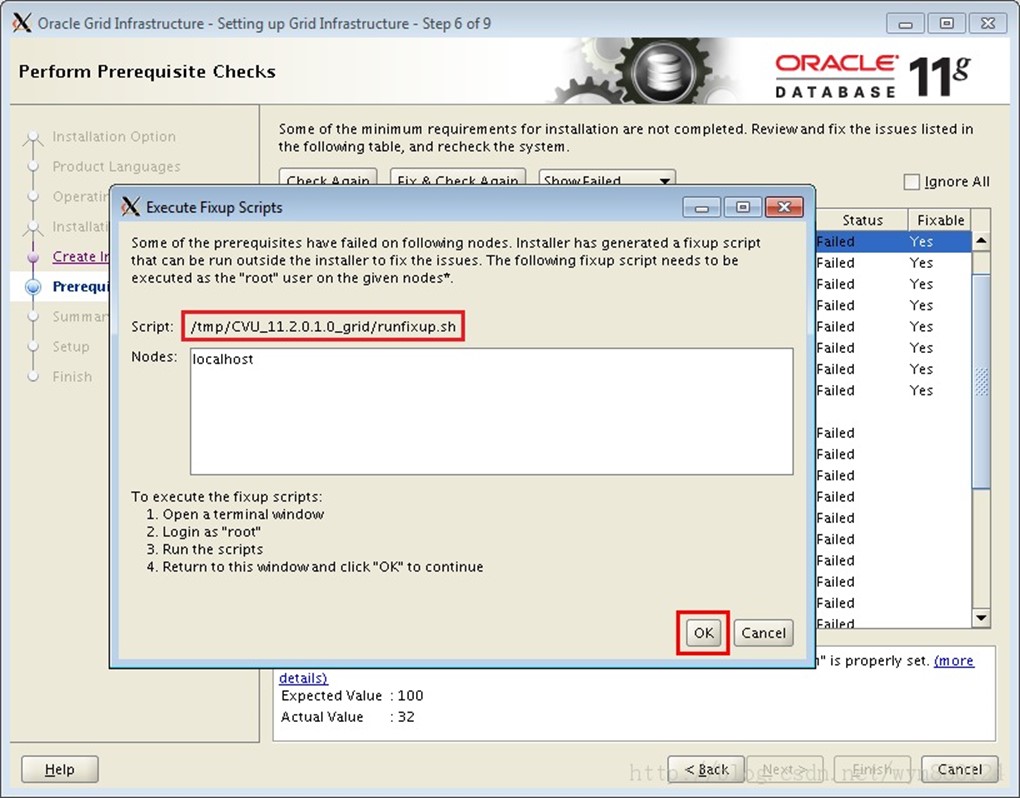
執行修復指令碼:
[root@localhost ~]# /tmp/CVU_11.2.0.1.0_grid/runfixup.sh
Response file being used is :/tmp/CVU_11.2.0.1.0_grid/fixup.response
Enable file being used is :/tmp/CVU_11.2.0.1.0_grid/fixup.enable
Log file location: /tmp/CVU_11.2.0.1.0_grid/orarun.log
Setting Kernel Parameters...
kernel.sem = 250 32000 100 128
fs.file-max = 6815744
net.ipv4.ip_local_port_range = 9000 65500
net.core.rmem_default = 262144
net.core.wmem_default = 262144
net.core.rmem_max = 4194304
net.core.wmem_max = 1048576
fs.aio-max-nr = 1048576
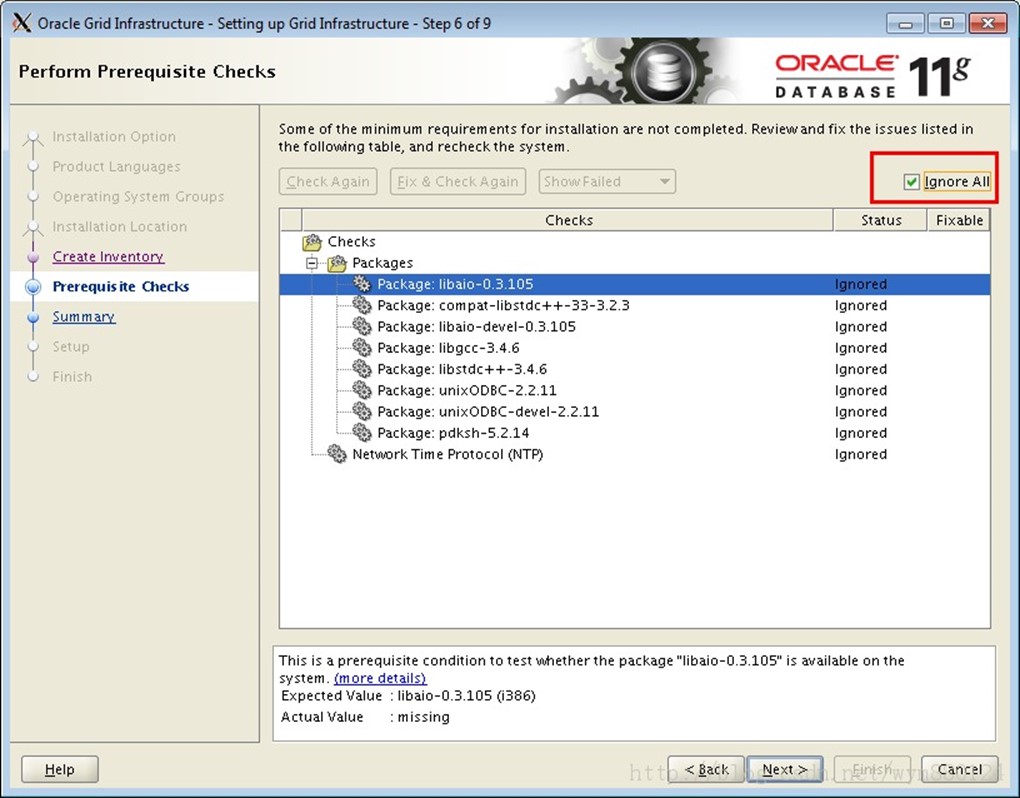
17.6.3. 安裝缺失軟體包
# yum install -y package_name
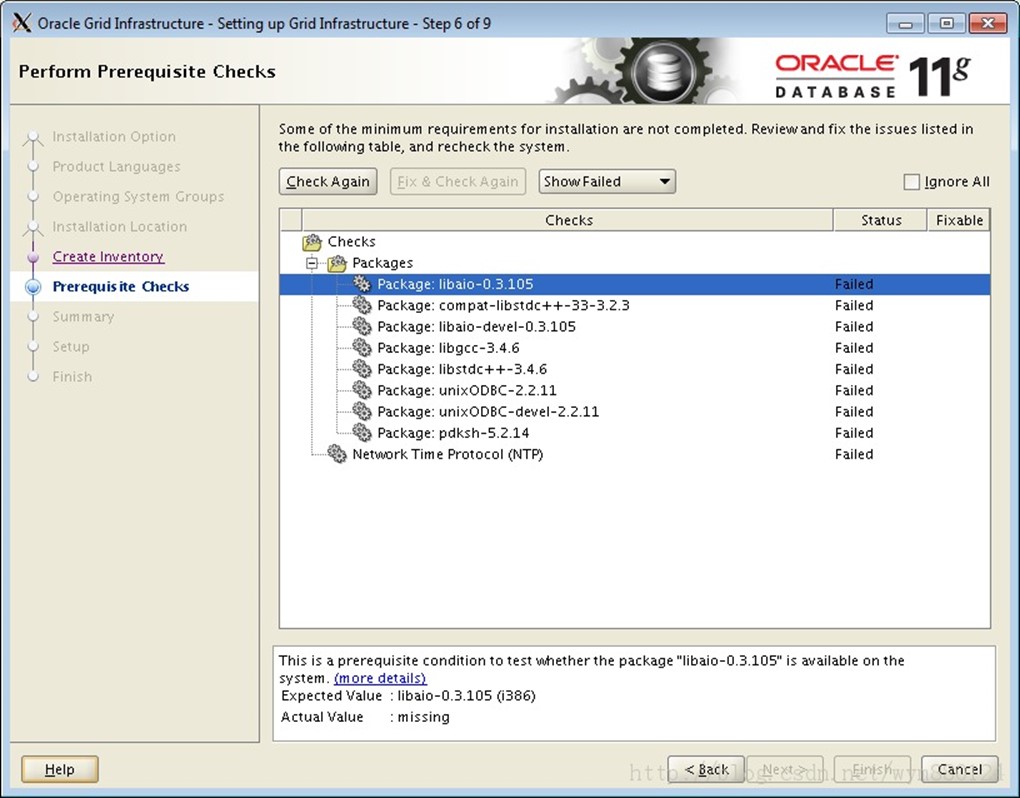
這些軟體包其實已安裝,只不過因為 Oracle Linux 6.4 自帶的軟體包版本高於檢查版本,所以檢查不透過,忽略即可。
Oracle Linux 6.4 的安裝光碟中無 pdksh 軟體包,安裝 ksh 軟體包即可。
# yum install -y ksh
因為沒有 NTP 時鐘伺服器,所以 NTP 檢查不透過,忽略即可。
17.6.4.
17.7.

17.8.
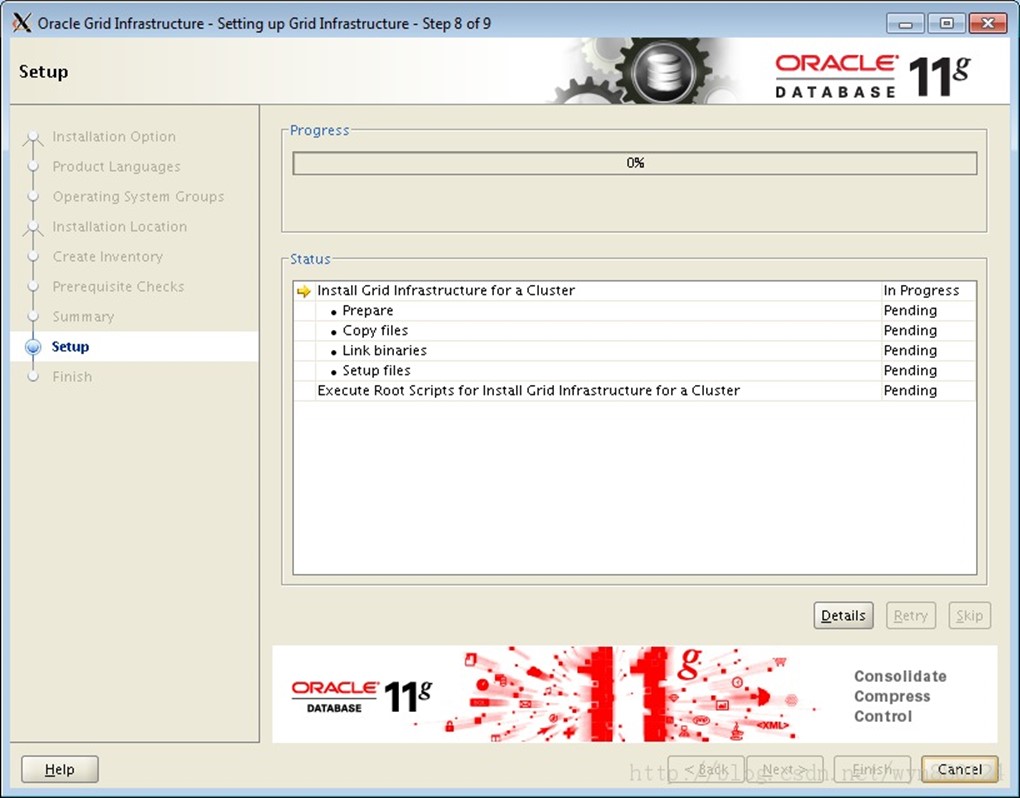
17.9. 安裝時間較長,請耐心等待。

-
最後的執行指令碼步驟
安裝過程中會彈出對話方塊,提示你以 root 身份執行兩個指令碼:
[root@localhost ~]# /u01/app/oraInventory/orainstRoot.sh
Changing permissions of /u01/app/oraInventory.
Adding read,write permissions for group.
Removing read,write,execute permissions for world.
Changing groupname of /u01/app/oraInventory to oinstall.
The execution of the script is complete.
[root@localhost ~]# /u01/app/11.2.0/grid/root.sh
Running Oracle 11g root.sh script...
The following environment variables are set as:
ORACLE_OWNER= grid
ORACLE_HOME= /u01/app/11.2.0/grid
Enter the full pathname of the local bin directory: [/usr/local/bin]: -- 輸入回車
Copying dbhome to /usr/local/bin ...
Copying oraenv to /usr/local/bin ...
Copying coraenv to /usr/local/bin ...
Creating /etc/oratab file...
Entries will be added to the /etc/oratab file as needed by
Database Configuration Assistant when a database is created
Finished running generic part of root.sh script.
Now product-specific root actions will be performed.
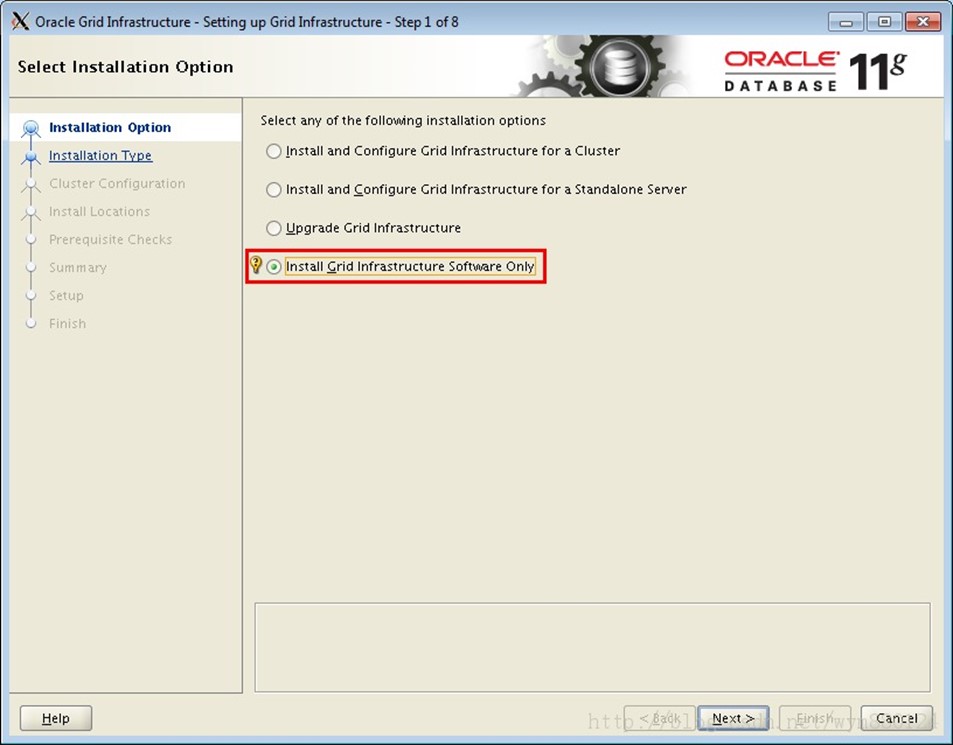
To configure Grid Infrastructure for a Stand-Alone Server run the following command as the root user: -- 單例項安裝需執行以下指令碼
/u01/app/11.2.0/grid/perl/bin/perl -I/u01/app/11.2.0/grid/perl/lib -I/u01/app/11.2.0/grid/crs/install /u01/app/11.2.0/grid/crs/install/roothas.pl
To configure Grid Infrastructure for a Cluster perform the following steps:
1. Provide values for Grid Infrastructure configuration parameters in the file - /u01/app/11.2.0/grid/crs/install/crsconfig_params. For details on how to do this, see the installation guide.
2. Run the following command as the root user:
/u01/app/11.2.0/grid/perl/bin/perl -I/u01/app/11.2.0/grid/perl/lib -I/u01/app/11.2.0/grid/crs/install /u01/app/11.2.0/grid/crs/install/rootcrs.pl
To update inventory properties for Grid Infrastructure, perform the following
steps. If a pre-11.2 home is already configured, execute the following:
11.2_Home/oui/bin/runInstaller -updateNodeList -silent -local CRS=false ORACLE_HOME=pre-11.2_Home
Always execute the following to register the current home:
11.2_Home/oui/bin/runInstaller -updateNodeList -silent -local CRS=true ORACLE_HOME=11.2_Home.
If either home is shared, provide the additional argument -cfs.
截圖如下:

下邊按照要求執行指令碼:
[root@localhost ~]# /u01/app/11.2.0/grid/perl/bin/perl -I/u01/app/11.2.0/grid/perl/lib -I/u01/app/11.2.0/grid/crs/install /u01/app/11.2.0/grid/crs/install/roothas.pl
2013-10-17 16:18:19: Checking for super user privileges
2013-10-17 16:18:19: User has super user privileges
2013-10-17 16:18:19: Parsing the host name
Using configuration parameter file: /u01/app/11.2.0/grid/crs/install/crsconfig_params
Creating trace directory
/u01/app/11.2.0/grid/bin/clscfg.bin: error while loading shared libraries: libcap.so.1: cannot open shared object file: No such file or directory -- 報錯
Failed to create keys in the OLR, rc = 32512, 32512
OLR configuration failed
[root@localhost ~]#

解決報錯:
17.9.1. 檢查作業系統中 libcap.so 是否已安裝
如果是 64 位系統,i686 和 x86_64 都要安裝。
# yum install -y libcap*.i686
# yum install -y libcap*.x86_64
[root@localhost ~]# rpm -qa | grep libcap
libcap-ng-0.6.4-3.el6_0.1.i686
libcap-2.16-5.5.el6.x86_64
libcap-devel-2.16-5.5.el6.x86_64
libcap-devel-2.16-5.5.el6.i686
libcap-ng-0.6.4-3.el6_0.1.x86_64
libcap-2.16-5.5.el6.i686
libcap-ng-devel-0.6.4-3.el6_0.1.i686
libcap-ng-devel-0.6.4-3.el6_0.1.x86_64
[root@localhost ~]#
17.9.2. 檢查 libcap.so 檔案
[root@localhost ~]# ll /lib64/libcap.so*
lrwxrwxrwx 1 root root 11 Oct 17 16:28 /lib64/libcap.so -> libcap.so.2
lrwxrwxrwx. 1 root root 14 Oct 16 15:22 /lib64/libcap.so.2 -> libcap.so.2.16
-rwxr-xr-x 1 root root 19016 Oct 13 2011 /lib64/libcap.so.2.16
[root@localhost ~]#
17.9.3.
[root@localhost ~]# ln -s /lib64/libcap.so.2.16 /lib64/libcap.so.1
[root@localhost ~]#ln -s /lib64/libcap.so.2 /lib64/libcap.so
[root@localhost ~]# ll /lib64/libcap.so*
lrwxrwxrwx 1 root root 11 Oct 17 16:28 /lib64/libcap.so -> libcap.so.2
lrwxrwxrwx 1 root root 21 Oct 17 17:01 /lib64/libcap.so.1 -> /lib64/libcap.so.2.16
lrwxrwxrwx. 1 root root 14 Oct 16 15:22 /lib64/libcap.so.2 -> libcap.so.2.16
-rwxr-xr-x 1 root root 19016 Oct 13 2011 /lib64/libcap.so.2.16
[root@localhost ~]#
17.9.4. 重新執行 /u01/app/11.2.0/grid/root.sh 指令碼
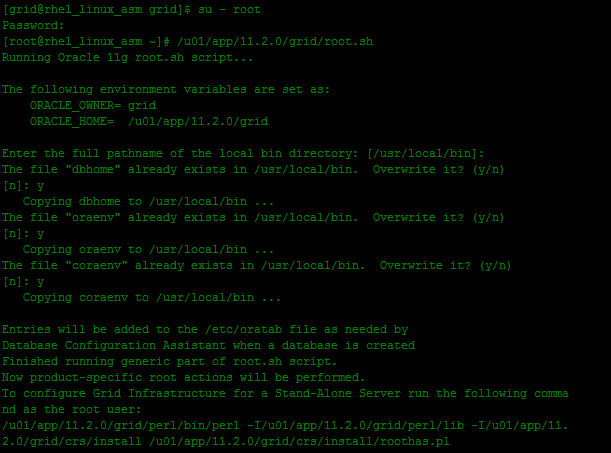
[root@localhost ~]# /u01/app/11.2.0/grid/root.sh
Running Oracle 11g root.sh script...
The following environment variables are set as:
ORACLE_OWNER= grid
ORACLE_HOME= /u01/app/11.2.0/grid
Enter the full pathname of the local bin directory: [/usr/local/bin]:
The file "dbhome" already exists in /usr/local/bin. Overwrite it? (y/n)
[n]: y -- 輸入 y 覆蓋安裝
Copying dbhome to /usr/local/bin ...
The file "oraenv" already exists in /usr/local/bin. Overwrite it? (y/n)
[n]: y -- 輸入 y 覆蓋安裝
Copying oraenv to /usr/local/bin ...
The file "coraenv" already exists in /usr/local/bin. Overwrite it? (y/n)
[n]: y -- 輸入 y 覆蓋安裝
Copying coraenv to /usr/local/bin ...
Entries will be added to the /etc/oratab file as needed by
Database Configuration Assistant when a database is created
Finished running generic part of root.sh script.
Now product-specific root actions will be performed.
To configure Grid Infrastructure for a Stand-Alone Server run the following command as the root user:
/u01/app/11.2.0/grid/perl/bin/perl -I/u01/app/11.2.0/grid/perl/lib -I/u01/app/11.2.0/grid/crs/install /u01/app/11.2.0/grid/crs/install/roothas.pl
To configure Grid Infrastructure for a Cluster perform the following steps:
1. Provide values for Grid Infrastructure configuration parameters in the file - /u01/app/11.2.0/grid/crs/install/crsconfig_params. For details on how to do this, see the installation guide.
2. Run the following command as the root user:
/u01/app/11.2.0/grid/perl/bin/perl -I/u01/app/11.2.0/grid/perl/lib -I/u01/app/11.2.0/grid/crs/install /u01/app/11.2.0/grid/crs/install/rootcrs.pl
To update inventory properties for Grid Infrastructure, perform the following
steps. If a pre-11.2 home is already configured, execute the following:
11.2_Home/oui/bin/runInstaller -updateNodeList -silent -local CRS=false ORACLE_HOME=pre-11.2_Home
Always execute the following to register the current home:
11.2_Home/oui/bin/runInstaller -updateNodeList -silent -local CRS=true ORACLE_HOME=11.2_Home.
If either home is shared, provide the additional argument -cfs.
[root@localhost ~]# /u01/app/11.2.0/grid/perl/bin/perl -I/u01/app/11.2.0/grid/perl/lib -I/u01/app/11.2.0/grid/crs/install /u01/app/11.2.0/grid/crs/install/roothas.pl
2013-10-17 17:04:58: Checking for super user privileges
2013-10-17 17:04:58: User has super user privileges
2013-10-17 17:04:58: Parsing the host name
Using configuration parameter file: /u01/app/11.2.0/grid/crs/install/crsconfig_params
Improper Oracle Clusterware configuration found on this host
Deconfigure the existing cluster configuration before starting -- 報錯
to configure a new Clusterware
run '/u01/app/11.2.0/grid/crs/install/rootcrs.pl -deconfig'
to configure existing failed configuration and then rerun root.sh
17.9.5. 解決步驟 4) 中的錯誤
[root@localhost ~]# /u01/app/11.2.0/grid/crs/install/roothas.pl -verbose -delete -force
2013-10-17 18:25:15: Checking for super user privileges
2013-10-17 18:25:15: User has super user privileges
2013-10-17 18:25:15: Parsing the host name
Using configuration parameter file: /u01/app/11.2.0/grid/crs/install/crsconfig_params
CRS-4639: Could not contact Oracle High Availability Services
CRS-4000: Command Stop failed, or completed with errors.
CRS-4639: Could not contact Oracle High Availability Services
CRS-4000: Command Delete failed, or completed with errors.
CRS-4544: Unable to connect to OHAS
CRS-4000: Command Stop failed, or completed with errors.
/u01/app/11.2.0/grid/bin/acfsdriverstate: line 51: /lib/acfstoolsdriver.sh: No such file or directory
/u01/app/11.2.0/grid/bin/acfsdriverstate: line 51: exec: /lib/acfstoolsdriver.sh: cannot execute: No such file or directory
Successfully deconfigured Oracle Restart stack
[root@localhost ~]#
17.9.6. 重新執行 /u01/app/11.2.0/grid/root.sh 指令碼
[root@localhost ~]# /u01/app/11.2.0/grid/root.sh
Running Oracle 11g root.sh script...
The following environment variables are set as:
ORACLE_OWNER= grid
ORACLE_HOME= /u01/app/11.2.0/grid
Enter the full pathname of the local bin directory: [/usr/local/bin]:
The file "dbhome" already exists in /usr/local/bin. Overwrite it? (y/n)
[n]: y
Copying dbhome to /usr/local/bin ...
The file "oraenv" already exists in /usr/local/bin. Overwrite it? (y/n)
[n]: y
Copying oraenv to /usr/local/bin ...
The file "coraenv" already exists in /usr/local/bin. Overwrite it? (y/n)
[n]: y
Copying coraenv to /usr/local/bin ...
Entries will be added to the /etc/oratab file as needed by
Database Configuration Assistant when a database is created
Finished running generic part of root.sh script.
Now product-specific root actions will be performed.
To configure Grid Infrastructure for a Stand-Alone Server run the following command as the root user:
/u01/app/11.2.0/grid/perl/bin/perl -I/u01/app/11.2.0/grid/perl/lib -I/u01/app/11.2.0/grid/crs/install /u01/app/11.2.0/grid/crs/install/roothas.pl
To configure Grid Infrastructure for a Cluster perform the following steps:
1. Provide values for Grid Infrastructure configuration parameters in the file - /u01/app/11.2.0/grid/crs/install/crsconfig_params. For details on how to do this, see the installation guide.
2. Run the following command as the root user:
/u01/app/11.2.0/grid/perl/bin/perl -I/u01/app/11.2.0/grid/perl/lib -I/u01/app/11.2.0/grid/crs/install /u01/app/11.2.0/grid/crs/install/rootcrs.pl
To update inventory properties for Grid Infrastructure, perform the following
steps. If a pre-11.2 home is already configured, execute the following:
11.2_Home/oui/bin/runInstaller -updateNodeList -silent -local CRS=false ORACLE_HOME=pre-11.2_Home
Always execute the following to register the current home:
11.2_Home/oui/bin/runInstaller -updateNodeList -silent -local CRS=true ORACLE_HOME=11.2_Home.
If either home is shared, provide the additional argument -cfs.
[root@localhost ~]# /u01/app/11.2.0/grid/perl/bin/perl -I/u01/app/11.2.0/grid/perl/lib -I/u01/app/11.2.0/grid/crs/install /u01/app/11.2.0/grid/crs/install/roothas.pl
2013-10-17 18:27:55: Checking for super user privileges
2013-10-17 18:27:55: User has super user privileges
2013-10-17 18:27:55: Parsing the host name
Using configuration parameter file: /u01/app/11.2.0/grid/crs/install/crsconfig_params
LOCAL ADD MODE
Creating OCR keys for user 'grid', privgrp 'oinstall'..
Operation successful.
CRS-4664: Node localhost successfully pinned.
Adding daemon to inittab
CRS-4124: Oracle High Availability Services startup failed. -- 報錯
CRS-4000: Command Start failed, or completed with errors.
ohasd failed to start: Inappropriate ioctl for device
ohasd failed to start: Inappropriate ioctl for device at /u01/app/11.2.0/grid/crs/install/roothas.pl line 296.
[root@localhost ~]#
這是 11.0.2.1 的一個 BUG,如果安裝11.2.0.3的話就不存在這個問題
17.9.7. 解決 BUG
17.9.7.1. 回滾 /u01/app/11.2.0/grid/root.sh 產生的操作
[root@localhost ~]# /u01/app/11.2.0/grid/crs/install/roothas.pl -verbose -delete -force
2013-10-17 18:45:42: Checking for super user privileges
2013-10-17 18:45:42: User has super user privileges
2013-10-17 18:45:42: Parsing the host name
Using configuration parameter file: /u01/app/11.2.0/grid/crs/install/crsconfig_params
CRS-4639: Could not contact Oracle High Availability Services
CRS-4000: Command Stop failed, or completed with errors.
CRS-4639: Could not contact Oracle High Availability Services
CRS-4000: Command Delete failed, or completed with errors.
CRS-4544: Unable to connect to OHAS
CRS-4000: Command Stop failed, or completed with errors.
/u01/app/11.2.0/grid/bin/acfsdriverstate: line 51: /lib/acfstoolsdriver.sh: No such file or directory
/u01/app/11.2.0/grid/bin/acfsdriverstate: line 51: exec: /lib/acfstoolsdriver.sh: cannot execute: No such file or directory
Successfully deconfigured Oracle Restart stack
[root@localhost ~]#
17.9.7.2. 在執行 root.sh 指令碼出現 Adding daemon to inittab 時,以 root 身份立即執行下面的命令:
# /bin/dd if=/var/tmp/.oracle/npohasd of=/dev/nullbs=1024 count=1
如果出現 /bin/dd: opening `/var/tmp/.oracle/npohasd': No such file or directory,說明檔案還沒有生成,繼續執行,直到能執行為止。
同時開兩個 SSH 會話進行下面兩步操作
[root@localhost ~]# /bin/dd if=/var/tmp/.oracle/npohasd of=/dev/nullbs=1024 count=1
/bin/dd: opening `/var/tmp/.oracle/npohasd': No such file or directory
[root@localhost ~]# /bin/dd if=/var/tmp/.oracle/npohasd of=/dev/nullbs=1024 count=1
[root@localhost ~]# /u01/app/11.2.0/grid/root.sh
Running Oracle 11g root.sh script...
The following environment variables are set as:
ORACLE_OWNER= grid
ORACLE_HOME= /u01/app/11.2.0/grid
Enter the full pathname of the local bin directory: [/usr/local/bin]:
The file "dbhome" already exists in /usr/local/bin. Overwrite it? (y/n)
[n]: y
Copying dbhome to /usr/local/bin ...
The file "oraenv" already exists in /usr/local/bin. Overwrite it? (y/n)
[n]: y
Copying oraenv to /usr/local/bin ...
The file "coraenv" already exists in /usr/local/bin. Overwrite it? (y/n)
[n]: y
Copying coraenv to /usr/local/bin ...
Entries will be added to the /etc/oratab file as needed by
Database Configuration Assistant when a database is created
Finished running generic part of root.sh script.
Now product-specific root actions will be performed.
To configure Grid Infrastructure for a Stand-Alone Server run the following command as the root user:
/u01/app/11.2.0/grid/perl/bin/perl -I/u01/app/11.2.0/grid/perl/lib -I/u01/app/11.2.0/grid/crs/install /u01/app/11.2.0/grid/crs/install/roothas.pl
To configure Grid Infrastructure for a Cluster perform the following steps:
1. Provide values for Grid Infrastructure configuration parameters in the file - /u01/app/11.2.0/grid/crs/install/crsconfig_params. For details on how to do this, see the installation guide.
2. Run the following command as the root user:
/u01/app/11.2.0/grid/perl/bin/perl -I/u01/app/11.2.0/grid/perl/lib -I/u01/app/11.2.0/grid/crs/install /u01/app/11.2.0/grid/crs/install/rootcrs.pl
To update inventory properties for Grid Infrastructure, perform the following
steps. If a pre-11.2 home is already configured, execute the following:
11.2_Home/oui/bin/runInstaller -updateNodeList -silent -local CRS=false ORACLE_HOME=pre-11.2_Home
Always execute the following to register the current home:
11.2_Home/oui/bin/runInstaller -updateNodeList -silent -local CRS=true ORACLE_HOME=11.2_Home.
If either home is shared, provide the additional argument -cfs.
[root@localhost ~]# /u01/app/11.2.0/grid/perl/bin/perl -I/u01/app/11.2.0/grid/perl/lib -I/u01/app/11.2.0/grid/crs/install /u01/app/11.2.0/grid/crs/install/roothas.pl
2013-10-17 18:55:45: Checking for super user privileges
2013-10-17 18:55:45: User has super user privileges
2013-10-17 18:55:45: Parsing the host name
Using configuration parameter file: /u01/app/11.2.0/grid/crs/install/crsconfig_params
LOCAL ADD MODE
Creating OCR keys for user 'grid', privgrp 'oinstall'..
Operation successful.
CRS-4664: Node localhost successfully pinned.
Adding daemon to inittab
CRS-4123: Oracle High Availability Services has been started.
ohasd is starting
ADVM/ACFS is not supported on redhat-release-server-6Server-6.4.0.4.0.1.el6.x86_64
localhost 2013/10/17 18:56:11 /u01/app/11.2.0/grid/cdata/localhost/backup_20131017_185611.olr
Successfully configured Oracle Grid Infrastructure for a Standalone Server
[root@localhost ~]#
17.10. 結束 Grid 安裝
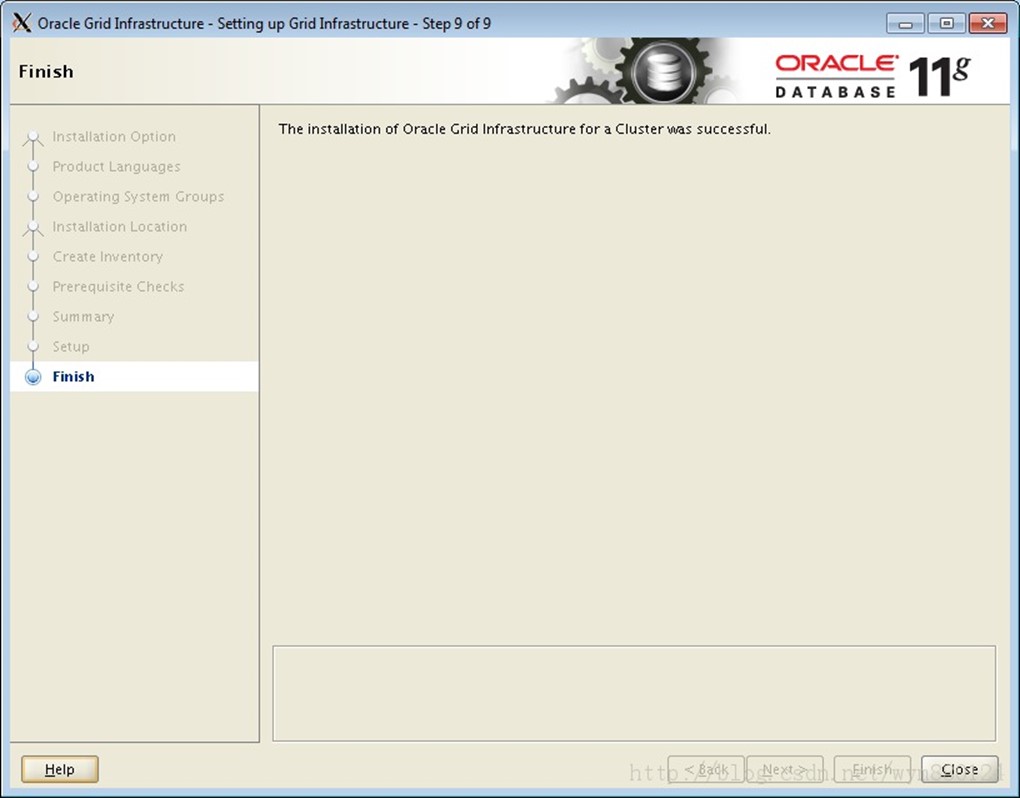
-
11.2.0.3.0 root指令碼
新版本就不會報錯的
[root@rhel6_lhr oraInventory]# /u01/app/grid/11.2.0/root.sh
Performing root user operation for Oracle 11g
The following environment variables are set as:
ORACLE_OWNER= grid
ORACLE_HOME= /u01/app/grid/11.2.0
Enter the full pathname of the local bin directory: [/usr/local/bin]:
The contents of "dbhome" have not changed. No need to overwrite.
The contents of "oraenv" have not changed. No need to overwrite.
The contents of "coraenv" have not changed. No need to overwrite.
Creating /etc/oratab file...
Entries will be added to the /etc/oratab file as needed by
Database Configuration Assistant when a database is created
Finished running generic part of root script.
Now product-specific root actions will be performed.
Using configuration parameter file: /u01/app/grid/11.2.0/crs/install/crsconfig_params
Creating trace directory
LOCAL ADD MODE
Creating OCR keys for user 'grid', privgrp 'oinstall'..
Operation successful.
LOCAL ONLY MODE
Successfully accumulated necessary OCR keys.
Creating OCR keys for user 'root', privgrp 'root'..
Operation successful.
CRS-4664: Node rhel6_lhr successfully pinned.
Adding Clusterware entries to upstart
rhel6_lhr 2014/06/14 22:42:26 /u01/app/grid/11.2.0/cdata/rhel6_lhr/backup_20140614_224226.olr
Successfully configured Oracle Grid Infrastructure for a Standalone Server
-
利用asmca建立磁碟組
[grid@rhel6_lhr ~]$ export DISPLAY=192.168.1.100:0.0
[grid@rhel6_lhr ~]$ xhost +
以 grid 使用者執行 asmca 命令
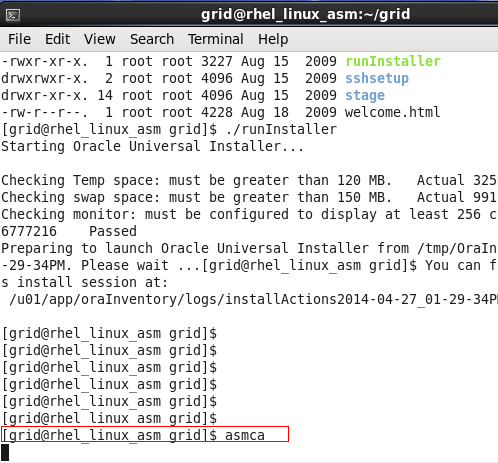
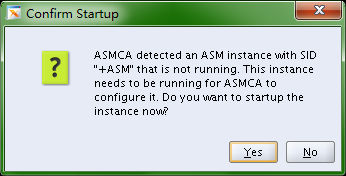
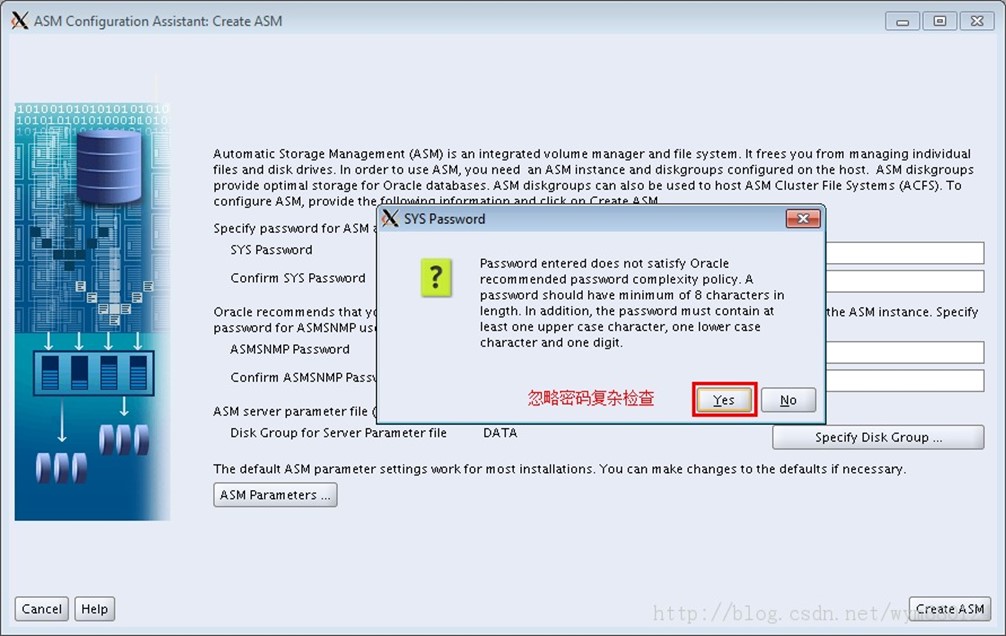
這裡利用asmca建立磁碟組的時候需要ASM例項啟動才能配置,我們點選yes後報錯:
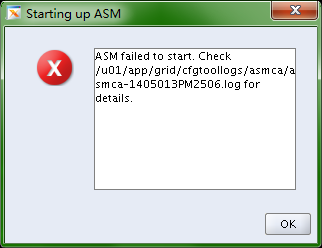
檢視日誌來解決,或者利用命令列來啟動asm例項:
18.1.
SYS Password -- sys
ASMSNMP Password -- asmsnmp
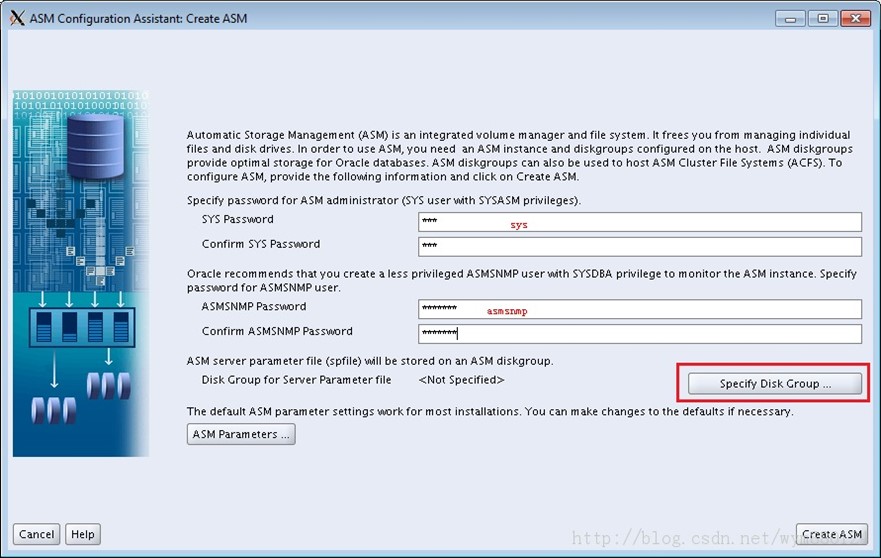
18.2.
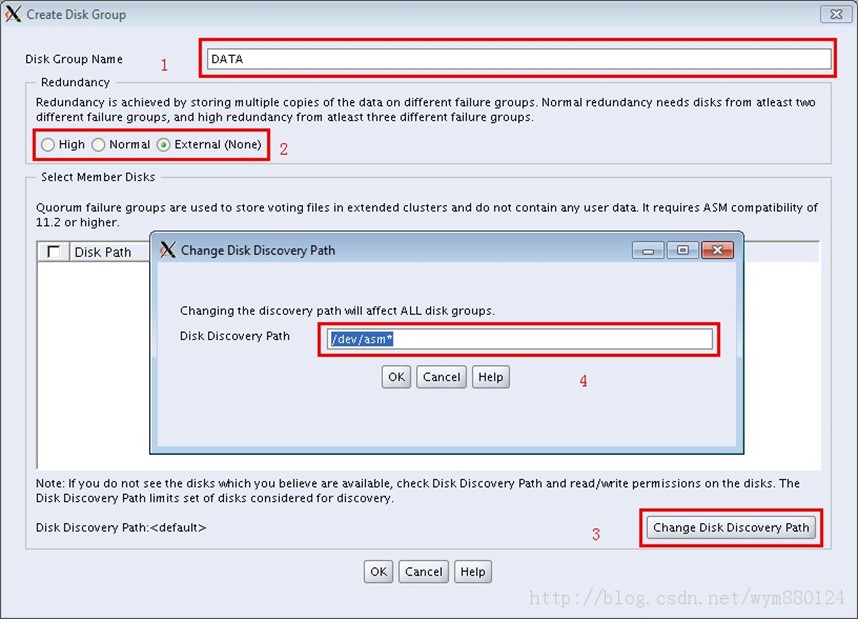
Step 1. 給磁碟組命名
Step 2. 選擇冗餘方式
High: 為每個分配單元建立三個副本(因此至少需要三個磁碟)
Normal: 單映象(預設)
External: 不會映象,假定底層存在一個 LVM 並且它正在執行認為適當的任何一種 RAID 級別。
Step 3. 新增磁碟掛載位置
Step 4. 輸入磁碟掛載位置和名稱
18.3.
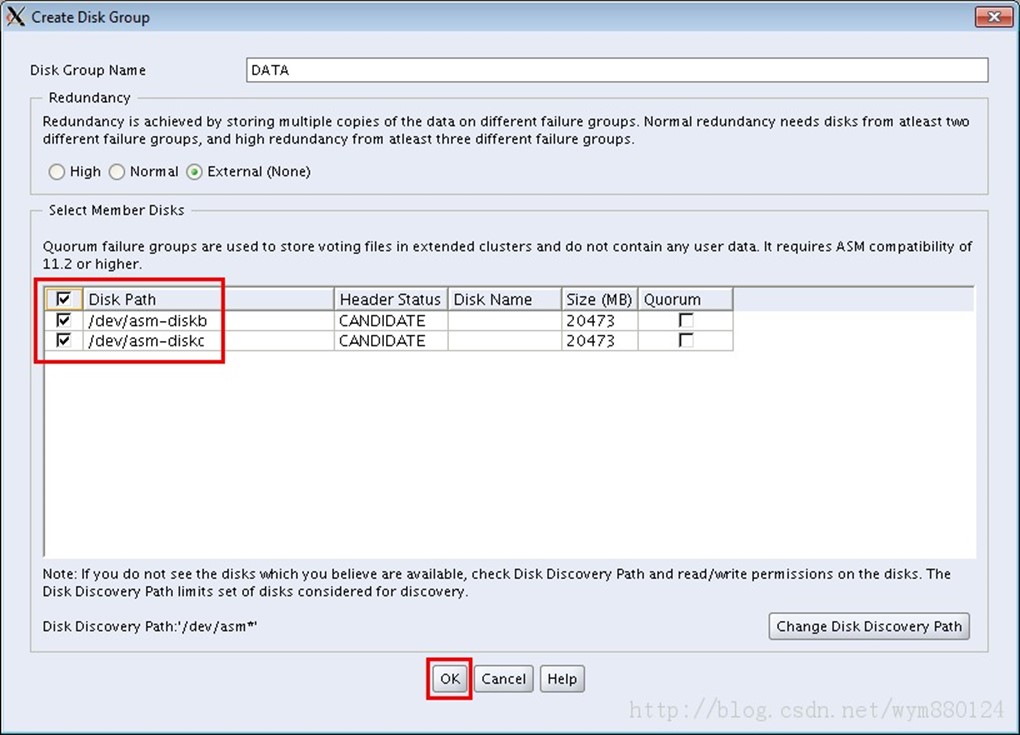 這裡我只建立了兩個磁碟,一個磁碟組,沒有建立 FRA 區域。如果你建立了 3 個或者 3 個以上磁碟,可以留一部分給後面的 FRA 使用(什麼是FRA? 就是閃回區)。
18.4. 點選 Create ASM 建立 Disk Group

如果點選yes後報如下的錯誤,則說明前邊的Oracle Grid Infrastructure沒有配置好,需要重新配置:
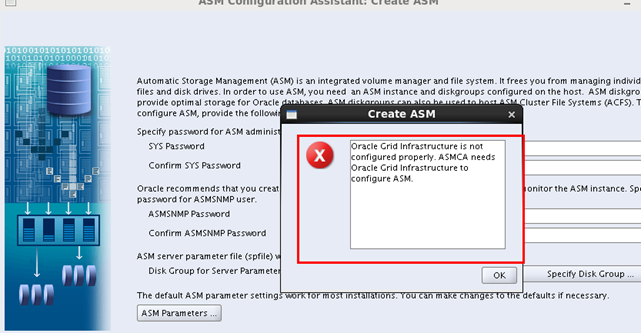
配置好Oracle Grid Infrastructure 後,重新點選 Create ASM 建立 Disk Group
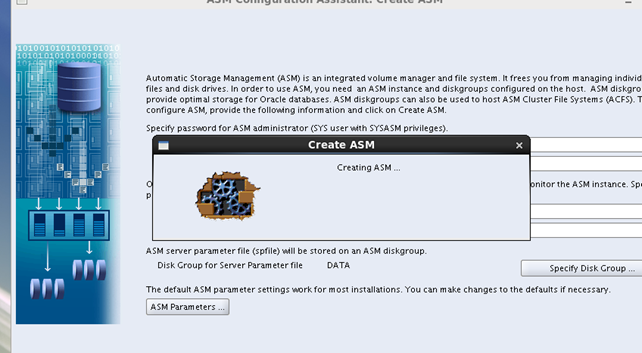
稍等一會後(其實大約需要1分鐘吧):
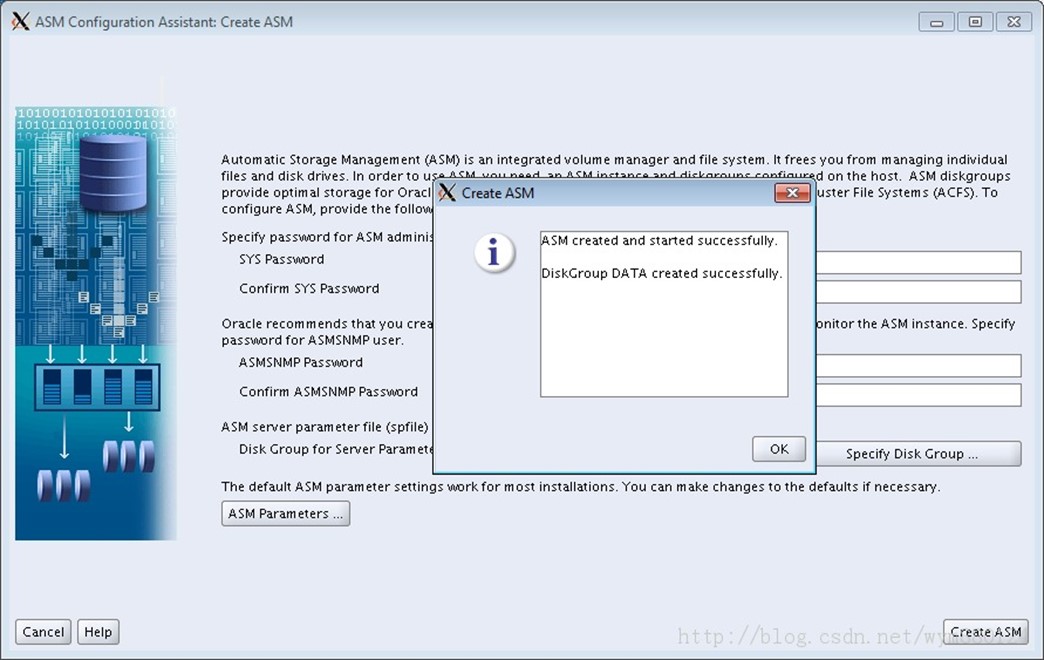
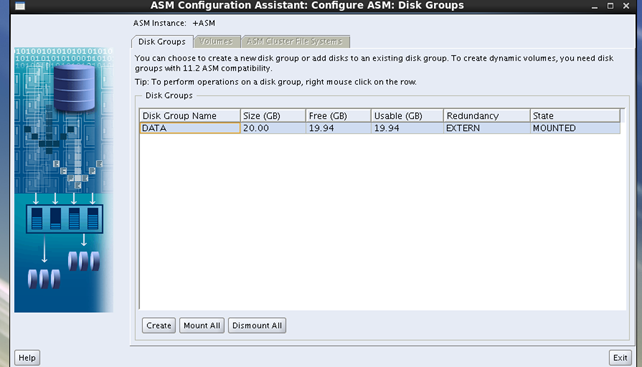
18.5. Disk Group 建立完成,退出。
-
使用netmgr建立監聽
安裝grid後採用grid來管理監聽,所以監聽也是在grid使用者下建立的,建立辦法參考下邊的Oracle使用者下建立監聽的辦法。

-
透過 grid 使用者執行 crs_stat -t 檢查 ASM 是否安裝好,如下所示表示搭建 OK。
[grid@localhost ~]$ crs_stat -t
Name Type Target State Host
------------------------
ora.DATA.dg ora....up.type ONLINE ONLINE localhost
ora.asm ora.asm.type ONLINE ONLINE localhost
ora.cssd ora.cssd.type ONLINE ONLINE localhost
ora.diskmon ora....on.type ONLINE ONLINE localhost
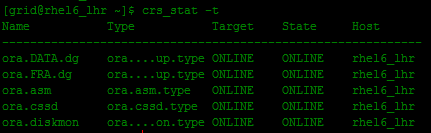
[grid@localhost ~]$
[grid@rhel_linux_asm ~]$ echo $ORACLE_SID
+ASM
[grid@rhel_linux_asm ~]$ sqlplus / as sysasm
SQL*Plus: Release 11.2.0.1.0 Production on Mon Apr 28 23:07:24 2014
Copyright (c) 1982, 2009, Oracle. All rights reserved.
Connected to an idle instance.
SQL> startup
ASM instance started
Total System Global Area 283930624 bytes
Fixed Size 2212656 bytes
Variable Size 256552144 bytes
ASM Cache 25165824 bytes
ASM diskgroups mounted
SQL> select * from v$version;
BANNER
--------------------------------------------------------------------------------
Oracle Database 11g Enterprise Edition Release 11.2.0.1.0 - 64bit Production
PL/SQL Release 11.2.0.1.0 - Production
CORE 11.2.0.1.0 Production
TNS for Linux: Version 11.2.0.1.0 - Production
NLSRTL Version 11.2.0.1.0 - Production
SQL> select name,total_mb from v$asm_diskgroup;
NAME TOTAL_MB
------------------------------ ----------
DATA 20480
SQL> select name,group_number,file_number,alias_index,alias_directory,system_created from v$asm_alias;
-
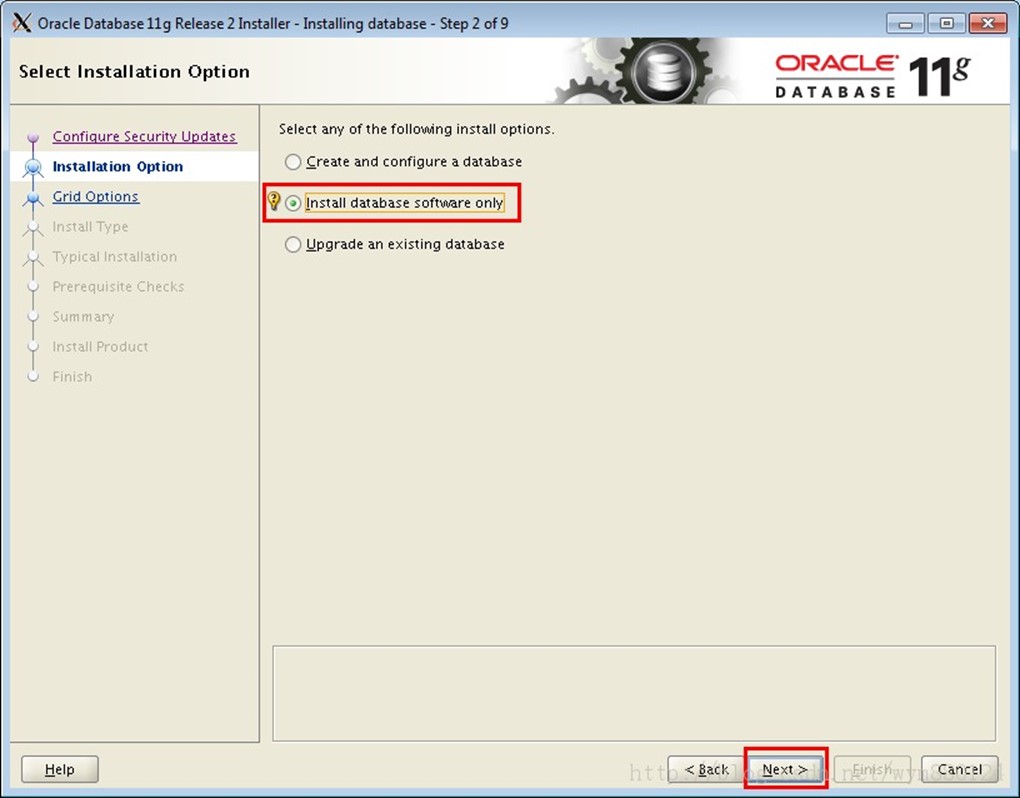
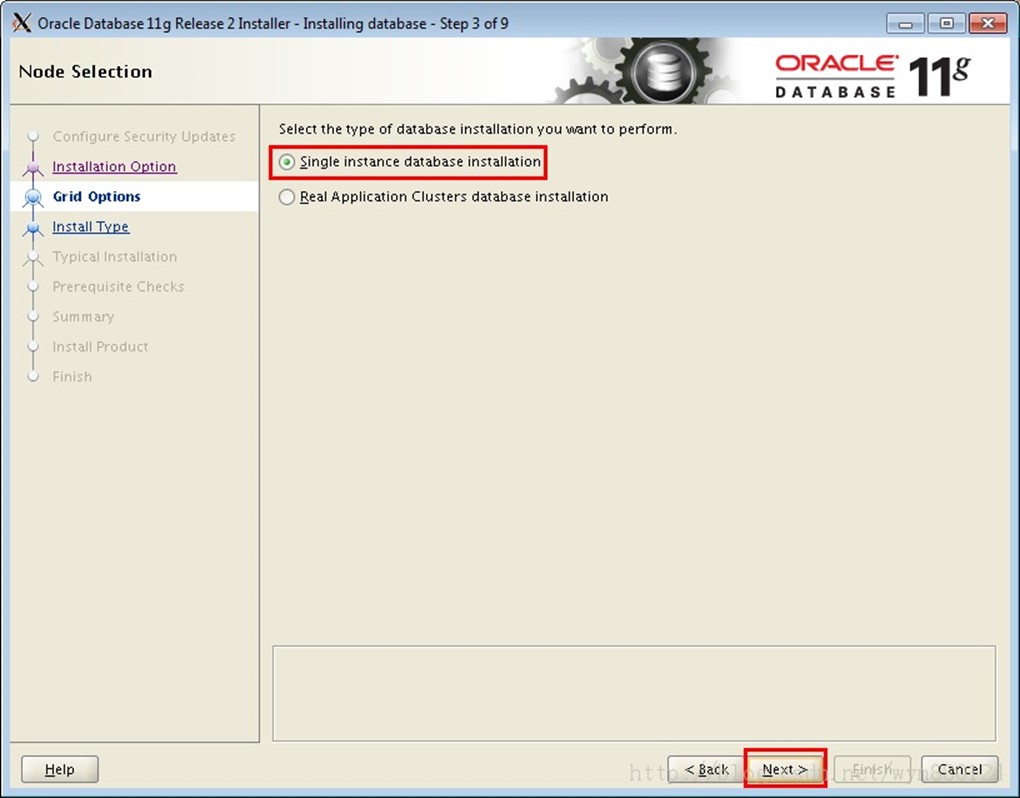
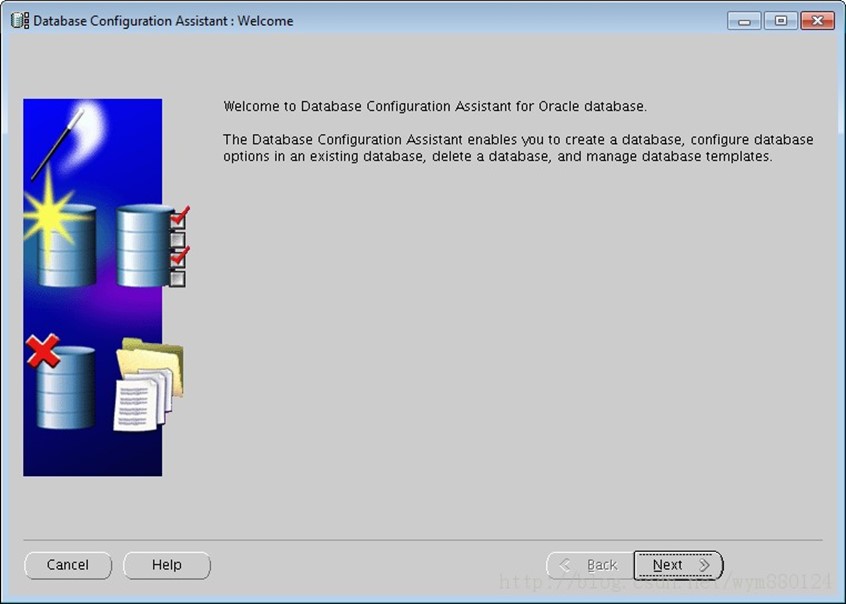
開始搭建 Oracle 資料庫
如果系統之前搭建過ORACLE資料庫的話就可以不用再搭建資料庫了,只需要重新建立一個例項即可。。。。。
20.1. 作為 oracle 使用者登入系統,將安裝包上傳到 Oracle 家目錄。

20.2. 解壓兩個壓縮包
[oracle@localhost ~]$ ll linux*
-rw-r--r-- 1 oracle oinstall 1239269270 Apr 18 20:44 linux.x64_11gR2_database_1of2.zip
-rw-r--r-- 1 oracle oinstall 1111416131 Apr 18 20:47 linux.x64_11gR2_database_2of2.zip
[oracle@localhost ~]$ unzip linux.x64_11gR2_database_1of2.zip && unzip linux.x64_11gR2_database_2of2.zip
20.3. 執行 runInstaller
[oracle@localhost ~]$ /home/oracle/database/runInstaller
Starting Oracle Universal Installer...
Checking Temp space: must be greater than 120 MB. Actual 30971 MB Passed
Checking swap space: must be greater than 150 MB. Actual 4088 MB Passed
Checking monitor: must be configured to display at least 256 colors. Actual 16777216 Passed
Preparing to launch Oracle Universal Installer from /tmp/OraInstall2013-10-17_08-01-38PM. Please wait ...[oracle@localhost ~]$
20.4.
20.5.
20.6.
20.7.
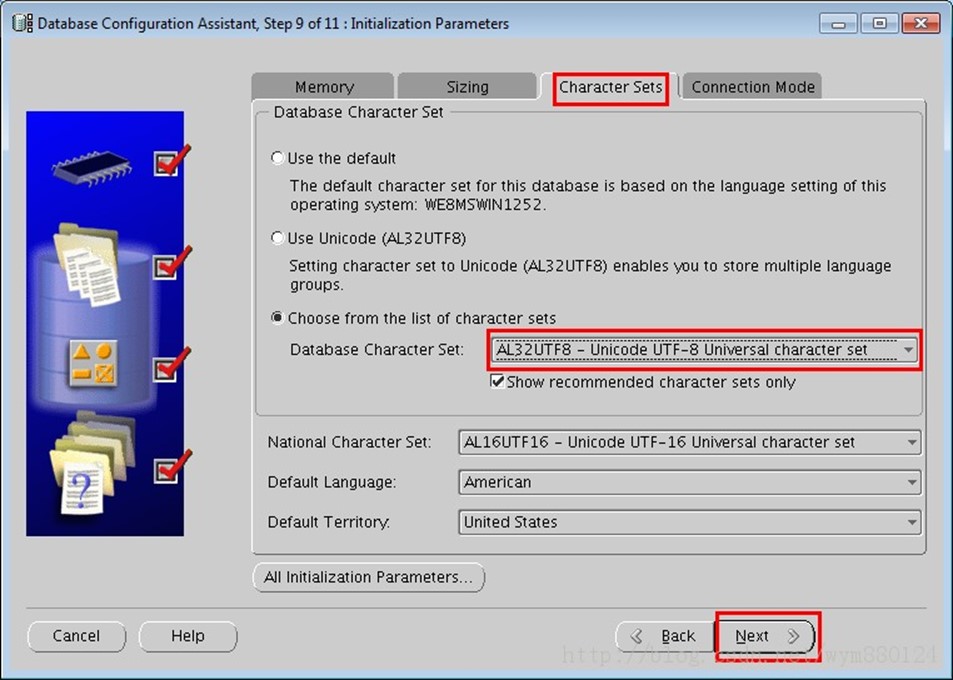
這裡選擇字符集的時候最好把簡體中文安裝上,不然後邊安裝OEM後,網頁瀏覽可能出現會亂碼

20.8.

20.9.
20.10.
20.11.

20.12.
20.13.
安裝時間較長,請耐心等待。

安裝快結束時,會彈出視窗,提示你以 root 身份執行一個指令碼。

[root@localhost ~]# /u01/app/oracle/product/11.2.0/dbhome_1/root.sh
Running Oracle 11g root.sh script...
The following environment variables are set as:
ORACLE_OWNER= oracle
ORACLE_HOME= /u01/app/oracle/product/11.2.0/dbhome_1
Enter the full pathname of the local bin directory: [/usr/local/bin]:
The file "dbhome" already exists in /usr/local/bin. Overwrite it? (y/n)
[n]: y
Copying dbhome to /usr/local/bin ...
The file "oraenv" already exists in /usr/local/bin. Overwrite it? (y/n)
[n]: y
Copying oraenv to /usr/local/bin ...
The file "coraenv" already exists in /usr/local/bin. Overwrite it? (y/n)
[n]: y
Copying coraenv to /usr/local/bin ...
Entries will be added to the /etc/oratab file as needed by
Database Configuration Assistant when a database is created
Finished running generic part of root.sh script.
Now product-specific root actions will be performed.
Finished product-specific root actions.
[root@localhost ~]#
20.14. 結束安裝
-
檢查 $ORACLE_HOME/bin/oracle檔案的所屬組
這一步不是必須的,如果在後邊使用dbca建立資料庫的時候選不到磁碟組的時候就返回來做這一步吧。。。
在RAC或者ORACLE RESTART中,oracle可執行檔案的所屬組是asmadmin。
[root@khm5 bin]# chown oracle:asmadmin oracle
[root@khm5 bin]# ls -l oracle
-rwxr-x--x 1 oracle asmadmin 232399473 Apr 19 07:04 oracle
[root@khm5 bin]# chmod +s oracle
[root@khm5 bin]# ls -l oracle
-rwsr-s--x 1 oracle asmadmin 232399473 Apr 19 07:04 oracle
-
使用 netmgr 建立監聽--Oracle使用者不需要建立
需配置好環境變數,否則會出現找不到命令的情況。
該步驟即建立監聽檔案,也可以從其它地方複製過來,或者自己新建檔案:/u01/app/oracle/product/11.2.0/dbhome_1/network/admin/listener.ora
[oracle@rhel_linux_asm grid]$ netmgr
21.1.
21.2.
21.3.
21.4.
21.5.

21.6.
點選 File --> Save Network Configuration
然後退出,執行完後在以下路徑有檔案:
[oracle@rhel_linux_asm admin]$ pwd
/u01/app/oracle/product/11.2.0/dbhome_1/network/admin
[oracle@rhel_linux_asm admin]$ ll
total 8
drwxr-xr-x. 2 oracle dba 4096 Apr 28 23:24 samples
-rw-r--r--. 1 oracle dba 187 May 7 2007 shrept.lst
[oracle@rhel_linux_asm admin]$ netmgr
[oracle@rhel_linux_asm admin]$ ll
total 12
-rw-r--r--. 1 oracle dba 475 Apr 28 23:47 listener.ora
drwxr-xr-x. 2 oracle dba 4096 Apr 28 23:24 samples
-rw-r--r--. 1 oracle dba 187 May 7 2007 shrept.lst
[oracle@rhel_linux_asm admin]$ cat listener.ora
# listener.ora Network Configuration File: /u01/app/oracle/product/11.2.0/dbhome_1/network/admin/listener.ora
# Generated by Oracle configuration tools.
SID_LIST_LISTENER =
(SID_LIST =
(SID_DESC =
(GLOBAL_DBNAME = orclasm)
(ORACLE_HOME = /u01/app/oracle/product/11.2.0/dbhome_1)
(SID_NAME = orclasm)
)
)
LISTENER =
(DESCRIPTION =
(ADDRESS = (PROTOCOL = TCP)(HOST = rhel_linux_asm)(PORT = 1521))
)
ADR_BASE_LISTENER = /u01/app/oracle
-
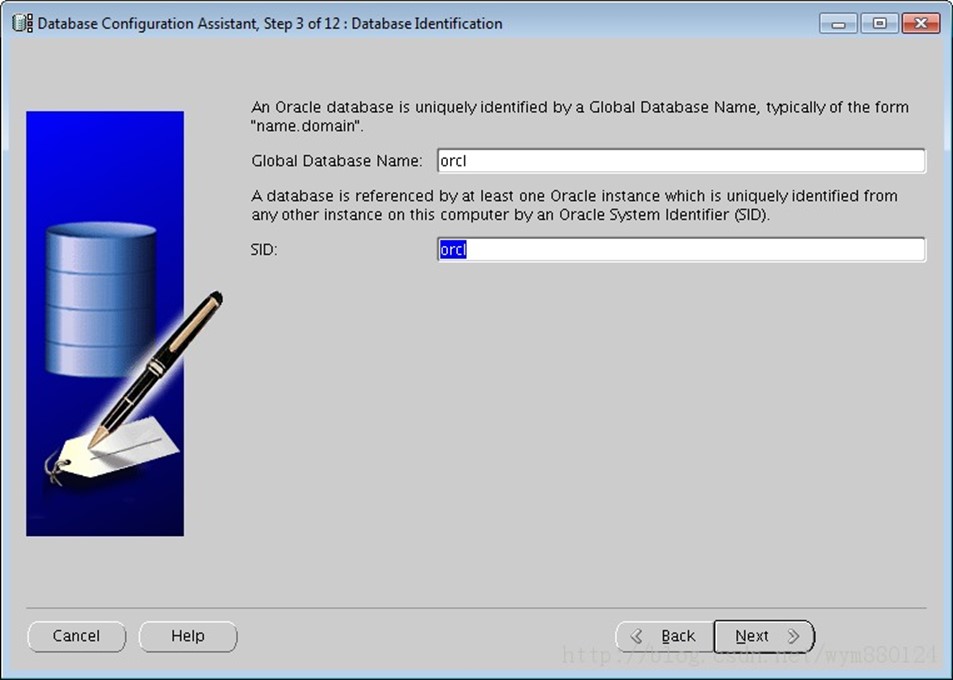
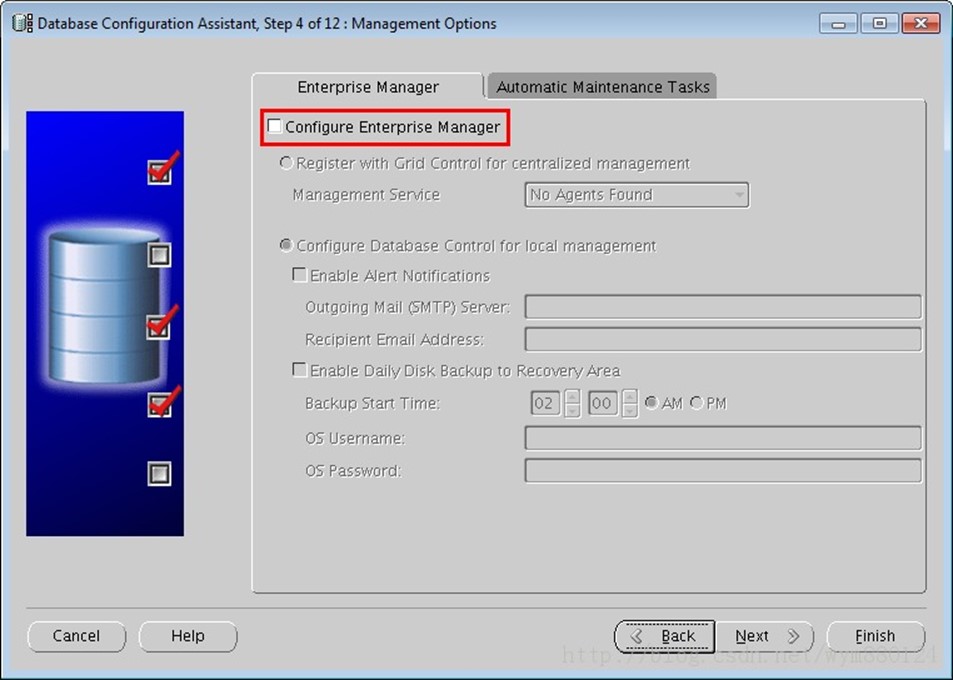
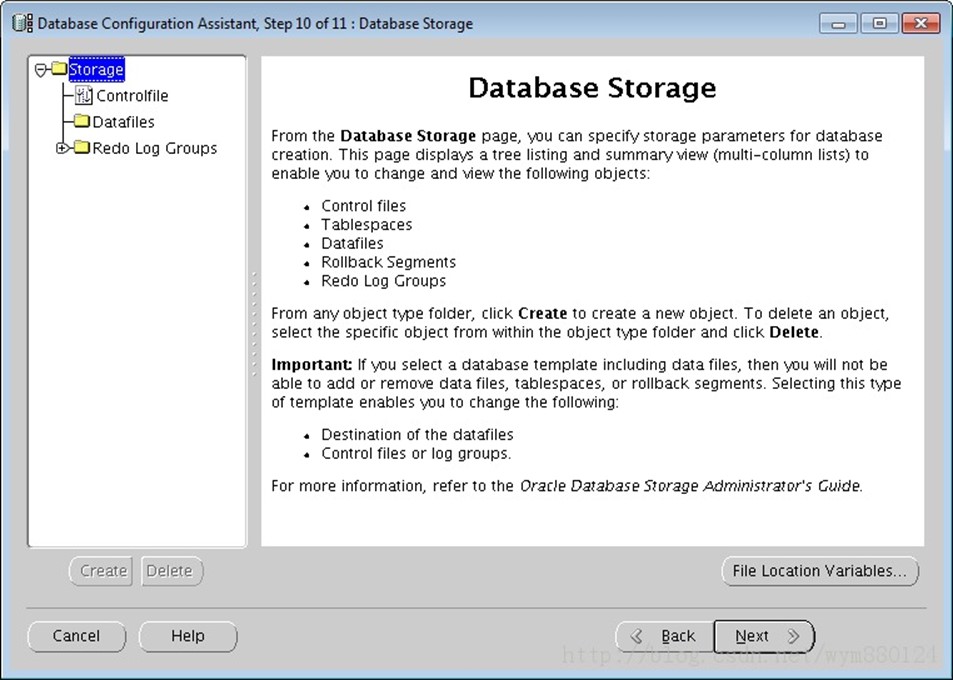
使用 dbca 建立資料庫
以oracle使用者執行dbca命令來建立一個資料庫:
27.2.

27.3.

27.4.
27.5.
27.6.

27.7.

27.8.
這裡如果啟用閃回區和歸檔的話,就選擇fra磁碟組,不啟用的話可以不選擇


27.9.

27.10.
27.11.
27.12.

27.13.
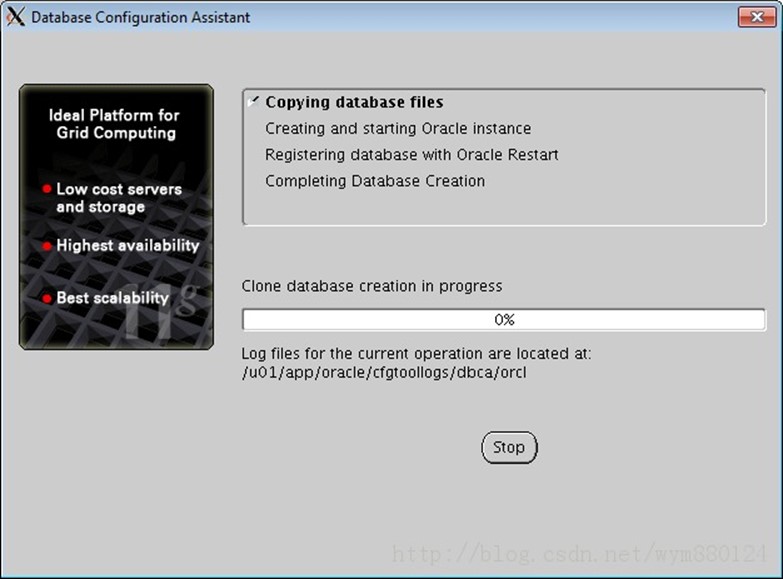
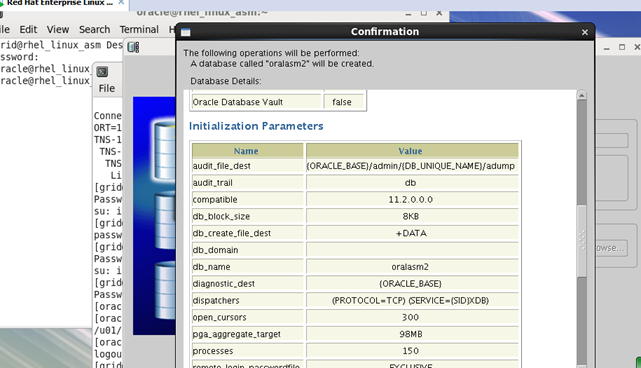
安裝過程中可以檢視日誌:
[root@rhel_linux_asm ~]# cd /u01/app/grid/cfgtoollogs/dbca/oralasm2/
[root@rhel_linux_asm oralasm2]# tail -f trace.log
。。。。。。。
Datafile
'+DATA/oralasm2/datafile/system.256.845998107',
'+DATA/oralasm2/datafile/sysaux.257.845998109',
'+DATA/oralasm2/datafile/undotbs1.258.845998109',
'+DATA/oralasm2/datafile/users.259.845998109'
[Thread-151] [ 2014-04-27 15:29:49.328 CST ] [CloneDBCreationStep.executeImpl:419] Length of OriginalRedoLogsGrNames=3
[Thread-151] [ 2014-04-27 15:29:49.330 CST ] [CloneDBCreationStep.executeImpl:427] 0th redoLogText = GROUP 1 SIZE 51200K
[Thread-151] [ 2014-04-27 15:29:49.331 CST ] [CloneDBCreationStep.executeImpl:427] 1th redoLogText = GROUP 2 SIZE 51200K
[Thread-151] [ 2014-04-27 15:29:49.331 CST ] [CloneDBCreationStep.executeImpl:427] 2th redoLogText = GROUP 3 SIZE 51200K
[Thread-151] [ 2014-04-27 15:29:49.332 CST ] [CloneDBCreationStep.executeImpl:448] createCTLSql=Create controlfile reuse set database "oralasm2"
MAXINSTANCES 8
MAXLOGHISTORY 1
MAXLOGFILES 16
MAXLOGMEMBERS 3
MAXDATAFILES 100
Datafile
'+DATA/oralasm2/datafile/system.256.845998107',
'+DATA/oralasm2/datafile/sysaux.257.845998109',
'+DATA/oralasm2/datafile/undotbs1.258.845998109',
'+DATA/oralasm2/datafile/users.259.845998109'
LOGFILE GROUP 1 SIZE 51200K,
GROUP 2 SIZE 51200K,
GROUP 3 SIZE 51200K RESETLOGS;
[Thread-151] [ 2014-04-27 15:29:55.330 CST ] [CloneDBCreationStep.executeImpl:460] calling zerodbid
[Thread-151] [ 2014-04-27 15:30:02.332 CST ] [CloneDBCreationStep.executeImpl:470] Shutdown database
[Thread-151] [ 2014-04-27 15:30:02.334 CST ] [CloneDBCreationStep.executeImpl:492] Startup ......nomount......
[Thread-151] [ 2014-04-27 15:30:04.131 CST ] [CloneDBCreationStep.executeImpl:500] deleting dummy control file from v$controlfile: +DATA/oralasm2/controlfile/current.260.845998195
[Thread-151] [ 2014-04-27 15:30:08.881 CST ] [CloneDBCreationStep.executeImpl:511] Enabling restricted session.
[Thread-151] [ 2014-04-27 15:30:11.028 CST ] [CloneDBCreationStep.executeImpl:513] alter database "oralasm2" open resetlogs;
[Thread-151] [ 2014-04-27 15:30:29.193 CST ] [CloneDBCreationStep.executeImpl:521] Removing existing services from sourcedb seeddata
[Thread-151] [ 2014-04-27 15:30:30.025 CST ] [CloneDBCreationStep.executeImpl:526] Renaming globale_name
[Thread-151] [ 2014-04-27 15:30:30.163 CST ] [CloneDBCreationStep.executeImpl:542] control file from v$controlfile: +DATA/oralasm2/controlfile/current.260.845998209
[Thread-151] [ 2014-04-27 15:30:30.164 CST ] [CloneDBCreationStep.executeImpl:557] controlfiles("+DATA/oralasm2/controlfile/current.260.845998209")
[Thread-151] [ 2014-04-27 15:30:30.186 CST ] [CloneDBCreationStep.executeImpl:601] Temp file to be added:=+DATA/{DB_UNIQUE_NAME}/temp01.dbf
[Thread-151] [ 2014-04-27 15:30:30.187 CST ] [CloneDBCreationStep.executeImpl:602] Temp file size in KB:=20480
[Thread-151] [ 2014-04-27 15:30:31.603 CST ] [CloneDBCreationStep.executeImpl:632] Establish USERS as the default permanent tablespace of the database
[Thread-151] [ 2014-04-27 15:30:31.704 CST ] [TemplateManager.isInstallTemplate:2300] Selected Template by user:=General Purpose
[Thread-151] [ 2014-04-27 15:30:31.704 CST ] [TemplateManager.isInstallTemplate:2307] The Message Id to be searched:=GENERAL_PURPOSE
。。。。。。。。。
27.14.

-
-
至此,基於 ASM 的 Oracle Database 11g 環境搭建完畢。
-
關閉防火牆--不然客戶端可能連線不上
service iptables stop
[root@rhel6_lhr ~]# service iptables stop
iptables: Setting chains to policy ACCEPT: filter [ OK ]
iptables: Flushing firewall rules: [ OK ]
iptables: Unloading modules: [ OK ]
[root@rhel6_lhr ~]#
-
是否有tnsnames.ora 生成
檢查 /u01/app/oracle/product/11.2.0/dbhome_1/network/ 下是否有 tnsnames.ora,如果沒有就生成以為檔案吧:
/u01/app/oracle/product/11.2.0/dbhome_1/network/admin/tnsnames.ora
orclasm =
(DESCRIPTION =
(ADDRESS = (PROTOCOL = TCP)(HOST = 192.168.128.134)(PORT = 1521))
(CONNECT_DATA =
(SERVER = DEDICATED)
(SERVICE_NAME = orclasm)
)
)
-
配置ORACLE自動啟動
如果不需要系統啟動的時候自動起動則可以不用配置。
-
編輯/etc/oratab
[oracle@dbserver1 ~]$ vi /etc/oratab
orcl:/u01/app/oracle/product/11.2.0/db_1:Y
-
ROOT使用者建立/etc/init.d/dbora
[root@dbserver1 ~]# cat /etc/init.d/dbora
#!/bin/sh
# chkconfig: 345 99 10
# description: Oracle auto start-stop script.
#
# Set ORA_HOME to be equivalent to the $ORACLE_HOME
# from which you wish to execute dbstart and dbshut;
#
# Set ORA_OWNER to the user id of the owner of the
# Oracle database in ORA_HOME.
#ORA_HOME=/u01/app/oracle/product/10.2.0/db_1
#ORA_HOME=/u01/app/oracle/product/11.1.0/db_1
ORA_HOME=/u01/app/oracle/product/11.2.0/db_1
ORA_OWNER=oracle
if [ ! -f $ORA_HOME/bin/dbstart ]
then
echo "Oracle startup: cannot start"
exit
fi
case "$1" in
'start')
# Start the Oracle databases:
# The following command assumes that the oracle login
# will not prompt the user for any values
su - $ORA_OWNER -c "$ORA_HOME/bin/dbstart $ORA_HOME"
touch /var/lock/subsys/dbora
;;
'stop')
# Stop the Oracle databases:
# The following command assumes that the oracle login
# will not prompt the user for any values
su - $ORA_OWNER -c "$ORA_HOME/bin/dbshut $ORA_HOME"
rm -f /var/lock/subsys/dbora
;;
esac
-
加入啟動項
[root@dbserver1 ~]# chmod 750 /etc/init.d/dbora
[root@dbserver1 ~]# chkconfig --add dbora
-
驗證
[oracle@localhost ~]$ sqlplus / as sysdba
SQL*Plus: Release 11.2.0.1.0 Production on Thu Oct 17 21:37:22 2013
Copyright (c) 1982, 2009, Oracle. All rights reserved.
Connected to:
Oracle Database 11g Enterprise Edition Release 11.2.0.1.0 - 64bit Production
With the Partitioning, Automatic Storage Management, OLAP, Data Mining
and Real Application Testing options
SQL> select * from v$version;
BANNER
--------------------------------------------
Oracle Database 11g Enterprise Edition Release 11.2.0.1.0 - 64bit Production
PL/SQL Release 11.2.0.1.0 - Production
CORE 11.2.0.1.0 Production
TNS for Linux: Version 11.2.0.1.0 - Production
NLSRTL Version 11.2.0.1.0 - Production
SQL> select file_name from dba_data_files;
FILE_NAME
--------------------------------------------
+DATA/orcl/datafile/users.259.829084507
+DATA/orcl/datafile/undotbs1.258.829084505
+DATA/orcl/datafile/sysaux.257.829084505
+DATA/orcl/datafile/system.256.829084505
+DATA/orcl/datafile/example.265.829084649
SQL>select name,total_mb,state from v$asm_diskgroup;
select name,group_number,file_number,alias_index,alias_directory,system_created from v$asm_alias;
# su – grid$ crsctl check has$ crsctl check css$ crsctl check evm$ crs_stat –t –v$ ocrcheck
# su – oracle$ sqlplus / as sysdbaSQL> select name from v$datafile 2 union all 3 select name from v$controlfile 4 union all 5 select member from v$logfile;
檢查高可用性伺服器的狀態[grid@restart ~]$ crsctl check hasCRS-4638: Oracle High Availability Services is online[grid@restart ~]$ crsctl check cssCRS-4529: Cluster Synchronization Services is online[grid@restart ~]$ crsctl check evmCRS-4533: Event Manager is online
[grid@restart ~]$ crs_stat -tName Type Target State Host ————————————————————ora.CRS.dg ora….up.type ONLINE ONLINE restart ora….ER.lsnr ora….er.type ONLINE ONLINE restart ora.asm ora.asm.type ONLINE ONLINE restart ora.cssd ora.cssd.type ONLINE ONLINE restart ora.diskmon ora….on.type OFFLINE OFFLINE ora.evmd ora.evm.type ONLINE ONLINE restart ora.ons ora.ons.type OFFLINE OFFLINE
[grid@restart ~]$ ps -ef | grep asmgrid 16058 1 0 19:56 ? 00:00:00 asm_pmon_+ASMgrid 16060 1 0 19:56 ? 00:00:00 asm_psp0_+ASMgrid 16062 1 0 19:56 ? 00:00:00 asm_vktm_+ASMgrid 16066 1 0 19:56 ? 00:00:00 asm_gen0_+ASMgrid 16068 1 0 19:56 ? 00:00:00 asm_diag_+ASMgrid 16070 1 0 19:56 ? 00:00:00 asm_dia0_+ASMgrid 16072 1 0 19:56 ? 00:00:00 asm_mman_+ASMgrid 16074 1 0 19:56 ? 00:00:00 asm_dbw0_+ASMgrid 16076 1 0 19:56 ? 00:00:00 asm_lgwr_+ASMgrid 16078 1 0 19:56 ? 00:00:00 asm_ckpt_+ASMgrid 16080 1 0 19:56 ? 00:00:00 asm_smon_+ASMgrid 16082 1 0 19:56 ? 00:00:00 asm_rbal_+ASMgrid 16084 1 0 19:56 ? 00:00:00 asm_gmon_+ASMgrid 16086 1 0 19:56 ? 00:00:00 asm_mmon_+ASMgrid 16088 1 0 19:56 ? 00:00:00 asm_mmnl_+ASMgrid 16188 16152 0 19:59 pts/1 00:00:00 grep asm
# cat /etc/oracle/ocr.lococrconfig_loc=/u01/app/11.2.0/grid/cdata/localhost/local.ocrlocal_only=TRUE
# /u01/app/11.2.0/grid/bin/ocrcheckStatus of Oracle Cluster Registry is as follows : Version : 3 Total space (kbytes) : 262120 Used space (kbytes) : 152 Available space (kbytes) : 261968 ID : 1179492779 Device/File Name : /u01/app/11.2.0/grid/cdata/localhost/local.ocr Device/File integrity check succeeded
Device/File not configured
Device/File not configured
Device/File not configured
Device/File not configured
Cluster registry integrity check succeeded
Logical corruption check succeeded
[grid@restart ~]$ crs_stat -t -vName Type R/RA F/FT Target State Host ———————————————————————-ora.ARCH.dg ora….up.type 0/5 0/ ONLINE ONLINE restart ora.CRS.dg ora….up.type 0/5 0/ ONLINE ONLINE restart ora.DATA.dg ora….up.type 0/5 0/ ONLINE ONLINE restart ora….ER.lsnr ora….er.type 0/5 0/ ONLINE ONLINE restart ora.asm ora.asm.type 0/5 0/ ONLINE ONLINE restart ora.cssd ora.cssd.type 0/5 0/5 ONLINE ONLINE restart ora.diskmon ora….on.type 0/10 0/5 OFFLINE OFFLINE ora.evmd ora.evm.type 0/10 0/5 ONLINE ONLINE restart ora.ons ora.ons.type 0/3 0/ OFFLINE OFFLINE ora.restart.db ora….se.type 0/2 0/1 ONLINE ONLINE restart
SQL> select name from v$datafile 2 union all 3 select name from v$controlfile 4 union all 5 select member from v$logfile;
NAME——————————————————————————–+DATA/restart/datafile/system.260.790288571+DATA/restart/datafile/sysaux.261.790288633+DATA/restart/datafile/undotbs1.262.790288683+DATA/restart/datafile/users.264.790288715+DATA/restart/controlfile/current.256.790288547+DATA/restart/onlinelog/group_1.257.790288549+DATA/restart/onlinelog/group_2.258.790288555+DATA/restart/onlinelog/group_3.259.790288561
8 rows selected.
SQL>SQL> archive log listDatabase log mode No Archive ModeAutomatic archival DisabledArchive destination /u01/app/oracle/product/11.2.0/dbhome_1/dbs/archOldest online log sequence 36Current log sequence 38
不是歸檔模式執行,現在手動開啟
SQL> create pfile='/u01/pfile-0802.bak' from spfile;
File created.
SQL> alter system set log_archive_dest_1='LOCATION=+ARCH';
System altered.
SQL> shutdown immediateDatabase closed.Database dismounted.ORACLE instance shut down.
SQL> startup mountORACLE instance started.
Total System Global Area 839282688 bytesFixed Size 2233000 bytesVariable Size 528485720 bytesDatabase Buffers 306184192 bytesRedo Buffers 2379776 bytesDatabase mounted.
SQL> alter database archivelog;
Database altered.
SQL> alter database open;
Database altered.
SQL> archive log list;Database log mode Archive ModeAutomatic archival EnabledArchive destination +ARCHOldest online log sequence 36Next log sequence to archive 38Current log sequence 38
SQL> select name from v$archived_log;
no rows selected
SQL> alter system switch logfile;
System altered.
SQL> select name from v$archived_log;
NAME——————————————————————————–+ARCH/restart/archivelog/2012_08_02/thread_1_seq_38.256.790292467
以監聽為例用srvctl 關閉啟動測試:[grid@restart ~]$ srvctl status listenerListener LISTENER is enabledListener LISTENER is running on node(s): restart[grid@restart ~]$ srvctl stop listener[grid@restart ~]$ srvctl status listenerListener LISTENER is enabledListener LISTENER is not running
[grid@restart ~]$ srvctl start listener[grid@restart ~]$ crs_stat -t -vName Type R/RA F/FT Target State Host ———————————————————————-ora.ARCH.dg ora….up.type 0/5 0/ ONLINE ONLINE restart ora.CRS.dg ora….up.type 0/5 0/ ONLINE ONLINE restart ora.DATA.dg ora….up.type 0/5 0/ ONLINE ONLINE restart ora….ER.lsnr ora….er.type 0/5 0/ ONLINE ONLINE restart ora.asm ora.asm.type 0/5 0/ ONLINE ONLINE restart ora.cssd ora.cssd.type 0/5 0/5 ONLINE ONLINE restart ora.diskmon ora….on.type 0/10 0/5 OFFLINE OFFLINE ora.evmd ora.evm.type 0/10 0/5 ONLINE ONLINE restart ora.ons ora.ons.type 0/3 0/ OFFLINE OFFLINE ora.restart.db ora….se.type 0/2 0/1 ONLINE ONLINE restart
再測試kill監聽程式,看能否自動起來。
[grid@restart ~]$ ps -ef | grep lsnrgrid 28139 1 0 21:43 ? 00:00:00 /u01/app/11.2.0/grid/bin/tnslsnr LISTENER -inheritgrid 28325 28251 0 21:46 pts/1 00:00:00 grep lsnr
[grid@restart ~]$ kill -9 28139
過幾秒鐘後他就起來,因為這中間有監控程式的時間段
[grid@restart ~]$ ps -ef | grep lsnrgrid 28455 1 0 21:47 ? 00:00:00 /u01/app/11.2.0/grid/bin/tnslsnr LISTENER -inheritgrid 28469 28251 0 21:47 pts/1 00:00:00 grep lsnr
好,最後測試硬性重啟之後看ORACLE能不能自動起來# reboot
系統起來稍等之後:[root@restart bin]# ./crs_stat -tName Type Target State Host ————————————————————ora.ARCH.dg ora….up.type ONLINE ONLINE restart ora.CRS.dg ora….up.type ONLINE ONLINE restart ora.DATA.dg ora….up.type ONLINE ONLINE restart ora….ER.lsnr ora….er.type ONLINE ONLINE restart ora.asm ora.asm.type ONLINE ONLINE restart ora.cssd ora.cssd.type ONLINE ONLINE restart ora.diskmon ora….on.type OFFLINE OFFLINE ora.evmd ora.evm.type ONLINE ONLINE restart ora.ons ora.ons.type OFFLINE OFFLINE ora.restart.db ora….se.type ONLINE ONLINE restart
-
啟動crs
[root@b1 install]# /u01/app/grid/11.2.0/crs/install/roothas.pl -deconfig -force -verbose
[root@b1 grid]#/u01/app/grid/11.2.0/root.sh
----同時執行
/u01/app/grid/11.2.0/perl/bin/perl -I/u01/app/grid/11.2.0/perl/lib -I/u01/app/grid/11.2.0/crs/install /u01/app/grid/11.2.0/crs/install/roothas.pl
/bin/dd if=/var/tmp/.oracle/npohasd of=/dev/null bs=1024 count=1
---grid使用者下啟動
crs_start -all
crs_start -t
crsctl check css
crsctl check has
-
一些報錯解決方案:
CRS-4124: Oracle High Availability Services startup failed.
CRS-4000: Command Start failed, or completed with errors.
ohasd failed to start: Inappropriate ioctl for device
ohasd failed to start at/u01/app/11.2.0/grid/crs/install/rootcrs.pl line 443.
第一次安裝11gR2 RAC的時候就遇到了這個11.0.2.1的經典問題,上網一查才知道這是個bug,解決辦法也很簡單,
就是在執行root.sh之前執行以下命令
/bin/dd if=/var/tmp/.oracle/npohasd of=/dev/null bs=1024 count=1
如果出現
/bin/dd: opening`/var/tmp/.oracle/npohasd': No such file or directory
的時候檔案還沒生成就繼續執行,直到能執行為止,一般出現Adding daemon to inittab這條資訊的時候執行dd命令。
另外還有一種解決方法就是更改檔案許可權
chown root:oinstall /var/tmp/.oracle/npohasd
重新執行root.sh之前別忘了刪除配置:/u01/app/11.2.0/grid/crs/install/roothas.pl -deconfig -force-verbose
在啟動asm例項的時候報如下錯誤:
[grid@b1 ~]$ sqlplus / as sysasm
SQL*Plus: Release 11.2.0.1.0 Production on Thu Sep 12 18:14:13 2013
Copyright (c) 1982, 2009, Oracle. All rights reserved.
Connected to an idle instance.
SQL> startupORA-01078: failure in processing system parametersORA-29701: unable to connect to Cluster Synchronization Service
然後用crsctl check css檢查的時候報如下錯誤:
[grid@b1 ~]$ crsctl check cssCRS-4639: Could not contact Oracle High Availability ServicesCRS-4000: Command Check failed, or completed with errors.
解決CRS-4639: Could not contact Oracle High Availability Services過程如下:
[root@b1 grid]# cd /u01/app/11.2.0/grid/crs/install[root@b1 install]# ./roothas.pl -deconfig -force -verbose2013-09-12 19:25:05: Checking for super user privileges2013-09-12 19:25:05: User has super user privileges2013-09-12 19:25:05: Parsing the host nameUsing configuration parameter file: ./crsconfig_paramsCRS-4639: Could not contact Oracle High Availability ServicesCRS-4000: Command Stop failed, or completed with errors.CRS-4639: Could not contact Oracle High Availability ServicesCRS-4000: Command Delete failed, or completed with errors.Failure at scls_scr_getval with code 1Internal Error Information: Category: -2 Operation: opendir Location: scrsearch1 Other: cant open scr home dir scls_scr_getval System Dependent Information: 2
CRS-4544: Unable to connect to OHASCRS-4000: Command Stop failed, or completed with errors.ACFS-9200: SupportedSuccessfully deconfigured Oracle Restart stack
[root@b1 install]# cd /u01/app/11.2.0/grid/[root@b1 grid]# ./root.shRunning Oracle 11g root.sh script...
The following environment variables are set as: ORACLE_OWNER= grid ORACLE_HOME= /u01/app/11.2.0/grid
Enter the full pathname of the local bin directory: [/usr/local/bin]: The file "dbhome" already exists in /usr/local/bin. Overwrite it? (y/n) [n]: y Copying dbhome to /usr/local/bin ...The file "oraenv" already exists in /usr/local/bin. Overwrite it? (y/n) [n]: y Copying oraenv to /usr/local/bin ...The file "coraenv" already exists in /usr/local/bin. Overwrite it? (y/n) [n]: y Copying coraenv to /usr/local/bin ...
Entries will be added to the /etc/oratab file as needed byDatabase Configuration Assistant when a database is createdFinished running generic part of root.sh script.Now product-specific root actions will be performed.2013-09-12 19:27:31: Checking for super user privileges2013-09-12 19:27:31: User has super user privileges2013-09-12 19:27:31: Parsing the host nameUsing configuration parameter file: /u01/app/11.2.0/grid/crs/install/crsconfig_paramsLOCAL ADD MODE Creating OCR keys for user 'grid', privgrp 'oinstall'..Operation successful.CRS-4664: Node b1 successfully pinned.Adding daemon to inittabCRS-4123: Oracle High Availability Services has been started.ohasd is starting
b1 2013/09/12 19:29:12 /u01/app/11.2.0/grid/cdata/b1/backup_20130912_192912.olrSuccessfully configured Oracle Grid Infrastructure for a Standalone ServerUpdating inventory properties for clusterwareStarting Oracle Universal Installer...
Checking swap space: must be greater than 500 MB. Actual 4094 MB PassedThe inventory pointer is located at /etc/oraInst.locThe inventory is located at /u01/app/oraInventory'UpdateNodeList' was successful.
[grid@b1 ~]$ crs_stat -tName Type Target State Host ------------------------------------------------------------ora.cssd ora.cssd.type OFFLINE OFFLINE ora.diskmon ora....on.type OFFLINE OFFLINE [grid@b1 ~]$ crs_start -allAttempting to start `ora.diskmon` on member `b1`Attempting to start `ora.cssd` on member `b1`Start of `ora.diskmon` on member `b1` succeeded.Start of `ora.cssd` on member `b1` succeeded.
[grid@b1 ~]$ sqlplus / as sysasm
SQL*Plus: Release 11.2.0.1.0 Production on Thu Sep 12 19:34:50 2013
Copyright (c) 1982, 2009, Oracle. All rights reserved.
Connected to an idle instance.
SQL> startupASM instance started
Total System Global Area 283930624 bytesFixed Size 2212656 bytesVariable Size 256552144 bytesASM Cache 25165824 bytesASM diskgroups mountedASM diskgroups volume enabled
-
ORA-29701: unable to connect to Cluster Synchronization Service
[grid@vm11gr2] /home/grid> sqlplus "/as sysasm" SQL*Plus: Release 11.2.0.1.0 Production on Sun Oct 25 10:16:21 2009 Copyright (c) 1982, 2009, Oracle. All rights reserved. Connected to an idle instance. SQL> startup ORA-01078: failure in processing system parameters ORA-29701: unable to connect to Cluster Synchronization Service SQL> 無法連線到CSS服務上.到作業系統上檢查一下看看 [grid@vm11gr2] /home/grid> crsctl check css CRS-4530: Communications failure contacting Cluster Synchronization Services daemon [grid@vm11gr2] /home/grid> [grid@vm11gr2] /home/grid> ps -ef|grep cssd 果然沒有CSS的服務daemon程式,再看一下HAS(High Availability Service)的狀態 [grid@vm11gr2] /home/grid> crsctl check has CRS-4638: Oracle High Availability Services is online [grid@vm11gr2] /home/grid> ps -ef|grep d.bin grid 5886 1 0 10:06 ? 00:00:01 /u01/app/grid/product/11.2/grid/bin/ohasd.bin reboot [grid@vm11gr2] /home/grid> 發現HAS的服務確實啟動了的,而ora.cssd和ora.diskmon這2個服務是依賴於HAS維護的. 進一步檢視各資源的狀態 [grid@vm11gr2] /home/grid> crs_stat -t Name Type Target State Host -------------------------------------------------------------- ora.FLASH_DATA.dg ora.diskgroup.type OFFLINE OFFLINE vm11gr2 ora.SYS_DATA.dg ora.diskgroup.type OFFLINE OFFLINE vm11gr2 ora.asm ora.asm.type OFFLINE OFFLINE vm11gr2 ora.cssd ora.cssd.type OFFLINE OFFLINE vm11gr2 ora.diskmon ora.diskmon.type OFFLINE OFFLINE vm11gr2 [grid@vm11gr2] /home/grid> [grid@vm11gr2] /home/grid> crsctl status resource -t -------------------------------------------------------------------------------- NAME TARGET STATE SERVER STATE_ DETAILS -------------------------------------------------------------------------------- Local Resources -------------------------------------------------------------------------------- ora.FLASH_DATA.dg OFFLINE OFFLINE vm11gr2 ora.SYS_DATA.dg OFFLINE OFFLINE vm11gr2 ora.asm OFFLINE OFFLINE vm11gr2 -------------------------------------------------------------------------------- Cluster Resources -------------------------------------------------------------------------------- ora.cssd 1 OFFLINE OFFLINE ora.diskmon 1 OFFLINE OFFLINE 再看一下ora.cssd和ora.diskmon的屬性 [grid@vm11gr2] /home/grid> crs_stat -p ora.cssd NAME=ora.cssd TYPE=ora.cssd.type ACTION_SCRIPT= ACTIVE_PLACEMENT=0 AUTO_START=never CHECK_INTERVAL=30 DESCRIPTION="Resource type for CSSD" FAILOVER_DELAY=0 FAILURE_INTERVAL=3 FAILURE_THRESHOLD=5 HOSTING_MEMBERS= PLACEMENT=balanced RESTART_ATTEMPTS=5 SCRIPT_TIMEOUT=600 START_TIMEOUT=600 STOP_TIMEOUT=900 UPTIME_THRESHOLD=1m [grid@vm11gr2] /home/grid> crs_stat -p ora.diskmon NAME=ora.diskmon TYPE=ora.diskmon.type ACTION_SCRIPT= ACTIVE_PLACEMENT=0 AUTO_START=never CHECK_INTERVAL=20 DESCRIPTION="Resource type for Diskmon" FAILOVER_DELAY=0 FAILURE_INTERVAL=3 FAILURE_THRESHOLD=5 HOSTING_MEMBERS= PLACEMENT=balanced RESTART_ATTEMPTS=10 SCRIPT_TIMEOUT=60 START_TIMEOUT=60 STOP_TIMEOUT=60 UPTIME_THRESHOLD=5s [grid@vm11gr2] /home/grid> 到這裡基本就找到了原因了,可以看到這兩個資源的AUTO_START屬性預設都設定為never,也就是說他們不會隨著HAS服務的啟動而自動啟動的,儘管預設情況下HAS服務是開機自動啟動的.好了,那我們就手動啟動一下吧: [grid@vm11gr2] /home/grid> crsctl start resource ora.cssd CRS-2672: Attempting to start 'ora.cssd' on 'vm11gr2' CRS-2679: Attempting to clean 'ora.diskmon' on 'vm11gr2' CRS-2681: Clean of 'ora.diskmon' on 'vm11gr2' succeeded CRS-2672: Attempting to start 'ora.diskmon' on 'vm11gr2' CRS-2676: Start of 'ora.diskmon' on 'vm11gr2' succeeded CRS-2676: Start of 'ora.cssd' on 'vm11gr2' succeeded [grid@vm11gr2] /home/grid> 注:ora.cssd和ora.diskmon這兩個服務是有依賴關係的,啟動哪個都會把兩個都起來. [grid@vm11gr2] /home/grid> crs_stat -t Name Type Target State Host -------------------------------------------------------------- ora.FLASH_DATA.dg ora.diskgroup.type OFFLINE OFFLINE vm11gr2 ora.SYS_DATA.dg ora.diskgroup.type OFFLINE OFFLINE vm11gr2 ora.asm ora.asm.type OFFLINE OFFLINE vm11gr2 ora.cssd ora.cssd.type ONLINE ONLINE vm11gr2 ora.diskmon ora.diskmon.type ONLINE ONLINE vm11gr2 [grid@vm11gr2] /home/grid> CSS服務起來了,重啟動asm instance [grid@vm11gr2] /home/grid> sqlplus "/as sysasm" SQL*Plus: Release 11.2.0.1.0 Production on Sun Oct 25 10:30:03 2009 Copyright (c) 1982, 2009, Oracle. All rights reserved. Connected to an idle instance. SQL> startup ASM instance started Total System Global Area 284565504 bytes Fixed Size 1336036 bytes Variable Size 258063644 bytes ASM Cache 25165824 bytes ASM diskgroups mounted SQL> exit Disconnected from Oracle Database 11g Enterprise Edition Release 11.2.0.1.0 - Production With the Automatic Storage Management option [grid@vm11gr2] /home/grid> crs_stat -t Name Type Target State Host -------------------------------------------------------------- ora.FLASH_DATA.dg ora.diskgroup.type ONLINE ONLINE vm11gr2 ora.SYS_DATA.dg ora.diskgroup.type ONLINE ONLINE vm11gr2 ora.asm ora.asm.type ONLINE ONLINE vm11gr2 ora.cssd ora.cssd.type ONLINE ONLINE vm11gr2 ora.diskmon ora.diskmon.type ONLINE ONLINE vm11gr2 [grid@vm11gr2] /home/grid> tips 1)預設情況下HAS(High Availability Service)是自動啟動的.透過如下命令可以取消和啟用自動啟動 crsctl disable has crsctl enable has 2)HAS手動啟動和停止 crsctl start has crsctl stop has 3)檢視HAS的狀態 crsctl check has 4)如果想讓ora.css和ora.diskmon服務隨著HAS的啟動而自動啟動,那麼你可以這兩個服務的AUTO_START屬性 crsctl modify resource "ora.cssd" -attr "AUTO_START=1" or crsctl modify resource "ora.diskmon" -attr "AUTO_START=1" 5)如果想取消ora.css和ora.diskmon的Auto start crsctl modify resource "ora.cssd" -attr "AUTO_START=never" crsctl modify resource "ora.diskmon" -attr "AUTO_START=never"
今天安裝oracle11g R2的grid,裝完之後發現無法載入diskgroups,報錯如下:
SQL> startupORA-00099: warning: no parameter file specified for ASM instanceASM instance started
Total System Global Area 283930624 bytesFixed Size 2225792 bytesVariable Size 256539008 bytesASM Cache 25165824 bytesORA-15110: no diskgroups mounted
(1)分析認為是由於ORA-00099引起,無法找到diskgroup。
(2)在網上搜尋得到asm引數檔案的配置格式如下:
asm_diskstring='/dev/oracleasm/disks/DISK*'
asm_diskgroups='DATA'asm_power_limit=1diagnostic_dest='/opt/oracle'instance_type='asm'large_pool_size=12Mremote_login_passwordfile='EXCLUSIVE'
生成檔案:$ORACLE_HOME/dbs/init+ASM.ora
注意asm_diskstring中必須包含"*"才能正確載入,否則報下面錯誤
SQL> startupASM instance started
Total System Global Area 283930624 bytesFixed Size 2225792 bytesVariable Size 256539008 bytesASM Cache 25165824 bytesORA-15032: not all alterations performedORA-15017: diskgroup "DATA" cannot be mountedORA-15063: ASM discovered an insufficient number of disks for diskgroup "DATA"
(3)儲存設定到spfile
SQL> create spfile from pfile;create spfile from pfile*ERROR at line 1:ORA-29786: SIHA attribute GET failed with error [Attribute 'SPFILE' sts[200]lsts[0]]
產生這個問題的原因為ORACLE認為ASM例項是手工建立的,並沒有註冊這個資源,那麼首先增加ASM資源
需要使用下面命令註冊asm,在grid使用者下執行:
srvctl add asm -l LISTENER -d '/dev/oracleasm/disks/DISK*'
然後重新執行命令:
SQL> create spfile from pfile;
File created.
(4)關閉asm例項後重新啟動,成功載入:
SQL> startupASM instance started
Total System Global Area 283930624 bytesFixed Size 2225792 bytesVariable Size 256539008 bytesASM Cache 25165824 bytesASM diskgroups mountedASM diskgroups volume enabled
在啟動DB時報錯ORA-27154 ORA-27300 ORA-27301 ORA-27302
這個錯誤是核心引數設定的問題,測試過程如下。[oracle@gtlions ~]$ sqlplus "/as sysdba"SQL*Plus: Release 10.2.0.5.0 - Production on Sat Feb 4 23:47:02 2012Copyright (c) 1982, 2010, Oracle. All Rights Reserved.Connected to an idle instance.SQL> startupORA-27154: post/wait create failedORA-27300: OS system dependent operation:semget failed with status: 28ORA-27301: OS failure message: No space left on deviceORA-27302: failure occurred at: sskgpsemsperSQL>
[root@gtlions ~]# /sbin/sysctl -pnet.ipv4.ip_forward = 0net.ipv4.conf.default.rp_filter = 2net.ipv4.conf.default.accept_source_route = 0kernel.sysrq = 0kernel.core_uses_pid = 1net.ipv4.tcp_syncookies = 1kernel.msgmnb = 65536kernel.msgmax = 65536kernel.shmmax = 4294967295kernel.shmall = 268435456fs.aio-max-nr = 1048576fs.file-max = 6815744net.ipv4.ip_local_port_range = 9000 65500net.core.rmem_default = 262144net.core.rmem_max = 4194304net.core.wmem_default = 262144net.core.wmem_max = 1048586kernel.sem = 25032000100128注意上面的最後一個引數kernel.sem = 25032000100128這個值看似很正常的,實際上是有問題的,我測試了修改為下面正常的值後OK,它值與值之間有空格標記的[root@gtlions ~]# vi /etc/sysctl.conf[root@gtlions ~]# /sbin/sysctl -pnet.ipv4.ip_forward = 0net.ipv4.conf.default.rp_filter = 2net.ipv4.conf.default.accept_source_route = 0kernel.sysrq = 0kernel.core_uses_pid = 1net.ipv4.tcp_syncookies = 1kernel.msgmnb = 65536kernel.msgmax = 65536kernel.shmmax = 4294967295kernel.shmall = 268435456fs.aio-max-nr = 1048576fs.file-max = 6815744net.ipv4.ip_local_port_range = 9000 65500net.core.rmem_default = 262144net.core.rmem_max = 4194304net.core.wmem_default = 262144net.core.wmem_max = 1048586kernel.sem = 250 32000 100 128[root@gtlions ~]#來看下是否可以正常啟動資料庫了。[oracle@gtlions ~]$ sqlplus "/as sysdba"SQL*Plus: Release 10.2.0.5.0 - Production on Sun Feb 5 00:00:39 2012Copyright (c) 1982, 2010, Oracle. All Rights Reserved.Connected to an idle instance.SQL> startupORACLE instance started.Total System Global Area 167772160 bytesFixed Size 1272600 bytesVariable Size 62915816 bytesDatabase Buffers 100663296 bytesRedo Buffers 2920448 bytesDatabase mounted.Database opened.SQL>
Normal 0 7.8 磅 0 2 false false false EN-US ZH-CN X-NONE
ORA-29786: SIHA attribute GET failed with error [Attribute 'ASM_DISKSTRING' sts[200] lsts[0]]
如果使用asmca建立的asm例項,asm會自動註冊到crs,手動建立asm例項需要註冊
[10:18:03 oracle(grid)@test ~]$ sql
SQL*Plus: Release 11.2.0.3.0 Production on Tue Sep 10 10:18:04 2013
Copyright (c) 1982, 2011, Oracle. All rights reserved.
Connected to:
Oracle Database 11g Enterprise Edition Release 11.2.0.3.0 - 64bit Production
With the Automatic Storage Management option
10:18:05 idle> show parameter name
NAME TYPE VALUE
------------------------------------ --------------------------------- ------------------------------
db_unique_name string +ASM
instance_name string +ASM
lock_name_space string
service_names string +ASM
10:18:14 idle> create spfile from pfile;
create spfile from pfile
*
ERROR at line 1:
ORA-29786: SIHA attribute GET failed with error [Attribute 'SPFILE' sts[200] lsts[0]]
Elapsed: 00:00:00.17
10:19:06 idle> exit
Disconnected from Oracle Database 11g Enterprise Edition Release 11.2.0.3.0 - 64bit Production
With the Automatic Storage Management option
[10:19:12 oracle(grid)@test ~]$ srvctl add asm -l LISTENER -p /oracle/product/11.2.0/grid/dbs/init+ASM.ora -d 'ASMDISK*'
PRCR-1001 : Resource ora.LISTENER.lsnr does not exist
[10:20:19 oracle(grid)@rmdgl ~]$ crs_stat -t
Name Type Target State Host
------------------------------------------------------------
ora.cssd ora.cssd.type ONLINE ONLINE rmdgl
ora.diskmon ora....on.type OFFLINE OFFLINE
ora.evmd ora.evm.type ONLINE ONLINE rmdgl
ora.ons ora.ons.type OFFLINE OFFLINE
[10:20:35 oracle(grid)@test~]$ srvctl add asm -p /u01/app/11.2.0/grid/dbs/spfile+ASM.ora -d 'ASMDISK*'
[10:20:56 oracle(grid)@rmdgl ~]$ crs_stat -t
Name Type Target State Host
------------------------------------------------------------
ora.asm ora.asm.type OFFLINE OFFLINE
ora.cssd ora.cssd.type ONLINE ONLINE rmdgl
ora.diskmon ora....on.type OFFLINE OFFLINE
ora.evmd ora.evm.type ONLINE ONLINE rmdgl
ora.ons ora.ons.type OFFLINE OFFLINE
[10:20:58 oracle(grid)@test ~]$ cd /u01/app/11.2.0/grid/dbs/
[10:21:21 oracle(grid)@test dbs]$ ll
total 20
-rw-rw---- 1 oracle oinstall 1257 Sep 5 02:34 ab_+ASM.dat
-rw-rw---- 1 oracle oinstall 1544 Sep 5 02:34 hc_+ASM.dat
-rw-r----- 1 oracle oinstall 169 Aug 30 13:49 init+ASM.ora
-rw-r--r-- 1 oracle oinstall 2851 May 15 2009 init.ora
-rw-r----- 1 oracle oinstall 2560 Aug 30 13:50 orapw+ASM
[10:21:22 oracle(grid)@test dbs]$ crs_stat -t
Name Type Target State Host
------------------------------------------------------------
ora.asm ora.asm.type OFFLINE OFFLINE
ora.cssd ora.cssd.type ONLINE ONLINE rmdgl
ora.diskmon ora....on.type OFFLINE OFFLINE
ora.evmd ora.evm.type ONLINE ONLINE rmdgl
ora.ons ora.ons.type OFFLINE OFFLINE
[10:21:40 oracle(grid)@rmdgl dbs]$ crs_stat -t
Name Type Target State Host
------------------------------------------------------------
ora.asm ora.asm.type OFFLINE OFFLINE
ora.cssd ora.cssd.type ONLINE ONLINE rmdgl
ora.diskmon ora....on.type OFFLINE OFFLINE
ora.evmd ora.evm.type ONLINE ONLINE rmdgl
ora.ons ora.ons.type OFFLINE OFFLINE
[10:23:16 oracle(grid)@rmdgl dbs]$ srvctl start asm
[10:23:20 oracle(grid)@rmdgl dbs]$ crs_stat -t
Name Type Target State Host
------------------------------------------------------------
ora.asm ora.asm.type ONLINE ONLINE rmdgl
ora.cssd ora.cssd.type ONLINE ONLINE rmdgl
ora.diskmon ora....on.type OFFLINE OFFLINE
ora.evmd ora.evm.type ONLINE ONLINE rmdgl
ora.ons ora.ons.type OFFLINE OFFLINE
[11:13:50 oracle(grid)@test dbs]$ sql
SQL*Plus: Release 11.2.0.3.0 Production on Tue Sep 10 11:14:39 2013
Copyright (c) 1982, 2011, Oracle. All rights reserved.
Connected to:
Oracle Database 11g Enterprise Edition Release 11.2.0.3.0 - 64bit Production
With the Automatic Storage Management option
11:14:39 idle> create spfile from pfile;
File created.
Elapsed: 00:00:00.24
Elapsed: 00:00:00.26
從11gR2開始,使用圖形化方式安裝Grid Infrastructure和使用ASMCA工具建立ASM例項都強制使用磁碟組作為ASM例項引數檔案的儲存方式。如果想將ASM引數檔案存放到本地磁碟檔案系統中,只能手動建立ASM例項。手動建立ASM例項,在執行CRETAE SPFILE FROM PFILE將PFILE轉換成SPFILE的時候收到如下報錯:SQL> create spfile from pfile;
create spfile from pfile
*
ERROR at line 1:
ORA-29786: SIHA attribute GET failed with error [Attribute 'SPFILE' sts[200]
lsts[0]]下面是METALINK的解決方案:ORA-29786: SIHA attribute GET failed with Error If 11gR2 ASM instance is created manually [ID 976075.1] 修改時間:2011-8-11
 型別:PROBLEM
 狀態:PUBLISHED
 優先順序:3
In this Document


Symptoms
After creating an initial parameter file init+ASM.ora manually and starting an ASM instance, certain ASM commands fails with ORA-29786 in sqlplus:
sqlplus / as sysasmSQL> create spfile='$ORACLE_HOME/spfile+ASM.ora' from pfile='$ORACLE_HOME/dbs/init+ASM.ora';create spfile='$ORACLE_HOME/spfile+ASM.ora' from pfile='$ORACLE_HOME/dbs/init+ASM.ora'*ERROR at line 1:ORA-29786: SIHA attribute GET failed with error [Attribute 'SPFILE' sts[200]lsts[0]]
SQL> create diskgroup dg1 normal redundancy disk '/opt/oracle/oradata/nobilldb/DG1_dev0' disk '/opt/oracle/oradata/nobilldb/DG1_dev1';Diskgroup created.SQL> drop diskgroup dg1;drop diskgroup dg1*ERROR at line 1:ORA-15039: diskgroup not droppedORA-29786: SIHA attribute GET failed with error [Attribute 'SPFILE' sts[200]lsts[0]]
Better option to create ASM instance is to run asmca in GUI/Silent mode.
Changes
Starting with 11gR2, ASM instance is a resoure in CRS repository also in single instance installations. Hence, it must be registered to OCR before doing certain operations like create/drop diskgroup, create pfile/spfile, etc.
Cause
ASM instance is created and started manually but it is not registered to cluster repository.
Solution
If ASM instance is created manually, add ASM instance to CRS repository with srvctl add asm:
srvctl add asm -l LISTENER -p /oracle/product/11.2.0/grid/dbs/init+ASM.ora -d '/dev/sdc*'srvctl add asm -h -- will give the options
根據文章提示,執行以下命令:# pwd
/u01/app/11.2.0/grid/bin
# ./srvctl add asm -h
Adds an ASM configuration to be managed by Oracle Restart.
Usage: srvctl add asm [-l ] [-p ] [-d ]
-l Listener name
-p Server parameter file path
-d ASM diskgroup discovery string
-h Print usage
# su - grid $ ./srvctl add asm -l LISTENER -p /u01/app/11.2.0/grid/dbs/spfile+ASM.ora -d '/dev/rhdisk*'
注意:以上的srvctl add asm命令必須用grid使用者執行,不能用root使用者執行,詳情參考文章《11gR2手動建立的ASM例項無法被Clusterware管理的問題的解決》http://space.itpub.net/?uid-23135684-action-viewspace-itemid-743090
$ sqlplus / as sysdba
SQL*Plus: Release 11.2.0.3.0 Production on Mon Sep 10 11:12:53 2012
Copyright (c) 1982, 2011, Oracle. All rights reserved.
Connected to:
Oracle Database 11g Enterprise Edition Release 11.2.0.3.0 - 64bit Production
With the Automatic Storage Management option
SQL> create spfile from pfile;
create spfile from pfile
*
ERROR at line 1:
ORA-27038: created file already exists
Additional information: 1
SQL> exit
Disconnected from Oracle Database 11g Enterprise Edition Release 11.2.0.3.0 - 64bit Production
With the Automatic Storage Management option
$ cd $ORACLE_HOME/dbs
$ ls
ab_+ASM.dat hc_+ASM.dat init+ASM.ora init.ora spfile+ASM.ora
執行srvctl add asm命令會自動為ASM例項新增SPFILE引數檔案。
$ strings spfile*
/M?
*.asm_power_limit=1
*.diagnostic_dest='/u01/app/grid'
*.instance_type='asm'
*.large_pool_size=12M
*.remote_login_passwordfile='EXCLUSIVE'
$ sqlplus / as sysasm
SQL*Plus: Release 11.2.0.3.0 Production on Mon Sep 10 11:13:21 2012
Copyright (c) 1982, 2011, Oracle. All rights reserved.
Connected to:
Oracle Database 11g Enterprise Edition Release 11.2.0.3.0 - 64bit Production
With the Automatic Storage Management option
SQL> shutdown immediate
ORA-15100: invalid or missing diskgroup name
ASM instance shutdown
SQL>
SQL> startup nomount
ASM instance started
Total System Global Area 283930624 bytes
Fixed Size 2220800 bytes
Variable Size 256544000 bytes
ASM Cache 25165824 bytes
SQL> show parameter spfile
NAME TYPE
------------------------------------ ----------------------
VALUE
------------------------------
spfile string
/u01/app/11.2.0/grid/dbs/spfil
e+ASM.ora
--end--
-
ORACLE dbca 找不到asm disks
2012-04-11 14:44:03
ORACLE dbca 找不到asm disks
oracle版本: 11.2.0.1.0
grid 版本: 11.2
前面的安裝基本都一步一步都走過來了,當然走的不是那麼的平坦.還好有百度google的鼎力相助終於是裝好了.
問題現象:dbca 到第6步的時候 "Database file location ",
選擇 Storage Type :Automatic Storage management
然後 Databse Area : DATA(建立的asm disk group的名稱)
如下圖:
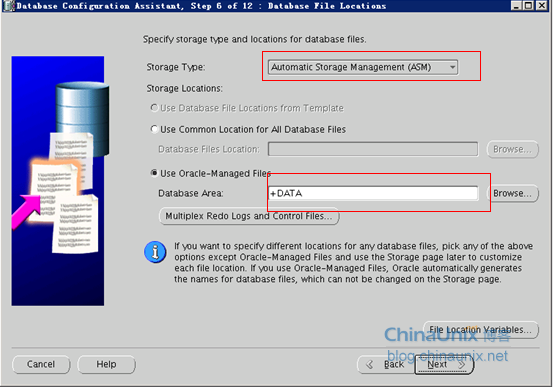
點選下一步系統提示: 無法找到指定的磁碟組.
錯誤判斷:
1 執行: /usr/sbin/oracleasm scandisks
/usr/sbin/oracleasm listdisks
結果正常,而且listdisk可以正常的將磁碟組可顯示出來.
2 切換到 grid 帳戶 ,執行資料查詢
sqlplus /nolog
conn /as sysdba
select name from v$asm_disks
也可以查得到.
3 使用者組判斷
id oracle
發現oracle沒能在asmdba組裡面,問題在此.
解決問題
執行 usermod -G oinstall -g dba,asmdba oracle
再次選擇,asm 磁碟組出來了.
後記
其實在我的最開始的建立使用者及組的指令碼里面是將oracle 加入到了asmdba中的,但是建立的指令碼受了系統自帶指令碼orarun的影響.
oracle 11g dbca 找不到asm diskgroup的解決辦法
昨天在家裡的本本虛擬機器裡配置11G R2 RAC時,GI安裝正常,db soft 安裝正常,檢視資源asm 磁碟也正常,GI是用的GRID 使用者及用ASMLIB配置的ASM DISKGROUP.但到最後一步用ORACLE使用者DBCA建庫時,在儲存選擇ASM,無法找到ASMDISKGROUP?
家裡沒法上網只能自己猜一下,嘗試用GRID 使用者執行DBCA,當然目的只是嘗試到選擇儲存時會不會發現ASM DISKGROUP,開始會因為環境變數問題報錯忽略,當到選擇儲存時發現正常的發現了先前用ASMCA建立的ASM磁碟組,取消安裝,開始排查錯誤。
命令 id oracle檢視了ORACLE的使用者組,發現有oinstall,asmdba,dba再檢視 id grid發現grid的使用者組要比ORACLE使用者多出一個asmadmin的使用者組然後再檢視ASM裝置的使用者組ls -l /dev/oracleasm/diskstotal 0brw-rw—- 1 grid asmadmin 8, 33 Nov 4 15:35 CRDATAbrw-rw—- 1 grid asmadmin 8, 49 Nov 4 15:35 DBDATA
所以你可以修改ASM裝置的組為asmdba,也可以給ORACLE使用者加到asmadmin,我選擇第二個usermod -a -G asmadmin oracle
或者:chown grid:asmdba /dev/asm*
還有就是去檢查一下$GRID_HOME/bin/oracle執行檔案的許可權是不是下面[grid@rac1 bin]$ ll oracle-rwsr-s–x 1 grid oinstall 152462814 Apr 10 19:51 oracle
我記的當時好像是沒有s而是x,如果沒有執行下面的命令chmod +s oracles對於執行檔案是suid,就是告之以檔案所有者的身份執行。
執行完上面一系列的排查後,在ORACLE使用者的DBCA中終於發現了ASM DISKGROUP.
1. Incorrect permission setting for oracle user2. ASM instance was not started or diskgroups are not mounted.3. The diskgroup resources are not online.4. The permission setting for the asm devices are incorrect.5. The oracle executable under /bin has incorrect permission settings.6. the file system for grid home was mounted with option 'nosuid'.
Related Posts:
-

- No related posts found!
最近和一朋友做這樣的測試,在安裝RAC或者Oracle Restart的時候如果先安裝RDBMS Software,後安裝GI(Grid Infrastructure),會不會影響資料庫的使用或者會不會影響建立資料庫。我們懷著這樣的疑問在測試環境裡進行了實驗。RDBMS Software安裝和GI的安裝都很順利,透過asmca也建立了後續存放資料檔案和用於閃回恢復區的ASM磁碟組。本以為很順利進行下去,但dbca建庫的時候遇到了問題,到選擇儲存方式的時候無法識別asm磁碟組。如下圖:
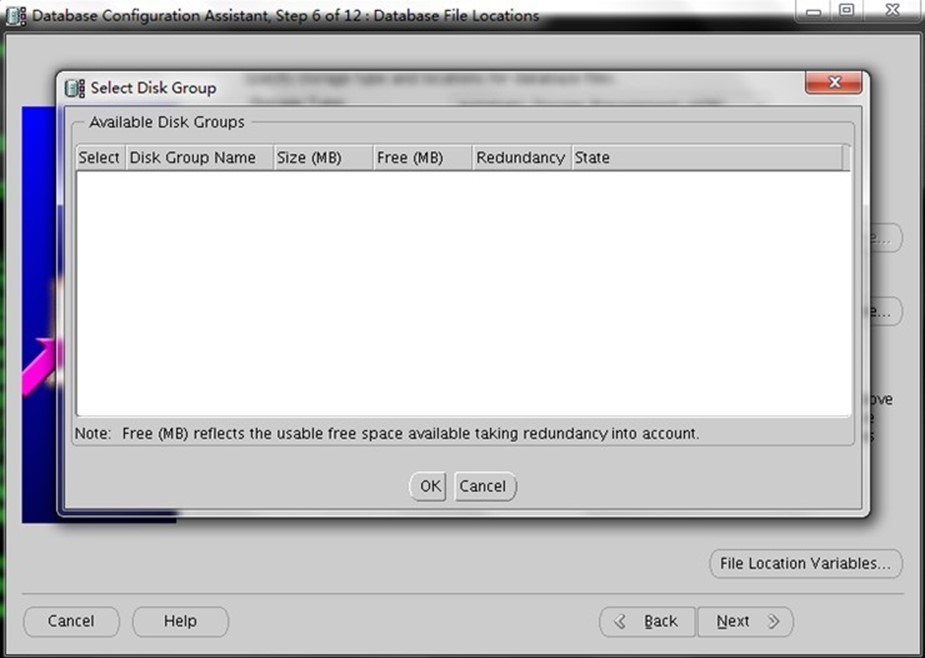
提醒:大家要相信如果安裝順序是正確的,那麼在這個步驟中肯定是能夠看到大家建立好的ASM磁碟組資訊的。
那分析下常見的找不到ASM磁碟組的原因:1)grid家目錄或者其子目錄許可權錯誤2)asm磁碟的許可權錯誤3)asm例項未啟動或者asm磁碟組沒有mount上4)asm磁碟組資源沒有線上5)oracle使用者的許可權錯誤6)oracle($ORACLE_HOME/bin)可執行檔案的許可權錯誤
OK,那我就按照上面的分析結果進行逐一排查:1)gi家目錄或者其子目錄許可權錯誤
[root@khm5 ~]# ls -ld /u02/app/11.2.0/grid/
drwxr-x--- 66 root oinstall 4096 Apr 19 01:36 /u02/app/11.2.0/grid/
我先簡單檢視了GI的家目錄許可權,這是正常的。這裡想要提醒大家,有些DBA有意無意中看到這樣的目錄許可權,發現所屬主是root,以為出了問題,理所應當地透過命令去更改,如果只更改該目錄許可權問題也不大,回退方法很簡單,但一旦加上-R引數遞迴方式把子目錄、子檔案的許可權一併更改,那故障就發生了。所以,大家在操作的時候不要盲目去做沒有把握的事情,掌握每個操作後面的原理以及其帶來的後果,以至於充分準備好回退方法。
在這裡我很清楚地知道沒有做過修改許可權的操作,所以初步認為是這個環節沒有問題,所以pass。
2)asm磁碟的許可權錯誤我是透過ASMLib驅動建立的asm磁碟,透過下面命令檢視:
[root@khm5 ~]# ls -l /dev/oracleasm/disks/t
otal 0brw-rw---- 1 grid asmadmin 8, 17 Apr 19 01:22 ASMDISK1
brw-rw---- 1 grid asmadmin 8, 33 Apr 19 01:22 ASMDISK2
brw-rw---- 1 grid asmadmin 8, 49 Apr 19 01:22 ASMDISK3
如果發現許可權不對,透過如下命令修改:
[root@khm5 ~]# oracleasm configure -I 或者[root@khm5 ~]# /etc/init.d/oracleasm configure
修改之後檢視:[root@khm5 ~]# oracleasm configureORACLEASM_ENABLED=trueORACLEASM_UID=grid
ORACLEASM_GID=asmadmin
ORACLEASM_SCANBOOT=trueORACLEASM_SCANORDER=""ORACLEASM_SCANEXCLUDE=""
3)asm例項未啟動或者asm磁碟組沒有mount上4)asm磁碟組資源沒有線上透過檢視資源情況可以判斷有沒有3和4提到的問題
[grid@khm5 ~]$ crsctl stat res -t
--------------------------------------------------------------------------------
NAME TARGET STATE SERVER STATE_DETAILS
--------------------------------------------------------------------------------Local Resources--------------------------------------------------------------------------------ora.DATA.dg
ONLINE ONLINE khm5
ora.FLASH.dg
ONLINE ONLINE khm5
ora.GRID.dg
ONLINE ONLINE khm5
ora.LISTENER.lsnr
ONLINE ONLINE khm5
ora.asm ONLINE ONLINE khm5 Started
ora.ons
OFFLINE OFFLINE khm5
--------------------------------------------------------------------------------Cluster Resources--------------------------------------------------------------------------------ora.cssd
1 ONLINE ONLINE khm5
ora.diskmon
1 OFFLINE OFFLINE
ora.evmd
1 ONLINE ONLINE khm5
5)oracle使用者的許可權錯誤
[root@khm5 ~]# id oracle
uid=1101(oracle) gid=1000(oinstall) groups=1000(oinstall),1300(dba),1301(oper),1201(asmdba)
oracle使用者需要加入到asmdba組,如果發現沒有加入,進行如下操作:
[root@khm5 ~]# gpasswd -a oracle asmdba
Adding user oracle to group asmdba
6)oracle($ORACLE_HOME/bin)可執行檔案的許可權錯誤
[root@khm5 ~]# su - oracle
[oracle@khm5 ~]$ cd $ORACLE_HOME/bin
[oracle@khm5 bin]$ ls -l oracle
-rwsr-s--x 1 oracle oinstall 232399473 Apr 19 07:04 oracle
好,到這裡我們發現問題了,oracle可執行檔案的許可權不正確。在RAC或者ORACLE RESTART中,oracle可執行檔案的所屬組是asmadmin。
如下方式進行修改:
[root@khm5 ~]# cd /u02/app/oracle/product/11.2.0/dbhome_1/bin/
[root@khm5 bin]# chown oracle:asmadmin oracle
[root@khm5 bin]# ls -l oracle
-rwxr-x--x 1 oracle asmadmin 232399473 Apr 19 07:04 oracle
[root@khm5 bin]# chmod +s oracle
[root@khm5 bin]# ls -l oracle
-rwsr-s--x 1 oracle asmadmin 232399473 Apr 19 07:04 oracle
修改完後問題解決,我們能夠看到ASM磁碟組資訊了。
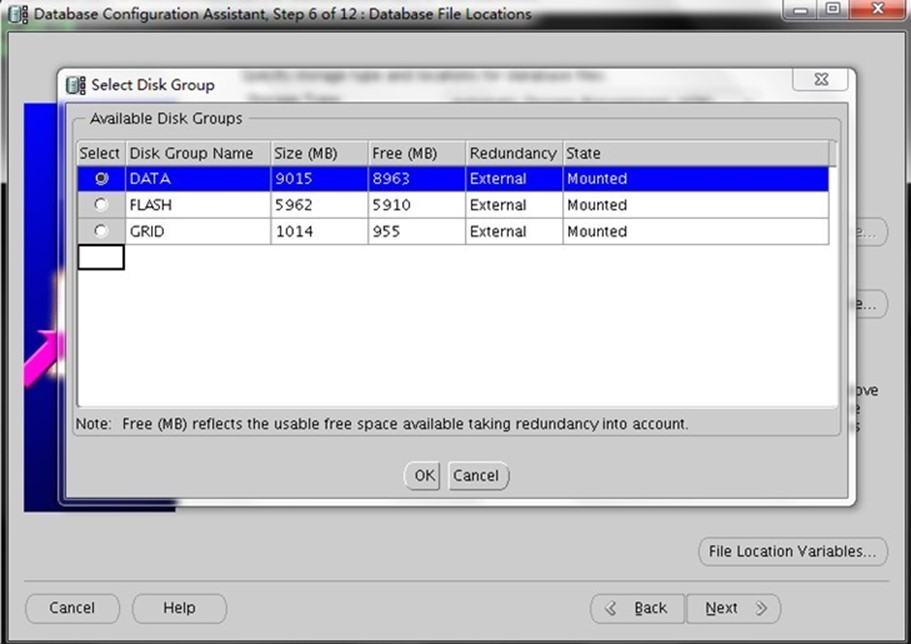
-
ora-15077,ASM磁碟組不能掛載
一、現象分析:1、資料庫和例項服務無法啟動,如下:[oracle@rac1 ~]$ crs_stat -tName Type Target State Host------------------------------------------------------------ora.....CRM.cs application ONLINE OFFLINE rac1ora....cl1.srv application ONLINE OFFLINE rac1ora.orcl.db application ONLINE OFFLINE rac2ora....l1.inst application ONLINE OFFLINE rac1ora....l2.inst application ONLINE OFFLINE rac2ora....SM1.asm application ONLINE ONLINE rac1ora....C1.lsnr application ONLINE ONLINE rac1ora.rac1.gsd application ONLINE ONLINE rac1ora.rac1.ons application ONLINE ONLINE rac1ora.rac1.vip application ONLINE ONLINE rac1ora....SM2.asm application ONLINE ONLINE rac2ora....C2.lsnr application ONLINE ONLINE rac2ora.rac2.gsd application ONLINE ONLINE rac2ora.rac2.ons application ONLINE ONLINE rac2ora.rac2.vip application ONLINE ONLINE rac22、單獨啟動某個應用服務依然啟不起來3、用sqlplus啟動例項,如下:[oracle@rac1]$ export ORACLE_SID=devdb1SQL> startup;ORA-01078: failure in processing system parametersORA-01565: error in identifying file '+DG1/devdb/spfiledevdb.ora'ORA-17503: ksfdopn:2 Failed to open file +DG1/devdb/spfiledevdb.oraORA-15077: could not locate ASM instance serving a required diskgroup可以看出diskgroup沒有mount,所以先把diskgroup mount
也可做下面的測試,同樣也會報磁碟組沒掛載:[oracle@rac1 bdump]$ export ORACLE_SID=+ASM1[oracle@rac1 bdump]$ sqlplus / as sysdba
SQL*Plus: Release 10.2.0.1.0 - Production on Sat Mar 22 17:59:39 2008
Copyright (c) 1982, 2005, Oracle. All rights reserved.
Connected to:Oracle Database 10g Enterprise Edition Release 10.2.0.1.0 - ProductionWith the Partitioning, Real Application Clusters, OLAP and Data Mining options
SQL> shutdown immediate;ORA-15100: invalid or missing diskgroup name
ASM instance shutdownSQL> startup;ASM instance started
Total System Global Area 92274688 bytesFixed Size 1217884 bytesVariable Size 65890980 bytesASM Cache 25165824 bytesORA-15110: no diskgroups mounted
二、解決辦法:1、首先掛載ASM磁碟組[oracle@rac1 bdump]$ export ORACLE_SID=+ASM1[oracle@rac1 bdump]$ sqlplus / as sysdba
SQL*Plus: Release 10.2.0.1.0 - Production on Sat Mar 22 17:59:39 2008
Copyright (c) 1982, 2005, Oracle. All rights reserved.
Connected to:Oracle Database 10g Enterprise Edition Release 10.2.0.1.0 - ProductionWith the Partitioning, Real Application Clusters, OLAP and Data Mining optionsSQL> select name,state from v$asm_diskgroup;
NAME STATE------------------------------ -----------RECOVERYDEST DISMOUNTEDDG1 DISMOUNTED
SQL> alter diskgroup RECOVERYDEST mount;
Diskgroup altered.
SQL> alter diskgroup DG1 mount;
Diskgroup altered.
SQL> exitDisconnected from Oracle Database 10g Enterprise Edition Release 10.2.0.1.0 - ProductionWith the Partitioning, Real Application Clusters, OLAP and Data Mining options
2、啟動資料庫例項[oracle@rac1 bdump]$ export ORACLE_SID=devdb1[oracle@rac1 bdump]$ sqlplus / as sysdbaSQL> startup;ORACLE instance started.
Total System Global Area 264241152 bytesFixed Size 1218868 bytesVariable Size 109053644 bytesDatabase Buffers 150994944 bytesRedo Buffers 2973696 bytesDatabase mounted.database open.
三、原因:發現可能是因為oracle使用者下的.bashrc檔案中$ORACLE_SID環境變數與實際建庫的資料庫名不一致所至,所以在資料庫啟動時會找不到環境變數對應的例項名.bashrc中是orcl1[oracle@rac1~]cat .bashrc.....export ORACLE_SID=orcl1.....
而實現的例項名是devdb1所以修改.bashrc中的ORACLE_SID=devdb1
About Me
...............................................................................................................................
● 本文作者:小麥苗,只專注於資料庫的技術,更注重技術的運用
● 本文在itpub(http://blog.itpub.net/26736162)、部落格園(http://www.cnblogs.com/lhrbest)和個人微信公眾號(xiaomaimiaolhr)上有同步更新
● 本文itpub地址:http://blog.itpub.net/26736162/abstract/1/
● 本文部落格園地址:http://www.cnblogs.com/lhrbest
● 本文pdf版及小麥苗雲盤地址:http://blog.itpub.net/26736162/viewspace-1624453/
● 資料庫筆試面試題庫及解答:http://blog.itpub.net/26736162/viewspace-2134706/
● QQ群:230161599 微信群:私聊
● 聯絡我請加QQ好友(646634621),註明新增緣由
● 於 2017-07-01 09:00 ~ 2017-07-31 22:00 在魔都完成
● 文章內容來源於小麥苗的學習筆記,部分整理自網路,若有侵權或不當之處還請諒解
● 版權所有,歡迎分享本文,轉載請保留出處
...............................................................................................................................
拿起手機使用微信客戶端掃描下邊的左邊圖片來關注小麥苗的微信公眾號:xiaomaimiaolhr,掃描右邊的二維碼加入小麥苗的QQ群,學習最實用的資料庫技術。


來自 “ ITPUB部落格 ” ,連結:http://blog.itpub.net/26736162/viewspace-1205206/,如需轉載,請註明出處,否則將追究法律責任。
相關文章
- Oracle ASM安裝要點OracleASM
- 11Gr2 RAC udev ASM openfiler(安裝文件)devASM
- oracle 11gr2 drop asmOracleASM
- asm-windows下安裝asmASMWindows
- oracle 11gR2 rac+asm 資料庫安裝配置步驟OracleASM資料庫
- ASM學習筆記_ASM安裝ASM筆記
- 【Oracle】ASM例項安裝入門OracleASM
- Oracle ASM+11gR2安裝OracleASM
- 探索ORACLE之ASM02_安裝OracleASM
- ORACLE 11gr2 ASM redo log 增加OracleASM
- OEL5.6+oracle11.2.0.3+ASM安裝OracleASM
- oracle10g ASM+RAC安裝OracleASM
- ASM驅動安裝與ASM盤建立(一)ASM
- ASM驅動安裝與ASM盤建立(二)ASM
- ASM的安裝配置ASM
- asm命令及安裝ASM
- Oracle 11gR2 DBCA 找不到ASM 磁碟組OracleASM
- oracle11Gr2安裝ASM,使用裸裝置OracleASM
- 安裝ORACLE 11.2.0.3 ASM for AIX HA (Non-RAC)OracleASMAI
- Oracle 11gR2 ASM例項記憶體管理OracleASM記憶體
- 成功搭建oracle 11gR2 asm 主備叢集OracleASM
- oracle asmOracleASM
- 安裝__DB、ASM注意事項ASM
- 【ORACLE ASM】ASM 支援工具簡介OracleASM
- 11gR2 RAC ASM 啟動ASM
- Window下安裝Oracle ASM單例項資料庫OracleASM單例資料庫
- 安裝oracle 11g 使用ASM儲存 詳細OracleASM
- aix5.3上安裝oracle10gR2 asmAIOracleASM
- oracle 11gR2 配置goldengate連線asm例項OracleGoASM
- RAC安裝【AIX 7 + 11.2.0.4 + ASM】AIASM
- ASM入網小助手解除安裝ASM
- RAW+ASM 的RAC 安裝文件ASM
- 在linux安裝asm總結LinuxASM
- oracle asm命令OracleASM
- Oracle ASM 管理OracleASM
- Oracle ASM 限制OracleASM
- oracle asm asmcmdOracleASM
- AIX6.1安裝ORACLE 11g(單機使用ASM)AIOracleASM