高仿網易評論列表效果之介面生成(三)
前兩節我們分別分析了網易評論列表介面和生成一些我們需要的測試資料,生成測試資料那段如果大家看著看得頭疼沒關係,直接調業務物件中的方法生成資料即可不必理會我是怎麼處理的,接下來的對於大家來說才是讓各位感興趣的東西
介面分析了、資料也有了,那我們如何實現這樣的一個介面呢?首先我們來看一下整個專案的結構圖大致瞭解下:

MainActivity是該應用的入口Activity,裡面就對ActionBar和Fragment做了一些初始化:
- package com.aigestudio.neteasecommentlistdemo.activities;
- import android.os.Bundle;
- import android.support.v7.app.ActionBar;
- import android.support.v7.app.ActionBarActivity;
- import com.aigestudio.neteasecommentlistdemo.R;
- import com.aigestudio.neteasecommentlistdemo.bo.SQLiteDataBO;
- import com.aigestudio.neteasecommentlistdemo.fragment.CommentFragment;
- /**
- * 應用的入口Activity
- * 沒有做太多的邏輯,除了ActionBar所有的介面元素都整合在Fragment中
- *
- * @author Aige
- * @since 2014/11/14
- */
- public class MainActivity extends ActionBarActivity {
- private ActionBar actionBar;//狀態列
- private SQLiteDataBO sqLiteDataBO;//資料業務物件
- @Override
- protected void onCreate(Bundle savedInstanceState) {
- super.onCreate(savedInstanceState);
- setContentView(R.layout.activity_main);
- //初始化控制元件
- initWidget();
- //初始化資料:一次即可,如果你clean了專案需要重新生成資料,生成資料前前註釋掉上面的initWidget()初始化控制元件方法
- // sqLiteDataBO = new SQLiteDataBO(this);
- // sqLiteDataBO.initServerData();
- }
- /**
- * 初始化控制元件
- */
- private void initWidget() {
- //初始化ActionBar
- initActionBar();
- //設定當前顯示的Fragment
- getSupportFragmentManager().beginTransaction().add(R.id.container, new CommentFragment()).commit();
- }
- /**
- * 初始化ActionBar
- */
- private void initActionBar() {
- actionBar = getSupportActionBar();
- actionBar.setDisplayShowTitleEnabled(false);
- actionBar.setDisplayShowHomeEnabled(true);
- actionBar.setHomeButtonEnabled(true);
- actionBar.setDisplayHomeAsUpEnabled(true);
- }
- }
- package com.aigestudio.neteasecommentlistdemo.fragment;
- import android.os.Bundle;
- import android.support.annotation.Nullable;
- import android.support.v4.app.Fragment;
- import android.util.Log;
- import android.view.LayoutInflater;
- import android.view.View;
- import android.view.ViewGroup;
- import android.widget.BaseAdapter;
- import android.widget.ListView;
- import com.aigestudio.neteasecommentlistdemo.R;
- import com.aigestudio.neteasecommentlistdemo.beans.Post;
- import com.aigestudio.neteasecommentlistdemo.bo.CommentFMBO;
- import com.aigestudio.neteasecommentlistdemo.dao.ServerDAO;
- import com.aigestudio.neteasecommentlistdemo.views.PostView;
- import java.util.ArrayList;
- import java.util.HashSet;
- import java.util.List;
- import java.util.Map;
- /**
- * 唯一的一個Fragment用來顯示介面
- *
- * @author Aige
- * @since 2014/11/14
- */
- public class CommentFragment extends Fragment {
- private ListView lvContent;//填充內容的List列表
- private ServerDAO serverDAO;//伺服器資料的訪問物件
- private CommentFMBO commentFMBO;//業務物件
- private List<Post> posts;//儲存帖子的列表
- @Override
- public void onCreate(Bundle savedInstanceState) {
- super.onCreate(savedInstanceState);
- //初始化伺服器資料庫DAO
- serverDAO = new ServerDAO(getActivity());
- //初始化儲存帖子的列表
- posts = new ArrayList<Post>();
- //初始化業務物件
- commentFMBO = new CommentFMBO(serverDAO);
- }
- @Override
- public View onCreateView(LayoutInflater inflater, @Nullable ViewGroup container, @Nullable Bundle savedInstanceState) {
- //獲取根佈局
- View rootView = inflater.inflate(R.layout.fragment_comment, container, false);
- //獲取ListView控制元件
- lvContent = (ListView) rootView.findViewById(R.id.comment_fm_content_lv);
- //初始化資料
- initData();
- return rootView;
- }
- /**
- * 初始化資料
- * <p/>
- * 注:資料的載入方式非按實際方式以遠端伺服器非同步載入,So……別鑽空子~~
- */
- private void <span style="color:#990000;"><strong>initData</strong></span>() {
- //查詢贊前十的帖子
- List<Map<String, String>> praiseTop10Post = serverDAO.queryMulti("user_praise", new String[]{"postFlag"}, null, null, "postFlag", null, "count(postFlag) desc", "10");
- // List<Map<String, String>> praiseTop10Post = serverDAO.queryMulti("select postFlag from user_praise group by postFlag order by count(postFlag) desc limit 10");
- //查詢Post資料
- posts = commentFMBO.queryPost(praiseTop10Post, "postFlag", posts, Post.Type.HOTTEST);
- //查詢最新的十條帖子資料
- List<Map<String, String>> newestTop10Posts = serverDAO.queryMulti("post", new String[]{"flag"}, null, null, null, null, "_id desc", "10");
- // List<Map<String, String>> newestTop10Posts = serverDAO.queryMulti("select flag from post order by count(_id) desc limit 10");
- //查詢Post資料
- posts = commentFMBO.queryPost(newestTop10Posts, "flag", posts, Post.Type.NEWEST);
- //資料驗證
- // commentFMBO.verifyData(posts);
- //資料載入
- lvContent.setAdapter(new CommentAdapter(posts));
- }
- private class CommentAdapter extends BaseAdapter {
- private List<Post> posts;
- private CommentAdapter(List<Post> posts) {
- this.posts = posts;
- }
- @Override
- public int getCount() {
- return posts.size();
- }
- @Override
- public Object getItem(int position) {
- return null;
- }
- @Override
- public long getItemId(int position) {
- return 0;
- }
- @Override
- public View getView(int position, View convertView, ViewGroup parent) {
- if (null==convertView){
- convertView = new PostView(getActivity());
- }
- ((PostView)convertView).setPost(posts.get(position));
- return convertView;
- }
- }
- }
:
- /**
- * 查詢Post資料
- *
- * @param postList Post資料來源
- */
- public List<Post> queryPost(List<Map<String, String>> postList, String key, List<Post> posts, Post.Type type) {
- for (int i = 0; i < postList.size(); i++) {
- //例項化一個Post物件
- Post post = new Post();
- /*
- 判斷帖子的型別是否為最新的或最熱的,如果是則將第一條帖子的Type設定為相應型別
- */
- if (type != Post.Type.NORMAL && i == 0) {
- post.setType(type);
- } else {
- post.setType(Post.Type.NORMAL);
- }
- //設定該Post的標識值
- post.setFlag(postList.get(i).get(key));
- //設定該Post的建立時間
- String createAt = serverDAO.queryValue("post", new String[]{"createAt"}, "flag", post.getFlag());
- // String createAt = serverDAO.queryValue("select createAt from post where flag like " + post.getFlag());
- post.setCreateAt(createAt);
- //設定該Post的評論列表
- List<Comment> comments = getComments(postList, i, key);
- post.setComments(comments);
- //設定該Post讚的User列表
- List<User> praises = getUserPraises(postList, i, key);
- post.setUserPraises(praises);
- //設定該Post踩的User列表
- List<User> unPraises = getUserUnPraises(postList, i, key);
- post.setUserUnPraises(unPraises);
- //設定該Post收藏的User列表
- List<User> collects = getUserCollects(postList, i, key);
- post.setUserCollects(collects);
- posts.add(post);
- }
- return posts;
- }
:- @Override
- public View getView(int position, View convertView, ViewGroup parent) {
- if (null==convertView){
- convertView = new PostView(getActivity());
- }
- ((PostView)convertView).setPost(posts.get(position));
- return convertView;
- }
,不知道大家在看這段程式碼的時候有沒有這樣一個疑問,為什麼不通過PostView的建構函式注入資料呢?為什麼要單獨給出一個方法來設定資料?大家可以自己思考下。下面我們來看看自定義控制元件PostView中有些什麼東西:
- package com.aigestudio.neteasecommentlistdemo.views;
- import android.annotation.SuppressLint;
- import android.content.Context;
- import android.util.AttributeSet;
- import android.view.LayoutInflater;
- import android.widget.LinearLayout;
- import android.widget.TextView;
- import com.aigestudio.neteasecommentlistdemo.R;
- import com.aigestudio.neteasecommentlistdemo.beans.Comment;
- import com.aigestudio.neteasecommentlistdemo.beans.Post;
- import java.util.List;
- /**
- * 用來顯示Post的自定義控制元件
- *
- * @author Aige
- * @since 2014/11/14
- */
- public class PostView extends LinearLayout {
- private TextView tvType, tvUserName, tvLocation, tvDate, tvPraise, tvContent;//依次為顯示型別標籤、使用者名稱、地理位置、日期、贊資料和最後一條評論內容的TextView
- private CircleImageView civNick;//使用者圓形頭像顯示控制元件
- private FloorView floorView;//蓋樓控制元件
- public PostView(Context context) {
- this(context, null);
- }
- public PostView(Context context, AttributeSet attrs) {
- this(context, attrs, 0);
- }
- @SuppressLint("NewApi")
- public PostView(Context context, AttributeSet attrs, int defStyleAttr) {
- super(context, attrs, defStyleAttr);
- //初始化控制元件
- initWidget(context);
- }
- /**
- * 初始化控制元件
- *
- * @param context 上下文環境引用
- */
- private void initWidget(Context context) {
- //設定佈局
- LayoutInflater.from(context).inflate(R.layout.view_post, this);
- //獲取控制元件
- tvType = (TextView) findViewById(R.id.view_post_type_tv);
- tvUserName = (TextView) findViewById(R.id.view_post_username_tv);
- tvLocation = (TextView) findViewById(R.id.view_post_location_tv);
- tvDate = (TextView) findViewById(R.id.view_post_date_tv);
- tvPraise = (TextView) findViewById(R.id.view_post_praise_tv);
- tvContent = (TextView) findViewById(R.id.view_post_content_tv);
- civNick = (CircleImageView) findViewById(R.id.view_post_nick_civ);
- floorView = (FloorView) findViewById(R.id.view_post_floor_fv);
- }
- /**
- * 為PostView設定資料
- *
- * @param post 資料來源
- */
- public void setPost(Post post) {
- //設定Post的型別
- setType(post);
- //設定Post的贊資料
- setPraise(post);
- //獲取該條帖子下的評論列表
- List<Comment> comments = post.getComments();
- /*
- 判斷評論長度
- 1.如果只有一條評論那麼則顯示該評論即可並隱藏蓋樓佈局
- 2.否則我們進行蓋樓顯示
- */
- if (comments.size() == 1) {
- floorView.setVisibility(GONE);
- Comment comment = comments.get(0);
- //設定控制元件顯示資料
- initUserDate(comment);
- } else {
- //蓋樓前我們要把最後一條評論資料提出來顯示在Post最外層
- int index = comments.size() - 1;
- Comment comment = comments.get(index);
- //設定控制元件顯示資料
- initUserDate(comment);
- floorView.setComments(comments);
- }
- }
- /**
- * 設定與使用者相關的控制元件資料顯示
- *
- * @param comment 評論物件
- */
- private void initUserDate(Comment comment) {
- tvContent.setText(comment.getContent());
- tvDate.setText(comment.getCreateAt());
- tvUserName.setText(comment.getUser().getUserName());
- tvLocation.setText(comment.getUser().getLocation());
- civNick.setImageResource(Integer.parseInt(comment.getUser().getNick()));
- }
- /**
- * 設定Post的贊資料
- *
- * @param post 資料來源
- */
- private void setPraise(Post post) {
- tvPraise.setText(post.getUserPraises().size() + "贊");
- }
- /**
- * 設定Post的型別
- *
- * @param post 資料來源
- */
- private void setType(Post post) {
- //獲取Post型別
- Post.Type type = post.getType();
- /*
- 設定型別顯示
- */
- switch (type) {
- case NEWEST:
- tvType.setVisibility(VISIBLE);
- tvType.setText("最新跟帖");
- break;
- case HOTTEST:
- tvType.setVisibility(VISIBLE);
- tvType.setText("熱門跟帖");
- break;
- case NORMAL:
- tvType.setVisibility(GONE);
- break;
- }
- }
- }

在PostView被例項化的時候我們就在initWidget(Context context)方法中初始化其佈局,而設定其PostView顯示資料的方法我們獨立在setPost(Post post)方法中,說白了就是資料和顯示的分離,為什麼要這樣做?很簡單,即便我當前的PostView被重用了,我也可以通過setPost(Post post)方法重新設定我們的資料而不需要重新再例項化一個PostView也不用擔心PostView在Item中順序混淆,更不用擔心多次地去findView造成的效率問題,因為findView的過程只在例項化的時候才會去做,設定資料不需要再管
在setPost(Post post)方法中除了獲取封裝的資料並設定PostView上各控制元件的顯示資料外我們還要進行Comment的判斷:
- /*
- 判斷評論長度
- 1.如果只有一條評論那麼則顯示該評論即可並隱藏蓋樓佈局
- 2.否則我們進行蓋樓顯示
- */
- if (comments.size() == 1) {
- floorView.setVisibility(GONE);
- Comment comment = comments.get(0);
- //設定控制元件顯示資料
- initUserDate(comment);
- } else {
- //蓋樓前我們要把最後一條評論資料提出來顯示在Post最外層
- int index = comments.size() - 1;
- Comment comment = comments.get(index);
- //設定控制元件顯示資料
- initUserDate(comment);
- floorView.setComments(comments);
- }
- package com.aigestudio.neteasecommentlistdemo.views;
- import android.annotation.SuppressLint;
- import android.content.Context;
- import android.graphics.Canvas;
- import android.graphics.drawable.Drawable;
- import android.util.AttributeSet;
- import android.view.LayoutInflater;
- import android.view.View;
- import android.widget.LinearLayout;
- import android.widget.TextView;
- import com.aigestudio.neteasecommentlistdemo.R;
- import com.aigestudio.neteasecommentlistdemo.beans.Comment;
- import com.aigestudio.neteasecommentlistdemo.beans.User;
- import java.util.List;
- /**
- * 用來顯示PostView中蓋樓的自定義控制元件
- *
- * @author Aige
- * @since 2014/11/14
- */
- public class FloorView extends LinearLayout {
- private Context context;//上下文環境引用
- private Drawable drawable;//背景Drawable
- public FloorView(Context context) {
- this(context, null);
- }
- public FloorView(Context context, AttributeSet attrs) {
- this(context, attrs, 0);
- }
- @SuppressLint("NewApi")
- public FloorView(Context context, AttributeSet attrs, int defStyleAttr) {
- super(context, attrs, defStyleAttr);
- this.context = context;
- //獲取背景Drawable的資原始檔
- drawable = context.getResources().getDrawable(R.drawable.view_post_comment_bg);
- }
- /**
- * 設定Comment資料
- *
- * @param comments Comment資料列表
- */
- public void setComments(List<Comment> comments) {
- //清除子View
- removeAllViews();
- //獲取評論數
- int count = comments.size();
- /*
- 如果評論條數小於9條則直接顯示,否則我們只顯示評論的頭兩條和最後一條(這裡的最後一條是相對於PostView中已經顯示的一條評論來說的)
- */
- if (count < 9) {
- initViewWithAll(comments);
- } else {
- initViewWithHide(comments);
- }
- }
- /**
- * 初始化所有的View
- *
- * @param comments 評論資料列表
- */
- private void initViewWithAll(List<Comment> comments) {
- for (int i = 0; i < comments.size() - 1; i++) {
- View commentView = getView(comments.get(i), i, comments.size() - 1, false);
- addView(commentView);
- }
- }
- /**
- * 初始化帶有隱藏樓層的View
- *
- * @param comments 評論資料列表
- */
- private void initViewWithHide(final List<Comment> comments) {
- View commentView = null;
- //初始化一樓
- commentView = getView(comments.get(0), 0, comments.size() - 1, false);
- addView(commentView);
- //初始化二樓
- commentView = getView(comments.get(1), 1, comments.size() - 1, false);
- addView(commentView);
- //初始化隱藏樓層標識
- commentView = getView(null, 2, comments.size() - 1, true);
- commentView.setOnClickListener(new OnClickListener() {
- @Override
- public void onClick(View v) {
- initViewWithAll(comments);
- }
- });
- addView(commentView);
- //初始化倒數第二樓
- commentView = getView(comments.get(comments.size() - 2), 3, comments.size() - 1, false);
- addView(commentView);
- }
- /**
- * 獲取單個評論子檢視
- *
- * @param comment 評論物件
- * @param index 第幾個評論
- * @param count 總共有幾個評論
- * @param isHide 是否是隱藏顯示
- * @return 一個評論子檢視
- */
- private View getView(Comment comment, int index, int count, boolean isHide) {
- //獲取根佈局
- View commentView = LayoutInflater.from(context).inflate(R.layout.view_post_comment, null);
- //獲取控制元件
- TextView tvUserName = (TextView) commentView.findViewById(R.id.view_post_comment_username_tv);
- TextView tvContent = (TextView) commentView.findViewById(R.id.view_post_comment_content_tv);
- TextView tvNum = (TextView) commentView.findViewById(R.id.view_post_comment_num_tv);
- TextView tvHide = (TextView) commentView.findViewById(R.id.view_post_comment_hide_tv);
- /*
- 判斷是否是隱藏樓層
- */
- if (isHide) {
- /*
- 是則顯示“點選顯示隱藏樓層”控制元件而隱藏其他的不相干控制元件
- */
- tvUserName.setVisibility(GONE);
- tvContent.setVisibility(GONE);
- tvNum.setVisibility(GONE);
- tvHide.setVisibility(VISIBLE);
- } else {
- /*
- 否則隱藏“點選顯示隱藏樓層”控制元件而顯示其他的不相干控制元件
- */
- tvUserName.setVisibility(VISIBLE);
- tvContent.setVisibility(VISIBLE);
- tvNum.setVisibility(VISIBLE);
- tvHide.setVisibility(GONE);
- //獲取使用者物件
- User user = comment.getUser();
- //設定顯示資料
- tvUserName.setText(user.getUserName());
- tvContent.setText(comment.getContent());
- tvNum.setText(String.valueOf(index + 1));
- }
- //設定佈局引數
- LayoutParams params = new LayoutParams(LayoutParams.MATCH_PARENT, LayoutParams.WRAP_CONTENT);
- //計算margin指數,這個指數的意義在於將第一個的margin值設定為最大的,然後依次遞減體現層疊效果
- int marginIndex = count - index;
- int margin = marginIndex * 3;
- params.setMargins(margin, 0, margin, 0);
- commentView.setLayoutParams(params);
- return commentView;
- }
- @Override
- protected void dispatchDraw(Canvas canvas) {
- /*
- 在FloorView繪製子控制元件前先繪製層疊的背景圖片
- */
- for (int i = getChildCount() - 1; i >= 0; i--) {
- View view = getChildAt(i);
- drawable.setBounds(view.getLeft(), view.getLeft(), view.getRight(), view.getBottom());
- drawable.draw(canvas);
- }
- super.dispatchDraw(canvas);
- }
- }
我相信稍有基礎的童鞋都能看懂,沒有複雜的邏輯沒有繁雜的計算過程,唯一的一個計算就是margin的計算,其原理也如程式碼註釋所說的那樣並不難,背景圖片的繪製使用了我們事先定義的一個drawable資源:
- <?xml version="1.0" encoding="utf-8"?>
- <shape xmlns:android="http://schemas.android.com/apk/res/android">
- <solid android:color="#222225"/>
- <stroke
- android:width="1px"
- android:color="#777775"/>
- </shape>
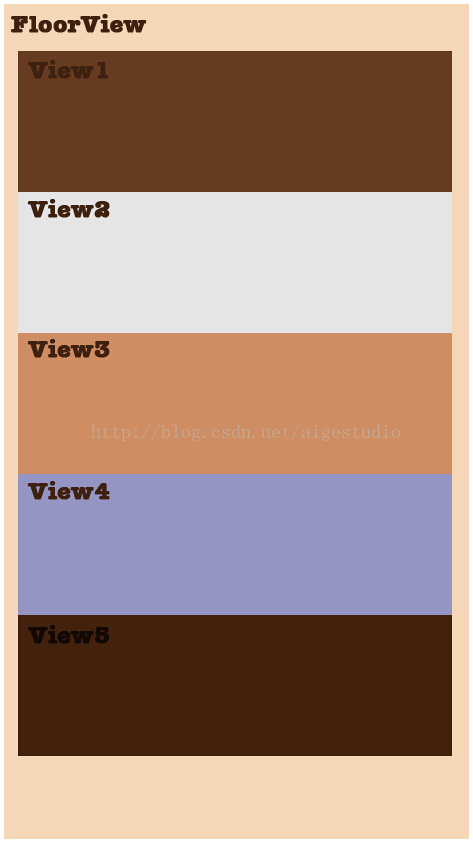
。這裡要提醒大家一點就是在dispatchDraw方法中記得要先畫背景再去呼叫父類的super.dispatchDraw(canvas);方法去畫子View,不然就會出現背景把所有控制元件都遮擋的效果。這個背景是FloorView的,而不是單個子評論控制元件的,也就是說我們其實是做了個假象,繪製了這麼一張圖:
昨天有個童鞋問這樣的框框是如何畫的……首先我糾正,這一個框是一張背景Drawable而不是一個“框”,這張背景Drawable的外觀樣式是我們在xml檔案中預先定義好載入的:
- //獲取背景Drawable的資原始檔
- drawable = context.getResources().getDrawable(R.drawable.view_post_comment_bg);
在父容器measure和layout之後~~所有的子控制元件大小位置將被確定,我們可以得到子View相對於父控制元件的left、top、right和bottom:
回到我們的程式碼:

- @Override
- protected void dispatchDraw(Canvas canvas) {
- /*
- 在FloorView繪製子控制元件前先繪製層疊的背景圖片
- */
- for (int i = getChildCount() - 1; i >= 0; i--) {
- View view = getChildAt(i);
- drawable.setBounds(view.getLeft(), view.getLeft(), view.getRight(), view.getBottom());
- drawable.draw(canvas);
- }
- super.dispatchDraw(canvas);
- }
?
這就是整個評論列表的實現過程,原始碼在此:傳送門,IDE為Studio,如果你用Eclipse,做一個程式碼的搬運工即可~
對於大家來說可能碼程式碼這一過程是最重要的,其實對於我來說,前期對實現的分析才是最重要的,如果分析得不對實現的過程就會巨繁瑣,舉個栗子如果我們在分析介面的時候得出每個Item中元素的關係為“評論—>回覆”結構,那麼不但我們的資料設計要繁瑣,介面的展示也難以得到我們想要的效果~~~~還是那句話,牛逼的體現不在於用複雜的技術實現複雜的效果,而是用簡單的方法得到複雜的效果~~~~
實現過程就是這樣,但是依然有一些不足,在這我留給大家兩個問題去思考下:
1.我們都知道findView是一個很耗時的過程,因為我們要從xml文件中解析出各個節點,解析xml文件是很廢時的,也正基於此,在我們自定義BaseAdapter的時候我們會在getView方法中通過一個ViewHolder物件儲存已經find的控制元件並複用他以此來提高效率。而在我們的FloorView的getView方法中我們會不斷地去從xml文件中解析控制元件:
- private View getView(Comment comment, int index, int count, boolean isHide) {
- //獲取根佈局
- View commentView = LayoutInflater.from(context).inflate(R.layout.view_post_comment, null);
- //獲取控制元件
- TextView tvUserName = (TextView) commentView.findViewById(R.id.view_post_comment_username_tv);
- TextView tvContent = (TextView) commentView.findViewById(R.id.view_post_comment_content_tv);
- TextView tvNum = (TextView) commentView.findViewById(R.id.view_post_comment_num_tv);
- TextView tvHide = (TextView) commentView.findViewById(R.id.view_post_comment_hide_tv);
- /*………………………………………………………………………………………………………………………………………………………………*/
- return commentView;
- }
2.在dispatchDraw中繪製背景圖的時候,我們會根據所有子View的location來繪製drawable,這個過程是again and again並且一層一層地畫……事實上有必要嗎?
這兩問題就交給大家解決了
- 頂
- 1
- 踩
相關文章
- 高仿網易評論列表效果之介面分析(一)
- 高仿網易評論列表效果之資料準備(二)
- 淘寶/天貓淘寶評論問答列表(item_question_answer-淘寶評論問答列表介面)
- 仿網易LOFTER視差滾動列表
- 仿網易雲音樂播放介面
- iOS 仿網易 APP 介面封裝iOSAPP封裝
- 仿網易新聞效果原始碼分析原始碼
- Flutter(十二)之練習高仿豆瓣電影列表Flutter
- Flutter仿網易雲音樂:播放介面Flutter
- Python爬蟲之js加密破解,抓取網易雲音樂評論生成詞雲Python爬蟲JS加密
- 單個Acticity顯示多個列表,仿內涵段子詳情頁的熱門評論、全部評論
- 淘寶商品評論介面,商品評論內容,天貓商品評論介面程式碼展示
- LazadaAPI介面解析,實現獲得lazada商品評論列表API
- 高仿網易雲音樂 Vue前端專案Vue前端
- 網易雲音樂評論爬蟲(2):歌曲的全部評論爬蟲
- 高階UI特效之仿3D翻轉切換效果UI特效3D
- 爬蟲實踐之獲取網易雲評論資料資訊爬蟲
- 28.qt quick-ListView高仿微信好友列表和聊天列表QTUIView
- 仿微信評論控制元件封裝控制元件封裝
- 淘寶商品評論資料介面,電商平臺評論介面,行業商品評論資料介面程式碼封裝教程行業封裝
- 仿天貓App實現商品列表佈局切換效果APP
- 網易雲音樂的一個評論
- 第 10 篇 評論介面
- 京東商品評論資料介面,電商平臺評論介面,行業商品評論資料介面程式碼封裝教程行業封裝
- vue 高仿微信即時 IM 聊天|仿微信 vue+h5 版|仿微信介面VueH5
- iOS 仿即刻評論輸入框帶圖片iOS
- vue + element-ui + scss 仿簡書評論模組VueUICSS
- 微信小程式--仿朋友圈Pro(內容釋出、點贊、評論、回覆評論)微信小程式
- python高階特性:切片/迭代/列表生成式/生成器Python
- Android 高仿騰訊新聞視訊切換效果Android
- 高仿京東到家APP引導頁炫酷動畫效果APP動畫
- 自定義View高仿懂球帝我是教練效果View
- Android仿簡書長按文章生成圖片效果Android
- 高仿微信聊天介面長按彈框樣式
- iOS仿網易雲音樂iOS
- Android專案實戰之高仿網易雲音樂啟動介面Android
- Python 獲取網易雲音樂熱門評論Python
- LRC歌詞原理和實現高仿Android網易雲音樂Android