首先,大家可以看下這個連結 Windows GUI自動化測試技術的比較和展望 。
這篇文章介紹了Windows中GUI自動化的三種技術:Windows API, MSAA - Microsoft Active Accessibility, UIAutomation
用指令碼語言AutoIT實現自動化就是第一種技術Windows API, 查詢視窗控制程式碼實現的。
用工具Spy++檢視程式,如果Spy++能識別程式視窗中的控制元件就能用這種技術。
python中也有一個UI自動化測試模組pywinauto,也是用這種技術實現的(補充:pywinauto後來也支援UIAutomation了,本人寫這個庫時還不支援)。
但Windows API實現的自動化不支援WPF程式、Windows 8中的Metro程式。
用UIAutomation實現的自動化支援微軟提供的各種介面開發框架,如MFC, Windows Forms, WPF, Metro App。也部分支援Qt。
該技術的詳細介紹可以參考CodeMagazine上的一篇文章
Creating UI Automation Client Applications
官方文件 msdn: UI Automation Client Programmer's Guide
我就是根據這個用Python和C++對UIAutomation做了一層封裝,方便我自己的使用,可以快速開發自動化指令碼。
UIAutomation支援平臺包括Windows XP(SP3),Windows Vista, Windows 7, Windows 8、8.1、10。
安裝使用uiautomation,支援Python2,Python3,x86,x64。
執行pip install uiautomation,安裝後在c:\python36\scripts目錄裡會有automation.py,在cmd裡執行automation.py -h。
或者在github上下載原始碼https://github.com/yinkaisheng/Python-UIAutomation-for-Windows,在cmd裡執行原始碼根目錄裡的automation.py -h。
執行原始碼demos目錄裡的操作計算器的指令碼 demos\automation_calculator.py看下執行效果。
下面通過QQ2013做下實驗(spy++獲取不到QQ視窗內的控制元件,可以對比一下):
然後執行最新版QQ2013, 先保持在qq登入介面
執行cmd,cd到工具的目錄,輸入automation.py -t3回車,然後3秒內切換到qq的登入介面
cmd視窗中就顯示了qq視窗中的控制元件資訊

執行automation.py遍歷控制元件時,支援下列引數
-t int value, 延遲時間time秒,延遲指定秒數再遍歷控制元件,
-r, 從樹的根部(root: Desktop)遍歷,如果不指定,從當前視窗遍歷
-d, int Value, 遍歷控制元件樹的的深度depth,如果不指定,遍歷整個樹,和-c一起使用時,可以為負值
-f, 遍歷焦點focus控制元件,如果不指定,從當前視窗遍歷
-c, 遍歷游標下的控制元件,如果不指定,從當前視窗遍歷,如果同時指定-d, -d可以為負值,比如-d-2表示從游標下控制元件向上找到兩層父控制元件,遍歷這個父控制元件
-a, 獲取游標下控制元件及其所有祖先(ancestor)控制元件
-n, 顯示控制元件的完整name, 如果不指定,只顯示前30個字元
-m, 顯示控制元件更多more屬性,預設只顯示控制元件的幾個屬性
例子:
automation.py –t3, 3秒後遍歷當前視窗所有控制元件
automation.py –d2 –t3, 3秒後遍歷當前視窗前三層控制元件
automation.py –r –d1 –t0 -n, 0秒後遍歷root的第一層子控制元件,並顯示控制元件完整名稱
automation.py –c –t3, 3秒後遍歷滑鼠游標下面的控制元件資訊
automation.py –c –t3 -d-2, 3秒後遍歷滑鼠游標下面的控制元件向上兩層的父控制元件
下面是在Windows 8中執行automation.py –r –d1 –t0的例子, 如下圖
在UIAutomation中控制元件樹的根部是 桌面Desktop, 上面的命令輸入了了 -r(root)引數,就從根部列舉視窗,引數-d1,只列舉桌面的第一層子控制元件。
在Windows 8中,如果要檢視Metro App的控制元件資訊,必須當前視窗要在Metro介面才能列舉,如果Metro App被切換到後臺,則獲取不到它的控制元件。
先執行automation.py -t5, 在5秒內切換到Metro App, 等待幾秒鐘,檢視cmd,就能看到Metro App的控制元件資訊。
automation模組同時會把顯示的資訊寫入到檔案@AutomaitonLog.txt,方便檢視。
還有,在Windows 7及更高版本系統中,最好以管理員來執行cmd,再呼叫python,我發現有些程式用普通許可權獲取不到全部控制元件資訊。
登入QQ2013,再一次列舉它的視窗,如圖

另一個操作QQ群匯出所有群成員詳細資訊的例子 :
使用python UIAutomation從QQ2017(v8.9)群介面獲取所有群成員詳細資料
下面介紹下用uiautomaton模組自動化作業系統記事本notepad.exe的一個例子,
先用automaiton.py遍歷記事本視窗,知道它的控制元件樹結構,再開始寫程式碼
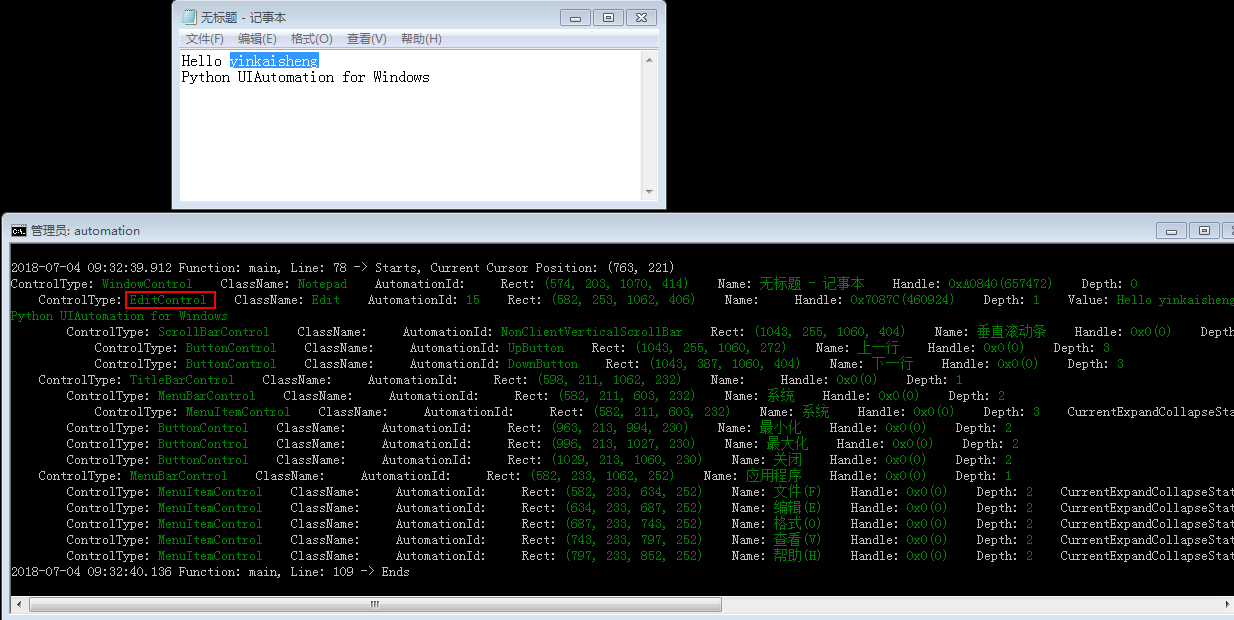
python2.7程式碼如下(在程式碼demos目錄automation_notepad_py2.py, automation_notepad_py3.py):
#!python2
# -*- coding: utf-8 -*-
import os, sys, time
import subprocess
import uiautomation as automation

def testNotepadCN():
    consoleWindow = automation.GetConsoleWindow()
    consoleWindow.SetActive()
    automation.Logger.ColorfulWriteLine('\nI will open <Color=Green>Notepad</Color> and <Color=Yellow>automate</Color> it. Please wait for a while.')
    time.sleep(2)
    automation.ShowDesktop()
    #開啟notepad
    subprocess.Popen('notepad')
    #查詢notepad, 如果name有中文,python2中要使用Unicode
    window = automation.WindowControl(searchDepth = 1, ClassName = 'Notepad', RegexName = u'.* - 記事本')
    #可以判斷window是否存在,如果不判斷,找不到window的話會丟擲異常
    #if window.Exists(maxSearchSeconds = 3):
    if automation.WaitForExist(window, 3):
        automation.Logger.WriteLine("Notepad exists now")
    else:
        automation.Logger.WriteLine("Notepad does not exist after 3 seconds", automation.ConsoleColor.Yellow)
    screenWidth, screenHeight = automation.Win32API.GetScreenSize()
    window.MoveWindow(screenWidth // 4, screenHeight // 4, screenWidth // 2, screenHeight // 2)
    window.SetActive()
    #從window查詢edit
    edit = window.EditControl()
    edit.Click(waitTime = 0)
    #python2中要使用Unicode, 模擬按鍵
    edit.SetValue(u'hi你好')
    edit.SendKeys(u'{Ctrl}{End}{Enter}下面開始演示{! 4}{ENTER}', 0.2, 0)
    edit.SendKeys('{Enter 3}0123456789{Enter}', waitTime = 0)
    edit.SendKeys('ABCDEFGHIJKLMNOPQRSTUVWXYZ{ENTER}', waitTime = 0)
    edit.SendKeys('abcdefghijklmnopqrstuvwxyz{ENTER}', waitTime = 0)
    edit.SendKeys('`~!@#$%^&*()-_=+{ENTER}', waitTime = 0)
    edit.SendKeys('[]{{}{}}\\|;:\'\",<.>/?{ENTER}', waitTime = 0)
    edit.SendKeys(u'™®①②③④⑤⑥⑦⑧⑨⑩§№☆★○●◎◇◆□℃‰€■△▲※→←↑↓〓¤°#&@\^_―♂♀{ENTER}{CTRL}a')
    window.CaptureToImage('Notepad.png')
    edit.SendKeys('Image Notepad.png was captured, you will see it later.', 0.05)
    #查詢選單
    window.MenuItemControl(Name = u'格式(O)').Click()
    window.MenuItemControl(Name = u'字型(F)...').Click()
    windowFont = window.WindowControl(Name = u'字型')
    windowFont.ComboBoxControl(AutomationId = '1140').Select(u'中文 GB2312')
    windowFont.ButtonControl(Name = u'確定').Click()
    window.Close()
    if automation.WaitForDisappear(window, 3):
        automation.Logger.WriteLine("Notepad closed")
    else:
        automation.Logger.WriteLine("Notepad still exists after 3 seconds", automation.ConsoleColor.Yellow)

    # buttonNotSave = ButtonControl(searchFromControl = window, SubName = u'不儲存')
    # buttonNotSave.Click()
    # or send alt+n to not save and quit
    # automation.SendKeys('{Alt}n')
    # 使用另一種查詢方法
    buttonNotSave = automation.FindControl(window,
        lambda control, depth: control.ControlType == automation.ControlType.ButtonControl and u'不儲存' in control.Name)
    buttonNotSave.Click()
    subprocess.Popen('Notepad.png', shell = True)
    time.sleep(2)
    consoleWindow.SetActive()
    automation.Logger.WriteLine('script exits', automation.ConsoleColor.Cyan)
    time.sleep(2)
首先用subprocess.Popen('notepad') 呼叫notepad
先寫查詢notepad視窗的程式碼了
#查詢notepad, 如果name有中文,要使用Unicode
window = WindowControl(searchDepth = 1, ClassName = 'Notepad', SubName = u'記事本')
searchDepth = 1, 表示只查詢樹的的第一層子控制元件,不會遍歷整個樹查詢,所以能很快找到notepad的視窗。
查詢控制元件可以指定如下引數 ClassName, WindowControl, AutomationId, Name , SubName,foundIndex,前四個都是cmd裡顯示的內容,
SubName可以指定如果Name中含有SubName這個字串,也算查詢成功。
foundIndex表示第幾個符合查詢條件的控制元件,不指定的話預設是1。

然後再查詢EditControl
    #從window查詢edit
    edit = window.EditControl()
修改EditControl內容並在當前文字後面模擬打字
    #python2中要使用Unicode, 模擬按鍵
    edit.SetValue(u'hi你好')
    edit.SendKeys(u'{Ctrl}{End}{Enter}下面開始演示{! 4}{ENTER}', 0.2, 0)
另一個例子, 操作QQ登入介面的一段程式碼,這裡沒有寫呼叫的程式碼,先手動啟動qq2013,保持在登入介面,
# -*- coding:utf-8 -*-
from automation import *

time.sleep(2)
#查詢qq視窗,searchDepth = 1,設定查詢深度為1,查詢Desktop的第一層子視窗就能很快找到QQ
qqWindow = WindowControl(searchDepth = 1, ClassName = 'TXGuiFoundation', Name = 'QQ2013')
if not qqWindow.Exists():
    shellTray = Control(searchDepth = 1, ClassName = 'Shell_TrayWnd')
    qqTray = ButtonControl(searchFromControl = shellTray, Name = 'QQ')
    if qqTray.Exists():
        qqTray.Click()
        time.sleep(1)
if not qqWindow.Exists():
    Logger.WriteLine(u'Can not find QQ window, please put it in front first!' % edit.CurrentValue(), ConsoleColor.Red)

#查詢QQ帳號Edit,設定searchFromControl = qqWindow,從qqWindow開始查詢子控制元件
#foundIndex = 1,表示查詢第一個符合要求的控制元件,子視窗中的第一個Edit
edit = EditControl(searchFromControl = qqWindow, foundIndex = 1)
edit.Click()
Win32API.SendKeys('{Ctrl}A')
Logger.Write('Current QQ is ')
#獲取edit內容
Logger.WriteLine(u'%s' % edit.CurrentValue(), ConsoleColor.DarkGreen)
time.sleep(1)
#查詢第二個Edit,即密碼Edit
edit = EditControl(searchFromControl = qqWindow, foundIndex = 2)
edit.Click()
Logger.Write('Current QQ password is ')
#獲取password內容
Logger.WriteLine('%s' % edit.CurrentValue(), ConsoleColor.DarkGreen)
Logger.WriteLine('Only get stars. password can not be got', ConsoleColor.DarkGreen)
time.sleep(1)
Logger.WriteLine('Now let\'s show the buttons of QQ')
time.sleep(2)
#遍歷QQ視窗內的所有Button
buttonIndex = 1
button = ButtonControl(searchFromControl = qqWindow, foundIndex = buttonIndex)
while button.Exists():
    l, t, r, b = button.BoundingRectangle
    Logger.WriteLine('button %d, position (%d,%d,%d,%d)' % (buttonIndex, l, t, r, b))
    button.MoveCursorToMyCenter()
    time.sleep(1)
    buttonIndex += 1
    button = ButtonControl(searchFromControl = qqWindow, foundIndex = buttonIndex)

Logger.WriteLine('\r\nLook, the last button\'s position are all 0, it may be invisible.', ConsoleColor.Yellow)
button = ButtonControl(searchFromControl = qqWindow, foundIndex = 4)
button.Click()
menu = Control(searchDepth = 1, ControlType = ControlType.MenuControl, Name = u'TXMenuWindow')
if (menu.Exists()):
    menuItem = MenuItemControl(searchFromControl = menu, Name = u'隱身')
    menuItem.Click()
    time.sleep(1)
button = ButtonControl(searchFromControl = qqWindow, foundIndex = 8)
button.Click()
time.sleep(1)
button = ButtonControl(searchFromControl = qqWindow, Name = u'取消')
button.Click()

Windows 8 中自動化作業系統Metro日曆的一段程式碼
from automation import *

def main():
    RunMetroApp(u'日曆')
    canlendarWindow = WindowControl(ClassName = MetroWindowClassName, Name = u'日曆')
    t = time.localtime()
    day = t.tm_mday

    text1 = TextControl(searchFromControl = canlendarWindow, foundIndex = 1, Name = str(day))
    text2 = TextControl(searchFromControl = canlendarWindow, foundIndex = 2, Name = str(day))
    if text2.Exists(1) and text2.BoundingRectangle[0] > 0:
        text2.Click()
    else:
        text1.Click()
    location = EditControl(searchFromControl = canlendarWindow, AutomationId = 'LocationTextbox')
    location.Click()
    Win32API.SendKeys(u'南京')
    title = EditControl(searchFromControl = canlendarWindow, AutomationId = 'EventTitleTextbox')
    title.Click()
    Win32API.SendKeys('Hi')
    content = EditControl(searchFromControl = canlendarWindow, AutomationId = 'NotesTextboxContent')
    content.Click()
    Win32API.SendKeys('Nice to meet you!', 0.2)
    canlendarWindow.MetroClose()
    ShowDesktop()

if __name__ == '__main__':
    main()
測試Firefox:
Windows版Firefox(Version<=56)是用DirectUI實現的,只能看到一個視窗控制程式碼,但是用UIAutomation就能看到網頁裡所有元素控制元件。但最新版Firefox57版本採用了新的Rust核心,不支援UIAutomation了。
現在是2018年,我用最新版的Firefox60測試發現該版本支援UIAutomation了。

UIAutomation的工作原理是:
當你用UIAutomation操作程式時,UIAutomation會給程式傳送WM_GETOBJECT訊息,
如果程式處理WM_GETOBJECT訊息,實現UI Automation Provider,並呼叫函式
UiaReturnRawElementProvider(HWND hwnd,WPARAM wparam,LPARAM lparam,IRawElementProviderSimple *el),
此程式就支援UIAutomation。
IRawElementProviderSimple就是UI Automation Provider,包含了控制元件的各種資訊,如Name,ClassName,ContorlType,座標...
UIAutomation根據程式返回的IRawElementProviderSimple,就能遍歷程式的控制元件,得到控制元件各種屬性,進行自動化操作。
所以如果你發現UIAutomation不能識別一些程式內的控制元件或部分不支援,這並不是UIAutomation的問題,
是程式作者沒有處理WM_GETOBJECT或沒有實現UIAutomation Provider,或者故意不想支援UIAutomation。

很多DirectUI程式都沒有實現UIAutomation Provider,所以不支援自動化,要想支援自動化,必須程式作者修改原始碼支援。
原始碼下載
https://github.com/yinkaisheng/Python-Automation-for-Windows
。